


Operating, installation and caring instructions
T28V56N0
GB |
Operating, installation and caring instructions |
page 02 |
English
Dear Customer,
We thank you and congratulate you on your choice. This practical appliance, which is modern and functional, has been manufactured from top-quality materials which have been subjected to a strict quality control during the entire manufacturing process and have been carefully tested so that they will meet all your cooking needs.
We strongly advise you to read through these simple instructions, so as to ensure that you get perfect results from the moment you first use this appliance. This booklet contains important information, not only on how to use the appliance, but also on maintenance and safety.
When our products are being transported, they must be provided with suitable protective packaging. However, we have reduced our packaging to the bare essentials, and the materials are all completely recyclable. You too can contribute to the conservation of the environment by depositing the packaging in the nearest recycling container. Before you get rid of an old appliance, make sure you render it useless, and then take it to a centre for the recovering recyclable materials. Ask your local authorities for details on the nearest centre to your home.
Safety Warnings
Read this user’s manual carefully, to ensure that you use this appliance as effectively and safely as possible.
The following instructions are only valid in countries whose symbol appears on the rating plate of the appliance. To adapt the appliance to conditions of use in your country, always follow the technical instructions.
Make sure you keep these instructions for use and assembly, so that you can hand them on with the appliance if it ever changes owner.
The diagrams contained in this instruction book are for orientation purposes only.
This appliance is intended solely for household use only.
Only use this appliance for cooking, and never as a form of heating.
In accordance with current regulations, installation of the appliance, changing of gas types or other adjustments to the interior of the appliance may only be carried out by an officially authorised technician.
Before having your new cooking hob installed, check that the measurements are correct.
2
This appliance shall be installed in accordance with the regulations in force and only used in a well ventilated location. Read the instructions before installing or using this appliance.
Isolate the appliance from the mains during every maintenance operation. To do this, remove the plug from the mains or actuate the corresponding fuse. Close the gas supply.
This appliance should not be connected to a combustion products evacuation device.
When connecting electrical appliances in the proximity of the appliance, make sure that connection cables do no come into contact with hot cooking surfaces.
Thoroughly clean the appliance and accessories before using them for the first time. This will eliminate any "newness" smells and soiling.
Keep packaging from the appliance and dispose of it properly. Keep packaging elements away from children.
Do not leave the appliance unattended while in operation
As the appliance’s heating and cooking surfaces get very hot during operation, always use with care. Always, keep children away from the appliance.
Very hot fat or oil can easily catch fire, and so if you are cooking with fat or oil keep an eye on the pan.
DANGER If a pan containing fat or oil catches fire, do not pour water onto it, as this may cause burns. Cover the pan with at damp cloth to extinguish the fire and disconnect the cooking appliance.
Never use a malfunctioning appliance.
In the event of a malfunction, turn-off the appliance’s gas and electricity supply, before calling our technical assistance service.
Make sure that pans are always placed centrally on the gas burner and never place the pot directly on the burners.
Never place unstable pans or containers on the cooking hob or the burners, as they may accidentally tip over.
Do not operate the appliance without pots and pans placed on it. Make sure that all the burner parts are correctly fitted.
Do not heat up any empty pots or pans; this may result in a build-up of heat.
Be sure to switch the burners to the lowest setting whenever you remove pots or pans briefly. In this way, you reduce the risk of burns when working next to flames; you also save gas and reduce pollution.
Pots and pans with thick bottoms can improve heat distribution. The flame is better exploited and costs can be saved.
Pots and pans with a diameter greater than 28cm should not be used. Wok supports for concave woks are sold separately.
3
If a gas tap gets stuck, do not force it. Call our service technician immediately.
Do not clean the appliance with a steam cleaning apparatus or with water pressure – risk of short-circuiting.
Whenever the appliance is fitted under a vapour extractor hood and the hob is in use, always have pots or pans over the burners in use. With an open flame the vapour extractor hood may become damaged by external heat development or grease residues in the filter may ignite. Ensure an adequate air supply when using a vapour extractor hood operating in the exhaust air mode.
Use of a gas cooker generates heat and humidity in the room where it is installed. Please be sure you have good kitchen ventilation. Natural ventilation openings must be kept unobstructed. Prolonged use of the appliance with few or all burners may call for additional ventilation such as opening a window or a door, and/or stronger air extraction by an extractor hood.
Make sure that the appliance is not subjected to strong draughts, as they might blow out the burners.
As the user, you are responsible for maintenance and proper use in the household.
Note: The rating plate for this appliance is included in this instruction manual. Keep the rating plate in a safe place along with your operating and assembly instructions.
Please pay particular attention to Sections 3 and 4 of these operating instructions so that you can enjoy all the advantages which this appliance has to offer.
4
CONTENTS |
|
1. INSTALLATION ................................................................................................. |
6 |
Before installation................................................................................................... |
6 |
Installation (for the installer) ................................................................................... |
9 |
Electrical connection............................................................................................. |
11 |
Gas connection (for the fitter)............................................................................... |
12 |
Caution ................................................................................................................. |
15 |
Converting the burners to another type of gas (for the fitter) ............................... |
16 |
Changing the nozzles........................................................................................... |
16 |
Nozzle table.......................................................................................................... |
17 |
2. OPERATION .................................................................................................... |
18 |
This is your new hob............................................................................................. |
18 |
Gas tap ................................................................................................................. |
18 |
Ignition .................................................................................................................. |
19 |
Switching the Burners to the "Off Position" .......................................................... |
19 |
Note ...................................................................................................................... |
19 |
3. WHAT TO LOOK OUT FOR ............................................................................ |
20 |
A few tips on pots ................................................................................................. |
20 |
Notes on cooking using the wok burner ............................................................... |
21 |
4. CARE AND CLEANING................................................................................... |
22 |
How to care for your gas hob: Cleaning............................................................... |
22 |
Your burner and burner cap ................................................................................. |
23 |
Pan support .......................................................................................................... |
24 |
Home troubleshooting .......................................................................................... |
24 |
After-sales service.............................................................................................. |
26 |
E number and FD-number.................................................................................... |
26 |
Packing and old appliances .............................................................................. |
26 |
5

1. INSTALLATION
Before installation
These built-in hobs are intended for insertion into a cut out in the worktop.
The appliance must only be connected by an authorized gas and electrical fitter to ensure that statutory regulations and the connection requirements of the local electricity and gas supply company are met.
Before installing the unit, remove any protective film.
When the hob is built in over a cabinet with drawers, the upper drawer has to be replaced with a cabinet front. No installation directly over a drawer!
Do not install refrigerators, dishwashers, ovens and/or cookers or any laundry appliances underneath the hob.
Be sure to keep minimum distances of 100 mm from the side wall and 50 mm from the back wall. The minimum width of the worktop should be 600 mm.
The installation dimensions can be seen on the following page.
6

Dimensions in mm
7
Chimney cooker hoods are to be installed in accordance with the installation instructions of the hood.
On the furniture into which the appliance is to be installed, the plastic coating and/or veneer must have been treated with a heat-resistant adhesive, otherwise it may become distorted or peel off, especially on the narrow sides.
The rough edges of the cut-out must be sealed using a watertight material.
Prior to connection of the appliance, it must be checked that the appliance specifications comply with local connection requirements (gas type and pressure). Please also check for any special regulations of your local supply company.
The specifications of this appliance are listed on the rating plates which are located on the underside of the gas hob.
This appliance is not to be connected to the exhaust air outlet. It must be installed and connected according to the currently effective installation conditions. Particular care must be taken to provide suitable means of ventilation.
8
Installation
(for the installer)
Picture 1
Picture 2
Installation must be made by a kitchen installation expert.
Note: If you intend to have the gas hob welded into a stainless steel worktop, for safety reasons and in order to fully maintain the requirements of your Siemens warranty, we recommend that this type of installation be done solely through our designated partner: Bautek. (Address available on request).
IMPORTANT!!!
The countertop must have a thickness of 30 mm and a maximum of 40 mm. Do not use liquid silicone to glue the hob to the countertop.
The furniture below the countertop should have an opening for passage of the gas pipe and electric wires measuring at least 50x50 mm. Any eventual cabinet, resting on the worktop, at any of the two sides of the hob, and the upstand on the back of the hob, each must be at least 50 mm from the edge of the hob itself. In case of elements sold complete with cabinet, the instructions for installation of the cooker hob are provided in the manual for the cabinet.
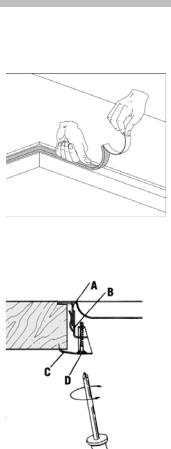
Apply the sealing gasket along the edge of the opening taking care to overlap the joints (picture 1).
Fit hook B in angle iron A welded on the unit (picture 2) taking care to block it in the holes provided, depending on the thickness of the countertop (30 mm, max. 40 mm), picture 3.
Turn tab C and position it under the countertop, then tighten screw D. Trim, if necessary, the part of the gasket extending beyond the cooker hob.
9
 Loading...