


Neff T1533, T5583, T5543, T1543, T1583 Instruction manual
...! " 59
|
|
|
|
|
|
|
! " |
|
|
|
|
|
|
|
|
|
|
|
|
5 |
|
54 |
|
|
|
554 |
|
5 |
|
|
|
5 |
|
55 |
|
9 9 5

T 1543.. |
T |
5543.. |
T |
1573.. |
|
ø 6 5 |
ø |
5 |
ø |
6 5 |
ø 5 |
ø |
5 |
ø |
|
|
ø |
5 |
ø |
|
|
|
|
T 1583.. |
T 5583.. |
T |
1533.. |
|
|
||
|
|
|
|
|
|
|
|||
ø 5 ø |
|
ø |
5 5 |
|
ø |
|
ø |
5 |
|
|
|
|
|
|
|
|
|
|
|
|
|
|
|
|
|
|
|
|
|
ø |
ø 5 |
ø 5 |
ø |
|
|
Ø = cm
2

Table |
of contents |
|
|
|
|
|
|
|
|
|
|
|
|
|
|
|
|
Important information. . . |
. . |
. . |
. . . |
. |
. . |
.5 . . . . . . . . |
||
|
|
|
|
|
|
|
|
|
Before |
installation. . . . . |
. . |
. . |
. . . |
. |
. . |
. 5. . . . . . . . . |
|
|
|
|
|
|
|
|
|
|
Safety precautions. . . . . . . . . . . |
. |
. |
. |
. |
.5. . . . . . . . |
|||||
|
|
|
|
|
|
|
||||
Causes of damage. . . . . . . . . . . |
. |
. |
. |
. |
. 7. . . . . . . . |
|||||
|
|
|
|
|
|
|||||
Familiarising |
yourself |
with |
the |
appliance. . . . . |
. 8 |
|||||
|
|
|
|
|
|
|||||
The control |
panel. . . |
. . |
. . . |
. . . . . . . . |
.9. . . . . . . . |
|||||
|
|
|
|
|
|
|
|
|
|
|
The hotplates . . . . . . . . . . . . . . . . . .9 . . . . . . . .
Residual heat indicator. . . . . . . . . . . . . . 11. . . . . . . . .
Twistpad with removable twist knob. . . . . . . . 11. .
Twistpad . . . . . . . . . . . . . . . . . . .11. . . . . . . . .
Twist knob. . . . . . . . . . . . . . . . . . .12. . . . . . . . .
Main switch with child"proof .lock. . . . . . . . . 13. .
Main switch. . . . . . . . . . . . . . . . . . 13. . . . . . . . .
Childproof lock. . . . . . . . . . . . . . . . .14. . . . . . . . .
Cooking . . . . . . . . . . . . . . . . . . .15. . . . . . . . .
Setting procedure. . . . . . . . . . . . . . . .15. . . . . . . . .
Table . . . . . . . . . . . . . . . . . . . . 16. . . . . . . . . .
Tips on saving energy. . . . . . . . . . . . . . . 17. . . . . . . . .
Timer function. . . . . . . . . . . . . . . . .18. . . . . . . . .
Setting a hotplate to switch off automatically. . . . . . 18
Cooking timer. . . . . . . . . . . . . . . . . 20. . . . . . . . .
3

Tabl of cont nts
M mory function . . . . . . . . . . . . . . . 20. . . . . . . . .
Storing the setting. . . . . . . . . . . . . . . . 21. . . . . . . . .
Calling up the memory. . . . . . . . . . . . . . .22. . . . . . . .
Automatic tim limit .r . . . . . . . . . . . . .23. . . . . . . .
Switching off ntry confirmation. . . . . . . . . .24. . . .
Car and cl aning. . . . . . . . . . . . . . . 24. . . . . . . .
Care . . . . . . . . . . . . . . . . . . . . .24. . . . . . . . .
Cleaning glass ceramic. . . . . . . . . . . . . .24. . . . . . . . .
Cleaning the hob surround. . . . . . . . . . . . . 25. . . . . . .
Twist knob. . . . . . . . . . . . . . . . . . .26. . . . . . . . .
Troubl shooting . . . . . . . . . . . . . . . 26. . . . . . . . .
Notes: . . . . . . . . . . . . . . . . . . . .27. . . . . . . . .
Packaging and old applianc. s. . . . . . . . . 28. . . . .
Aft r&sal s s rvic . . . . . . . . . . . . . . .28. . . . . . . .
Acrylamid in food. . . . . . . . . . . . . . . 29. . . . . . . .
What can you do?. . . . . . . . . . . . . . . . 29. . . . . . . . .
4

Important information
Read |
this instruction manual |
carefully. Only then wil |
you |
be able to operate your |
hob safely and correc |
Keep the instruction and installation manual and the appliance pass in good condition. Please pass on these documents to the new owner if you sell the appliance.
Before installation
Transport damage Check the hob after unpacking it. Do not connect appliance if it has been damaged in transport.
Electrical connection The hob may only be connected by a licensed specialist. Damage due to the appliance being connected incorrectly will invalidate the guarantee.
Safety precautions
|
This |
appliance |
is intended only for domestic use. |
|||||||
|
Only use the hob for food preparation. |
|
|
|||||||
Overheated oil and fat |
Overheated |
oil |
or fat |
can ignite very |
quickly. |
|
||||
|
Risk |
of fire! |
|
|
|
|
|
|
||
|
Never leave heating oil or fat unsupervised. |
|
||||||||
|
Should |
the oil |
ignite, do not |
try to |
put it |
out |
by |
|||
|
water |
on |
it. |
|
|
|
|
|
|
|
|
Cover the pan with a lid or plate immediately. |
|
||||||||
|
Switch |
off |
the |
hotplate. |
|
|
|
|
||
|
Leave the ovenware on the hotplate |
to cool down. |
||||||||
Hot hotplates |
Do |
not touch |
hot hotplates. There is a risk of bur |
|||||||
|
Children must be kept at a safe distance from the |
|||||||||
|
appliance. |
The |
residual |
heat |
indicator |
warns |
you |
tha |
||
|
the |
hotplates are hot. |
|
|
|
|
|
|||
|
Never place combustible items on the hob. |
|
||||||||
|
Risk |
of fire! |
|
|
|
|
|
|
||
|
You |
must |
not |
keep any combustible items or aeros |
||||||
|
cans in a |
drawer located under the |
hob. |
Risk |
of |
|||||
5

The service cables from electrical appliances must n
touch the hot |
hotplates. This could cause damage t |
the hob and |
the cable insulation. |
Wet saucepan bases and Steam pressure can be generated from the liquid
hotplates |
between the base of the saucepan and |
the |
hotplate |
|
|
The steam pressure could cause the pan to jump |
|||
|
suddenly. There is a risk of injury. |
|
|
|
|
Always keep the hotplate and the bases |
of |
saucepa |
|
|
dry. |
|
|
|
Cracks in the glass ceramicIf there are fractures, flaws or cracks in the |
glass |
|||
|
ceramic, there is a risk of electric shock. |
|
||
|
Switch off the appliance immediately. |
|
|
|
|
Isolate the appliance from the power supply |
at the |
||
|
fuse |
box. |
|
|
|
Call |
after$sales service. |
|
|
The hotplate heats up theSwitch off the hotplate if the hotplate heats up but indicator does not work indicator is not working. There is a risk of burning.
Call after$sales service.
The hob switches off automatically
Incorrect repairs
If the hob switches itself off and can then no long used, disconnect it from the electricity supply immediately. The hob can be switched on again lat
Risk |
of |
fire! |
|
Switch |
off the |
circuit breaker in the fuse box and |
|
the |
after$sales |
service. |
|
Incorrect repairs are dangerous. There is a risk of electrocution.
Repairs may only be carried out by one of our experienced after$sales engineers.
6

Causes |
of |
damage |
|
|
|
|
|
Saucepan |
and pan bases |
Rough saucepan bases scratch the glass ceramic. |
|
||||
|
|
|
|
Check your ovenware. |
|
||
|
|
|
|
Avoid cooking on the hob with an empty pan, |
|
||
|
|
|
|
especially with enamel and aluminium pans. This |
|
||
|
|
|
|
could cause damage to the saucepan bases and |
|
||
|
|
|
|
glass ceramic. |
|
||
|
|
|
|
Observe the manufacturer's instructions when using |
|
||
|
|
|
|
special |
ovenware. |
|
|
Hot |
pans |
and |
saucepans |
Do not place hot pans or saucepans on the contr |
|||
|
|
|
|
panel, display area or the frame. |
|
||
|
|
|
|
This |
could cause damage. |
|
|
Twist |
knob |
|
Do |
not place the twist knob on the hotplates. It c |
|||
|
|
|
|
be |
damaged. |
|
|
|
|
|
|
The |
twist knob is magnetic. Metal parts attached |
to |
|
|
|
|
|
the underside could scratch the glass ceramic hob |
|||
|
|
|
|
surface. Always wipe the twist knob thoroughly. |
|
||
Salt |
sugar and |
sand |
Salt, sugar and sand cause scratches on the glass |
||||
|
|
|
|
ceramic. Do not use the hob as a work surface o |
|||
|
|
|
|
storage |
space. |
|
|
Hard |
and |
pointed objects |
Damage |
can occur if hard or pointed objects fall |
o |
||
|
|
|
|
the |
hob. |
|
|
|
|
|
|
Do not store such objects above the hob. |
|
||
Food |
spills |
|
Sugar and food with a high sugar content damage |
||||
|
|
|
|
hob. Remove food spills immediately with a glass |
|
||
|
|
|
|
scraper. |
|
|
|
|
|
|
|
Caution The glass scraper has a sharp blade. |
|
||
Foil |
and |
plastic |
|
Aluminium foil or plastic containers melt on hot |
|
||
|
|
|
|
hotplates. |
|
||
|
|
|
|
Oven protective foil is not suitable for your hob. |
|
||
7
Examples of possible damage
The following types of damage affect neither the cooker's function nor the stability of the glass ceramic.
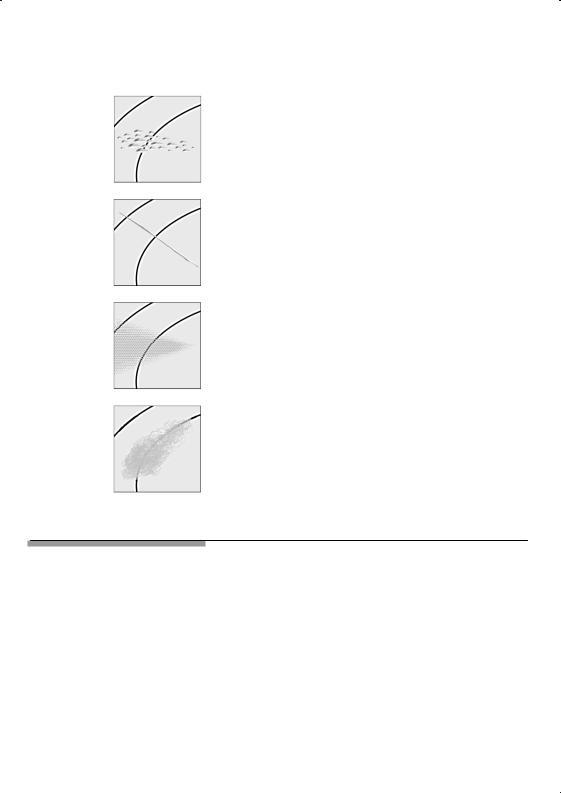
Blisters
caused by melted sugar or food with a high sugar content.
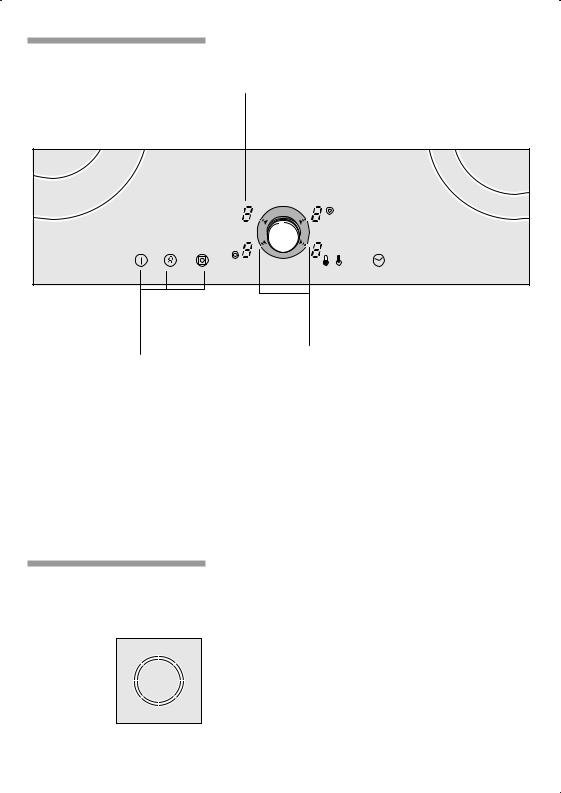
Scratches
caused by salt, sugar or sand particles or from rou pan bases.
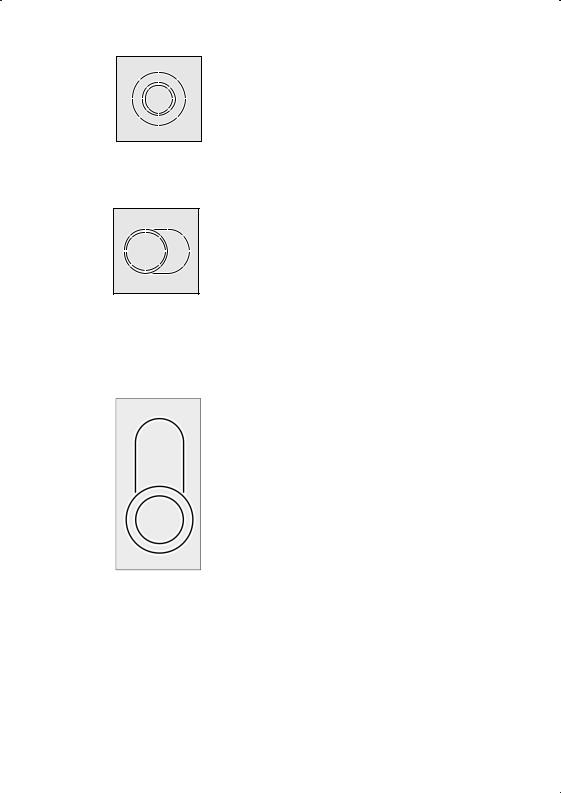
Shimmering metallic discoloration
caused by pan abrasion or the use of unsuitable cleaning agents.
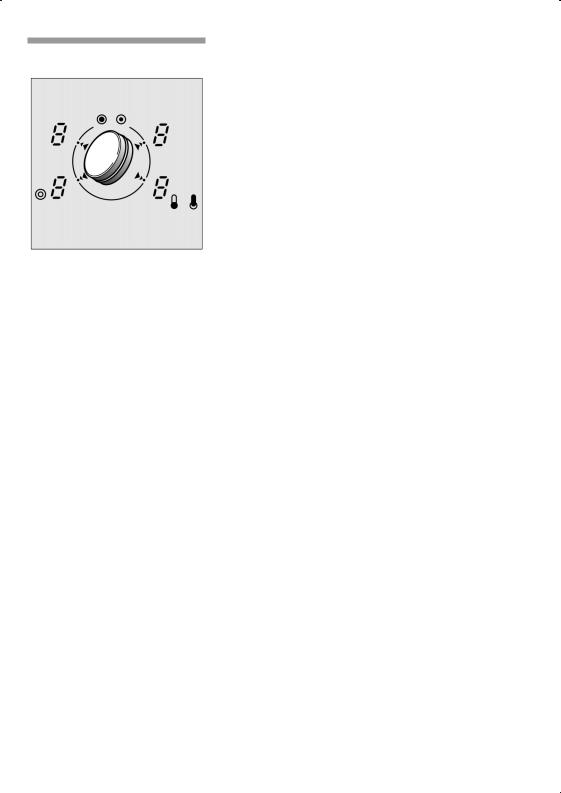
Scuffed surface caused by using unsuitable cleaning agents.
Familiarising yourself with the applianc
The instruction manual applies to various hobs. On page 2 you will find an overview of models with dimensions.
This |
section |
describes |
the control |
panels, hotplates |
and |
displays. |
They are |
shown by |
appliance model. |
8
The control panel
f heat setting
operational readiness residual heat /
e f
main switch
memory function
switching on
Control panels
Note
|
|
|
|
|
k |
|
|
e f |
|
|
|||||||
|
|
timer |
function |
|||||
For |
selecting |
the hotplate |
|
|||||
|
||||||||
|
|
|
||||||
For |
setting |
the |
heat |
setting |
|
|
|
|
When you touch a symbol the respective function activated.
Example: Touch the symbol.
The hob is switched on.
The settings remain unchanged if several symbols a touched briefly. You can therefore easily mop up s on the control panel.
Always keep the control panels clean and dry. Moisture and dirt may impair function.
The hotplates
Single circuit hotplate The cooking surface size of these hotplates cannot altered.
Select the correct hotplate.
The saucepan and hotplate sizes should match.
9
Dual circuit hotplate
Extended cooking zone
Dual circuit hotplate hotplate with extended cooking zone
The size of these hotplates can be altered. The hotplate must be switched on.
To switch |
on the outer ring: |
Select the |
hotplate with the twist knob. Touch the |
Ó&symbol. |
The indicator light lights up. |
To switch |
off: |
Select the |
hotplate with the twist knob. Touch the |
Ó&symbol. |
The indicator light goes out. |
The extended cooking zone can be switched on wh using this hotplate. The hotplate must be switched
To switch on the extended cooking zone: Select the hotplate with the twist knob.
Touch theÓ symbol. The indicator light lights up. To switch off:
Select the hotplate with the twist knob.
Touch theÓ symbol again. The indicator light goes out.
The size of these hotplates can be altered. The hotplate must be switchedon.
To switch on the outer ring: |
|
|
|
|
|||||
Use |
the |
twist |
knob |
to |
select |
the |
hotplate |
and |
touc |
the Ó symbol. |
The |
indicator light |
lights up. |
|
|
||||
To switch on the extended cooking zone: |
|
|
|||||||
Use |
the |
twist |
knob |
to |
select |
the |
hotplate |
and |
touc |
the Ó symbol |
again. |
The indicator |
light lights up. |
||||||
To switch off the outer rings: |
|
|
|
|
|||||
Use |
the |
twist |
knob |
to |
select |
the |
hotplate |
and |
touc |
the Ó symbol |
again. |
The indicator |
light goes out. |
||||||
The cm dual'circuit hotplate and the .5x 5 cm extended cooking zone cannot be switched on simultaneously. If one is switched on the other is automatically disabled.
10
Residual |
heat |
|
|
|
|
|
indicator |
The hob has a residual heat indicator for each |
|||||
|
hotplate. It shows which hotplates are still hot. The |
|||||
|
residual heat indicator |
has two |
levels. |
|||
|
If anH appears in |
the |
display |
the hotplate is still ho |
||
|
You can for example keep a small meal warm or |
|||||
|
chocolate using this heat. |
|
||||
|
As the hotplate cools down further the display |
|||||
|
changes toh. The display remains lit until the |
|||||
|
hotplatehas |
cooled |
sufficiently. |
|
||
Caution |
The |
residual |
heat |
indicator will no longer come on |
||
|
after |
a power cut. |
The hotplates could still be hot. |
|||
Twistpad with removable twist knob
Twistpad
The twistpad is the area in which you select the hotplates with the twist knob and can set heat settings.
The twist knob automatically centres itself in the twistpad.
11
Twist knob
The |
twist knob |
is magnetic and is placed on the |
|||||
twistpad. You can activate |
the |
corresponding |
hotplat |
||||
by |
pushing the |
twist |
knob |
in |
the direction |
of |
the a |
You |
can adjust |
the |
heat setting by turning |
the twis |
|||
knob.
Removing the twist knob You |
can |
remove the |
twist |
knob. |
This |
makes cleanin |
easier. |
|
|
|
|
|
|
You |
can |
also remove |
the |
twist |
knob |
while the hotp |
is in operation. All the hotplates will switch off automatically after 3 seconds.
|
|
If you place a metal object on the twistpad within |
|
|
|
3 seconds the hob may continue to heat up. For t |
|
|
|
|
|
|
|
reason always switch off the hob using the main |
|
|
|
switch. |
|
Storing |
the twist knob |
The twist knob contains a strong magnet. Keep the |
|
|
|
twist knob away from magnetic data carriers such |
|
|
|
video cassettes diskettes credit cards or cards with |
|
|
|
magnetic strips. The data these contain could |
|
|
|
otherwise be wiped. |
|
|
|
It can also cause interference in television sets and |
|
|
|
monitors. |
|
|
|
|
|
|
|
For carriers of electronic implants |
|
|
|
e.g. a pacemaker an insulin pump. |
|
|
|
Implants could be affected by magnetic |
fields. |
|
|
You must therefore never carry the twist knob in a |
|
|
|
pocket in your clothing. It must be kept |
at least |
|
|
from pacemakers. |
|
Spare |
knob |
If you cannot find your twist knob your |
hob has |
|
|
another magnetic spare knob that you can use |
|
|
|
temporarily to operate your hob. |
|
12

The spare knob is not suitable for continuous operation. If you cannot find your original twist knob please ask our after"sales service for a replacement.
Main switch with child proof lock
Main switch
|
|
Switch |
on |
the electronics in the control panel |
using |
||
|
|
the main switch. Now the hob is ready for use. |
|||||
Switching |
on |
Touch |
the@ |
symbol |
until thehotplate indicators |
|
|
|
|
light |
up. |
|
|
|
|
Switching |
off |
Touch |
the@ symbol |
until thehotplate indicators go |
|||
|
|
out. All the hotplates are switched off. The residual |
|||||
|
|
heat indicator remains lit until the hotplates have |
|||||
|
|
cooled |
sufficiently. |
|
|
||
Notes |
|
The |
hob switches off automatically if all the hotplate |
||||
|
|
have |
been |
switched |
off for more than seconds. |
||
|
|
The |
settings remain |
stored for 5 seconds after |
the |
||
|
|
has |
been switched |
off. If you switch the hob |
on a |
||
during this time the hob will operate using the previously stored settings.
13

Ch ldp oof lock
You can prevent the hob from being switched on unintentionally so that children cannot switch on the hotplates. The childproof lock remains activated permanently.
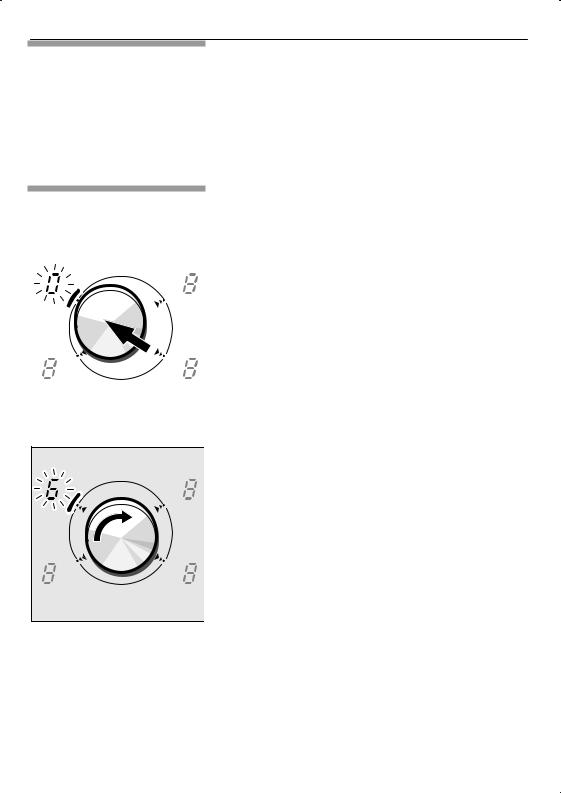
Act vat ng the ch ld p oof Switch on the hob using the main switch. lock
|
1. |
Set all 4 hotplates to heat setting . |
|
|
2. |
Switch off the hotplates one after the other |
|
|
|
starting with the front right hotplate. See |
|
|
|
illustration. |
|
|
3. |
Touch the main switch for at least 5 seconds |
|
|
|
which a signal |
sounds. |
|
|
The child(proof |
lock is activated. |
|
|
|
|
Ope at ng the hob |
To |
switch on touch @themain |
switch |
for |
more |
than |
|
|
4 seconds. During this time lights |
up |
in |
the |
display. |
||
|
As |
soon as the display goes |
out |
the |
hob is switc |
||
|
on. |
|
|
|
|
|
|
Deact vat ng the ch ldp oof |
You |
can deactivate the childproof lock |
again. |
Proce |
|||
lock |
in the same manner as for activating the child(proo |
||||||
|
lock. |
|
|
|
|
|
|
Lock ng the hob once off You |
can lock the hob on a single occasion |
if for |
|||||
|
example small children are visiting: |
|
|
|
|||
|
The hob must be switched off. |
|
|
|
|
||
|
Touch the@ main switch for more than |
4 seconds. |
|||||
|
The |
hotplate indicators go out. Theindicator lights |
|||||
|
up |
for seconds and goes |
out. |
The |
hob |
is lock |
|
Unlock ng the once off lock ng
Impo tant
Touch the@ |
main switch |
for more |
than 4 seconds. |
The hob is |
switched on. |
The hob |
is unlocked. |
The child(proof locks could be activated or deactivated unintentionally when the appliance is cleaned using water or as a result of spillages or objects covering the main switch@.
14
Cooking
This |
section describes how to adjust the hotplates. |
The |
table shows the heat settings and cooking tim |
for various food dishes. The following tips help to energy.
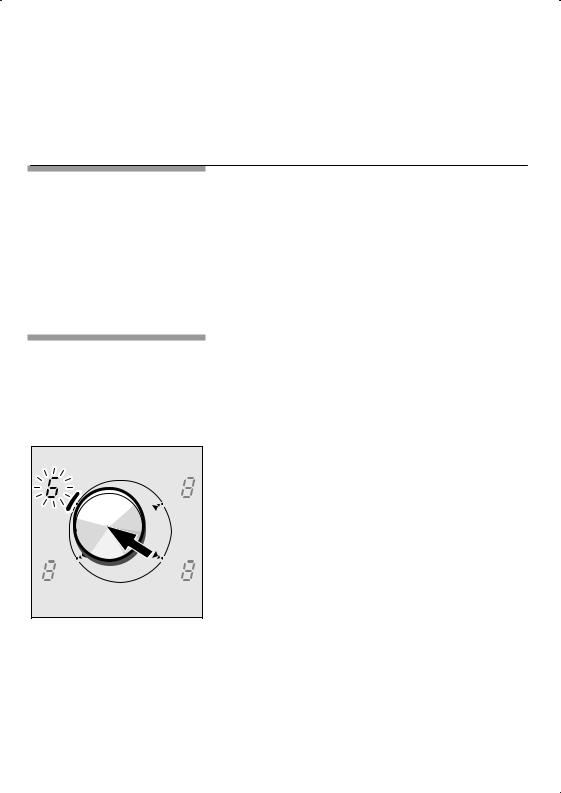
Setting procedure
|
The hob |
must |
be switched |
on. |
|
|
|
1. Select |
the |
hotplate. |
|
|
|
|
|
|
||||
|
To |
do |
this |
slide the twist knob in the |
direction |
|
|
the corresponding heat setting indicator. |
|
||||
|
The |
indicator light comes |
on andflashes in |
the |
||
|
heat |
setting |
indicator. |
|
|
|
|
|
|
|
|
|
|
2. Move the twist knob back to the centre.
3. Within the next |
5 seconds turn |
the twist knob |
|||||
the desired heat setting appears in the hotplate |
|||||||
indicator. |
|
|
|
|
|
|
|
Heat |
setting |
1 |
= |
lowest |
power |
|
|
Heat |
setting |
9 |
= |
highest |
power |
|
|
The |
heat setting |
indicator |
lights |
up |
permanently |
||
after |
5 seconds |
and the |
indicator |
lamp goes ou |
|||
Changing the heat setting Select the hotplate and set a new heat setting.
Switching off the hotplate Select the hotplate and set .it to
The hotplate is switched off and the residual heat indicator appears after approximately 5 seconds.
15

Table
The |
following |
table |
provides |
a few examples. |
The |
cooking |
time |
may vary |
depending on the type |
food its weight and quality. Deviations are therefore |
||||
possible. |
|
|
|
|
|
|
|
|
|
|
|
|
|
|
Quantity |
|
|
Heat |
|
|
Ongoing |
|
Ongoing cooking |
||||||
|
|
|
|
|
|
|
|
|
|
|
|
|
|
setting 9 |
cooking |
|
time |
|
||||||
|
|
|
|
|
|
|
|
|
|
|
|
|
|
|
|
|
|
|
|
|
|
|
|
|
Melting |
|
|
|
|
|
|
|
|
|
|
|
|
|
|
|
|
|
|
|
|
|
|
|
|
chocolate, |
chocolate |
coating, |
|
|
|
|
|
|
|
|
|
|
|
|
|
|
|
|
||||||
butter, |
honey |
|
|
|
|
|
|
100 g |
|
|
' |
|
|
|
1 |
' |
2 |
' |
|
|
||||
gelatine |
|
|
|
|
|
|
|
|
1 pck. |
|
|
' |
|
|
|
1 |
' |
2 |
' |
|
|
|||
|
|
|
|
|
|
|
|
|
|
|
|
|
|
|
|
|
|
|
|
|
|
|
|
|
Heating |
|
|
|
|
|
|
|
|
|
|
|
|
|
|
|
|
|
|
|
|
|
|
|
|
canned |
vegetables |
|
|
|
|
400 g |
' |
800 g |
2 |
' |
4 mins. |
1 |
' |
2 |
3 |
' |
6 mins. |
|||||||
clear |
soup |
|
|
|
|
|
|
|
500 ml |
' |
1 ltr |
3 |
' |
4 mins. |
7 |
' |
8 |
2 |
' |
4 mins. |
||||
thick |
soup |
|
|
|
|
|
|
|
500 ml |
' |
1 ltr |
2 |
' |
4 mins. |
2 |
' |
3 |
2 |
' |
4 mins. |
||||
milk |
|
|
|
|
|
|
|
|
|
200 ml |
' |
400 ml |
2 |
' |
4 mins. |
1 |
' |
2 |
2 |
' |
3 mins. |
|||
|
|
|
|
|
|
|
|
|
|
|
|
|
|
|
|
|
|
|
|
|
||||
Heating |
and |
keeping |
warm |
|
|
|
|
|
|
|
|
|
|
|
|
|
|
|
|
|||||
stew |
(e.g. |
lentil |
stew) |
|
|
|
400 g |
' |
800 g |
2 |
' |
3 mins. |
1 |
' |
2 |
|
|
|
|
|||||
milk |
|
|
|
|
|
|
|
|
|
500 ml |
' |
1 ltr. |
3 |
' |
4 mins. |
1 |
' |
2 |
|
|
|
|
||
|
|
|
|
|
|
|
|
|
|
|
|
|
|
|
|
|
|
|
|
|||||
Defrosting |
and |
heating |
|
|
|
|
|
|
|
|
|
|
|
|
|
|
|
|
||||||
frozen |
spinach |
|
|
|
|
|
300 g |
' |
600 g |
4 |
' |
5 mins. |
2 |
' |
3 |
5 |
' |
15 mins. |
||||||
frozen |
goulash |
|
|
|
|
|
500 g |
' |
1 kg |
4 |
' |
5 mins. |
2 |
' |
3 |
20 |
' |
30 mins. |
||||||
|
|
|
|
|
|
|
|
|
|
|
|
|
|
|
|
|
|
|
|
|
|
|
||
Simmering |
|
|
|
|
|
|
|
|
|
|
|
|
|
|
|
|
|
|
|
|
|
|
||
dumplings, |
meatballs |
|
|
|
|
|
|
|
|
|
|
|
|
|
|
|
|
|
|
|
||||
(1 ' 2 ltr. water) |
|
|
|
|
|
4 ' 8 pieces |
8 |
' |
12 mins. |
4 |
' |
5* |
20 |
' |
30 mins. |
|||||||||
fish |
|
|
|
|
|
|
|
|
|
300 g |
' |
600 g |
5 |
' |
8 mins. |
4 |
' |
5* |
10 |
' |
15 mins. |
|||
|
|
|
|
|
|
|
|
|
|
|
|
|
|
|
|
|
|
|
|
|
|
|
|
|
Cooking |
|
|
|
|
|
|
|
|
|
|
|
|
|
|
|
|
|
|
|
|
|
|
|
|
rice (with double the amount of |
|
|
|
|
|
|
|
|
|
|
|
|
|
|
||||||||||
water) |
|
|
|
|
|
|
|
|
|
125 g |
' |
250 g |
3 |
' |
4 mins. |
2 |
' |
3 |
15 |
' |
30 mins. |
|||
rice pudding |
(500 ml ' 1 ltr. milk) |
|
125 g |
' |
250 g |
4 |
' |
6 mins. |
1 |
' |
2 |
25 |
' |
35 mins. |
||||||||||
potatoes |
boiled |
in their |
skins with |
|
|
|
|
|
|
|
|
|
|
|
|
|
|
|||||||
1 ' 3 cups of water |
|
|
|
750 g |
' |
1.5 kg |
5 |
' |
7 mins. |
4 |
' |
5 |
25 |
' |
30 mins. |
|||||||||
boiled |
potatoes |
with |
1 ' 3 cups |
of |
|
|
|
|
|
|
|
|
|
|
|
|
|
|
||||||
water |
|
|
|
|
|
|
|
|
|
750 g |
' |
1.5 kg |
5 |
' |
7 mins. |
4 |
' |
5 |
15 |
' |
25 mins. |
|||
fresh |
vegetables |
with |
1 ' 3 cups |
|
of |
|
|
|
|
|
|
|
|
|
|
|
|
|
|
|||||
water |
|
|
|
|
|
|
|
|
|
500 g |
' |
1 kg |
4 |
' |
5 mins. |
2 |
' |
3 |
10 |
' |
20 mins. |
|||
pasta |
(1 |
' |
2 ltr. water) |
|
|
|
200 g |
' |
500 g |
8 |
' |
12 mins. |
6 |
' |
7* |
6 |
' |
10 mins. |
||||||
16

|
|
|
|
|
Quantity |
|
|
Heat |
|
|
Ongoing |
|
Ongoing |
cooking |
||||||||
|
|
|
|
|
|
|
|
|
|
setting 9 |
cooking |
|
time |
|
|
|||||||
|
|
|
|
|
|
|
|
|
|
|
|
|
|
|
|
|
|
|
|
|
|
|
Roasting |
|
|
|
|
|
|
|
|
|
|
|
|
|
|
|
|
|
|
|
|
|
|
roulade |
|
|
4 |
servings |
|
5 |
+ |
8 mins. |
4 |
+ |
5 |
50 |
+ |
60 mins. |
||||||||
pot roast |
|
|
|
1 kg |
|
|
5 |
+ |
8 mins. |
4 |
+ |
5 |
80 |
+ |
100 mins. |
|||||||
goulash |
|
|
|
500 g |
|
|
6 |
+ |
11 mins. |
4 |
+ |
5 |
50 |
+ |
60 mins. |
|||||||
|
|
|
|
|
|
|
|
|
|
|
|
|
|
|
|
|
|
|
|
|
|
|
Roasting |
|
|
|
|
|
|
|
|
|
|
|
|
|
|
|
|
|
|
|
|
|
|
pancakes (Fladle, |
Swabian |
|
|
|
|
|
|
|
|
|
|
|
|
|
|
|
|
|
||||
pancakes) |
|
|
|
|
|
|
|
2 |
+ |
4 mins. |
6 |
+ |
7 |
|
constant |
roasting |
||||||
cutlet, |
breaded |
1 |
+ |
2 pieces |
2 |
+ |
4 mins. |
6 |
+ |
7 |
6 |
+ |
10 mins. |
|||||||||
steak |
|
|
2 |
+ |
3 pieces |
2 |
+ |
4 mins. |
7 |
+ |
8 |
8 |
+ |
12 mins. |
||||||||
fish fingers |
10 |
pieces |
|
2 |
+ |
4 mins. |
6 |
+ |
7 |
8 |
+ |
12 mins. |
||||||||||
|
|
|
|
|
|
|
|
|
|
|
|
|
|
|
|
|
|
|
|
|
|
|
Deep fat |
frying |
|
|
|
|
|
|
|
|
|
|
|
|
|
|
|
|
|
|
|
|
|
(in 1 |
+ |
2 ltr. of |
oil) |
|
|
|
|
|
|
|
|
|
|
|
|
|
|
|
|
|
||
deep+frozen foods |
|
|
200 g |
per |
serving 10 |
+ |
15 mins.8 |
+ |
9 |
|
constant |
deep+fat |
||||||||||
|
|
|
|
|
|
|
|
|
|
|
|
|
|
|
|
|
|
|
frying |
|
|
|
others |
|
|
|
|
400 g |
per |
serving 10 |
+ |
15 mins.4 |
+ |
5 |
|
constant |
deep+fat |
||||||||
|
|
|
|
|
|
|
|
|
|
|
|
|
|
|
|
|
|
|
frying |
|
|
|
|
|
|
|
|
|
|
|
|
|
|
|
|
|
|
|
|
|
|
|
|
|
|
*Ongoing cooking without lid
Tips |
on |
saving |
|
|
|
|
|
energy |
|
|
|
|
|
|
|
|
|
|
|
Use saucepans and pots with thick even bases. |
|||
|
|
|
|
Uneven bases increase the cooking time. |
|||
The correct |
saucepan |
size Select the correct saucepan size for each hotplate. |
|||||
|
|
|
|
The diameter of the bases of the saucepans and p |
|||
|
|
|
|
should match the size of the hotplate. |
|
||
|
|
|
|
Note: Ovenware manufacturers often give the |
|||
|
|
|
|
diameter of the top of the saucepan. |
It is usually |
||
|
|
|
|
than |
the diameter of the |
base of the |
saucepan. |
|
|
|
|
Use |
a small saucepan for |
small quantities. A larger |
|
|
|
|
|
less full saucepan requires more energy. |
|||
Using |
a |
lid |
|
Saucepans and pots should always be covered with |
|||
|
|
|
|
suitable lid. Cooking without a lid requires much m |
|||
|
|
|
|
energy. |
|
|
|
Cooking |
with small |
Cook |
with small quantities of water This saves ener |
||||
quantities |
of |
water |
and |
helps vegetables to retain vitamins |
and minerals |
||
Lowering the heat setting Switch down to a lower heat setting in good time.
17
Using residual heat |
For longer |
cooking times |
switch off the hotplate 5 |
||
|
minutes |
before |
the end of the cooking time. |
||
|
As long as |
the |
residual |
heat indicatorH is lit |
you can |
|
still use the hotplate which has already been |
||||
|
switched off for |
warming |
up or melting |
food. |
|
Timer function
The timer is an electronic clock. It |
can be used to |
switch off any of the four hotplates |
automatically. |
The timer also has a cooking timer. It runs independently of all the other settings. This means that it can still be set when the hob is locked.
Setting a hotplate to switch off automatically
Setting |
procedure |
Enter a specific duration for the desired hotplate. When the duration has elapsed the hotplate switch off automatically.
The hotplate must be switched on.
1. Use the twist knob to select the hotplate.
18
 Loading...