

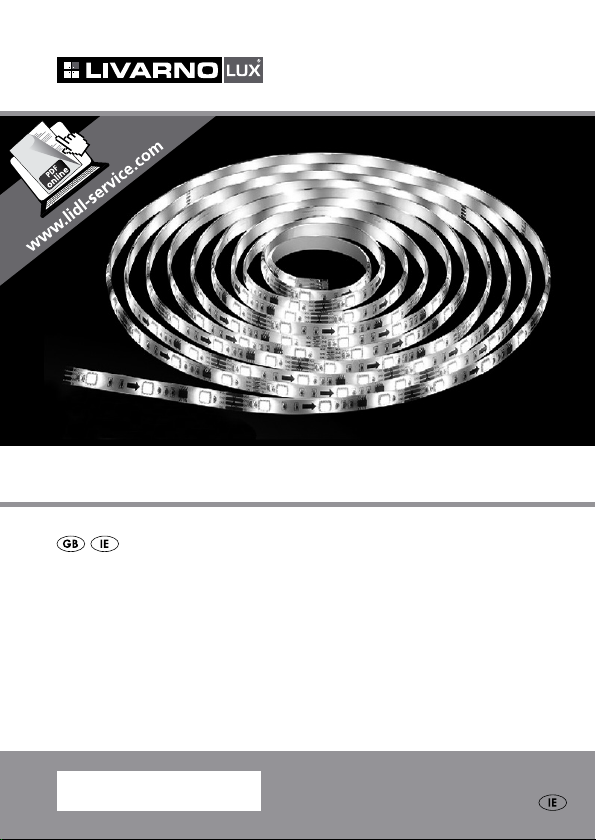
LED ROpE LIGHt
LED ROpE LIGHt
Operation and Safety Notes
IAN 104000

GB / IE Operation and Safety Notes Page 5
A
151
51
1
151
1
2
151
151
151
151
151
151
35
3
151
151
151
151
B
1
151
151
151
151
2
4
4
2
1

Introduction
Intended use ............................................................................ Page 6
Parts description ...................................................................... Page 6
Technical Data ........................................................................ Page 6
Scope of delivery .................................................................... Page 7
Safety notices .................................................................. Page 7
Installation ......................................................................... Page 8
Shortening the LED strip .......................................................... Page 9
Cleaning and Care ....................................................... Page 9
Disposal ................................................................................ Page 10
Warranty ............................................................................. Page 10
5 GB/IE

LED Rope Light
Introduction
Before using the product, please familiarise
yourself with all of the
safety information and instructions
for use. When passing this product on to others, please also
include all the documents.
Intended use
This product is intended for use in
indoor environments and only for
private, domestic purposes. The
product can be used on all normally flammable, smooth surfaces.
The product is not intended for
commercial use.
Not suitable for
ordinary lighting
in household room
illumination.
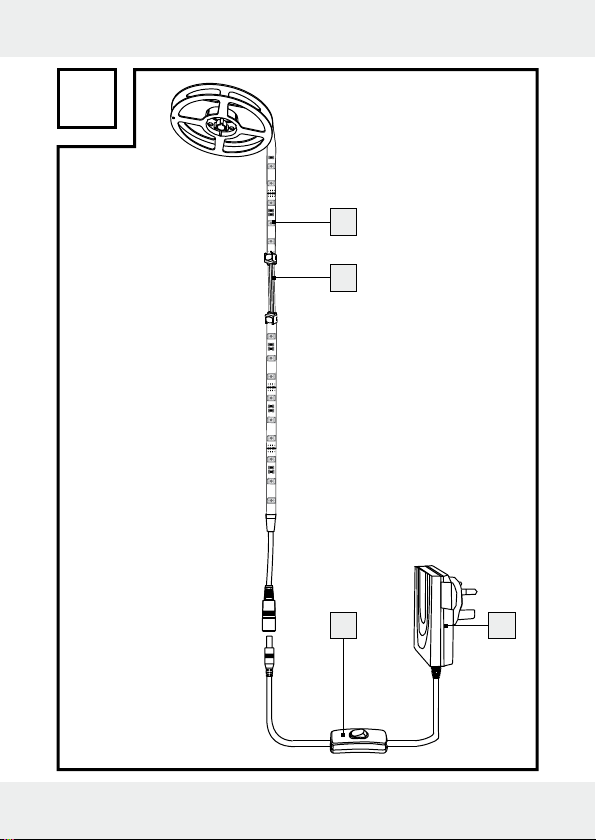
Parts description
1
LED Rope Light
2
Connector
3
Power supply
4
Plastic clip
5
ON/OFF switch
Technical Data
LED Rope Light
Operating
voltage: 12 V
Light bulb: 150 LEDs
Protection class:
Model number: 104000-14-
AC Adaptor
Input voltage: 100–240 V∼
Output voltage: 12 V
Protection class:
Model number: SUN-
,
max. 24 W
(LEDs not
replaceable)
01-BS
50 / 60 Hz,
max. 0.8 A
, 3 A
1200300B2
6 GB/IE

Scope of delivery
1 LED strip
1 Mains supply
4 Connectors
8 Plastic clips
1 Set of instructions for use
Safety
notices
PLEASE READ THE INSTRUCTIONS FOR USE PRIOR TO USE!
PLEASE KEEP THE INSTRUCTIONS
FOR USE IN A SAFE PLACE!
Check the product for dam-
age before use. Never use a
damaged product.
This appliance
can be used by
children aged
from 8 years and above and
persons with reduced physical, sensory or mental capabilities or lack of experience
and knowledge if they have
been given supervision or instruction concerning use of
the appliance in a safe way
and understand the hazards
involved. Children shall not
play with the appliance.
Cleaning and user maintenance shall not be made by
children without supervision.
Danger to life by
electric shock
Check the product for dam-
age before use. Never use a
damaged product.
Only use the product with
the components specified in
these instructions for use.
Prior to installation, verify the
available mains voltage
matches the required operating voltage of the power
supply (100–240 V∼).
The product is only suited for
use with the included mains
adapter (model no.
SUN-1200300B2).
Always unplug the mains
plug from the socket before
installation, removal or
cleaning.
Do not attach objects to the
product.
7 GB/IE

CAUTION! RISK OF
OVERHEATING! Do not
operate the product inside
the packaging or rolled up.
Protect the product from
sharp edges, mechanical
loads and hot surfaces.
Do not secure with sharp
staples or nails.
Never expose the product to
high temperatures or moisture as this could damage
the product.
Never open any of the com-
ponents of the electrical
equipment or insert any
ob-
jects into the same components
Disconnect from the mains
when not used for extended
periods (e.g. holidays).
Installation
Note: Thoroughly clean the surface where you wish to mount
the product. The surface must be
clean, free from grease and dry.
The adhesion of the double-sided
adhesive strip on the back of the
LED strip may otherwise be limited.
Note: Before use, check on a
hidden area of the surface,
whether the adhesive can cause
damage.
Peel the protective film off the
adhesive strip on the back of
the LED strip
1
and secure
the LED strip in the desired
location.
Connect the power supply 3
with the LED strip (Fig. A).
Plug the product into a
socket.
Use the On/Off switch 5,
to switch the product on or
off.
.
Please remember the power
supply will continue to draw
a small amount of electricity
even without the light being
operated so long as the
power supply
3
is plugged
into the socket. To switch the
device off completely, unplug
the power supply
the socket.
Be sure the power supply is
always accessible.
3
from
8 GB/IE

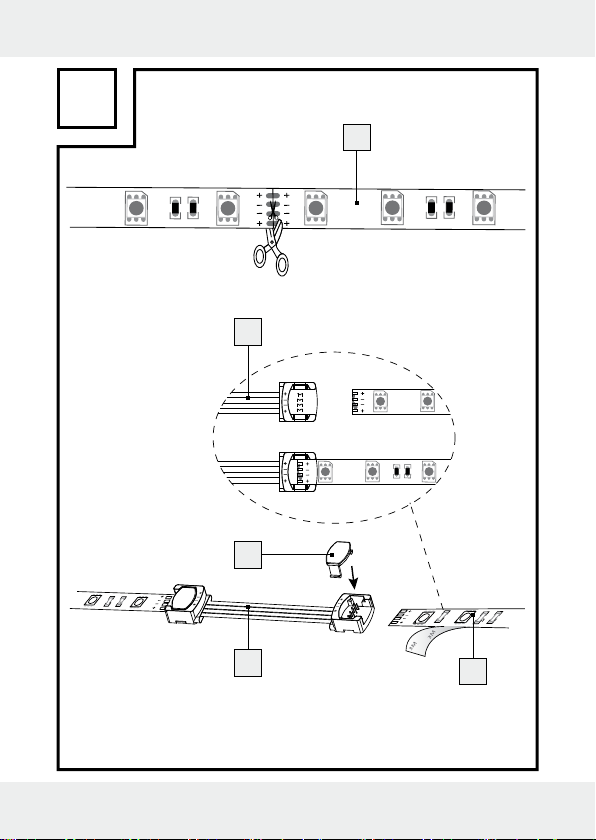
Shortening the
LED strip
The LED strip 1 may be trimmed
to size. It can be cut with scissors
at the marked position, as shown
in Fig. B. The trimmed sections
can then be connected.
DANGER
TO LIFE BY ELECTRIC SHOCK!
Before performing any work, first
disconnect the product from the
mains power. To do so, unplug
the power supply 3 from the mains
Connect as described below:
Remove the protective film
from the double-sided adhesive strip at the ends of the
LED strip sections being
connected.
Then firmly press the end of
the one LED strip onto the
pins on the connector
they pierce the strip conductor of the LED strip.
Then push a plastic clip 4
onto this new connection
from the top (Fig. B).
2
so
Note: Be sure the plastic
clips lock in to establish a
secure connection.
Repeat this process to estab-
lish a contact for the other
end of the connector.
Note: Unlike the LED strip,
the connector can be moved
in any direction.
The product
has delicate solder points.
Do not route the LED strip
around corners and do not
kink. The solder points may
.
otherwise be damaged, disrupting the functionality of
the LED strip.
Connect the power supply
with the LED strip (Fig. A).
Plug the product into a socket
to switch it on.
Be sure the power supply is
always accessible.
Cleaning and Care
Only clean with a dry
lint-free cloth.
9 GB/IE

Disposal
Warranty
The packaging is
made of
environmentally friendly materials,
which
may be disposed
of through your local
recycling facilities.
Contact your local authorities for
information on how to dispose of
the product at the end of the
product‘s life.
Never dispose of
the product and
the bulb in your
regular household rubbish.
Dispose of the product and light
bulb through an authorised
waste management company or
your municipal disposal facilities.
Observe the applicable regulations. In case of doubt, please
contact your waste disposal centre.
The device has been manufactured to strict quality guidelines
and meticulously examined before delivery. In the event of
product defects you have legal
rights against the retailer of this
product. Your legal rights are not
limited in any way by our warranty detailed below.
The warranty for this device is
3 years from the date of purchase. Should this device show
any fault in materials or manufacture within 3 years from the date
of purchase, we will repair or replace it – at our choice – free of
charge to you.
The warranty period begins on
the date of purchase. Please
keep the original sales receipt in
a safe location. This document is
required as your proof of purchase. This warranty becomes
void if the device has been damaged or improperly used or
maintained.
10 GB/IE

The warranty applies to faults in
material or manufacture. This
warranty does not cover product
parts subject to normal wear, thus
possibly considered consumables
(e.g. batteries) or for damage to
fragile parts, e.g. switches, rechargeable batteries or glass
parts.
11 GB/IE

OWIM GmbH & Co. KG
Stiftsbergstraße 1
D-74167 Neckarsulm
Model-No.: 104000-14-01-BS
Version: 09 / 2014
Last Information Update: 10 / 2014
Ident.-No.: 104000-14-01-BS102014-6
IAN 104000
6
 Loading...