


Not For Resale – Free Download at http://www.joe-chan.com/manuals
Not For Resale – Free Download at http://www.joe-chan.com/manuals
The LEICAFLEX® SL 2 is a modern single-lens-reflex camera with selective light metering through the lens.
The large, bright LEICAFLEX viewfinder gives you all the necessary information. At the same time it functions as the
control and composing centre for focusing, spot exposure measurement, assessment of the pictorial effect, and perspective. Both the shutter speed set on the dial and the lens stop can be read at the same time. All controls are arranged conveniently so that you will soon carry out the few operations almost in your sleep.
But please spend a little time on reading these instructions: you will have even more fun when you take photographs with your new LEICAFLEX SL 2.
2
Not For Resale – Free Download at http://www.joe-chan.com/manuals
Contents
Brief description for the reader |
|
Accessories for the LEICAFLEX SL 2 |
|
|
|
Interchangeable lenses |
28 |
in a hurry |
4 |
|
|
|
|
Follow-focus lenses |
30 |
Inserting and changing the lens |
6 |
|
|
|
|
LEICA lenses on the LEICAFLEX |
30 |
Holding the camera correctly |
7 |
|
|
The composing and control centre |
8 |
Focusing Bellows-R |
31 |
|
|
Motor for the LEICAFLEX SL2 MOT |
31 |
Focusing |
10 |
|
|
|
|
Ring combination for the |
|
Exposure meter |
12 |
|
|
|
|
close-up range |
32 |
Setting film speed and -type |
13 |
|
|
Use of filters |
16 |
ELPRO close-up attachments |
32 |
|
|
Cases |
34 |
Testing and changing the battery |
17 |
|
|
|
|
Enlargers |
34 |
Rapid transport lever, shutter speed |
|
|
|
|
|
Projectors |
35 |
dial, release button |
18 |
|
|
The LEICAFLEX lenses |
19 |
LEITZ Warranty |
36 |
|
|
After-sales service |
36 |
Automatic diaphragm |
19 |
|
|
|
|
LEITZ Information Service |
37 |
Depth-of-field button |
20 |
|
|
|
|
"LEICA FOTOGRAFIE" journal |
38 |
Depth-of-field scale |
20 |
|
|
Lens hoods |
21 |
Available accessories |
39 |
Series filters |
22 |
|
|
Self-timer |
22 |
|
|
Flash synchronization, flash table |
23 |
|
|
Inserting the film |
24 |
|
|
Taking out the film |
26 |
|
|
Tips for the care and maintenance of |
|
|
|
the LEICAFLEX and its lenses |
26 |
|
|
3

Not For Resale – Free Download at http://www.joe-chan.com/manuals
Brief Description for the Reader in a Hurry |
6 |
Depth-of-field button (p. 20) |
|
1 |
Automatic film counter (p. 24) |
7 |
Bayonet lock for the lens (p. 6) |
2 |
Shutter speed dial (p. 18) |
8 |
Button for switching on the viewfinder |
3 |
Release button with thread for cable release |
|
illumination in poor lighting conditions |
|
(p. 18) |
|
(p. 15) |
4 |
Rapid transport lever for shutter wind and |
9 |
Accessory shoe with central contact (p. 23) |
|
film transport (p. 18), at the same time |
10 |
Red dot mark for lens change (p. 6) |
|
on/off switch of the exposure meter (p. 12) |
11 |
Diaphragm pre-setting ring (p. 19) |
5 |
Self-timer (delayed-action mechanism) |
12 |
Depth-of-field scale (p. 20) |
|
(p. 22) |
13 |
Distance setting ring (p. 10) |
4

Not For Resale – Free Download at http://www.joe-chan.com/manuals
14 |
Contact bushes for flash units (p. 23) |
21 |
Cover of the battery for viewfinder |
15 |
Button for testing the exposure meter |
|
illumination (p. 15) |
|
battery (p. 17) |
22 |
Eyelets for the carrying strap (p. 7) |
16 |
Locking button for DIN/ASA setting of the |
23 |
ASA scale (p. 13) |
|
exposure meter (p. 13) |
24 |
24 Cover for the exposure meter battery |
17 |
Clamp for pulling out the rewind crank to |
|
(p.17) |
|
open the camera back (p. 25) |
25 |
Viewfinder eyelens, accepts mount for |
18 |
Swing-out rewind crank (p. 25) |
|
correction lenses (p. 8) |
19 |
Disc with film-type symbols (p. 13) |
26 |
¼ in tripod bush |
20 |
DIN scale (p. 13) |
27 |
Push-button for rewind release (p. 25) |
5

Not For Resale – Free Download at http://www.joe-chan.com/manuals
Inserting the lens
For insertion of the lens in the bayonet ring on the camera body the red dot (10) on the lens mount must face the bayonet lock (7) marked in red. After a slight turn to the right the lens clicks into position.
Change lenses in the shadow of your body.
Taking out the lens
Irrespective of the distance and diaphragm settings the LEICAFLEX lenses are changed as follows:
Grip the lens on the fixed ring (12), depress the bayonet lock (7), turn the lens to the left and take it out.
6
Not For Resale – Free Download at http://www.joe-chan.com/manuals
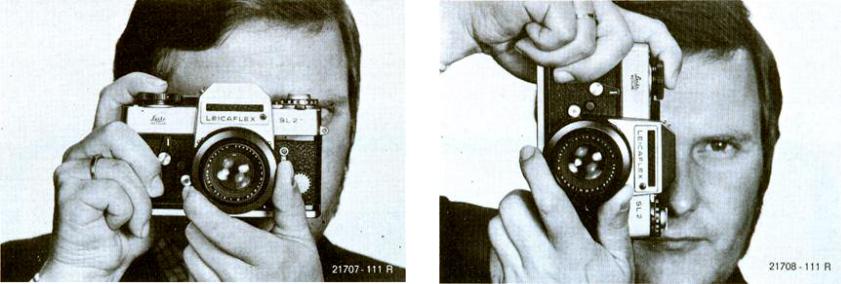
Holding the camera correctly
For the steady 3-point support the right hand grips the camera. The index finger rests on the release button, the thumb against the rapid transport lever. The left hand supports the lens from below.
When taking pictures in the upright format, simply turn the LEICAFLEX. The hands remain in the same position as for horizontal pictures, ready to wind on the film and to focus.
7

Not For Resale – Free Download at http://www.joe-chan.com/manuals
8
Not For Resale – Free Download at http://www.joe-chan.com/manuals
The composing and control centre
The viewfinder of the LEICAFLEX SL 2 is the centre both for pictorial composition and for control of all important data: sharpness, picture area and perspective, measuring field and exposure meter pointer, shutter speed set on the dial and lens stop.
Spectacle wearers, too, can normally survey the viewfinder image without difficulty. In special cases, correction lenses in a mount can be pushed onto the eyelens mount.
The viewfinder of the LEICAFLEX SL 2 has been adjusted with micro-precision. This ensures optimum sharpness as well as exact agreement of viewfinder image and picture area on the film.
A scale below the viewfinder field indicates on the left the shutter speed set on the dial, and on the right the pre-set lens stop.
9
Not For Resale – Free Download at http://www.joe-chan.com/manuals
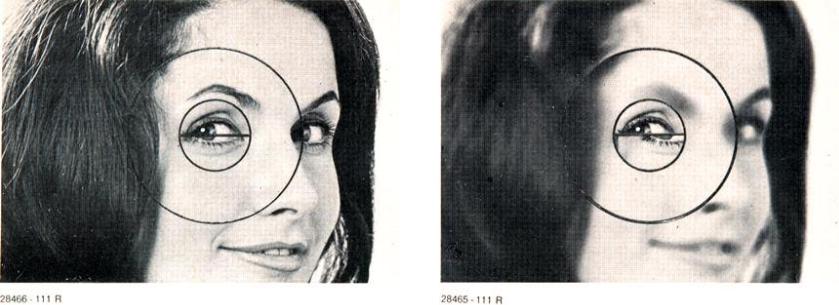
Focusing
According to your predominant photographic work you will have chosen between 3 permanently built-in viewfinder screens.
The image is focused by rotation of the distance setting ring (13) on the lens.
a) Screen with split-image wedge
This screen is particularly suitable for quick focusing with wide-angle and standard lenses. Unless focusing is critical, edges and lines of the object are mutually displaced in the horizontal split image.
A ring-shaped quadrangular micro-prism
screen surrounds the central split image. This serves for the focusing of objects lacking crisp outlines. Out-of-focus setting is indicated by distinct flickering.
The surrounding field consists of triangular micro-prisms, producing a ground-glass screen effect. This surrounding field is therefore used mainly for focusing with longer-focal-length lenses and in the close-up range.
10
Not For Resale – Free Download at http://www.joe-chan.com/manuals
b) Screen without split-image wedge The entire central measuring field is occupied by a quadrangular micro-prism screen. Distinct flickering indicates that the object sighted is not critically focused on this screen.
c) Groundglass screen
The image can be focused within the entire viewfinder field. The central circle indicates the measuring field for the exposure meter. This screen is suitable for close-up and macro-photography as well as for extreme telephoto work. In these cases the working stop is usually employed for focusing etc. because a transmission of the automatic diaphragm is no longer possible. The LEICAFLEX SL 2 MOT special version is supplied with a ground-glass screen unless otherwise ordered.
11

Not For Resale – Free Download at http://www.joe-chan.com/manuals
Exposure meter
The exposure meter of the LEICAFLEX SL 2 measures through the lens at full aperture. Additional and therefore timeconsuming operations are eliminated. 20% of the light coming from the lens is directed to the detector of the exposure meter via a cylindrical deflecting mirror arranged behind the hinged mirror. The detector is a CdS photo-resistor built into the bottom part of the camera and arranged so that no stray light influences the measurement. The outline of the measuring range of the exposure meter is indicated by the two semicircular markings top and bottom right on the
edge of the viewfinder image.
The exposure meter is switched on and off with the rapid transport lever (4). In the LEICAFLEX SL 2 the exposure meter is switched off when the rapid transport lever is parked against the camera body in the resting position. It is switched on when the rapid transport lever (4) is swung into the measuring position (in the LEICAFLEX SL 2 MOT special model the exposure meter is constantly switched on).
The measuring field of the exposure meter is exactly defined in the viewfinder by the large central circle. Thus the target area for the focal length of all the lenses
12
 Loading...