


 Loading...
INSTRUCTION HANDBOOK
Please read the instruction handbook before using the copier. Keep it in the designated
location for easy reference.
As an ENERGY STAR Partner, KYOCERA MITA AMERICA, INC. has determined that this product meets the ENERGY STAR guidelines for energy efficiency.
* ENERGY STAR is a U.S. registered mark.
All rights reserved. No part of this material may be reproduced or transmitted in any form or by any means, electronic or mechanical, including photocopying, recording or by any information storage and retrieval system, without permission in writing from the Publisher.
Legal Restriction On Copying
•It may be prohibited to copy copyrighted material without permission of the copyright owner.
•It is prohibited under any circumstances to copy domestic or foreign currencies.
•Copying other items may be prohibited.

Please read the instruction handbook before using the copier. Keep it in the designated location for easy reference.
The sections of this handbook and parts of the copier marked with symbols are safety warnings meant to protect the user, other individuals and surrounding objects, and ensure correct and safe usage of the copier. The symbols and their meanings are indicated below.
 DANGER: Indicates that serious injury or even death will very possibly result from insufficient attention to or incorrect compliance with the related points.
 WARNING: Indicates that serious injury or even death may result from insufficient attention to or incorrect compliance with the related points.
 CAUTION: Indicates that personal injury or mechanical damage may result from insufficient attention to or incorrect compliance with the related points.
Symbols
The  symbol indicates that the related section includes safety warnings. Specific points of attention are indicated inside the symbol.
................... [General warning]
................... [Warning of danger of electrical shock]
................... [Warning of high temperature]
The  symbol indicates that the related section includes information on prohibited actions. Specifics of the prohibited action are indicated inside the symbol.
.................... [Warning of prohibited action]
..................... [Disassembly prohibited]
The ● symbol indicates that the related section includes information on actions which must be performed. Specifics of the required action are indicated inside the symbol.
.................... [Alert of required action]

 .................... [Remove the power plug from the outlet]
.................... [Always connect the copier to an outlet with a ground connection]
Please contact your service representative to order a replacement if the safety warnings in the handbook are illegible or if the handbook itself is missing. (fee required)

Contents
Section 1: Introduction
To the User ................................................................................................................... |
1-2 |
Key Operator Functions ......................................................................................... |
1-2 |
Copier Service, Repairs & Supplies ...................................................................... |
1-2 |
Machine Labels ...................................................................................................... |
1-2 |
Control Panel with Interactive Touch Screen ........................................................ |
1-2 |
Overview of this Manual ........................................................................................ |
1-3 |
Help Mode ............................................................................................................. |
1-3 |
Product Overview ......................................................................................................... |
1-4 |
Features of This Machine ............................................................................................. |
1-5 |
Copier Features .......................................................................................................... |
1-11 |
Standard Equipment ............................................................................................ |
1-11 |
Optional Equipment ............................................................................................. |
1-11 |
Section 2: Safety Information
CAUTION LABELS .................................................................................................. |
2-2 |
INSTALLATION PRECAUTIONS ............................................................................ |
2-4 |
PRECAUTIONS FOR USE ...................................................................................... |
2-7 |
Regulations ................................................................................................................. |
2-10 |
FCC Regulations ................................................................................................. |
2-10 |
Canadian Department of Communications Regulations ..................................... |
2-10 |
FDA Regulations .................................................................................................. |
2-10 |
Section 3: Machine Information
Machine Configuration .................................................................................................. |
3-2 |
External Machine Call-Outs ................................................................................... |
3-3 |
Internal Machine Call-Outs .................................................................................... |
3-3 |
Standard/Optional Equipment ............................................................................... |
3-4 |
Site Requirements ........................................................................................................ |
3-5 |
Control Panel Layout .................................................................................................... |
3-6 |
Touch Screen ................................................................................................................ |
3-7 |
Basic Screen .......................................................................................................... |
3-7 |
Initial Settings ............................................................................................................... |
3-8 |
Auto/Reset Mode .......................................................................................................... |
3-8 |
Automatic Paper Selection (APS) ................................................................................. |
3-8 |
Contents
Section 3: Machine Information (continued)
Automatic Magnification Selection (AMS) .................................................................... |
3-8 |
Automatic Exposure Selection (AES) ........................................................................... |
3-8 |
Automatic Tray Switching (ATS) ................................................................................... |
3-8 |
Lead Edge Delete ......................................................................................................... |
3-9 |
Service Settings ............................................................................................................ |
3-9 |
Finisher-Paper Capacity ........................................................................................ |
3-9 |
Key Operator Password ........................................................................................ |
3-9 |
ECM Master Key Code .......................................................................................... |
3-9 |
Weekly Timer Master Key Code ............................................................................ |
3-9 |
Weekly Timer Key in Help Screen ......................................................................... |
3-9 |
Control Panel Contrast Key in Help Screen ........................................................ |
3-10 |
Staple Sheet Capacity ......................................................................................... |
3-10 |
Notice Message: ADD TONER/ PM CALL .......................................................... |
3-10 |
Section 4: Paper Information
Positioning Originals on the Platen Glass .................................................................... |
4-2 |
Positioning an Original for Manual Copying .......................................................... |
4-2 |
Using the Reversing Automatic Document Feeder (RADF) ......................................... |
4-3 |
Positioning Originals .............................................................................................. |
4-4 |
Positioning an SDF Original .................................................................................. |
4-5 |
Positioning Mixed Originals ................................................................................... |
4-6 |
Paper in Main Body Trays ............................................................................................ |
4-7 |
Paper in Large Capacity Tray (Option) ......................................................................... |
4-7 |
Paper in Automatic Duplex Unit .................................................................................... |
4-8 |
Paper in Multi-Sheet Bypass Tray ................................................................................ |
4-8 |
Paper in 2 Paper Tray/3 Paper Tray Finisher (Option) ................................................ |
4-9 |
2 Paper Tray/3 Paper Tray Finisher Primary (Main) Tray ..................................... |
4-9 |
2 Paper Tray/3 Paper Tray Finisher Secondary (Sub) Tray ................................. |
4-9 |
3 Paper Tray Finisher Booklet Tray ..................................................................... |
4-10 |
Paper in Cover Sheet Feeder (Option) ....................................................................... |
4-10 |
Cover Sheet Feeder ............................................................................................ |
4-10 |
Paper Weight Compatibility Chart .............................................................................. |
4-11 |
Contents
Section 5: Copier Management
Power Saver Mode ....................................................................................................... |
5-2 |
Auto Low Power ..................................................................................................... |
5-2 |
Manual Low Power ................................................................................................ |
5-3 |
Auto Shut-Off ......................................................................................................... |
5-4 |
Manual Shut-Off ..................................................................................................... |
5-4 |
Entering an ECM Password.......................................................................................... |
5-5 |
Weekly Timer Function ................................................................................................. |
5-6 |
Timer Interrupt ....................................................................................................... |
5-6 |
Counter List ................................................................................................................... |
5-8 |
To Display Counter List ......................................................................................... |
5-8 |
To Print Counter List .............................................................................................. |
5-8 |
Section 6: Basic Operations
How to Make a Basic Copy ........................................................................................... |
6-2 |
The Basic Screen .................................................................................................. |
6-2 |
Copy Mode .................................................................................................................... |
6-4 |
Copy Mode Using RADF ....................................................................................... |
6-5 |
1s2 Copy Mode Using Platen Glass .................................................................... |
6-6 |
Copy Density................................................................................................................. |
6-7 |
Automatic Exposure Selection (AES) .................................................................... |
6-7 |
Manual Mode (Lighter, Normal, Darker) ................................................................ |
6-7 |
Density Shift ........................................................................................................... |
6-8 |
Lens Mode .................................................................................................................. |
6-10 |
Automatic Paper Selection (APS) ....................................................................... |
6-10 |
Automatic Magnification Selection (AMS) ........................................................... |
6-11 |
Special Ratio Table ............................................................................................. |
6-12 |
Selecting a Special Ratio for Non-Standard Paper ............................................. |
6-13 |
Preset and User Set Ratios ................................................................................. |
6-14 |
Zoom Mode .......................................................................................................... |
6-15 |
Vertical/Horizontal Zoom ..................................................................................... |
6-16 |
Copy Size .................................................................................................................... |
6-17 |
Programming Copy Size for UNIV. Key .............................................................. |
6-18 |
Selecting Paper Type/Size for Multi-Sheet Bypass Tray .................................... |
6-19 |
Reserve ....................................................................................................................... |
6-22 |
Set Reserve Job .................................................................................................. |
6-22 |
Job Status Screen ............................................................................................... |
6-24 |
Mishandled Paper During the Reserve Setting ................................................... |
6-26 |
When Paper is Depleted for the Job in Progress ................................................ |
6-27 |
Store Mode ................................................................................................................. |
6-28 |
Platen Store Mode ............................................................................................... |
6-28 |
RADF Store Mode ............................................................................................... |
6-30 |
Contents
Section 6: Basic Operations (continued)
Rotation ....................................................................................................................... |
6-31 |
90° Rotation ......................................................................................................... |
6-31 |
90° Rotation and APS .......................................................................................... |
6-31 |
90° Rotation and AMS ......................................................................................... |
6-32 |
180° Rotation ....................................................................................................... |
6-33 |
To Release Automatic Rotation ........................................................................... |
6-34 |
Check Mode and Proof Copy ...................................................................................... |
6-35 |
Interrupt Mode............................................................................................................. |
6-38 |
Help Mode ................................................................................................................... |
6-40 |
Using the Multi-Sheet Bypass Tray ............................................................................ |
6-42 |
Section 7: Output Modes
2 Paper Tray/3 Paper Tray Finisher Specifications |
...................................................... 7-2 |
Non-Sort Mode Using Primary (Main) Tray .................................................................. |
7-4 |
Sort Mode Using Primary (Main) Tray .......................................................................... |
7-5 |
Staple-Sort Mode Using Primary (Main) Tray .............................................................. |
7-6 |
Group Mode Using Primary (Main) Tray....................................................................... |
7-9 |
Output Modes Using Secondary (Sub) Tray .............................................................. |
7-10 |
Folding and Stapling & Folding Modes ....................................................................... |
7-12 |
Cover Sheet Feeder ................................................................................................... |
7-15 |
Manual Stapling .......................................................................................................... |
7-18 |
Output Mode for Machine without Finisher ................................................................. |
7-20 |
Face Down Exit .................................................................................................... |
7-21 |
Face Up Exit ........................................................................................................ |
7-24 |
Section 8: Special Original
Special Original Screen ................................................................................................ |
8-2 |
Resolution (Image Quality) ........................................................................................... |
8-3 |
High Mode ............................................................................................................. |
8-3 |
Very High Mode ..................................................................................................... |
8-4 |
600 Dpi................................................................................................................... |
8-5 |
Text/Photo Enhance ..................................................................................................... |
8-6 |
Special Original ............................................................................................................. |
8-8 |
Mixed Original ........................................................................................................ |
8-8 |
Z-Folded Original ................................................................................................. |
8-10 |
SDF (Single Document Feed) ............................................................................. |
8-11 |
Original Form .............................................................................................................. |
8-12 |
Contents
Section 9: Applications
Application Function Menu |
........................................................................................... 9-2 |
Sheet/Cover Insertion ................................................................................................... |
9-3 |
Chapter ......................................................................................................................... |
9-8 |
Combination ................................................................................................................ |
9-10 |
Booklet ........................................................................................................................ |
9-12 |
Transparency Interleave ............................................................................................. |
9-15 |
Image Insert ................................................................................................................ |
9-17 |
Book Copy .................................................................................................................. |
9-19 |
Program Job ............................................................................................................... |
9-21 |
Non-Image Area Erase ............................................................................................... |
9-23 |
Reverse Image............................................................................................................ |
9-25 |
Repeat Image ............................................................................................................. |
9-26 |
Frame/Fold Erasure .................................................................................................... |
9-29 |
AUTO Layout .............................................................................................................. |
9-31 |
All-Image Area ............................................................................................................ |
9-33 |
Image Shift .................................................................................................................. |
9-34 |
Stamp/Overlay ............................................................................................................ |
9-38 |
Section 10: Job Memory
Job Store ..................................................................................................................... |
10-2 |
Job Recall ................................................................................................................... |
10-4 |
Job Memory Form ....................................................................................................... |
10-6 |
Section 11: Server Function
Server Function .......................................................................................................... |
11-2 |
Image Store/Delete Mode ........................................................................................... |
11-4 |
To Store Image Data in HDD ............................................................................... |
11-4 |
To Delete Image Data ......................................................................................... |
11-6 |
Image Store & Output Mode ....................................................................................... |
11-8 |
Image Recall Mode ................................................................................................... |
11-10 |
Section 12: Shortcuts
Set Reserve Job ......................................................................................................... |
12-2 |
Store Originals Scanned from Platen ......................................................................... |
12-2 |
Store Originals Scanned from RADF .......................................................................... |
12-2 |
Stapling & Folding and Folding ................................................................................... |
12-3 |
Mixed Original ............................................................................................................. |
12-3 |
Sheet/Cover Insertion ................................................................................................. |
12-3 |
Chapter ....................................................................................................................... |
12-4 |
Contents
Section 12: Shortcuts (continued)
Combination ................................................................................................................ |
12-4 |
Booklet ........................................................................................................................ |
12-4 |
Transparency Interleave ............................................................................................. |
12-5 |
Image Insert ................................................................................................................ |
12-5 |
Book Copy .................................................................................................................. |
12-6 |
Program Job ............................................................................................................... |
12-6 |
Non-Image Area Erase ............................................................................................... |
12-6 |
Reverse Image............................................................................................................ |
12-7 |
Repeat Image ............................................................................................................. |
12-7 |
Frame/Fold Erasure .................................................................................................... |
12-7 |
AUTO Layout .............................................................................................................. |
12-8 |
All-Image Area ............................................................................................................ |
12-8 |
Image Shift/ Reduce & Shift ....................................................................................... |
12-8 |
Stamp/Overlay ............................................................................................................ |
12-9 |
Loading Paper........................................................................................................... |
12-10 |
Adding Toner ............................................................................................................ |
12-10 |
Section 13: Key Operator Mode
To the Key Operator ................................................................................................... |
13-2 |
How to Access the Key Operator Mode .............................................................. |
13-3 |
Function Menu Map .................................................................................................... |
13-4 |
System Initial Setting [1] ............................................................................................. |
13-7 |
Date & Time Setting [1] ....................................................................................... |
13-7 |
Language Select Setting [2] ................................................................................ |
13-8 |
IP Address Setting [3] .......................................................................................... |
13-9 |
Copier Initial Setting [2] ............................................................................................ |
13-10 |
User Setting Mode [3] ............................................................................................... |
13-12 |
User Density Level 1 Setting [1] ........................................................................ |
13-12 |
User Density Level 2 Setting [2] ........................................................................ |
13-13 |
User Lens Mode Ratio Setting [3] ..................................................................... |
13-14 |
ECM (Electronic Copy Monitor) Function Setting [4] ................................................ |
13-15 |
How to Access the ECM Setting Mode ............................................................. |
13-16 |
E.C.M. Data Edit [1] ........................................................................................... |
13-17 |
E.C.M. All Count Reset [2] ................................................................................. |
13-21 |
E.C.M. Function Setting [3] ................................................................................ |
13-22 |
Lock/Delete Job Memory [5] ..................................................................................... |
13-23 |
Paper Type / Special Size Set [6] ............................................................................. |
13-24 |
Panel Contrast / Key Sound Adjustment [7] ............................................................. |
13-26 |
Key Operator Data Setting [8] .................................................................................. |
13-27 |
Weekly Timer [9] ....................................................................................................... |
13-28 |
How to Access the Weekly Timer Setting Mode ............................................... |
13-29 |
Weekly Timer On/Off Setting [1] ........................................................................ |
13-30 |
Timer Setting [2] ................................................................................................ |
13-31 |
Timer Action On/Off Setting [3] ......................................................................... |
13-33 |
Lunch Hour Off Setting [4] ................................................................................. |
13-35 |
Timer Interrupt Password Setting [5] ................................................................. |
13-36 |
Contents
Section 13: Key Operator Mode (continued)
Control Panel Adjustment [10] .................................................................................. |
13-37 |
Tray Size Setting [11] ............................................................................................... |
13-38 |
Power Save Setting [12] ........................................................................................... |
13-39 |
Memory Switch Setting [13] ...................................................................................... |
13-40 |
Machine Management List Print [14] ........................................................................ |
13-46 |
Side 2 Lens Adjustment [16] ..................................................................................... |
13-47 |
Finisher Adjustment [17] ........................................................................................... |
13-48 |
HDD Management Setting [18] ................................................................................. |
13-49 |
Key Operator ECM Form .......................................................................................... |
13-51 |
Section 14: Maintenance & Supplies
Loading Paper............................................................................................................. |
14-2 |
Paper Indicator .................................................................................................... |
14-2 |
Paper Empty Indicator ......................................................................................... |
14-2 |
Using the HELP Key ............................................................................................ |
14-2 |
Loading Paper in Tray 1, 2, and 3 ....................................................................... |
14-3 |
Loading Paper in Tray 4 ...................................................................................... |
14-4 |
Loading Tabbed Sheets in Tray 1, 2, or 3 ........................................................... |
14-5 |
Loading Tabbed Sheets in Tray 4 (LCT) ............................................................. |
14-6 |
Adding Toner .............................................................................................................. |
14-7 |
Inserting a New Staple Cartridge into 2 Paper Tray/3 Paper Tray Finisher ............... |
14-8 |
Preventive Maintenance ............................................................................................. |
14-9 |
Reading the PM Count ........................................................................................ |
14-9 |
Printing the PM Count ......................................................................................... |
14-9 |
Cleaning the Left Partition Glass .............................................................................. |
14-10 |
Cleaning the Document Glass and Cover ................................................................ |
14-10 |
Service, Repairs, Supplies ....................................................................................... |
14-11 |
Section 15: Troubleshooting
Call for Service ........................................................................................................... |
15-2 |
Limited Use of the Copier in Trouble ................................................................... |
15-3 |
Memory Overflow ........................................................................................................ |
15-4 |
Power OFF/ON Screen ............................................................................................... |
15-5 |
Clearing Mishandled Paper ........................................................................................ |
15-6 |
Copying Hints .............................................................................................................. |
15-8 |
Section 16: Machine Specifications
Specifications .............................................................................................................. |
16-2 |

Section 1: Introduction
To the User
Key Operator Functions Copier Service, Repairs & Supplies Machine Labels Control Panel with Interactive Touch Screen
Overview of This Manual Help Mode
Product Overview
Features of This Machine
Copier Features
Standard Equipment
Optional Equipment
Introduction 1-1

Introduction
To the User
The following topics relate to general product information and provide tips on using this manual.
Key Operator Functions
Custom settings can be made by the key operator or anyone who is responsible for the machine. Access to the Key Operator mode may require a key operator password, if previously set by service. Use the password system to limit use of key operator functions to a person who is authorized to handle the responsibility.
Copier Service, Repairs & Supplies
Copier service and repairs should be performed only by an authorized service representative. To maintain personal safety and to avoid machine damage, never disassemble the machine for any reason. To ensure optimal copy quality, use only supplies that are recommended by our company. For convenience, use the form located at the end of Section 14: Maintenance & Supplies to record all service, repair, and supply orders.
Machine Labels
Information labels are affixed to the copier to provide quick and easy instructions on basic copying, loading paper, adding toner, and clearing mishandled paper. In addition, safety labels are attached to various internal areas of the copier, and provide cautionary information that must be heeded to prevent personal injury or damage to the copier. Sample machine safety labels are shown in Section 2: Safety Information.
Control Panel with Interactive Touch Screen
The control panel of this machine is user friendly and easy to operate. The far right portion of the panel displays the Timer indicator and buttons to select Power Saver On/ Off, Interrupt, Proof Copy and Stop. Adjacent to this section is the keypad to select Print Quantity, Counter and Clear Quantity. The next section on the left displays the Copy/ Scanner/Server/Printer indicator and keys to select the mode; as well as keys to select Check, Help, Job Memory and Auto Reset modes. To the left is the LCD screen.
Copying modes, selections, and setting changes can be made from the touch screen. The upper portion of the touch panel automatically displays machine status information, as required. In addition, the [HELP] key can be used to display information on each function that is displayed on the screen and provide step by step instructions.
1-2 Introduction

Introduction
To the User (continued)
Overview of This Manual
To enjoy optimal performance, read this manual before using the copier. Be sure to handle the machine and perform all copying operations only as recommended in the manual. Keep the manual located with the machine so that all users may refer to it, as needed.
Manual Organization:
This manual includes thirteen topic sections and Specifications of the product. Highlights are as follows:
Section 1 includes general product information and features.
Section 2 provides all safety information, which should be read before operating this equipment.
Section 3 includes machine information that can be used as a reference when performing all copying jobs, especially when capacities, sizes and weights are factors.
Section 4 includes paper information that can be used as a reference when performing all copying jobs.
Section 5 provides copier management information, which should be read before operating this equipment.
Section 6 includes information on using the touch screen and selecting basic copying functions.
Section 7 provides information on output modes, including sort, staple-sort, group, face up, folding/stapling & folding, cover sheet feed, and manual staple functions.
Section 8 provides information on special original modes. Section 9 provides information on special applications modes. Section 10 provides information on job memory functions.
Section 11 describes server functions for storing the image data in HDD during printing. Section 12 provides shortcuts for special application functions and some basic functions.
Section 13 describes key operator functions for customizing the machine to suit your working environment. The key operator mode should be used by an authorized person.
Section 14 provides information on maintaining this equipment and replenishing paper and toner. Section 15 provides troubleshooting information and instructions for clearing mishandled paper.
Page Design:
The page layout of this manual is designed to help you perform each operation quickly and easily. The basic format includes an introductory explanation of each function; step-by-step procedures; and illustrations to enhance many of the procedures. Caution statements specific to a topic are located on appropriate pages. Special notes are located at the bottom of the page.
Help Mode
Help can be obtained for any function or mode that is displayed on the screen.
Introduction 1-3

Introduction
Product Overview
This machine is a digital printer/copier that can be used as a stand-alone copier, or it can be used as a high-speed network printer when connected to the optional printer controller Image Processor.
This machine can also be used as a print server on a network operating system.
Separate user’s manuals and installation instructions are included with the optional printer controller device.
Digital technology and memory capability of this machine provide many advantages over the conventional photocopying process.
In conventional photocopying, a scanned image virtually remains intact as it is represented on the drum and then copied onto the output media. While many conventional settings can be made before outputting the copies to effect image reduction, lens adjustment, image erasure and job store, etc., the conventional photocopying process cannot transform the image into bits or store image data into memory.
In this machine, a scanned image is electronically digitized into data bits that are represented in code form and stored into memory. Stored data can be retrieved from memory and output in various ways, as controlled by software. Digitized image is represented as pixels on a screen or as dots per inch (dpi) on hard copy. This machine resolves image in the copier mode at 400/600 dpi and resolves image in the printer mode at 600 dpi.
The digital technology of this machine enables you to:
•feed originals only once to make multiple copies, thereby preserving the condition of originals
•store image in memory and perform Sheet/Cover insertion, Chapter, Combination, Booklet, Image insert, Book copy, Program job, Mixed original, Repeat, Image shift, Stamp/Overlay
•enhance photo, complex text image quality, and enhance lighter image
•reduce toner consumption and produce clean copies with Non-image area erase
•organize images into booklet format
•insert images scanned from the platen into a set scanned from the document feeder
•check copying conditions and produce a proof copy before making multiple copied sets
•confirm the current machine status
•select offset-sort, offset-group, staple-sort, folding, or stapling & folding output mode using optional Finisher (2 Paper Tray/3 Paper Tray)
•set reserve jobs to make copies of different types in succession
•lay stamp, watermark, or scanned image onto copy image
•store image data in HDD (option) for future printing
1-4 Introduction

Introduction
Features of This Machine
• 600dpi Mode
Scan in higher resolution (600dpi) than in normal mode (400dpi).
• All-Image Area
Make copies printed completely to the edges to avoid image loss.
• AES - Automatic Exposure Selection
Automatically adjust exposure to compensate for the original.
• AMS - Automatic Magnification Selection
Automatically select an appropriate magnification ratio when Copy Size is selected manually. Automatically selected when [AMS] key is touched.
• APS - Automatic Paper Selection
Automatically select copy paper size to match the original documents.
• ATS - Automatic Tray Switching
Automatically switch tray to allow copying to be continued without interruption when the selected tray becomes empty while copying is in progress.
• Auto Layout
The original image on the platen glass or in the document feeder is copied and centered on a sheet.
• Auto Low Power
Automatically lower the power after a specified period of copier inactivity.
• Auto Reset
Automatically reset to auto mode defaults after a specified period of copier inactivity.
• Auto Shut-Off
Automatically shut off the main power after a specified period of copier inactivity.
• Book Copy
Copy both pages of an open book or book-size sheet separately onto two letter sheets in 1-1 mode or separately onto each side of one letter sheet in 1-2 mode. You can use the Book Copy mode with the Front or Front/Back cover mode. The cover page(s) will be scanned and copied normally before image division is performed on the other pages.
• Booklet
Create letter R or ledger size booklets from letter size originals in 1-2 or 2-2 copy mode.
Introduction 1-5

Introduction
Features of This Machine (continued)
• Chapter
Start chapter pages on the right side (front pages) of the finished document. Only duplex mode (1-2 or 2-2) is compatible.
• Combination
Copy a fixed number (2, 4, or 8) of pages onto one sheet of copy paper.
• Copy Density
Manually select up to 9 density levels.
• Copy Mode
Select the desired simplex mode (1-1 or 2-1); or duplex mode (1-2 or 2-2).
• Counter List
Display on the screen and print the following data for confirmation; total counter of the machine, copier counter, print counter and the date when the counter started.
• Density Shift
Shift each seven density levels of 4 density modes (Auto, Text, Photo, Increase Contrast) into two levels to lighter and three levels to darker.
• Frame/Fold Erasure
Erase border and/or fold image area using Frame (1 - 15mm), Fold (1 - 30mm), or Frame & Fold.
• HDD Store
While operating ordinary copying job, store image data in HDD (option) for future printing.
• Image Insert
Store pages in memory from the platen glass, and insert the pages into a document copied from the document feeder.
• Image Rotation
Image Rotation rotates the image before copying when the portrait/landscape orientation of the original is different from the orientation of the copy paper.
In 1-2 copy mode, Rotation arranges the even pages of simplex originals so that the reverse sides of the duplex copies appear upside down.
In 2-1 copy mode, Rotation rearranges the reverse sides of duplex originals, when the reverse side is upside down, so that they can be read as normal simplex copies.
1-6 Introduction

Introduction
Features of This Machine (continued)
• Image Shift
Create or remove a binding margin at the top, bottom, right and left edges (shift amount from 0mm ~ 250mm in 1mm increments); reduce image to prevent image loss (reduce & shift amount from 0 ~ 250mm in 1mm increments).
• Interrupt Copying
Interrupt copying in progress to perform copying from the platen glass.
• Job Memory
Program up to 30 jobs and Recall each job by job number, as needed. All compatible platen glass functions can be programmed into Job Memory directly after they are selected.
• Job Status
Display the Job Status Screen to view the machine status, change the operation order of reserve jobs, delete the unused reserve job, or display the previous job list.
• Lens Mode (Preset, Zoom)
Select Preset ratios, three reduction and three enlargement ratios.
Zoom ratios can be selected from 33% ~ 400% in 1% increments (400 dpi), or 33% ~ 200% increments (600 dpi).
• Machine Status Confirmation
Display the current machine status on LCD for confirmation.
• Magnification
Set user-programmable ratios under User Set 1, User Set 2 and User Set 3.
• Manual Shut-off
Shut off the main power when pressing [POWER SAVER ON/OFF] key.
• Mixed Original
Copy mixed size originals from the document feeder in APS or AMS mode. APS automatically selects the copy size of each original. AMS mode allows you to select one paper size for all originals.
• Non-Image Area Erase
When copying from the platen glass when the document cover is open, copy only the image area and not the exposed area of glass, which would otherwise copy as black.
Introduction 1-7

Introduction
Features of This Machine (continued)
• Non STD Size for Multi-Sheet Bypass Tray
Enter the special paper size to be loaded on the Multi-sheet bypass tray using the touch screen keypad in order to avoid paper misfeed.
• Non STD Size for Original
Identify the special original size which the machine could not detect in order to select the optimal paper size for copying or printing.
• Output mode for Machine with 2 Paper Tray/3 Paper Tray Finisher Installed: Non-Sort, Sort, Staple-Sort, and Group modes using the primary (main) tray Non-Sort Face Down exit, Non-Sort Face Up exit, Group Face Down exit, and Group Face Up exit modes using the secondary (sub) tray
Stapling & Folding, and Folding modes using the booklet tray (3 Paper Tray Finisher only)
Select an output tray and output mode on the Output Mode Screen and on the Control panel. For details of each output mode, see Section 7: Output Modes.
• Output for Machine with no Finisher Installed: Sort and Group modes
Use the default condition to output copies in the same order as the originals. Use the Sort mode to alternately switch the horizontal and vertical orientation of each copied set upon exit. Use the Group mode to output multiple copies of each original without offsetting them upon exit.
•Output mode for 2 Paper Tray/3 Paper Tray Finisher with Cover Sheet Feeder Installed:
Cover Sheet mode Manual Staple mode
For details of each output mode, see Section 7: Output Modes.
• Paper Capacity
Total 2,150 sheets, including two 500-sheet trays, a 1,000-sheet tray, and a 150-sheet Multi Sheet Bypass tray.
Total 6,150 sheets, including 4,000-sheet optional large capacity tray.
• Platen Memory
Scan documents into memory from the platen glass and/or the document feeder and insert the pages into another document copied from the document feeder. If an incompatible function is selected in this mode, the latter function will not be selected, and a Caution message will be displayed.
1-8 Introduction

Introduction
Features of This Machine (continued)
• Power Saver
Automatically turns off all but nominal power supply after a specified period of copier inactivity, for optimal efficiency. Power is returned after a brief warm up period by pressing [POWER SAVER ON/OFF] key on the Control panel.
• Program Job
Scan documents into memory while designating a different copy condition for each original, then print all the images collectively.
• Proof Copy
To ensure correct output before running multiple copies, run a proof copy by touching PROOF COPY on the Check Screen or pressing [PROOF COPY] key on the Control panel.
• Repeat Image
Select the horizontal image area across the page, and repeat it down the page as many times as the repeat width setting (10 ~ 150mm) permits in manual or auto.
• Reserve
Scan in subsequent copy jobs while the machine is busy printing or copying.
• Resolution (High, Very High)
High resolution mode and Very High resolution mode provide optimal image quality for photos and complicated graphics and text that require high to very high compression amounts.
• Reverse Image
Reverse the image from black-on-white to white-on-black or vice versa.
• Rotation Exit (Rotation Sort/ Rotation Group)
When no Finisher is installed, Rotation Exit alternately switches the horizontal and vertical orientation of each sorted set as it outputs to the exit tray. Be sure to load both 8.5"x11" and 8.5"x11"R in separate trays (including the Multi-sheet bypass tray) before selecting this feature.
• Server Function (option)
Store image data in the HDD for future printing.
• SDF
Feed thick original one sheet at a time from the document feeder.
Introduction 1-9
Introduction
Features of This Machine (continued)
• Sheet/Cover Insertion
Insert up to 30 blank or copied sheets from any tray including the Multi-Sheet Bypass Tray, or insert blank or copied front and back covers from any tray including the MultiSheet Bypass Tray.
• Stamp/Overlay
Imprint a stamp, watermark, or scanned image onto the copy image.
• Staple
Select the stapling position and number of staples (3 positions).
• STD Size (Special)
Detect the standard paper sizes which cannot normally be detected (A4R and A5) when loaded in a main body tray. A5R and F4 sizes will also be available when loaded in the Multi-sheet bypass tray.
• Text/Photo Enhance
Enhance photo image in Photo mode; regular image in Auto mode; enhance text image in Text mode; enhance lighter image in increase contrast mode.
• Transparency Interleave
Copy onto transparency film and interleave blank or copied paper for each original copied.
• Userset Density (USERSET 1, USERSET 2)
Output up to 16 density samples on a total of 4 pages that display 4 samples per page, then program the desired density under USERSET 1 and/or USERSET 2.
• Weekly Timer
Can be set according to the needs of each work environment. Turn main body power Off/On daily or weekly, during lunch time, on holidays, and also enable the timerinterrupt mode, which allows temporary use of the machine even when the machine is in the daily, weekly, or holiday Off mode.
• Wide Size Paper
Copy onto paper slightly larger than the specified regular size.
• Z-Folded Original
This feature sets the RADF to accept Z-folded originals.
1-10 Introduction

Introduction
Copier Features
Standard Equipment
Main Body with 3 Paper Trays (500/500/1,000 sheets) Reversing Automatic Document Feeder (RADF) Automatic Duplex Unit (ADU)
Configuration Options:
with Multi-Sheet Bypass Tray (150 sheets)
Optional Equipment
Stapler Finisher (2 Paper Tray)
This finisher is equipped with two exit trays.
Secondary (sub) tray: Four output types can be specified on the Output Mode Screen.
(1)Face down non-sort exit
(2)Face up non-sort exit
(3)Face down group exit
(4)Face up group exit
Primary (main) tray: Four output types can be specified by STAPLE SORT and SORT keys on the Basic Screen and by the setting on the Output Mode Screen. Face up exit is not available.
(1)Sort exit
(2)Staple sort exit
(3)Non-sort exit
(4)Group exit
Stapler Finisher (3 Paper Tray)
This finisher is equipped with three exit trays and a cover sheet feeder (option). Secondary (sub) tray: Four output types can be specified on the Output Mode Screen.
(1)Face down non-sort exit
(2)Face up non-sort exit
(3)Face down group exit
(4)Face up group exit
Primary (main) tray: Four output types can be specified by STAPLE SORT and SORT keys on the Basic Screen and by the setting on the Output Mode Screen. Face up exit is not available.
(1)Sort exit
(2)Staple sort exit
(3)Non-sort exit
(4)Group exit
Booklet tray: Stapled and folded, or simply folded booklets are to be delivered onto this tray. These two finishing modes can be specified on the Output Mode Screen.
Introduction 1-11

Introduction
Copier Features (continued)
Optional Equipment (continued)
Cover Sheet Feeder
Used when selecting COVER SHEET on the Output Mode Screen, or when stapling copies manually.
Large Capacity Tray (4,000 sheets)
Expanded Memory Unit-64MB/128MB
Image Processor
HDD
Network Board
PostScript Unit
1-12 Introduction

Section 2: Safety Information
 CAUTION LABELS
 INSTALLATION PRECAUTIONS
 PRECAUTIONS FOR USE
Regulations
FCC Regulations
Canadian Department of Communications Regulations
FDA Regulations
Safety Information 2-1

Safety Information
 CAUTION LABELS
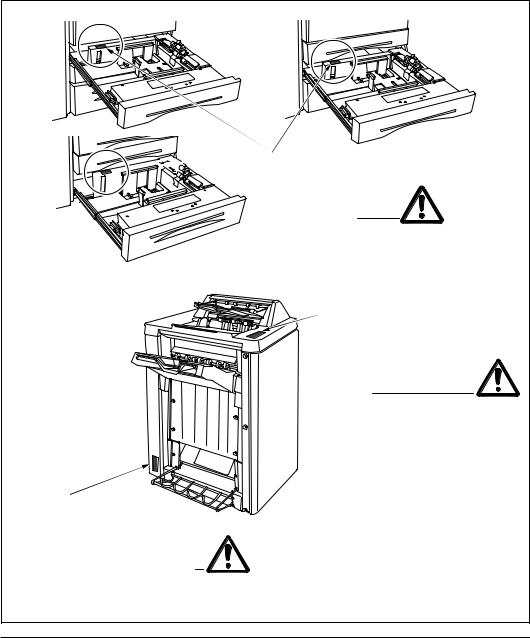
Caution labels have been attached to the copier at the following locations for safety purposes. BE SUFFICIENTLY CAREFUL to avoid fire or electric shock when removing a paper jam or when replacing toner.
Label 3, 4
High temperature inside. Do not touch parts in this area, because there is a danger of getting burned.
Label 1
High voltage inside. NEVER touch parts in this area, because there is a danger of electric shock.
Label 5
The conveyance fixing unit is heavy.
Use care and draw it out gently; otherwise you may be injured.
Label 2
DO NOT put your hand between the main body and developing fixing unit; otherwise you may be injured.
NOTE: DO NOT remove these labels.
2-2 Safety Information
Safety Information
 CAUTION LABELS (continued)
Tray 1
Tray 2


 Label 6
DO NOT put your hand
between the main body
and tray; otherwise you
may be injured.
Tray 3
Label 7
Use care after opening the paper exit outlet. DO NOT put your hand into it; otherwise you may be injured.
Label 8 |
|
|
Inside the lower paper exit |
3 Paper Tray Finisher |
|
outlet is the roller drive unit. |
||
|
||
DO NOT put your hand into it; |
|
|
otherwise you may be injured. |
|
NOTE: DO NOT remove these labels.
Safety Information 2-3
Safety Information
 INSTALLATION PRECAUTIONS
■ Environment
 CAUTION
•Avoid placing the copier on or in locations which are unstable or not level. Such locations may cause the copier to fall down or fall over. This type of situation presents a danger of personal injury or damage to the copier. .............................
•Avoid locations with humidity or dust and dirt. If dust or dirt become attached to the power plug, clean the plug to avoid the danger of fire or electrical shock.......
•Avoid locations near radiators, heaters, or other heat sources, or locations near flammable items, to avoid the danger of fire. .........................................................
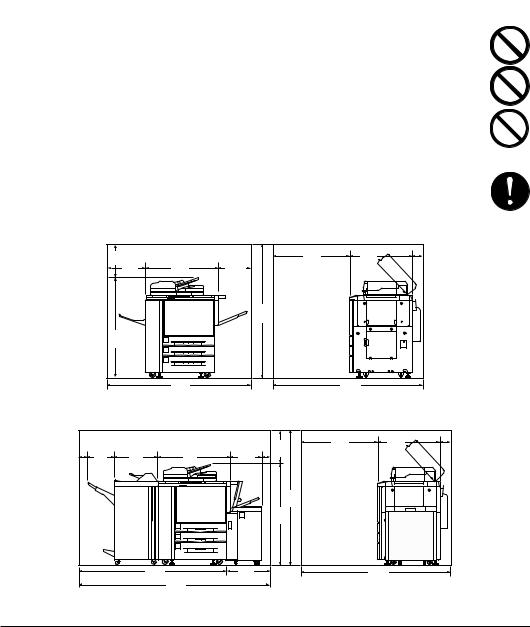
•To keep the copier cool and facilitate changing of parts and maintenance, allow access space as shown below.
Leave adequate space, especially around the left and back cover, to allow air to be properly ventilated out of the copier. .................................................................
|
|
|
|
Unit: inches (mm) |
|
15.75 |
|
|
37.4 |
30.5 |
4.7 |
(400)18.7 |
34.9 |
15.75 |
(950) |
(775) |
(120) |
(475) |
(887) |
(400) |
|
|
|
|
|
63.1 |
|
|
|
|
|
(1603) |
|
|
|
47.35 |
1 |
|
|
|
|
(1203) |
|
|
|
|
|
2 |
|
|
|
|
|
|
|
|
|
|
|
|
3 |
|
|
|
|
|
69.4 |
|
|
72.6 |
|
|
(1762) |
Main Body |
|
(1845) |
|
|
|
|
|
|
|
3.9 |
|
|
3.9 |
15.7 |
(100) |
21.7 |
34.95 |
(100) |
|
12.65 |
15.2 |
(400) |
||
(321) |
(550) |
(887) |
(386) |
|
|
|
|
|
63.1 |
|
|
|
|
(1603) |
|
|
|
4 |
47.4 |
|
|
|
(1203) |
|
|
|
1 |
|
|
|
|
|
|
|
|
|
2 |
|
|
|
|
3 |
|
|
|
|
73.2 |
19.1 |
|
|
(1858)92.3 |
(486) |
|
|
|
|
(2344) |
|
|
Unit: inches (mm)
37.430.5
(950) |
(775) |
4.7 |
|
|
(120) |
72.6
(1845)
Main Body + 2 Paper Tray/3 Paper Tray Finisher + Large Capacity Tray
2-4 Safety Information
Safety Information
•Always use the caster stoppers to stabilize the copier once it is in place to keep it from moving and/or falling over and causing injury. ...........................................
Other precautions
•Adverse environmental conditions may affect the safe operation and performance of the copier. Install in an air-conditioned room (recommended room temperature: around 68°F, humidity: around 65%RH) and avoid the following locations when selecting a site for the copier.
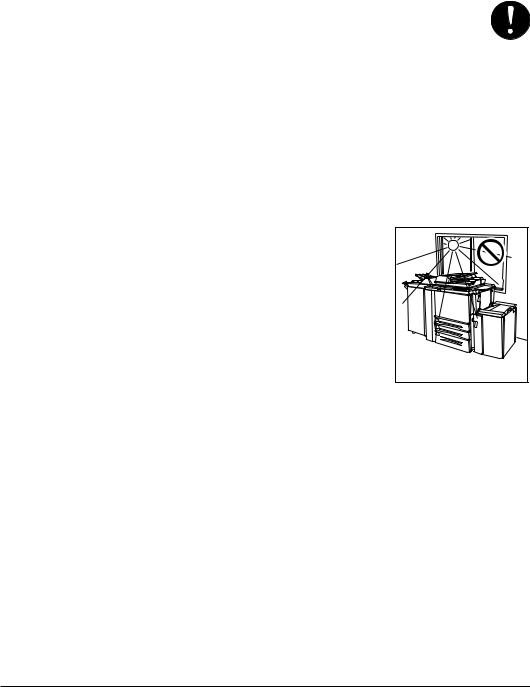
•Avoid locations near a window or with exposure to direct sunlight.
•Avoid locations with vibrations.
•Avoid locations with drastic temperature fluctuations.
•Avoid locations with direct exposure to hot or cold air.
•Avoid poorly ventilated locations.
Temperature |
Safety Information 2-5

Safety Information
■ Power supply/Grounding the copier
 WARNING
•DO NOT use a power supply with a voltage other than that specified. Avoid multiple connections in the same outlet. These types of situations present a danger of fire or electrical shock. ...........................................................................
•Plug the power cord securely into the outlet. If metallic objects come in contact with the prongs on the plug, it may cause a fire or electric shock. ........................
•Always connect the copier to an outlet with a ground connection to avoid the danger of fire or electrical shock in case of an electric short. If an earth connection is not possible, contact your service representative. ..........................
Other precautions
•Connect the power plug to the closest outlet possible to the copier.
•The power supply cord is used as the main disconnect device. Ensure that the socket/outlet is located/installed near the equipment and is easily accessible.
■ Handling of plastic bags
 WARNING
•Keep the plastic bags that are used with the copier away from children. The plastic may cling to their nose and mouth causing suffocation. ............................
2-6 Safety Information

Safety Information
 PRECAUTIONS FOR USE
■ Cautions when using the copier
 WARNING
•DO NOT place metallic objects or containers with water (flower vases, flower pots, cups, etc.) on or near the copier. This type of situation presents a danger of fire or electrical shock should they fall inside. ...................................................
•DO NOT remove any of the covers from the copier as there is a danger of
electrical shock from high voltage parts inside the copier. ....................................
•DO NOT damage, break or attempt to repair the power cord. DO NOT place heavy objects on the cord, pull it, bend it unnecessarily or cause any other type of damage.
These types of situations present a danger of fire or electrical shock. .................
•NEVER attempt to repair or disassemble the copier or its parts as there is a danger of fire, electrical shock or damage to the laser. If the laser beam
escapes, there is a danger of it causing blindness. ...............................................
•If the copier becomes excessively hot, smoke appears from the copier, there is an odd smell, or any other abnormal situation occurs, there is a danger of fire or
electrical shock. Turn the main switch OFF (O) immediately, remove the power
plug from the outlet and contact your service representative. ...............................
•If anything harmful (paper clips, water, other fluids, etc.) falls into the copier, turn the main switch OFF (O) immediately. Next, remove the power plug from the
outlet to avoid the danger of fire or electrical shock. Then contact your service
representative.........................................................................................................
•DO NOT remove or connect the power plug with wet hands, as there is a danger of electrical shock. ..................................................................................................
•ALWAYS contact your service representative for maintenance or repair of internal parts...........................................................................................................
 CAUTION
•DO NOT pull the power cord when removing it from the outlet. If the power cord is pulled, the wires may become broken and there is a danger of fire or electrical shock. (ALWAYS grasp the power plug when removing the power cord from the outlet.) ....................................................................................................................
•ALWAYS remove the power plug from the outlet when moving the copier. If the
power cord is damaged, there is a danger of fire or electrical shock. ...................
Safety Information 2-7
Loading...