


E4710
Table of contents
 Loading...
User Guide

TOC i
Table of Contents
Phone Basics ................................................................................................................. 8
Phone Overview ......................................................................................................... 8
Key Functions ......................................................................................................... 9
Get the Phone Ready ................................................................................................ 12
Battery and Charger .............................................................................................. 12
Battery Capacity .................................................................................................... 12
Install the Battery ................................................................................................. 12
Charge the Battery ................................................................................................ 14
Remove the Battery ............................................................................................... 14
Replace the SIM Card ............................................................................................ 15
Insert the microSD Card ........................................................................................ 16
Turn Your Phone On and Off ..................................................................................... 17
Set Up Voicemail ...................................................................................................... 17
Navigate Through the Menus .................................................................................... 17
Display Your Phone Number ...................................................................................... 18
Your Home Screen ................................................................................................... 19
Home Screen Overview.......................................................................................... 19
Status bar ............................................................................................................. 19
Text Entry ................................................................................................................... 23
Key Function ............................................................................................................ 23
Select a Text Input Mode .......................................................................................... 23
XT9 Smart Input ...................................................................................................... 24
ABC Mode ................................................................................................................ 25
Set Text Entry Options .............................................................................................. 25
Copy and Paste Text ................................................................................................. 26
Phone Calls ................................................................................................................. 27
Make Phone Calls ..................................................................................................... 27
Call Using the Phone Keypad .................................................................................. 27
Call from Recent Calls ............................................................................................ 27

TOC ii
Call from Contacts ................................................................................................. 27
Call Emergency Numbers ....................................................................................... 28
Call a Phone Number with Pauses........................................................................... 28
Call Using a Speed Dial Number ............................................................................. 29
Call Using the Plus (+) Code .................................................................................. 29
Call a Phone Number in a Message ......................................................................... 30
Receive Phone Calls .................................................................................................. 30
End Phone Calls ....................................................................................................... 31
Voicemail ................................................................................................................. 31
Set Up Voicemail ................................................................................................... 31
Voicemail Notification ............................................................................................ 32
Retrieve Your Voicemail Messages .......................................................................... 32
Phone Call Options ................................................................................................... 33
In-call Options ...................................................................................................... 33
Call Waiting .......................................................................................................... 33
Conference Calling ................................................................................................ 34
Phone Call Settings ................................................................................................... 35
Call Answer Mode .................................................................................................. 35
Quick Responses ................................................................................................... 36
Set Up Speed Dialing ............................................................................................. 36
Caller ID ............................................................................................................... 37
Call Forwarding ..................................................................................................... 37
Call Barring ........................................................................................................... 38
Activate Call Waiting .............................................................................................. 38
Fixed Dialing Numbers (FDN) ................................................................................. 39
Voicemail settings ................................................................................................. 40
Call Timer ............................................................................................................. 40
Recent Calls ............................................................................................................. 41
View Recent Calls .................................................................................................. 41
Recent Calls Options .............................................................................................. 41
Delete Recent Calls ............................................................................................... 42

TOC iii
Contacts ..................................................................................................................... 43
Display Contacts ....................................................................................................... 43
Contacts List ......................................................................................................... 43
Display Options ..................................................................................................... 43
Contacts Details .................................................................................................... 44
Add a Contact .......................................................................................................... 44
Save a Phone Number .............................................................................................. 45
Edit a Contact .......................................................................................................... 45
Add or Change Information for a Contact ................................................................ 45
Assign a Picture to a Contact .................................................................................. 45
Assign a Ringtone to a Contact ............................................................................... 46
Assign a Vibration Type to a Contact ...................................................................... 46
Add a Contact to Favorites ..................................................................................... 46
Delete Single or Multiple Contacts .......................................................................... 47
Add a Group Contact ................................................................................................ 47
Edit a Group Contact ................................................................................................ 47
Add or Remove a Group Contact Entry, or Rename a Group ..................................... 47
Delete a Group Contact ......................................................................................... 48
Find Contacts Entries ................................................................................................ 48
Find an Entry from Contacts ................................................................................... 48
Find an Entry Using the Phone Keypad ................................................................... 49
ICE (In Case of Emergency) Contacts ........................................................................ 49
Share a Contact ....................................................................................................... 50
Accounts and Messaging .............................................................................................. 51
Email ....................................................................................................................... 51
Add an Email Account ............................................................................................ 51
Add a Corporate Account ....................................................................................... 51
Send an Email Message ......................................................................................... 52
View and Reply to Email ........................................................................................ 53
Manage Your Email Messages ................................................................................ 54
Email Settings .......................................................................................................... 55

TOC iv
General Email Settings ........................................................................................... 55
Email Account Settings .......................................................................................... 56
Text and Multimedia Messaging ................................................................................. 57
Compose Messages ............................................................................................... 57
New Messages Notification ..................................................................................... 58
Read a Message .................................................................................................... 58
Reply to a Message ............................................................................................... 58
Delete a Message Thread ....................................................................................... 59
Delete All Message Threads ................................................................................... 59
Delete a Message .................................................................................................. 59
Text and Multimedia Messaging Settings .................................................................... 59
Emergency Alerts ..................................................................................................... 60
View an Emergency Alert ....................................................................................... 60
Emergency Alert Settings ....................................................................................... 60
My Apps ..................................................................................................................... 62
Launch an Installed App ........................................................................................ 62
My Apps Options ................................................................................................... 62
Web and Data ............................................................................................................. 63
Wi-Fi ....................................................................................................................... 63
Turn Wi-Fi On and Connect to a Wireless Network ................................................... 63
Check the Wireless Network Status ......................................................................... 63
Connect to a Different Wi-Fi Network ...................................................................... 64
Wi-Fi Options Menu ............................................................................................... 64
Data Services ........................................................................................................... 65
Launch a Web Connection ..................................................................................... 65
Data Connection Status and Indicators ................................................................... 65
Virtual Private Networks (VPN) .................................................................................. 66
Prepare Your Phone for VPN Connection ................................................................. 66
Connect to or Disconnect from a VPN ..................................................................... 67
Web Browser ........................................................................................................... 67
Learn to Navigate the Web .................................................................................... 67

TOC v
Browser Menu ....................................................................................................... 69
Tethering and Mobile Hotspot ................................................................................... 72
Tethering .............................................................................................................. 72
Mobile Hotspot ...................................................................................................... 72
Camera and Videos ...................................................................................................... 75
Take a Picture or Record a Video ............................................................................... 75
Activate Camera or Video Mode .............................................................................. 75
Deactivate the Camera or Video Mode .................................................................... 75
Take a Picture ....................................................................................................... 75
Record a Video ..................................................................................................... 76
Review Picture or Video ......................................................................................... 76
Camera and Video Settings ....................................................................................... 77
Configure Camera Settings ..................................................................................... 77
Configure Video Settings ........................................................................................ 78
View Pictures and Videos in Photos & Videos .............................................................. 79
View Pictures and Videos ....................................................................................... 80
Photos & Videos Options ........................................................................................ 80
Assign Pictures ...................................................................................................... 81
Send Pictures and Videos ....................................................................................... 81
Tools & Calendar ......................................................................................................... 83
Calendar .................................................................................................................. 83
Add an Event to the Calendar ................................................................................. 83
Add a Task ........................................................................................................... 84
Invite Guests to Your Calendar Event ...................................................................... 85
Calendar Event Alerts ............................................................................................ 85
View Calendar Events ............................................................................................ 86
Edit Calendar Events ............................................................................................. 87
Calendar Options ................................................................................................... 87
Clock ....................................................................................................................... 88
Alarm ................................................................................................................... 88
Countdown Timer .................................................................................................. 88

TOC vi
Stopwatch ............................................................................................................ 89
World Clock .......................................................................................................... 89
Calculators ............................................................................................................... 89
Calculator ............................................................................................................. 89
Tip Calculator ........................................................................................................ 90
Unit Converter ...................................................................................................... 90
Voice Services .......................................................................................................... 91
Automatic Speech Recognition (ASR) ...................................................................... 91
Manage Voice Memos ............................................................................................ 95
Bluetooth ................................................................................................................. 96
Turn Bluetooth On and Off ..................................................................................... 96
Bluetooth Settings Menu ........................................................................................ 96
Pair Bluetooth Devices ........................................................................................... 97
Disconnect a Bluetooth Device ............................................................................... 97
microSD Card ........................................................................................................... 97
Insert the microSD Card ........................................................................................ 97
Remove the microSD Card ..................................................................................... 98
View the microSD Card Memory ............................................................................. 99
Unmount the microSD Card ................................................................................... 99
Format the microSD Card ....................................................................................... 99
Use the Phone’s microSD Card as a Media Device .................................................... 99
Notepad ................................................................................................................ 100
Flashlight ............................................................................................................... 100
SIM Toolkit ............................................................................................................ 101
Settings .................................................................................................................... 102
Wireless & Networks Settings .................................................................................. 102
Wi-Fi .................................................................................................................. 102
Bluetooth ............................................................................................................ 102
Airplane Mode ..................................................................................................... 102
Tethering & Mobile Hotspot Settings ..................................................................... 103
VPN Settings ....................................................................................................... 103

TOC vii
Cellular Network Settings ..................................................................................... 103
Device Settings ...................................................................................................... 104
Display Settings .................................................................................................. 104
Sound & Notification Settings ............................................................................... 105
Programmable Key Settings ................................................................................. 108
Navigation Key Shortcuts ..................................................................................... 108
Keyguard ............................................................................................................ 108
Storage Settings .................................................................................................. 109
Connectivity Settings ........................................................................................... 109
Personal Settings .................................................................................................... 109
Location Settings ................................................................................................. 109
Security Settings ................................................................................................. 110
Accounts Settings ................................................................................................ 111
Language & Input Settings .................................................................................. 111
Reset Your Phone and Phone Content ................................................................... 112
System Settings ..................................................................................................... 113
Date & Time Settings .......................................................................................... 113
Accessibility Settings ........................................................................................... 113
About Phone ....................................................................................................... 116
Copyrights ................................................................................................................ 117
Index ........................................................................................................................ 118

Phone Basics 8
Phone Basics
Phone Overview

Phone Basics 9
Key Functions
● Smart sonic receiver (internal) lets you hear the caller and automated prompts.
Place your ear around the internal receiver and adjust the position of the phone to
find the best hearing point depending on the surrounding environment.
Note: Do not cover the microphones during a call. Do not apply any sheet or sticker to
the display area as it may compromise the hearing quality.
●
Main screen displays all the information needed to operate your phone, such as
the call status, the Contacts list, the date and time, and the signal and battery
strength.
●
Left/Right softkeys let you select softkey actions or menu items corresponding to
the bottom left or right lines on the main screen.
●
Volume Button allows you to adjust the ringtone volume in standby mode or the
voice volume during a call.
● OK/Center softkey ( ) lets you select the highlighted choice when navigating
through a menu, or softkey actions or menu items corresponding to the bottom
center lines on the main screen.
● Recent apps key ( ) lets you open a list of functions you have worked with
recently. To open one, press .
● Talk key ( ) allows you to place or receive calls, answer Call Waiting, use 3-Way
Calling, display recent call history, or activate Automatic Speech Recognition (ASR).
● Speaker key ( ) lets you place or receive calls in speakerphone mode or turn
the speakerphone on and off during a call, or activate Automatic Speech Recognition
(ASR) in speakerphone mode.
● Primary microphone transmits your voice and ambient sound during voice calls,
voice recordings and videos.
●
Navigation key lets you scroll through the phone’s menu options.
●
Back/delate key ( ) deletes characters from the display in text input mode.
When in a menu, pressing it returns you to the previous menu. This key also allows
you to return to the previous screen in a data session.

Phone Basics 10
●
End/Home/Power key ( ) lets you turn the phone on or off, end a call, or
cancel your input and return to the Home screen.
●
Keypad lets you enter numbers, letters, and characters, and perform functions.
● External End key lets you ignore an incoming call, end the ongoing call, or hide
the recent calls list.
● External speaker key lets you display the recent call history, place or receive calls
in speakerphone mode, turn the speakerphone on and off during a call, activate
Automatic Speech Recognition (ASR) in speakerphone mode , or unlock the
keyguard.
●
Camera lens, as part of the built-in camera, lets you take pictures and videos.
● Secondary microphone suppresses background noise improving audio quality for
the other party during voice calls except in speakerphone mode.
● Flash allows you to take pictures or record videos in low light situations. It can also
work as a flashlight. See Flashlight.
● PTT/Programmable key allows you to assign a frequently used function for quick
access. By installing PTT application, this key can also act as a PTT key. See
Programmable Key Settings.
●
Outer screen displays the information such as the call status, the date and time,
and the signal and battery strength.
●
Speaker lets you hear the different ringtones and sounds. The speaker also lets you
hear the caller’s voice in speakerphone mode.
●
Headset Jack allows you to plug in an optional headset for convenient, hands-free
conversations.
● USB/Charging port allows you to connect the phone and the USB cable for use
with the charger adapter or other compatible accessories.
CAUTION! Inserting an accessory into the incorrect jack may damage the phone.
●
Battery door screw opens the battery door to replace the battery.
● Charging contacts allow you to connect to a multi-bay battery charger that can
charge multiple phones simultaneously.

Phone Basics 11
● Internal antenna facilitates reception and transmission. To maximize performance,
do not obstruct while using the phone.
● SIM card slot (internal) allows you to insert a SIM card. The SIM compartment is
behind the battery. See Replace the SIM Card.
●
microSD card slot (internal) allows you to insert an optional microSD card to
support external memory. The microSD compartment is behind the battery. See
Insert the microSD Card.

Phone Basics 12
Get the Phone Ready
You must first install and charge the battery to begin setting up your phone.
Battery and Charger
Warning: Use only Kyocera-approved batteries and chargers with your phone. The
failure to use a Kyocera-approved battery and charger may increase the risk
that your phone will overheat, catch fire, or explode, resulting in serious
bodily injury, death, or property damage.
Battery Capacity
Your phone is equipped with a Lithium Ion (Li-Ion) battery. It allows you to recharge your
battery before it is fully drained.
For a quick check of your battery level, glance at the battery percentage displayed in the
center of your phone’s Home screen or the battery charge icon located in the upper right
corner of the screen. When there are approximately ten minutes of talk time left, the
battery icon turns to and the phone sounds a warning tone. When there are
approximately five minutes of talk time left, the battery icon turns to .
Note: To turn on the battery percentage display or turn it off, from the Home screen,
press Menu (center softkey) > Settings > Device > Display > Main clock and
select On or Off. See Clock Display.
Note: Long backlight settings, searching for service, vibrate mode, browser use, and other
variables may reduce the battery’s talk and standby times.
Tip: Watch your phone’s battery level and charge the battery before it runs out of power.
Install the Battery
1. Using a coin, rotate the battery door screw on the back of the phone counter-
clockwise several times to loosen (you should hear a 'click' sound when the screw is
loose).
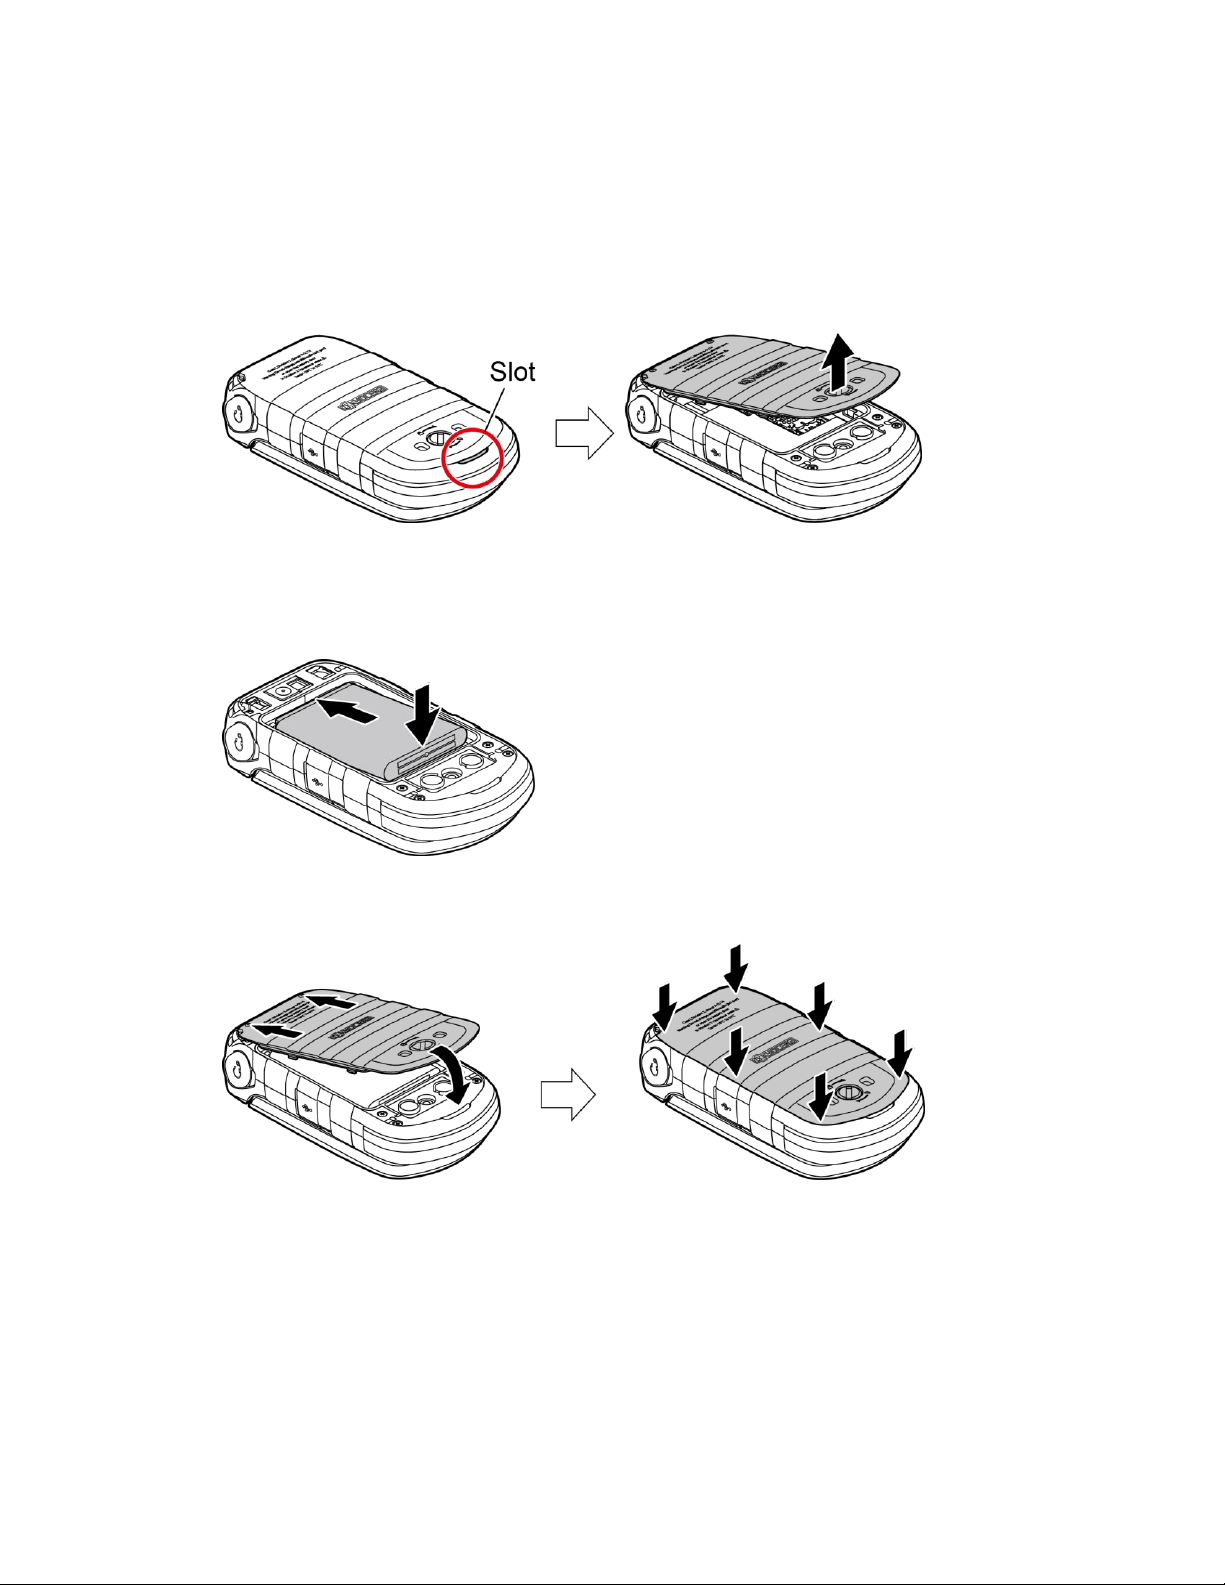
Phone Basics 13
Note: The battery door screw is permanently mounted on the door and cannot be
removed.
2. Insert your fingernail into the slot at the bottom of the battery door and lift the
battery.
3. Insert the battery into the battery compartment, making sure the connectors align.
Gently press down to secure the battery.
4.
Replace the battery door, making sure all the tabs are secure and there are no gaps
around the door.
Warning: Press all around the edges of the battery door ensuring it is properly sealed
to maintain the phone's waterproof capability.
Phone Basics 14
5.
Using a coin, rotate the battery door screw clockwise until it is tight.
Charge the Battery
Fully charge the battery before powering the phone on.
Important: Before turning on your phone, charge the battery fully with the charger that
came with your phone.
1. Open the USB/charging port cover on the right side of the phone.
2. Plug the smaller end of the micro-USB cable into the phone’s USB/charging port.
3. Plug the other end of the USB cable into the charger, and then plug the charger into
an electrical outlet.
4. When charging is complete, remove the cable from the port and close the cover.
Press around the edges of the cover to ensure that it is securely closed.
Warning: Be sure all ports and covers are properly sealed to maintain the phone's
waterproof capability.
Remove the Battery
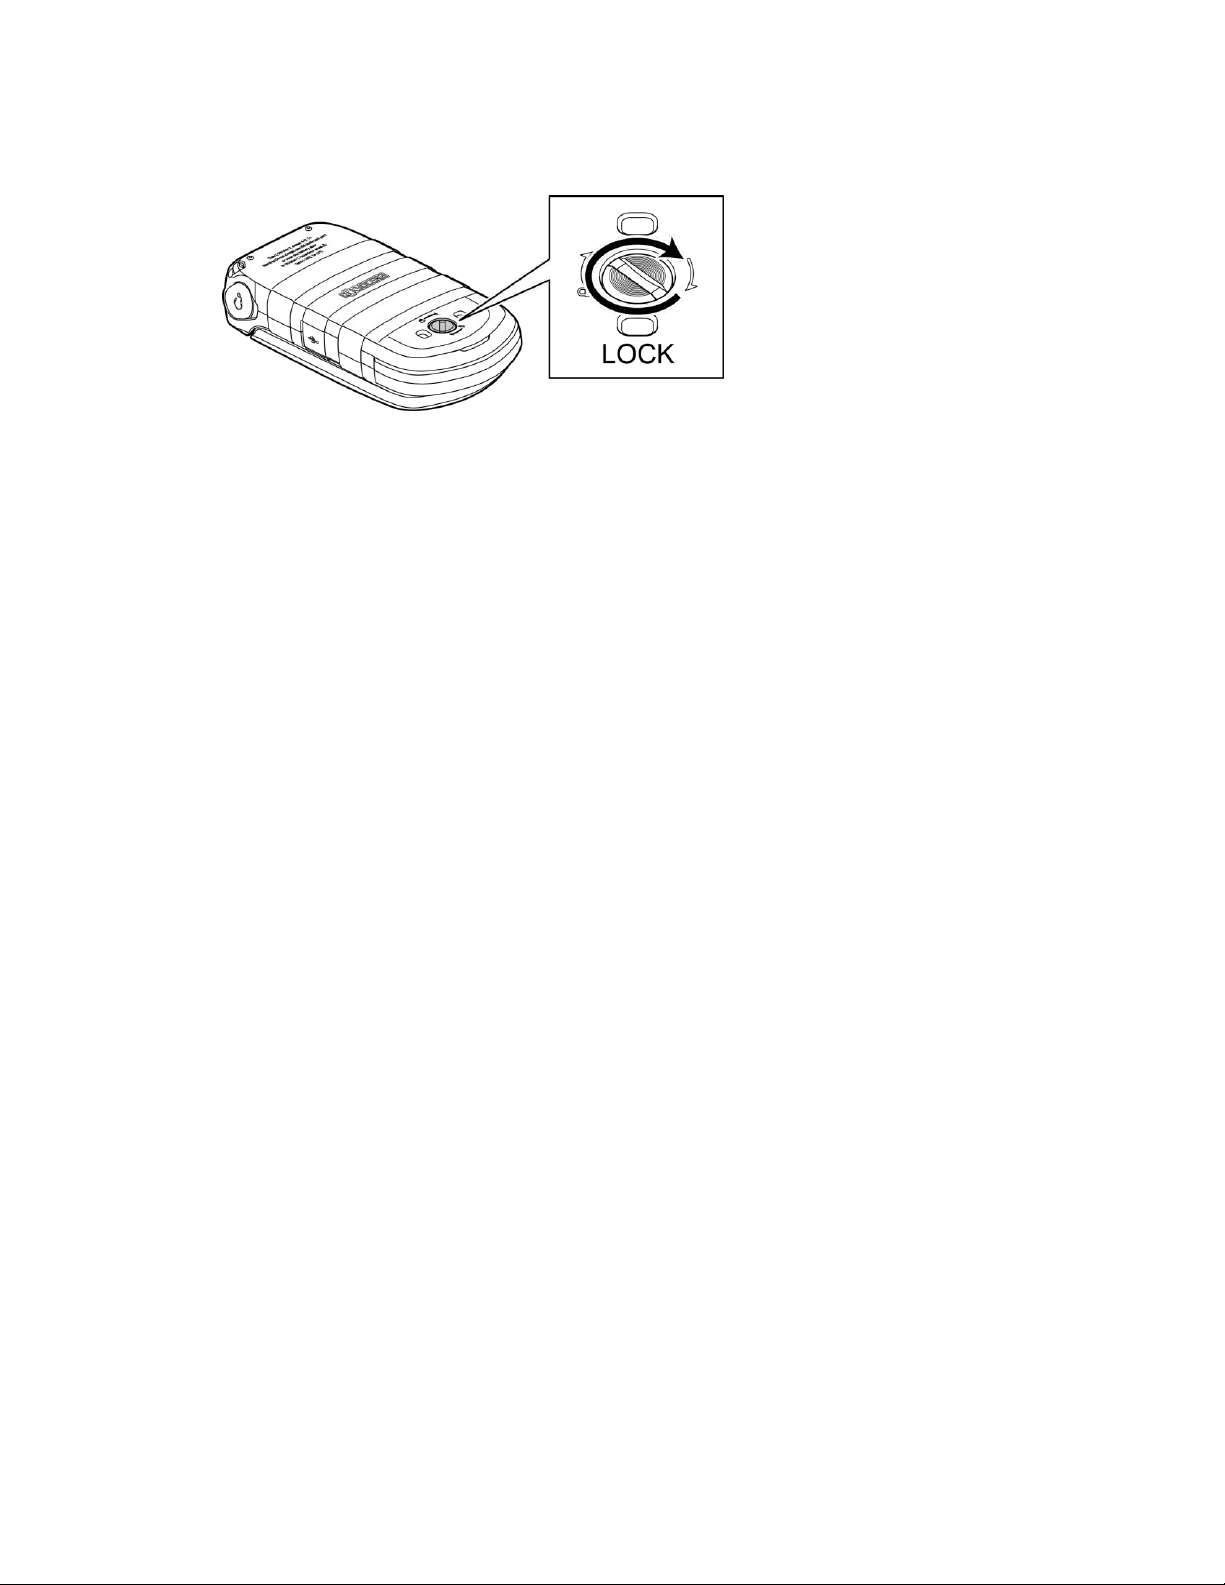
1.
Make sure the power is off so that you don’t lose any stored numbers or messages.
2.
Insert a coin into the slot on the battery door screw and turn it counter-clockwise to
open the battery door.
3.
Remove the battery and replace the door. See Install the Battery.
Warning: Do not handle a damaged or leaking Li-Ion battery as you can be burned.

Phone Basics 15
Replace the SIM Card
Your phone comes with the SIM card already installed. If you need to replace your SIM card,
follow these steps.
Note: Use only a nano SIM card in this phone.
1. Remove the battery door and the battery.
2. Slide the flap of the SIM card holder in the direction of the arrow to unlock it ( ).
3. Lift the flap with your finger and remove the original SIM card ( ).
4. Insert the new nano SIM card into the flap, making sure the gold contacts are facing
toward you and the cut-off corner is at the top right ( ).
Note: Make sure you insert your nano SIM card in the correct orientation.
5. Lower the flap of the SIM card holder ( ) and slide the flap in the direction of the
arrow to lock it ( ).
6. Place the battery back into its compartment and replace the battery door.
Warning: Press all around the edges of the battery door ensuring it is properly sealed
to maintain the phone's waterproof capability.
Note: When you turn your phone on for the first time with a new SIM card, you will be
asked to enter a PIN code to unlock your SIM.
Phone Basics 16
Insert the microSD Card
A microSD™ card is an optional accessory that allows you to store images, videos, music,
documents, and voice data. See microSD Card for more information.
Warning: You can easily damage the microSD card by improper operation. Please be
careful when inserting, removing, or handling the microSD card
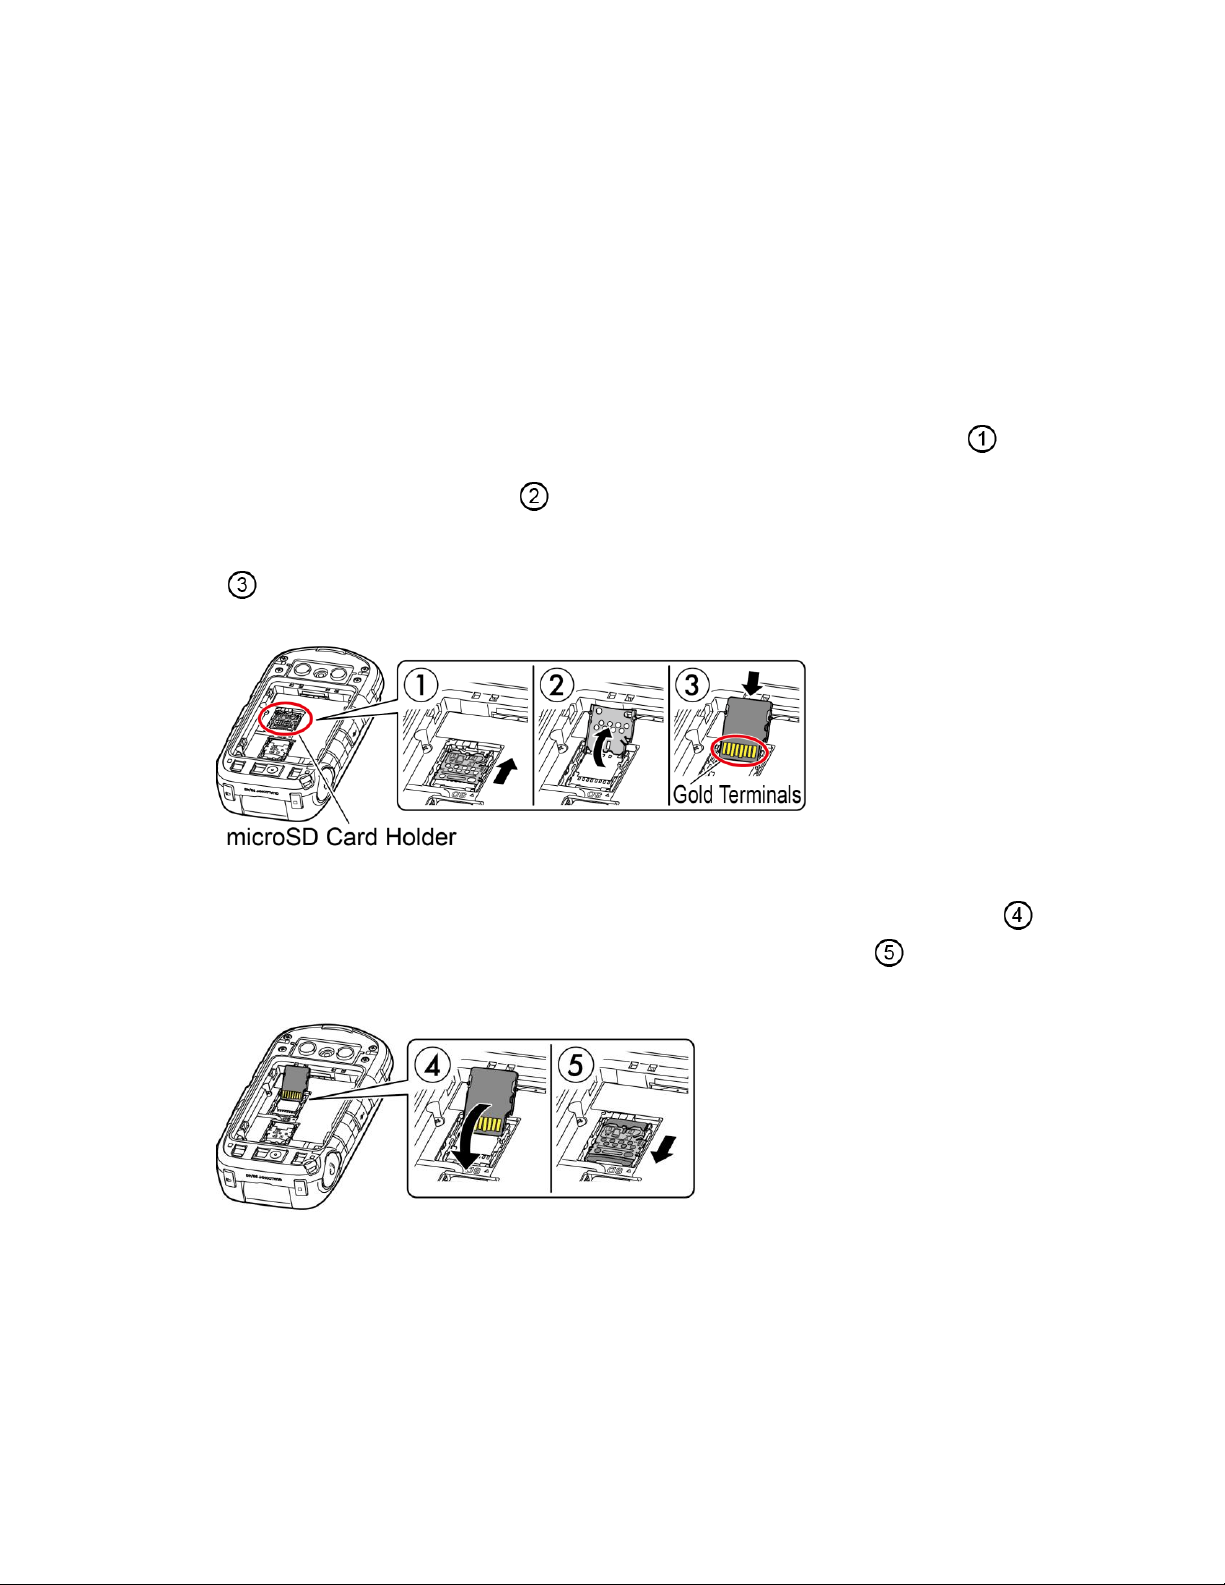
1. Remove the battery door and the battery.
2. Slide the flap of the card holder in the direction of the arrow to unlock it ( ).
3. Lift the flap with your finger ( ).
4. Insert the microSD card into the flap, with the gold terminals facing toward you
( ).
5. Lower the flap of the card holder, gently press the card and the card holder ( ),
and then slide the holder in the direction of the arrow to lock it ( ).
6. Place the battery back into its compartment and replace the battery door.
Warning: Press all around the edges of the battery door ensuring it is properly sealed
to maintain the phone's waterproof capability.

Phone Basics 17
Turn Your Phone On and Off
Turn Your Phone On
► Open the phone and press and hold until the screen lights up.
Turn Your Phone Off
►
Open the phone and press and hold for two seconds until you see the
powering-down animation on the main screen.
Set Up Voicemail
You should set up your Voicemail and personal greeting as soon as your phone is activated.
Always use a password to protect against unauthorized access. Your phone automatically
transfers all unanswered calls to your Voicemail, even if your phone is in use or turned off.
See Voicemail for more information.
1.
From the Home screen, Press and hold to dial your voicemail number.
2.
Follow the system prompts to:
Create your password.
Record your name announcement.
Record your greeting.
Important: Voicemail Password – It is strongly recommended that you create a
password when setting up your voicemail to protect against unauthorized
access. Without a password, anyone who has access to your phone is able to
access your voicemail messages.
Navigate Through the Menus
The navigation key on your phone lets you scroll through onscreen items. To navigate
through a menu, press the navigation key up or down.
Many menus feature a scroll bar on the right to help you keep track of your position in the
menu.

Phone Basics 18
Select Menu Items
As you navigate through the menu, menu options are highlighted. Select any option by
highlighting it and pressing . If the option is numbered, you can select it by pressing the
corresponding number on the phone’s keypad.
For example, to view the Brightness level screen:
1.
Press Menu (center softkey) to access the main menu.
2.
Select Settings by highlighting it and pressing .
3.
Select Device by highlighting it and pressing .
4.
Select Display by highlighting it and pressing .
5.
Select Brightness level by highlighting it and pressing .
For the purposes of this guide, the above steps condense into:
► Press Menu (center softkey) > Settings > Device > Display > Brightness level.
Move between the Tabs
The navigation key on your phone lets you move between the tabs too. To move from a tab
to another tab, press the navigation key left or right.
Back Up Within a Menu
To go to the previous menu:
►
Press .
To return to Home screen:
►
Press .
Navigation Key Shortcuts
From the Home screen, press the Up, Down, Left or Right Navigation keys to launch its
corresponding application. The Up, Down, or Left Navigation keys can be reassigned to
create customized shortcuts. See Navigation Key Shortcuts for more information.
Display Your Phone Number
You can display your phone number and other information about your phone.
Phone Basics 19
From the Home screen, press Menu (center softkey) > Settings > System >
About phone > Status > My phone number.
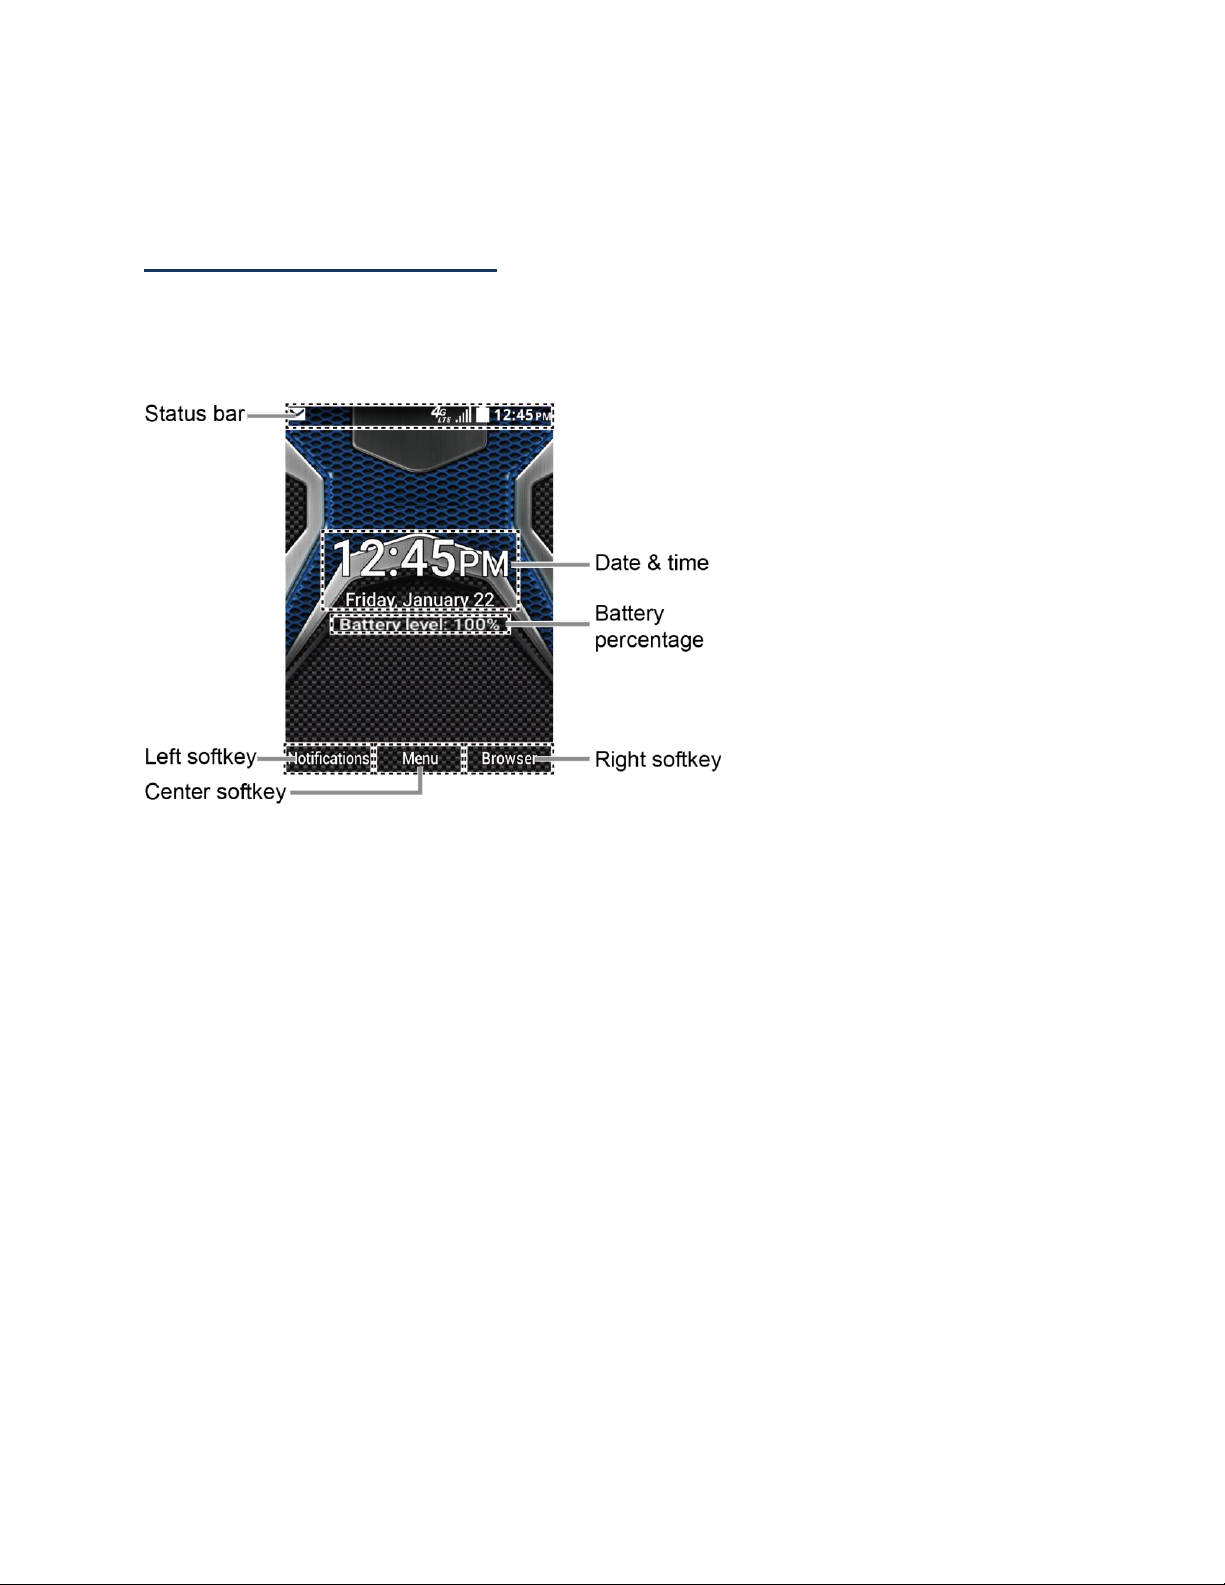
Your Home Screen
The Home screen is the starting point for your phone’s functions and menus.
Home Screen Overview
● Status bar: Displays the time and phone status icons.
● Date & time: Displays date and time data. You can turn on or off this display from
the Settings menu. See Clock Display.
● Battery percentage: Displays your phone’s battery charge level as a percentage.
This will be displayed when Date & time is set to on.
● Left softkey: Displays actions or menu items that you can select by pressing the
left softkey.
● Center softkey: Displays actions or menu items that you can select by pressing the
center softkey.
● Right softkey: Displays actions or menu items that you can select by pressing the
right softkey.
Status bar
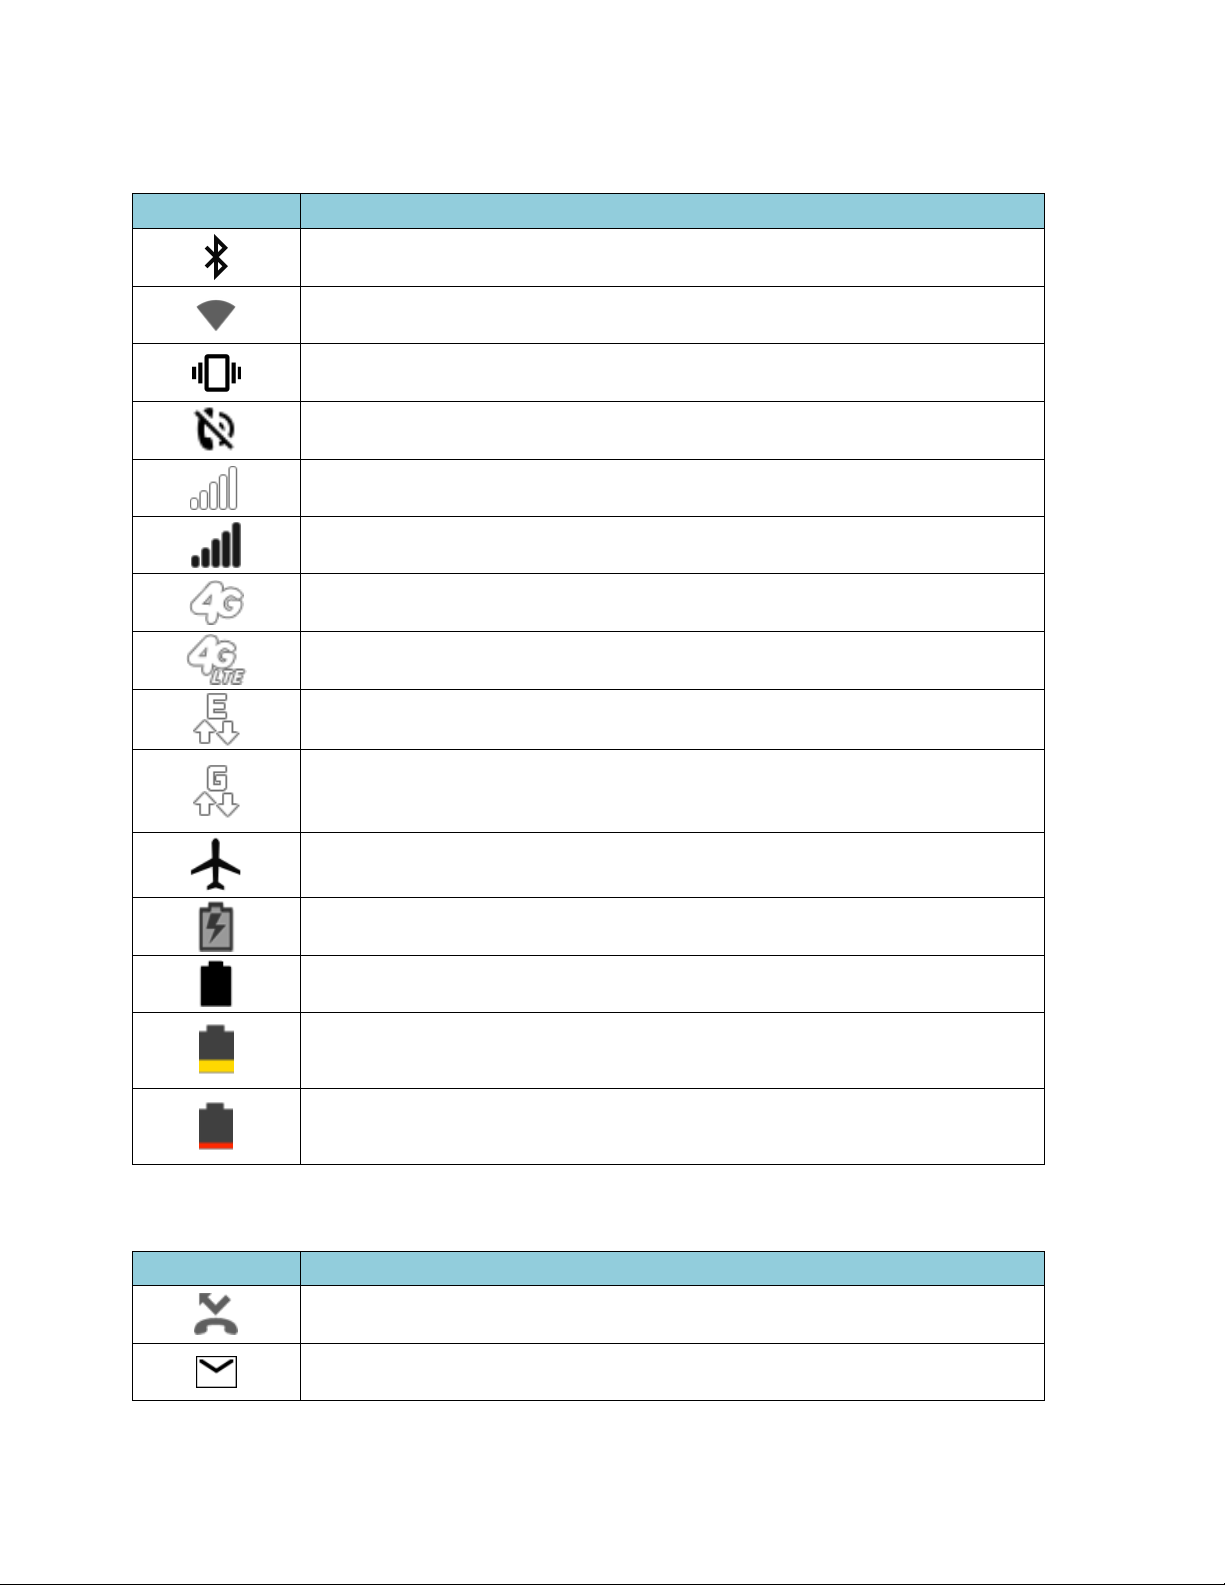
The status bar appears at the top of your phone’s display screen. It provides phone and
service status information on the right side and notification alerts on the left.
Phone Basics 20
Status Icons
Icon
Description
Bluetooth® enabled
Wi-Fi® active (full signal)
Vibrate
Silent
Network (full signal)
Network (no signal)
4G (data service)
4G LTE (data service)
EDGE (data service)
GPRS (data service)
Airplane mode
Battery (charging)
Battery (full charge)
Battery (low charge)
Battery (discharged)
Notification Icons
Icon
Description
Missed call
New email
Phone Basics 21
Icon
Description
New message
New Voicemail message
Event
Alarm set
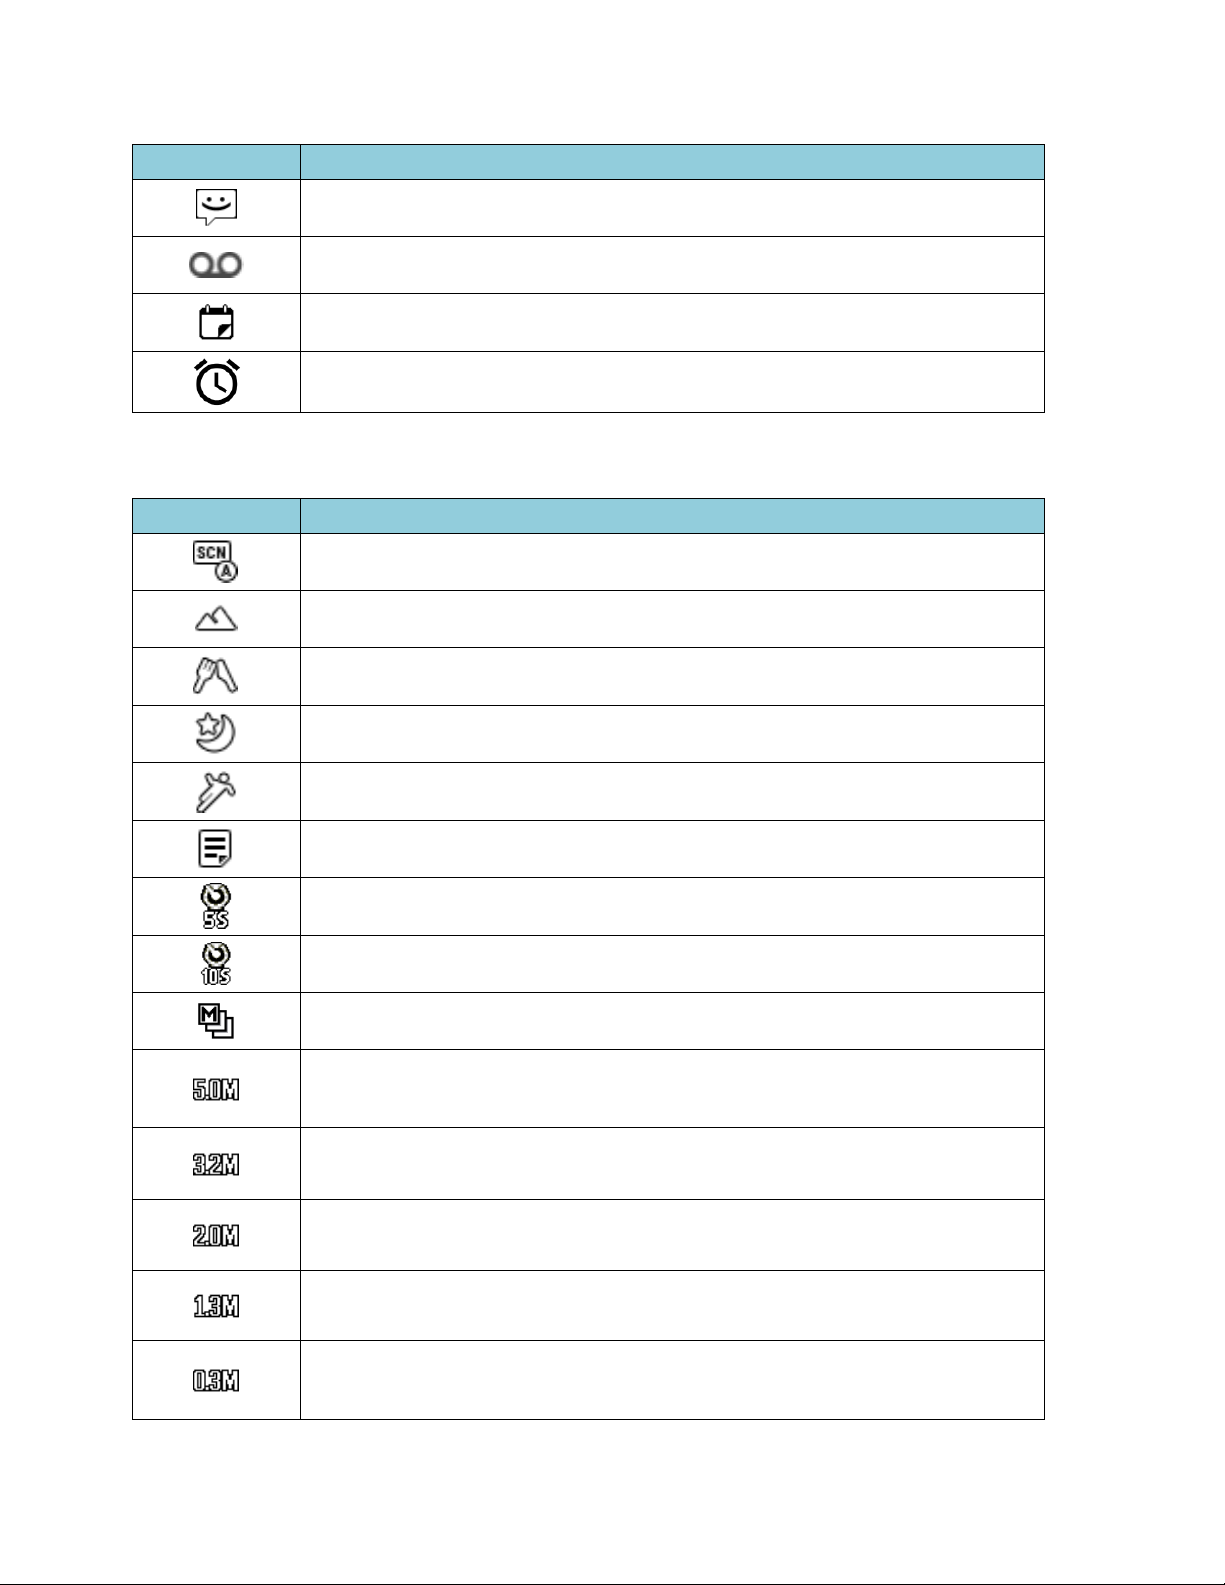
Camera Icons
Icon
Description
Auto scene mode
Landscape mode
Food mode
Night mode
Sports mode
Memo mode
Self-Timer (5 Seconds)
Self-Timer (10 Seconds)
Multiple shots set
Camera resolution (5.0M)
Camera resolution (3.2M)
Camera resolution (2.0M)
Camera resolution (1.3M)
Camera resolution (0.3M)
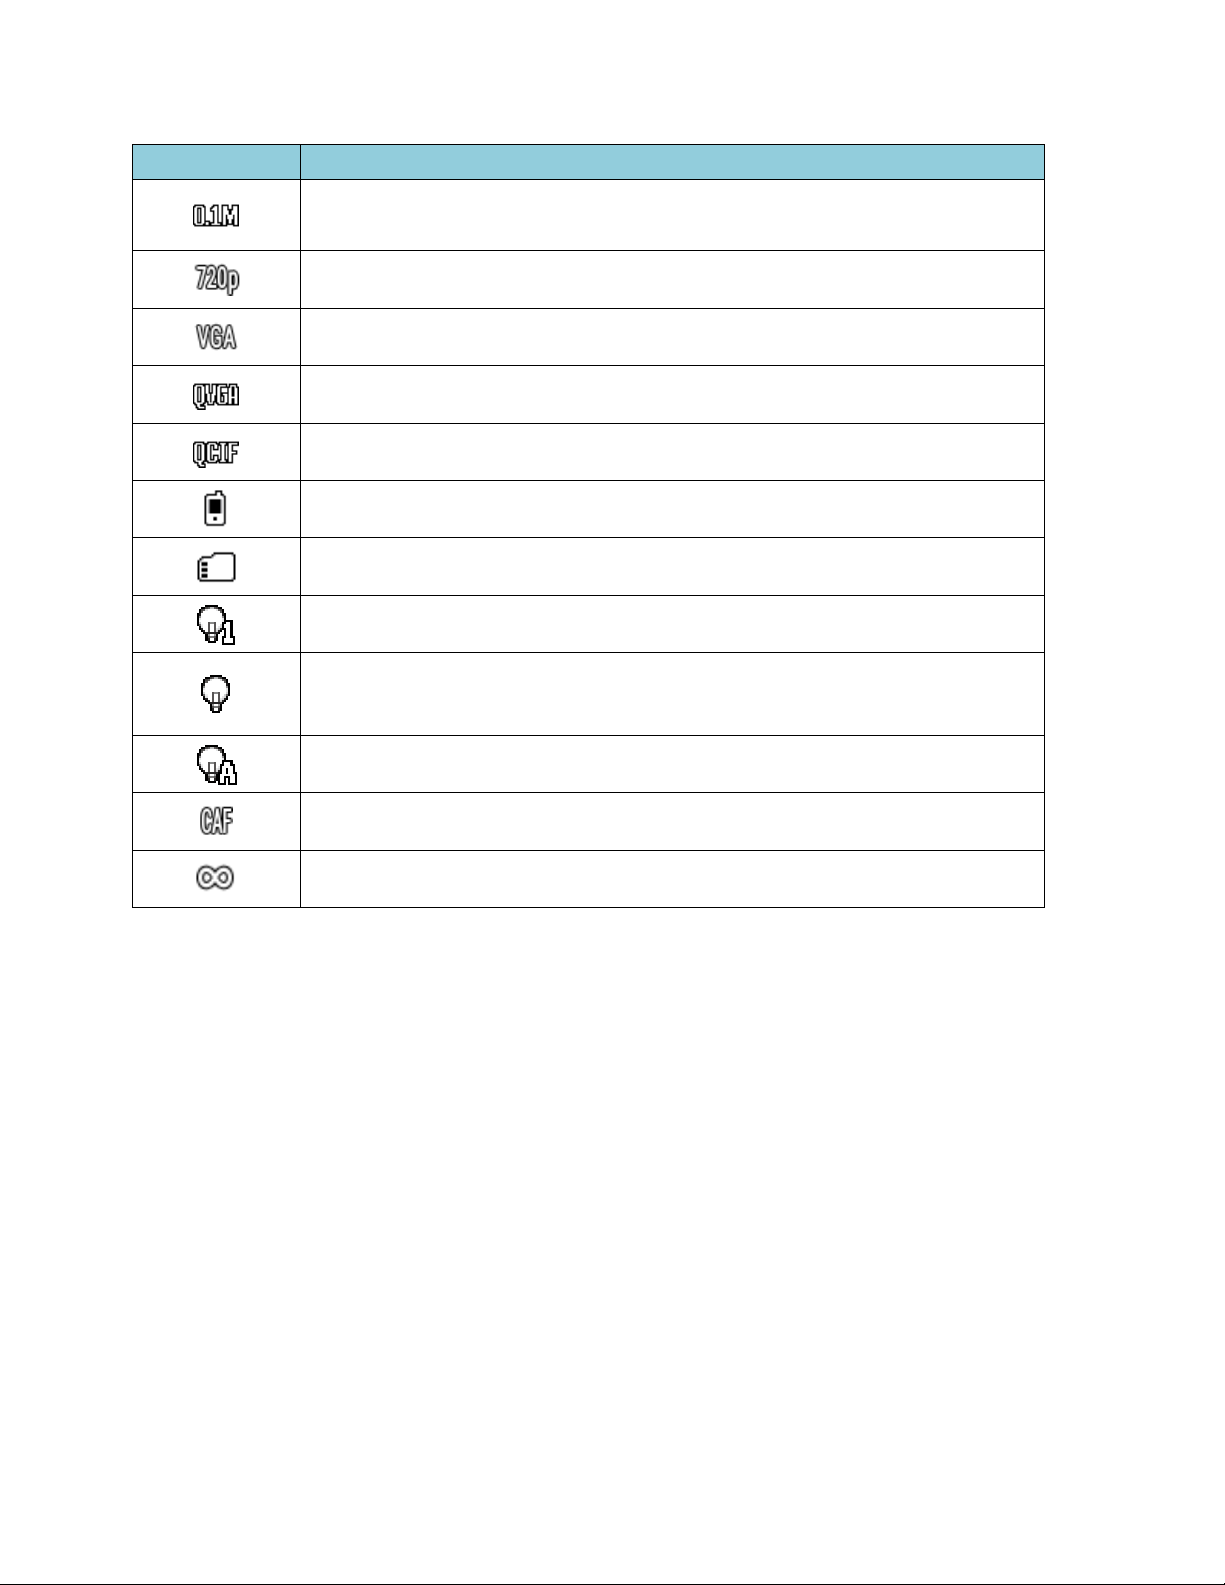
Phone Basics 22
Icon
Description
Camera resolution (0.1M)
Video resolution (720P)
Video resolution (VGA)
Video resolution (QVGA)
Video resolution (QCIF)
Saving to Phone
Saving to Memory Card
Camera Flash On This Shot
Camera Flash Always On or Video Light On
Automatic Camera Flash
Focus settings (Continuous AF)
Focus settings (Infinity)

Text Entry 23
Text Entry
Your phone provides convenient ways to enter letters, numbers, and symbols whenever
you are prompted to enter text.
Key Function
For text entry, you can use the following keys as mentioned below.
● Press to delete characters from the display.
● Press to enter some frequently used symbols, such as period, comma, @, ?, !,
*, # or /.
● Press to enter a space or long press to insert a new line.
● Press to change the capitalization style as Abc > ABC > abc (ABC mode), or
as XT9Word > XT9WORD > XT9word (T9Word mode). The selected style is
displayed in the bottom-right corner of the screen, above the right softkey label (if
applicable).
Select a Text Input Mode
1.
When entering text, you can change the input mode or access to some option menu
by pressing
Text mode
(left softkey).
2.
Select one of the following options:
Abc to enter characters by using the alphabet mode. See ABC Mode.
XT9Word to enter text using a predictive text system. See XT9 Smart Input.
123 to enter numeric characters.
Symbols to enter symbols.
Smileys to enter smile icons.
Emoticons to enter “emoticons.” (This is available, for example, when
composing a message or when editing a Schedule or To Do description in
Calendar.)

Text Entry 24
Web shortcuts to enter Web shortcuts (for example, www., http://,
or .com).
Note: When you select Symbols, Smileys, Emoticons, or Web shortcuts, a list will be
displayed at the bottom of the screen. You can scroll through the options by
pressing the navigation key left, right, up or down. To select an option, highlight it
and press .
Copy/Cut to copy or cut selected text and save to the Paste list. See Copy and
Paste Text.
Paste list to paste copied or cut text in the paste list (if applicable). See Copy
and Paste Text.
Delete All to delete all entered text (if applicable).
Text options to display the text entry options menu (if applicable). See Set Text
Entry Options.
XT9 Smart Input
XT9 Smart Input is a predictive text input technology which uses the word database to
analyze the letters you enter and create a suitable word.
Enter Text in the XT9 Mode
1. Select the XT9Word text input mode.
2. Press the corresponding keys once per letter to enter a word. (For example, to enter
the word “Bill,” press .) (If you make a mistake, press
to erase a single character. Press and hold to erase an entire word.)
3. As you type, a word choice list opens. (The word may change as you type.) Press
the navigation key to scroll to the word you want to enter and press to select it.
If the word you want is not displayed after you have entered all the letters, see
“Add a Word to the XT9 Database” in this chapter.
Add a Word to the XT9 Database
If the word you want to enter is not displayed in the word choice list when you are using
XT9 Input, add it to the database.
1.
While you are in XT9Word mode, enter a letter. (A word choice list opens.)
2.
Press Add word (right softkey) and enter a ward.

Text Entry 25
Tip: You can also add a word by copying from the text entry field. Move the cursor next
to the word you want to add and press Text mode (left softkey) > Copy/Cut.
Press the navigation key and highlight the word. Then, press Next (left softkey) >
Add word.
3.
Press Save (left softkey) and then . The word will appear as an option the next
time you scroll through options during XT9 Text Input.
For more information about XT9 Smart Input, visit the Nuance website at
www.nuance.com/.
ABC Mode
In Abc mode, also known as multi-tap entry, you press keys one, two, three, or four times
to enter the letters you see on the keypad.
By default, the first letter of a sentence is capitalized and the following letters are
lowercased. To switch between lowercase and uppercase, press the key. After a
character is entered, the cursor automatically advances to the next space after two seconds
or when you enter a character on a different key.
1.
Select the Abc text input mode. See Select a Text Input Mode.
2.
Press the corresponding key repeatedly until the correct letter appears. For example,
to enter “Abc,” press once for “a,” twice for “b,” and three times for “c.”
Set Text Entry Options
The text entry options menu allows you to specify a suitable feature during the text entry
process. See Text Entry for the options available from the settings menu.
1.
When entering text, press
Text mode
(left softkey) > Text options.
2.
Highlight an option and press .
Word complete to suggest possible words based on letters you have entered.
Next word complete to automatically display the word that may follow the
current text input.
Word choice list to select whether to display the word choice list.
Input language to select the language to enter (English, Spanish, or French).

Text Entry 26
My words to edit or delete custom words you have added to the predictive text
database.
Add word to store words that you frequently use.
Help to view the XT9 instructions.
Copy and Paste Text
You can copy or cut the text and paste it in the text entry field.
1. In the text entry field, move the cursor next to the text you want to copy and press
Text mode (left softkey) > Copy/Cut.
2. Press the navigation key and highlight the text you want to copy or cut.
3. Press Next (left softkey) > Copy or Cut. The text is saved in the Paste List.
4. In the text entry field, move the cursor to the place where you want to paste the
text to and press Text mode (left softkey) > Paste list.
5. Press the navigation key to scroll to the text you want to paste and press .
– or –
6.
Move the cursor next to the word you want to add and press Text mode (left
softkey) > Copy/Cut. Press the navigation key and highlight your desired word.
Press Next (left softkey) > Add word (right softkey).
Note: This feature is not available where you cannot select the text input mode or in the
Web application.

Phone Calls 27
Phone Calls
Make Phone Calls
Call Using the Phone Keypad
The most “traditional” way to place a call is by using the phone’s keypad.
1.
Enter a phone number from in standby mode. (If you make a mistake while dialing,
press to erase the numbers.)
2.
Press , , or the external speaker key.
3.
Press or the external End key when you are finished.
Call from Recent Calls
Place a call to the numbers in your recent calls list.
1.
From the Home screen, press Menu (center softkey) > Recent calls.
– or –
Press or the external speaker key in standby mode.
2.
Highlight an entry and press .
Tip: To redial your last outgoing call, press twice.
Call from Contacts
Place a call to the numbers stored in your Contacts.
1.
From the Home screen, press Menu (center softkey) and select Contatcs.
2.
Highlight the entry you want to call.
3.
Press to dial the entry’s default phone number.
– or –

Phone Calls 28
To dial another number from the same entry, press , select a number, and then
press or Call (center softkey).
Call Emergency Numbers
You can place calls to 9-1-1 or 1-1-2 even if your phone is locked or your account is
restricted.
To call the 9-1-1 emergency number:
► Press .
To call the 1-1-2 emergency number:
► Press .
To call the 911 or 112 emergency number when the screen is locked:
1.
Press Emergency (left softkey) on the screen.
2.
Highlight 911 or 112 and press Call (center softkey).
Enhanced 9-1-1 (E911) Information
This phone features an embedded Global Positioning System (GPS) chip necessary for
utilizing E911 emergency location services where available.
When you place an emergency 9-1-1 call, the GPS feature of your phone seeks information
to calculate your approximate location. Depending on several variables, including availability
and access to satellite signals, it may take up to 30 seconds or more to determine and
report your approximate location.
Important: Always report your location to the 9-1-1 operator when placing an
emergency call. Some designated emergency call takers, known as Public
Safety Answering Points (PSAPs) may not be equipped to receive GPS
location information from your phone.
Call a Phone Number with Pauses
You can dial numbers with pauses for use with automated systems, such as voicemail or
credit card billing numbers.
There are two options available to add pauses on your phone:
● Wait will wait for your confirmation to send the rest of the digits when reached.

Phone Calls 29
●
2-sec pause automatically sends the next set of numbers after two seconds.
Note: You can have multiple pauses in a phone number and combine two-second and
hard pauses.
To dial or save phone numbers with pauses:
1.
Enter all or part of a number.
2.
Press Options (left softkey) > Add wait or 2-sec pause.
3.
Enter additional numbers.
4.
Press to dial the number.
Call Using a Speed Dial Number
You can store up to 98 numbers in your phone’s speed dial memory to make contacting
friends and family easier.
You must have already assigned a speed dial number to an existing phone number. See Set
Up Speed Dialing.
To use speed dial for locations 2-9:
► In standby mode, press and hold the appropriate key for approximately two seconds,
and then press or Call (center softkey).
To use speed dial for locations 10-99:
► In standby mode, enter a two-digit speed dial number, and then press or Call
(center softkey).
The display confirms that the number has been dialed when it shows “
Connecting...
”
Call Using the Plus (+) Code
When placing international calls, use Plus Code Dialing to automatically enter the
international access code for your location (for example, 011 for international calls made
from the U.S.).
1.
Press and hold to display “+” on your phone screen.
Loading...