


 Loading...
Availableapplications andservices aresubjecttochangeatany time.

Table of Contents
Get Started |
1 |
User Guide Notes |
1 |
Your Phone at a Glance |
2 |
Set UpYour Phone |
3 |
Activation andService |
4 |
Create Your Account andPick Your Plan |
4 |
Activate Your Phone |
5 |
Manage Your Account |
5 |
Top-UpYour Account |
6 |
Additional Information |
6 |
Set UpVoicemail |
6 |
Phone Basics |
8 |
Your Phone’s Layout |
8 |
Turn Your Phone On andOff |
10 |
Status Bar |
11 |
Navigate Through the Menus |
13 |
Display Your Phone Number |
14 |
Enter Text |
14 |
Slide-out QWERTY Keyboard |
14 |
Select a Text Input Mode |
16 |
XT9 Smart Input |
17 |
Abc Mode |
18 |
Text Entry Options |
18 |
Copy andPaste Text |
19 |
Phone Calls |
20 |
Make Phone Calls |
20 |
Call Using the Phone Keypad |
20 |
Call from Call History |
20 |
Call from Contacts |
20 |
Call Using Your Voice |
21 |
Call Using the Plus (+) Code |
21 |
Call Using a SpeedDial Number |
21 |
i

Call a Phone Number with Pauses |
22 |
Call a Phone Number in a Message |
22 |
Call Emergency Numbers |
22 |
Receive Phone Calls |
24 |
EndPhone Calls |
25 |
MissedCall Notification |
25 |
Voicemail |
26 |
Voicemail Setup |
26 |
Voicemail Notification |
26 |
Retrieve Your Voicemail Messages |
26 |
Phone Call Options |
27 |
In-call Options |
27 |
Caller ID |
28 |
Call Waiting |
28 |
3-Way Calling |
29 |
Call Forwarding |
29 |
Set UpSpeedDialing |
30 |
Call Settings |
30 |
AbbreviatedDialing |
30 |
Call Answer Mode |
31 |
Auto-Answer Mode |
31 |
Call History |
32 |
Contacts |
34 |
Get Startedwith Contacts |
34 |
Access Contacts |
34 |
The Contacts List |
34 |
Contacts List Options |
34 |
Adda Contact |
35 |
Save a Phone Number |
36 |
Edit a Contact |
36 |
Addor Edit Information for a Contact |
36 |
Assign a Picture toa Contact |
36 |
Assign a Ringtone toa Contact |
37 |
Assign a Vibrate Type toa Contact |
37 |
Delete a Contact |
38 |
ii

Adda GroupContact |
38 |
Edit a GroupContact |
38 |
AddMembers toa Group |
38 |
Remove Members from a Group |
39 |
Delete a GroupContact |
39 |
ICE (In Case of Emergency) Contacts |
39 |
ICE Contacts |
40 |
Call the ICE Contact |
40 |
Emergency Message |
40 |
Personal Information |
41 |
Secret Contacts Entries |
41 |
Dial Services |
41 |
Accounts andMessaging |
43 |
Text andMultimedia Messaging |
43 |
Senda Message |
43 |
Access Messages |
44 |
ThreadedMessaging |
44 |
Messaging Settings |
46 |
Simple Data Exchange |
48 |
Apps andEntertainment |
50 |
DownloadGames, Ringtones, andMore |
50 |
Web andData |
52 |
Launch a Web Connection |
52 |
Data Services General Information |
52 |
Your User Name |
52 |
Data Connection Status andIndicators |
53 |
Browser |
53 |
Learn toNavigate the Web |
53 |
Browser Menu |
54 |
Camera |
57 |
Take Pictures |
57 |
Take a Picture |
57 |
Camera Mode Options |
57 |
Camera Settings |
59 |
Assign Pictures |
60 |
iii

Store Pictures |
60 |
SendPictures |
61 |
Tools andCalendar |
62 |
Activate This Device |
62 |
Alarm |
62 |
Calendar |
63 |
Addan Event tothe Calendar |
63 |
Adda ToDoList Item tothe Calendar |
64 |
Calendar Event Alerts |
64 |
ViewCalendar Events |
65 |
Erase Calendar Events |
65 |
Bluetooth |
66 |
Turn Bluetooth On or Off |
66 |
Bluetooth Settings Menu |
66 |
Change the Device Name |
67 |
Pair Bluetooth Devices |
67 |
Viewthe TrustedDevices List |
67 |
TrustedDevices List Menu |
67 |
SendItems via Bluetooth |
68 |
Update Phone |
68 |
Media Transfer |
69 |
Voice Services |
69 |
Automatic Speech Recognition (ASR) |
69 |
Manage Voice Memos |
73 |
AssignedMedia |
74 |
Calculator |
74 |
Countdown Timer |
75 |
Stopwatch |
75 |
WorldClock |
75 |
Notepad |
76 |
Settings |
77 |
Display Settings |
77 |
Change the Graphic |
77 |
Change the Brightness |
77 |
Change the Font Size |
77 |
iv

Change the Backlight Settings |
78 |
Set the Notification Pop-up |
78 |
Select a Picture ID |
79 |
Power Save Mode |
79 |
KeypadLight |
79 |
Change the Clock/Calendar Display |
79 |
Set a Custom Greeting |
80 |
Change the Phone’s Menu Style |
80 |
Volume Settings |
80 |
Adjust the Phone’s Volume Settings |
80 |
Silence All |
80 |
Ringtone Settings |
81 |
Keyguard |
82 |
Text Entry |
82 |
Phone Information |
83 |
Security Settings |
84 |
Lock Phone |
84 |
Reset Your Phone andPhone Content |
85 |
Delete Phone Content |
85 |
Accessibility Settings |
86 |
Voice Guide |
86 |
Voice Recognition |
86 |
TTY Mode |
87 |
Font Size |
87 |
Vibrate Type |
87 |
Hearing AidDevice Compatibility |
88 |
Screen Contrast |
88 |
Phone SetupOptions |
89 |
Airplane Mode |
89 |
Alerts |
89 |
Call Setup |
90 |
Data Settings |
90 |
Headset Mode |
91 |
Language Settings |
91 |
Location Settings |
91 |
v

Navigation Key Shortcuts |
92 |
Copyright Information |
93 |
Index |
94 |
vi
Get Started
The following topics give you all the information you needtoset upyour phone andservice the first time.
User Guide Notes
Instructions toperform tasks in this guide may change depending on the software version on your phone. All screens in this guide are simulated. Actual displays may vary.
Get Started |
1 |
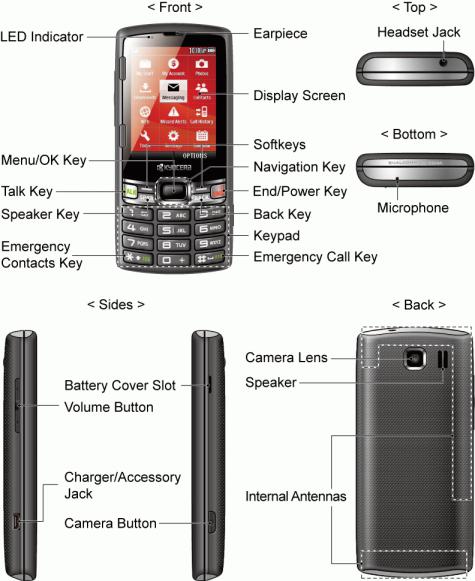
Your Phone at a Glance
The following illustration outlines your phone’s primary external features andkeys.
Get Started |
2 |

Set Up Your Phone
You must first install andcharge the battery tobegin setting upyour phone. 1. Install the battery.
•Insert your fingernail intothe slot at the side of the battery compartment cover andlift the cover off gently.
• Insert the battery, contacts endfirst, andgently press the battery intoplace.
•Replace the battery compartment cover, making sure all the tabs are secure andthere are no gaps aroundthe cover.
Get Started |
3 |
Note: When you insert the battery, your phone may power on automatically.
2. Charge your battery.
• Plug the USB connector intothe charger/accessory jack on the lower left side of your phone.
• Plug the ACadapter intoan electrical outlet.
Note: Your phone’s battery shouldhave enough charge for the phone toturn on andfinda signal, set up voicemail, andmake a call. You shouldfully charge the battery as soon as possible.
3. Press andhold toturn the phone on.
•If your phone is activated, it will turn on andsearch for service.
•If your phone is not yet activated, see Activation andService for more information.
Activation and Service
Before using your phone, you must set upyour service with Virgin Mobile. You will needyour phone’s serial number (MEID), printedon a sticker inside the battery compartment.
Create Your Account and Pick Your Plan
Set upyour Virgin Mobile account.
Get Started |
4 |
1.From your computer, visit virginmobileusa.com andclick Activate.
2.Choose an activation option andclick Next. Then enter your zipcode andclick Next.
3.Whenprompted,entertheserialnumber(MEID)printedonthestickerlocatedonthebackofyourphone inthebatterycompartment.Thisnumbercanalsobefoundonthebottompanelofthephone’spackage.
4.Followthe remaining instructions tochoose your plan andselect a payment method.
5.Followthe activation instructions belowandyou’ll be able tostart using your phone.
Activate Your Phone
After setting upyour account on virginmobileusa.com, simply turn your phone on. Your phone is designedtoactivate automatically. If you are swapping from another Virgin Mobile phone toa newone, be sure toturn off the oldphone before swapping the serial number (MEID). Once the MEID swapis complete, turn on the newphone andthe programming information will be pushedtoyour phone automatically.
You can alsostart the activation process manually.
n From standby mode, press  > Tools > ActivateThis Device.
If your phone was previously programmedwith a different phone number, you will needtofollowthese steps toprogram your phone:
1.On the display screen, enter ##72786# (##SCRTN#). The message “WARNING! Doyou want to reset your phone’s network settings andstill retain your personal information?” will appear.
2.PressYES(leftsoftkey).Thephonewillpoweroffandthenpoweronagainandprogramitself automatically.
If you experience any issues activating your phone, check tomake sure you are in a network coverage area. Power your phone off andthen power it back on. The phone shouldprogram itself automatically. If you are still experiencing issues, call Customer Care at 1-888-322-1122.
Manage Your Account
Access information about your account. You can:
nCheck your minutes.
nAddmoney (Top-Up).
nChanges plans.
nAndmore!
Get Started |
5 |
From Your Phone
Access your account from the special My Account app.
n From standby mode, press  > My Account.
From Your Computer
n Log in with your phone number andaccount PIN at virginmobileusa.com.
Top-Up Your Account
Sign upfor AutoPay tokeepyour service working month after month. Or, you can buy Top-Upcards at thousands of retailers andaddmoney toyour account from your phone or by logging in at virginmobileusa.com.
Auto Pay
AutoPay is the easiest way tokeepyour service working. Once you register your credit card, debit cardor PayPal account, you can set it toautomatically pay your monthly plan. Then you can keeptalking and texting with nointerruptions. Set upAutoPay anytime by logging intoMy Account at virginmobileusa.com, andadjusting your payment settings.
One-Time Top-Ups From Your Phone
nFromstandbymode,press >MyAccount>Top-Up.
–or–
Dial*729.
Additional Information
For more information about your Virgin Mobile account, as well as other Virgin Mobile services, visit us at: virginmobileusa.com.
Or, call us at 1-888-322-1122. We’re here toserve you.
Set Up Voicemail
You shouldset upyour voicemail andpersonal greeting as soon as your phone is activated. Always use a passwordtoprotect against unauthorizedaccess. Your phone automatically transfers all unanswered calls toyour voicemail, even if your phone is in use or turnedoff.
Get Started |
6 |
1.Press andhold in standby mode todial your voicemail number.
2.Followthe system prompts to:
•Create your password.
•Recordyour name announcement.
•Recordyour greeting.
Important: Voicemail Password – It is strongly recommendedthat you create a passwordwhen setting upyour voicemail toprotect against unauthorizedaccess. Without a password, anyone whohas access to your phone is able toaccess your voicemail messages.
For more information about voicemail, see Voicemail.
Get Started |
7 |

Phone Basics
Your phone is packedwith features that simplify your life andexpandyour ability tostay connectedtothe people andinformation that are important toyou. The following topics will introduce the basic functions andfeatures of your phone.
Your Phone’s Layout
The illustrations anddescriptions belowoutline your phone’s basic layout.
PhoneBasics |
8 |
Key Functions
nLEDIndicator shows your phone's status at a glance.
nMenu/OK Key ( ) lets you access the phone’s menus andselect the highlightedchoice when navigating through a menu.
nTalk Key ( ) allows you toplace or receive calls, answer Call Waiting, use 3-Way Calling, or activate Automatic Speech Recognition (ASR).
nSpeaker Key ( ) lets you place or receive calls in speakerphone mode, turn the speakerphone on andoff during a call, or activate Automatic Speech Recognition (ASR).
nEmergency Contacts Key ( ) lets you access your In Case of Emergency (ICE) contacts. See ICE (In Case of Emergency) Contacts.
nEarpiecelets you hear the caller andautomatedprompts.
nDisplay Screen displays all the information neededtooperate your phone, such as the call status, the Contacts list, the date andtime, andthe signal andbattery strength.
nSoftkeys (
 ) let you select softkey actions or menu items corresponding tothe bottom left andright lines on the screen.
nNavigation Key scrolls through the phone’s menu options andacts as a shortcut key in standby mode. These keys can be reassignedtocreate customizedshortcuts. See Navigation Key Shortcuts.
nEnd/PowerKey( )letsyouturnthephoneonoroff,endacall,orcancelyourinputandreturnto standbymode.
PhoneBasics |
9 |
nBackKey( )deletescharactersfromthedisplayintextinputmode.Wheninamenu,pressingit returnsyoutothepreviousmenu.Thiskeyalsoallowsyoutoreturntothepreviousscreeninadata session.
nKeypad lets you enter numbers, letters, andcharacters, andperform functions.
nEmergency Call Key ( ) lets you call 9-1-1 immediately. See Call Emergency Numbers.
nHeadset Jack allows you toplug in an optional headset for convenient, hands-free conversations.
nMicrophoneallows other callers tohear you clearly when you are speaking tothem.
nBattery Cover Slot lets you open the battery cover toreplace the battery.
nVolumeButtonallowsyoutoadjusttheringtonevolumeinstandbymodeorthevoicevolumeduringa call.
nCharger/AccessoryJackallowsyoutoconnectacompatiblechargingcableorUSBdatacable(not included).
nCameraButton( )letsyouaccessthePhotosmenu.Pressandholdtoactivatethecameramode andtakepictures.
nCamera Lens, as part of the built-in camera, lets you take pictures.
nSpeaker lets you hear the different ringtones andsounds. The speaker alsolets you hear the caller’s voice in speakerphone mode.
nInternalAntennasfacilitatereceptionandtransmission.Tomaximizeperformance,donotobstruct whileusingthephone.
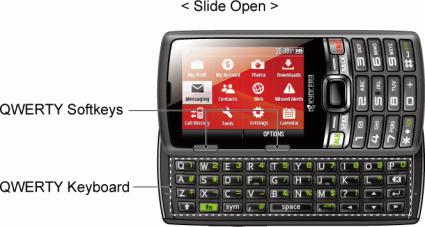
nQWERTY Softkeys (
 ) let you select softkey actions or menu items corresponding tothe bottom left andright lines on the screen when the QWERTY keyboardis open.
nQWERTY Keyboard slides out from the left side of the phone.
CAUTION!Inserting an accessory intothe incorrect jack may damage the phone.
Turn Your Phone On and Off
The instructions belowexplain howtoturn your phone on andoff.
Turn Your Phone On
n Press andhold .
.
PhoneBasics |
10 |

Turn Your Phone Off
nFrom standby mode, press andhold for twoseconds until you see the powering-down animation on the screen.
Your screen remains blank while your phone is off (unless the battery is charging).
Status Bar
The status bar at the topof your phone's display screen provides information about your phone's status andoptions. The following tables identify the symbols you’ll see on your phone’s display screen.
Tip: Toviewa list of your phone’s icons anddescriptions, from the main menu, select Settings > Phone Info > Icon Glossary.
Status Icons
Icon |
Status |
Network(fullsignal)
Network(no signal)
Data service available
Data service dormant
Data service unavailable
Bluetooth® enabled
Bluetooth visible
Bluetooth connected
Battery(fullcharge)
Batterycharging (animated)
Ringtone & vibrate
1 beep
PhoneBasics |
11 |
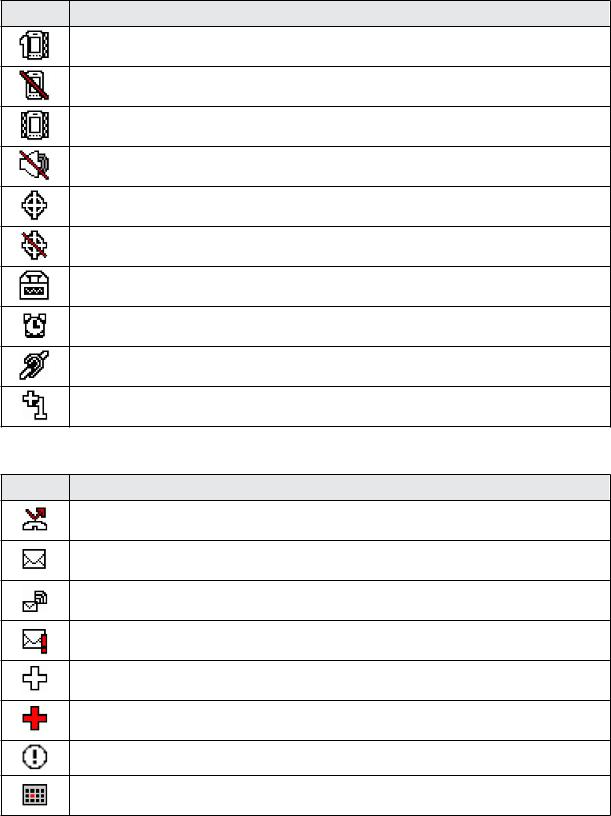
Icon |
Status |
1 beep & vibrate
Ringtone off
Vibrate all
Silence all
Location on
Location off
TTY mode
Alarm on
Hearing aid
Multitasking virtualmachine
Notification Icons
Icon |
Notification |
Missed call
New message
New voicemail
Urgent messages
Multiple alerts
Urgent multiple alerts
Application alerts
Calendar
PhoneBasics |
12 |

Camera Icons
Icon |
Camera |
Beach/snow mode
Scenerymode
Mirror image mode
Night/darkmode
Self-timer (5 seconds)
Self-timer (10 seconds)
Multiple shots
Camera resolution (2.0M)
Camera resolution (1.3M)
Camera resolution (0.3M)
Camera resolution (0.1M)
Navigate Through the Menus
The navigation key on your phone lets you scroll through onscreen items. Tonavigate through a menu, press the navigation key upor down.
Many menus feature a scroll bar on the right tohelpyou keeptrack of your position in the menu.
Select Menu Items
Asyounavigatethroughthemenu,menuoptionsarehighlighted.Selectanyoptionbyhighlightingitand
pressing .Iftheoptionisnumbered,youcanselectitbypressingthecorrespondingnumberonthe phone’skeypad.
Note: On the slide-out QWERTY keyboard, you can press the number keys, if the items are numbered, or  toselect an item.
For example, toviewthe Icon Glossary screen:
1. From standby mode, press  toaccess the main menu.
PhoneBasics |
13 |
2.Select Settings by highlighting it andpressing  .
.
3.Select PhoneInfo by highlighting it andpressing  .
.
4.Select Icon Glossary by highlighting it andpressing  . For the purposes of this guide, the above steps condense into:
n From standby mode, press  > Settings > PhoneInfo > Icon Glossary.
Back Up Within a Menu
Togotothe previous menu:
n Press  .
.
Toreturn tostandby mode:
n Press  .
.
Display Your Phone Number
You can display your phone number andother information about your phone andaccount.
nFrom standby mode, press  > Settings > PhoneInfo > My Phone#.
– or –
From standby mode, press CONTACTS (right softkey) > OPTIONS (right softkey) > My Number.
Enter Text
You can type on your phone using either the keypador the slide-out QWERTY keyboard.
Slide-out QWERTY Keyboard
Open the slide-out QWERTY keyboardtotype faster andmore conveniently. 1. Holdthe phone sideways, with the front panel keypadtoyour right.
PhoneBasics |
14 |
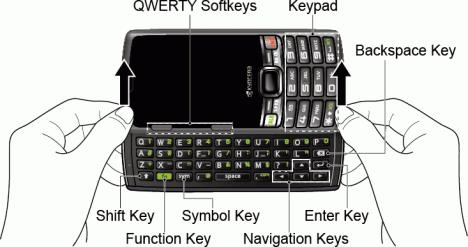
2. Push the screen panel upwith your thumbs toreveal the slide-out keyboard.
Note: When the slide-out keyboardis opened, the display stays in landscape mode andyou can use the keypadon the front panel for entering numbers.
3.Start an appor select a fieldthat requires entry of text or numbers.
4.Press the letter keys toenter text. Press the following keys toenter uppercase letters, numbers, special characters, or symbols:
• Shift key ( )
)
o Press once tocapitalize the next letter you select.
oPress twice tolock the key andtype a series of uppercase letters (this works just like the Caps Lock key on your computer keyboard).
o Tounlock, press the shift key once again.
Note: As you press the shift key, the capitalization style changes as Abc > ABC > abc (Abc mode), or XT9Word > XT9WORD> XT9word (XT9Wordmode) andthe selectedstyle is displayedat the bottomright corner of the screen.
• Function key ( )
)
oPress once totype the character shown on the right side of the key. For example, if you need totype an ampersand(&), press  (
( is displayedat the bottom-right corner of the screen), andthen press the B key (
 ).
).
oPress twice tolock the key andtype a series of numbers andcharacters.  is displayedat the bottom-right corner of the screen while the function key is locked.
o Tounlock, press the function key once again.
PhoneBasics |
15 |
• |
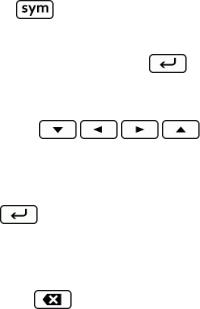
Symbol key ( |
|
) |
|
|
|
o |
Press toopen the Symbols window. Press the navigation key toscroll tothe symbol you want |
|||
|
|
toinsert intoyour text andpress |
toselect it. |
||
5. Press these keys toperform other actions: |
|
||||
• |
Navigation keys ( |
|
) |
||
|
o |
Presstoscrollthroughthephone’smenuoptions.Onthetextinputscreen,presstomovethe |
|||
|
|
cursor. |
|
|
|
• |
Enter key ( |
) |
|
|
|
|
o |
Press toinsert a line feedin text input mode, or access the phone’s menus andselect the |
|||
|
|
highlightedchoice when navigating through a menu. |
|||
• |
Backspacekey ( |
|
) |
|
|
o Press todelete characters from the display in text input mode.
• QWERTY softkeys (
 )
)
nPress toselect the functions shown at the right andleft bottoms on the screen. The left softkey corresponds tothe function displayedon the left, andthe right softkey on the right.
Select a Text Input Mode
Selectanappropriatetextmodetoenterletters,numbers,andsymbolswheneveryouarepromptedtoenter text.
1.From a screen where you can enter text, press OPTIONS (right softkey) tochange the text mode. (If you are on the message entry screen, press OPTIONS [right softkey] > Text Mode.)
2.Select one of the following options:
•Abc toenter characters by using the alphabet mode. See Abc Mode.
•XT9Word toenter text using a predictive text system. See XT9 Smart Input.
•123 toenter numeric characters.
•Symbols toenter symbols.
•Smileys toenter smile icons.
•Emoticons toenter “emoticons.” (This is available, for example, when composing a message or when editing a Schedule or ToDodescription in Calendar.)
•PasteList topaste copiedor cut text (if applicable).
PhoneBasics |
16 |
•Web Shortcuts toenter Web shortcuts (for example, www., http://, or .com).
•Text Options todisplay the text entry options menu (if applicable). See Text Entry Options.
XT9 Smart Input
XT9 Smart Input is a predictive text input technology which uses the worddatabase toanalyze the letters you enter andcreate a suitable word.
Enter Text in the XT9 Mode
1.Select the XT9Word text input mode. See Select a Text Input Mode.
2.On the QWERTY keyboard, press the corresponding keys.
•Ifyoumakeamistake,press toeraseasinglecharacter.Pressandhold
 toerasean entireword.
– or –
On the front panel keypad, press the corresponding keys once per letter toenter a word. For example, toenter the word“Bill,” press 


 .
.
•Ifyoumakeamistake,press toeraseasinglecharacter.Pressandhold
 toerasean entireword.
3.As you type, a wordchoice list opens. (The wordmay change as you type.) Press the navigation key toscroll tothe wordyou want toenter andpress  or
or  toselect it.
•Ifthewordyouwantisnotdisplayedafteryouhaveenteredalltheletters,seeAddaWordtotheXT9 Database.
Add a Word to the XT9 Database
IfthewordyouwanttoenterisnotdisplayedinthewordchoicelistwhenyouareusingXT9Input,additto thedatabase.
1.While you are in XT9Word mode, enter a letter. (A wordchoice list opens.)
2.Scroll down the list andselect <Add Word>.
3.Enter a wordandpress SAVE (left softkey). The wordwill appear as an option the next time you scroll through options during XT9 Text Input.
For more information about XT9 Smart Input, visit the Nuance website at nuance.com/for-business/by- product/xt9/index.htm.
PhoneBasics |
17 |
Abc Mode
Abc mode is a traditional text input mode. Simply type the keys on the QWERTY keyboardas you doon the computer keyboardor multi-tapthe keys on the keypad.
Use Abc Mode on the Keypad
In Abc mode, alsoknown as multi-tapentry, you press keys one, two, three, or four times toenter the letters you see on the keypad.
Bydefault,thefirstletterofasentenceiscapitalizedandthefollowinglettersarelowercased.Toswitch
betweenlowercaseanduppercase,press .ThecapitalizationstylechangesasAbc>ABC>abcand theselectedstyleisdisplayedatthebottom-rightcornerofthescreen.Afteracharacterisentered,the cursorautomaticallyadvancestothenextspaceaftertwosecondsorwhenyouenteracharacterona differentkey.
1.Select the Abc text input mode. See Select a Text Input Mode.
2.Press the corresponding key repeatedly until the correct letter appears. For example, toenter “Abc,” press  once for “a,” twice for “b,” andthree times for “c.”
Text Entry Options
The Text Entry options menu allows you tospecify a suitable feature during the text entry process. See Text Entry for the options available from the settings menu.
1.When entering text, press OPTIONS (right softkey) > Text Options.
2.Select an option:
•Word Completetosuggest possible words basedon the frequency of usage.
•Next Word Completetoautomatically display the wordthat may followthe current text input.
•PhraseCompletetopredict possible phrases after one wordwith a space is entered.
•Word Scan toallowthe predictive text input system torecognize words by searching Contacts.
•Word ChoiceList toselect whether todisplay the wordchoice list.
•Input Languagetoselect the language toenter (English or Spanish).
•My Words toedit or delete the custom words you have addedtothe XT9 database.
o Add Word tostore words you frequently use.
•Select Text toselect text for copying, cutting or adding (if applicable).
•DeleteAll todelete all text (if applicable).
PhoneBasics |
18 |
• Help toviewthe XT9 instructions.
Copy and Paste Text
You can copy andpaste the text in the text entry field.
1.In the text entry field, move the cursor next tothe text you want tocopy andpress OPTIONS (right softkey) > Text Options > Select Text.
2.Press the navigation key andhighlight the text you want tocopy.
3.Press NEXT ACT…(left softkey) > Copy. The text is savedin the Paste List.
4.Inthetextentryfield,movethecursortotheplacewhereyouwanttopastethetexttoandpress OPTIONS(rightsoftkey)>PasteList.(Onthemessageentryscreen,pressOPTIONS[rightsoftkey]>
TextMode>PasteList.)
5.Press the navigation key toscroll tothe text you want topaste andpress  or
or  .
.
Note: This feature is not available where you cannot select the text input mode or in the Web application.
PhoneBasics |
19 |
Phone Calls
Withmobile serviceandyourphone’s callingfeatures, youcan enjoyclear phonecalls acrossthe country.
Make Phone Calls
There are several convenient ways toplace calls from your phone.
Call Using the Phone Keypad
The most “traditional” way toplace a call is by using the phone’s keypad.
1.Enteraphonenumberfromstandbymode.(Ifyoumakeamistakewhiledialing,press toerasethe numbers).
2.Press  or
or  .
.
3.Press  when you are finished.
Call from Call History
The Recent History list lets you quickly place calls torecent incoming, outgoing, or missednumbers.
1.From standby mode, press  > Call History.
– or –
Press  in standby mode.
2. Highlight an entry andpress  .
.
Tip: Toredial your last outgoing call, press  twice.
Note: You cannot make calls from Call History toentries identifiedas No Caller ID, Private(RestrictedID), or UnavailableID.
Call from Contacts
You can place phone calls directly from entries in your Contacts list. 1. From standby mode, press CONTACTS (right softkey).
PhoneCalls |
20 |
2.Highlight the entry you want tocall.
3.Press  todial the entry’s default phone number.
– or –
Todial another number from the same entry, press the navigation key right or left todisplay the number, andthen press  .
.
Call Using Your Voice
You can make a phone call using Automatic Speech Recognition (ASR).
1.Press andhold or
or  in standby mode toactivate ASR.
2.Followthe voice prompts. Say "Call" andthe name of an entry savedin your Contacts or a phone number. See Make a Voice Call Using ASR.
See Automatic Speech Recognition (ASR) for more information on ASR.
Call Using the Plus (+) Code
When placing international calls, use Plus Code Dialing toautomatically enter the international access code for your location (for example, 011 for international calls made from the U.S.).
1.From standby mode, press andhold todisplay “+” on your phone screen.
2.Enter the country code andphone number, andthen press  . (The phone automatically prepends the access code for international dialing, followedby the country code andphone number.)
Call Using a Speed Dial Number
Speeddial numbers let you dial numbers by touching andholding a single number on the dialpad. See Set UpSpeedDialing for information on assigning speeddial numbers.
Touse speeddial for locations 2-9:
nFrom standby mode, press andholdthe appropriate key for approximately twoseconds. Touse speeddial for locations 10-99:
nFrom standby mode, enter a two-digit speeddial number, andthen press  .
.
The display confirms that you have dialedthe number when it shows “Connecting...”
PhoneCalls |
21 |
Call a Phone Number with Pauses
You can dial or save phone numbers with pauses for use with automatedsystems, such as voicemail or credit cardbilling numbers.
There are twotypes of pauses available on your phone:
nHard Pausesends the next set of numbers when you press SENDTONES (left softkey).
n2-Sec. Pauseautomatically sends the next set of numbers after twoseconds.
Note: You can have multiple pauses in a phone number andcombine two-secondandhardpauses. Todial or save phone numbers with pauses:
1.From standby mode, enter all or part of a number.
2.Press OPTIONS (right softkey) > Hard Pauseor 2-Sec. Pause.
3.Enter additional numbers.
4.Press  todial the number.
– or –
Press OPTIONS (right softkey) > Save. (You can save toa newor existing Contacts entry.)
Note:Whendialinganumberwithahardpause,pressSENDTONES(leftsoftkey)tosendthenextsetof numbers.
Call a Phone Number in a Message
You can place a call toa number that appears in a message.
1.From standby mode, press MESSAGING (left softkey) > Messages.
2.Select a message with the number you want tocall andhighlight the number.
3.Press  .
.
For more information on utilizing the information in a message, see Simple Data Exchange.
Call Emergency Numbers
You can place calls to9-1-1 even if the phone’s screen is lockedor your account is restricted.
PhoneCalls |
22 |
nFrom standby mode, press andhold > OK (left softkey).
– or –
From standby mode, press 


 .
.
Note: After you have placedan emergency call, your phone automatically enters the Emergency Mode.
View Options During an Emergency Call
n During an emergency call, press OPTIONS (right softkey) toviewthe following:
•Transfer Audio toswitch the call toan external device (if applicable).
•Contacts toshowthe Contacts list.
•VoiceMemo torecordthe other party’s voice.
•PhoneInfo todisplay information about your phone.
Tip: Press  toenable the speakerphone mode.
Tip: Press MY PHONE# (left softkey) todisplay your phone number during an emergency call.
Exit Emergency Mode
1.Press  toenda 9-1-1 call.
2.Press  >
>  toexit emergency mode.
Enhanced 9-1-1 (E 9-1-1) Information
This phone features an embeddedGlobal Positioning System (GPS) chipnecessary for utilizing E 9-1-1 emergency location services where available.
When you place an emergency 9-1-1 call, the GPS feature of your phone seeks information tocalculate your approximate location. Depending on several variables, including availability andaccess tosatellite signals, it may take upto30 seconds or more todetermine andreport your approximate location.
Important: Always report your location tothe 9-1-1 operator when placing an emergency call. Some designatedemergency call takers, known as Public Safety Answering Points (PSAPs), may not be equippedtoreceive GPS location information from your phone.
PhoneCalls |
23 |
Loading...