


 Loading...
Command Center RX
User Guide
Legal Notes
Unauthorized reproduction of all or part of this guide is prohibited.
The information in this guide is subject to change without notice.
Examples of the operations given in this guide support the Windows 7 printing environment. Essentially the same operations are used for Microsoft Windows Vista, Windows XP, Windows 8, Windows 8.1, Windows 10, Windows Server 2003, Windows Server 2008, and Windows Server 2012 environments.
We cannot be held liable for any problems arising from the use of this product, regardless of the information herein.
Regarding Trademarks
Microsoft Windows is a registered trademark of Microsoft Corporation in the U.S. and/or other countries. KPDL is a trademark of Kyocera Corporation. PCL is a trademark of Hewlett-Packard Company. Google, Google Cloud PrintTM are trademarks and/or registered trademarks of Google Inc.
All other brand and product names herein are registered trademarks or trademarks of their respective companies.
© 2016 KYOCERA Document Solutions Inc.

Table of Contents
|
Legal Notes ......................................................................................... |
1 |
|
Regarding Trademarks........................................................................ |
1 |
1 |
Introduction.............................................................................. |
1 |
|
System Requirements ......................................................................... |
1 |
|
Accessing the Embedded Server ........................................................ |
1 |
2 |
The Embedded Server Home Page ........................................ |
2 |
|
Login.................................................................................................... |
2 |
|
Top Bar................................................................................................ |
3 |
|
Navigation Menu ................................................................................. |
4 |
|
Device Status ...................................................................................... |
6 |
3 |
About Login.............................................................................. |
7 |
|
Levels of Login .................................................................................... |
7 |
4 |
Document Box ......................................................................... |
9 |
|
Custom box ......................................................................................... |
9 |
|
FAX Box ............................................................................................ |
12 |
|
Sub Address Box............................................................................... |
14 |
|
Polling Box ........................................................................................ |
15 |
|
Job Box Settings ............................................................................... |
16 |
5 |
Address Book ........................................................................ |
17 |
|
Machine Address Book ..................................................................... |
17 |
|
External Address Book Settings........................................................ |
19 |
|
One Touch Key ................................................................................. |
21 |
6 |
Device Settings...................................................................... |
23 |
|
Paper/Feed/Output............................................................................ |
23 |
|
Original Document............................................................................. |
25 |
|
Energy Saver/Timer .......................................................................... |
26 |
|
Date/Time.......................................................................................... |
28 |
|
System .............................................................................................. |
29 |
7 |
Function Settings .................................................................. |
32 |
Common/Job Default......................................................................... |
32 |

Copy .................................................................................................. |
37 |
Printer................................................................................................ |
37 |
E-mail ................................................................................................ |
41 |
Scan to Folder ................................................................................... |
43 |
DSM Scan ......................................................................................... |
44 |
FAX/i-FAX ......................................................................................... |
45 |
Send and Forward............................................................................. |
51 |
RX/Forward Rules ............................................................................. |
54 |
Operation Panel ................................................................................ |
57 |
8 Network Settings ................................................................... |
60 |
General.............................................................................................. |
60 |
TCP/IP............................................................................................... |
60 |
Protocol ............................................................................................. |
71 |
Wireless LAN..................................................................................... |
75 |
9 Security Settings ................................................................... |
79 |
Device Security ................................................................................. |
79 |
Network Security ............................................................................... |
83 |
Certificates ........................................................................................ |
86 |
10 Management Settings.......................................................... |
88 |
Job Accounting.................................................................................. |
88 |
Authentication.................................................................................... |
90 |
ID Card .............................................................................................. |
96 |
Notification/Report............................................................................. |
97 |
History Settings ................................................................................. |
99 |
SNMP .............................................................................................. |
102 |
System stamp.................................................................................. |
103 |
Message Board ............................................................................... |
105 |
Reset ............................................................................................... |
106 |
11 Troubleshooting ................................................................ |
108 |

Introduction
1 Introduction
Command Center RX (Remote eXtension), which will hereafter be referred to as the embedded server, refers to the web server that is built into the printing device. It allows you to verify the operating status of the device and make settings related to security, network printing, E-mail transmission and advanced networking.
With the embedded server, the administrator can remotely track paper and toner usages per user and the status of optional equipment installed. The embedded server also configures device settings, monitors jobs, and manages document boxes and address books.
System Requirements
The embedded server operates in the following environment. Check the following before use.
Protocol
•The TCP/IP protocol is installed on the PC.
•An IP address is assigned to the printing system.
Web browser
•Microsoft Internet Explorer 9.0 or later (Microsoft Internet Explorer operates on Microsoft Windows XP/ Vista/7/8/8.1, and Microsoft Windows Server 2008/2012.)
•Microsoft Edge (Microsoft Edge operates on Microsoft Windows 10.)
•Mozilla Firefox 14.0 or later
•Safari 5.0 or later (Safari operates on Apple Mac OS X 10.4 or later.)
•Google Chrome 21.0 or later
Accessing the Embedded Server
Access the embedded server by entering the printing system's host name or IP address in a web browser. Obtain the IP address from your network administrator.
Note: Do not access to other web sites for security reasons while operating the
Command Center RX.
1.
2.
Open a web browser.
Enter the device's host name or IP address as the URL. If you use the host name, you must first specify the DNS server information. For example, https://192.168.10.1.
If the screen “There is a problem with this website's security certificate.” is displayed, configure the certificate. For details, see Certificates on page 86. You can also continue the operation without configuring the certificate.
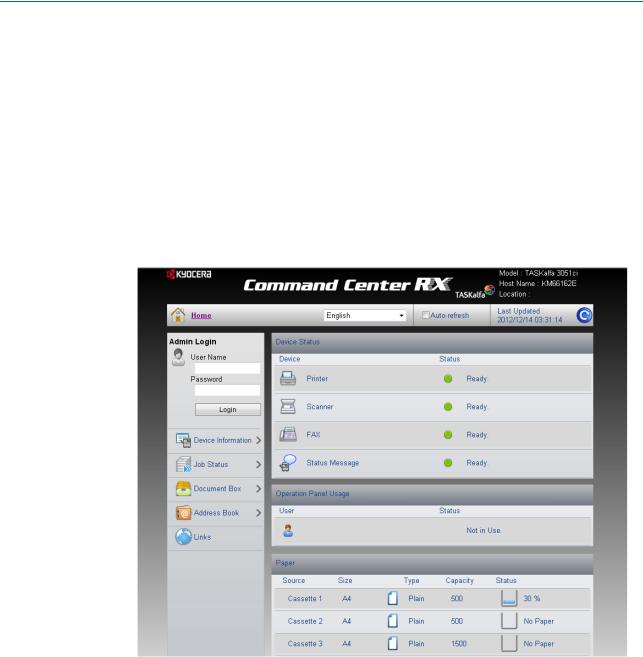
The embedded server's home page will be accessed and displayed.
For initial login, use the predefined “Admin” as the Use Name, and “Admin” as the Password to access all the pages. For initial login, use the predefined Admin as the Use Name, and Admin as the Password to access all the pages. This is set up internally.
User Guide |
1 |
The Embedded Server Home Page
2The Embedded Server Home Page
The embedded server's home page allows you to select a category from the navigation menu on the left to view and set values for that category, as well as displaying information on the device, user, and consumables on the right, which changes according to the selection in the navigation menu.
Login
To fully access the features of the embedded server pages, enter the User Name and Password and click Login. Entering the predefined administrator password allows the user to access all pages, including Document Box, Address Book, and Device Settings on the navigation menu.
2 |
Embedded Web Server |

The Embedded Server Home Page
To access the embedded server pages, the users can be identified by choosing one of network authentication, local authentication, and job accounting authentication methods. For details, see 3 About Login Levels of Login on page.
Top Bar
At the top of the home page, you can perform the following:
Home
To quickly return to this home page (top page) from any other server page, click
Home.
Select language
The embedded server supports multiple languages. To change the language that the embedded server is displayed in, open the language drop down list and select the appropriate language. If you attempt to view the embedded server with a character set other than the language that is used on the operation panel's display, some characters may be garbled.
Auto-refresh
To continuously update the embedded server's pages to the most recent status, select the Auto-Refresh check box.
Note: If checking [Auto-refresh] check box, the login state continues without the automatic logout. Do not check [Auto-refresh] for the safe connection.
 Refresh
Click this circular arrow icon to refresh the embedded server pages any time.
User Guide |
3 |

The Embedded Server Home Page
Navigation Menu
The navigation menu at the left of the home page divides the following functions onto separate bars. By clicking each bar, you can jump to the desired page as outlined below:
My Information/User Properties
My Information or User Properties is accessible when you have logged in to the embedded server with a general user or administrator privilege, and user authentication is enabled. This page summarizes the general settings to which access is granted by the general user. This depends on the scope of the user's or group's privileges. For example, if a user is allowed access to the document box, he/she can add or delete documents in the document box shown in My Information.
Device Information
This page includes this machine's various information. After clicking on Device
Information, information is available in the following device information pages:
Configuration
This page includes this machine's various information that apply to the entire machine, such as Device Defaults (basic, ID information, and capability) as well as optional equipment installed, firmware, network parameters, and FAX parameters.
Counter
This page includes the printed pages and scanned pages. You can narrow details by pulling down Type.
About Command Center RX
This page includes the firmware version and the list of web browsers supported by the embedded server.
Job Status
This page includes information on all device jobs including job status for printing, scanning, storing, and scheduled jobs as well as the job log. After clicking on Job Status, information is available in the following job status pages: The displayed items vary depending on the access level.
Printing Job Status, Sending Job Status, Storing Job Status
Displays details on each job. You can narrow details by pulling down Type. Click Refresh to update the list. Click Cancel Job to abort the job. To see details of each job in the log, click the Number or the Job Name.
Scheduled Jobs (when FAX is installed)
This page is populated with FAX jobs currently scheduled for transmission. Click Refresh to update the list. Click Cancel Job to remove the FAX job from the list to abort.
Printing Job Log, Sending Job Log, Storing Job Log
Displays logs to track jobs of each type. You can narrow details by pulling down Type. Click Refresh at the right end of the Top Bar to update the list of logs. To see details of each job in the log, click the Number or the Job Name.
Document Box
This page allows you to add, edit, or delete a document box, and delete documents in a document box. This page allows you to add, edit, or delete a document box, and delete documents in a document box. Under Document Box, Custom Box,
4 |
Embedded Web Server |

The Embedded Server Home Page
Fax Box, Sub Address Box, Polling Box, and Job Box Settings are included. For more information, see Document Box on page 9.
Address Book
This page allows you to add, edit, or delete a contact address or a group of addresses. Under Address Book, Machine Address Book, External Address Book Settings, and One Touch Key are included. For more information, see
Address Book on page 17.
Device Settings
This page includes advanced settings that apply to the entire device. Under Device Settings, Paper/Feed/Output, Original Document, Energy Saver/Timer, Date/ Time and System are included. For more information, see Device Settings on page 23.
Function Settings
This page includes advanced settings of each function that the device has. Under
Function Settings, Common/Job Defaults, Copy, Printer, E-mail, Scan to Folder, DSM Scan, FAX/i-FAX, Send and Forward, RX/Forward Rules, and
Operation Panel are included. For more information, see Function Settings on page 32.
Network Settings
This page includes advanced network settings that apply to the device. Under Network Settings, General, TCP/IP, and Protocol are included. For more information, see Network Settings on page 60.
Security Settings
This page includes advanced security settings that apply to the device. Under
Security Settings, Device Security, Send Security, Network Security, and Certificates are included. For more information, see Security Settings on page 79.
Management Settings
This page includes advanced management settings that apply to the device. Under
Management Settings, Job Accounting, Authentication, ID Card, Notification/ Report, History Settings, SNMP, System Stamp, Message Board, and Reset are included. For more information, see Management Settings on page 88.
Links
Links to our websites. Visit the following website for more information and downloads.
Download Drivers and Software
For downloading printer drivers and software:
KYOCERA Document Solutions - Download
http://www.kyoceradocumentsolutions.com/download/
About KYOCERA Document Solutions
For more information about products:
KYOCERA Document Solutions Website
http://www.kyoceradocumentsolutions.com/
User Guide |
5 |

The Embedded Server Home Page
HyPAS Applications
The link information is displayed when the HyPAS applications are installed and configuring their settings.
Network options
When the optional network interface kit (IB-50 or IB-51) is attached to the machine, the link information to web page of IB-50 or IB-51 is displayed.
Device Status
The home page displays information on the status of the device, operation panel usage, and consumables, to the right of the page. This page allows you to quickly verify the device's current settings and statuses.
Status Displays
Shows the operating status of the printer, scanner, and/or FAX.
Operation Panel Usage
Shows the user currently logged in to the device from the operation panel and its operating status. Note that settings made using the operation panel may override those made using the embedded server.
Paper
Shows the size, type, maximum capacity, and the current supply by paper source.
Toner
Shows the toner supply by color. The status of the waste toner box is also shown.
Staple/Punch
Shows the amount of the remaining staples and the punch waste.
Information
Shows the message type, title and date modified when the Message Board is set to On and the new message is described.
6 |
Embedded Web Server |
About Login
3 About Login
This section provides information to help the administrator manage domain and local users. The administrator can set authentication that allows the predefined users to access the embedded server pages and set administrator passwords.
Levels of Login
An administrator can configure the device to require a user login before it is accessed, in either of three different ways of authentication as described in this section.
If you select local or network authentication, User Login must be turned on.
The default user name and password, or the local administrator account when User Login is turned off, is Admin.
Local Authentication
Users are registered in this device and one-to-one authentication is performed between this printing system and a PC. A local account user accesses the embedded server by entering a User Name and Password and selecting Local in the drop-down list (if shown) below the entries, followed by clicking the Login button.
A user logged in with administrator privileges can gain access to My Information,
Device Information, Job Status, Document Box, Address Book, Device Settings, Function Settings, Network Settings, Security Settings, Management Settings, and Links on the navigation menu.
A user logged in with a general user account cannot add or delete document boxes, nor view the Address Book, Device Settings, Function Settings, Network Settings, Security Settings, and Management Settings.
To add, delete or configure a locally authenticated user, see Authentication on page 90.
Network Authentication
If the device is configured for network authentication, the device and the relevant PC's need to be under the management of a Windows domain network. Select the domain you want to login to in the drop-down list, enter a User Name and Password, and then click the Login button.
A user logged in with administrator privileges can gain access to My Information,
Device Information, Job Status, Document Box, Address Book, Device Settings, Function Settings, Network Settings, Security Settings, Management Settings, and Links on the navigation menu.
A user logged in with a general user account cannot add or delete document boxes, nor view the Address Book, Device Settings, Function Settings, Network Settings, Security Settings, and Management Settings.
To add, delete or configure a network authenticated user, see Authentication on page 90.
User Guide |
7 |

About Login
Authentication Using Job Account ID
If the device is configured for job accounting but not for User Login, a user can be authenticated by his/her job account ID. Enter the job account ID in Account Login and click Login.
Note: If a user is registered as an Administrator on the Local User List, click
Admin Login. Enter a User Name and Password and click the Login button.
For access using a job account ID, My Information, Device Information, Job Status, Document Box, Address Book, and Links are displayed in the navigation menu.
8 |
Embedded Web Server |

Document Box
4 Document Box
This page is accessible when you have logged in using a general user or administrator account. It allows you to add or delete a document box, as well as deleting documents in a document box. A general user is not allowed to add or delete a document box.
There are several types of document boxes, which vary depending on models: Custom Box, FAX Box, Sub Address Box, Polling Box, and Job Box Settings as described below. Note that FAX Box, Sub Address Box, and Polling Box are available only if the device is equipped with a FAX kit.
The users with a general user account can delete the documents which were created and added in their own document boxes.
Custom box
The section below explains how to add, edit or delete custom boxes as well as working with their contents.
Adding a New Custom Box
1. Click Custom Box under Document Box on the navigation menu. The Custom Boxes page opens.
2.
3.
4.
Click Add icon. The New Box - Property page will open.
Make entries required to define the custom box, such as Number, Name, etc.
Click Submit button.
Editing a Custom Box
1. Click Custom Box under Document Box on the navigation menu. The Custom Boxes page opens.
2. Select the custom box you want to edit by clicking on its Number or Box Name. The documents contained in the custom box are displayed with its name, date of creation, size, etc. You can choose List View or Thumbnail to view the box contents.
Alternatively, you can open the list of the user boxes, directly enter the box number in the Box # window and click Go to, or enter the box name in the Box Name window and click the magnifying glass icon, to quickly search the custom box.
3.
4.
5.
Click Box Property. The Property page will appear.
Make entries required to modify the custom box properties such as Number, Name, etc.
Click Submit button.
Working with a Custom Box
You can delete, move, copy, join, download, E-mail or print documents in the custom box.
User Guide |
9 |

Document Box
First select the document to apply any of the above actions by following the steps below:
1. Click Custom Box under Document Box on the navigation menu. The Custom Boxes page opens.
2. Select the custom box you want to work with by clicking on its Number or Box Name. If the box is password-protected, enter the password. The documents contained in the custom box are displayed with its name, date of creation, size, etc. You can choose List View or Thumbnail to view the box contents.
To search the document in the custom box, you can open the custom box, enter the document name in the File Name window and click the magnifying glass icon.
3. In the custom box, select the check box next to the name of the document that you want to apply the action. You can select more than one document simultaneously.
Deleting a Document
1. Select the document to delete as described above.
2. Click Delete icon.
Moving a Document from Box to Box
1. Select the document to move as described above.
2. Click Move icon. The Move Settings page opens. The selected file is shown in
Selected Files.
3. Select the box to move the document to in Destination. If the box is passwordprotected, enter the password.
4. Click Move button. The document is moved to the box.
Copying a Document from Box to Box
1. Select the document to copy as described above.
2. Click Copy icon. The Copy Settings page opens. The selected file is shown in
Selected Files.
3. Select the box to store the copied document in Destination. If the box is passwordprotected, enter the password.
4. Click Copy button. The document is copied into the box.
Joining Documents in One
1. Select the documents to join as described above.
2. Click Join icon. The Join Settings page opens. The selected file is shown in Selected Files (Join Order).
3. If desired, change the order of the documents to be joined by clicking Top, Up, Down, and Bottom. You can exclude a document from the Selected Files (Join Order) list by clicking Delete.
4. Name the new document which the documents selected are joined in File Name.
5. Click Join button. The documents are joined in the new document.
10 |
Embedded Web Server |

Document Box
Downloading a Document to a PC
1. Select a document you want to download and store into your PC as described above. You can download only one document at a time.
2. Click Download icon. The Download Settings page opens. The selected file is shown in
Selected Files.
If you want to download the selected page in a file, click Settings in Selected Files. After selecting the desired pages, click Submit button.
3. Use the Color Selection drop-down list if you want to change the color of the document after downloading. For example, you can download a color document as a monochrome document when it is stored in a PC.
4.
5.
Use the File Format drop-down list to select the type of the document you want to send.
Click Download button to begin downloading. Enter the name and destination of the document as you are prompted.
Note: If downloading is interrupted by the web browser's pop-up blocking, perform the following:
•For example, on Internet Explorer 11, go to Tools > Internet options > Privacy > Pop-up Blocker, and disable Turn on Pop-up Blocker to turn off pop-up blocking. Or, click Settings on Pop-up Blocker and enter the print system's IP address in
Allowed sites.
•If pop-up blocking is still engaged, on Internet Explorer 11, go to Tools > Internet Options > Security > Custom level > Use Pop-up Blocker and select Disable.
•If downloading won't complete, try to turn off SmartScreen Filter by browsing to
Safety > Turn Off SmartScreen Filter on Internet Explorer 11.
Sending a Document to a Destination
1. Select a document you want to send as described above. You can send only one document at a time.
2. Click Send icon. The Send Settings page opens. The selected file is shown in Selected Files.
3. In Destination, select a destination from Address Book, E-mail, Folder, FAX and i- FAX.
To select a destination, select Address Book to display the destinations currently registered (depending on E-mail, Folders, FAX, i-FAX, or Groups). Note, however, only Address Book is displayed if the entry of new addresses is prohibited in the device's system menu.
To delete a destination from Destinations, click Delete icon. If you want to print the selected page in a file, click Settings in Selected Files. After selecting the desired pages, click Submit button.
4. Use the Color Selection drop-down list if you want to change the color of the document to send. For example, you can send a color document as a monochrome document.
5.
6.
7.
Name the document in File Name.
Enter the date of sending and job ID in Additional Information. These entries are appended in the file name.
Use the File Format drop-down list to select the type of the document you want to send.
User Guide |
11 |

Document Box
8. Click Send button. If you are prompted to confirm sending, in case Confirmation Screen is activated on the device's operation panel, make confirmation. The document is sent to the destination.
Printing a Document
1. Select the document(s) to print as described above.
2. Click Print button. The Print Settings page opens. The selected file is shown in
Selected Files (Print Order).
3. If desired, change the order of the documents to be joined by clicking Top, Up, Down, and Bottom. You can exclude a document from the Select Pages (Print Order) list by clicking Delete.
If you want to print the selected page in a file, click Settings in Selected Pages to Process. After selecting the desired pages, click Submit button.
4. Enter the number of copies to print in Copies. When clicking Delete after Print, the document is deleted after printing.
5. Use the Paper Selection drop-down list if you want to change the paper source.
6. Use the Color Selection drop-down list if you want to change the color of the document when it is printed.
7. In Functions, change settings for Duplex, Combine, EcoPrint, and Toner Save Level as desired.
8. Click Print button. The document is printed.
Deleting a Custom Box
1. Click Custom Box under Document Box on the navigation menu. The Custom Boxes page opens.
2. Click Delete icon once. This will not delete any custom box yet, but this will let the checkboxes (Select) appear to the left.
3. Select the custom box you want to delete by selecting the checkbox to the left. You can select only one custom box to delete at a time.
4. You can enter the box name in the Box Name window and click the magnifying glass icon to quickly search the custom box.
5. Click Delete icon.
FAX Box
The section below explains how to add, edit or delete fax boxes as well as working with their contents.
Adding a New Fax Box
1.
2.
3.
Click Fax Box under Document Box on the navigation menu.
Click Add icon. The New Box - Property page opens.
Enter the property such as Number and Box Name.
12 |
Embedded Web Server |

Document Box
4. Click Submit button.
Editing a Fax Box
1.
2.
3.
4.
5.
Click Fax Box under Document Box on the navigation menu.
Select the fax box you want to edit by clicking on its Number or Box Name. The documents contained in the fax box are displayed with its name, date of creation, size, etc. You can choose List View or Thumbnail to view the box contents.
Alternatively, you can directly enter the box number in the Box # window and click Go to, or enter the box name in the Box Name window and click the magnifying icon, to quickly search the fax box.
Click Box Property. The Property page will appear.
Make entries required to modify the fax box properties such as Number, Name, etc.
Click Submit button.
Working with a FAX Box
1.
2.
Click Fax Box under Document Box on the navigation menu.
Select the fax box you want to work with by clicking on its Number or Box Name. If the box is password-protected, enter the password. The documents contained in the fax box are displayed with its name, date of creation, size, etc. You can choose List View or Thumbnail to view the box contents. To view details on a document in the fax box, click its Name. The Property page opens and you can view the number of pages, resolution, etc. You can also change the file name by clicking Change File Name or preview by clicking Preview on this page.
To search the document in the fax box, you can open the fax box, enter the document name in the File Name window and click the magnifying glass icon.
3. In the fax box, select the check box next to the name of the document that you want to apply the action. You can select more than one document simultaneously.
4. Select either of Delete, Download, and Print to apply to the document. To perform either of these actions, follow the same procedure as described in Custom box on page 9.
Deleting a FAX Box
1.
2.
3.
4.
Click Fax Box under Document Box on the navigation menu. The FAX Boxes page opens.
Click Delete icon. This will not delete any fax box yet, but this will let the checkboxes (Select) appear to the left.
Select the fax box you want to delete by selecting the check box to the left. You can select only one fax box to delete at a time. You can enter the box name in the Box Name window and click the magnifying glass icon to quickly search the custom box.
Click Delete icon once. If required, enter the password and click OK.
User Guide |
13 |

Document Box
Sub Address Box
The section below explains how to add, edit or delete sub address boxes as well as working with their contents.
Adding a New Sub Address Box
1. Click Sub Address Box under Document Box on the navigation menu. The Sub Address Boxes page opens.
2.
3.
Click Add icon and enter descriptions for the sub address box.
Click Submit button.
Editing a Sub Address Box
1. Click Sub Address Box under Document Box on the navigation menu. The Sub Address Boxes page opens.
2. Select the sub address box you want to edit by clicking on its Number or Box Name. The documents contained in the sub address box are displayed with its name, date of creation, etc.
3.
4.
Alternatively, you can directly enter the box number in the Box # window and click Go to, or enter the box name in the Box Name window and click the magnifying icon, to quickly search the sub address box.
Click Box Property. The Property page will appear.
Make entries required to modify the sub address box properties such as Number, Name, etc.
5. Click Submit button.
Working with a Sub Address Box
1.
2.
3.
4.
Click Sub Address Box under Document Box on the navigation menu. The Sub Address Boxes page opens.
Select the sub address box you want to work with by clicking on its Number or Box Name. If the box is password-protected, enter the password. The documents contained in the sub address box are displayed with its name, date of creation, etc.
To search the document in the sub address box, you can open the sub address box, enter the document name in the File Name window and click the magnifying glass icon.
In the sub address box, select the check box next to the name of the document that you want to apply the action. You can select more than one document simultaneously.
Select either of Delete or Print to apply to the document. To perform either of these actions, follow the same procedure as described in p.9.
Deleting a Sub Address Box
1. Click Sub Address Box under Document Box on the navigation menu. The Sub Address Boxes page opens.
2. Click Delete icon once. This will not delete any sub address box yet but this will let check boxes (Select) appear to the left.
14 |
Embedded Web Server |

Document Box
3. Select the sub address box you want to delete by selecting the check box to the left. You can select only one box to delete at a time. You can enter the box name in the Box Name window and click the magnifying glass icon to quickly search the box.
4. Click Delete icon once. If required, enter the password and click OK.
Polling Box
This page allows you to print or delete documents in polling boxes. Also, you can determine whether documents are automatically deleted or retained after polling.
Polling Box Property
1.
2.
3.
4.
Polling Box Property determines after the document has been sent, whether you want the document to be automatically deleted or to be retained (overwritten).
Click Polling Box under Document Box on the navigation menu. The Polling Box page opens.
Click Box Property. The Polling Box - Property opens to select whether the document which was sent is deleted, or overwritten and retained.
To configure the box so that documents are overwritten at updating, set Overwrite Setting to Permit. To configure the box so that documents are automatically deleted after transmission, set Delete after Transmit to On.
After confirming the settings, click Submit button.
Deleting Documents in Polling Box
To delete documents in a polling box, proceed as follows:
1. Click Polling Box under Document Box on the navigation menu. The Polling Box page opens. You can choose List View or Thumbnail to view the box contents. To view details on a document in the polling box, click its Name. The Property page opens and you can view the number of pages, resolution, etc. You can also change the file name by clicking Change File Name or preview by clicking Preview on this page.
2. Select the document(s) you want to delete by selecting the check box to the left. You can select more than one check box to delete the documents simultaneously.
3. Click Delete icon once.
Printing Documents in Polling Box
To print documents in a polling box, proceed as follows:
1. Click Polling Box under Document Box on the navigation menu. The Polling Box page opens. You can choose List View or Thumbnail to view the box contents. To view details on a document in the polling box, click its Name. The Property page opens and you can view the number of pages, resolution, etc. You can also change the file name by clicking Change File Name or preview by clicking Preview on this page.
2. Select the document(s) you want to print by checking the checkbox to the left. You can select more than one checkbox to print the documents in succession.
3. Click Print button. The Basic submenu will open.
User Guide |
15 |

Document Box
4. You can immediately start to print the documents in the order shown in Selected Files by clicking Print. If you want to change the order of printing, highlight a document and press Top, Up, etc. If you want to omit a document from the list, click Delete icon.
5. Click Print button.
Job Box Settings
|
The section below explains how to change the number of Quick Copy jobs and set |
|
automatic delete times for temporary jobs in Job Box. Also, you can determine whether |
|
documents are automatically deleted or retained after printing. |
1. |
Click Job Box Settings under Document Box on the navigation menu. The Job Box |
|
Settings page opens. |
2. |
Enter the value in Quick Copy Job Retention. You can select Quick Copy jobs from 0 |
|
to 300. |
3. |
Enter the value in Repeat Copy Job Retention. You can select Quick Copy jobs from |
|
0 to 50. |
4. |
To delete automatically the temporary retained jobs after printing, select 1 hour, 4 |
|
hours, 1 day, or 1 week on the Deletion of Job Retention drop-down list. If you do not |
|
want to delete the jobs after printing, select Off on the Deletion of Job Retention drop- |
|
down list. |
5. |
After confirming the settings, click Submit button. |
16 |
Embedded Web Server |
Address Book
5 Address Book
This page is accessible when you have logged in using a general user or administrator account.
Address Book contains Machine Address Book and External Address Book. You can also specify the address quickly by assigning it to the One-Touch key.
Machine Address Book
This section explains you to add, edit or delete contacts in the machine address book.
Contacts
This subsection explains how to add, edit or delete contacts in the machine address book.
In the Addresses page, contacts and groups are listed together. Contacts are identified by the single person icon and groups by the triple person icon. You can filter to display only the contacts or groups by choosing Contact or Group on the Type drop-down list.
Adding a New Contact
1. Click Machine Address under Address Book on the navigation menu. The Addresses page opens.
2.
3.
Click Add icon. The New Contact - Property page opens.
Enter the contact's Number, Name and E-mail.
You can also enter SMB and FTP access information for the contact including a shared folder accessible from Microsoft Windows Network. Specify Host Name, Port Number, Path to the shared folder, Login User Name, and Login Password for the contact.
When the Test button is pressed, this machine tries to connect to the SMB or FTP server.
If you use the host name, you must first specify the DNS server information.
If the FAX system is installed or i-FAX is activated in the system, you can include a FAX number and/or i-FAX address.
4. Click Submit button. To cancel, click Back button.
Editing a Contact
The steps below allow you to modify the number or name, e-mail address, SMB and FTP information, FAX and i-FAX settings of a contact.
1. Click Machine Address under Address Book on the navigation menu. The Addresses page opens.
2. Click the contact's Number or Name you want to edit. The Property page appears.
User Guide |
17 |

Address Book
Alternatively, you can directly enter the address number in the Address # window and click Go to, or enter the address name in the Address Name window and click the magnifying icon, to quickly search the contact.
3. Modify Number, Name, or E-mail of the contact. If the system is installed with a FAX system or has i-FAX activated, you can modify these settings.
4. Modify the settings for SMB and FTP accesses as desired. When the Test button is pressed, this machine tries to connect to the SMB or FTP server.
5. Click Submit button. To cancel, click Back button.
Deleting a Contact
1. Click Machine Address under Address Book on the navigation menu. The Addresses page opens.
Select the contact(s) you want to delete by selecting the checkbox to the left.
2. If you want all contacts displayed on the page deleted, click Check All icon. To deselect all, click None icon.
3. Click Delete icon once.
Adding a New Group
1. Click Machine Address under Address Book on the navigation menu. The Addresses page opens.
2.
3.
Click Add Group button. The New Group - Property page opens.
Enter the group's Number, or leave it to the system to automatically assign a number, and the group's Name.
4.
5.
Add contacts to the group by clicking the Add icon. The Addresses page appears.
Select the contact to join the group by checking the Select checkbox to the left. You can select more than one document simultaneously. Note that the contacts to join must already have been existent on the Addresses page.
6. Click Submit button. You are returned to the Property page. To delete a contact, select a contact and click the Delete icon.
7. Click Submit button. Repeat the above steps to add more groups.
Edit Group
1. Click Machine Address under Address Book on the navigation menu. The Addresses page opens.
2. Click the group’s Number or Name you want to edit. The Property page of the group opens.
3.
4.
Alternatively, you can directly enter the group number in the Address # window and click Go to, or enter the group name in the Address Name window and click the magnifying icon, to quickly search the group.
Modify the group's Number and Name as desired.
Add contacts to the group by clicking the Add icon. The Addresses page appears.
18 |
Embedded Web Server |

Address Book
5.
6.
7.
Select the contact to join the group by checking the Select checkbox to the left. You can select more than one document simultaneously.
You can filter contacts by selecting E-mail, Folder, FAX, or i-FAX on the Type dropdown list.
Click Submit button to add the contacts. You are returned to the Property page. To delete a contact, select a contact and click Delete icon.
Click Submit button. You are returned to the Address page.
Delete group
1.
2.
3.
Click Machine Address under Address Book on the navigation menu. The Addresses page opens.
Select the group(s) you want to delete by selecting the check box to the left.
If you want all groups displayed on the page deleted, click Check All icon. To deselect all, click None icon.
Note: Deleting a group does not delete the contacts joined in the group. Click Delete once.
External Address Book Settings
This section explains how to use the external address book.
1. Click External Address Book Settings under Address Book on the navigation menu. External Address Book Settings page opens.
2. Confirm that LDAP is set to On. If the LDAP is Off, make settings in Protocol.
3. Click On of the desired external address book(s), and then click Settings button.
External Address Book 1 (to 8) Settings page opens.
Note: External Address Book 5 (to 8) is used for sending a fax via FAX server.
4. If prompted, configure the following settings for External Address Book.
External Address Book Name
Enter the external address book name.
LDAP Server
Configure the LDAP server.
1.LDAP Server Name: Specifies a name or IP address for the LDAP server.
2.LDAP Port Number: Sets the port number used by LDAP. The default port is 389.
3.Search Timeout: Specifies the timeout in seconds after which a search on the LDAP server expires.
4.Login User Name: Enter the name of the user to access the LDAP server.
5.Login Password: Enter the password of the user to access the LDAP server.
6.Max Search Results: Enter the maximum value of the search results using Search Settings.
7.Search Base: Enter the basic information of search. Entry example of Search Base is as follows.
To search through the "Users" container in the Active Directory
User Guide |
19 |

Address Book
"serv.example.com" domain: cn=Users,dc=serv,dc=example,dc=com
To search through the "Sales div" Organizational Unit (OU) in the Active Directory "serv.example.com" domain:
ou="Sales div",dc=serv,dc=example,dc=com
To search through the user's container "Hanako Yamada" which belongs to "Sales2" Organizational Unit (OU) in the Active Directory "serv.example.com" domain:
cn="Hanako Yamada",ou=Sales2,dc=serv,dc=example,dc=com
If there are one or more blank spaces in each of value, you have to enclose the value in double quotation marks (").
8.LDAP Security: Configure this setting in the Protocol Settings page under
Network Settings.
9.Authentication Type: Select an authentication type from the drop-down list.
10.Connection Test: This will test one transmission for each press, attempting to establish communication with the LDAP server.
Display Sequence
Select a Display Mode from Display from the first name and Display from the family name on the drop-down list.
Search Settings 1 (to 2)
You can configure the following settings.
1.Search Criteria: Enter Display Name and LDAP Attribute as a search criteria.
2.Return Value: Enter LDAP Attribute as a return value and select Job Type from the drop-down list.
3.Optional Return Value: Enter Display Name and LDAP Attribute as an optional return value.
5.If prompted, configure the following settings for External Address Book (FAX Server).
External Address Book Name
Enter the external address book name.
LDAP Server Settings
Configure the LDAP server.
1.LDAP Server Name: Specifies a name or IP address for the LDAP server.
2.LDAP Port Number: Sets the port number used by LDAP. The default port is 389.
3.Search Timeout: Specifies the timeout in seconds after which a search on the LDAP server expires.
4.Login User Name: Enter the name of the user to access the LDAP server.
5.Login Password: Enter the password of the user to access the LDAP server.
6.Max Search Results: Enter the maximum value of the search results using Search Settings.
7.Search Base: Enter the basic information of search. Entry example of Search Base is as follows.
To search through the "Users" container in the Active Directory "serv.example.com" domain: cn=Users,dc=serv,dc=example,dc=com
To search through the "Sales div" Organizational Unit (OU) in the Active Directory "serv.example.com" domain:
ou="Sales div",dc=serv,dc=example,dc=com
20 |
Embedded Web Server |

Address Book
To search through the user's container "Hanako Yamada" which belongs to "Sales2" Organizational Unit (OU) in the Active Directory "serv.example.com" domain:
cn="Hanako Yamada",ou=Sales2,dc=serv,dc=example,dc=com
If there are one or more blank spaces in each of value, you have to enclose the value in double quotation marks (").
8.LDAP Security: Configure this setting in the Protocol Settings page under
Network Settings.
9.Authentication Type: Select an authentication type from the drop-down list.
10.Connection Test: This will test one transmission for each press, attempting to establish communication with the LDAP server.
Display Sequence Settings
Select a Display Mode from Display from the first name and Display from the family name on the drop-down list.
Search Settings 1 (to 2)
You can configure the following settings.
1.Search Criteria: Enter Display Name and LDAP Attribute as a search criteria.
2.Return Value: Enter LDAP Attribute as a return value.
3.Optional Return Value: Enter Display Name and LDAP Attribute as an optional return value.
6.After confirming the settings, click Submit button.
One Touch Key
This section explains how to register the address to the One Touch key.
Registering a new One Touch key
1.
2.
3.
Click One Touch Key under Address Book on the navigation menu. One Touch Key List opens.
Click Settings of the One Touch Key which you want to register. The One Touch Key Property page opens.
Enter the Display Name and Destination in the One Touch Key Property. You can call the address registered in the Address Book by clicking Address Book. You can select the type of addresses using the Type drop-down list in the Addresses page.
Click No. or Name of the address you want to register. The address name and the property information are shown. Select the contact you want to register by checking the radio button to the left. You can check only one contact to assign at a time.
You can enter the address name in the Address Name window and click the magnifying glass icon to quickly search the contact.
4. After confirming the settings, click Submit button.
Edit one touch key
1. Click One Touch Key under Address Book on the navigation menu. One Touch Key List opens.
User Guide |
21 |

Address Book
2. Enter the key number in the Key # windows and click Go to. The Property page appears.
3. Make entries required to modify the Display Name and the Destination. Click Delete to delete the destination.
4. After confirming the settings, click Submit button.
Delete One Touch Key
1. Click One Touch Key under Address Book on the navigation menu. One Touch Key List opens.
2. Click Delete of the One Touch Key which you want to delete.
22 |
Embedded Web Server |

Device Settings
6 Device Settings
This page is accessible when you have logged in the embedded server with administrator privilege, while network authentication or local authentication is enabled.
If prompted, configure the following settings. See the sections below for detailed information.
•Paper/Feed/Output
•Original Document
•Energy Saver/Timer
•Date/Time
•System
Paper/Feed/Output
This section includes settings that apply to paper size and media type for the paper loaded in the MP tray and the cassettes, configuring cassette group, paper output, and the other detailed properties.
Cassette Settings
1. Click Paper/Feed/Output under Device Settings on the navigation menu. The Paper/ Feed/Output Settings page opens.
2.
3.
Configure the paper size and media type for each cassette.
After confirming the settings, click Submit button.
MP Tray Settings
1. Click Paper/Feed/Output under Device Settings on the navigation menu. The Paper/ Feed/Output Settings page opens.
2.
3.
Configure the paper size and media type for MP Tray.
After confirming the settings, click Submit button.
Group Settings
1. Click Paper/Feed/Output under Device Settings on the navigation menu. The Paper/ Feed/Output Settings page opens.
2.
3.
Select the cassette(s) corresponding to your desired group arrangement.
After confirming the settings, click Submit button.
Paper Output Settings
1. Click Paper/Feed/Output under Device Settings on the navigation menu. The Paper/ Feed/Output Settings page opens.
User Guide |
23 |

Device Settings
2. Configure the default output tray. You can change the output tray for Copy/Custom Box, Printer and FAX respectively.
3. After confirming the settings, click Submit button.
Other Settings
1. Click Paper/Feed/Output under Device Settings on the navigation menu. The Paper/ Feed/Output Settings page opens.
2. You can configure the following settings.
Default Paper Source
You can select the cassette or MP Tray feed the paper with priority.
Paper Selection
You can select Auto or Default Paper Source by clicking the drop-down list.
Auto Paper Selection
You can select Most Suitable Size or Same as Original Size by clicking the dropdown list.
Special Paper Action
You can select Adjust Print Direction or Speed Priority by clicking the drop-down list.
Media for Auto (Color)
You can select the media type when Auto is selected in Paper Selection for color printing.
Media for Auto (B&W)
You can select the media type when Auto is selected in Paper Selection for black and white printing.
Paper Source for Cover
You can select the cassette or MP Tray feed the cover.
Paper Size for Small Original
You can select Default Paper Size or the paper size by clicking the drop-down list when an original of a small size, such as a card, which the scanner cannot detect is printed.
Offset One Page Documents
You can select whether offset stacking (On) or not (Off) when printing documents comprised of only one page.
Offset Documents Each Job
You can select whether offset stacking (On) or not (Off) when printing documents comprised of each job.
24 |
Embedded Web Server |

Device Settings
Separator Sheet Paper Source
You can select the cassette or MP Tray feed the separator sheet by clicking the drop-down list.
Message Paper Set
YYou can select whether display (On) or not (Off) the confirmation screen when loading the paper in each paper source.
3. After confirming the settings, click Submit button.
Paper Detail Settings
1. Click Paper/Feed/Output under Device Settings on the navigation menu. The Paper/ Feed/Output Settings page opens.
2. Click Settings in Paper Detail Settings. The Paper Details Settings page opens.
You can configure the following settings.
Custom Page Size Settings
You can change the size of paper for cassette and MP tray . When you want to change the settings, enter the length (X) and width (Y) of the Custom Paper. Note: Some model type can select On and then specify the paper size.
Media Type Settings
You can select the paper weight for each media type by clicking the drop-down list. When you select the Custom 1 to 4, you can select the paper weight as well as specifying whether or not to use duplex printing and entering the custom paper name.
3. After confirming the settings, click Submit button.
Original Document
This section explains how to configure the original.
Auto Detect Original Size
1. Click Original Document under Device Settings on the navigation menu. The Original Document page opens.
2. You can configure the following settings.
System of Units
Select Metric or Inch as measurement of original document for auto detect. If you select Inch, select an original size (Legal, OfficioII or 216 x 340 mm) from the dropdown list.
A6/Hagaki
Select A6 or Hagaki (postcard) as a original size for auto detect. When you select Hagaki (postcard), only an original placed on a platen can be detected.
User Guide |
25 |

Device Settings
Folio
Select On when you want to detect the Folio-size document automatically.
11 x 15"
Select On when you want to detect the 11 x 15"-size document automatically.
Note: Some model type can detect all the originals automatically, or select the default size of original placed on the platen.
3. You can select A6 or Hagaki for A6/Hagaki and On (auto detection) or Off for Folio and 11 x 15”, accrding to the machine type.
4. After confirming the settings, click Submit button.
Custom Original Size
1. Click Original Document under Device Settings on the navigation menu. The Original Document page opens.
2. Select On or Off for each Custom Original (1 to 4). When you want to change the settings, enter the length (X) and width (Y) of the Custom Paper.
Note: You can enter the length of Custom Paper without selecting On or Off according to the machine.
3. After confirming the settings, click Submit button.
Energy Saver/Timer
This section explains how to configure the Energy Saver Settings and Timer Settings.
Energy Saver Settings
1. Click Energy Saver/Timer under Device Settings on the navigation menu. The Energy Saver/Timer Settings page opens.
2. You can configure the following settings.
Sleep Level
Select Quick Recovery or Energy Saver. Even if you selected either sleep level, the machine can recover from the sleep mode when you press any key on the operation panel or the machine received the print or fax job.
Quick Recovery recovers from the sleep mode faster than Energy Saver.
Energy Saver reduces power consumption even more than Quick Recovery, and allows sleep mode to be set separately for each function. The time required for the machine to wake up from the sleep mode and resume normal operation will be longer than for Quick Recovery.
Alternatively, on some models, the Sleeping page appears on the embedded web server while the system is engaged in Energy Saver. You can click Start on the
Sleeping page.
26 |
Embedded Web Server |
Loading...