


KOHLER K-99693 Installation Manual
Installation and Care Guide
DTV I Conversion to DTV+
Français, page “Français-1”
Español, página “Español-1”
1233354-2-B
IMPORTANT INSTRUCTIONS
WARNING: When using electrical products, basic precautions should always be followed, including the following:
WARNING: Risk of electric shock. Disconnect power before servicing.
WARNING: Risk of injury or property damage. Please read all instructions thoroughly before beginning installation.
NOTICE: Follow all plumbing, electrical, and building codes.
Before Operating the System For the First Time:
Download and install the latest software. This may take an hour or more to complete based on system configuration and internet connection speed. Do not disconnect the power from the controller during software download and installation.
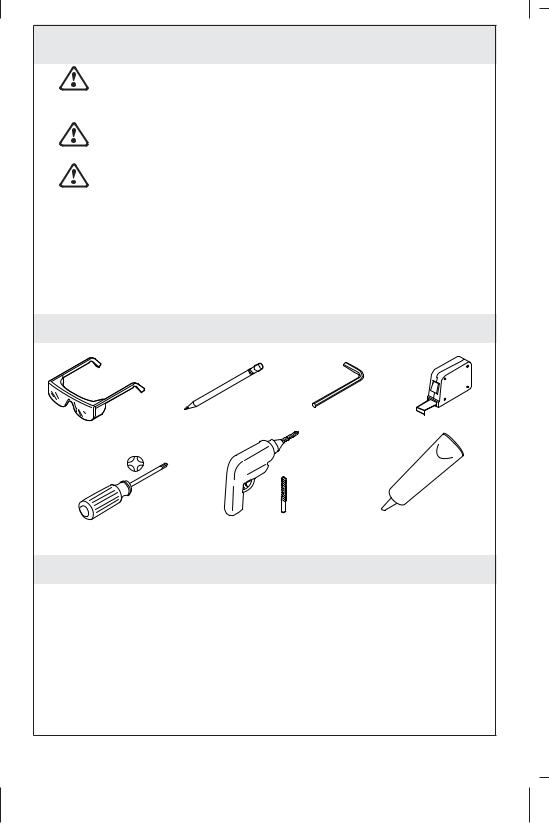
Tools and Materials
3/32"
1/4" |
Silicone Sealant |
Before You Begin
CAUTION: Risk of product damage: Disconnect the power from all components before beginning this installation.
NOTICE: An existing DTV I system should already be in place to complete this installation.
NOTICE: The K-99695 system controller and the K-99693 digital interface are required to complete this installation.
1233354-2-B |
2 |
Kohler Co. |
Before You Begin (cont.)
Observe all local plumbing, building, and electrical codes.
Read these instructions and determine all required components along with their installation locations before beginning this installation.
Kohler Co. |
3 |
1233354-2-B |
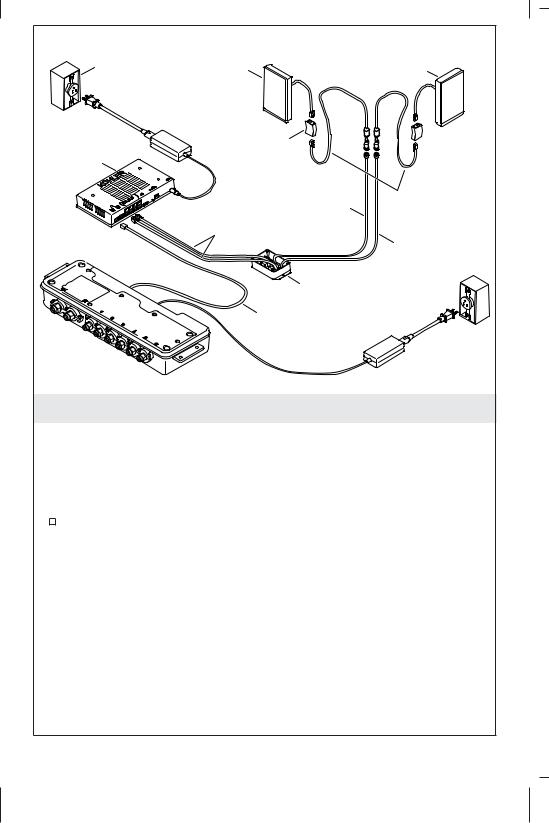
Outlet |
Master |
Accessory |
|
Interface |
Interface (Optional) |
||
|
Coupler |
|
Controller |
|
30' (9.1 m) |
18" (457 mm) |
8-pin Cable |
|
6' (1.8 m) |
Retrofit Cable |
Data Cable |
|
|
30' (9.1 m) |
|
4-pin Cable |
Adapter |
|
30' (9.1 m) |
|
Valve Cable |
|
1. Plan the System
NOTE: The controller powers the interface(s) and controls the digital valve(s) and other system components.
NOTE: The data cable connecting the adapter to the controller is 6’ (1.8 m) long. The adapter installation location must be within 5’ (1.5 m) of the controller.
Refer to the installation guides packed with each product for specific installation needs.
Retrofit Cable Length |
18″ (457 mm) |
Data Cable Length |
6’ (1.8 m) |
Valve Cable Length |
30’ (9.1 m) |
|
|
1233354-2-B |
4 |
Kohler Co. |

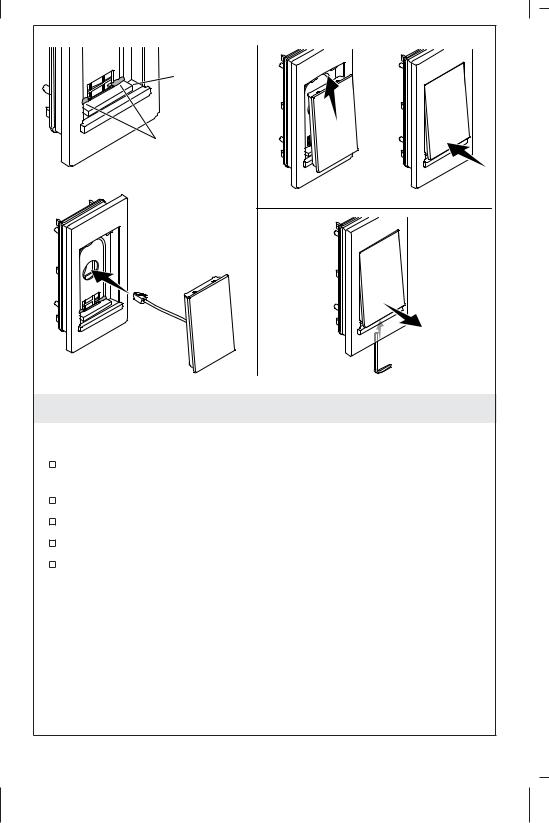
Tab
Power
Cable
Clip
Accessory Interface Cable (Optional)
Door
Master
Interface
Cable
2. Disconnect the Cables from the Valve
IMPORTANT! Disconnect the power from the valve before disconnecting the cables.
Press the clips to release and open the door on the valve.
To remove the door, slide the hinge side of the door in either direction until it slips free.
Disconnect the power cable and existing interface cable(s) from the valve.
Kohler Co. |
5 |
1233354-2-B |
Foam |
|
Gasket |
|
Apply |
|
silicone |
|
sealant. |
Install |
|
Remove |
3. Install the DTV+ Interface to the Housing
NOTE: The K-99693 digital interface is required to complete this installation.
Apply silicone sealant to the inside edges of the foam gasket near the bottom of the housing.
Feed the interface cable through the hole in the housing.
Tilt the top of the interface onto the tabs in the housing.
Press the bottom of the interface until it clicks in place.
If the interface needs to be removed from the housing, insert a 3/32″ hex wrench to unlatch the bottom, then tilt out.
1233354-2-B |
6 |
Kohler Co. |
Retainer
Wall Sleeve
Suction Cup
Disconnect the cable after the retainer is in place.
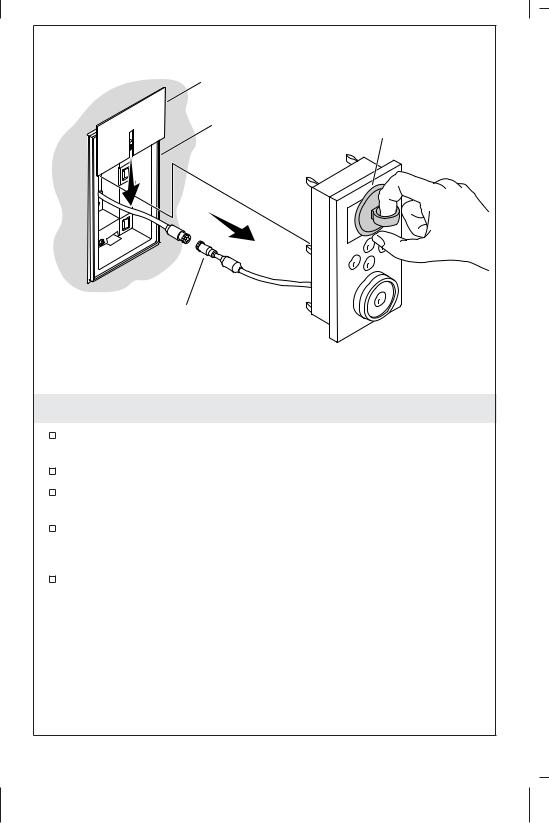
4. Remove the Existing Interface
Attach the suction cup (provided) to the screen of the existing interface.
Using the suction cup, remove the interface from the wall sleeve.
Carefully pull the cable through the hole in the wall sleeve and out of the wall cavity.
Slide the cardboard retainer (provided with the DTV+ interface) over the cable to prevent it from falling back though the hole in the wall sleeve.
With the retainer in place, disconnect the interface cable from the cable coming from the wall.
Kohler Co. |
7 |
1233354-2-B |
Apply grease in both ends.
18" (457 mm) Retrofit Cable
Coupler
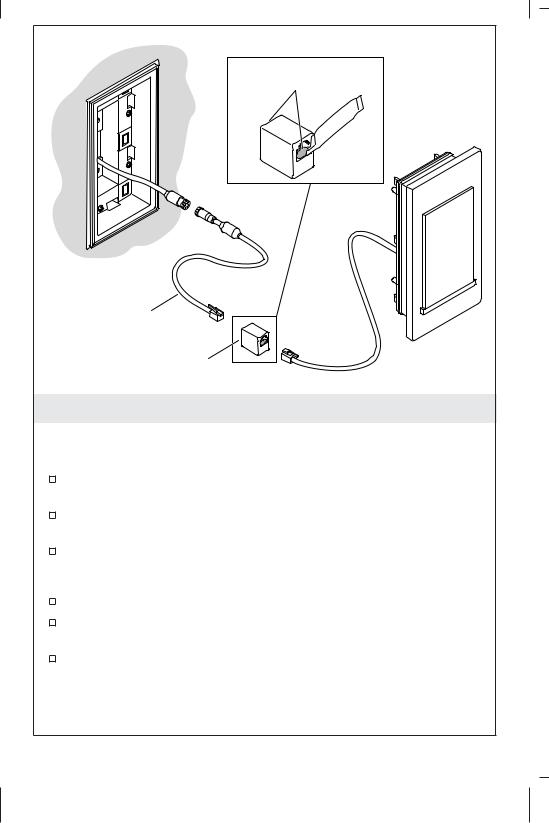
5. Install the Housing Assembly
CAUTION: Risk of product damage: Before proceeding, verify that both ends of the original cable coming from the wall are disconnected from any components.
Apply grease (provided with the DTV+ interface) into both ends of the coupler.
Connect the 18″ (457 mm) retrofit cable and the interface cable to the coupler. Make sure the cables fully click into the coupler.
Connect the other end of the retrofit cable to the cable from the wall. Align the white arrows on the connectors and make sure they fully engage.
Carefully feed the cables and coupler into the hole in the wall.
Firmly press the housing assembly into the wall sleeve until it snaps in place.
Repeat the steps above for any accessory interfaces.
1233354-2-B |
8 |
Kohler Co. |
Adapter
Drill holes and use anchors where needed.
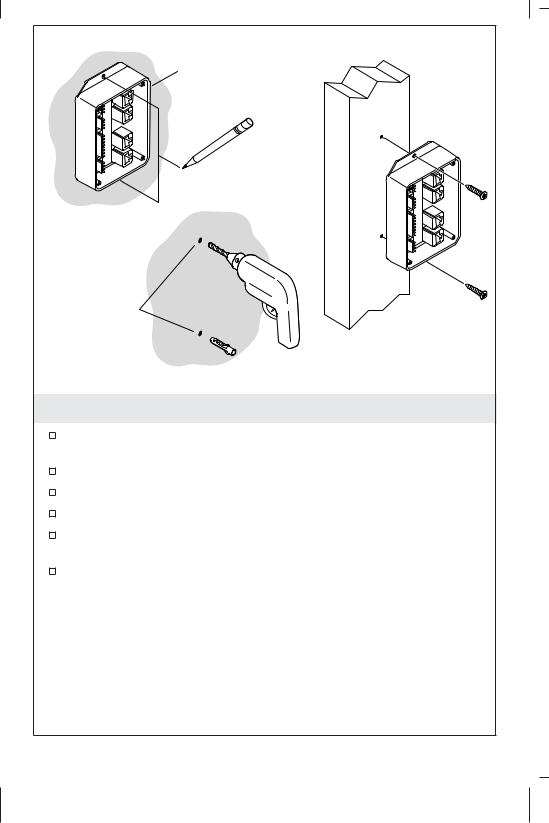
6. Install the Adapter
Install the K-99695 system controller according to the instructions packed with the product.
Install the adapter within 5’ (1.5 m) of the system controller.
Position the adapter against a wall or 2x4 stud.
Mark the holes.
Use anchors if the marks are not at a stud location. Drill two 1/4″ holes and install the anchors.
Secure the adapter with two screws.
Kohler Co. |
9 |
1233354-2-B |
|
6' (1.8 m) |
Accessory |
Data Cable |
|
|
Interface Cable |
|
Master |
To |
Interface Cable |
Controller |
Drip Loop
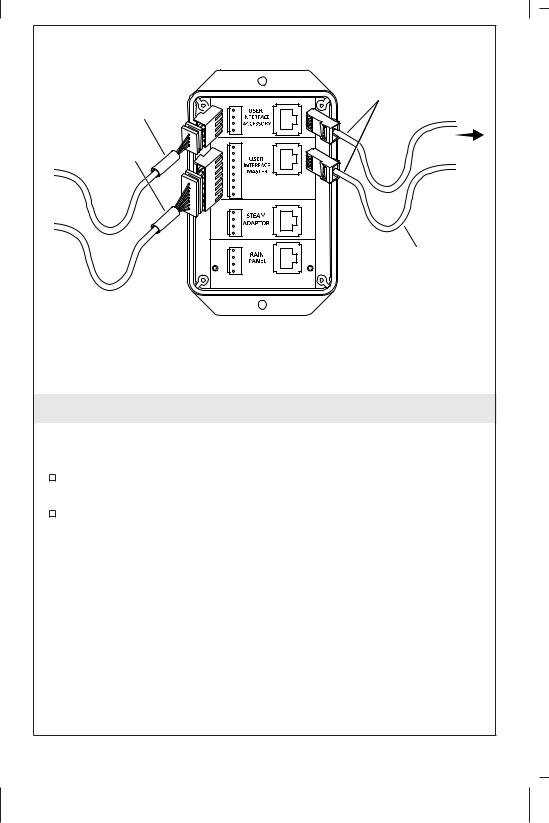
7. Connect the Cables to the Adapter
IMPORTANT! Make drip loops in all cables.
IMPORTANT! Make sure all cables fully click into the sockets.
Connect the interface cable(s) to the appropriate master (8-pin) or accessory (4-pin) interface connector on the adapter.
Connect the 6’ (1.8 m) data cable(s) to the adapter.
1233354-2-B |
10 |
Kohler Co. |
Controller |
Digital Valve |
To
Adapter
Data
Cables Power
Cable
Valve
Cable
Valve Cable |
Drip Loop |
8. Complete the Installation
IMPORTANT! Make drip loops in all cables.
IMPORTANT! Make sure all cables fully click into the sockets.
Connect the data cable(s) from the adapter into the eight-port section of the controller.
Connect the 30’ (9.14 m) valve cable into a valve port on the controller.
Connect the 8-pin end of the valve cable to the valve.
Reconnect the power cable to the valve.
Verify all grommets are in place, then reinstall the door to the valve.
To close the door, press on the tabs until the clips snap in place.
Turn on the power to the valve and connect the power to the controller.
The interface is powered by the controller. The interface should illuminate when power is connected to the controller.
Kohler Co. |
11 |
1233354-2-B |

Warranty
KOHLER® Electronic Faucets, Valves and Controls
FIVE-YEAR LIMITED WARRANTY
Kohler Co. warrants that its electronic faucets, valves and controls will be free of defects in material and workmanship during normal residential use for five years from the date the product is installed. This warranty applies only to electronic faucets, valves and controls installed in the United States of America, Canada and Mexico (″North America″).
If a defect is found in normal residential use, Kohler Co. will, at its election, repair, provide a replacement part or product, or make appropriate adjustment where Kohler Co.’s inspection discloses any such defect. Damage caused by accident, misuse, or abuse is not covered by this warranty. Improper care and cleaning will void the warranty*. Proof of purchase (original sales receipt) must be provided to Kohler Co. with all warranty claims. Kohler Co. is not responsible for labor charges, installation, or other incidental or consequential costs other than those noted above. In no event shall the liability of Kohler Co. exceed the purchase price of the faucet, valve or control.
If the electronic faucets, valves or controls are used commercially or are installed outside of North America, Kohler Co. warrants that the faucet, valve or control will be free from defects in material and workmanship for one (1) year from the date the product is installed, with all other terms of this warranty applying except duration.
If you believe that you have a warranty claim, contact your Home Center, Dealer, Plumbing Contractor or E-tailer. Please be sure to provide all pertinent information regarding your claim, including a complete description of the problem, the product, model number, the date the product was purchased, from whom the product was purchased and the installation date. Also include your original invoice. For other information, or to obtain the name and address of the service and repair facility nearest you, write Kohler Co., Attn: Customer Care Center, Kohler, Wisconsin 53044 USA, or by calling 1-800-4-KOHLER (1-800-456-4537) from within the USA and Canada, and 001-800-456-4537 from within Mexico, or visit www.kohler.com within the USA, www.ca.kohler.com from within Canada, or www.mx.kohler.com in Mexico.
THE FOREGOING WARRANTIES ARE IN LIEU OF ALL OTHER WARRANTIES, EXPRESS OR IMPLIED, INCLUDING BUT NOT LIMITED TO THE IMPLIED WARRANTIES OF MERCHANTABILITY AND FITNESS FOR A PARTICULAR PURPOSE.
KOHLER CO. AND/OR SELLER DISCLAIM ANY LIABILITY FOR
1233354-2-B |
12 |
Kohler Co. |
 Loading...