


CD/CASSETTE RECEIVER |
KW-XC899 |
 ATT SOUND
U
 R SOURCE F
D
VOL |
VOL |
For installation and connections, refer to the separate manual.
INSTRUCTIONS
LVT1463-001A [U]
IMPORTANT FOR LASER PRODUCTS
Precautions:
1.CLASS 1 LASER PRODUCT
2.CAUTION: Invisible laser radiation when open and interlock failed or defeated. Avoid direct exposure to beam.
3.CAUTION: Do not open the top cover. There are no user-serviceable parts inside. Leave all servicing to qualified service personnel.
4.CAUTION: This CD player uses invisible laser radiation; however, is equipped with safety switches to prevent radiation emission when unloading CDs. It is dangerous to defeat the safety switches.
5.CAUTION: Use of controls, adjustments or performance of procedures other than those specified herein may result in hazardous radiation exposure.
CAUTION on Volume Setting
CDs produce very little noise compared with other sources. If the volume level is adjusted for the tuner, for example, the speakers may be damaged by the sudden increase in the output level. Therefore, lower the volume before playing a CD and adjust it as required during playback.
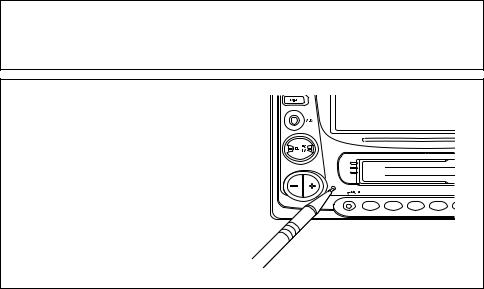
How to reset your unit
Press the reset button on the front panel using a ball-point pen or similar tool.
Note:
Your preset adjustments – such as preset channels or sound adjustments – will be erased.
2

Thank you for purchasing a JVC product. Please read all instructions carefully before operation, to ensure your complete understanding and to obtain the best possible performance from the unit.
CONTENTS
How to reset your unit ..............................
LOCATION OF THE BUTTONS ...........
Control panel ............................................
Remote controller .....................................
Preparing the remote controller ...............
2 |
SOUND ADJUSTMENTS .................. |
25 |
|
4 |
Adjusting the sound ................................. |
25 |
|
Reinforcing the bass sound |
25 |
||
4 |
|||
Selecting preset sound modes |
26 |
||
5 |
|||
Storing your own sound adjustments |
27 |
||
6 |
|||
|
|
BASIC OPERATIONS |
7 |
LEVEL METER SETTING .................. |
28 |
|
Selecting level meter patterns |
28 |
|||
|
|
RADIO OPERATIONS ..................... |
8 |
Listening to the radio ................................ |
8 |
Storing stations in memory ...................... |
9 |
Tuning in to a preset station ..................... |
10 |
Other convenient tuner functions ............. |
11 |
CD OPERATIONS .......................... |
12 |
Playing a CD ............................................ |
12 |
Locating a track or a particular portion |
|
on a CD ................................................ |
13 |
Selecting CD playback modes ................. |
14 |
Playing a CD Text ..................................... |
15 |
Other convenient CD functions ................ |
15 |
MP3 INTRODUCTION ..................... |
16 |
What is MP3? ........................................... |
16 |
How are MP3 files recorded and |
|
played back? ........................................ |
16 |
MP3 OPERATIONS ........................ |
18 |
Playing an MP3 disc ................................ |
18 |
Locating a file or particular portion |
|
on an MP3 disc ...................................... |
19 |
Selecting MP3 playback modes ............... |
21 |
OTHER MAIN FUNCTIONS ............... |
29 |
About the demonstration mode |
|
(DEMO MODE) ..................................... |
29 |
Setting the clock ....................................... |
29 |
Changing general settings (PSM) ............ |
30 |
Assigning names to the sources .............. |
33 |
EXTERNAL COMPONENT OPERATIONS ... |
34 |
CD CHANGER OPERATIONS ............. |
35 |
Playing CDs ............................................. |
35 |
Selecting CD playback modes ................. |
37 |
ADDITIONAL INFORMATION ............ |
38 |
Handling cassettes ................................... |
38 |
Handling discs .......................................... |
39 |
TROUBLESHOOTING ..................... |
40 |
SPECIFICATIONS .......................... |
43 |
TAPE OPERATIONS ....................... |
22 |
Listening to a tape .................................... |
22 |
Finding the beginning of a tune ................ |
23 |
Other convenient tape functions .............. |
24 |
BEFORE USE
*For safety....
•Do not raise the volume level too much, as this will block outside sounds, making driving dangerous.
•Stop the car before performing any complicated operations.
*Temperature inside the car....
If you have parked the car for a long time in hot or cold weather, wait until the temperature in the car becomes normal before operating the unit.
3
LOCATION OF THE BUTTONS
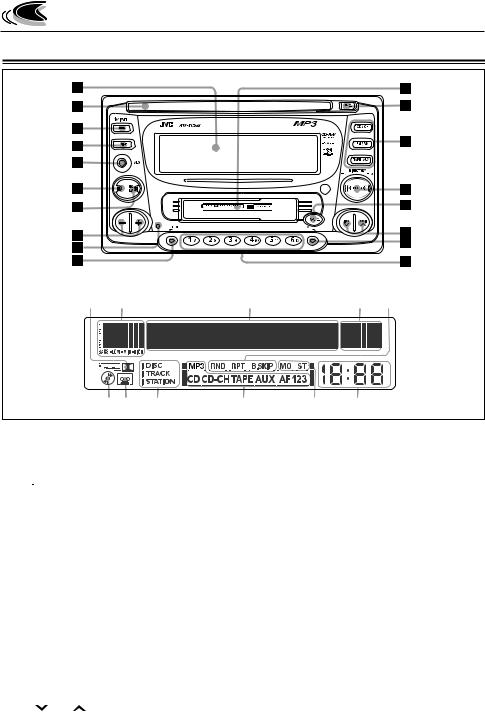
Control panel
Display window
o ; |
a |
s d |
f g h |
j |
k |
l |
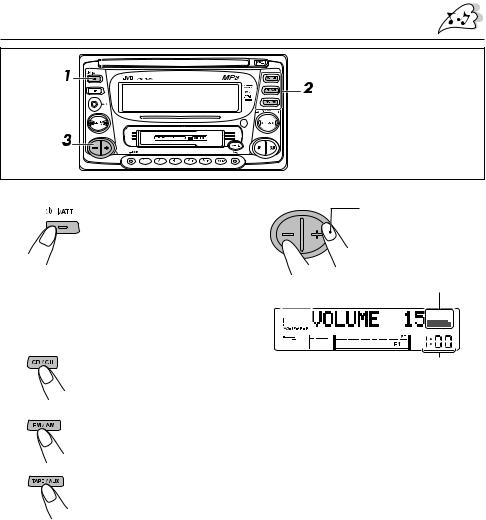
Control panel
1 Display window
2 CD loading slot
3 

 /ATT (standby/on/attenuator) button
4 DISP (display) button
5 Auxiliary input jack
6 SEL (select) button
7 EQ LV (Equalizer/Level) button
8 + / – buttons
9 Reset button p MODE button
q Cassette compartment w CD 0 (eject) button
eSource buttons
•CD/CH button
•FM/AM button
•TAPE/AUX button r • 2 PROG 3 button
•+10 / –10 button
t TAPE 0 (eject) button y 4 / ¢ buttons u EX (extra) button
i Number buttons
4
Display window
o Dolby NR indicator
;S.BASS EQ (Super Bass/Equalizer) level /level meter
a Main display s Level meter
dPlay mode indicators
RND (random), RPT (repeat),
B.SKIP (blank skip) f CD indicator
g TAPE indicator
hText name indicators DISC, TRACK, STATION
j Source indicators
MP3, CD, CD-CH (CD-changer), TAPE, AUX,
F1, F2, F3, A
k Tuner reception indicators MO (monaural), ST (stereo)
l Clock display
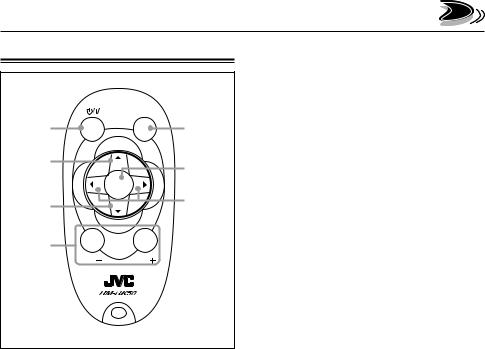
Remote controller
ATT |
SOUND |
|
1 |
|
5 |
2 |
U |
6 |
|
||
|
|
|
R SOURCE F |
|
|
3 |
D |
7 |
|
||
4 |
|
|
VOL |
VOL |
|
1Functions the same as the 
 /ATT button on the main unit.
2• Changes the band while listening to the radio.
•Skips to the first file of the next directory if pressed while listening to an MP3 disc.
•Changes the tape direction while listening to a tape.
•Selects disc numbers in increasing order, and starts playing while listening to the CD changer.
3• Selects preset numbers in increasing order while listening to the radio.
•Skips to the first file of the previous directory if pressed while listening to an MP3 disc.
•Selects disc numbers in decreasing order, and starts playing while listening to the CD changer.
4Functions the same as the +/– buttons on the main unit.
Note:
This button does not function for the preferred setting mode (PSM) adjustment.
5Selects the sound mode.
Each time you press the button, the EQ (equalizer) mode changes.
6Selects the source.
Each time you press SOURCE, the source changes.
7• Searches stations while listening to the radio.
•Fast-forwards or reverses the track/file if pressed and held while listening to any disc.
•Skips to the beginning of the next track or goes back to the beginning of the current (or previous) track/file if pressed briefly while listening to any disc.
•Fast-forwards or rewinds a tape and finds the beginning of a tune (MMS) while listening to a tape. To release this operation, press button 2 which then starts playback.
5
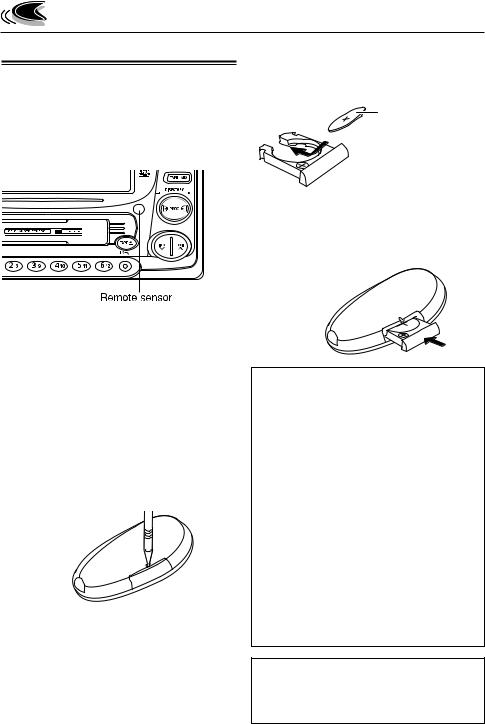
Preparing the remote controller
Before using the remote controller:
•Aim the remote controller directly at the remote sensor on the main unit. Make sure there is no obstacle in between.
•Do not expose the remote sensor to strong light (direct sunlight or artificial lighting).
2. Place the battery.
Slide the battery into the holder with the + side facing upwards so that the battery is fixed in the holder.
Lithium coin battery (product number:
CR2025)
3. Return the battery holder.
Insert again the battery holder pushing it until you hear a clicking sound.
(back side)
Installing the battery
When the controllable range or effectiveness of the remote controller decreases, replace the battery.
1. Remove the battery holder.
1)Push out the battery holder in the direction indicated by the arrow using a ball-point pen or a similar tool.
2)Remove the battery holder.
(back side)
1)
 2)
2)
WARNING:
•Store the battery in a place where children cannot reach.
If a child accidentally swallows the battery, consult a doctor immediately.
•Do not recharge, short, disassemble or heat the battery or dispose it in a fire.
Doing any of these things may cause the battery to give off heat, crack or start a fire.
•Do not leave the battery with other metallic materials.
Doing this may cause the battery to give off heat, crack or start a fire.
•When throwing away or saving the battery, wrap it in tape and insulate; otherwise, the battery may start to give off heat, crack or start a fire.
•Do not poke the battery with tweezers or similar tools.
Doing this may cause the battery to give off heat, crack or start a fire.
CAUTION:
DO NOT leave the remote controller in a place (such as dashboards) exposed to direct sunlight for a long time. Otherwise, it may be damaged.
6
BASIC OPERATIONS
Note:
When you use this unit for the first time, set the built-in clock correctly, see page 29.
1
2
Turn on the power.
“HELLO!” appears on the display.
Note on One-Touch Operation:
When you select a source in step 2 below, the power automatically comes on. You do not have to press this button to turn on the power.
Select the source.
•Each time you press CD/CH, the source alternates between
CD* and CD-changer (or external component)**.
3 Adjust the volume.
To turn up the volume.
 To turn down the volume.
Volume level
Clock time
4 Adjust the sound as you want (see pages 25 – 27).
• Each time you press FM/AM, the band changes to FM (FM1, FM2, FM3) and AM.
•Each time you press TAPE/AUX, the source alternates between
TAPE*** and external component
(AUX INPUT).
*If a disc is not in the loading slot, you cannot select CD as the source to play. (“NO DISC” will appear on the display.)
**Without connecting the CD changer or the external component, you cannot select it as the source to play.
***If a cassette is not in the cassette compartment, you cannot select TAPE as the source to play. (“NO TAPE” will appear on the display.)
•If you need to change the level meter pattern, see page 28.
To drop the volume immediately
Press 
 /ATT briefly while listening to any source. “ATT” starts flashing on the display, and the volume level will drop immediately.
To resume the previous volume level, press the button briefly again.
To turn off the power
Press 
 /ATT for more than 1 second. “SEE YOU” appears, then the unit turns off.
•If you turn off the power while listening to a disc, the disc play will start from where playback has been stopped previously, next time you turn on the power.
To operate the tuner, see pages 8 – 11.
To play the CD, see pages 12 – 15.
To play the MP3 disc, see pages 18 – 21.
To operate the tape deck, see pages 22 – 24.
To operate the external components, see page 34.
To operate the CD changer, see pages 35 – 37.
•If you turn off the ignition key without turning off this unit, the unit will automatically turn on when you turn on the ignition key next time. If the last selected source is ready for playback (ex. a disc or a tape is in the unit), playback starts automatically.
7

 RADIO OPERATIONS
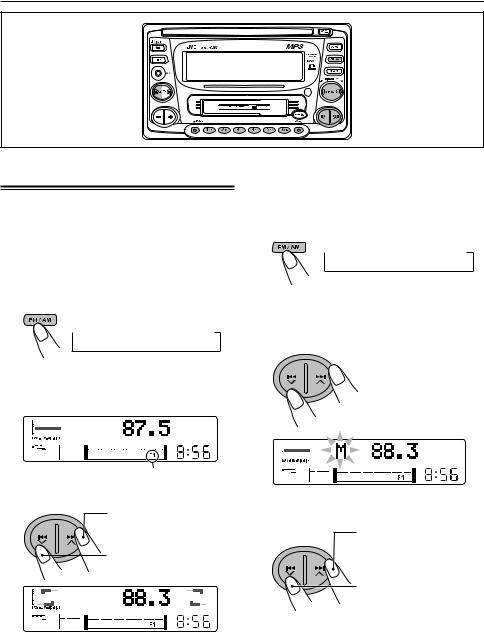
Listening to the radio
You can use either automatic searching or manual searching to tune in to a particular station.
Searching for a station automatically: Auto search
1 Select the band (FM1, FM2, FM3 or AM).
 FM1
FM1 FM2
FM2 FM3
FM3  AM
AM
Note:
This receiver has three FM bands (FM1, FM2, and FM3). You can use any one of them to listen to an FM broadcast.
Selected band appears.
2 Start searching for a station.
To search stations of higher frequencies
To search stations of lower frequencies
Searching for a station manually: Manual search
1 Select the band (FM1, FM2, FM3, or AM).
 FM1
FM1 FM2
FM2 FM3
FM3  AM
AM
2 Press and hold ¢  or 4
or 4  until
until
“M (manual)” starts flashing on the display.
3 Tune in to a station you want while “M” is flashing.
Press ¢ to tune in to stations of higher frequencies.
Press 4 to tune in to stations of lower frequencies.
When a station is received, searching stops.
To stop searching before a station is received, press the same button you have pressed for searching.
•If you release your finger from the button, the manual mode will automatically turn off after 5 seconds.
•If you hold down the button, the frequency keeps changing (in 50 kHz intervals for FM and 9 kHz for AM) until you release the button.
8
Storing stations in memory
You can use one of the following methods to store broadcasting stations in memory.
•Automatic preset: SSM (Strong-station
Sequential Memory)
•Manual preset
•Storing your favorite station into the EX button
Automatic preset: SSM
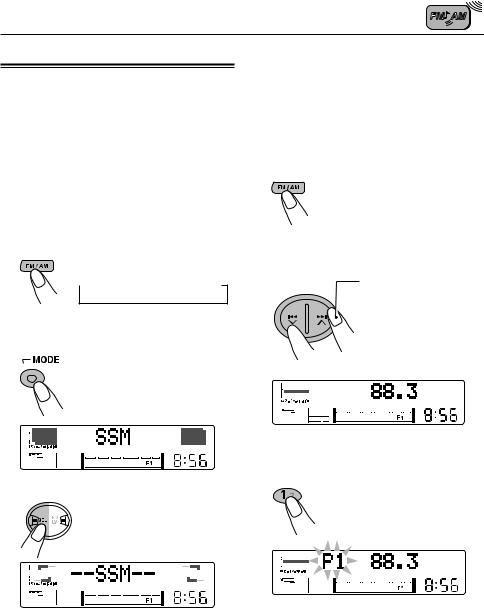
Manual preset
You can preset up to 6 stations in each band
(FM1, FM2, FM3, and AM) manually.
EXAMPLE: Storing an FM station of 88.3 MHz into the preset channel number 1 of the FM1 band
1 Select the FM1 band.
You can preset up to 6 local stations in each FM band (FM1, FM2, and FM3).
1 Select the band (FM1, FM2, or FM3).
 FM1
FM1 FM2
FM2 FM3
FM3  AM
AM
2 Press MODE repeatedly until “SSM” appears.
3 Press SEL.
“--SSM--” appears, then disappears when automatic preset is over.
Local stations with the strongest signals are searched for and stored automatically in the band you have selected (FM1, FM2, and FM3). These stations are preset in the number buttons — No. 1 (lowest frequency) to No. 6 (highest frequency). When automatic preset is over, the station stored in the number 1 button will be automatically tuned in.
2 Tune in to a station (in this example,
of 88.3 MHz).
Press ¢  to tune in to stations of higher frequencies.
 Press 4
  to tune in to stations of lower frequencies.
3 Press and hold the number button (in this example, 1) for more than 2 seconds.
“P1” flashes for a few seconds.
4 Repeat the above procedure to store other stations into other preset numbers.
9
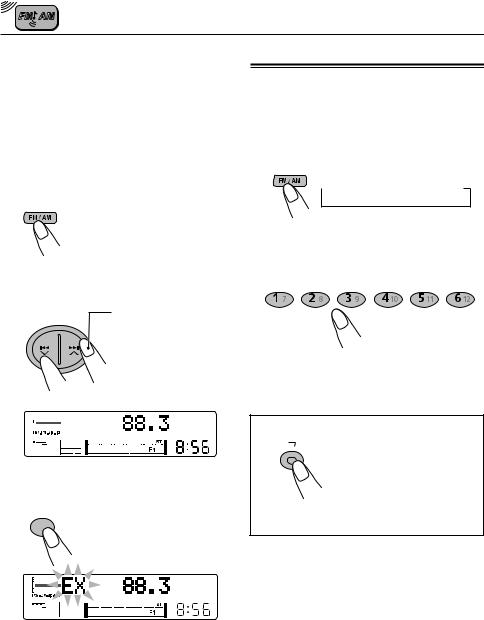
Storing your favorite station into the EX (extra) button
You can preset an FM or AM station (such as your favorite station or traffic announcement station); and recall it by one touch operation even if the unit is turned off.
EXAMPLE: Storing an FM station of 88.3 MHz into the EX button
1 Select the FM1 band.
2 Tune in to a station (in this example, of 88.3 MHz).
Press ¢  to tune in to stations of higher frequencies.
 Press 4
  to tune in to stations of lower frequencies.
3 Press and hold the EX button until “EX” flashes.
EX 
“EX” flashes on the display.
Notes:
•The previously preset station is erased when a new station is stored.
•Preset stations are erased when the power supply to the memory circuit is interrupted (for example, during battery replacement). If this occurs, preset the stations again.
Tuning in to a preset station
You can easily tune in to a preset station.
Remember that you must store stations first. If you have not stored them yet, see page 9.
1 Select the band (FM1, FM2, FM3, or AM) you want.
 FM1
FM1 FM2
FM2 FM3
FM3  AM
AM
2 Select the number (1 – 6) for the preset station you want.
To tune in the favorite station (EX)
EX |
Press EX so that the unit |
|
automatically turns on (if it has |
|
been off). |
|
Your favorite station is tuned in. |
•If you press the button again, the previous source will be played back again.
10
Other convenient tuner functions
Scanning broadcast stations
1 Select “SCAN.”
 *SSM
*SSM  SCAN
SCAN
Canceled *MONO
*MONO 
(frequency indication)
* When receiving an FM stereo broadcast.
2 Start scanning.
Each time a broadcast is tuned in, scanning stops for about 5 seconds (tuned frequency number flashes on the display), and you can check what program is now being broadcasted.
If you want to listen to that program, press MODE button again to stop scanning.
Showing an assigned name
If you have assigned a name to a station frequency, the display shows its assigned name after the station frequency is displayed.
When the station name is displayed, the STATION indicator lights up on the display (see page 33).
Lights up.
To confirm the station frequency while the assigned name is shown, press DISP (display). Each time you press the button, the assigned name and the station frequency alternate on the display.
Note:
If no name is assigned, “NO NAME” will appear when you press DISP.
Selecting FM reception mode
When an FM stereo broadcast is hard to receive, follow the procedure below:
1 Select “MONO.”
 SSM
SSM  SCAN
SCAN
Canceled MONO
MONO 
(frequency indication)
2 Select FM reception mode.
FM reception mode turns on (“MONO ON”) and off (“MONO OFF”) alternately.
When the monaural mode is turned on, the sound you hear becomes monaural but reception will be improved.
Lights up when receiving an FM broadcast in stereo.
J
11
CD OPERATIONS
Playing a CD
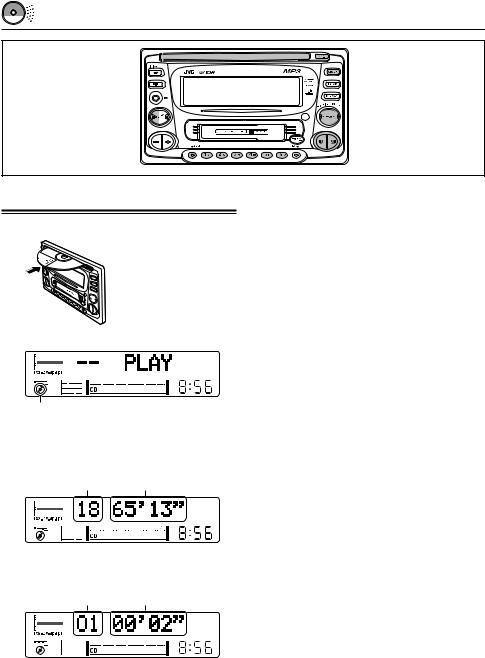
1 Insert a disc into the loading slot.
The unit turns on, draws in the CD and starts playback automatically.
CD indicator lights up. |
|
\ |
Total playing time of |
Total track number of |
|
the inserted disc |
the inserted disc |
\
Current track Elapsed playing time
Note on One-Touch Operation:
When a CD is already in the loading slot, pressing CD/CH turns on the unit and starts playback automatically.
12
Notes:
•When a CD is inserted upside down, the CD automatically ejects.
•When you play a CD Text, the disc title and performer appear on the display. Then the current track title appears on the display, followed by the track number and elapsed playing time. See also “Playing a CD Text” (page 15) and “Selecting the scroll mode – SCROLL” (page 32).
If a CD Text includes much text information, some may not appear on the display.
•If you play a CD with assigned name (see page 33), the assigned name appears on the display, followed by the track number and elapsed playing time. See also “Showing an assigned name” on page 15.
To stop play and eject the CD
Press CD 0.
CD play stops and the CD automatically ejects from the loading slot (“EJECT” appears on the display). The source changes to the last selected source.
Notes:
•If the ejected disc is not removed for about 15 seconds, the disc is automatically inserted again into the loading slot to protect it from dust. (CD play will not start this time.)
•You can eject the CD even when the unit is turned off.
•If you change the source, CD play also stops (without ejecting the disc).
Next time you select “CD” as the source, CD play starts from where playback had been stopped previously.

Locating a track or a particular portion on a CD
To fast-forward or reverse the track
Press and hold ¢  while playing a CD, to fast-forward the track.
Press and hold 4  while playing a CD, to reverse the track.
To go to the next tracks or the previous tracks
Press ¢  briefly while playing a CD, to go ahead to the beginning of the next track. Each time you press the button consecutively, the beginning of the next track is located and played back.
Press 4  briefly while playing a CD, to go back to the beginning of the current track. Each time you press the button consecutively, the beginning of the previous track is located and played back.
To go to a particular track directly
Press the number button corresponding to the track number to start its playback.
•To select a track number from 1 – 6: Press 1 (7) – 6 (12) briefly.
•To select a track number from 7 – 12:
Press and hold 1 (7) – 6 (12) for more than 1 second.
To skip 10 tracks
1 Press MODE repeatedly until
“2–10 +103” appears.
2 Press +10 or –10 button.
To skip 10 tracks* fowards |
to the last track. |
 To skip 10 tracks* backwards to the first track.
*The fist time you press +10 or –10 button, the track skips to the nearest higher or lower track with a track number of multiple ten (ex. 10th,
20th, 30th).
Then each time you press the button, you can skip 10 tracks (see “How to use the +10 and –10 buttons” below).
•After the last track, the first track will be selected, and vice versa.
How to use the +10 and -10 buttons
• Ex. 1: To select track number 32 while playing track number 6.
(Three times) |
(Twice) |
Track 6 \10 \ 20 \ 30 |
\ 31 \ 32 |
• Ex. 2: To select track number 8 while playing track number 32.
(Three times) |
(Twice) |
Track 32 \30 \ 20 \ 10 |
\ 9 \ 8 |
13

Selecting CD playback modes
To play back tracks repeatedly (Repeat Play)
You can play back the current track repeatedly.
1 Press MODE repeatedly until
“REPEAT” appears.
2Press SEL.
Each time you press the button, CD random play mode turns on (“RANDOM ON”) and off (“RANDOM OFF”) alternately.
2Press SEL.
Each time you press the
button, CD repeat play mode turns on (“REPEAT ON”) and off (“REPEAT OFF”) alternately.
When the repeat mode is turned on, the RPT indicator lights up on the display.
To play back tracks at random (Random Play)
You can play back all tracks on the CD at random.
1 Press MODE repeatedly until
“RANDOM” appears.
When the random mode is turned on, the RND indicator lights up on the display and a randomly selected track starts playing.
To play back only intro (Intro scan)
You can play back the first 15 seconds of each track sequentially.
1 Press MODE repeatedly until
“INTRO” appears.
2Press SEL.
Each time you press the
button, CD Intro scan mode turns on (“INTRO ON”) and off (“INTRO OFF”) alternately.
\ |
When the Intro scan mode is turned on, the current track number flashes.
14
 Loading...