


GPS NAVIGATION SYSTEM
SISTEMA DE NAVEGACIÓN GPS
SYSTÈME DE NAVIGATION GPS
KW-NT800HDT / KW-NT700
FRANÇAIS ESPAÑOL ENGLISH
Only for KW-NT800HDT
Sólo para KW-NT800HDT
Uniquement pour le
KW-NT800HDT
For installation and connections, refer to the separate manual. Para la instalación y las conexiones, refiérase al manual separado.
Pour l’installation et les raccordements, se référer au manuel séparé.
INSTRUCTIONS
MANUAL DE INSTRUCCIONES
MANUEL D’INSTRUCTIONS
Only for KW-NT800HDT Sólo para KW-NT800HDT Uniquement pour le KW-NT800HDT
For customer Use:
Enter below the Model No. and Serial No. which are located on the top or bottom of the cabinet. Retain this information for future reference.
Model No.
Serial No.
LVT2276-001A
[J]

ENGLISH
Thank you for purchasing a JVC product.
Please read all instructions carefully before operation, to ensure your complete understanding and to obtain the best possible performance from the unit.
IMPORTANT FOR LASER PRODUCTS
1.CLASS 1 LASER PRODUCT
2.CAUTION: Do not open the top cover. There are no user serviceable parts inside the unit; leave all servicing to
|
qualified service personnel. |
|
3. |
CAUTION: (For U.S.A.) |
Visible and/or invisible class II laser radiation when open. Do not stare into beam. |
|
(For Canada) |
Visible and/or invisible class 1M laser radiation when open. Do not view directly with |
|
|
optical instruments. |
4. |
REPRODUCTION OF LABEL: CAUTION LABEL, PLACED OUTSIDE THE UNIT. |
|
FCC CAUTION
This equipment may generate or use radio frequency energy. Changes or modifications to this equipment may cause harmful interference unless the modifications are expressly approved in the instruction manual.
The user could lose the authority to operate this equipment if an unauthorized change or modification is made.
FCC NOTE
This equipment has been tested and found to comply with the limits for a Class B digital device, pursuant to Part 15 of the FCC Rules. These limits are designed to provide reasonable protection against harmful interference in a residential installation. This equipment may cause harmful interference to radio communications, if it is not installed and used in accordance with the instructions.
However, there is no guarantee that interference will not occur in a particular installation. If this equipment does cause harmful interference to radio or television reception, which can be determined by turning the equipment off and on, the user is encouraged to try to correct the interference by one or more of the following measures:
•Reorient or relocate the receiving antenna.
•Increase the separation between the equipment and receiver.
•Connect the equipment into an outlet on a circuit different from that to which the receiver is connected.
•Consult the dealer or an experienced radio/TV technician for help.
 CAUTION
Use of controls or adjustments or performance of procedures other than those specified herein may result in hazardous radiation exposure. In compliance with Federal Regulations, following are reproductions of labels on, or inside the product relating to laser product safety.
JVC KENWOOD Corporation 2967-3, ISHIKAWA-MACHI, HACHIOJI-SHI, TOKYO, JAPAN
THIS PRODUCT COMPLIES WITH DHHS
RULES 21CFR SUBCHAPTER J IN EFFECT
AT DATE OF MANUFACTURE.
Location : Top Panel
2
(For USA)
CAUTION: This device and its antenna(s) must not be co-located or operating in conjunction with any other antenna or transmitter. End user cannot modify this transmitter device. Any unauthorized modification made on the device could avoid the user’s authority to operate this device.
(For Canada) “The installer of this radio equipment must ensure that the antenna is located or pointed such that it does not emit RF field in excess of Health Canada limits for the general population, consult Safety Code 6, obtainable from Health Canada’s website www. hc-sc.gc.ca/rpb”
The term “IC:” before the radio certification number only signifies that Industry Canada technical specifications were met.
This device complies with RSS 210 of Industry Canada “IC”. “Operation is subject to the following two conditions:
(1)this device may not cause interference, and
(2)this device must accept any interference, including interference that may cause undesired operation of the device”.
L’ utilisation de ce dispositif est autorisée seulement aux conditions suivantes: (1) il ne doit pas produire de brouillage et (2) l’ utilisateur du dispositif doit étre prêt à accepter tout brouillage radioélectrique reçu, même si ce brouillage est susceptible de compromettre le fonctionnement du dispositif.
Cautions on the monitor:
•The monitor built in this unit has been produced with high precision, but it may have some ineffective dots. This is inevitable and is not malfunction.
•Do not expose the monitor to direct sunlight.
•Do not operate the touch panel using a ball-point pen or similar tool with the sharp tip.
Touch the buttons on the touch panel with your finger directly (if you are wearing a glove, take it off).
•When the temperature is very cold or very hot...
–Chemical changes occur inside, causing malfunction.
–Pictures may not appear clearly or may move slowly. Pictures may not be synchronized with the sound or picture quality may decline in such environments.
WARNINGS:
To prevent accidents and damage
•DO NOT install any unit or wire any cable in a location where;
–it may obstruct the steering wheel and gearshift lever operations.
–it may obstruct the operation of safety devices such as air bags.
–it may obstruct visibility.
•DO NOT operate the unit while driving.
If you need to operate the unit while driving, be sure to look around carefully.
•The driver must not watch the monitor while driving.
[European Union only]
ENGLISH
3

ENGLISH
This equipment complies with FCC/IC radiation exposure limits set forth for an uncontrolled environment and meets the FCC radio frequency (RF) Exposure Guidelines in Supplement C to OET65 and RSS-102 of the IC radio frequency (RF) Exposure rules. This equipment has very low levels of RF energy that it deemed to comply without maximum permissive exposure evaluation (MPE). But it is desirable that it should be installed and operated keeping the radiator at least 20 cm or more away from person’ s body (excluding extremities: hands, wrists, feet and ankles).
Cet équipement est conforme aux limites FCC/IC d’exposition aux rayonnements définies pour un environnement non réglementé, aux lignes directrices de la FCC en matière d’exposition aux radiofréquences spécifiées dans le supplément C du bulletin OET65 et aux régulations RSS-102 de l’IC sur l’exposition aux radiofréquences (RF). Cet équipement étant associé à de très faibles niveaux d’énergie radiofréquence, il est considéré conforme sans évaluation de l’exposition maximale admise (EMA). Il est cependant conseillé de l’installer et de l’utiliser en maintenant la source de rayonnement radioélectrique à 20 cm minimum du corps (à l’exclusion des extrémités du corps, à savoir les mains, les poignets, les pieds et les chevilles).
Under Industry Canada regulations, this radio transmitter may only operate using an antenna of a type and maximum (or lesser) gain approved for the transmitter by Industry Canada. To reduce potential radio interference to other users, the antenna type and its gain should be so chosen that the equivalent isotropically radiated power (e,i,r,p.) is not more than that necessary for successful communication.
Selon les régulations d’Industrie Canada, cet émetteur radioélectrique peut uniquement fonctionner avec une antenne dont le type et le gain maximum (ou inférieur) sont approuvés par Industrie Canada. Pour réduire les perturbations radioélectriques potentielles pour les autres utilisateurs, le type et le gain de l’antenne doivent être choisis de façon que la puissance isotrope rayonnée équivalente (P.I.R.E.) ne soit pas supérieure à la puissance nécessaire pour la réussite des communications.
This device complies with RSS-310 of Industry Canada. Operation is subject to the condition that this device does not cause harmful interference.
Cet appareil est conforme au cahier des charges CNR-310 d’Industrie Canada. Son emploi est soumis à la condition que l’appareil ne provoque pas de brouillage préjudiciable.
4
For safety...
•Do not raise the volume level too much, as this will block outside sounds, making driving dangerous.
•Stop the car before performing any complicated operations.
Temperature inside the car...
If you have parked the car for a long time in hot or cold weather, wait until the temperature in the car becomes normal before operating the unit.
 How to forcibly eject a disc
[Hold]
When replacing/rotating the tires:
It is required to clear all the accumulated calibration data which is important for accurate navigation. To clear the data, page 39.
• Make sure you remove the disc so that it does not fall.
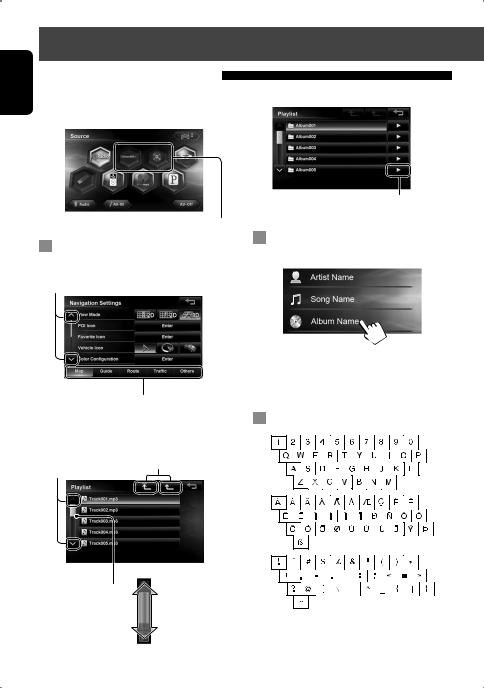
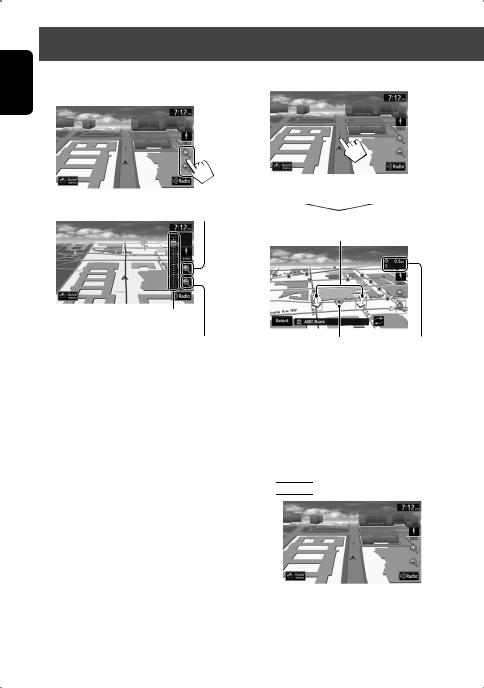
How to read this manual:
•Illustrations of KW-NT800HDT are mainly used for explanation.
•< > indicates the variable screens/menus/operations/settings that appear on the touch panel.
•[ ] indicates the buttons on the touch panel.
ENGLISH
5

ENGLISH
Contents |
|
How to forcibly eject a disc ......................................................................... |
5 |
Introduction............................................. |
10 |
Parts identification........................................................................... |
10 |
Installation settings.......................................................................... |
12 |
Basic operations ............................................................................... |
13 |
• Turning on the power ............................................................................... |
13 |
• Turning off/on the screen ......................................................................... |
13 |
• Adjust the angle of the front panel ........................................................... |
13 |
• Operations on the touch panel .................................................................. |
14 |
• Using the Quick menu ............................................................................... |
15 |
• Extending/shortening the auto antenna .................................................. |
15 |
Switching screens ............................................................................. |
16 |
Navigation System .................................. |
18 |
Safety instructions/information for the Navigation System....................... |
18 |
• Information/icons on the map .................................................................. |
18 |
Basic operations ............................................................................... |
19 |
• About the current position screen ............................................................. |
19 |
• To change the map view ........................................................................... |
19 |
• To change the map scale ........................................................................... |
20 |
• To scroll the map ...................................................................................... |
20 |
• To display your current position ................................................................ |
20 |
• To display/hide POI icons on the map ....................................................... |
21 |
• To display/hide Favorite icons on the map ................................................ |
21 |
Registering your home/favorite points............................................... |
22 |
Searching for a place......................................................................... |
23 |
• Setting a destination by scrolling the map ................................................ |
23 |
• Setting a destination using the <Destination> menu .............................. |
23 |
• About search screens and input screens .................................................... |
24 |
• By address <Address> ............................................................................. |
25 |
• POI near a place/route <Vicinity> ........................................................... |
26 |
• From the list of POI <POI Name> ............................................................. |
26 |
• By telephone number <Phone> .............................................................. |
27 |
• By coordinates <Coordinates> ................................................................ |
27 |
How you are guided .......................................................................... |
28 |
• Starting guidance to the destination or via point ...................................... |
28 |
• Changing route options ............................................................................ |
29 |
• Recalculating the route after changing route options ............................... |
29 |
• Adjusting the volume of the voice guidance ............................................. |
30 |
• Canceling guidance ................................................................................... |
30 |
• Delete previous destinations ..................................................................... |
30 |
• About route guidance screen .................................................................... |
31 |
6

• Getting information on your route and places .......................................... |
32 |
Arranging your route ........................................................................ |
33 |
• Changing the sequence of the destination/via points ............................... |
33 |
• Adjusting the vehicle position .................................................................. |
34 |
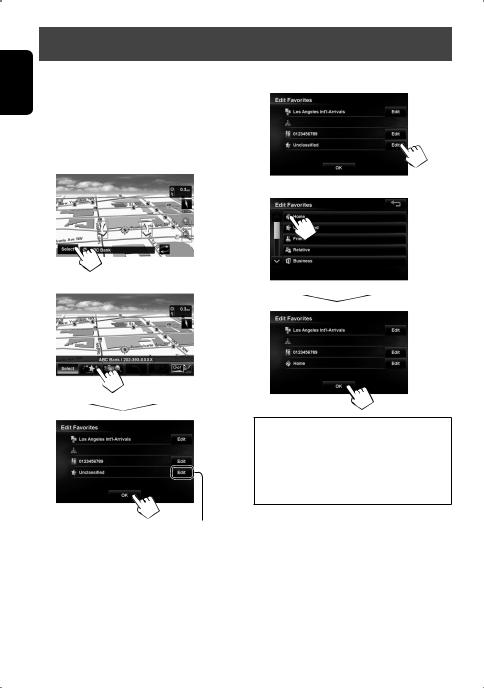
Editing registration of home/favorite points ...................................... |
35 |
Only for KW-NT800HDT |
|
Using information service.................................................................. |
36 |
• Using the traffic information service ......................................................... |
36 |
• Using the information service ................................................................... |
38 |
Checking the information of the navigation system ............................ |
39 |
Navigation menu items..................................................................... |
40 |
Additional information ..................................................................... |
42 |
AV Operations.......................................... |
44 |
Common operations on source screen................................................. |
44 |
• Selecting the playback source ................................................................... |
44 |
• Turning off the AV source ......................................................................... |
44 |
Listening to the HD Radio™ broadcast (For KW-NT800HDT)................... |
45 |
• Changing HD Radio reception mode ......................................................... |
47 |
• Storing stations in memory ...................................................................... |
47 |
• Selecting a preset station .......................................................................... |
48 |
• Reducing the interference ........................................................................ |
48 |
• Bookmarking the song .............................................................................. |
49 |
• Displaying the list of bookmarked songs .................................................. |
49 |
• Deleting the bookmark ............................................................................. |
49 |
• Tagging/purchasing your favorite songs from iTunes Store ...................... |
50 |
Listening to the radio (For KW-NT700)................................................ |
52 |
• Storing stations in memory ...................................................................... |
52 |
• Selecting a preset station .......................................................................... |
53 |
• Reducing the interference ........................................................................ |
53 |
Disc operations ................................................................................. |
54 |
• Playable disc types .................................................................................... |
55 |
• Selecting playback modes ........................................................................ |
59 |
• Settings for the disc playback ................................................................... |
60 |
SD/USB operations ............................................................................ |
61 |
iPod/iPhone operations..................................................................... |
65 |
• Selecting a track/video from menu on the iPod/iPhone ............................ |
69 |
iHeartRadio operations ..................................................................... |
71 |
Pandora® internet radio operations ................................................... |
75 |
Listening to the SiriusXM Radio.......................................................... |
77 |
ENGLISH
7

ENGLISH
Contents |
|
• Activating subscription ............................................................................. |
77 |
• Storing channels in memory ..................................................................... |
78 |
• Selecting preset channels ......................................................................... |
78 |
• Selecting on the list .................................................................................. |
78 |
• Selecting a channel directly ...................................................................... |
79 |
• Setting the reception restrictions .............................................................. |
79 |
Using other external components ...................................................... |
82 |
Changing illumination color .............................................................. |
83 |
Settings for video playback................................................................ |
84 |
• Picture/aspect ratio adjustment ............................................................... |
84 |
System settings items ....................................................................... |
84 |
Additional information ..................................................................... |
87 |
Sound Settings......................................... |
90 |
Setting the Sound............................................................................. |
90 |
• Setting Fader/Balance .............................................................................. |
90 |
• Setting the vehicle type ............................................................................ |
91 |
• Setting the speaker configuration ............................................................. |
91 |
• Setting the listening position .................................................................... |
93 |
• Setting the preset equalizer ...................................................................... |
95 |
• Setting the volume of each source equal .................................................. |
96 |
• Setting the audio effects ........................................................................... |
96 |
• Setting the hardware ................................................................................ |
98 |
• Setting the subwoofer level ...................................................................... |
98 |
Bluetooth Operations ............................. |
99 |
Information for using Bluetooth® devices........................................... |
99 |
Using Bluetooth device ................................................................... |
100 |
• Registering a Bluetooth device ............................................................... |
100 |
• Change the PIN code ............................................................................... |
102 |
• Connecting/disconnecting a registered Bluetooth device ....................... |
102 |
• Deleting a registered Bluetooth device ................................................... |
102 |
Using Bluetooth mobile phone ........................................................ |
103 |
• Receiving a call ....................................................................................... |
103 |
• Adjusting the volume of calls/earpiece ................................................... |
103 |
• Switching between handsfree mode and phone mode ........................... |
104 |
• Making a call .......................................................................................... |
104 |
• Copying the phone book ......................................................................... |
105 |
• Searching for a phone number from phone book .................................... |
105 |
• Deleting the phone number memory in the unit .................................... |
106 |
• About mobile phone compatible with Phone Book Access Profile |
|
(PBAP) .................................................................................................... |
106 |
• Preset dial ............................................................................................... |
107 |
8

• Storing phone numbers in preset dial ..................................................... |
107 |
Using Bluetooth audio player .......................................................... |
108 |
Bluetooth device settings................................................................ |
109 |
Rear View Camera Operations............. |
110 |
Using a rear view camera................................................................. |
110 |
• Activating the rear view camera ............................................................. |
110 |
• Displaying the picture from the rear view camera .................................. |
110 |
Others.................................................... |
111 |
Initializing the settings................................................................... |
111 |
Setting the security lock.................................................................. |
112 |
References............................................. |
114 |
Maintenance .................................................................................. |
114 |
Troubleshooting/error messages ..................................................... |
115 |
Specifications ................................................................................. |
122 |
ENGLISH
9
ENGLISH
Introduction
Parts identification
10
1 Screen (touch panel)
2 |
|
|
|
(Eject) button/Security indicator |
|
|
|
•Adjusts the angle of the front panel
( page 13), displays the disc or SD card insert and eject screen. ( page 54, 61)
•Flashes when the unit is turned off if you have enabled the security indicator.
3 |
|
|
|
(volume) button |
|
|
|
||
|
Adjusts the audio volume. |
|||
4


 button
Displays the screen for the current source.
5


 button
Parts identification
8


 (source) button
Displays the source screen. ( page 17) Turns off the AV function.[Hold]. ( page 44)
9Disc loading slot
p SD card slot
Displays the map for the current location. ( page 16)
Turns off/on the screen.[Hold] ( page 13)
6


 button
Displays the destination menu screen. ( page 16)
7 |
|
|
|
(skip/search) button |
|
|
|
||
|
|
|
ENGLISH
11

ENGLISH
Installation settings
When you turn on the unit for the first time, the initial setup screen appears.
1Turn on the ignition switch.
The power of the unit is turned on.
2Select the language you want for the display and the voice guidance.
3Set the installation settings (1), then press [OK] (2).
•You can also select the system language through <Settings> - <System> - <Region> - <Language>. ( page 84)
State/ |
Select the State or Province where |
Province |
you are now. |
Time Zone* |
Select your residential area for |
|
automatic clock adjustment by |
|
GPS signal. |
DST* |
Select [Auto] if your residential |
|
area is subject to Daylight Saving |
|
Time. |
Camera |
Select [On] when connecting the |
Input* |
rear view camera to the CAMERA |
|
IN jack. |
*You can also change these settings through <Settings> - <System>. ( page 85, 86)
12
Basic operations
Turning on the power 
Turn on the ignition switch.
•When displaying the map screen for the first time after turning on the power, the screen below appears. Press [OK] to use the map screen.
•The power is turned off when the ignition switch is turned off.
Adjust the angle of the front panel 
You can adjust the angle of the front panel to compensate for the effects of glare etc..
Front panel angle |
|
|
-1 |
0 |
5 |
1 |
Press |
|
|
|
. |
|
|
|
|||
2 |
Select the desired angle. |
||||
ENGLISH
Turning off/on the screen 
Press and hold 


 to turn the screen off. Touch the screen to turn it on again.
•You can erase the clock display while the screen is turned off. (<Clock on Video/Screen-Off>, page 85)
• The front panel moves to the selected angle.
3Press 

 or
or 


 to return to the desired screen.
Notice:
The front panel moves to the “0” angle setting when the unit is turned off. The front panel will move to the selected angle when the unit is turned on again.
13
ENGLISH |
Basic operations |
||
Operations on the touch panel |
|||
|
|||
|
|
When items on the menu are not |
|
|
|
||
|
|
||
|
|
available |
|
Non-available items will be shaded
To change the page of menu/list
Menu
Changes the page
Changes the tab
List
Ex.: Folder/track list
Displays the top/previous layer
Changes the page
Skips the list up or down
Ex.: Album list
Plays back all items in the next lower layer
Scrolling the track/song information
When all the text is not shown at once...
•Note that when driving, the album name and artist name are not displayed, and the song name does not scroll.
Characters you can use
14
|
|
Basic operations |
|
|
|
Using the Quick menu |
|
3 Touch the feature you want to assign to the |
|
||
Quick menu is assigned a set of frequently used |
button. |
|
|
||
features, which is user-changeable. It is activated from |
|
|
the current position screen. |
|
|
To use the quick menu
1
ENGLISH
2
Assigning different features
1
2 Touch the button you want to configure.
You can also change these settings through <Settings> - <System>-<Others> - <Shortcut Button>.
Extending/shortening the auto antenna 
When <Antenna Remote> is set to <Auto>, [ ] is not displayed. ( page 86)
1 Press 


 .
.
2 Press [ ] or [
 ].
].
Press [ ] to extend the antenna, and press [
 ] to shorten the antenna.
15
ENGLISH
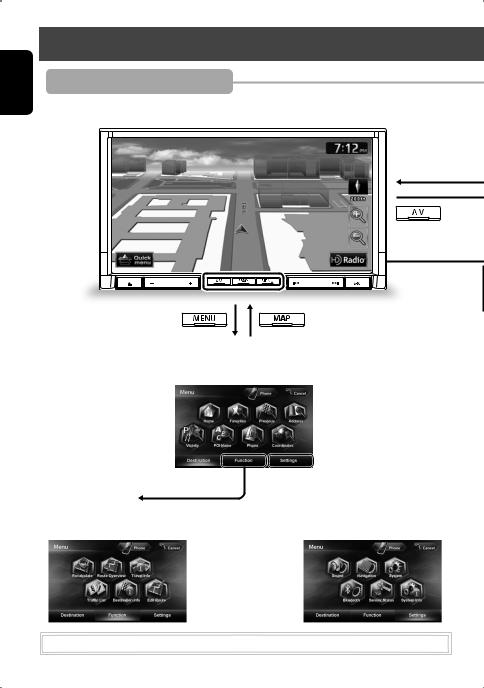
Switching screens
Navigation mode
■Map screen
■Destination Menu
Use this screen to search for a destination using one of the available search methods.
■Function Menu
Use this screen to get information about your destination and the travel route.
 ■Settings Menu
Use this screen to change the detailed settings and get information about the navigation system.
While driving at a speed greater than 3 mi (5 km/h), some screens are not available.
16

The AV control bar is displayed on the map screen. You can perform AV source operations using the AV control bar.
Erases the AV control bar
Switching screens
AV mode
■AV screen
Displays the screen for the current AV source.
■Source selection screen
Use this screen to select an AV source.
ENGLISH
17

ENGLISH
Navigation System
Safety instructions/information for the Navigation System
SAFETY INSTRUCTIONS
Use of the Navigation System is only permitted if the traffic conditions are suitable and you are absolutely sure that no risk, obstruction or inconvenience will be incurred to you, your passengers or other road users.
The requirements of the Road Traffic Regulations must always be followed. The destination must not be entered while driving the car.
The Navigation System serves solely as an aid to navigation. It never releases the drivers from their duties to drive carefully and to make own judgement in road traffic. Inaccurate or incorrect instructions may happen to be given due to changing traffic
conditions. The actual road signs and traffic regulations must therefore always be observed. In particular,
the Navigation System cannot be used as an aid to orientation when visibility is poor.
This Navigation System must only be used for its intended purpose. The volume of the car radio/ Navigation System must be adjusted so that external noise is still audible.
Navigation guidance is performed, based on the database, therefore, it may not be applicable to the current situation because of changes in traffic
conditions (e.g. changes in tollroads, principal roads, one-way traffic, or other traffic regulations). In this case, observe the current traffic signs or regulations.
•Traffic signs should be observed carefully while driving using the Navigation System. Navigation System is only an aid. Driver must always decide whether or not to heed the information provided.
JVC does not accept liability for erroneous data provided by the Navigation System.
•Traffic guidance is restricted to passenger vehicles only. Special driving recommendations and regulations for other vehicles (e.g. commercial vehicles) are not included.
•Do not operate the unit while driving.
Terms of licence
You are granted a non-exclusive licence to use the database for your personal purposes. The present licence does not authorise the granting of sublicenses. Use of the data is only permitted in this specific JVC system. It is forbidden to extract or make further use of significant parts of the database content, or to duplicate, modify, adapt, translate, analyse, decompile or reverse-engineer any part thereof.
WARNING:
Map content, including names and appearance of streets and bridges, POI (Point Of Interest) information, etc. may be inaccurate. If the traffic rules displayed by the unit are different from the actual traffic rules, obey the actual traffic rules.
Road traffic regulations always take priority when a vehicle is being driven in traffic. Navigation System is only an aid. Errors may occur in individual data items/ entries. At all times, the driver must decide whether or not to heed the information provided.
JVC does not accept liability for erroneous data provided by the Navigation System.
Information/icons on the map 
•The information on the map (such as street name, the POI information, and speed limit) may not be always displayed (for example, if the System does not have the information of the position).
•Home ( ) and favorite point (
 ) icons are displayed after home/favorite points are registered.
•POI icons are displayed on the map depending on the <POI Icon> setting ( page 21) and the map scale is between 80 ft (25 m) and 500 ft (150 m).
•POI icons may not be displayed correctly when the System displays the wide area of map. In this case, zoom in the map to display the detailed map.
18
Basic operations
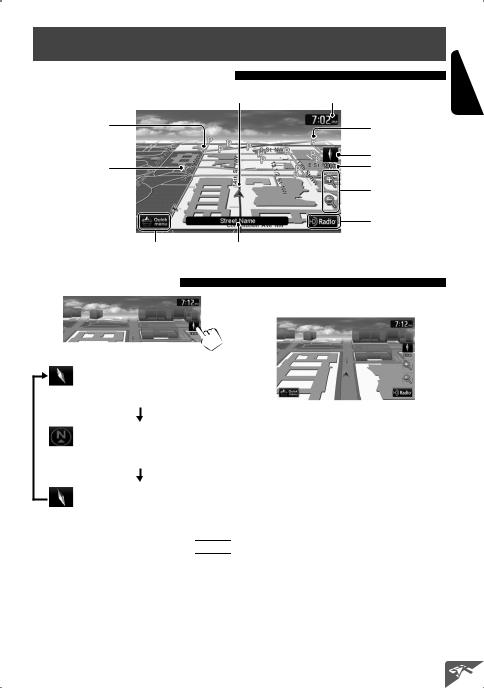
About the current position screen
Your position |
Current time |
Home ( pages 22 and 35)
Favorite points ( pages 22 and 35)
Shows the quick menu ( page 15) |
Current street |
POI (Point Of Interest) ( “List of POI icons”, page 43)
Direction
Scale
Zoom buttons ( below)
Shows the AV control bar ( page 17)
To change the map view
3D Map
The three dimensional map is displayed in “heading up”.
2D North Up
The map view is oriented with north “upwards”, as in usual paper maps.
2D Heading Up
The map rotates so that you are always displayed heading “upwards”.
•You can also change the map view through

 - <Settings> - <Navigation> - <Map> - <View Mode>. ( page 40)
About the 3D map
•When the scale is set between 80 ft (25 m) and 200 ft (65 m), the street map is displayed only when the data is provided.
•When the 3D Map view is selected and the street map is displayed, the map is shown in the three dimensional virtual style depicting how the surrounding buildings etc. look like.
ENGLISH
19
ENGLISH
Basic operations
To change the map scale 
1 Display the zoom buttons and scale buttons.
2
Zoom in
You can also zoom in and out by sliding the slider.
Zoom out
•When the AV control bar is displayed, slider is not shown.
To scroll the map 
The position you touched is centered on the map.
(only for 3D map) Touch the arrow to rotate the map 360 degrees
(cursor) Target position |
Direction and distance of |
of operation |
the destination from your |
|
current position |
•Touch and hold the map to keep scrolling the map.
•If you touch and hold the map near the cursor, the map keeps scrolling slowly.
To display your current position 
Press 


 .
.
20
To display/hide POI icons on the map 
1 Press 


 - <Settings> - <Navigation>.
2
3Select categories (1) of POI which you want to be displayed on the map.
•When you press an item, it is highlighted. When you press again, the selection is canceled.
•If you press [More], you can select sub-categories.
•If you press [Off], selected POI icons are not displayed. If you press [On], selected POI icons are displayed.
Basic operations
To display/hide Favorite icons on the map 
1 Press 


 - <Settings> - <Navigation>.
2
3Select categories of Favorite Icons that you want to be displayed on the map.
•When you press an item, it is highlighted. When you press again, the selection is canceled.
•If you press [Off], selected POI icons are not displayed. If you press [On], selected POI icons are displayed.
ENGLISH
21
ENGLISH
Registering your home/favorite points
You can register up to 300 favorite points (including one home).
1Scroll the map to select the position you want to select as a destination.
•To search the destination using <Destination> menu, pages 23 to 27.
To register as your home
1
2
2
3
Notice:
If you have already registered a destination as your home, a confirmation message is displayed when you select  . Select [Yes] to save the new destination as your home. The previous home destination is moved to the unclassified category.
To register as your home
•To edit the registration, page 35.
•To search from register points, page 23.
22
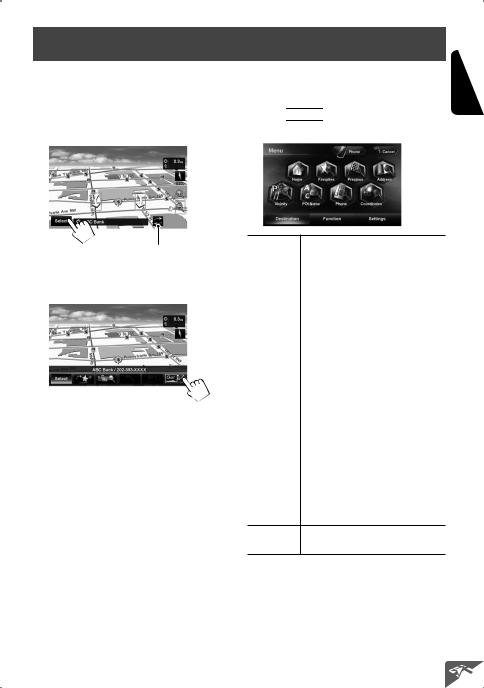
Searching for a place
Setting a destination by scrolling the map 
1Scroll the map to select the position you want to select as a destination. ( page 20)
2
Setting a destination using the <Destination> menu 
1 Press 

 .
.
2 Select a method to search for a destination.
ENGLISH
If there are several POIs on the selected position, press [ ] to switch to the next POI.
3 The search result is displayed.
•To set the search result as the destination and start guidance, page 28.
Home* |
Goes to your home. |
|
|
|
• To register your home, page 22. |
|
|
• To start guidance, page 28. |
|
Favorites* |
Searches from your favorite points. |
|
|
• To register your favorite points, |
|
|
page 22. |
|
|
• To edit the information about the |
|
|
favorite points, page 35. |
|
Previous* |
Searches from the history of previous |
|
|
destinations and via points. |
|
|
• You can select a place from the last |
|
|
50 destinations and via points. |
|
|
• To delete the history, page 30. |
|
Address |
Searches by an address. ( page 25) |
Vicinity |
Searches for POIs around your current |
|
|
|
position, the destination, or via point(s). |
|
|
( page 26) |
|
POI Name |
Searches for POIs by name. |
|
|
( page 26) |
|
Phone |
Searches by a telephone number. |
|
|
( page 27) |
Coordinates Searches by coordinates of the destination. ( page 27)
* Selectable only when at least one place is registered.
23
ENGLISH
Searching for a place
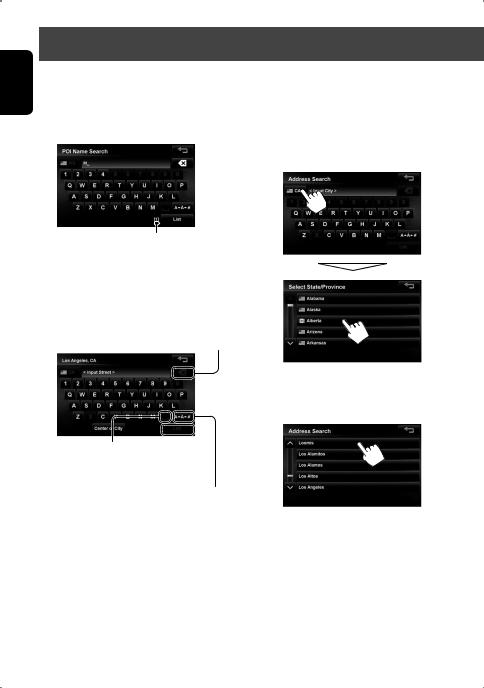
About search screens and input screens 
Read through the following instructions for using search screens and input screens before using <Destination> menu.
To enter names, addresses, or numbers |
State/Province selecting screen |
|
You can change the State/Province if the selecting |
|
button appears on the screen. |
Number of matches
• When there are more than 1000 matches, “1000+” is displayed and only the first 1000 matches are displayed.
•If you enter a name and the answer is given in [number], it is the number of perfect matches.
Press: Deletes the last character
Hold: Deletes all characters
Enters a space  Displays the list of matches
( “List of matches” on the right)
Displays other keyboards
• For available characters,page 14.
•Buttons vary depending on the input item.
•For some input screens, available characters are automatically narrowed down as the System searches its database for matches.
•Lower cases are not available.
List of matches
When you press [List] on the input screen, the list of matches appears. Select desired item from the list.
•When the number of matches is 5 or less, the list of matches automatically appears.
24
Searching for a place
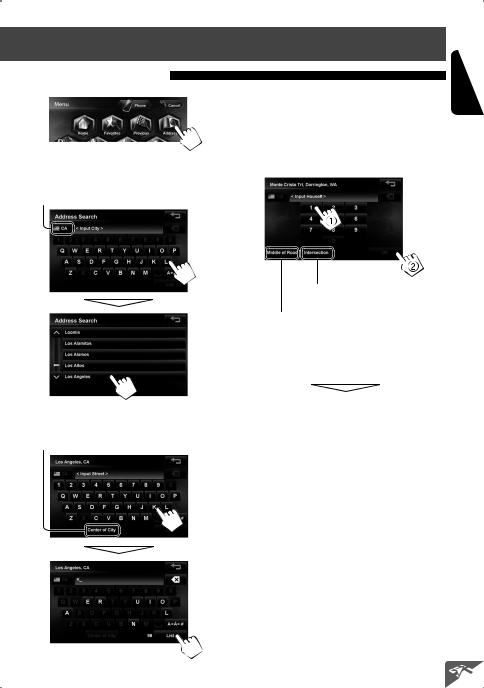
By address <Address>
1
2Enter the city name, then select from the list.
( page 24)
Changes State or Province
3Enter the street name, then select from the list. ( page 24)
4Enter the house number, then press [OK].
( page 24)
•If you don’t know the number of house for the selected street, you can select [Middle of Road] or [Intersection].
Specifies the crossing street to select intersection on the street
Selects the center of the street
•If the house number you entered is not found in the database, the map with the nearest house number is displayed.
The search result is displayed.
•To start guidance, page 28.
Selects the center of the city
ENGLISH
25
ENGLISH
Searching for a place
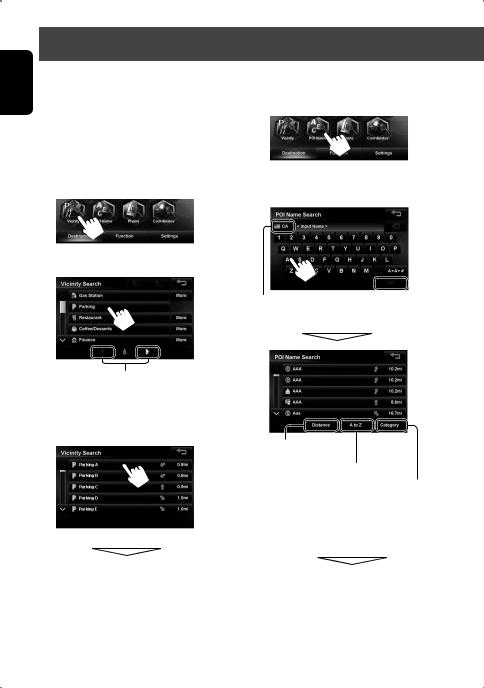
POI near a place/route <Vicinity> 
The System has a huge database of POIs (Point Of Interest), such as restaurants, gas stations, hospitals, etc.
You can search for a POI around the place where you are now. While guided, you can also search for a POI near the destination or via point
1
2 Select a category for the POI.
Switches locations for search
(Present location via point
 destination)
• If you press [More], you can select sub-categories.
3 Select a POI from the list.
The search result is displayed.
• To start guidance, page 28.
From the list of POI
<POI Name> 
1
2Enter the POI name, then select from the list.
( page 24)
Changes State or Province  Displays the list of matches
Displays POI based on their
distance
Displays POI in alphabetical order
Press to select a category of POI
The System displays up to 1000 POIs.
When you press [Category], [More] is displayed. By pressing [More], you can select sub-categories.
The search result is displayed.
• To start guidance, page 28.
26
Searching for a place
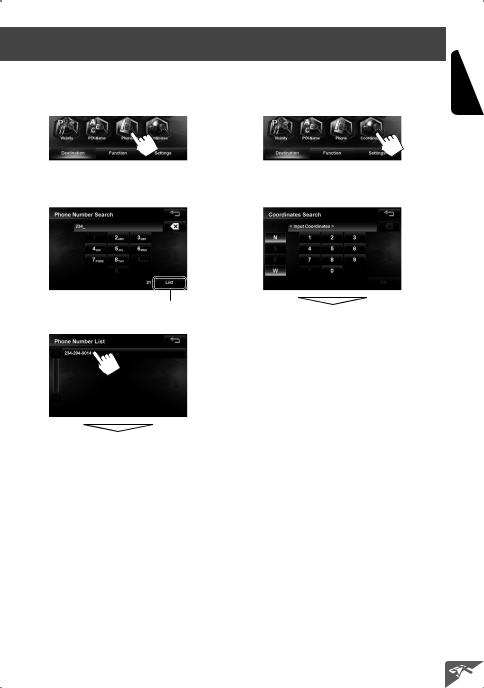
By telephone number |
By coordinates |
|
|
<Phone> |
|
<Coordinates> |
|
|
|
||
1 |
|
1 |
|
2 Enter the telephone number, then press |
2 Enter the latitude and the longitude, then |
[List]. ( page 24) |
press [OK]. |
|
Displays the list of matches |
3 |
The search result is displayed. |
• To start guidance, page 28. |
The search result is displayed.
• To start guidance, page 28.
ENGLISH
27
ENGLISH
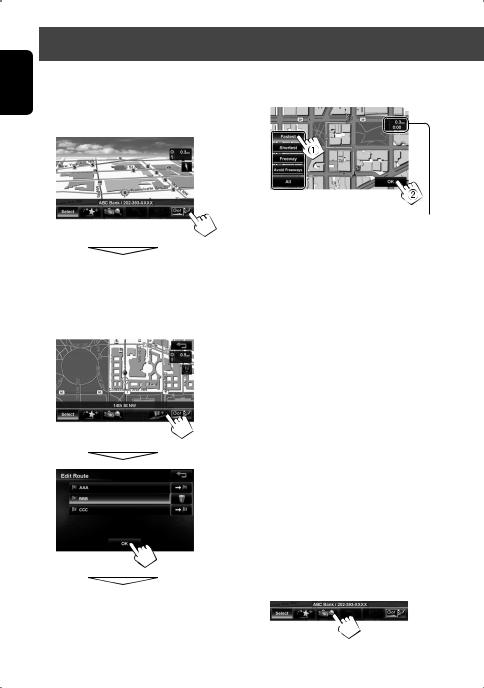
How you are guided
Starting guidance to the destination or via point 
1Select a destination or via point. ( pages 23 to 27)
2 To set as destination
The System starts calculating.
To set as via point
You can add the via points only after selecting your destination.
The System starts calculating.
3. Select a route (1), then press [OK](2).
|
The estimated time and distance to the |
|
destination are displayed. |
[Fastest]: |
The recommended route. |
[Shortest]: |
The shortest route. |
[Freeway]: |
The recommended route by the most |
|
use of freeways. |
[Avoid Freeways]: The recommended route by the least
|
use of freeways. |
[All]: |
Displays all above four routes at once. |
•Route select screens always displayed using the 2D North up map view regardless of the current map view setting. ( page 19)
To cancel guidance, page 30.
•If you press [ ] before selecting a destination or via point, you can search for a POI around where you searched for by category.
28

|
|
|
|
|
|
|
How you are guided |
||
|
|
|
|
|
|
|
|
|
|
Changing route options |
|
Recalculating the route after |
|||||||
|
|||||||||
|
|||||||||
1 |
Press |
|
- <Settings> - <Navigation>. |
changing route options |
|
|
|||
|
|
||||||||
2 |
|
|
|
|
1 Press |
|
- <Function> |
||
|
|
|
|
|
|||||
|
|
|
|
|
|||||
|
|
|
|
|
2 |
|
|
|
|
3 Set options. |
3 Select a route (1), then press [OK](2). |
ENGLISH
Priority |
Select the priority for route |
|
calculation ([Fastest]: |
|
the recommended route/ |
|
[Shortest]: the shortest route/ |
|
[Freeway]:the recommended |
|
route by the most use of |
|
freeways/[Avoid Freeways]: |
|
the recommended route by the |
|
least use of freeways.) |
Toll Road |
Select whether to use ([Use]) or |
Ferry |
avoid ([Avoid]) these types of |
|
options for route calculation. |
|
The estimated time and distance to the |
|
destination are displayed. |
[Fastest]: |
The recommended route. |
[Shortest]: |
The shortest route. |
[Freeway]: |
The recommended route by the most |
|
use of freeways. |
[Avoid Freeways]: The recommended route by the least
|
use of freeways. |
[All]: |
Displays all above four routes at once. |
•Route select screens always displayed using the 2D North up map view regardless of the current map view setting. ( page 19)
29
ENGLISH
How you are guided
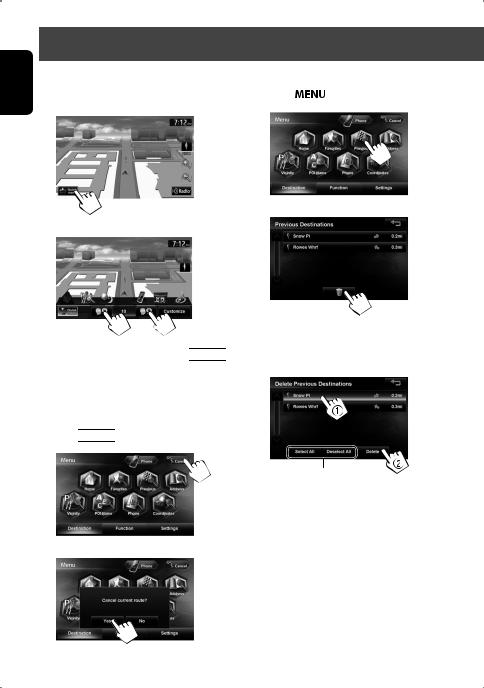
Adjusting the volume of the |
Delete previous destinations |
|
||||
|
||||||
|
||||||
voice guidance |
|
1 |
Press |
|
. |
|
|
|
|
||||
|
|
|||||
1 |
|
2 |
|
|
|
|
|
|
|
|
|
||
3
2
•You can also adjust the volume through 


 - <Settings> - <Navigation> - <Guide> - <Guidance Volume>. ( page 41)
Canceling guidance 
1 Press 


 .
.
2
4Select items to delete (1), and delete them (2).
Selected items are highlighted.
Selects/deselects all items
A confirmation message appears.
3
30
 Loading...