


DIGITAL VIDEO CAMERA
GR-D770U
INSTRUCTIONS
Dear Customer,
Thank you for purchasing this digital video camera. Before use, please read the safety information and precautions contained in the pages 3 – 5 to ensure safe use of this product.
|
ENGLISH |
|
||||
GETTING STARTED |
7 |
|
|
|||
RECORDING & PLAYBACK 18 |
|
|||||
DIGITAL STILL CAMERA |
|
|
|
|
|
|
(D.S.C.) RECORDING & |
24 |
|
|
|||
PLAYBACK |
|
|
||||
ADVANCED FEATURES |
29 |
|
|
|||
REFERENCES |
42 |
|
|
|||
TERMS |
48 |
|
|
|||
|
|
|
|
|
|
|
|
For Customer Use: |
|
|
|
|
|
|
Enter below the Model No. and |
|
|
|
|
|
|
Serial No. which is located on the |
|
|
ENGLISH |
||
|
bottom of the camcorder. Retain |
|
|
|
|
|
|
this information for future reference. |
|
|
|
||
|
Model No. |
|
|
|
|
|
|
|
|
|
|
|
|
|
Serial No. |
|
|
|
|
|
|
|
|
|
|
|
|
|
|
|
|
|
|
|
To deactivate the demonstration, set “DEMO MODE” to “OFF”. ( pg. 29, 32)
LYT1652-001B
2 EN
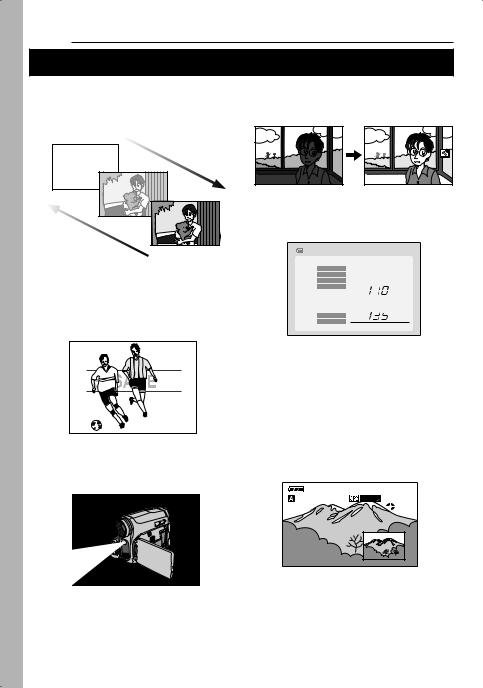
Major Features of this Camcorder
Wipe/Fader Effects |
Backlight Compensation |
You can use the Wipe/Fader Effects to make pro-style scene transitions.
( pg. 38)
Simply pressing the  button brightens the image darkened by backlight. ( pg. 36)
Fade in
Fade out
Program AE, Effects and Shutter Effects
For example, “SPORTS” mode allows fastmoving images to be captured one frame at a time, for vivid, stable slow-motion.
( pg. 38)
Data Battery
You can check the battery status by simply pressing the DATA button. ( pg. 14)
BATTERY CONDITION
100% MAX TIME
LCD
50% |
|
|
min |
|
|
FINDER |
|
|
|
|
|
|
|
min
0%
Auto Button
You can change the recording mode between manual setting to the standard mode setting of the camcorder by pressing the AUTO button. ( pg. 20)
LED Light
You can brighten the subject in the dark place with the LED Light. ( pg. 34)
Dual Rec.
You can capture and view still images without disturbing the recording in progress. ( pg. 20)
16:9  --- min
13
 PHOTO
PHOTO
EN 3
Read This First!
●Before recording important video, be sure to make a trial recording.
Play back your trial recording to make sure the video and audio have been recorded properly.
●We recommend cleaning your video heads before use.
If you haven’t used your camcorder for awhile, the heads may be dirty. We recommend periodically cleaning the video heads with a cleaning cassette (optional).
●Be sure to store your cassette tapes and camcorder in the proper environment.
Video heads can become dirty more easily if your cassette tapes and camcorder are stored in a dusty area. Cassette tapes should be removed from the camcorder and stored in cassette cases. Store the camcorder in a bag or other container.
●Use SP (Standard) mode for important video recordings.
LP (Long Play) mode lets you record 50% more video than SP (Standard) mode, but you may experience mosaic-like noise during playback depending on the tape characteristics and the usage environment.
So, for important recordings, we recommend using SP mode.
●For safety and reliability.
It is recommended only genuine JVC batteries and accessories are used in this camcorder.
●This product includes patented and other proprietary technology and will operate only with JVC Data Battery. Use the JVC BN-VF808U/VF815U/VF823U battery packs. Using generic non-JVC batteries can cause damage to the internal charging circuitry.
●This camcorder is designed exclusively for the digital video cassette, SD Memory Card and MultiMediaCard. Only cassettes marked
“
 ” and memory cards marked “
 ” or “


 ” can be used with this unit.
●SDHC Memory Card cannot be used with this camcorder.
●Remember that this camcorder is not compatible with other digital video formats.
●It is recommended that you use JVC brand cassette tapes.
Your camcorder is compatible with all brands of commercially available cassette tapes complying with the MiniDV standard, but JVC brand cassette tapes are designed and
optimized to maximize the performance of your camcorder.
●Remember that this camcorder is intended for private consumer use only.
Any commercial use without proper permission is prohibited. (Even if you record an event such as a show, performance or exhibition for personal enjoyment, it is strongly recommended that you obtain permission beforehand.)
●DO NOT leave the unit
-in place of over 50°C (122°F)
-in place where humidity is extremely low (below 35%) or extremely high (80%).
-in direct sunlight.
-in a closed car in summer.
-near a heater.
●The LCD monitor is made with highprecision technology. However, black spots or bright spots of light (red, green or blue) may appear constantly on the LCD monitor. These spots are not recorded on the tape. This is not due to any defect of the unit. (Effective dots: more than 99.99%)
●Do not leave the battery pack attached when the camcorder is not in use and check the unit regularly whether it is working or not.
Also read “CAUTIONS” on pages 44 – 46.
●Microsoft® and Windows® are either registered trademarks or trademarks of Microsoft Corporation in the United States and/or other countries.
●Macintosh is a registered trademark of Apple Computer, Inc.
●QuickTime is a registered trademark of Apple Computer, Inc.
4 EN
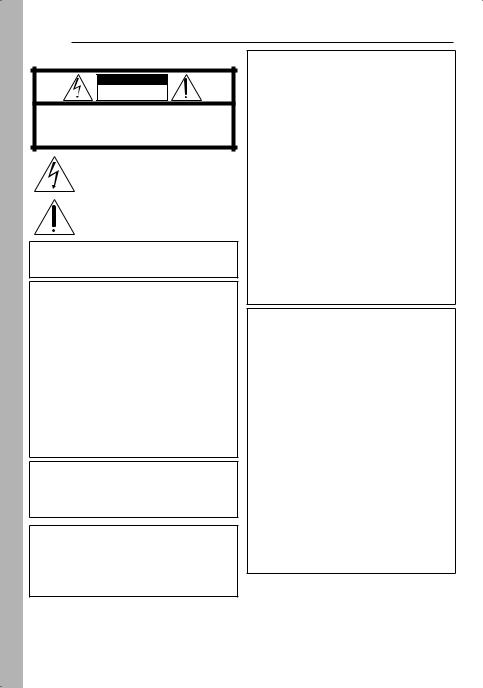
SAFETY PRECAUTIONS
CAUTION
RISK OF ELECTRIC SHOCK
DO NOT OPEN
CAUTION: TO REDUCE THE RISK OF ELECTRIC SHOCK, DO NOT REMOVE COVER (OR BACK).
NO USER-SERVICEABLE PARTS INSIDE.
REFER SERVICING TO QUALIFIED SERVICE PERSONNEL.
The lightning flash with arrowhead symbol, within an equilateral triangle, is intended to alert the user to the presence of uninsulated "dangerous voltage" within the product’s enclosure that may be of sufficient magnitude to constitute a risk of electric shock to persons.
The exclamation point within an equilateral triangle is intended to alert the user to the presence of important operating and maintenance (servicing) instructions in the literature accompanying the appliance.
WARNING: TO PREVENT FIRE OR SHOCK HAZARD, DO NOT EXPOSE THIS UNIT TO RAIN OR MOISTURE.
CAUTIONS:
●This camcorder is designed to be used with NTSC-type color television signals. It cannot be used for playback with a television of a different standard. However, live recording and LCD monitor/viewfinder playback are possible anywhere.
●This product includes patented and other proprietary technology and will operate only with JVC Data Battery. Use the JVC BN-VF808U/VF815U/VF823U battery packs and, to recharge them or to supply power to the camcorder from an AC outlet, use the provided multi-voltage AC Adapter. (An appropriate conversion adapter may be necessary to accommodate different designs of AC outlets in different countries.)
This product contains a CR Coin Cell Lithium Battery which contains Perchlorate Material - special handling may apply.
See www.dtsc.ca.gov/hazardouswaste/ perchlorate
NOTES:
●The rating plate (serial number plate) and safety caution are on the bottom and/or the back of the main unit.
●The rating information and safety caution of the AC Adapter are on its upper and lower sides.
When the equipment is installed in a cabinet or on a shelf, make sure that it has sufficient space on all sides to allow for ventilation (10 cm (3-15/16") or more on both sides, on top and at the rear).
Do not block the ventilation holes.
(If the ventilation holes are blocked by a newspaper, or cloth etc. the heat may not be able to get out.)
No naked flame sources, such as lighted candles, should be placed on the apparatus. When discarding batteries, environmental problems must be considered and the local rules or laws governing the disposal of these batteries must be followed strictly.
The apparatus shall not be exposed to dripping or splashing.
Do not use this equipment in a bathroom or places with water.
Also do not place any containers filled with water or liquids (such as cosmetics or medicines, flower vases, potted plants, cups etc.) on top of this unit.
(If water or liquid is allowed to enter this equipment, fire or electric shock may be caused.)
Do not point the lens or the viewfinder directly into the sun. This can cause eye injuries, as well as lead to the malfunctioning of internal circuitry. There is also a risk of fire or electric shock.
CAUTION!
The following notes concern possible physical damage to the camcorder and to the user.
When carrying, be sure to always securely attach and use the provided strap. Carrying or holding the camcorder by the viewfinder and/or the LCD monitor can result in dropping the unit, or in a malfunction.
Take care not to get your finger caught in the cassette holder cover. Do not let children operate the camcorder, as they are particularly susceptible to this type of injury.
Do not use a tripod on unsteady or unlevel surfaces. It could tip over, causing serious damage to the camcorder.
CAUTION!
Connecting cables (Audio/Video, S-Video, etc.) to the camcorder and leaving it on top of the TV is not recommended, as tripping on the cables will cause the camcorder to fall, resulting in damage.

IMPORTANT SAFETY INSTRUCTIONS
1.Read these instructions.
2.Keep these instructions.
3.Heed all warnings.
4.Follow all instructions.
5.Do not use this apparatus near water.
6.Clean only with dry cloth.
7.Do not block any ventilation openings. Install in accordance with the manufacturer’s instructions.
8.Do not install near any heat sources such as radiators, heat registers, stoves, or other apparatus (including amplifiers) that produce heat.
9.Only use attachments/accessories specified by the manufacturer.
10.Use only with the cart, stand, tripod,
bracket, or table specified by the
manufacturer, or sold with the apparatus. When a
cart is used, use caution when
moving the cart/
apparatus combination to avoid injury from tipover.
11.Unplug this apparatus during lightning storms or when unused for long periods of time.
12.Refer all servicing to qualified service personnel. Servicing is required when the apparatus has been damaged in any way, such as power-supply cord or plug is damaged, liquid has been spilled or objects have fallen into the apparatus, the apparatus has been exposed to rain or moisture, does not operate normally, or has been dropped.
USER MAINTENANCE |
EN 5 |
|
|
|
|

 Cleaning The Camcorder
Before cleaning, turn off the camcorder and remove the battery pack and AC Adapter.
To clean the exterior
Wipe gently with a soft cloth. Put the cloth in diluted mild soap and wring it well to wipe off heavy dirt. Then wipe again with a dry cloth.
To clean the LCD monitor
Wipe gently with a soft cloth. Be careful not to damage the monitor. Close the LCD monitor.
To clean the lens
Blow it with a blower brush, then wipe gently with lens cleaning paper.
To clean the viewfinder lens
Remove dust from the viewfinder using a blower brush.
NOTES:
●Avoid using strong cleaning agents such as benzine or alcohol.
●Cleaning should be done only after the battery pack has been removed or other power units have been disconnected.
●Mold may form if the lens is left dirty.
●When using a cleaner or chemically treated cloth refer to the cautions of each product.
●To clean the viewfinder, please consult your nearest JVC dealer.

 USE CLEANING CASSETTE
Appears if dirt is detected on the heads during recording. Use an optional cleaning cassette
( pg. 3).

6 EN CONTENTS
GETTING STARTED |
7 |
Regarding This Manual ................................. |
7 |
Provided Accessories .................................... |
7 |
Index.............................................................. |
8 |
Grip Adjustment........................................... |
12 |
Power .......................................................... |
13 |
Language Settings....................................... |
14 |
Date/Time Settings ...................................... |
15 |
Viewfinder Adjustment................................. |
15 |
Brightness Adjustment Of The Display........ |
15 |
Tripod Mounting........................................... |
15 |
Loading/Unloading A Cassette .................... |
16 |
Loading/Unloading A Memory Card ............ |
17 |
16:9 Wide Mode .......................................... |
17 |
RECORDING & PLAYBACK |
18 |
VIDEO RECORDING ........................................ |
18 |
Basic Recording .......................................... |
18 |
Tape Remaining Time ............................. |
18 |
Quick Review........................................... |
18 |
Zooming................................................... |
19 |
Journalistic Shooting ............................... |
19 |
Interface Shooting ................................... |
19 |
Time Code ............................................... |
20 |
Recording From The Middle Of A Tape... |
20 |
Dual Rec.................................................. |
20 |
Auto/Manual Mode .................................. |
20 |
VIDEO PLAYBACK .......................................... |
21 |
Normal Playback ......................................... |
21 |
Still Playback ........................................... |
21 |
Variable Shuttle Search........................... |
22 |
Blank Search ........................................... |
22 |
Playback Snapshot.................................. |
22 |
Connections To A TV Or VCR..................... |
23 |
D.S.C. RECORDING ......................................... |
24 |
Basic Shooting (D.S.C. Snapshot) .............. |
24 |
D.S.C. PLAYBACK ........................................... |
25 |
Normal Playback Of Images........................ |
25 |
Auto Playback Of Images ............................ |
25 |
Index Playback Of Files............................... |
25 |
Removing On-Screen Display ..................... |
25 |
ADVANCED FEATURES |
29 |
MENUS FOR DETAILED ADJUSTMENT .............. |
29 |
Changing The Menu Settings...................... |
29 |
Recording Menus ........................................ |
30 |
Playback Menus .......................................... |
33 |
FEATURES FOR RECORDING ........................... |
34 |
LED Light..................................................... |
34 |
Snapshot (Record Still Image On Tape) ..... |
34 |
Manual Focus.............................................. |
35 |
Exposure Control......................................... |
35 |
Iris Lock ....................................................... |
36 |
Backlight Compensation.............................. |
36 |
Spot Exposure Control ................................ |
36 |
White Balance Adjustment .......................... |
37 |
Manual White Balance Adjustment ............. |
37 |
Wipe Or Fader Effects................................. |
38 |
Program AE, Effects And Shutter Effects.... |
38 |
Dubbing Still Images Recorded On A Tape To |
|
A Memory Card ....................................... |
39 |
EDITING ........................................................ |
39 |
Dubbing To A VCR...................................... |
39 |
Dubbing To Or From A Video Unit Equipped |
|
With A DV Connector (Digital Dubbing) .. |
40 |
Connection To A Personal Computer.......... |
41 |
REFERENCES |
42 |
TROUBLESHOOTING....................................... |
42 |
CAUTIONS ..................................................... |
44 |
SPECIFICATIONS ............................................ |
47 |
TERMS .......................................................... |
48 |
ADDITIONAL FEATURES FOR D.S.C. |
26 |
Resetting The File Name............................. |
26 |
Protecting Files............................................ |
26 |
Deleting Files............................................... |
27 |
Setting Print Information (DPOF Setting)* ... |
27 |
Initializing A Memory Card........................... |
28 |

GETTING STARTED EN 7

 Regarding This Manual
Control Lever
LCD Monitor
Control lever
There are two kinds of operation using the control lever: moving the lever towards up/down/left/right, or pressing down the lever.
They are described and illustrated as shown below.
1) Move the control lever up/down/left/right (3/4/1/2) to select:
Select

 Provided Accessories
OR
AC Adapter AP-V14U or AP-V18U
|
OR |
Battery Pack |
Audio/Video Cable |
BN-VF808U |
(ø3.5 mini-plug to RCA plug) |
USB Cable |
CD-ROM |
GETTING STARTED
|
Operation |
To select |
|
|
|
|
|
3 |
6 |
FOCUS |
Move the control lever up. |
|
|
|
|
4 |
7 |
|
Move the control lever |
|
down. |
||
|
|
|
|
|
|
|
|
2 |
¡ |
LIGHT |
Move the control lever |
|
|
|
right. |
1 |
1 |
QUICK |
Move the control lever left. |
REVIEW |
|
||
|
|
|
|
2) Press down the control lever to select SET:
SET
Shoulder Strap |
Lens Cap |
( pg. 12) |
( pg. 12) |
NOTES:
●In order to maintain optimum performance of the camcorder, provided cables may be equipped with one or more core filter. If a cable has only one core filter, the end that is closest to the filter should be connected to the camcorder.
●Make sure to use the provided cables for connections. Do not use any other cables.

8 EN GETTING STARTED

 Index
Index
89 |
o~) 35 |
|
27
28
29
30
33
$ |
32 |
|
31 |
% |
20 |
1 4 3
How to open the LCD monitor
Pull on the end A of the LCD monitor.
!#" |
24 |
|
25 |
5 6
7
21
2 26 &( 22 34 23
NOTES:
The LCD monitor can rotate 270°.
Power-linked operation
When the power switch is set to “REC”, you can also turn the camcorder on/off by opening/ closing the LCD monitor or pulling out/pushing in the viewfinder.
●The image will not appear simultaneously on the LCD monitor and the viewfinder. When the viewfinder is pulled out while the LCD monitor is opened, you can select which one to use. Set “PRIORITY” to the desired mode in SYSTEM Menu. ( pg. 32)
●Colored bright spots may appear all over the LCD monitor or the viewfinder. However, this is not a malfunction.

GETTING STARTED EN 9
Controls
11 : Left/Rewind (1) ( pg. 21)/
Quick Review [QUICK REVIEW] ( pg. 18) 2 : Right/Fast-Forward (¡) ( pg. 21)/ LED Light [LIGHT] ( pg. 34)
3 : Up/Play/Pause (6) ( pg. 21)/ Manual Focus [FOCUS] ( pg. 35) 4 : Down/Stop (7) ( pg. 21)/
Backlight Compensation [  ] ( pg. 36)/ Spot Exposure ( pg. 36)
Press down : SET 2VIDEO/MEMORY Switch
316:9 Wide Screen Button [16:9] ( pg. 17) Blank Search [BLANK] ( pg. 22)
Index Button [INDEX] ( pg. 25) 4Menu Button [MENU] ( pg. 29) 5Data Battery Button [DATA] ( pg. 14) 6Auto Button [AUTO] ( pg. 20) 7Diopter Adjustment Control ( pg. 15) 8Snapshot Button [SNAPSHOT]
( pg. 24, 34)
9Power Zoom Lever [T/W] ( pg. 19) Speaker Volume Control [VOL. +, –] ( pg. 21)
!Recording Start/Stop Button [START/STOP] ( pg. 18)
"Power Switch [REC, PLAY, OFF]
#Lock Button
$Battery Release Button [BATT.] ( pg. 13) %Cassette Open/Eject Switch [OPEN/EJECT]
( pg. 16)
Connectors
&USB (Universal Serial Bus) Connector
( pg. 41)
(Digital Video Connector [DV IN/OUT]
(i.LINK*) ( pg. 40, 41)
*i.LINK refers to the IEEE1394-1995 industry specification and extensions thereof. The 
logo is used for products compliant with the i.LINK standard.
The connectors are located beneath the covers.
)Audio/Video Output Connector [AV] ( pg. 23, 39)
~DC Input Connector [DC] ( pg. 13)
Indicators
âPOWER/CHARGE Lamp ( pg. 13)
Other Parts
äLCD Monitor ( pg. 8) ãViewfinder ( pg. 15) åCard Cover [  ] ( pg. 17)
çBattery Pack Mount ( pg. 13) éShoulder Strap Eyelet ( pg. 12) èGrip Strap ( pg. 12) êSpeaker ( pg. 21)
ëLens
íLED Light ( pg. 34) ìCamera Sensor
(Be careful not to cover this area, a sensor necessary for shooting is built-in here.)
îStereo Microphone ïStud Hole ( pg. 15)
ñTripod Mounting Socket ( pg. 15) óCassette Holder Cover ( pg. 16) òMemory Card Slot
ôConnector Cover
Power Switch Position
REC:
To perform recording on the tape or in the memory card.
OFF:
To switch off the camcorder.
PLAY:
●To play back a recording on the tape.
●To display a still image stored in the memory card or to transfer a still image stored in the memory card to a PC.
VIDEO/MEMORY Switch Position
VIDEO:
To record on a tape or play back a tape.
MEMORY:
To record in a memory card or access data stored in a memory card.
GETTING STARTED
10 EN GETTING STARTED
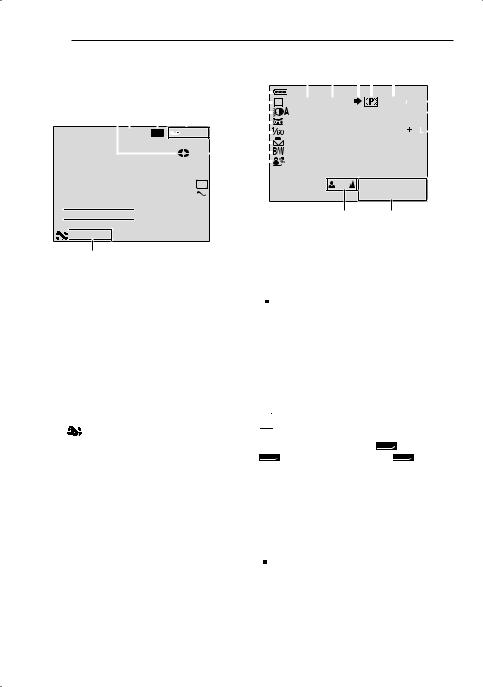
LCD Monitor/Viewfinder |
|
|
|
|
During Both Video And D.S.C. Recording |
|
||||||||||||||||||||||||||||||||
Indications |
|
|
|
|
|
|
|
|
|
|
|
|
|
9 ! |
|
" # $ |
|
|
|
|
|
|
||||||||||||||||
During Video Recording Only |
|
|
|
|
1 |
|
|
|
|
|
|
|
|
|
|
|
|
|
|
|
|
|
|
|
15 |
|
|
|||||||||||
|
|
|
|
|
|
|
|
|
|
|
|
|
2 |
|
|
M |
|
|
|
|
10 x |
|
|
|
|
|
|
640F |
|
% |
||||||||
|
|
|
|
|
|
|
|
|
|
|
|
|
|
|
|
|
|
|
|
|
|
|
|
|||||||||||||||
1 2 |
3 |
|
|
4 |
|
|
3 |
|
|
|
|
|
|
|
|
|
|
|
|
|
|
|
|
|
|
|
PHOTO |
|
& |
|||||||||
|
|
|
|
|
|
|
|
|
|
|
|
|
|
|
|
|
|
|
|
|
|
|
||||||||||||||||
|
|
|
|
|
|
|
|
|
|
|
|
|
4 |
|
|
|
|
|
|
|
|
|
|
|
|
|
|
|
|
|
|
|
|
3 |
|
|
( |
|
|
|
|
|
|
|
|
|
|
|
|
|
|
|
|
|
|
|
|
|
|
|
|
|
|
|
|
|
|
|
|
|
|
|
|
||||
|
|
|
16:9 |
LP |
|
|
– – –min |
5 |
|
|
|
|
|
|
|
|
|
|
|
|
|
|
|
|
|
|
|
|
|
|
||||||||
|
|
|
|
|
|
|
|
|
|
|
|
|
6 |
|
|
|
|
|
|
|
|
|
|
|
|
|
|
|
|
|
|
|
|
|
|
|
||
|
|
|
|
|
|
|
|
|
|
|
|
|
|
|
|
|
|
|
|
|
|
|
|
|
|
|
|
|
|
|
|
|
|
|
|
|||
|
|
|
|
|
|
|
|
|
|
REC |
|
5 |
7 |
|
|
|
|
|
|
|
|
|
|
|
|
|
|
|
|
|
|
|
|
|
|
|
|
|
|
|
|
|
|
|
|
|
|
|
|
|
|
|
|
|
|
|
|
|
|
|
|
|
|
|
|
|
|
|
|
|
|
|
|
||||
|
|
|
|
|
|
|
|
|
|
|
|
|
8 |
|
|
|
|
|
|
|
|
|
|
|
|
|
|
|
|
|
|
|
|
|
|
|
||
|
|
|
|
|
|
|
|
|
|
|
|
|
|
|
|
|
|
|
|
|
|
|
|
|
|
|
|
|
|
|
|
|
|
|
|
|||
WH  6
6
 7
7
! SOUND 12 B I T
9


 15:55
15:55
8
1Tape Running Indicator (Rotates while tape is running.)
2Selected Wide Mode Indicator ( pg. 17) (only 16:9 indicator is displayed)
3Recording Speed Mode (SP/LP) ( pg. 31) (only LP indicator is displayed)
4Tape Remaining Time ( pg. 18)
5REC: (Appears during recording.) ( pg. 18)
6Selected Wipe/Fader Effect Indicator ( pg. 38)
7Wind Cut Indicator ( pg. 31)
8Time Code ( pg. 32)
9Digital Image Stabilizer (“DIS”) ( pg. 30) (only 


 indicator is displayed)
!SOUND 12BIT/16BIT: Sound Mode Indicator ( pg. 31) (Appears for approx. 5 seconds after turning on the camcorder.)
11 : 13 AM |
DEC . 6 . 2007 |
~)
1Battery Remaining Power Indicator
2Operation Mode ( pg. 20) A : Auto Mode
M : Manual Mode
3LED Light Indicator ( pg. 34)
4 : Night-Alive Indicator ( pg. 38)
 : Gain Up Mode ( pg. 31) 5Shutter Speed ( pg. 39)
6White Balance Indicator ( pg. 37)
7Selected Effect Indicator ( pg. 38)
8Selected Program AE Indicator ( pg. 38)
9Approximate Zoom Ratio ( pg. 19) !Zoom Indicator ( pg. 19) "Shooting Icon
(Appears and blinks during shooting.)
#Card Icon ( pg. 24)

 : Appears during shooting.
 : Blinks in white when a memory card is not loaded.
$Image Size/Picture Quality: 640F 640 x 480 F 640F (FINE) and 640 x 480 S 640S (STANDARD) (in order of quality)
( pg. 31)
%Remaining Number Of Shots ( pg. 24) (Displays the approximate remaining number of shots that can be stored during D.S.C. recording.)
&PHOTO: (Appears when taking Snapshot.) ( pg. 24, 34)
(  : Spot Exposure Control Indicator ( pg. 36)
 : Backlight Compensation Indicator ( pg. 36)
±: Exposure Adjustment Indicator ( pg. 35)
 : Iris Lock Indicator ( pg. 36) )Date/Time ( pg. 15)
~Manual Focus Adjustment Indicator ( pg. 35)
|
|
GETTING STARTED EN 11 |
|
During Video Playback |
During D.S.C. Playback |
|
|
|
|
|
|
1 2 |
34 |
5 6 |
LP x3
 12 B I T / M I X
 L
L
BLANK SEARCH
PUSH "STOP" BUTTON
TO CANCEL
|
|
VOLUME |
|
|
|
3 AM |
||
|
|
|
|
11 :1 |
||||
20 : 21 : 25 |
|
DE C . 6 . |
2007 |
|||||
|
|
|
|
|
|
|
|
|
9 |
8 |
7 |
||||||
1Battery Remaining Power Indicator
2Sound L/R Indicator ( pg. 33)
3Blank Search Indicator ( pg. 22)
4Tape Speed (SP/LP) ( pg. 33) (only LP indicator is displayed)
5Variable Search Speed Indicator: x-10, x-3, x3 and x10 ( pg. 22)
63: Playback
¡: Fast-Forward/Shuttle Search 1: Rewind/Shuttle Search
8: Pause
7Date/Time ( pg. 33)
8VOLUME: Volume Level Indicator ( pg. 21)
9Time Code ( pg. 33)
1 2
|
|
|
|
|
|
|
100-0013 |
|
|
|
|||
|
|
|
|
|
|
3 |
|
11:13 AM |
|
||||
|
|
4 |
||||
|
DEC. 6. 2007 |
|
|
|||
|
|
|
||||
|
|
|
|
|
|
|
1Battery Remaining Power Indicator
2Folder/File Number
3Operation Mode Indicator
4Date/Time
GETTING STARTED
12 EN GETTING STARTED
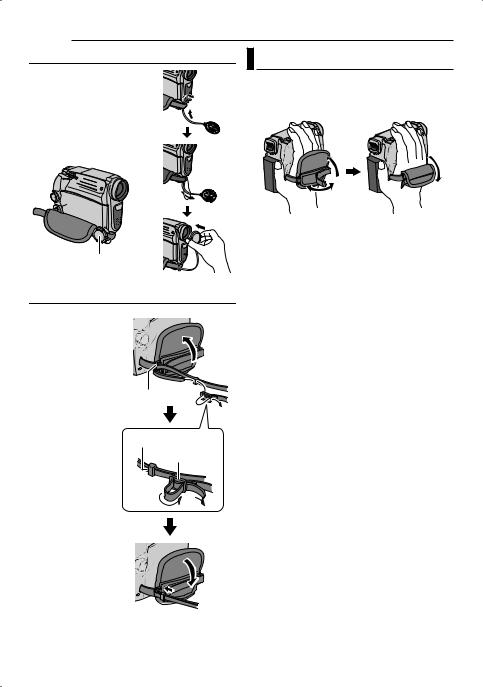
How To Attach The Lens Cap |
Grip Adjustment |
|
To protect the lens, attach |
Open the pad and make grip adjustments. |
|
the provided lens cap to the |
||
● Before making the adjustment, remove any |
||
camcorder as shown in the |
||
security tags that may be attached to the |
||
illustration. |
||
velcro. |
||
|
NOTE:
To confirm the lens cap is on correctly make sure the cap is flush to the camcorder.
Place here during shooting.
How To Attach The Shoulder Strap
1 Peel off the pad and thread the end of the strap through the eyelet.
2 Thread the strap through the buckle, adjust its length, and use the strap guide to fix it in place.
3 Position the buckle near the eyelet and reattach the pad.
Eyelet
Strap Guide
Buckle
|
|
GETTING STARTED EN 13 |
|
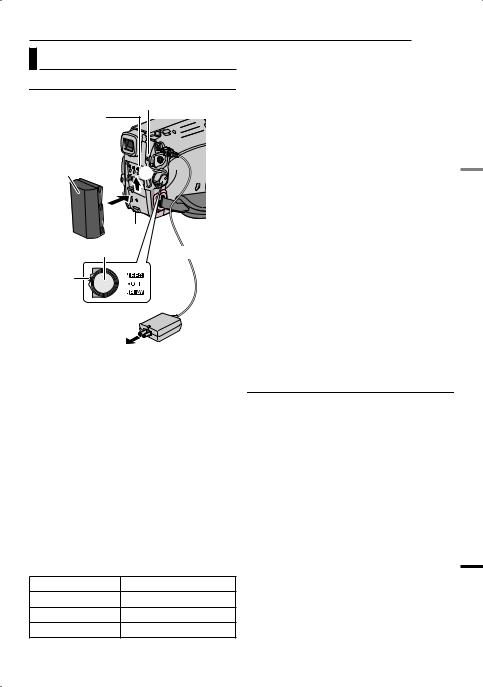
Power |
|
NOTES: |
|
Charging The Battery Pack |
● If the protective cap is attached to the battery |
||
pack, remove it first. |
|||
POWER/CHARGE Lamp |
● During charging, the camcorder cannot be |
||
operated. |
|||
Battery pack |
|
● Charging is not possible if the wrong type of |
|
|
battery is used. |
||
mount |
|
||
|
● When charging the battery pack for the first time |
||
|
|
||
|
|
or after a long storage period, the POWER/ |
|
|
|
CHARGE lamp may not light. In this case, |
|
Arrow |
2 |
remove the battery pack from the camcorder, |
|
|
then try charging again. |
||
1 |
|
● If a fully charged battery pack is attached to the |
|
|
unit, POWER/CHARGE lamp will blink for |
||
Battery |
|
||
|
approx. 10 seconds before it turns off. |
||
pack |
|
● If the battery operation time remains extremely |
|
|
|
||
BATT. |
short even after having been fully charged, the |
||
|
|
battery is worn out and needs to be replaced. |
|
Power Switch |
To DC connector |
Please purchase a new one. |
|
|
|
● Since the AC Adapter processes electricity |
|
Lock |
|
internally, it becomes warm during use. Be sure |
|
|
to use it only in well-ventilated areas. |
||
Button |
|
||
|
● After 5 minutes have elapsed in Record- |
||
|
|
||
|
|
Standby mode with the cassette inserted and no |
|
|
|
operation is performed, the camcorder will |
|
|
|
automatically turn off its power supplied from |
|
|
AC Adapter |
the AC adapter. In this case, the battery charge |
|
|
starts if the battery is attached to the camcorder. |
||
To AC outlet |
|||
● Please do not pull or bend the AC adapter plug |
|||
1 Set the Power Switch to “OFF”. |
|||
and cable. This may damage the AC adapter. |
|||
2 With the arrow on the battery pack pointing |
About Batteries |
||
upward, push the battery pack slightly against |
DANGER! Do not attempt to take the batteries |
||
the battery pack mount 1. |
|||
apart, or expose them to flame or excessive |
|||
3 Slide up the battery pack until it locks in |
|||
heat, as it may cause a fire or explosion. |
|||
place 2. |
|
WARNING! Do not allow the battery or its |
|
4 Plug the AC Adapter into an AC outlet. |
terminals to come in contact with metals, as |
||
5 Connect the AC Adapter to the camcorder. |
this can result in a short circuit and possibly |
||
start a fire. |
|||
● The POWER/CHARGE lamp on the camcorder |
|||
|
|||
blinks to indicate charging has started. |
To restore the accuracy of the battery |
||
● When the POWER/CHARGE lamp goes out, |
|||
power indicator |
|||
charging is finished. Unplug the AC Adapter |
|||
from the AC outlet. Disconnect the AC Adapter |
If the battery power indication differs from the |
||
from the camcorder. |
|
actual operating time, fully charge the battery, |
|
To detach the battery pack |
and then run it down. However this method |
||
may not work if the battery was used for a long |
|||
Slide the battery pack downward while |
|||
period of time under extremely high/low |
|||
pressing BATT. to detach it. |
|||
temperature condition or charged too many |
|||
|
|
||
Battery pack |
Charging time |
times. |
|
BN-VF808U* |
Approx. 1 hr. 30 min. |
|
|
BN-VF815U |
Approx. 2 hrs. 40 min. |
|
|
BN-VF823U |
Approx. 3 hrs. 50 min. |
|
|
* Provided |
|
|
|
GETTING STARTED
14 EN GETTING STARTED
Using The Battery Pack |
|
|
|
|
● If “COMMUNICATION ERROR” appears |
||||||||||||||||
|
|
|
|
|
|
|
|
|
|
|
instead of the battery status even though you |
||||||||||
Perform steps 2 – 3 in “Charging The Battery |
|||||||||||||||||||||
|
|
tried to press DATA several times, there may |
|||||||||||||||||||
Pack” ( pg. 13). |
|
|
|
|
|
be a problem with your battery. In such a |
|||||||||||||||
Maximum continuous recording time |
|
|
case, consult your nearest JVC dealer. |
||||||||||||||||||
|
|
|
|
|
|
|
|
|
|
Using AC Power |
|
|
|
|
|||||||
Battery pack |
|
LCD monitor |
|
Viewfinder on |
|
|
|
|
|
||||||||||||
|
|
on |
|
|
|
|
|
|
|
|
|
|
|
|
|
|
|||||
|
|
|
|
|
|
|
|
Perform step 4 – 5 in “Charging The Battery |
|||||||||||||
|
|
|
|
|
|
|
|
|
|
||||||||||||
BN-VF808U* |
|
1 hr. 50 min. |
|
2 hrs. 15 min. |
|
||||||||||||||||
|
|
|
|
Pack” ( pg. 13). |
|
|
|
|
|||||||||||||
BN-VF815U |
|
3 hrs. 40 min. |
|
4 hrs. 30 min. |
|
|
NOTE: |
|
|
|
|
||||||||||
BN-VF823U |
|
5 hrs. 30 min. |
|
6 hrs. 45 min. |
|
|
The provided AC Adapter features automatic |
||||||||||||||
|
|
|
|
|
|
|
|
|
|
voltage selection in the AC range from 110 V to |
|||||||||||
* Provided |
|
|
|
|
|
|
|
||||||||||||||
|
|
|
|
|
|
|
|
240 V. |
|
|
|
|
|||||||||
NOTES: |
|
|
|
|
|
|
|
|
|
|
|
|
|||||||||
|
|
|
|
|
|
|
|
INFORMATION: |
|
|
|
|
|||||||||
● Recording time is reduced significantly under |
|
|
|
|
|
||||||||||||||||
|
The following explanations in this manual |
||||||||||||||||||||
the following conditions: |
|
|
|
|
|||||||||||||||||
|
|
|
|
supposes the use of LCD monitor in your |
|||||||||||||||||
• Zoom or Record-Standby mode is engaged |
|
||||||||||||||||||||
|
operation. If you want to use the viewfinder, |
||||||||||||||||||||
repeatedly. |
|
|
|
|
|
|
|
|
|||||||||||||
• The LCD monitor is used repeatedly. |
|
close the LCD monitor and pull out the |
|||||||||||||||||||
• The playback mode is engaged repeatedly. |
|
viewfinder fully. |
|
|
|
|
|||||||||||||||
• The LED Light is used. |
|
|
|
|
|
|
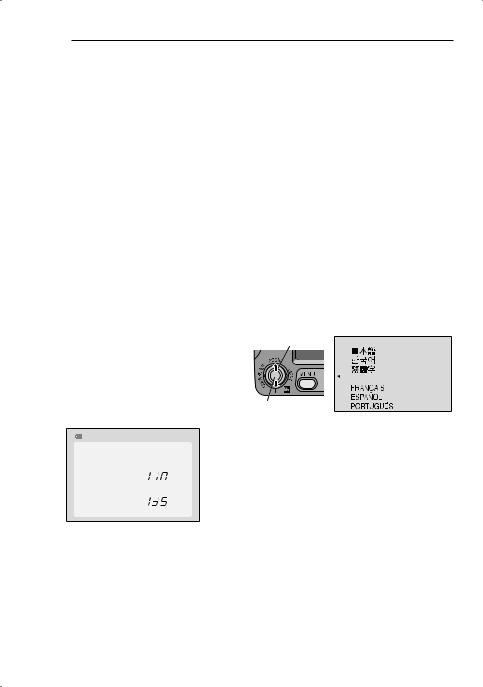
Language Settings |
||||||||||||||
● Before extended use, it is recommended that |
|
|
|
||||||||||||||||||
|
|
|
|
|
|
|
|
|
|
|
|
||||||||||
you prepare enough battery packs to cover |
|
|
|
|
|
|
|
|
|
|
|
|
|||||||||
3 times the planned shooting time. |
|
The language on the display can be changed. |
|||||||||||||||||||
ATTENTION: |
|
|
|
|
|
|
|
|
( pg. 32) |
|
|
|
|
||||||||
Before detaching the power source, make sure |
|
|
|
|
1 Select |
|
|
|
|
|
|||||||||||
|
|
|
|
LANGUAGE |
|
||||||||||||||||
that the camcorder’s power is turned off. Failure to |
|
|
|
|
|
|
|
|
|
|
|
|
|||||||||
do so can result in a camcorder malfunction. |
|
|
|
|
|
|
|
|
|
|
|
|
|||||||||
Data Battery System |
|
|
|
|
|
|
|
|
|
|
|
|
|
|
|
||||||
|
|
|
|
|
|
|
|
|
|
|
ENGLISH |
||||||||||
|
|
|
|
|
|
|
|
|
|
|
|
|
|
|
|
|
|
|
|
|
|
You can check the remaining battery power |
|
|
|
|
|
|
|
|
|
|
|
|
|||||||||
and the recordable time. |
|
|
|
|
|
|
2 SET |
|
|
|
|
||||||||||
When the battery is attached, press DATA. |
|
1 Open the LCD monitor fully. |
|||||||||||||||||||
BATTERY CONDITION |
|
||||||||||||||||||||
|
2 Set the Power Switch to “REC” or “PLAY” |
||||||||||||||||||||
100% |
|
|
MAX TIME |
|
|||||||||||||||||
|
|
|
while pressing down the Lock Button located |
||||||||||||||||||
|
|
|
|
LCD |
|
|
|
|
|||||||||||||
|
|
|
|
min |
|
on the switch. |
|
|
|
|
|||||||||||
|
|
|
|
|
|
|
|||||||||||||||
50% |
|
|
|
|
|
● If set to “REC”, the recording mode should be |
|||||||||||||||
|
|
|
|
||||||||||||||||||
|
|
|
|
|
|
|
|||||||||||||||
|
|
|
|
FINDER |
|
|
|
|
|
set to “M” ( pg. 20). |
|||||||||||
|
|
|
|
|
|
|
|||||||||||||||
0% |
|
|
|
|
min |
|
3 Press MENU. |
|
|
|
|
||||||||||
|
|
|
|
|
|
|
|
|
|||||||||||||
|
|
|
|
|
|
|
|
|
|||||||||||||
|
|
|
|
|
|
|
|
|
|
|
|
||||||||||
● When the Power Switch is set to “OFF”, it is |
|
4 Select “SYSTEM”, press SET or 2. |
|||||||||||||||||||
|
5 Select “LANGUAGE”, press SET or 2. |
||||||||||||||||||||
displayed for approx. 3 seconds if the button |
|
||||||||||||||||||||
is pressed and released quickly, and for |
|
6 Select the desired language, press SET or |
|||||||||||||||||||
approx. 15 seconds if the button is pressed |
2. |
|
|
|
|
|
|
|
|
|
|||||||||||
and hold for several seconds. |
|
|
|
|
7 Press MENU. |
|
|
|
|
||||||||||||
● When the Power Switch is set to “PLAY” or |
|
|
|
|
|
|
|
|
|
|
|
|
|||||||||
“REC”, press DATA again to return to the |
|
Press 1 whenever you want to return to the |
|||||||||||||||||||
normal screen. |
|
|
|
|
previous menu screen. |
|
|
|
|
||||||||||||
●Data battery status cannot be displayed during playback or while recording is in progress.
GETTING STARTED EN 15

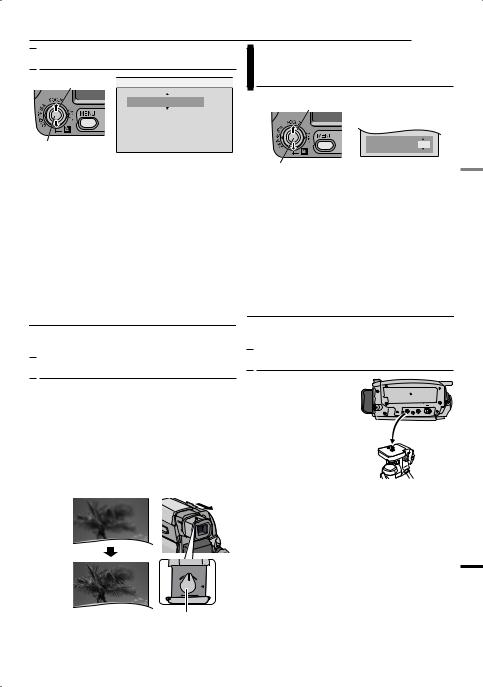
 Date/Time Settings
1 Select |
CLOCK ADJ. |
|
|
|
MONTH. DATE. YEAR 12h |
JAN. 03. 2007
02 : 10 AM
2 SET
The date/time is recorded onto the tape at all times, but its display can be turned on or off. ( pg. 32, 33)
Perform steps 1 – 3 in “Language Settings” ( pg. 14).
1 Select “DISPLAY”, press SET or 2.
2 Select “CLOCK ADJ.”, press SET or 2.
3 Select the desired date display format, press SET or 2.
●Repeat this step to input time display format (Select from “24h” or “12h”), month, date, year, hour and minutes.
4 Press MENU.
Brightness Adjustment Of The
Display
1 Select
BRIGHT |
± 0 |
2 SET
Perform steps 1 – 3 in “Language Settings” ( pg. 14).
●To adjust the brightness of the viewfinder, pull out the viewfinder fully and set “PRIORITY” to “FINDER” ( pg. 32).
1 Select “DISPLAY”, press SET or 2.
2 Select “BRIGHT”, press SET or 2.
3 Select the appropriate brightness, press
SET or 2.
4 Press MENU.
Press 1 whenever you want to return to the previous menu screen/setting.

 Viewfinder Adjustment
1 Set the Power Switch to “REC” while pressing down the Lock Button located on the switch.
2 Make sure the LCD monitor is closed and locked. Pull out the viewfinder fully.
3 Turn the Diopter Adjustment Control until the indications in the viewfinder are clearly focused.
Example:
Press 1 whenever you want to return to the previous menu screen.

 Tripod Mounting
To attach the camcorder to a tripod, align the direction stud and screw to the mounting socket and stud hole on the camcorder. Then tighten the screw clockwise.
●Some tripods are not equipped with studs.
Diopter Adjustment Control
CAUTION:
GETTING STARTED
When retracting the viewfinder, take care not to pinch your fingers.
 Loading...