HP 4250 User Manual

HP Print Server
Appliance 4250
User's Guide
Click a title to view a topic.
Home
General Information
Product Overview
Product Specifications
Setting the Date and Time
Initial Set Up
Getting Started
Installing Printers on Clients
Front Panel
Hardware Installation
Web Interface
Networking
TCP/IP and DNS Settings
Microsoft Network Settings
LPD Printing
SNMP Settings
Print Shares and Drivers
Managing Print Shares
Installing Print Shares
Managing Printer Drivers
Security
Microsoft NT Authentication
Administrators
LPD
Front Panel Password
SSL Certificate
Maintenance
Backup, Restore, Upgrade, and Reboot
Troubleshooting
System Summary Page
Diagnostics Page
Event Log
Event Log Messages
System Messages
Troubleshooting Tips
Questions
Support
Contacting HP
Warranty and Regulations

HP Print Server Appliance Documentation
for Firmware Version 2.5.x
© 1999-2004 Hewlett-Packard Company
Product Overview
Links within this page:
Product Introduction
Operation and Management
Product Description
Compatibility with HP Print Servers
Compatibility with Other (Non-HP) Print Servers
Product Updates
Links to related pages:
Technical Specifications
Product Introduction
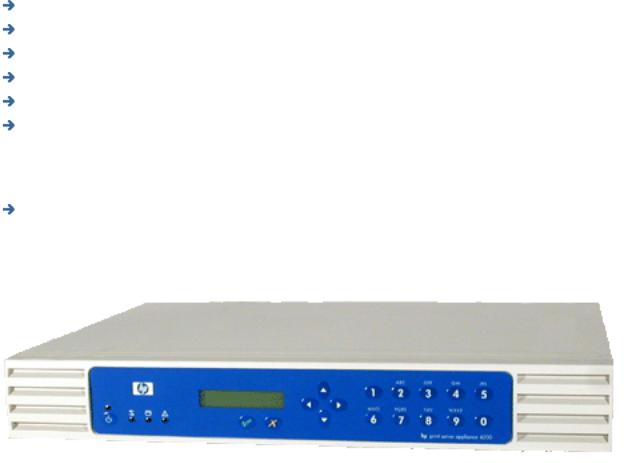
Figure 1: The HP Print Server PSA 4250
The HP Print Server Appliance 4250 is a state-of-the-art device for managing and monitoring printing over a network. It is a network device that has been designed to provide a quick and easy way to add print capacity without affecting the general purpose server. It has several distinct advantages over conventional network printing configurations which can result in improved performance in both printing and file access. These advantages are
discussed below.
Microsoft NT domain security, also known as Microsoft NT Authentication and Authority, is a feature that allows
administrators to easily authorize or restrict print administration and services to specific groups or users by using their existing user name and password of the NT 4.0 domain. An NT domain is a logical grouping of network servers and other computers that share a common security and user account for each user. Users log on to the domain, not to individual servers in the domain.
Installing printers on each client computer is required in order for clients to be able to print using the PSA. With the Microsoft Point and Print technology, printers are added to the PSA and associated with a factory-installed driver or a driver already associated with a printer. Clients can be easily set up with access to that printer and its driver without having to install the driver again.
In a typical network, general purpose servers manage both the printing tasks and the file/application serving. The PSA handles the spooling and network traffic associated with printing, reducing the workload on the general purpose server.
When printing takes place at remote offices or other locations distant from the servers, the speed of printing can be degraded. A PSA installed in a remote office can dramatically increase printing performance by eliminating the need for print requests to travel from the remote office to the central site and back to a remote office printer.
An additional benefit is that if general purpose file/application servers go down, remote office users can still print many jobs directly, using the PSA.
Operation and Management
Once the PSA is configured, virtually no management tasks are required. However, system administrators can monitor print activity, manage the printers, or alter the configuration of the PSA from anywhere on the network using the PSA's web-based graphical user interface and a supported browser, or by using Web Jetadmin.
Web Jetadmin plug-ins have been designed to configure and manage multiple PSAs. The Web Jetadmin plug-ins for PSA firmware version 2.4.x. are dependent on Web Jetadmin (version 7.2). The Web Jetadmin plug-ins provide LAN administrators and IT managers a single tool to manage their printing environment. The plug-ins provide the following management capabilities for the PSA:
●Automated migration of printers from Microsoft Windows servers
●Automated migration of existing printer connections on Microsoft Windows clients
●Auto-discovery of PSAs
●Batch configuration of most settings
●Remote print path creation
●Remote management of printer drivers
●Central device status reporting
●Scheduled batch firmware upgrades
●Scheduled backup/restore of configuration settings
Product Description
The PSA contains a large disk drive for spooling print jobs from clients. Print jobs are stored on the disk drive. The number of print jobs is only limited by the disk space available on the PSA.
The PSA provides web-accessible printer management and configuration and spools print jobs from the following clients:
●Microsoft Windows 95
●Microsoft Windows 98
●Microsoft Windows 2000
●Microsoft Windows NT
●Microsoft Windows ME
●Microsoft Windows XP
●UNIX
Following are some main features of the PSA:
●Off-loads spooling from a UNIX or Windows NT server
●Easy installation
●Easy management
Centralized management using Web Jetadmin
Can be managed from any supported web browser on the network
Virtually no management required once installed
●Supports APC uninterruptible power supplies (UPSs) (simple or basic signaling protocol)
●Increases performance of general purpose servers
●Remote management using Web Jetadmin
●Supports SNMP v1, v2c, and v3
●Provides data privacy, data integrity, and server authentication using Secure Sockets Layer (SSL v2/v3) and Transport Layer Security (TLS v1)
●Easy replication of configuration and printer drivers across PSAs
●Reduces network traffic
●Seamless integration into Microsoft networking environment (security, authentication, authorization, and active directory)
●Transparent to client users
●Easy to pre-configure before shipping to a remote office
●Web configuration interface
●Password security on the front panel and for the web interface
●Upgradable
●Front panel LCD display and keypad
●10/100Base-TX Ethernet network interface
●Microsoft networking (SMB over IP)
●Support for native Microsoft client printing tools
●Compatible with Microsoft's Point and Print technology (automatic driver download from the PSA to clients)
●Windows NT Domain integration
●Line Printer Daemon (LPD) support for UNIX clients
Compatibility with HP Print Servers
The PSA will work with any HP print server with firmware version x.03 and above.
Compatibility with Other (Non-HP) Print Servers
Any print server that supports LPD should work with the PSA. The proper LPD remote queue name for the print server might have to be known. Many print servers will work without specifying a remote queue name (use the default HP PRINT SERVER setting); however, some require a special string in order to work. The LPD remote queue name can be obtained from the print server vendor.
Product Updates
When new firmware or other device-specific support information is available for the PSA, the PSA can be notified automatically. On the TCP/IP and DNS page, a field Check for print server PSA firmware updates during each web login can be checked to enable this feature. If this is checked and new firmware or support information is available, the picture of the PSA image on the Overview page in the web interface will change.
This feature is enabled by default and can be disabled by unchecking this box. Each time an image is retrieved, it is logged like any other visit to HP's website. In addition, each request includes the serial number of the requesting unit. HP uses this to provide support information relative to the specific unit. No personally identifiable information such as user name, email address, or physical address is gathered as part of this process. HP does monitor web logs in order to understand our customers and improve our products. All web transactions are subject to HP's privacy policy which can be found at:http://www.hp.com/country/us/eng/privacy.htm.
Product Specifications
Links within this page:
Model Number
System Requirements
Language Options and Power Cord Requirements
Supported Clients
Supported Printers
Supported Web Browsers
What Ships in the Box
Security Features
Physical Specifications
Electrical Specifications
Environmental Specifications
Safety Certifications
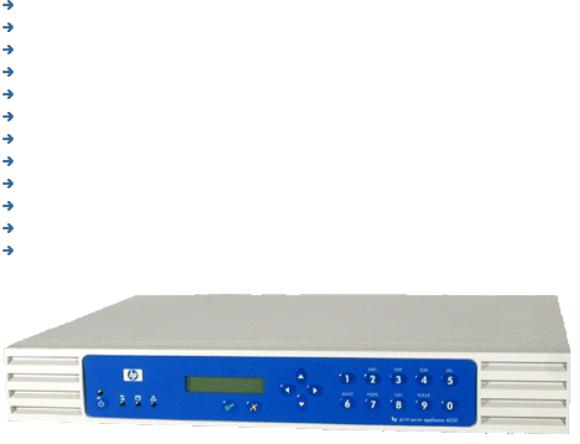
Figure 1: The HP Print Server Appliance 4250 (J7941)
Model Number
Product |
Model number |
HP Print Server PSA 4250 |
J7941A |
System Requirements
The computer printing to the PSA must be running TCP/IP and have Microsoft Windows 95, 98, NT, 2000, ME, XP, or other operating systems running LPD.
Language Options and Power Cord Requirements
The following localization options are available for the power cord. The power cord must be be a standard IEC-320 female power cord, terminated by a male plug appropriate for the country/region of use.
Country/Region |
Option Code |
Power Cord |
U.S. |
ABA |
8120-6805 |
Canada (excluding Quebec) |
|
|
Argentina |
AKY |
8121-0766 |
Brazil |
AKY |
8121-0670 |
Chile |
AKY |
8121-0765 |
Europe, including: |
401 |
8120-6802 |
Austria |
|
|
Belgium |
|
|
Finland |
|
|
France |
|
|
Germany |
|
|
Italy |
|
|
Netherlands |
|
|
Norway |
|
|
Portugal |
|
|
Spain |
|
|
Sweden |
|
|
Denmark |
ACE |
8120-6806 |
Switzerland |
AR8 |
8120-6807 |
United Kingdom |
ACC |
8120-0550 |
Singapore |
|
|
South Africa |
ACQ |
8120-6808 |
Australia |
ABG |
8120-6810 |
New Zealand |
|
|
Hong Kong SAR |
AB5 |
8120-0550 |
Supported Clients
Clients are networked PCs that submit print jobs to the PSA. The PSA can accept print jobs from the following clients:
●Windows 95
●Windows 98
●Windows NT 4.0
●Windows 2000
●Windows ME
●Windows XP
●Any RFC 1179-compliant LPD client including (not all LPD implementations are RFC 1179-compliant):
HP-UX 10.x and above
Solaris
Linux
Note: The Microsoft Point and Print feature for Windows NT and Windows 2000 is only supported on an x86 PC.
The PSA provides easy, consistent PSA management for multiple PSAs simultaneously. An SNMP agent provides network device information to monitor, configure, and control networked systems. It provides SNMP clients a method of communicating with PSAs for administration over a network. Operations in SNMP are limited to retrieving and modifying management information values and reporting events. SNMP v1, v2c, and v3 are supported for the 2.4.x firmware. An SNMP MIB defining the PSA's SNMP interface is available from www.hp.com or by contacting HP's support center.
Supported Printers
Any printer or print server that supports the LPD protocol should work with the PSA.
Supported Web Browsers
The following web browsers are supported:
●Netscape Navigator 6.0 or greater
●Microsoft (R) Internet Explorer 5.5 or greater
What Ships in the Box
The following are included in the box:
1.HP Print Server Appliance 4250 (J7941)
2.3 Quick Start Posters (English/Spanish (5990-4778), French/German (5990-4779), and Italian/Portuguese (59904780))
3.Documentation CD-ROM (5069-4434 for the CD and sleeve, and 5011-4598 for the CD)
4.Rackmount Kit (5069-4433)
5.Power cable
Security Features
The PSA has a front panel password to prevent unauthorized front panel configuration. It also has a web administrator name and password, which are required to configure the device or manage printers (the default user name is admin and the default password is admin). Additional web administrator accounts can be added.
The existing user account information of the NT 4.0 domain (name and password) is used; users or groups of users can be authorized to print through the PSA without requiring the creation of user accounts and passwords on the PSA.
For NT Domain networks, administrators can easily restrict print administration and services to specific groups or users. Valid access levels are:
●Print (print, pause, and delete your own print jobs)
●Manage Documents (print, pause, and delete other user's print jobs)
●Full Control (print, pause, and delete other user's print jobs; delete printers; and change security settings using native NT tools)
●No Access
Physical Specifications
Attribute |
Specification |
Dimensions |
441 millimeters (mm) (17.4 inches) W x 323 mm (12.7 inches) D x 63 mm (2.5 |
|
inches) H |
Weight |
4.6 kilograms (10.1 pounds) |
Temperature |
Operating: +5 degrees Celsius (C) to +40 degrees C (41 degrees Fahrenheit (F) |
|
to 104 degrees F) |
|
Non-operating: -40 degrees C to +70 degrees C (-40 degrees F to 158 degrees F) |
Network connection |
RJ-45 |
Serial port |
DB-9 (supports all APC uninterruptible power supplies with a Simple Signaling |
|
cable (APC part # 940-0020B)) |
Acoustic noise |
52 dB |
Minimum Hard Drive |
10 Gigabytes |
Minimum Processor Speed |
300 Megahertz |
Recommended Number of Printers |
50 |
Supported |
|
Largest Spoolable File Size |
2 Gigabytes |
Minimum Spooling Capacity |
7 Gigabytes |
|
Electrical Specifications |
|
|
Attribute |
Specification |
|
Power requirements |
120/240 VAC at 50/60 Hz |
|
Power consumption |
100-127 |
V ~ 1000mA |
|
200-240 |
V ~ 750mA |
Power connection |
IEC-320 |
|
Environmental Specifications
Attribute |
Specification |
Relative humidity |
80 percent at 40 degrees C (104 degrees F) |
Temperature |
(Operating) +5 degrees Celsius (C) (41 degrees Fahrenheit (F)) to +40 degrees |
|
Celsius (104 degrees F) |
|
(Non-operating) -40 degrees Celsius (-38 degrees F) to +70 degrees Celsius (158 |
|
degrees F) |
Safety Certifications
Products comply with:
●IEC 950: (1991)+A1,A2,A3,A4/EN60950 (1992)+A1,A2,A3,A4
●UL 1950
●CSA 950
●NOM-019-SCFI-1994

Web Interface for the PSA
Links within this page:
Supported Web Browsers
Accessing the Web Interface
Menu
Overview Page
Changing the Date and Time
The PSA contains a web server. The web server allows administrators to manage the configuration of the PSA, review the status of the device, and view print jobs from your web browser.
This page explains what can be configured through this interface and how to access the web interface on the PSA.
Supported Web Browsers
The following web browsers are supported:
●Netscape Navigator 6.0 or greater
●Microsoft (R) Internet Explorer 5.5 or greater
Accessing the Web Interface
Follow these steps to access the web interface:
1.Open the web browser.
2.In the Location field (Netscape Navigator) or Address field (Microsoft Internet Explorer), enter the IP address of the PSA, as displayed on the front panel liquid-crystal display (LCD) (for example: http://10.1.2.3).
Or, type the DNS name of the PSA (if the DNS server has been configured with the correct name entry).
3.Type the administrator name and password. (The default is "admin" for the user name and "admin" for the password.) The Overview page is displayed with the menu on the left.
The Overview page displays general information about the PSA.
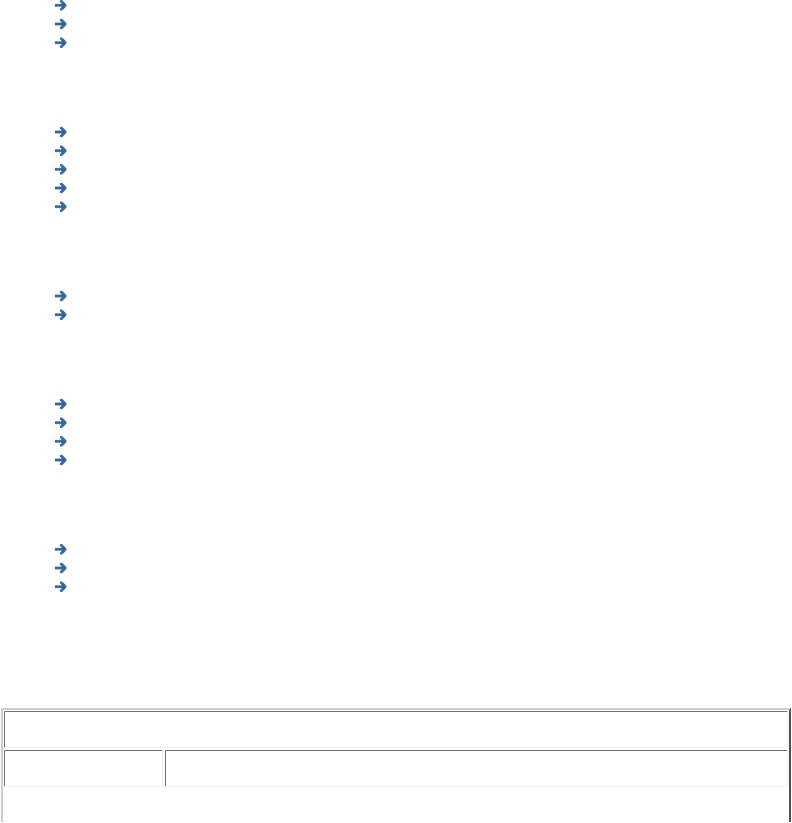
Menu
The menu is always displayed on the left side of the displayed page in the web interface. Click on any of the following topics listed on the menu for more information:
Print Services
Overview
Print Shares
Driver Management
Networking
Date and Time
TCP/IP and DNS
Microsoft Network
LPD Settings
SNMP
Security
Administrators
SSL Certificate
Maintenance
Backup
Restore
Upgrade
Restart
Diagnostics
System Summary
Diagnostic Report
Event Log
Overview Page
The following information is displayed on the Overview page:
Overview Page
Field Name |
Description |

Print Server Name |
Name as typed in the Print Server Appliance Name field on the Microsoft Network |
|
Settings page (in the web interface under Networking). |
Appliance Status |
Status of this PSA. If a backup, restore, or upgrade is in process, shows the current |
|
state of that operation. |
System Load |
Shows how heavily the PSA has been used in the past 15 minutes. (See the System |
|
Load section on the Diagnostic Report for more information.) |
Disk Usage |
Percentage of disk space used on the PSA. |
DNS Servers |
Lists the number of configured DNS servers that are reachable across the network. This |
|
value is updated every ten minutes or whenever Diagnostics are run. |
WINS Servers |
Lists the number of configured WNS servers that are reachable across the network. This |
|
value is updated every ten minutes or whenever Diagnostics are run. |
Microsoft Domain |
If Domain Mode is enabled on the PSA (on the Microsoft Network Settings page) , |
|
this displays the name of the domain it is a member of and its status. |
DNS Domain |
The DNS Domain name as typed in the DNS Domain field on the TCP/IP and DNS page |
|
(in the web interface under Networking). |
IP Address |
The IP address for the PSA as typed on the IP Address field on the TCP/IP and DNS |
|
page (in the web interface under Networking). |
Ethernet Address |
The PSA's IEEE Ethernet (802.3) Link Level MAC (Media Access Control) address. |
Serial Number |
Serial number for the PSA. |
Firmware revision |
Firmware revision number currently on the PSA. |
Changing the Date and Time
Use the Date and Time Settings page to set the date and time of the PSA.
Field Name |
Description |
|
Day |
Type the day of the month numerically (for example: "01" or "20"). |
|
Month |
Type the month (for example: "01", "02", and so on). |
|
Year |
Type the four-digit year (for example, "2003"). |
|
Time |
Type the time in the format: hh:mm:ss. The seconds and leading zeroes may be omitted (for |
|
|
example: "5:35" and "12:00:00"). |
|
AM/PM |
Use the drop-down box to select AM or PM. The 24-hour time format is not supported. |
|
Time Zone |
Select the appropriate time zone from the drop-down box. |
|
Click |
to keep the time and date at their previous values, or click |
to set the date and time. |

Links to related pages:
System Messages for Date and Time
Getting Started
Links within this document:
What Ships in the Box
Steps for Installation and Configuration
Hardware Installation
Links to related documents:
Troubleshooting the Appliance
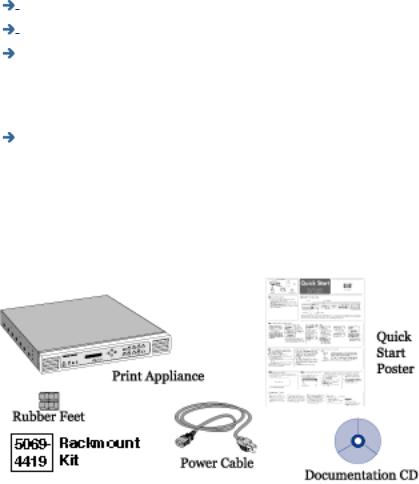
What Ships in the Box
The following items ship with PSA. If something is missing from the box, please contact the HP Dealer or Reseller where the PSA was purchased.
Figure 1: Contents of the box
Steps for Installation and Configuration
To install the PSA, complete these steps:
1. Unpack the PSA, and make sure the six items are included in the box.
2.Attach its rubber feet for desktop, rack shelf, or under-printer installation. For rackmount installation, click here.
3.Connect the cables and components.
4.Configure the IP settings using the front panel (for the first time). The IP address can be changed through the web interface if desired.
5.Access the web interface.
6.Complete the TCP/IP and DNS Settings page (on the menu under Networking).
7.Complete the Microsoft Network Settings page (on the menu under Networking) to identify the WINS
server address and the Windows NT domain or workgroup. For NT Domain security, complete the other fields on this page.
8.Install printers on clients.
9.Back up the settings.
10.Be sure to register the PSA (http://www.hp.com/go/printappliance_registration).

Installing Printers on Clients
Links within this document:
Installing Printers on Microsoft Clients (the Microsoft Point and Print feature)
Bypassing Point and Print
Configuring Printing for UNIX Clients
Links to related documents:
Troubleshooting the Appliance
Installing printers on each client computer is required in order for clients to be able to print using the PSA.
Note: Hewlett-Packard recommends verifying installation with one client computer before configuring more clients. This will confirm operation. It is easier to troubleshoot settings on one client computer than on many.
Installing Printers on Microsoft Clients (the Microsoft Point and Print feature)
Use one of the following procedures to install printers on each client computer (this feature is only supported on an x86 PC running Microsoft Windows 9x, ME, NT, 2K, or XP). Before you begin, check the following:
●The PSA is installed on the network and properly configured.
●Each client workstation is connected to the network.
●The printers are set up and turned on.
For Windows 9x, ME, NT, and 2K:
1.On the client workstation, click Tools in Microsoft's Explorer and select Find… Computer. Type the name or IP address of the PSA. Or, find the PSA in the Network Neighborhood.
2.Open the Printers folder.
3.Right-click on the printer to install.
4.Select Install from the drop-down menu.
5.For Windows NT, 2000, and XP clients, driver installation is complete. For Windows 95, 98, and ME clients, a wizard will ask several things (for example, Do you want to print from DOS, and so forth.).
Or:
1.On the client workstation, click Start-->Settings-->Printers.
2.Double-click the Add Printer icon.
3.Select the Network print server radio button.
4.Select the PSA and printer from the list box. Or, type the Universal Naming Convention (UNC) path (for example: "\\spooler1\printer1"). See Microsoft documentation for more information about UNC. Click OK.
5.Answer subsequent questions to complete the driver installation.
For Windows XP:
1.On the client workstation, click Start and then choose My Computer. Under Other Places, click My Network Places. Now click Search on the toolbar and type the name or IP address of the PSA.
2.Double-click the PSA that was found. This will expand into a list of printers available on the PSA.
3.Right-click on the printer and click Connect to install. The printer should now be in the printers and faxes folder.
Or:
1.On the client workstation, click Start and then choose Printers and Faxes.
2.Under Printer Tasks select Add a printer.Double-click the Add Printer icon.
3.Select the Network print server radio button.
4.Select the Connect to this printer radio button and type the Universal Naming Convention (UNC) path (for example: "\\spooler1\printer1"). See Microsoft documentation for more information about UNC. Click Next.
5.Answer subsequent questions to complete the driver installation.
Bypassing Point and Print
Installing printers on each client computer is required in order for clients to be able to print using the PSA. With the Microsoft Point and Print technology, when a printer is added to a client, an associated driver is automatically installed on the client also. This helps make printer installation easy. However, the driver associated with a given printer can only be managed at an administrator level, so changes to that driver such as enabling duplex or changing the driver itself will be reflected on all Windows NT, 2K, and XP clients using that printer; only one driver can be associated with a given printer.
In order to bypass this functionality, clients can install a local printer that uses a local port to print through the PSA.
Note: This requires the client to install a driver locally. Because the installed printer is viewed by the computer as a local printer, it will not receive job status feedback from the PSA. For example, if the printer on the PSA has been paused, the client printer will not reflect this and it may look like a job was printed when it was not.
To install a local printer with local driver that prints through the PSA, follow the following steps.
For Windows 2000 and XP Clients:
1.Start the Add Printer wizard (in Windows 2000 or XP).
2.Click Next.
3.On the Local or Network Printer screen, select Local printer and then click Next.
Note: On this screen, make sure Automatically detect and install any Plug and Play printer is not selected.
4.On the Select the Printer Port screen, select Create a new port and then select Local Port as the Type. Click Next.
5.On the Port Name screen, type the UNC name for the printer in the following format and click OK:
\\<psa_name>\<printer_name> (where "psa_name" is the name of the PSA and "printer_name" is the name of the printer)
6.On the screen showing printer manufacturers and printers, select a printer driver and then click Next.
7.On the Name Your Printer screen, specify a printer name and then click Next.
8.On the Printer Sharing screen, select Do not share this printer and then click Next.
9.On the Print Test Page screen, click Next.
10.Click Finish.
For Windows NT Clients:
Note: Before you begin, make sure you have Microsoft's Service Pack 6a (or greater) installed on the client(s).
1.Start the Add Printer wizard (in Windows NT).
2.Select My Computer and click Next.
3.On the screen showing available ports, click on the Add Port button.
4.On the Printer Ports screen, select Local Port and then click New Port.
5.On the Port Name screen, type the UNC name for the printer in the following format and click OK:
\\<psa_name>\<printer_name> (where "psa_name" is the name of the PSA and "printer_name" is the name of the printer)
6.Click OK.
7.On the Printer Ports screen, click Close.
8.On the screen showing available ports, select your newly created port and click Next.
9.On the screen showing printer manufacturers and printers, select a printer driver and then click Next.
10.On the screen asking for a printer name, enter your printer name and click Next.
11.On the screen referring to printer sharing, select Not Shared and click Next.
12.Click Finish.
Configuring Printing for UNIX Clients
The following topics are discussed in the section:
●configuring print queues for BSD-like systems
●configuring print queues using SAM (HP-UX systems)
●printing a test file
A print queue must be set up for each printer or printer personality (text, PCL, or PostScript) used.
If printing text documents from UNIX clients to an HP Jetdirect print server, a special queue must be configured on the PSA. First add the printer through the Print Share page in the web interface. On the Identify Printer page, for
connectivity select Other and then specify the Remote Queue Name. For the remote queue name on the target printer, TEXT must be specified (or TEXT2, TEXT3 for multi-port Jetdirect print servers). This must be done even though the target printer is an HP Jetdirect device. Use the normal print queue when printing jobs that have been formatted with a printer-specific page description language such as PDL (like PostScript) or PCL.
Configuring Print Queues for BSD-like Systems
If the printer supports automatic language switching, the application may select the printer language using commands embedded in the print data.
Make sure users know the printer names for the printers, since they will have to enter those names on the
command line for printing.
Following is an example of configuring print queues for BSD-like systems (for example, Linux):
1.Edit the /etc/printcap file to include the following entries:
printer_name:\ :lp=:\
:rm=print_appliance_name:\
:rp=remote_printername_argument:\ (this should be the same as the printer name on the appliance)
:lf=/var/spool/lpd/error_log_filename:\ :sd=/var/spool/lpd/printername:\
:sh:
where printer_name is the name of the printer on the local computer. , print_appliance_name identifies the printer on the network, and remote_printername_argument is the print queue designation on the appliance.
For more information on printcap, see the printcap man page in the UNIX documentation.
2.Create the spooling directory by making the following entries. As the root user, enter:
cd /var/spool/lpd mkdir printername chown root printername chgrp lp printername chmod 755 printername
where printername is the name of the printer on the local computer.
Configuring Print Queues Using SAM (HP-UX Systems)
On HP-UX systems, the SAM utility can be used to configure remote print queues for printing.
Before the SAM program is executed, select an IP address for the appliance and set up an entry in the /etc/hosts file on the system running HP-UX. (This is not required if DNS is configured.)
1.Start the SAM utility as a super user.
2.Select Printers/Plotters from the Peripheral Devices menu.
3.Select LP Spooler.
4.Select Printers/Plotters from the Printers/Plotters menu.
5.Select Action from the top menu and then select Add Remote Printer or Plotter.
6.Complete the Add Remote Printer/Plotter screen.
The Printer Name field should be the local printer name.
Be sure to check the box Remote Printer is on a BSD System.
7.Click OK.
8.Select Exit from the List menu.
9.Exit SAM.
Printing a Test File
To verify that the printer and PSA connections are correct, print a test file.
1.At the UNIX prompt type:
lp -dprintername file_name or on a BSD-like system:
lpr -Pprintername file_name
where printername is the name of the printer as added to the appliance, and file_name is the file to be printed.
2.To get print queue status, type the following at the prompt: lpstat printername
or on a BSD-like system: lpq -Pprintername
where printername is the designated printer. Example: lpq -Pappliance1
Front Panel
Links to related pages:
Troubleshooting the PSA
The following activities can be performed from the front panel:
Start Up or Shut Down the PSA
Configure the IP Address for the PSA
Configure the Link Speed and Duplex Mode for the PSA
Set or Change the Front Panel Password
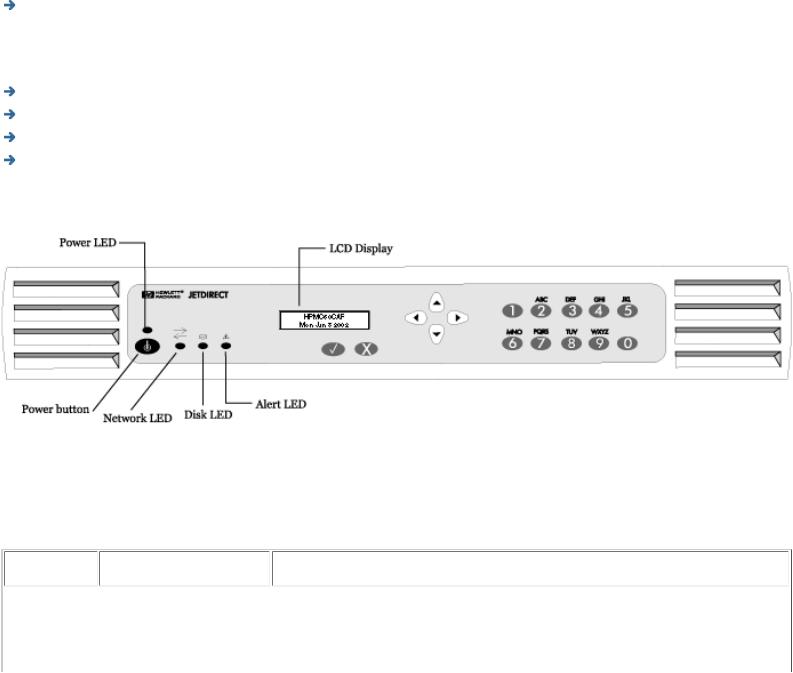
The front panel on the HP Print Server Appliance 4250 has the following components:
LEDs
There are four indicator lights (LEDs) on the front of the PSA. Understanding how the lights function is important for proper operation of the PSA. This page describes normal and problem LED status displays.
LED |
LED Name |
Description |
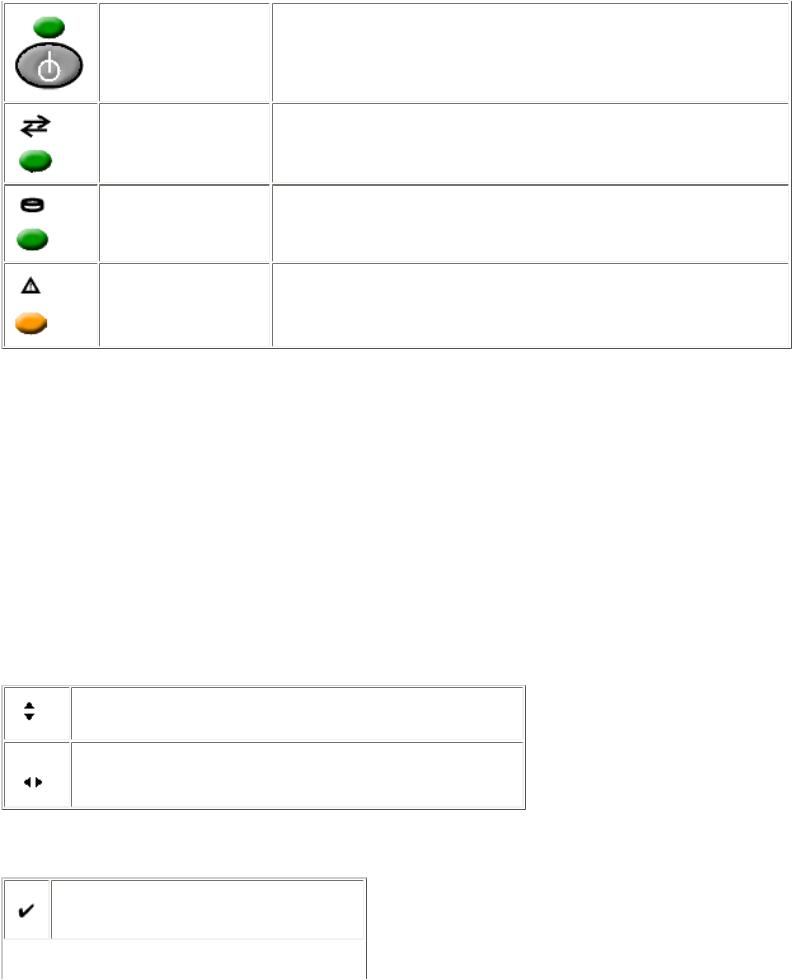
Power LED |
ON when power is supplied to the PSA and it is turned on. |
Network Activity LED LIT when there is a connection between the PSA and other network devices. BLINKS when there is network activity between the PSA and other network devices.
Disk Activity LED ON when there is disk activity on the PSA.
Alert LED |
OFF during normal operations (ON during bootup and shutdown). |
Power Button - Starting Up and Shutting Down the PSA
Press the Power button to power up the PSA. The bootup process begins. When the device is powered on, the Power LED is lit. To turn off the PSA, press the Power button and wait for about 20 seconds for the PSA to power down. The PSA performs an orderly shutdown.
If print jobs are printing when the PSA is powered down, the print jobs will not be completed. Jobs waiting to be printed will resume printing when the PSA is fully booted. If the PSA loses power unexpectedly and is not powered down, spooled print jobs that had not yet begun printing or print jobs that were in the middle of printing will resume printing when power is restored and the PSA is powered up again. If, however, the integrity of the PSA or print jobs are compromised, print jobs that were not spooled would have to be resent.
Front Panel Display
The LCD display has two rows of 16 characters or spaces. It is used to display the status of the PSA and to display configuration information entered at the front panel. The following arrow buttons are displayed on the front panel:
Indicates that the menu can scroll.  scrolls up,
  scrolls down.
Indicates that choices can be toggled through.
Enter and Cancel Buttons
Enter. Accept changes or begin an operation.
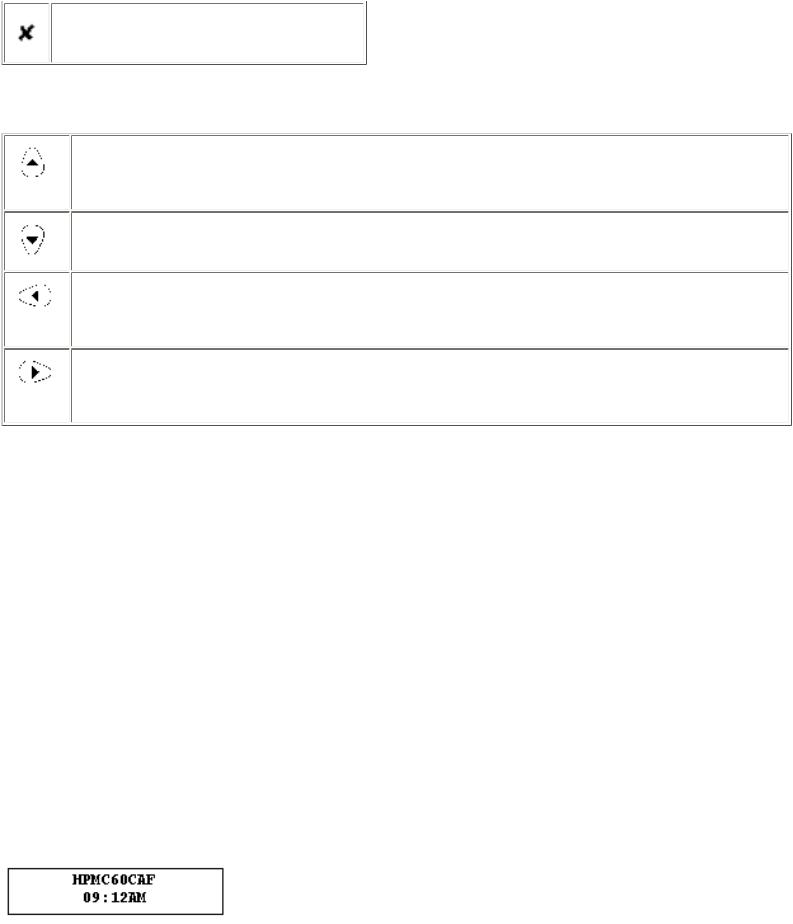
Cancel changes or end an operation.
Direction Buttons
Up. Press this button to return to the previous menu item or step of a procedure. If Enter hasn't been pressed, changes will not be applied.
Down. Press this button to advance to the next menu item or step of a procedure.
Left. When there is a choice of options (as indicated in the front panel display), press this button to toggle backward through the choices.
Right. When there is a choice of options (as indicated in the front panel display), press this button to toggle forward through the choices.
Numeric Keypad
The numeric keypad has buttons for the numbers 0-9. Above the keys are letters of the alphabet, like the keypad on a telephone.
Use the numeric keypad to enter numeric values, such as IP address, subnet mask, and so forth, when configuring the PSA. The letters above the keys can be useful as a mnemonic aid when entering the device's password.
Making Entries
Use  and
and  on the front panel to move the cursor in the front panel display. Enter only numbers from the keypad. When the entry is complete, press
  .
.
Messages on the Front Panel
When the PSA is powered up, it executes a series of self tests. It then displays a series of messages, including "Booting...
Configuring... Validating... Extracting... Formatting..." etc.
When the startup process is complete, the PSA displays a repeating series of normal operating messages.
The first line of the display shows the PSA name which can be entered from the web interface during configuration (on the
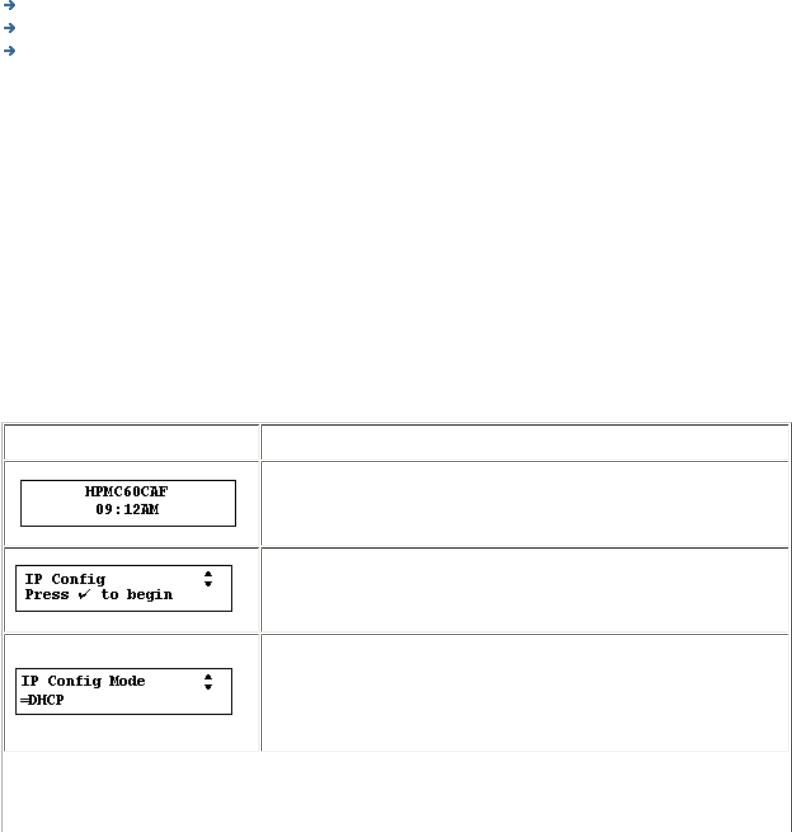
Microsoft Network Settings page). If the name is not typed in the web interface, the default name, based on the device's MAC address, is displayed.
The second line of the display shows date, time, IP address, and firmware version in a repeating sequence.
Starting Front Panel Operation
Configure the IP Address for the PSA
Configure the Link Speed and Duplex Mode for the PSA
Set or Change the Front Panel Password
There are three front panel operations: IP configuration, link speed and duplex mode configuration, and password configuration
Use the web interface to further configure the PSA. Refer back to the Getting Started procedures, or refer directly to information about using the web interface to further configure the device.
Configuring the IP Address Using the Front Panel
These procedures explain how to configure an Internet Protocol (IP) address on the PSA using the front panel. (The TCP/ IP and DNS page in the web interface can also be used to do the same.) Configuring the IP address allows the PSA to route print tasks properly.
If the network does not use Dynamic Host Configuration Protocol (DHCP), use the front panel of the PSA to manually enter the IP address, subnet mask, and default gateway.
Configuring the IP Address
Display |
Action |
To begin configuring the IP address, press  once.
once.
Press  again.
Select the mode by pressing  or
or  to toggle between Manual and DHCP.
Press  to continue.
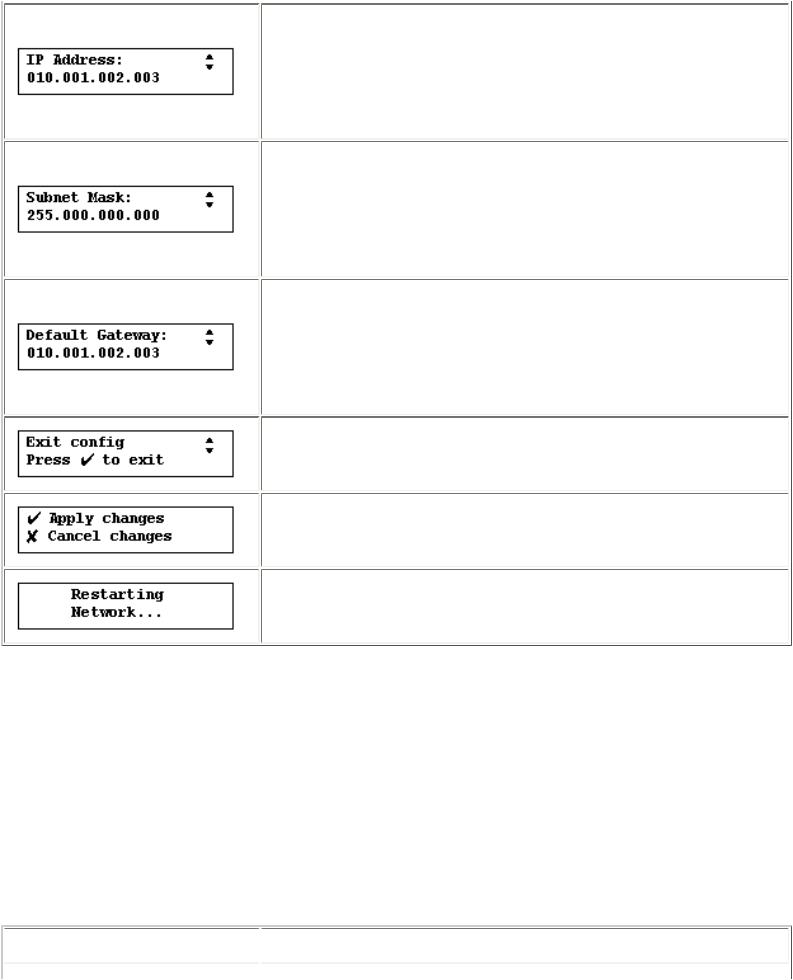
If Manual: Use the number buttons on the front panel of the PSA to enter the
IP address. Then press  .
.
If DHCP: Press  to continue.
If Manual: Use the number buttons on the front panel of the PSA to enter the subnet mask. Press  .
.
If DHCP: Press  to continue.
If Manual: Use the numbers on the front panel of the PSA to enter the default gateway. Press  .
.
If DHCP: Press  to continue.
Press  .
.
Press  .
.
After a moment, the PSA will resume displaying normal operating messages if the IP address is valid.
Configuring the Link Speed and Duplex Mode Using the Front Panel
These procedures explain how to configure the link speed (100 Mbps or 10 Mbps) and the duplex mode (full or half) for the PSA using the front panel. This can be done manually or the settings can be automatically detected (which is the default). The link speed is the speed at which the PSA communicates over the network. The speed is expressed in megabits per second and is either 10 or 100. The duplex mode defines whether data can be sent at the same time it is received:
●Full duplex: data can flow both directions at the same time
●Half duplex: data can only flow one way at a time and any attempt to do both at the same time creates a collision.
The current setting is displayed on the System Summary page (under Maintenance in the web interface).
 Display
  Action

To begin configuring the link speed and duplex mode for the PSA, press  once.
once.
Press  to skip the IP configuration and to go to the Link Speed and Duplex Mode configuration.
Press  .
.
Select the link mode by pressing  or
or  to toggle between Manual and
Auto Detect.
Press  to being configuring the link speed.
If Manual mode: Press  or
or  to select the link speed (10 Mbps or 100 Mbps).
If Auto Detect mode: The detected setting is displayed (10 Mbps or 100Mbps).
Press  to begin configuring the duplex mode.
If Manual mode: Press  or
or  to select the duplex mode (Half or Full).
If Auto Detect mode: The detected duplex mode is displayed (Half or Full).
Press  to continue.
Press  .
.
Then press  to apply changes, or press
  to cancel the changes.
Setting or Changing the Front Panel Password

There are two types of passwords that can be set for the PSA: a front panel password (one per PSA) and an administrator password (can be multiple accounts, but there must be at least one), which enables access to the web interface to manage the PSA. The front panel password is discussed in this section.
There is no front panel password until it is set. This password limits access to front panel functions. A password will prevent unauthorized configuration changes. After the front panel password is set, it must be entered before future configuration tasks can be performed at the front panel display.
To set or change the front panel password, press  once. The following messages are displayed:
Press 
Press  .
.
Type a new password and press  .
.
Retype the new password and press  .
.
The front panel displays this message briefly.
Press  to end the operation and the device will return to the display of normal operating messages.
Or, after a moment, it will display normal operating messages.
 Loading...