


FV 271
FV 242 D
Flush-mountable electric ventilated oven
Instructions for installation and use

Important safety warnings
1These instructions are only for those countries whose symbols appear in the booklet and on the matriculation plate of the appliance.
2This appliance is intended for non-professional use within the home.
3This owner’s manual is for a class 1 appliance (installed independently) or class 2 - sub-class 1 appliances (installed between two cabinets).
4Before using your appliance, read your owner’s manual carefully since it provides impor tant instructions for the safe installation, use and maintenance of your cooker. Keep in a safe place for future reference.
5When you have removed the packing, check that the appliance is not damaged. If you have any doubts, do not use the appliance, contact your nearest Ariston Service Centre. Never leave the packing components (plastic bags, foamed polystyrene, nails, etc.) within the reach of children since they are a source of potential danger.
6The appliance must be installed only by a qualified person in compliance with the instructions provided. The manufacturer declines all responsibility for improper installation which may harm persons and animals and damage property.
7The electrical safety of this appliance can only be guaranteed if the cooker is correctly and efficiently earthed, in compliance with current regulations on electrical safety. Always ensure that the earthing is efficient; if you have any doubts call in a qualified electrician to check the system. The manufacturer declines all responsibility for damage resulting from a system which has not been earthed.
8Before connecting the appliance to the mains, check that the specifications indicated on the rating plate (on the appliance and/or packaging) correspond to those of the electrical mains system of your home.
9The openings and slots used for ventilation and dispersion of heat on the rear and below the control panel must never be covered.
10This appliance must be used for the purpose for which it was expressly designed. Any other use (e.g. heating rooms) is considered to be improper and consequently dangerous.The manufacturer declines all responsibility for damage resulting from improper and irresponsible use.
11A number of fundamental rules must be followed when using electrical appliances. The following are of particular importance:
l do not touch appliance with wet or damp hands or
feet
ldo not use the appliance while bare-footed
ldo not use extension leads other than with the utmost caution
ldo not pull the power supply cable or the appliance itself to disconnect the plug from the socket.
ldo not expose the appliance to weather agents (raing, sun, etc)
ldo not allow unsupervised children or inexperienced persons to use the appliance.
12 Always switch off the electrical supply to the cooker and allow it to cool down before carrying out any cleaning operations etc.
13 In the case of faults and/or faulty operation, switch off the electricity supply to the cooker and do not tamper with it. For repairs call only an authorised after-sales servicing centre and request the use of original spare parts only. Failure to comply with the above may compromise the safety of the appliance.
14 Remember if you are discarding any domestic appliance with which children etc. may play, make it safe by removing the Mains Cable from it, after first disconnecting the electricity supply. Remove glass parts where possible, and consider sharp edges etc. which may now be exposed.
15Oven gloves or similar protection should be used when moving containers in or out of hot ovens and care should be taken to avoid contact with hot surfaces of exposed skin on wrists or arms.
16One of the commonest types of accident involving cooking appliances is burns to tabies and young children. These can occur by:
a)Touching hot parts
b)Being splashed with hot liquids
c)By pulling projecting pan handles and tipping hot liquids over themselves
17Please remember that a small child’s skin is far more sensitive and therefore more easily burnt than an adult. You are, therfore, strongly advised to keep babies and young children well clear of this appliance during use and whilst it is cooling down after use.
18Never use flammable liquids such as alcohol or gasoline, etc. near the appliance when it is in use.
19Make sure the knobs are in the “•”/” O” position when the appliance is not in use.
20When you are using the grill or the oven, some parts of the door can become very hot. Keep children away from these.
21Warning: open the door with care since if you are not careful you may hurt yourself in the hinge area.
2
Installation instructions
Important: disconnect the oven from the electricity when making any adjustment, maintenance operation, etc.
Unpacking
Remove the outer packing from the oven. Open the door outwards and remove packing from the shelves. Take out the plastic envelope containing instruction book, guarantee card and 4 fixing screws.
Installation
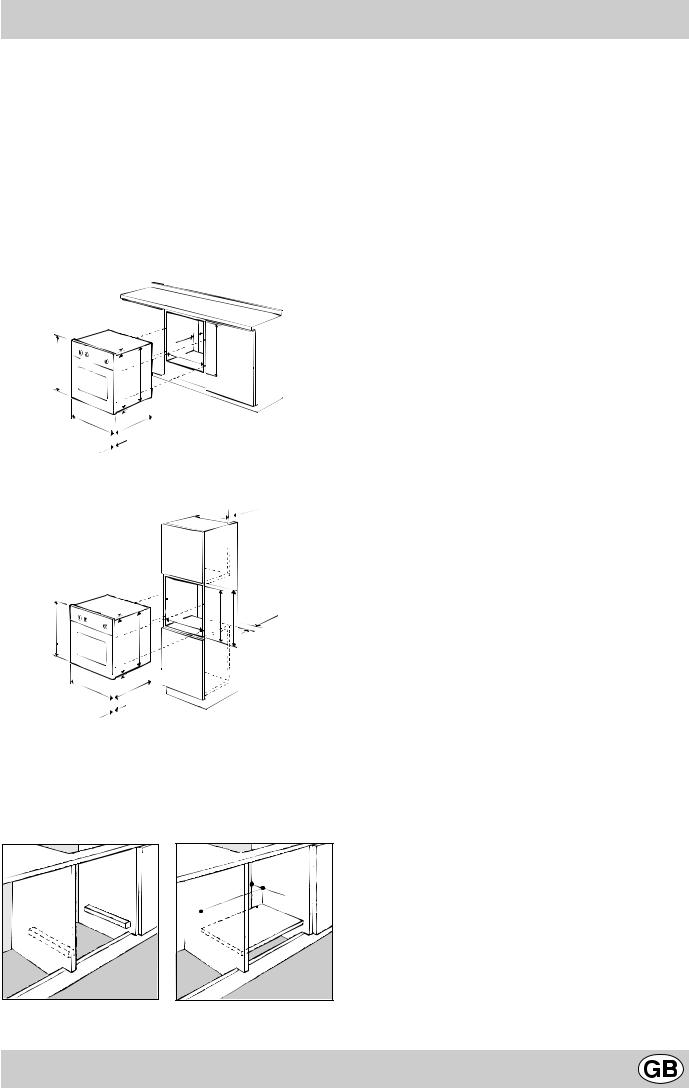
To ensure the good working order of a flush-mountable appliance, the kitchen unit must be of a suitable size. In figure you can find the required unit sizes for installing the appliance under a worktop or in a column unit.
595 mm. |
23 mm. |
567 mm. |
|
|
5 mm. |
595 |
mm. |
|
. |
|
543 |
mm |
|
|
|
||
|
. |
|
|
|
mm |
|
|
20 |
|
|
|
|
|
. |
45 |
mm |
|
|
|
|
|
558 |
mm. |
|
|
|
593 mm.
|
. |
45 |
mm |
. |
|
min |
|
mm.595 |
|
|
23 mm. |
mm.567 |
|
|
585-575mm. |
595mm. |
|
. |
|
|
|
|
|
558 |
|
|
|
45 |
mm |
|
|
|
|
|
mm. |
|
|
. |
||
|
|
|
|
|
|
|
|
|
min |
|
|
|
|
5 mm. |
|
|
|
|
|
|
|
|
595 |
mm. |
|
. |
|
|
|
|
|
|
|
|
543 |
mm |
|
|
|
|
|
|
|
|
|
|
|
|
|
|
|
|
||
|
|
. |
|
|
|
|
|
|
|
|
|
|
mm |
|
|
|
|
|
|
|
|
|
20 |
|
|
|
|
|
|
|
|
|
To ensure good ventilation, the back panel of the unit must be removed. The oven should preferably be installed so that it rests on two small wooden boards; should there be a one-piece worktop, there must be a back opening of at least 45 x 560 mm.
. |
45 |
mm. |
mm |
|
|
560 |
|
|
To secure the oven to the unit, open the oven door and fix the oven with the four wooden screws into the 4 holes in
the outer frame.The panels of units next to the oven must be heat resistant. In the case of veneered wood units, glues must be resistant to temperatures of 100°C. In compliance with safety regulations, once the appliance has been fitted, there must be not contact with electrical parts. All protective parts must be secured so that they may only be removed with the use of tools.
Electrical connection
Ovens with a three-pole power supply cable are designed to operate with alternated current at the supply frequency and voltage indicated on the data plate (at the bottom of the oven dashboard).The earthing conductor of the cable is the yellow-green conductor.
Two types of connection are provided:
Connection n° 1
Connecting the power supply cable to the mains.
Fit a normalized plug to the cable, which corresponds to the load indicated on the data plate; if the cooker is connected directly to the mains, an omnipolar circuitbreaker with a minimum opening of 3 mm between the contacts, suitable for the load indicated and complying with current directives, must be installed between the appliance and the mains (the earthing wire must not be interrupted by the circuit-breaker).The power supply cable must be positioned so that it does not exceed room temperature by 50°C at any point of its length. Before making the connection check that:
lthe limiter valve and the home system can support appliance load (see data plate);
lthe power supply system has an efficient earthing connection which complies with the provisions of current regulations and the law;
lthere is easy access to the socket or the omnipolar circuit-breaker once the cooker has been installed.
N.B.: do not use reducers, adapters or shunts as these could cause heating or burning.
Connection n° 2
Disposing of the plug.
WARNING: THIS APPLIANCE MUST BE EARTHED.
Ensure that before disposing of the plug itself, you make the pins unusable so that it cannot be accidentally inserted into a socket. Instructions for connecting cable to an alternative plug:
Important: the wires in the mains lead are coloured in accordance with the following code:
Green & Yellow |
-Earth |
Blue |
-Neutral |
Brown |
-Live |
If the colours of the wires in the mains lead do not correspond with the coloured markings identifying the terminals in your plug, proceed as follows.
Connect Green & Yellow wire to terminal marked “E” or  or coloured Green or Green & Yellow.
Connect Brown wire to terminal marked “L” or coloured Red. Connect Blue wire to terminal marked “N” or coloured Black. If a 13 amp plug (BS 1363) is used it must be fitted with a 13 amp fuse.
A 15 amp plug must be protected by a 15 amp fuse, either in the plug or adaptor or at the distribution board.If you
3

are in any doubt about the electrical supply to your machine, consult a qualified electrician before use.
How to connect an alternative plug
The wires in this mains lead are coloured in accordance
with the following code: |
|
|
|
BLUE |
“NEUTRAL” (N) |
||
BROWN |
“LIVE” (L) |
||
GREEN AND YELLOW |
“EARTH” (E) |
||
|
|
|
|
|
GREEN & |
|
|
|
YELLOW |
|
|
|
BROWN |
13 amp fuse |
|
|
|
|
|
|
BLUE |
CROSS-BAR |
|
|
|
CORD GRIP |
|
|
|
|
|
Disposing of the appliance
When disposing of the appliance please remove the plug by cutting the mains cable as close as possible to the plug body and dispose of it as described above.
ADashboard
BGrill pan or hob
COven wire shelf
DHoles for fixing screws
EOven knob
FVariable grill knob
GTimer knob
HThermostat light
IOven door-glass
L Oven door-glass support screws
Oven description
A
D |
D |
|
|
C |
B |
|
|
H |
|
D |
D |
L I
H
E G F
E F
4
 Loading...