


 Loading...
A540 IP
You can find the most up to date user manual at www.gigaset.com/manuals

Gigaset A540 IP – your high-quality accessory
Gigaset A540 IP – your high-quality accessory
Congratulations on your purchase of this latest generation Gigaset.
Your Gigaset can do a lot more than just make calls:
It's easy to configure your Gigaset thanks to the wizards
They help you to configure the VoIP connections for your phone and to assign the receive and send connections to the registered handsets.
You can perform the configuration with wizards on a handset or PC using the web configurator of your phone.
Your Gigaset is a real multi-line phone (it works like a PABX)
You can register up to six handsets. Assign each handset its own phone number.
Ethernet port
Connect your Gigaset to the Internet and your PC via Ethernet. Use your public directory on the Internet (¢page 66). Update the directory on your Gigaset and your directory on the PC simultaneously.
Save phone numbers and names to the directory (¢page 63). You can designate important entries as VIPs (Very Important Persons). VIP calls are then recognised by their ringtone and their background colour (¢page 64).
If you don't (always) want it to ring
Use time control for calls (¢page 103) or ensure that all calls from a withheld number are not signalled (¢page 103).
Transfer the directory from an existing Gigaset handset (¢page 65), use the shortcut function (¢page 65) and adjust the background colour and contrast of the display to your requirements (¢page 100).
Protecting our environment
Gigaset Green Home – be environmentally aware when using your phone. For details of our ECO DECT products, visit www.gigaset.com/service.
For more information about your phone, visit www.gigaset.com.
After purchasing your Gigaset phone, please register it at
www.gigaset.com/service – this will ensure that any questions you may have or warranty services you request are dealt with even faster!
If you have any questions about using your phone, please read the tips on troubleshooting (¢page 145) or contact our Customer Care team (¢page 145).
Have fun using your new Gigaset phone!
1

Contents |
|
Contents |
|
Gigaset A540 IP – your high-quality accessory . . . . . . . . . . . . . . . . . . . . . |
. 1 |
Overview . . . . . . . . . . . . . . . . . . . . . . . . . . . . . . . . . . . . . . . . . . . . . . . . . . . . . . . . . |
6 |
Display icons . . . . . . . . . . . . . . . . . . . . . . . . . . . . . . . . . . . . . . . . . . . . . . . . . . . . . . |
7 |
Display keys . . . . . . . . . . . . . . . . . . . . . . . . . . . . . . . . . . . . . . . . . . . . . . . . . . . . . . . |
8 |
Main menu icons . . . . . . . . . . . . . . . . . . . . . . . . . . . . . . . . . . . . . . . . . . . . . . . . . . |
8 |
The base at a glance . . . . . . . . . . . . . . . . . . . . . . . . . . . . . . . . . . . . . . . . . . . . . . . |
9 |
Safety precautions . . . . . . . . . . . . . . . . . . . . . . . . . . . . . . . . . . . . . . . . . . . . . . . . |
10 |
First steps . . . . . . . . . . . . . . . . . . . . . . . . . . . . . . . . . . . . . . . . . . . . . . . . . . . . . . . . |
11 |
Checking the package contents . . . . . . . . . . . . . . . . . . . . . . . . . . . . . . . . . . . . . . . . . . . . . . |
11 |
Setting up the handset for use . . . . . . . . . . . . . . . . . . . . . . . . . . . . . . . . . . . . . . . . . . . . . . . |
12 |
Changing the display language . . . . . . . . . . . . . . . . . . . . . . . . . . . . . . . . . . . . . . . . . . . . . . |
16 |
Installing the base station . . . . . . . . . . . . . . . . . . . . . . . . . . . . . . . . . . . . . . . . . . . . . . . . . . . . |
17 |
Connecting the base . . . . . . . . . . . . . . . . . . . . . . . . . . . . . . . . . . . . . . . . . . . . . . . . . . . . . . . . . |
18 |
Setting up the phone – installation wizard . . . . . . . . . . . . . . . . . . . . . . . . . . . . . . . . . . . . |
23 |
Date/time . . . . . . . . . . . . . . . . . . . . . . . . . . . . . . . . . . . . . . . . . . . . . . . . . . . . . . . . . . . . . . . . . . . |
34 |
Proceeding . . . . . . . . . . . . . . . . . . . . . . . . . . . . . . . . . . . . . . . . . . . . . . . . . . . . . . . . . . . . . . . . . . |
35 |
Using the phone . . . . . . . . . . . . . . . . . . . . . . . . . . . . . . . . . . . . . . . . . . . . . . . . . . 36
Control key . . . . . . . . . . . . . . . . . . . . . . . . . . . . . . . . . . . . . . . . . . . . . . . . . . . . . . . . . . . . . . . . . . 36 Keys on the keypad . . . . . . . . . . . . . . . . . . . . . . . . . . . . . . . . . . . . . . . . . . . . . . . . . . . . . . . . . . 36 Correcting incorrect entries . . . . . . . . . . . . . . . . . . . . . . . . . . . . . . . . . . . . . . . . . . . . . . . . . . 36 Menu guidance . . . . . . . . . . . . . . . . . . . . . . . . . . . . . . . . . . . . . . . . . . . . . . . . . . . . . . . . . . . . . . 37 Activating/deactivating the handset . . . . . . . . . . . . . . . . . . . . . . . . . . . . . . . . . . . . . . . . . . 38 Activating/deactivating the keypad lock . . . . . . . . . . . . . . . . . . . . . . . . . . . . . . . . . . . . . . 38 Understanding the operating steps . . . . . . . . . . . . . . . . . . . . . . . . . . . . . . . . . . . . . . . . . . . 39
Menu tree . . . . . . . . . . . . . . . . . . . . . . . . . . . . . . . . . . . . . . . . . . . . . . . . . . . . . . . . 41 Making calls . . . . . . . . . . . . . . . . . . . . . . . . . . . . . . . . . . . . . . . . . . . . . . . . . . . . . . 44
Making an external call . . . . . . . . . . . . . . . . . . . . . . . . . . . . . . . . . . . . . . . . . . . . . . . . . . . . . . |
44 |
Ending a call . . . . . . . . . . . . . . . . . . . . . . . . . . . . . . . . . . . . . . . . . . . . . . . . . . . . . . . . . . . . . . . . . |
46 |
Accepting a call . . . . . . . . . . . . . . . . . . . . . . . . . . . . . . . . . . . . . . . . . . . . . . . . . . . . . . . . . . . . . . |
47 |
Calling line identification . . . . . . . . . . . . . . . . . . . . . . . . . . . . . . . . . . . . . . . . . . . . . . . . . . . . . |
47 |
Notes on phone number display (CLIP) . . . . . . . . . . . . . . . . . . . . . . . . . . . . . . . . . . . . . . . |
49 |
VoIP telephony via Gigaset.net . . . . . . . . . . . . . . . . . . . . . . . . . . . . . . . . . . . . . . . . . . . . . . . |
50 |
Gigaset HDSP – telephony with brilliant sound quality . . . . . . . . . . . . . . . . . . . . . . . . |
51 |
Activating/deactivating handsfree mode . . . . . . . . . . . . . . . . . . . . . . . . . . . . . . . . . . . . . |
52 |
Muting the handset . . . . . . . . . . . . . . . . . . . . . . . . . . . . . . . . . . . . . . . . . . . . . . . . . . . . . . . . . . |
52 |
Making calls using select services . . . . . . . . . . . . . . . . . . . . . . . . . . . . . . . . . 53
Configuring general settings for all calls . . . . . . . . . . . . . . . . . . . . . . . . . . . . . . . . . . . . . . 53 Configuring settings for the next call . . . . . . . . . . . . . . . . . . . . . . . . . . . . . . . . . . . . . . . . . 56 Actions during an external call . . . . . . . . . . . . . . . . . . . . . . . . . . . . . . . . . . . . . . . . . . . . . . . 56
2
Contents
Using lists . . . . . . . . . . . . . . . . . . . . . . . . . . . . . . . . . . . . . . . . . . . . . . . . . . . . . . . . 59
Redial list . . . . . . . . . . . . . . . . . . . . . . . . . . . . . . . . . . . . . . . . . . . . . . . . . . . . . . . . . . . . . . . . . . . . 59 Function of the message key . . . . . . . . . . . . . . . . . . . . . . . . . . . . . . . . . . . . . . . . . . . . . . . . . 60 SMS inbox . . . . . . . . . . . . . . . . . . . . . . . . . . . . . . . . . . . . . . . . . . . . . . . . . . . . . . . . . . . . . . . . . . . 61 Call list . . . . . . . . . . . . . . . . . . . . . . . . . . . . . . . . . . . . . . . . . . . . . . . . . . . . . . . . . . . . . . . . . . . . . . 61
Using directories . . . . . . . . . . . . . . . . . . . . . . . . . . . . . . . . . . . . . . . . . . . . . . . . . 63
Local directory . . . . . . . . . . . . . . . . . . . . . . . . . . . . . . . . . . . . . . . . . . . . . . . . . . . . . . . . . . . . . . . 63 Using online directories . . . . . . . . . . . . . . . . . . . . . . . . . . . . . . . . . . . . . . . . . . . . . . . . . . . . . . 66 Using the Gigaset.net directory . . . . . . . . . . . . . . . . . . . . . . . . . . . . . . . . . . . . . . . . . . . . . . . 70
SMS (text messages) . . . . . . . . . . . . . . . . . . . . . . . . . . . . . . . . . . . . . . . . . . . . . . 74
Writing/sending SMS . . . . . . . . . . . . . . . . . . . . . . . . . . . . . . . . . . . . . . . . . . . . . . . . . . . . . . . . 74 Receiving SMS . . . . . . . . . . . . . . . . . . . . . . . . . . . . . . . . . . . . . . . . . . . . . . . . . . . . . . . . . . . . . . . 77 Receiving notifications via SMS . . . . . . . . . . . . . . . . . . . . . . . . . . . . . . . . . . . . . . . . . . . . . . . 79 Setting the SMS service centre/defining the send line . . . . . . . . . . . . . . . . . . . . . . . . . 80 SMS on a PABX . . . . . . . . . . . . . . . . . . . . . . . . . . . . . . . . . . . . . . . . . . . . . . . . . . . . . . . . . . . . . . . 81 Activating/deactivating SMS function . . . . . . . . . . . . . . . . . . . . . . . . . . . . . . . . . . . . . . . . 82 SMS troubleshooting . . . . . . . . . . . . . . . . . . . . . . . . . . . . . . . . . . . . . . . . . . . . . . . . . . . . . . . . 83
E-mail notifications . . . . . . . . . . . . . . . . . . . . . . . . . . . . . . . . . . . . . . . . . . . . . . . 84
Opening the incoming e-mail list . . . . . . . . . . . . . . . . . . . . . . . . . . . . . . . . . . . . . . . . . . . . . 85 View the message header of an e-mail . . . . . . . . . . . . . . . . . . . . . . . . . . . . . . . . . . . . . . . . 87 Viewing e-mail sender's address . . . . . . . . . . . . . . . . . . . . . . . . . . . . . . . . . . . . . . . . . . . . . . 87 Deleting e-mail messages . . . . . . . . . . . . . . . . . . . . . . . . . . . . . . . . . . . . . . . . . . . . . . . . . . . . 87
Using the network mailbox . . . . . . . . . . . . . . . . . . . . . . . . . . . . . . . . . . . . . . . 88
Activating/deactivating network mailboxes, entering numbers . . . . . . . . . . . . . . . . 88 Configuring a network mailbox for fast access . . . . . . . . . . . . . . . . . . . . . . . . . . . . . . . . 89
ECO DECT . . . . . . . . . . . . . . . . . . . . . . . . . . . . . . . . . . . . . . . . . . . . . . . . . . . . . . . |
91 |
Reduced transmission power (radiation) . . . . . . . . . . . . . . . . . . . . . . . . . . . . . . . . . . . . . . 91
Using the handset as an alarm clock . . . . . . . . . . . . . . . . . . . . . . . . . . . . . . . 93
Using multiple handsets . . . . . . . . . . . . . . . . . . . . . . . . . . . . . . . . . . . . . . . . . . 94
Registering handsets . . . . . . . . . . . . . . . . . . . . . . . . . . . . . . . . . . . . . . . . . . . . . . . . . . . . . . . . . 94 De-registering handsets . . . . . . . . . . . . . . . . . . . . . . . . . . . . . . . . . . . . . . . . . . . . . . . . . . . . . . 94 Locating a handset ("paging") . . . . . . . . . . . . . . . . . . . . . . . . . . . . . . . . . . . . . . . . . . . . . . . . 95 Making internal calls . . . . . . . . . . . . . . . . . . . . . . . . . . . . . . . . . . . . . . . . . . . . . . . . . . . . . . . . . 95 Changing the name of a handset . . . . . . . . . . . . . . . . . . . . . . . . . . . . . . . . . . . . . . . . . . . . . 97 Changing a handset's internal number . . . . . . . . . . . . . . . . . . . . . . . . . . . . . . . . . . . . . . . 98
Handset settings . . . . . . . . . . . . . . . . . . . . . . . . . . . . . . . . . . . . . . . . . . . . . . . . |
. 99 |
Changing the display language . . . . . . . . . . . . . . . . . . . . . . . . . . . . . . . . . . . . . . . . . . . . . |
. 99 |
Setting the display/screensaver . . . . . . . . . . . . . . . . . . . . . . . . . . . . . . . . . . . . . . . . . . . . . |
. 99 |
Configuring the display/colour and contrast . . . . . . . . . . . . . . . . . . . . . . . . . . . . . . . . . |
100 |
Quickly accessing functions . . . . . . . . . . . . . . . . . . . . . . . . . . . . . . . . . . . . . . . . . . . . . . . . . |
100 |
Activating/deactivating auto answer . . . . . . . . . . . . . . . . . . . . . . . . . . . . . . . . . . . . . . . . |
101 |
Changing the handsfree/earpiece volume . . . . . . . . . . . . . . . . . . . . . . . . . . . . . . . . . . . |
101 |
Changing ringtones . . . . . . . . . . . . . . . . . . . . . . . . . . . . . . . . . . . . . . . . . . . . . . . . . . . . . . . . . |
102 |
Restoring the handset default settings . . . . . . . . . . . . . . . . . . . . . . . . . . . . . . . . . . . . . . . |
104 |
Setting the base . . . . . . . . . . . . . . . . . . . . . . . . . . . . . . . . . . . . . . . . . . . . . . . . 105
3
Contents
Setting the date/time . . . . . . . . . . . . . . . . . . . . . . . . . . . . . . . . . . . . . . . . . . . . . . . . . . . . . . . 105 Protecting the telephone from unauthorised access . . . . . . . . . . . . . . . . . . . . . . . . . 105 Activating/deactivating music on hold . . . . . . . . . . . . . . . . . . . . . . . . . . . . . . . . . . . . . . 106 Setting the base's IP address in the LAN . . . . . . . . . . . . . . . . . . . . . . . . . . . . . . . . . . . . . 106 Configuring VoIP connections, assigning send and receive
connections . . . . . . . . . . . . . . . . . . . . . . . . . . . . . . . . . . . . . . . . . . . . . . . . . . . . . . . . . . . . . . . . 108 Automatic update for the VoIP provider settings . . . . . . . . . . . . . . . . . . . . . . . . . . . . . 109 Updating the phone firmware . . . . . . . . . . . . . . . . . . . . . . . . . . . . . . . . . . . . . . . . . . . . . . . 109
Operating a repeater . . . . . . . . . . . . . . . . . . . . . . . . . . . . . . . . . . . . . . . . . . . 111
Restarting the base . . . . . . . . . . . . . . . . . . . . . . . . . . . . . . . . . . . . . . . . . . . . . . . . . . . . . . . . . 112 Resetting the base to the default settings . . . . . . . . . . . . . . . . . . . . . . . . . . . . . . . . . . . . 112 Checking the base MAC address . . . . . . . . . . . . . . . . . . . . . . . . . . . . . . . . . . . . . . . . . . . . . 113
Connecting the base station to the PABX . . . . . . . . . . . . . . . . . . . . . . . . |
114 |
Recall (fixed line) . . . . . . . . . . . . . . . . . . . . . . . . . . . . . . . . . . . . . . . . . . . . . . . . . . . . . . . . . . . . 114 Saving an access code (outside line code) . . . . . . . . . . . . . . . . . . . . . . . . . . . . . . . . . . . . 114 Setting pauses . . . . . . . . . . . . . . . . . . . . . . . . . . . . . . . . . . . . . . . . . . . . . . . . . . . . . . . . . . . . . . 115 Switching temporarily to tone dialling (DTMF) . . . . . . . . . . . . . . . . . . . . . . . . . . . . . . . 116
Configuring the phone via the Web configurator . . . . . . . . . . . . . . . . . |
117 |
Connecting the PC with the telephone's Web configurator . . . . . . . . . . . . . . . . . . . |
118 |
Logging into/off the Web configurator . . . . . . . . . . . . . . . . . . . . . . . . . . . . . . . . . . . . . . |
120 |
Understanding the structure of the Web configurator pages . . . . . . . . . . . . . . . . . |
122 |
Web configurator menu . . . . . . . . . . . . . . . . . . . . . . . . . . . . . . . . . . . . . . . . . . . . . . . . . . . . . |
126 |
Functions of the Web configurator . . . . . . . . . . . . . . . . . . . . . . . . . . . . . . . . . . . . . . . . . . |
127 |
Customer Service & Assistance . . . . . . . . . . . . . . . . . . . . . . . . . . . . . . . . . . |
144 |
Questions and answers . . . . . . . . . . . . . . . . . . . . . . . . . . . . . . . . . . . . . . . . . . . . . . . . . . . . . |
145 |
Information on operating Gigaset VoIP telephones with routers with |
|
Network Address Translation (NAT) . . . . . . . . . . . . . . . . . . . . . . . . . . . . . . . . . . . . . . . . . . |
147 |
VoIP status codes . . . . . . . . . . . . . . . . . . . . . . . . . . . . . . . . . . . . . . . . . . . . . . . . . . . . . . . . . . . |
149 |
Checking service information . . . . . . . . . . . . . . . . . . . . . . . . . . . . . . . . . . . . . . . . . . . . . . . |
152 |
Authorisation . . . . . . . . . . . . . . . . . . . . . . . . . . . . . . . . . . . . . . . . . . . . . . . . . . . . . . . . . . . . . . . |
153 |
Exclusion of liability . . . . . . . . . . . . . . . . . . . . . . . . . . . . . . . . . . . . . . . . . . . . . . . . . . . . . . . . . |
153 |
Environment . . . . . . . . . . . . . . . . . . . . . . . . . . . . . . . . . . . . . . . . . . . . . . . . . . . 154
Appendix . . . . . . . . . . . . . . . . . . . . . . . . . . . . . . . . . . . . . . . . . . . . . . . . . . . . . . 155
Caring for your telephone . . . . . . . . . . . . . . . . . . . . . . . . . . . . . . . . . . . . . . . . . . . . . . . . . . . 155 Contact with liquid . . . . . . . . . . . . . . . . . . . . . . . . . . . . . . . . . . . . . . . . . . . . . . . . . . . . . . . . . 155 Specifications . . . . . . . . . . . . . . . . . . . . . . . . . . . . . . . . . . . . . . . . . . . . . . . . . . . . . . . . . . . . . . . 155 Writing and editing text . . . . . . . . . . . . . . . . . . . . . . . . . . . . . . . . . . . . . . . . . . . . . . . . . . . . . 157
Open Source Software . . . . . . . . . . . . . . . . . . . . . . . . . . . . . . . . . . . . . . . . . . 159
General . . . . . . . . . . . . . . . . . . . . . . . . . . . . . . . . . . . . . . . . . . . . . . . . . . . . . . . . . . . . . . . . . . . . . 159 Licence and copyright information . . . . . . . . . . . . . . . . . . . . . . . . . . . . . . . . . . . . . . . . . . 159
Glossary . . . . . . . . . . . . . . . . . . . . . . . . . . . . . . . . . . . . . . . . . . . . . . . . . . . . . . . 164 Accessories . . . . . . . . . . . . . . . . . . . . . . . . . . . . . . . . . . . . . . . . . . . . . . . . . . . . . 177 Mounting the base on the wall . . . . . . . . . . . . . . . . . . . . . . . . . . . . . . . . . . 178
4
Contents
Mounting the charger on the wall . . . . . . . . . . . . . . . . . . . . . . . . . . . . . . . 178 Index . . . . . . . . . . . . . . . . . . . . . . . . . . . . . . . . . . . . . . . . . . . . . . . . . . . . . . . . . . . 179
5

Overview
Overview
|
|
|
|
|
|
|
|
|
|
|
|
|
|
|
||
1 |
|
|
|
|
Ð |
|
|
|
U |
|
|
|
|
|
13 |
|
|
|
|
|
|
|
|
|
|
|
|||||||
|
|
|
|
|
|
INT 1 |
|
|
|
|
12 |
|||||
|
|
|
|
|
|
|
|
|
|
|
|
|
||||
|
|
|
|
|
23.04. |
10:53 |
|
|
|
|||||||
|
|
|
|
|
|
|
|
|
|
|
||||||
|
|
|
|
|
Redial |
|
Menu |
|
|
|
|
|
|
|
||
2 |
|
|
|
|
|
|
|
|
|
|
|
|
|
11 |
||
|
|
|
|
|
|
|
|
|
|
|
||||||
|
|
|
|
|
|
|
|
|
|
|
|
|
||||
|
|
|
|
|
|
|
|
|
|
|
|
10 |
||||
|
|
|
|
|
|
|
|
|
|
|
||||||
3 |
|
|
|
|
|
|
|
|
|
|
|
|
||||
|
|
|
|
|
|
|
|
|
|
|
||||||
4 |
|
|
|
|
|
|
|
|
|
|
|
|
|
|
|
|
|
|
|
|
|
|
|
|
|
|
|
|
|
|
|
||
5 |
|
|
|
|
|
|
9 |
||
|
|
|
|
|
|||||
6 |
|
|
|
|
|
|
|
|
8 |
|
|
|
|
|
|
|
|
||
7 |
|
|
|
|
|
|
|
|
|
|
|
|
|
|
|
|
|
|
|
|
|
|
|
|
|
|
|
||
|
|
|
|
|
|||||
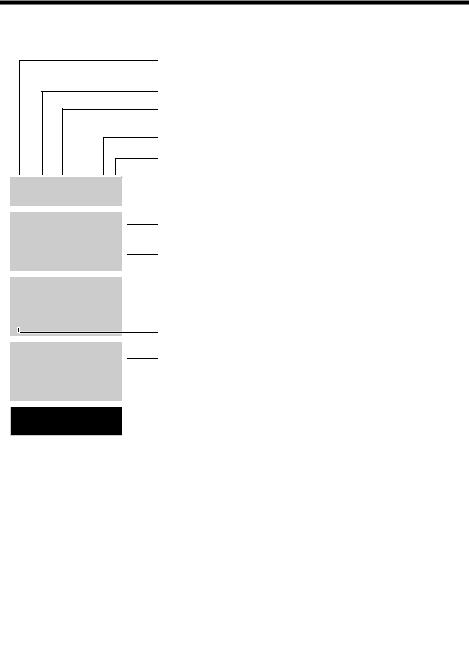
1Signal strength (¢page 34)
Icon¢ changes when No Radiation is activated
( page 91)¢page¢36)
Mute microphone ( page 52)2 Control key (
3Talk/Handsfree key
Flashing: incoming call;
Lights up: handsfree mode activated; accept call; in idle status: open redial list (press briefly);
¢open connection list (press and hold; page 44);
When writing an SMS: send SMS
During a call:¢Switch from earpiece to handsfree mode ( page 52)
4Key 1
Dial network mailbox (press and hold)
5 |
Star key |
|
Ringtones on/off (press and hold); |
|
With an open connection: switch from pulse |
|
dialling to tone dialling (press briefly) |
6 |
Message key (¢page 60) |
|
Access to calls and message lists; |
|
Flashing: new message or new call |
7 |
Microphone |
8Recall key
-Consultation call (flash)
-Insert a dialling pause (press and hold)
9Hash key
Keypad lock on/off (press and hold in idle status);
toggles between upper/lower case and digits
10End call key, On/Off key
End call; cancel function; go back one menu level (press briefly); back to idle status (press and hold); activate/deactivate handset (press and hold in idle¢status)
11Display keys ( page 8)
12 |
Display in idle status |
13 |
Charge status of the batteries (¢page 34) |
 Please note
  To change the display language, proceed as described on page 16 and page 99.
6
Display icons
Display icons
The following icons are displayed depending on the settings and the operating status of your telephone:

 Ð Ø ó U
INT 1
23.04.10:53
INT 1 ë12:0 10:53
Signal strength ¨ (¢page¢ 34)
or Eco Mode + icon ¼( page 91)
Keypad locked (¢page 38)
Ringtone switched off (¢page 103)
Batteries are charged (¢page 34)
Charge status of the batteries (¢page 34)
Name of the handset (¢page 97)
Current day/current time (¢page 34)
Alarm clock switched on and wake-up time set (¢page 93)
à ™ Ë
03 01 01
Redial U Menu 

Display during external call:
Number of new messages: |
|
u |
à On the network mailbox (¢page 60) |
u |
™ In the missed calls list (¢page 60) |
u |
Ë In the SMS list (¢page 63), e-mail list (¢page 85) |
Display keys (¢page 8)
|
|
|
|
|
|
|
|
|
|
|
01 |
|
|
||
— |
|
|
|
||||
IP |
|
|
|
|
|||
|
|
|
|
|
|
|
|
1234567890 |
|
|
|
|
|||
|
|
|
|
||||
00:00:53 |
|
|
|
|
|
|
|
|
|
|
|
|
|
||
|
|
|
|
|
|||
|
|
|
|
|
|
|
|
ExtCall |
Menu |
|
|
||||
|
|
||||||
|
|
|
|
|
|
|
|
VoIP connection established (—for fixed line connection)
For VoIP connections: number of VoIP line (01 – 06)
Number (or name) of caller
Call duration
Display key (¢page 8)
u Consulting an external call (¢page 57) u Set call volume (¢page 101)
u Access service information
7
Other display icons:
Establishing a connection |
Connection established |
||||||
|
|
|
|
|
|
||
|
z |
|
— |
||||
External call (¢page 47) |
Internal call (¢page 95) |
||||||
Ø Ü Ú |
|
|
Ø |
å Ú |
|
||
|
Information |
|
|
Query |
|
|
|
Ð |
|
|
|
¶ |
|
||
Action complete |
|
Action failed |
|||||
|
|
|
|
|
|
|
|
|
μ |
|
|
À |
|
||
|
|
|
|
|
|
|
|
Display keys
Connection cannot be established or connection
interrupted
˜
Alarm call (¢page 93)
Ø ì Ú
Please waitÛ...
Display keys
The functions of the display keys change depending on the operating situation. Example:
1 |
|
|
|
|
Redial Menu |
|
|
1 |
|
|
|
|
|
|
|||||
2 |
|
|
|
|
|
|
|
|
2 |
|
|
|
|
|
|
|
|||
1Current display key function
2Display keys
Important display keys:
Redial |
|
Open redial list. |
Menu |
|
Open a menu for further func- |
|
|
tions. |
|
|
Confirm selection. |
OK |
||
Del. |
|
Delete key: delete one character |
|
|
at a time from right to left. |
|
|
Skip back one menu level or |
Back |
|
|
|
|
cancel operation. |
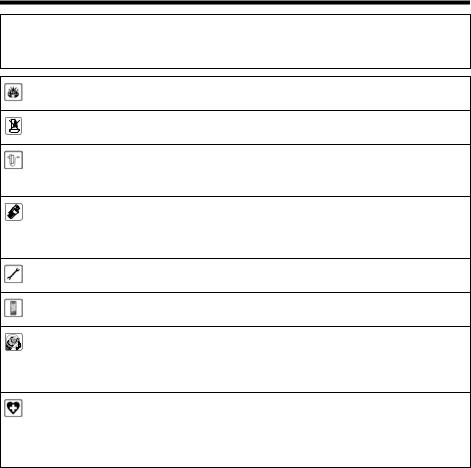
Main menu icons
ì
Alarm Clock
|
|
|
|
|
|
Back |
V |
OK |
|
|
|
|
|
|
Ë |
SMS |
|
|
|
Ç |
Select Services |
|||
 |
Online Contacts |
|||
ì |
Alarm Clock |
|||
Ì |
Voice Mail (Network mailbox) |
|||
Ï |
Settings |
|
|
|
Information on using the menus
¢page 37
Menu overview ¢page 41
8
The base at a glance
The base at a glance
Base key
|
1 Paging key |
|
Lights up: |
|
Network connection active (e.g. phone is con- |
|
nected to LAN/internet) |
|
Flashes: |
|
Data transfer is active (e.g. with router/provider |
|
server) |
|
Press briefly: |
1 |
Start paging, display IP address on handset |
Press and hold: |
Set base to registration mode
9
Safety precautions
Safety precautions
a Read the safety precautions and the user guide before use.
The device cannot be used in the event of a power failure. In case of a power failure it is also not possible to make emergency calls.
Do not use the devices in environments with a potential explosion hazard (e.g. paint shops).
The devices are not splashproof. For this reason do not install them in a damp environment such as bathrooms or shower rooms.
Use only the power adapter indicated on the device.
Use only the cable supplied for LAN connection and connect it to the intended ports only.
Use only rechargeable batteries that correspond to the specification (see "Specifications"). Never use a conventional (non-rechargeable) battery or other battery types as this could result in significant health risks and personal injury. Rechargeable batteries, which are noticeably damaged, must be replaced.
Remove faulty devices from use or have them repaired by our Service team, as these could interfere with other wireless services.
Do not use the device if the display is cracked or broken. Broken glass or plastic can cause injury to hands and face. Send the device to our Service department to be repaired.
Do not hold the rear of the handset to your ear when it is ringing or when speaker mode is activated. Otherwise you risk serious and permanent damage to your hearing.
The phone may cause interference in analogue hearing aids (humming or whistling) or cause them to overload. If you require assistance, please contact the hearing aid supplier.
Using your telephone may affect nearby medical equipment. Be aware of the technical conditions in your particular environment, e.g. doctor's surgery. If you use a medical device (e.g. a pacemaker), please contact the device manufacturer. They will be able to advise you regarding the susceptibility of the device to external sources of high frequency energy (for the specifications of your Gigaset product see "Specifications").
10

First steps
First steps
Checking the package contents
1 |
|
2 |
|
3a |
|
4 |
|
|
|
|
|
|
|
or
3b
|
|
6 |
|
7 |
5 |
||||
|
|
|
|
|
10
9
8
1 One Gigaset A540 IP base
2 One power adapter for connecting the base to the mains power supply
3One phone cable to connect the base to the analogue fixed line (RJ11 6-pole; flattened cable) 3a or 3b, depending on the country/provider.
4One Ethernet cable (Cat 5 with 2 RJ45 modular plug) for connecting the base to the LAN/internet
5 One Gigaset A540H handset
6 Two batteries for the handset (uncharged)
7 One battery cover for the handset
8 One handset charger
9 One power adapter for connecting the charger to the mains power supply 10 One quick guide
11

First steps
Firmware updates
Whenever there are new or improved functions for your Gigaset, firmware updates are made available for you to download to your base (¢page 109). If this results in operational changes when using your phone, a new version of this user manual or the necessary amendments will be published on the Internet at
www.gigaset.com.
Information on the firmware currently loaded ¢page 152.
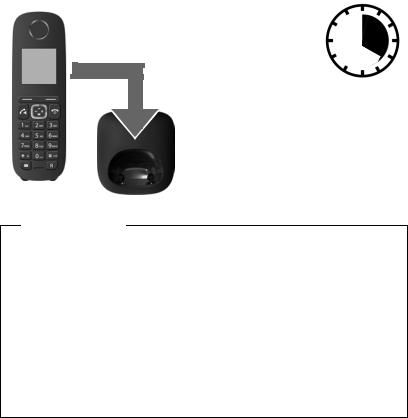
Setting up the handset for use
The display is protected by a plastic film.
Please remove the protective film!
Inserting the batteries and closing the battery cover
Warning
Use only rechargeable batteries (¢page 155) recommended by Gigaset Communications GmbH i.e., never use a conventional (non-rechargeable) battery, as this could result in significant health risks and personal injury. For example, the outer casing of the batteries could be damaged or the batteries could explode. The phone could also malfunction or be damaged as a result of using batteries that are not of the recommended type.
12

¤Insert the batteries with the polarity in the correct direction. The polarity is indicated in the battery compartment.
a
b
To open the battery cover, for instance to replace the batteries, insert a coin into the cavity on the casing, then pull the battery cover in an upward direction.
First steps
¤First insert the battery cover at the top a.
¤Then press the cover b until it clicks into place.
13
First steps
Connecting the charging cradle
2 |
¤ Connect the flat plug from the |
power adapter 1. |
|
1 |
¤ Plug the power adapter into the |
mains power socket 2. |
4
14
First steps
Initial charging and discharging of the batteries
The correct charge level can only be displayed if the batteries are first fully charged and discharged.
¤ Charge the handset for 4 hours in the charger.
¤Then remove the handset from the charger and do not replace it until the batteries are fully discharged.
Please note
uThe handset is pre-registered with the base. If you have purchased a model with multiple handsets, all handsets will already be registered with the base. You do not need to register the handsets again. However, if a handset
is not registered with the base (Register handset flashes on the display), register the handset manually ¢page 94.
uAfter the first battery charge and discharge, you may place your handset in the charger after every call.
uAlways repeat the charging and discharging procedure if you remove the batteries from the handset and reinsert them.
u The batteries may warm up during charging. This is not dangerous.
uAfter a while, the charge capacity of the batteries will decrease for technical reasons.
15
First steps
Changing the display language
Change the display language if you do not understand the language currently set.
L 4
English
³
Francais
´
Back UU OK
¤Press right on the control key.
¤Press the keys Land 4slowly one after the other.
The display for setting languages appears and the current language (e.g., English) is selected.
¤Press down on the control key s...
... until the language you wish to use is displayed e.g., French.
¤Press the key below §OK§ to select this language.
The selection is marked with ³.
Francais
³
¤ Press and hold the end call key ato return to idle status.
16

uNever expose the telephone to any of the following: heat sources, direct sunlight or other electrical appliances.
u Protect your Gigaset from moisture, dust, corrosive liquids and fumes.
17
First steps
Connecting the base
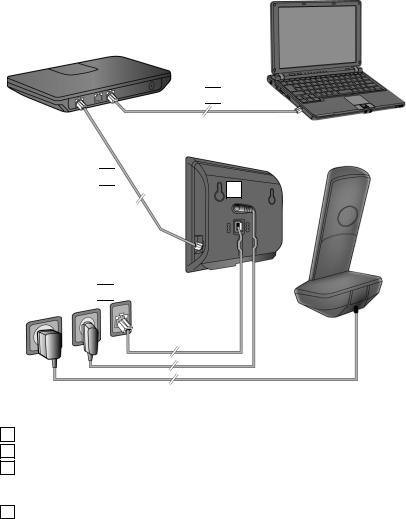
The following diagram is an overview of all connections for your base.
The individual connections are described in detail below. In order for you to make calls on your phone via the fixed line and VoIP, you need to connect the base to the fixed line and Internet (see diagram below).
 4
4 
 3
3 
1
 2
2 
Follow the steps in the order given below:
1 |
Connect the phone and power cables to the base. |
2 |
Connect the base to the telephone network and the mains power supply. |
3Connect the base to the router for accessing the Internet (via router and modem or via router with integrated modem) and for configuring the base via the Web configurator.
4Connect the PC to the router.
18
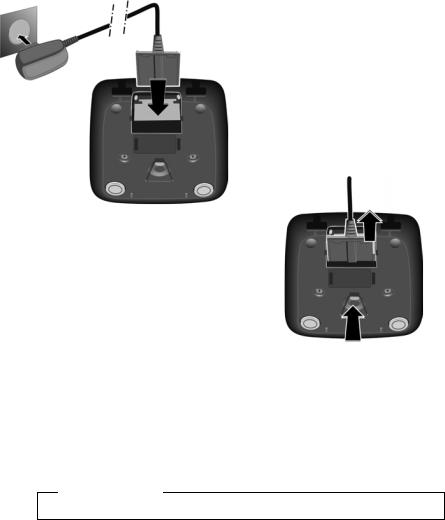
First steps
1. Connecting the phone and power cables to the base
Back panel
of the base
 2
2 
 1
1 
3
 3
3 
1Insert the phone cable (connection cable with RJ11 plugs) into the lower connection socket at the rear of the base.
2Insert the power cable of the power adapter into the upper connection socket at the rear of the base.
3 Push both cables into the appropriate cable channels.
Warning
Use only the power and telephone cables supplied. Pin connections on telephone cables can vary (pin connections ¢page 156).
19

First steps
2. Connecting the base to the fixed line and the mains power supply
|
|
|
|
Back panel |
|
|
|
|
of the base |
|
|
1 |
|
|
2 |
|
|||
|
|
|
|
|
|
|
|
||
|
|
|
|
|
1 Insert the phone cable into the fixed line connection socket. 2 Then insert the power adapter into the mains socket.
Warning
Keep the power cable plugged in at all times for operation, as the phone does not work without a mains connection.
You can now use your phone to make calls via the fixed line and can be reached on your fixed line number.
20

First steps
3. Connecting the base to a router (Internet)
Data protection notice
When the device is connected to the router, it automatically contacts the Gigaset support server to make it easier for you to configure the devices and to enable communication with the Internet services.
For this purpose, every device sends the following device-specific information once every day:
u Serial number/item number u MAC address
u Private IP address for the Gigaset in the LAN/its port numbers u Device name
u Software version
On the support server, this information is linked to the existing device-specific information:
u Gigaset.net phone number
u System-related/device-specific passwords
Further information about the Gigaset.net service data saved can be found at:
www.gigaset.net/privacy-policy
Your base features a LAN connection that you can use to connect the base to a router.
Connection to a router is required for Internet telephony VoIP (Voice over Internet Protocol). You can set up and configure up to six accounts (VoIP phone numbers) from one or more VoIP provider(s) of your choice on the phone.
You also need a connection to the router for the following features on your phone:
uIf you want to be notified as soon as new software is available for your phone on the Internet.
uIf you want the date and time on your phone to be updated by a time server on the Internet.
uIf you want to use info services (e.g., weather forecasts) and/or online directories on your phone.
You can also connect a PC to the router if you want to set your phone via its Web configurator.
For Internet access you need a router connected to the Internet via a modem (this may be integrated in the router).
21
First steps
Please note
For telephony via the Internet, you need a broadband Internet connection (e.g., DSL) with flat rate (recommended) or volume rate and a router that connects your phone to the Internet. You can find a list of recommended routers on the Internet at:
www.gigaset.com/service
From here, go to the FAQ page and select your Gigaset IP telephone. Search for "Router", for example.
2
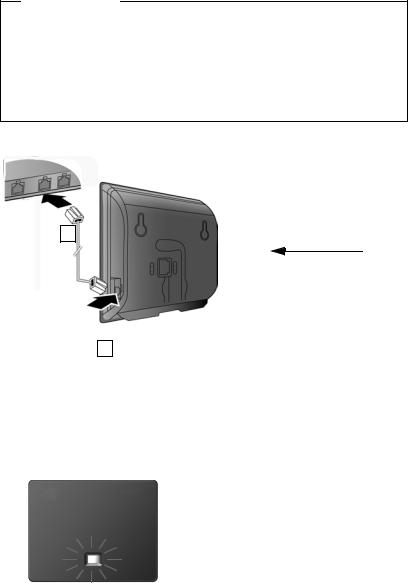
Back panel
of the base
1
1Insert a plug from the Ethernet cable supplied (Cat 5 with 2 RJ45 Western modular plugs) into the LAN connection socket at the side of the base.
2 Then insert the second Ethernet cable plug into a LAN socket on the router.
As soon as the cable connecting the phone and router is plugged in and the router is switched on, the button lights up on the front of the base (paging button).
You are now able to establish VoIP connections within Gigaset.net (¢page 50).
22

First steps
Setting up the phone – installation wizard
Auto configuration:
The configuration process for VoIP connections is automated for some VoIP providers. The provider creates a configuration file with all required VoIP access data (the general VoIP provider data and your personal account data). This file is placed on a configuration server on the Internet for downloading to your phone.
Your provider gives you a configuration code.
The installation wizard on your phone (¢page 24) prompts you to enter the code at the relevant point. All the required VoIP data is then downloaded automatically onto your phone.
The configuration file is only transferred via a secure connection (TLS authentication). If the TLS authentication fails, the message key fflashes. Press the message key to display the message Certificate error Please check certificates in the web configurator. Press the right display key to confirm the message.
Log in to the Web configurator (¢
The Web page Security (¢page 128) tells you why the secure connection could not be established and what you can do.
If the configuration file fails to download (e.g., because the configuration server is not available), the phone keeps trying to establish a connection until the file is downloaded successfully to the phone.
If no VoIP connections have been generated on the phone yet and the wizard has not been started, you can start the installation wizard. The wizard allows you to make all necessary settings for your phone.
Two individual wizards are combined to form the installation wizard: 1 VoIP wizard
2 Connection wizard
23

First steps
Launching the installation wizard
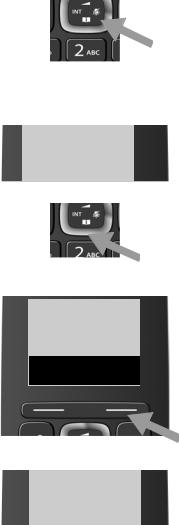
As soon as the handset battery is sufficiently charged, the message key fon the handset will flash (approx. 20 minutes after you have put the handset in the charger).
¤ Press the message key f.
1. VoIP wizard – making VoIP settings
You will see the following display:
¶
Start IP
wizard?
No Yes
Before you can use VoIP to phone any other numbers over the Internet, the fixed line or the mobile network, you need the services of a VoIP provider which supports the VoIP SIP standard.
Prerequisite: You have registered with a VoIP provider (e.g., via your PC) and set up at least one VoIP account (IP account).
To use VoIP, you now need to enter the access data for your VoIP account. You will receive all the necessary data from your VoIP provider. This will include:
Either:
uYour user name
(if required by the VoIP provider).
This is the user name of your IP account (caller ID), frequently identical to your phone number.
u Your authentication name or user ID
u The (login) password registered with the VoIP provider
u General settings for your VoIP provider (server addresses etc.)
Or:
u An auto configuration code (activation code)
Your Gigaset phone's VoIP wizard can help you make these entries.
24
First steps
Please note
You can configure up to six VoIP connections. When you get started with the phone, you can initially only configure one VoIP connection. You can configure additional VoIP connections later with the VoIP wizard (¢page 108) or the Web configurator.
Starting the VoIP assistant
Prerequisite: The phone is connected to the router. The router is connected to the Internet (¢page 21).
¤ Press the right display key §Yes§ to launch the VoIP wizard.
The IP wizard
helps you to configure an IP
V OK
IP 1
³
Back V OK
Information about the VoIP wizard appears in the display.
¤ Press the bottom of the control key sto scroll down.
¤ Press the §OK§ display key to continue.
The configurable IP connections are shown in the following displays (IP 1 to IP 6). VoIP connections that are already configured are marked with ³.
¤If necessary, press down on the control key sto select a connection.
¤Press the §OK§ display key to continue.
25

First steps
¤
You will see the following display:
¶
Do you have auto conf code?
No Yes
Your VoIP provider has supplied you with an authentication name/password and, where applicable, a user name:
¤Press the key below §No§ on the display screen.
¤For further information, please see
"Downloading VoIP provider data" ¢page 28.
You have received an auto configuration code (activation code) from your VoIP provider:
¤Press the key below §Yes§ on the display screen.
¤For further information, please see
"Entering the auto configuration code" ¢page 27.
26

First steps
No Internet connection:
The phone requires an Internet connection for you to register your telephone with a VoIP provider. If a connection cannot be made, one of the following messages is displayed:
uIf the phone cannot establish a connection to the router, the message IP address not available is displayed.
Check the plug connection between the router and the base and check the settings on the router.
Your phone is preconfigured for dynamic assignment of the IP address. In order for your router to "recognise" the phone, dynamic IP address assignment must also be activated on the router, i.e., the router's DHCP server must
be activated. If the DHCP server cannot or should not be activated, you must assign a fixed IP address to the phone (¢page 106).
uIf the phone cannot establish a connection to the Internet, the message
Internet conn. not available is displayed.
The IP server may be temporarily unavailable. In this case, try to make a connection again later.
Otherwise, check the plug connection between the router and the modem or DSL connection and check the settings on the router.
¤ Press §OK§ to close the VoIP wizard.
You will then need to call up the wizard later via the menu to configure the IP connection.
Entering the auto configuration code
Enter auto
conf. code: 5


Del. OK
¤
¤
Using the keypad, enter the auto configuration code you received from the provider (max. 32 characters).
If you enter an incorrect character, you can delete it by pressing the left display key.
Press the key below §OK§ on the display screen.
All data required for VoIP telephony is loaded directly from the Internet to your phone.
When all the data has been successfully loaded onto your phone, IP account is registered appears on the display.
¤ For further information, please see "2. Connection wizard", page 31.
27
First steps
Downloading VoIP provider data
The connection wizard establishes a connection with the Gigaset configuration server on the Internet. Various profiles with general access data for different VoIP providers can be downloaded here.
After a brief period you will see the following display:
Select Country:
Germany
Back V OK
Select Provider:
Provider 2
Back U OK
¤Press up or down on the control key q repeatedly until the country in which you want to use the phone and for which the telephone is permitted is selected in the display.
¤Press the key below §OK§ on the display screen to confirm your selection.A list of countries is loaded.
A list of the VoIP providers for which a profile with the general access data is available on
¤Press up or down on the control key
q repeatedly until your VoIP provider is shown in the display.
¤Press the key below §OK§ on the display screen to confirm your selection.the configuration server is loaded.
The general access data for your VoIP provider will be downloaded and saved on the phone.
You have not been able to download your provider's data
If your VoIP provider does not appear in the list, i.e., its general data is not pro-
¤Briefly press the end call key arepeatedly until End wizard? appears in the display and then press the display key §Yes§.vided for download, you must cancel the VoIP wizard:
You must then make the required VoIP provider and IP account settings using the Web configurator. You receive the general provider data from your VoIP provider.
You can change the assignment of the VoIP connection as send/receive connection at a later time via the Web configurator.
28
Loading...