

Page 1

Gateway DVD Recorder
user'sguide
AR-230
Setting up
Configuring
Page 2

Page 3

Contents
1 Checking Out Your DVD Recorder . . . . . . . . . . . . . . . . . . . . . . . . . . . . . . . 1
Features . . . . . . . . . . . . . . . . . . . . . . . . . . . . . . . . . . . . . . . . . . . . . . . . . . . . . . . . . . . 2
Compatible discs . . . . . . . . . . . . . . . . . . . . . . . . . . . . . . . . . . . . . . . . . . . . . . . . . 3
Package contents . . . . . . . . . . . . . . . . . . . . . . . . . . . . . . . . . . . . . . . . . . . . . . . . . . . 4
Accessories . . . . . . . . . . . . . . . . . . . . . . . . . . . . . . . . . . . . . . . . . . . . . . . . . . . . . . . . 4
Safety information . . . . . . . . . . . . . . . . . . . . . . . . . . . . . . . . . . . . . . . . . . . . . . . . . . . 5
Front . . . . . . . . . . . . . . . . . . . . . . . . . . . . . . . . . . . . . . . . . . . . . . . . . . . . . . . . . . . . . 7
Display panel . . . . . . . . . . . . . . . . . . . . . . . . . . . . . . . . . . . . . . . . . . . . . . . . . . . . . . . 8
Back . . . . . . . . . . . . . . . . . . . . . . . . . . . . . . . . . . . . . . . . . . . . . . . . . . . . . . . . . . . . . 10
Remote Control . . . . . . . . . . . . . . . . . . . . . . . . . . . . . . . . . . . . . . . . . . . . . . . . . . . . 12
Installing batteries . . . . . . . . . . . . . . . . . . . . . . . . . . . . . . . . . . . . . . . . . . . . . . . 14
2 Connecting Your DVD Recorder . . . . . . . . . . . . . . . . . . . . . . . . . . . . . . . . 15
Understanding video connections . . . . . . . . . . . . . . . . . . . . . . . . . . . . . . . . . . . . . . 16
Connecting a TV . . . . . . . . . . . . . . . . . . . . . . . . . . . . . . . . . . . . . . . . . . . . . . . . . . . 17
Using composite video . . . . . . . . . . . . . . . . . . . . . . . . . . . . . . . . . . . . . . . . . . . 17
Using S-Video . . . . . . . . . . . . . . . . . . . . . . . . . . . . . . . . . . . . . . . . . . . . . . . . . . 18
Using component video . . . . . . . . . . . . . . . . . . . . . . . . . . . . . . . . . . . . . . . . . . 19
Connecting audio components . . . . . . . . . . . . . . . . . . . . . . . . . . . . . . . . . . . . . . . . 20
Using analog audio output . . . . . . . . . . . . . . . . . . . . . . . . . . . . . . . . . . . . . . . . 20
Using coaxial digital output . . . . . . . . . . . . . . . . . . . . . . . . . . . . . . . . . . . . . . . . 21
Using optical digital output . . . . . . . . . . . . . . . . . . . . . . . . . . . . . . . . . . . . . . . . 22
Connecting a VCR . . . . . . . . . . . . . . . . . . . . . . . . . . . . . . . . . . . . . . . . . . . . . . . . . . 23
Connecting a camcorder . . . . . . . . . . . . . . . . . . . . . . . . . . . . . . . . . . . . . . . . . . . . . 25
3 Using Your DVD Recorder . . . . . . . . . . . . . . . . . . . . . . . . . . . . . . . . . . . . . . 27
Setting the date and time . . . . . . . . . . . . . . . . . . . . . . . . . . . . . . . . . . . . . . . . . . . . 28
Playing a disc . . . . . . . . . . . . . . . . . . . . . . . . . . . . . . . . . . . . . . . . . . . . . . . . . . . . . 29
Controlling DVD, VCD, and SVCD playback . . . . . . . . . . . . . . . . . . . . . . . . . . 30
Controlling audio CD and MP3 playback . . . . . . . . . . . . . . . . . . . . . . . . . . . . . 33
Controlling JPEG playback . . . . . . . . . . . . . . . . . . . . . . . . . . . . . . . . . . . . . . . . 33
Controlling slideshow playback . . . . . . . . . . . . . . . . . . . . . . . . . . . . . . . . . . . . . 34
Recording a disc . . . . . . . . . . . . . . . . . . . . . . . . . . . . . . . . . . . . . . . . . . . . . . . . . . . 35
Recording a TV channel . . . . . . . . . . . . . . . . . . . . . . . . . . . . . . . . . . . . . . . . . . 35
Recording from a VCR or camcorder . . . . . . . . . . . . . . . . . . . . . . . . . . . . . . . . 36
Setting up a timed recording . . . . . . . . . . . . . . . . . . . . . . . . . . . . . . . . . . . . . . 37
Editing a disc . . . . . . . . . . . . . . . . . . . . . . . . . . . . . . . . . . . . . . . . . . . . . . . . . . . . . . 39
Renaming a title . . . . . . . . . . . . . . . . . . . . . . . . . . . . . . . . . . . . . . . . . . . . . . . . 39
Protecting a title . . . . . . . . . . . . . . . . . . . . . . . . . . . . . . . . . . . . . . . . . . . . . . . . 40
i
Page 4

Overwriting a title . . . . . . . . . . . . . . . . . . . . . . . . . . . . . . . . . . . . . . . . . . . . . . . .40
Erasing a title . . . . . . . . . . . . . . . . . . . . . . . . . . . . . . . . . . . . . . . . . . . . . . . . . . .41
Using Disc Tools . . . . . . . . . . . . . . . . . . . . . . . . . . . . . . . . . . . . . . . . . . . . . . . . . . . .42
Setting parental controls . . . . . . . . . . . . . . . . . . . . . . . . . . . . . . . . . . . . . . . . . . . . . .43
Setting a password . . . . . . . . . . . . . . . . . . . . . . . . . . . . . . . . . . . . . . . . . . . . . . .44
Resetting the password . . . . . . . . . . . . . . . . . . . . . . . . . . . . . . . . . . . . . . . . . . .44
Using the Setup menu . . . . . . . . . . . . . . . . . . . . . . . . . . . . . . . . . . . . . . . . . . . . . . .45
4 Troubleshooting . . . . . . . . . . . . . . . . . . . . . . . . . . . . . . . . . . . . . . . . . . . . . . . . .49
Disc . . . . . . . . . . . . . . . . . . . . . . . . . . . . . . . . . . . . . . . . . . . . . . . . . . . . . . . . . . . . . .50
Power . . . . . . . . . . . . . . . . . . . . . . . . . . . . . . . . . . . . . . . . . . . . . . . . . . . . . . . . . . . .50
Remote control . . . . . . . . . . . . . . . . . . . . . . . . . . . . . . . . . . . . . . . . . . . . . . . . . . . . .50
Sound . . . . . . . . . . . . . . . . . . . . . . . . . . . . . . . . . . . . . . . . . . . . . . . . . . . . . . . . . . . .51
TV . . . . . . . . . . . . . . . . . . . . . . . . . . . . . . . . . . . . . . . . . . . . . . . . . . . . . . . . . . . . . . .51
Getting help . . . . . . . . . . . . . . . . . . . . . . . . . . . . . . . . . . . . . . . . . . . . . . . . . . . . . . .52
ASpecifications . . . . . . . . . . . . . . . . . . . . . . . . . . . . . . . . . . . . . . . . . . . . . . . . . . .53
B Safety, Regulatory, and Legal Information. . . . . . . . . . . . . . . . . . . . . . .57
ii
Page 5

Checking Out
Your DVD
Recorder
Read this chapter to learn about:
■ DVD recorder features and accessories
■ Safety information
■ Ports, jacks, and connectors
■ Display panel
■ Remote control
1
1
Page 6

Chapter 1: Checking Out Your DVD Recorder
Features
■ Composite video, S-Video, and component video outputs
■ Composite video, S-Video, and DV Link (IEEE 1394) inputs
■ Optical and coaxial digital audio jacks
■ Playback of most discs, including CD, DVD, VCD, and SVCD
■ Record DVD+R and DVD+RW discs for TV, VCR, and camcorder
■ Disc Tools providing easy to follow instructions for playing and recording
discs
2
www.gateway.com
Page 7

Compatible discs
Your DVD recorder can play the following types of discs:
■ DVD-Video with the regional code 1 (North America)
■ DVD-R/RW recorded in DVD-Video format and finalized
■ DVD+R/RW recorded in DVD-Video format and finalized
■ VCD
■ Audio CD
■ CD-R/RW
Your DVD recorder can record on the following types of discs:
■ DVD+R
■ DVD+RW
Your DVD recorder cannot play:
■ Unfinalized discs
Features
■ DVDs with a regional code other than 1 (North America)
■ DVD-RW discs recorded in VR format
■ DVD-ROM
■ DVD AUDIO
■ CD-ROM
■ PHOTO CD
■ SACD
www.gateway.com
3
Page 8

Chapter 1: Checking Out Your DVD Recorder
Package contents
In addition to your DVD recorder, the shipping package contains:
■ Remote control
■ AC power cord
■ Composite audio/video cable
■ RF (coaxial) cable
■ 2 AAA batteries
■ User’s guide
Accessories
You can purchase these optional accessories for your DVD player:
■ Cable kits. Gateway cable kits contain high-quality gold cables of various
lengths, including:
■ RCA audio cable
■ RCA component video cable
■ RCA composite video cable
■ S-Video cable
Contact Gateway for these and other accessories.
4
www.gateway.com
Page 9

Safety information
Warning Risk of electric shock - Do not open
To reduce the risk of electric shock, do not open the case.
There are no user-serviceable parts inside. Opening the
case voids the warranty.
Have your DVD recorder repaired by qualified service
personnel only.
Warnings and precautions
■ Do not place your hands, face, or objects close to the ventilation openings
of your DVD recorder. Burns or personal injuries may occur if you are too
close to the DVD recorder.
■ Disconnect all cables before moving your DVD recorder. Moving your
DVD recorder with its cables attached may damage the cables and cause
fire or electric shock danger.
■ Do not expose your DVD recorder to rain or moisture.
■ Keep your DVD recorder away from excessive dust, high temperatures,
moisture, or direct sunlight.
Safety information
■ Use your DVD recorder in a well-ventilated area and do not cover the
ventilation openings.
■ Do not modify your DVD recorder or use an unshielded power cord or
video input source cable, or you may experience excessive interference.
■ Disconnect your DVD recorder and unplug the power cord when not used
for a long period of time.
■ If the picture displayed is in any way abnormal, turn off your
DVD recorder, then disconnect it from the electrical outlet. Make sure that
your video input source cable is connected correctly, then reconnect your
DVD recorder to the electrical outlet.
■ Disconnect your DVD recorder from the electrical outlet before cleaning
or performing maintenance. Do not use liquid or aerosol cleaners. Use only
a slightly damp cloth for cleaning.
■ Do not place your DVD recorder on an unstable cart, stand, or table. Your
DVD recorder may fall, causing serious damage.
■ Do not place your DVD recorder on a bed, sofa, rug, or other similar
surfaces.
www.gateway.com
5
Page 10

Chapter 1: Checking Out Your DVD Recorder
■ Never place your DVD recorder near or over a radiator or heat source.
■ Do not install your DVD recorder in an enclosed area unless correct
ventilation is provided.
■ Your DVD recorder should be operated from the type of power source
indicated on the label. If the type of available power is unknown, consult
your electrician or local power company.
■ Do not rest objects on the power cord and avoid placing the power cord
near high traffic areas.
■ Do not overload wall outlets and extension cords because this can result
in a risk of fire or electric shock.
■ Unplug your DVD recorder and contact qualified service personnel if:
■ The power cord or plug is damaged or frayed.
■ Liquid has been spilled into your DVD recorder.
■ Your DVD recorder has been exposed to water or moisture.
■ Your DVD recorder does not operate normally when the operating
instructions are followed. Adjust only those controls that are covered
by the operating instructions.
■ Your DVD recorder has been dropped or the cabinet has been
damaged.
6
www.gateway.com
Page 11
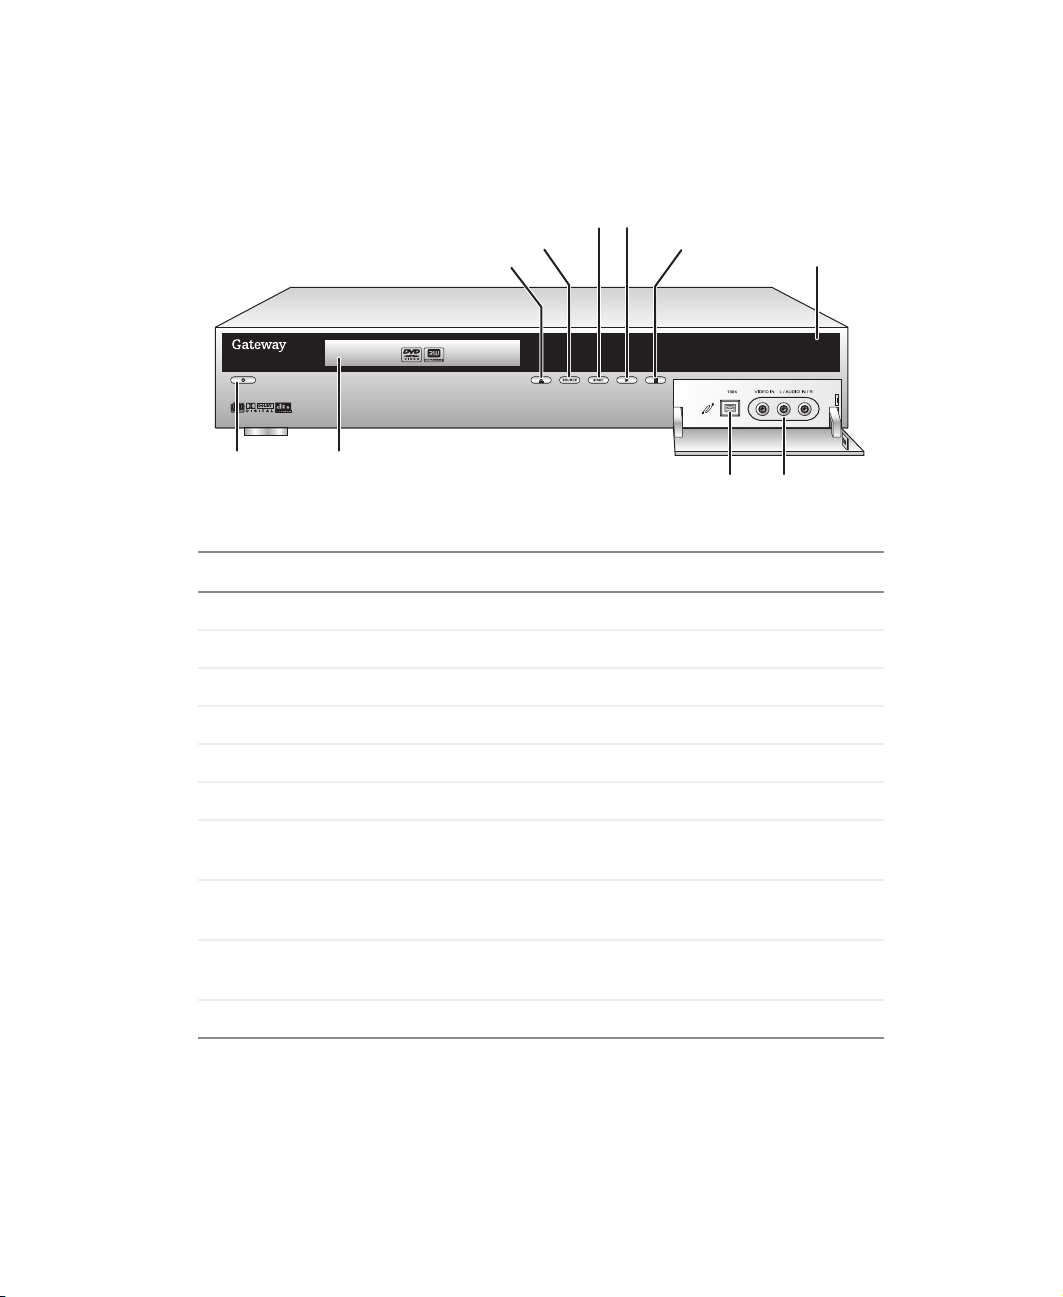
Front
Front
Power Di sc tray
Open/Close
Record
Source
Play
Component Description
Open/Close Opens and closes the disc tray.
Source Changes the video source.
Record Starts a recording.
Play Starts disc playback.
Stop Stops playback or recording.
Stop
DV-Link
jack
Display
panel
Line in
jacks
Display panel Displays current status information.
Line in jacks Plug a composite video device, such as a VCR, into
these ports.
DV-Line jack Plug a digital device, such as a camcorder, to this IEEE
1394 port.
Disc tray Holds the disc. Place the disc into the tray with the
label-side up.
Power Turns your DVD recorder on and off.
www.gateway.com
7
Page 12

Chapter 1: Checking Out Your DVD Recorder
Display panel
DVD
Play
Pause Disc status TIMER
SVCD
VCD
MP3
CD
CD JPEG +RW +RDVD VCDSVCD MP3
JPEG
DVD+RW
DVD +R
Record
TIMER
Icon Description
Play This icon appears when a disc is playing.
DVD This icon appears when a DVD is playing.
SVCD This icon appears when an SVCD is playing.
VCD This icon appears when a VCD is playing
CD This icon appears when a CD is playing
MP3 This icon appears when a disc that contains MP3
files is playing.
JPEG This icon appears when a disc that contains JPEG
files is playing.
DVD+RW This icon appears when a DVD+RW disc is playing.
DVD+R This icon appears when a DVD+R disc is playing.
Record This icon appears when your DVD recorder is
recording to a disc.
Pause This icon appears when playback is paused.
8
www.gateway.com
Page 13

Icon Description
Disc status This area displays information about the status of
your DVD recorder, such as No Disc, Disc loaded,
Open (the disc tray is opened).
TIMER This icon appears when a timed recording is in
progress.
Display panel
www.gateway.com
9
Page 14
Chapter 1: Checking Out Your DVD Recorder
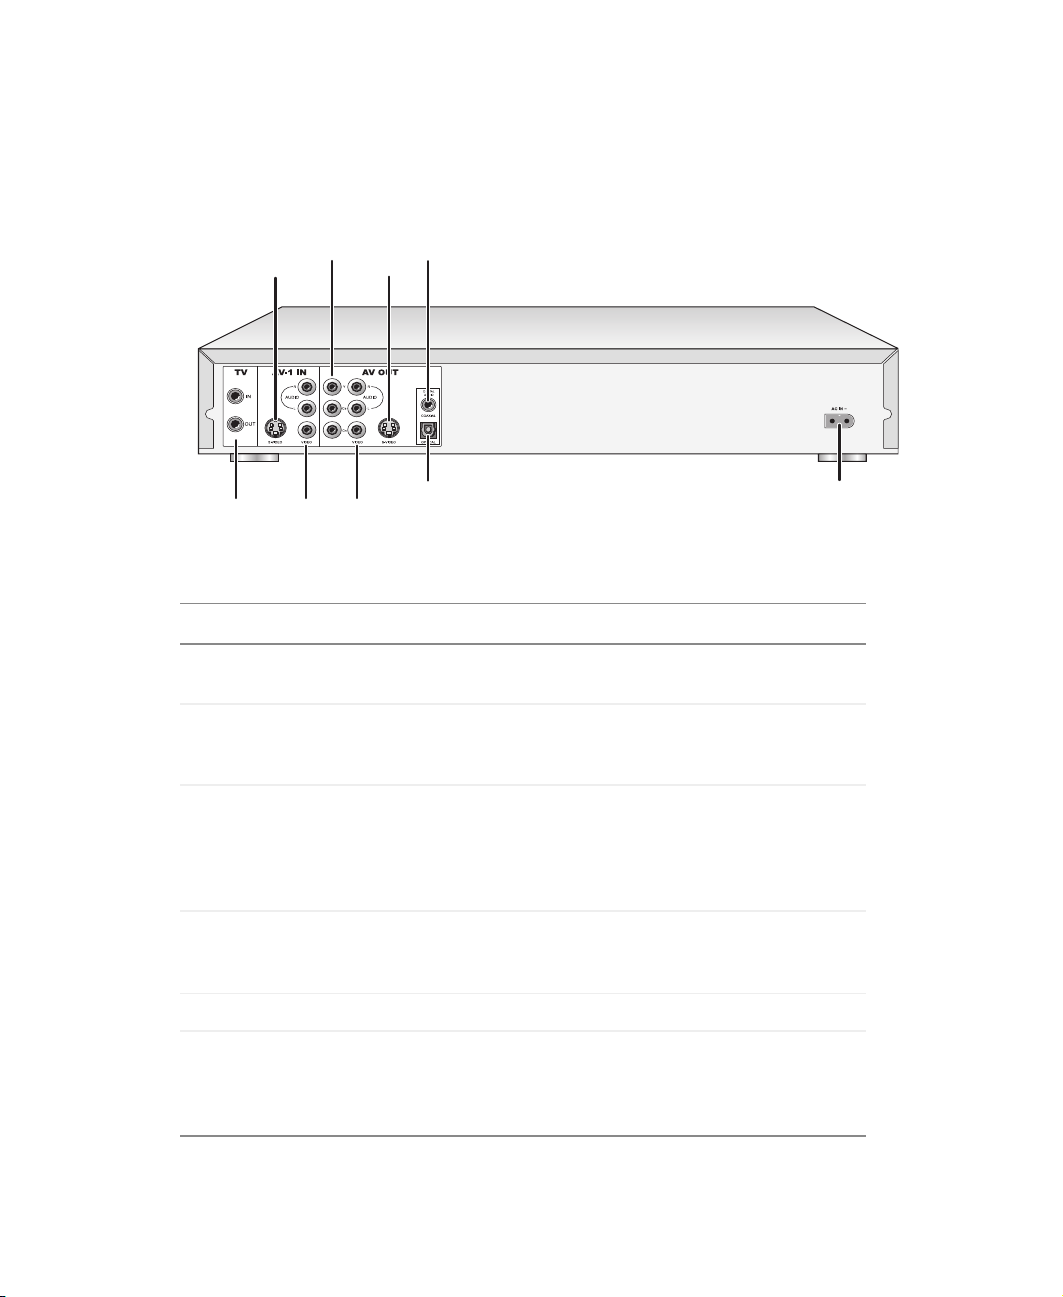
Back
TV In/
TV Out
Component
Video Out
S-Video
In
A/V In
Coaxial Digital
S-Video
Out
A/V Out
Audio Out
Optical Digital
Audio Out
Power
connector
Connector Description
S-Video In Plug an external S-Video device, such as a VCR, into
this jack.
Component Video Out Plug a component video TV into these jacks. This is the
best video connection available. For more information,
see “Understanding video connections” on page 16.
10
S-Video Out Plug an S-Video TV into these jacks. An S-Video
connection is better than a composite video connection,
but not as good as a component video connection. For
more information, see “Understanding video
connections” on page 16.
Coaxial Digital Audio
Out
TV In/TV Out Plug your antenna or cable TV into this jack.
A/V In Plug an external composite video device, such as a
Plug a coaxial digital audio device into this jack. This
audio connection is better than an analog audio
connection.
VCR, into these jacks. The yellow jack carries the video
signal. The white RCA jack carries the left audio signal
and the red RCA jack carries the right audio signal.
www.gateway.com
Page 15

Connector Description
A/V Out Plug a composite TV into these jacks. The yellow jack
carries the video signal. The white RCA jack carries the
left audio signal and the red RCA jack carries the right
audio signal.
While this video connection is good, S-Video is better
and component video is best.
Also, digital audio connections are better than analog
audio connections.
Back
Optical Digital Audio
Out
Power connector Plug the power cord into this connector.
Plug an optical digital audio device into this jack. This
audio connection is better than an analog audio
connection.
www.gateway.com
11
Page 16
Chapter 1: Checking Out Your DVD Recorder
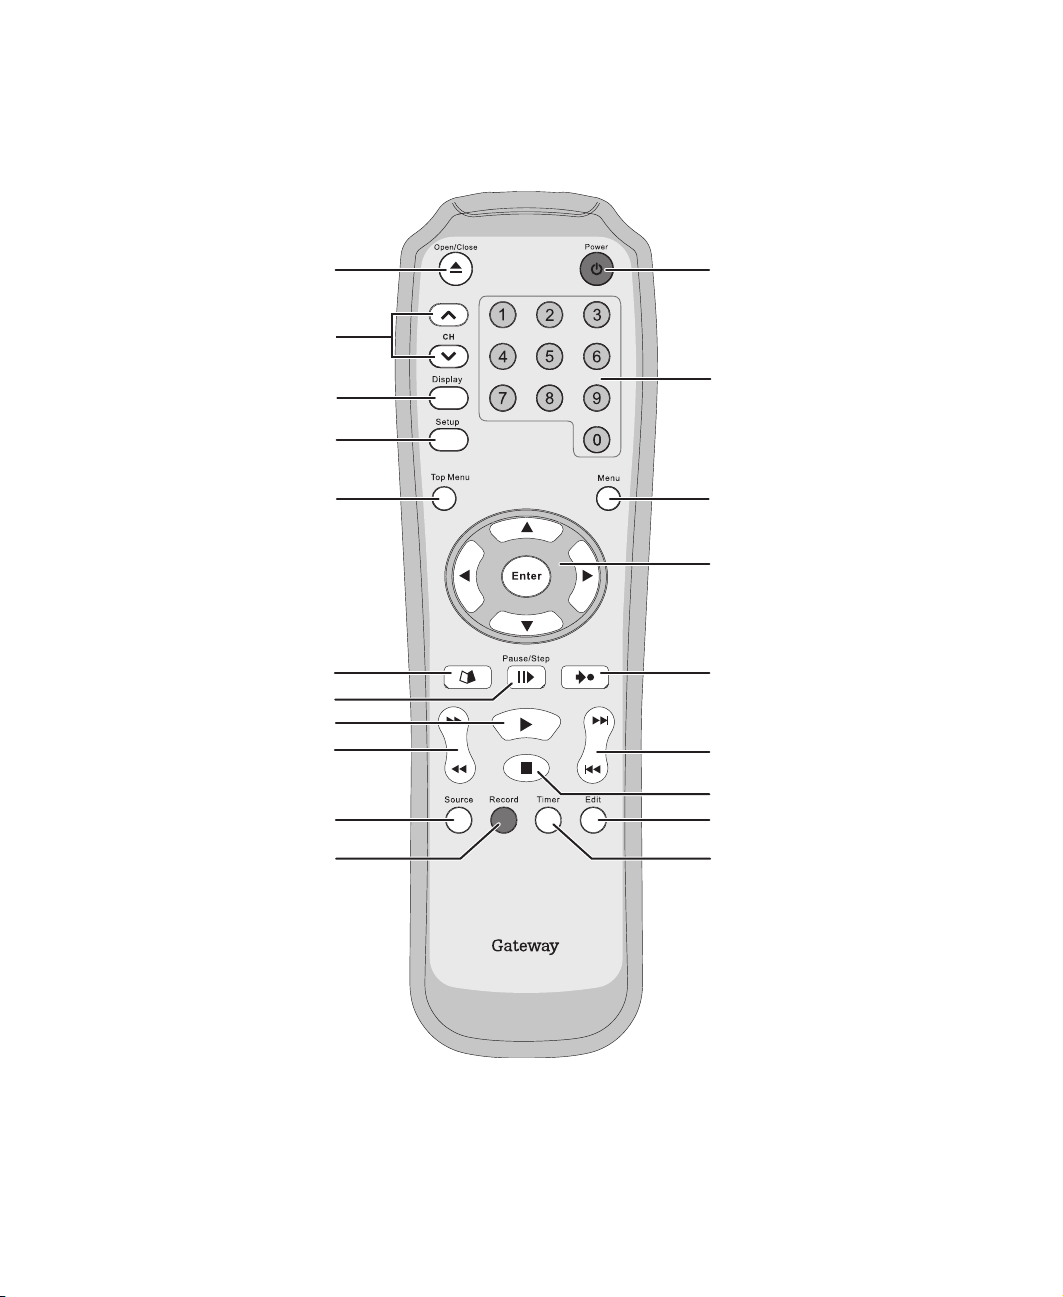
Remote Control
Open/Close
Channel
up/down
Display
Setup
Top Menu
Disc Tools
Pause/Step
Play
Fast-forward/
reverse
Source
Disc Tools Disc Nav.
Power
Number
pad
Menu
Enter/Arrows
Disc
Navigation
Next/Previous
Stop
Edit
12
Record
Timer
AR-230r
www.gateway.com
Page 17
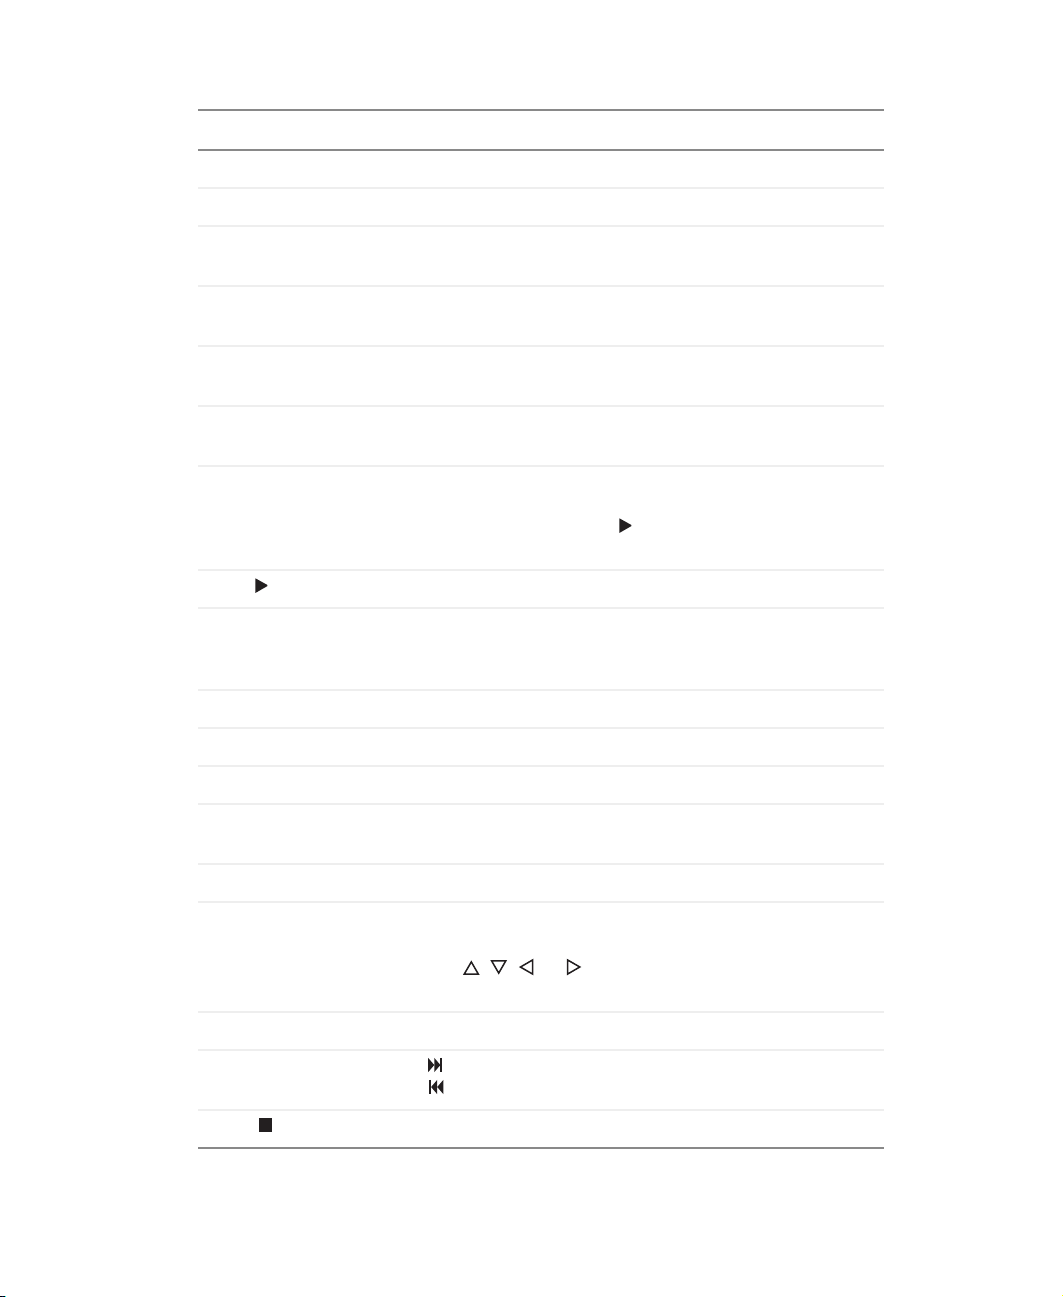
Remote Control
Button Description
Open/Close Opens and closes the disc tray.
Channel up/down Changes the TV channel.
Display Displays status information about the disc, such as
display time, chapter, and video quality.
Setup
Setup Open the
the Setup menu” on page 45.
Top Menu Displays a disc menu with a list of titles or files on the
disc.
menu. For more information, see “Using
Disc Tools Opens the
“Using Disc Tools” on page 42.
Pause/Step Pauses playback. After playback is paused, press this
button repeatedly to advance frame-by-frame on a DVD
or video CD. Press the button to return to normal
playback mode.
Play Starts disc playback.
Fast-forward/reverse Fast-forwards or fast-reverses through the disc.
Pressing this button repeatedly changes the speed from
2x, to 4x, to 8x, to 16x, then back to normal.
Source Changes the video source.
Record Starts a recording.
Power Turns your DVD recorder on and off.
Number pad Selects titles on DVDs, VCDs, and SVCDs, selects
chapters on DVDs, and selects tracks on CDs.
Menu Displays the DVD menu or chapter menu.
Enter/Arrows Enter selects Setup options and sub-options and selects
disc titles, chapters and tracks.
The , , , or button highlights Setup options and
sub-options and adjusts options.
Disc Tools
menu. For more information, see
Disc Navigation Opens a navigation menu for the current disc.
Next/Previous (Next) goes to the next chapter or track on the disc.
(Previous) goes to the last chapter or track on the disc.
Stop Stops disc playback.
www.gateway.com
13
Page 18
Chapter 1: Checking Out Your DVD Recorder
Button Description
Edit Displays the
protection to a disc, and erasing titles from the disc.
Timer Displays the
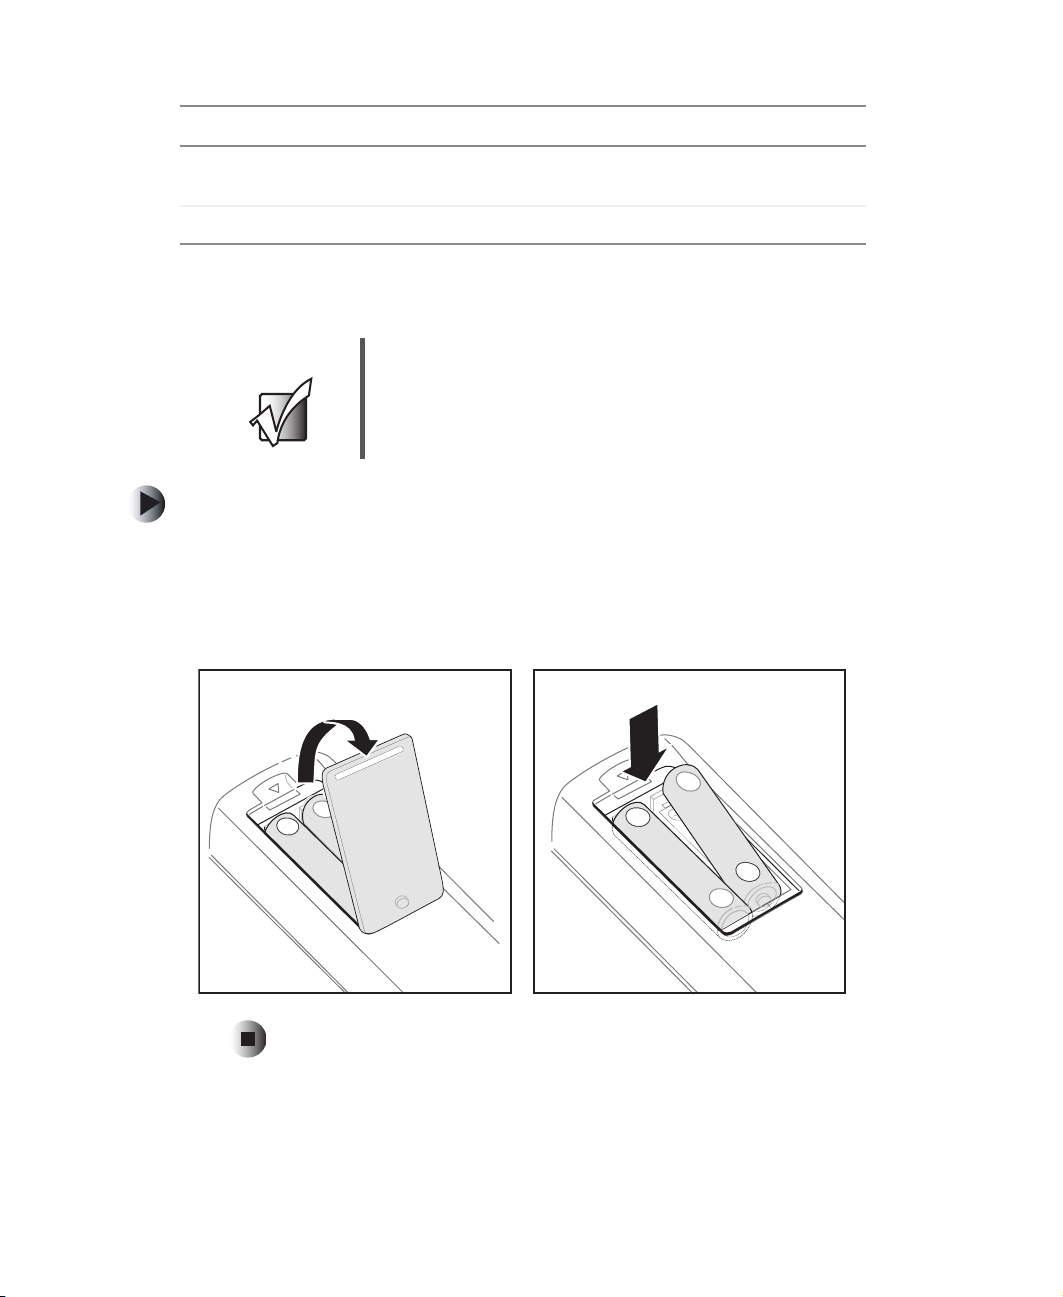
Installing batteries
Important The remote control uses AAA (triple A) batteries.
To install batteries in the remote control:
■ Remove the battery compartment cover, insert batteries into the
compartment, then replace the cover.
Make sure that you match the + and – on the batteries with the + and –
inside the compartment.
Title Edit
Timer
menu for editing a disc title, adding
menu for setting up timed recordings.
14
www.gateway.com
Page 19

Connecting Your
DVD Recorder
Read this chapter to learn how to:
■ Connect a TV
■ Connect a sound system
■ Connect a VCR or camcorder
2
15
Page 20
Chapter 2: Connecting Your DVD Recorder
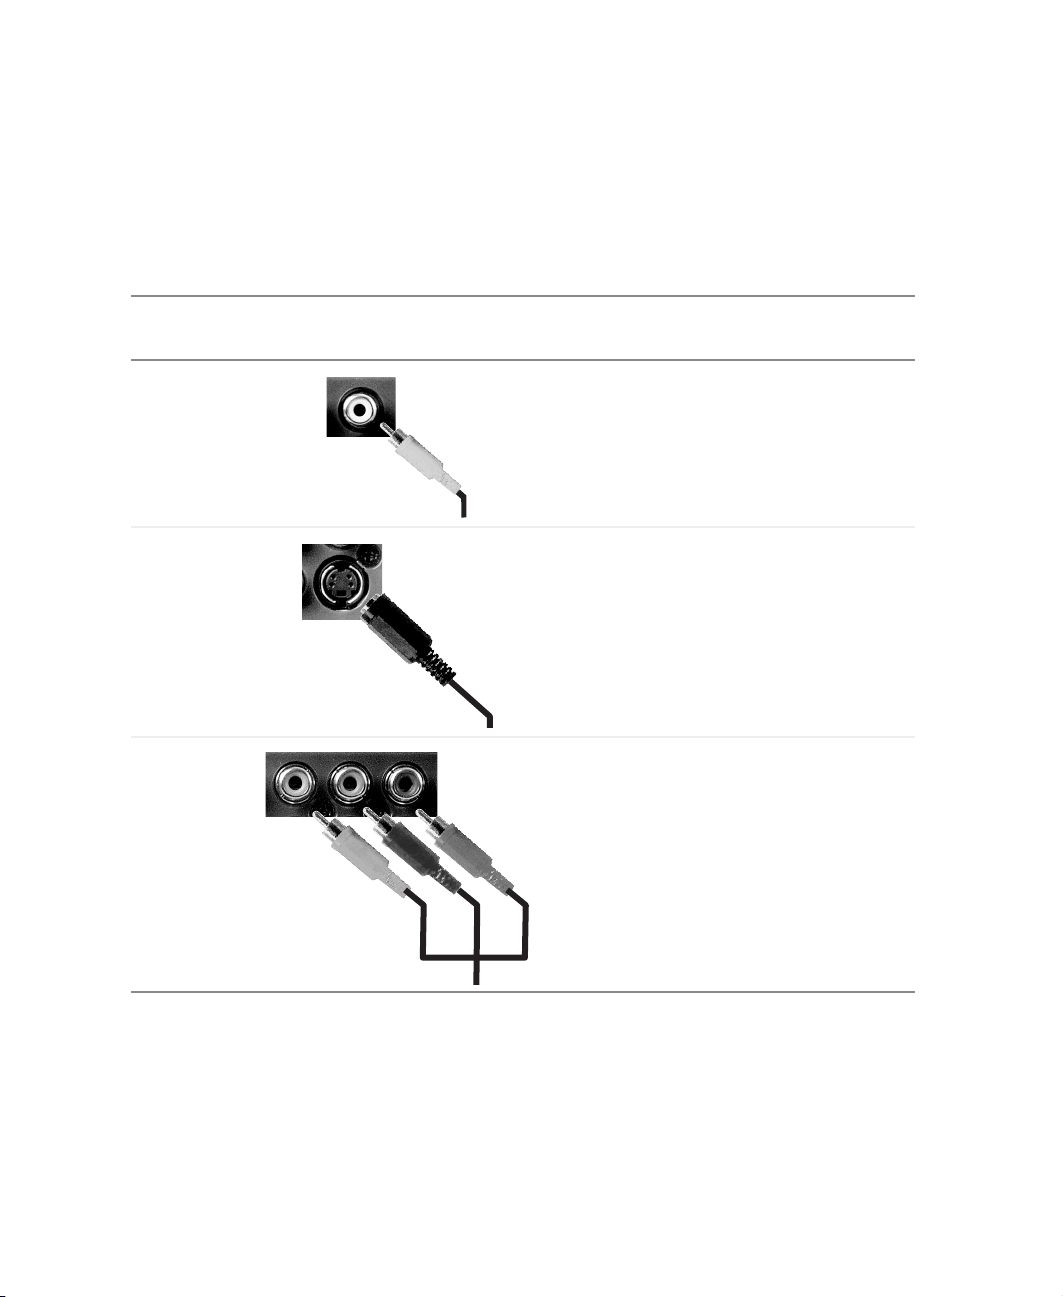
Understanding video connections
Your DVD recorder has three types of standard video connections. You should
use the best connection available to get the best display. For example, if your
TV supports a component video connection, connect the DVD recorder to your
TV using component video instead of composite video or S-Video.
Connection
Cable and Connector Description
Quality
Good Composite. The video signal is carried
through a single “pin.” This connection
method is the one that is most commonly
found on devices.
Better S-Video. The video signal is split into two
signals, black-and-white and color. Text
displayed on-screen through this connection
will be noticeably sharper then composite or
coaxial (RF).
Best Component. The video signal is split into
three signals, two color and one
black-and-white. Use component video to
take advantage of the superior picture
provided by signal sources as HDTV and
progressive
DVD.
16
www.gateway.com
Page 21
Connecting a TV
You can connect a TV using one of the following connection types:
■ Composite video (good video quality)
■ S-Video (better video quality)
■ Component best video quality)
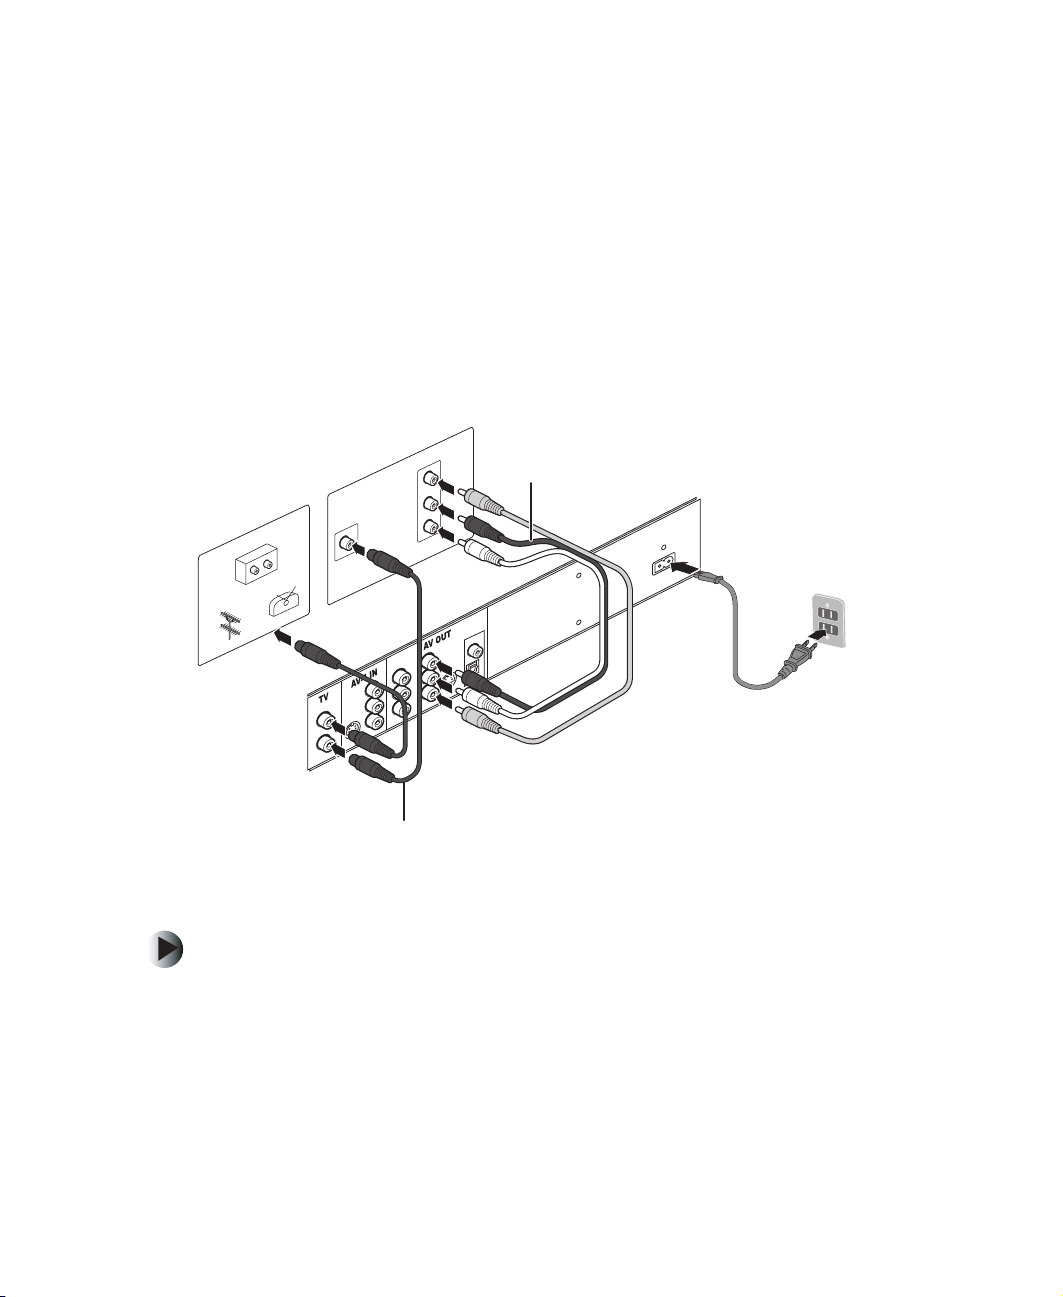
Using composite video
Connecting a TV
Antenna
Cable TV
Outdoor antenna
Indoor antenna
TV
VHF / UHF
RFIN
IN
VIDEO
RIGHT
DIO
AU
LEFT
COAXIAL
R
L
Y
R
Cb
L
Cr
VIDEO IN
S-VIDEO
OPTICAL
S-VIDEO
VIDEO OUT
Audio/Video
cable
RF (coaxial)
cable
To connect a TV using composite video:
1 Connect the TV In jack on the back of your DVD recorder to your antenna
or cable TV outlet.
2 Connect the TV Out jack on the back of your DVD recorder to the
VHF/UHF In jack on the back of your TV.
www.gateway.com
17
Page 22

Chapter 2: Connecting Your DVD Recorder
3 Connect the yellow A/V In jack on the back of your DVD recorder to the
yellow VIDEO 1 jack on the back of your TV.
4 Connect the red (R) and white (L) A/V In jacks on the back of your
DVD recorder to the AUDIO OUT jacks on the back of your TV.
Using S-Video
S-VIDEO
VIDEO
RIGHT
AU
LEFT
IN
DIO
Y
R
Cb
L
Cr
VIDEO IN
S-VIDEO
To connect a TV using S-Video:
1 Connect the S-Video Out jack on the back of your DVD recorder to the
S-Video In jack on the back of your TV.
2 Connect the audio. For more information, see “Connecting audio
components” on page 20.
18
R
L
VIDEO OUT
COAXIAL
OPTICAL
A
S-VIDEO
S-Video
cable
www.gateway.com
Page 23

Using component video
IN
COMPONENT IN
OAXIAL
C
OPTICAL
Y
S-VIDEO
VIDEO
RIGHT
IO
D
AU
LEFT
R
L
Y
R
Pb
L
IN
-V
S
OUT
Pr
IN
O
E
ID
V
O
E
ID
O
E
ID
-V
S
T
U
O
O
E
ID
V
Connecting a TV
R
P
B
P
AV
To connect a TV using component video:
1 Connect the green component Y jack on the back of your DVD recorder
to the green component Y1 jack on the back of your TV.
2 Connect the red component C
the red P
1/CR1 jack on the back of your TV.
R
3 Connect the blue component C
to the blue component P
jack on the back of your DVD recorder to
R
jack on the back of your DVD recorder
B
1/CB1 jack on the back of your TV.
B
4 Connect the audio. For more information, see “Connecting audio
components” on page 20.
www.gateway.com
19
Page 24

Chapter 2: Connecting Your DVD Recorder
Connecting audio components
You can connect audio components, such as a stereo system or receiver, using
one of the following connections:
■ Analog audio output (good audio quality)
■ Coaxial digital output (better audio quality)
■ Optical digital output (best audio quality)
Using analog audio output
IN
RIGHT
D
DV
LEFT
R
L
VIDEO IN
S-VIDEO
To an analog audio device:
■ Connect the red (R) and white (L) A/V jacks on the back of your external
amplifier or receiver to the red (R) and white (L) A/V Out jacks on the back
of your DVD recorder.
20
R
L
Y
Pb
VIDEO OUT
Pr
COAXIAL
OPTICAL
S-VIDEO
Audio/Video
cable
www.gateway.com
Page 25

Using coaxial digital output
Connecting audio components
DIGITAL
IN
OPTICAL
COAXIAL
R
L
Y
R
Pb
L
VIDEO IN
S-VIDEO
VIDEO OUT
Pr
COAXIAL
OPTICAL
S-VIDEO
Coaxial digital
cable
To a coaxial digital audio device:
■ Connect the Coaxial Digital Audio Out jack on the back of your
DVD recorder to the Coaxial Digital Audio In jack on the back of your
external amplifier or receiver.
www.gateway.com
21
Page 26

Chapter 2: Connecting Your DVD Recorder
Using optical digital output
DIGITAL
IN
OPTICAL
COAXIAL
R
L
Y
R
Pb
L
VIDEO IN
S-VIDEO
VIDEO OUT
Pr
COAXIAL
OPTICAL
S-VIDEO
Optical audio
cable
To connect an optical digital audio device:
■ Connect the Optical Digital Audio Out jack on the back of your
DVD recorder to the Optical Digital Audio In jack on your external
amplifier or receiver.
22
www.gateway.com
Page 27

Connecting a VCR
You can connect a VCR to record content from the VCR to a DVD+R disc.
Connecting a VCR
S-Video
Note: If you connect an
S-Video cable, do not
connect the yellow
composite (video) plug
on the composite
audio/video cable.
cable
VCR
S - VIDEO
OUT
www.gateway.com
AUDIO
OUT
Composite
audio/video
cable
VIDEO
LR
OUT
23
Page 28

Chapter 2: Connecting Your DVD Recorder
To connect a VCR:
■ Connect the S-Video In jack on the back of your DVD recorder to the
S-Video Out jack on the back of your VCR, and connect the red (R) and
white (L) audio jacks on the back of your DVD recorder to the red (R) and
white (L) audio jacks on the back of your VCR.
- OR -
Connect the yellow video jack and the red (R) and white (L) audio jacks
on the back of your DVD recorder to the yellow video jack and the red
(R) and white (L) audio jacks on the back of your VCR.
24
www.gateway.com
Page 29

Connecting a camcorder
Connecting a camcorder
DV Link
(IEEE 1394)
cable
DV
OUT
OR
VIDEO
OUT AUDIO
Composite
Audio/Video
cable
LR
OUT
www.gateway.com
25
Page 30

Chapter 2: Connecting Your DVD Recorder
To connect a camcorder:
■ Connect the DV Link jack on the front of your DVD recorder to the DV
out jack on your camcorder.
- OR -
Connect the yellow video jack and the red (R) and white (L) audio jacks
on the front of your DVD recorder to the yellow video jack and the red
(R) and white (L) audio jacks on your camcorder.
26
www.gateway.com
Page 31

Using Your DVD
Recorder
Read this chapter to learn how to:
■ Set your DVD recorder’s date and time
■ Play discs
■ Record discs
■ Edit discs
■ Use Disc Tools
■ Use the Setup menu
3
27
Page 32

Chapter 3: Using Your DVD Recorder
Setting the date and time
If you plan to use the Timed Recording feature to schedule the recording of a
TV program, you need to set your DVD recorder’s date and time.
To set the date and time:
1 Press the Power button to turn on your DVD recorder.
2 Press the Setup button to open the Setup menu.
3 Press the or button to select System, then press the Enter button.
4 Press the or button to select Date, then press the Enter button.
5 Press a number button or the or button to enter a digit, then press
the button to go to the next digit. If you need to change a digit, press
the button to go back.
6 Press the Enter button to confirm the date.
7 Press the or button to select Time, then press the Enter button.
8 Press a number button or the or button to enter a digit, then press
the button to go to the next digit. If you need to change a digit, press
the button to go back.
9 Press the Enter button to confirm the time.
10 Press the Setup button to close the Setup menu.
28
www.gateway.com
Page 33

Playing a disc
Use these basic instructions for playing a disc.
To play a disc:
1 Make sure that you have connected your TV. For more information, see
“Connecting a TV” on page 17.
2 Make sure that your DVD recorder is turned on.
3 Press the Open/Close button to open the disc tray.
4 Place the disc in the tray with the label-side facing up.
5 Press the Open/Close button to close the tray.
6 Press the (play) button.
For information about additional disc controls, see:
Playing a disc
■ “Controlling DVD, VCD, and SVCD playback” on page 30
■ “Controlling audio CD and MP3 playback” on page 33
■ “Controlling JPEG playback” on page 33
www.gateway.com
29
Page 34

Chapter 3: Using Your DVD Recorder
Controlling DVD, VCD, and SVCD playback
While playing a DVD, VCD, or SVCD, you can:
■ Select a title or chapter (for more information, see “Selecting a title or
chapter” on page 30)
■ Use the Navigation menu to:
■ Control playback speed
■ Create a playback loop. For more information, see “Creating a
playback loop” on page 32
■ Display subtitle if the disc has subtitles
■ Select an audio language or sound track if the disc has different
languages or sound tracks
■ Change the viewing angle if the disc has different angles
■ View information about a disc
For more information about the Navigation menu, see “Using the Navigation
menu” on page 31.
Selecting a title or chapter
To select a title on a DVD:
1 Press the Top Menu button to open the list of titles on the disc.
2 Press the , , , or button to select a title, then press the Enter button.
To select a chapter on a DVD:
1 While the DVD is playing, press the Menu button to open the chapter list
on a DVD.
2 Press the , , , or button to select a chapter, then press the Enter
button.
30
www.gateway.com
Page 35

To select a title on a VCD or SVCD:
1 Press the Top Menu button to open a list of titles on the disc.
2 Press a number button to select a title.
Using the Navigation menu
To use the Navigation menu:
1 Press Disc Nav to open the Navigation menu.
2 Press the or button to select a navigation option, then press the Enter
button.
You can select:
■ SLOW to select a slow motion playback speed.
■ SEARCH to search for a chapter by title or time. For more information,
see “Searching for a section or chapter” on page 32.
■ A-B REPEAT to create a playback loop. For more information, see
“Creating a playback loop” on page 32.
Playing a disc
■ SUBTITLE to display subtitles if the disc has subtitles.
■ AUDIO to select a different audio language or sound track if the disc
has different languages or sound tracks.
■ ANGLE to change the viewing angle if the disc has different angles.
■ INFORMATION to display information about the disc.
3 If the option you selected has sub-options, use the , , or button to
select a sub-option, then press the
Enter button.
4 Press the Disc Nav or the button to close the Navigation menu.
www.gateway.com
31
Page 36

Chapter 3: Using Your DVD Recorder
Searching for a section or chapter
To search for a section or chapter on a DVD:
1 Open the Navigation menu, then select SEARCH.
2 Press the or button to select Title/Chapter or Time, then press the Enter
button.
3 Press a number button or the or button to enter a digit, then press
the button to go to the next digit. If you need to change a digit, press
the to go back.
4 When you have finished, press the Enter button to start playback at the
time or chapter you specified.
Creating a playback loop
To create a playback loop:
1 Start playing a disc.
32
2 Open the Navigation menu, then select A-B Repeat.
3 When disc playback reaches the point where you want to start the loop,
press the button to select
Set Point A, then press the Enter button.
4 When disc playback reaches the point where you want to end the loop,
press the button to select
DVD recorder starts playing the loop.
Set Point B, then press the Enter button. Your
5 To cancel a playback loop, open the Navigation menu, select A-B Repeat,
select
Cancel, then press the Enter button.
www.gateway.com
Page 37

Controlling audio CD and MP3 playback
To control audio CD and MP3 playback:
■ While the disc is playing, you can:
■ Press the (next) or (previous) button to go to the next or previous
track or file.
■ Press the Pause button to pause playback. Press the (play) button
to start playback again.
■ Press the (stop) button to stop playback. Press the (play) button
to start playback again.
■ Press a number button on the Number Pad, then press the Enter button
to select a specific track (audio CD only).
Controlling JPEG playback
Playing a disc
To control JPEG playback:
■ While the disc is playing, you can:
■ Press the or button to select the JPEG file you want to view.
■ Press the or button to rotate the picture.
■ Press the (stop) button to stop playback. Press the (play) button
to start playback again.
www.gateway.com
33
Page 38

Chapter 3: Using Your DVD Recorder
Controlling slideshow playback
A slideshow consists of JPEG (JPG) files and MPEG (MP3) files. When the JPEG
and MPEG files are on the same CD or CD-RW disc, you can use you
DVD recorder to playback the slideshow.
To control slideshow playback:
■ While the disc is playing, you can:
■ Press the or button to skip an MP3 file.
■ Press the or button to rotate the picture file.
■ Press the Pause button to pause the slideshow. Press the (play)
button to start playback again.
34
www.gateway.com
Page 39

Recording a disc
Recording a TV channel
To record a TV channel:
1 Turn on your TV.
2 Make sure that your DVD recorder is turned on.
3 Place a disc, label-side up, into the disc tray. If you are using a new
DVD+RW disc, your DVD recorder will format the disc.
4 Press the Source button one or more times to select TV.
5 Press the CH (channel) up or down button to select the channel you want
to record.
6 If you want to change the quality of the recording, open the Setup menu
and select
the Setup menu, see “Using the Setup menu” on page 45.
Quality from the Record option. For more information about using
Recording a disc
7 Press the Record button to start the recording.
8 Press the (stop) button to stop the recording.
When you are recording a TV channel, you can also:
■ Press the Pause button to pause the recording. Press the Pause button again
to continue the recording.
■ Press the Display button to view recording information, such as the
recording quality and time.
After you finish recording, you can edit disc information. For more information,
see “Editing a disc” on page 39.
You can add additional recordings to a DVD+RW disc. You can also add
recordings to a DVD+R as long as you have not finalized the disc.
www.gateway.com
35
Page 40

Chapter 3: Using Your DVD Recorder
Recording from a VCR or camcorder
To record from a VCR or camcorder:
1 Make sure that your VCR or camcorder is connected to your DVD recorder.
For more information, see “Connecting a VCR” on page 23 or “Connecting
a camcorder” on page 25.
2 Turn on your VCR or camcorder. If you are recording from a VCR, insert
a video cassette.
3 Make sure that your DVD recorder is turned on.
4 If you want to change the quality of the recording, open the Setup menu
and select
the Setup menu, see “Using the Setup menu” on page 45.
5 Place a disc, label-side up, into the disc tray.
6 Press the Source button one or more times to select the video connection
for your VCR or camcorder.
7 Press the play button on your VCR or camcorder.
Quality from the Record option. For more information about using
36
8 Press the Record button on your DVD remote control to start the recording.
9 Press the (stop) button on your DVD remote control to stop the
recording.
www.gateway.com
Page 41

Setting up a timed recording
You can set up your DVD recorder to record a TV program that will be broadcast
at a later time.
To set up a timed recording:
1 Turn on your TV.
2 Make sure that your DVD recorder is turned on.
3 Make sure that you have set the recorder date and time. For more
information, see “Setting the date and time” on page 28.
4 Place a disc, label-side up, into the disc tray. If you are using a new
DVD+RW disc, your DVD recorder will format the disc.
5 Press the Source button one or more times to select TV.
6 Press the CH (channel) up or down button to select the channel on the
TV that you want to record.
Important To use your remote control to change TV channels, you
must scan for channels. For more information, see “TV
Tuner” on page 48.
Recording a disc
7 Press the Timer button to open the Timer Record menu.
8 Press the or button to select TV, then press the button.
9 Press the or button to select Mode, then press the Enter button.
10 Press the or button to select the mode you want. You can select ONCE
to record the program one time only. You can select
program once a week. You can select
DAILY to record the program every day.
WEEKLY to record the
11 Press the or button to select MM/DD, then press the Enter button.
12 Press a number button to enter a digit, then press the button to go to
the next digit. If you need to change a digit, press the button to go back.
13 Press the Enter button to confirm the date.
14 Press the or button to select Start, then press the Enter button.
www.gateway.com
37
Page 42

Chapter 3: Using Your DVD Recorder
15 Press a number button to enter a digit, then press the button to go to
the next digit. If you need to change a digit, press the button to go back.
16 Press the Enter button to confirm the start time.
17 Press the or button to select End, then press the Enter button.
18 Press a number button to enter a digit, then press the button to go to
the next digit. If you need to change a digit, press the button to go back.
19 Press the Enter button to confirm the end time.
20 Press the or button to select Source, then press the Enter button.
21 Press the or to select TV, then press the Enter button.
22 Press the or button to select Quality, then press the Enter button.
23 Press the or to select a quality setting, then press the Enter button.
24 Press the Power button to turn off your DVD recorder. Your DVD recorder
will turn on and record at the date and time you specified.
Tips & Tricks If you want to stop a timed recording in process, press the
button.
Canceling a timed recording
To cancel a timed recording:
1 Press the Timer button to open the Timer Record menu.
2 Press the or button to select TV, then press the button.
3 Press the or button to select the recording you want to cancel.
4 Press the or button to select Reset, then press the Enter button. The
recording is canceled.
38
www.gateway.com
Page 43

Editing a disc
After you record a disc, you can:
■ Edit the name of any of the titles on the disc
■ Protect the title from being erased
■ Overwrite a title on the disc
■ Erase a title from the disc
Renaming a title
To rename a title:
1 Press the Power button to turn on your DVD recorder.
2 Place the disc, label-side up, into the disc tray.
3 Press the (play) or Disc Tools button to open the DVD Menu, then select
the title you want to rename.
Editing a disc
4 Press the Edit button to open the Title Edit menu.
5 Press the or button to select Title Name, then press the Enter button.
6 Press a number button one or more times to enter a character, then press
the button to go to the next character. Each number button on the
remote control is associated with a set of letters. Use the on-screen display
to determine which number button to press.
7 After you enter the title, press the , , , or button to select Finish,
then press the Enter button.
8 Press the Edit button to close the Title Edit menu.
www.gateway.com
39
Page 44

Chapter 3: Using Your DVD Recorder
Protecting a title
You can protect a title to prevent it from accidently being erased.
To protect a title:
1 Press the Power button to turn on your DVD recorder.
2 Place the disc, label-side up, into the disc tray.
3 Press the (play) or Disc Tools button to open the DVD Menu, then select
the title you want to protect.
4 Press the Edit button to open the Title Edit menu.
5 Press the or button to select Protection, then press the Enter button.
6 Press the or button to select On, then press the Enter button.
7 Press the Edit button to close the Title Edit menu.
- OR -
Press the , , , or buttons to select
Exit, then press the Enter button.
Overwriting a title
If you want to record over a title on a disc, you need to turn on the Overwrite
option. You can record over a title on DVD+RW discs only.
To turn on Overwrite:
1 Press the Power button to turn on your DVD recorder.
2 Place a disc, label-side up, into the disc tray.
3 Press the (play) or Disc Tools button to open the DVD Menu, then select
the title you want to overwrite.
4 Press the Edit button to open the Title Edit menu.
40
www.gateway.com
Page 45

5 Press the or button to select Overwrite, then press the Enter button.
6 Press the or button to select On, then press the Enter button. You can
now record over the title.
Erasing a title
To erase a title:
1 Press the Power button to turn on your DVD recorder.
2 Place the disc, label-side up, into the disc tray.
3 Press the (play) or Disc Tools button to open the DVD Menu, then select
the title you want to erase.
4 Press the Edit button to open the Title Edit menu.
5 Press the or button to select Erase, then press the Enter button.
6 Press the Edit button to close the Title Edit menu.
Editing a disc
Tips & Tricks You can erase titles from both a DVD+RW and a DVD+R
disc. However, you cannot reuse the erased space on a
DVD+R disc.
www.gateway.com
41
Page 46

Chapter 3: Using Your DVD Recorder
Using Disc Tools
Disc Tools is an easy-to-use, online tool you can use to:
■ Play discs
■ Record discs
■ Format discs
■ Finalize discs.
To use Disc Tools:
1 Make sure that your DVD recorder is turned on.
2 Place a disc, label-side up, into the disc tray.
3 Press the Disc Tool button to open the Disc Tool menu.
4 Press the or button to select a Disc Tools option, then press the Enter
button.
5 Follow the on-screen instructions.
42
www.gateway.com
Page 47

Setting parental controls
To set up parental controls:
1 Make sure that your DVD recorder is turned on.
2 Press the Setup button to open the Setup menu.
3 Press the button to select Playback, then press the Enter button.
4 Press the button to select Parental, then press the Enter button.
5 Press the or to select the rating you want. Any DVD with the rating
you choose and all ratings above that rating will be blocked. For example,
if you choose 4-PG13, discs with a rating of 4 through 8 will be blocked.
For a list of the ratings, see “Playback” on page 47.
6 Press the number buttons to enter your password. If you have not set a
password, enter 0000 (default password). For more information about
passwords, see “Setting a password” on page 44.
Setting parental controls
Tips & Tricks When you try to play a disc with a rating you have blocked,
you will be prompted to enter your password.
www.gateway.com
43
Page 48

Chapter 3: Using Your DVD Recorder
Setting a password
To set a password:
1 Make sure that your DVD recorder is turned on.
2 Press the Setup button to open the Setup menu.
3 Press the button to select Playback, then press the Enter button.
4 Press the button to select Password, then press the Enter button.
5 If this is the first time you are setting up a password, press the number
buttons to enter 0000 (default password) in the
- OR -
If you are changing your password, press the number buttons to enter your
old password in the
6 Press the number buttons to enter your new password in the New Password
field. If you need to change a digit, press the to go back.
7 Press the number buttons to enter your new password in the Confirm field.
If you need to change a digit, press the to go back.
Old Password field.
Old Password field.
Resetting the password
To reset the password:
1 Make sure that your DVD recorder is turned on.
2 Press the Setup button to open the Setup menu.
3 Press the button to select Playback, then press the Enter button.
4 Press the button to select Password, then press the Enter button.
5 Press the number buttons to enter 8008. You can now use the default
password (0000) to set up a new password.
44
www.gateway.com
Page 49

Using the Setup menu
Using the Setup menu
The Setup menu lets you adjust settings and select options for your
DVD recorder. For example, you can specify your TV type, set parental controls,
and specify your audio type.
To use the Setup menu:
1 Make sure that your DVD recorder is turned on.
2 Press the Setup button to open the Setup menu.
3 Press the button to select an option, then press the Enter button.
4 If an option has sub-options, press the button to select a sub-option,
then press the Enter button.
5 Press the or button to adjust the option, then press the Enter button.
6 Press the Setup button to close the Setup menu.
www.gateway.com
45
Page 50

Chapter 3: Using Your DVD Recorder
Setup submenu Options
System Language: Changes the language of the
Choose English, French, Spanish, German, Italian,
Simplified Chinese, or Traditional Chinese.
TV Type: Specifies your TV type. Choose NTSC or PAL.
Date: Sets the date. The date format is MM/DD/YYY
(Month/Day/Year).
Time: Sets the time. The time format is HH:MM:SS
(Hour:Minute:Second)
Video Output: Specifies the video output from your
DVD recorder. Choose:
■
S-Video
■
Component
■
Progressive
Auto-sleep: Specifies the amount of time you want your
DVD recorder to wait before turning off automatically.
Choose:
■
Off
■
30 minutes
■
60 minutes
■
90 minutes
■
120 minutes
Setup
menu.
46
www.gateway.com
Page 51

Using the Setup menu
Setup submenu Options
Playback Aspect ratio: Adjusts the screen width. Choose:
■
16:9 Wide
■
4:3 Pan
■
4:4 L.Box
Menu: Selects the language for on-screen DVD menus.
The disc must have multiple languages for this option to
work.
Audio: Selects the audio language for disc playback.
The disc must have multiple languages for this option to
work.
Subtitle: Selects the subtitle language for disc playback.
The disc must have subtitles for this option to work.
Parental: Sets rating restrictions for the type of content
you can view on a DVD if the DVD is rated. You can
select 8=Adult, 7=NC-17, 6=R, 5=PG-R, 4=PG-13,
3=PG, 2=G, 1=Kid Safe, and Off.
You must enter a password to change this option.
Password: Sets a password.
Slide Time: Sets the time interval for displaying JPEG
files in a slideshow. Choose from 3 to 99 seconds.
VCD PBC: Turns Play Back Control (PBC) for SCD and
SVCD on and off.
Record Record Quality: Specifies the compression ratio which
affects the playback quality. Choose:
■
HQ (1 HR)
■
SP (2 HR)
■
EP (4 HR)
■
SLP (6 HR)
Chapter Mark: Sets the interval of chapter auto-insertion
while recording. Choose from 2 to 15 minutes.
Audio Digital Output: Specifies the type of digital output.
Choose:
■
PCM–enables digital audio output with PCM data.
■
Bitstream–enables digital audio output with encoded
data
DTS Out: Turns Digital Theater System (DTS) output on
and off. Choose:
■
On
■
Off
www.gateway.com
47
Page 52

Chapter 3: Using Your DVD Recorder
Setup submenu Options
TV Tuner TV Signal: Specifies the type of TV signal. Choose:
■
Antenna
■
Cable
Country: Specifies the country where your TV signal
originates.
Scan: Scans your TV signal for available channels. You
must scan for channels if you want to use the
DVD recorder remote control to change channels.
Fine: Fine tunes the TV signal.
48
www.gateway.com
Page 53

Troubleshooting
Read this chapter to learn how to:
■ Troubleshoot common problems
■ Contact Gateway Technical Support
4
49
Page 54

Chapter 4: Troubleshooting
Disc
The disc does not play.
■ Make sure that there is a disc in the tray.
■ If you are using the remote control, make sure that the batteries are inserted
correctly. If the batteries are inserted correctly, they may not have a charge.
Replace the batteries.
■ If the disc has two playable sides, make sure that the side you want to play
is facing down in the tray.
■ The disc may be warped and unplayable.
■ The region code on the DVD may not be Region 1 (North America).
■ Moisture may have condensed inside the recorder. Remove the DVD and
leave the recorder turned on for about half an hour to eliminate the
condensation.
Power
The recorder does not have power.
■ Make sure that the AC power cord is plugged securely into the wall outlet.
■ Make sure that the Power button on the front of the recorder is pressed in.
Remote control
The remote control does not work.
■ Point the remote control directly at the sensor on the front of the recorder.
■ Remove any obstacles between the remote control and the recorder.
■ Move closer to the recorder when using the remote control.
■ Make sure that the batteries are inserted correctly.
■ Replace the batteries.
50
www.gateway.com
Page 55

Sound
No sound plays while playing media through the recorder.
■ Make sure that all audio cables are securely plugged in.
■ If any audio or speaker cables are damaged, replace them.
■ Make sure that the volume is turned up on your TV.
■ Make sure that the recorder’s audio settings match your TV and audio
system settings.
■ The recorder may be in Pause, Slow Motion, or Fast Forward/Fast Reverse
mode. Press the button on the remote control to return to normal
playback mode.
I keep hearing a loud hum or noise.
■ Make sure that all components in your audio system are securely
plugged in.
■ Make sure that you keep your audio system’s cables away from a
transformer or motor and that you keep them at least 10 feet away from
a TV or fluorescent lights.
Sound
■ The plugs and jacks may be dirty. Unplug them, then wipe them clean with
a cloth slightly moistened with isopropyl alcohol.
■ Clean the DVD.
TV
No picture appears on my TV.
■ Make sure that the video cables are securely plugged into the recorder and
the TV.
■ Make sure that you have made only one video connection. If you are using
S-Video or component video, make sure that you have not plugged in the
yellow video connector on the composite audio/video cable.
■ If the video cables are damaged, replace them.
■ Make sure that the TV System option in the Setup menu is set correctly.
■ Make sure that video is set to the correct mode. Press the Source button
on the remote control until a picture is visible.
www.gateway.com
51
Page 56

Chapter 4: Troubleshooting
The picture on my TV has a lot of static, or “noise”
■ Make sure that the disc is not dirty or flawed.
■ Make sure that the video cable is connected correctly and securely.
■ Make sure that the TV system type is set correctly in the Setup menu. NTSC
is usually used in the United States. For more information, see “System”
on page 46.
■ If the picture output from your recorder goes through your VCR to get to
your TV, the copy-protection signal used on some DVDs could diminish
the picture quality. Try connecting the recorder directly to the TV. If you
still experience problems, try connecting your recorder to your TV’s
S-Video input.
■ If your TV has more than one type of video connection, try a different
type connection.
The DVD picture does not fill the screen on my standard television.
■ Change the aspect ratio. For more information, see “Playback” on page 47.
■ If the picture does not change, the disc’s aspect ratio may be fixed and
cannot be adjusted.
Getting help
If the troubleshooting information in this chapter does not solve your problem,
contact Gateway Technical Support at 800-846-2301, Monday through Friday,
from 7:00 a.m. to 9:00 p.m. Central Time.
TDD technical support (for the hearing impaired) is available weekdays from
6:00 a.m. to 8:00 p.m. Central Time and weekends from 6:00 a.m. to 5:00 p.m.
Central Time.
52
www.gateway.com
Page 57

Specifications
Read this chapter to learn about specifications for your
DVD recorder.
The specifications are subject to change without notice.
A
53
Page 58

Appendix A:
Supported media types (read only) DVD-R/RW, DVD+R/RW, DVD-ROM, CD-R/RW,
Supported recordable discs
Video recording quality Modes:
CD-ROM
CONTENT FORMAT SUPPORTED:
■
DVD - Video
■
DVD+VR (DVD+VR format is compatible with
DVD-Video in most cases)
■
Video CD
■
Super VCD
■
Audio CD
■
MP3 CD (Maximum number of files recognizable is
5000 files with a compression rate between 32 kbps
and 320 kbps.)
■
JPEG CD (Maximum number of pictures recognizable
is 5000 files with a resolution between 320x240 and
5760x3840 pixels. Sub sampling is 4:2:2 or 4:2:0)
■
DVD+R (DVD+VR format)
■
DVD+RW (DVD+VR format)
■
HQ: 1 hour with 9.5 Mpbs bit rate. MPEG2 encoding.
NTSC–720 × 480, PAL/SECAM–720 × 576
■
SP: 2 hours with 5.1 Mpbs bit rate. MPEG2 encoding.
NTSC–720 × 480, PAL/SECAM–720 × 576
■
EP: 4 hours with 2.5 Mpbs bit rate. MPEG2 encoding.
NTSC–352 × 480, PAL/SECAM–352 × 576
■
SLP: 6 hours with 1.7 Mpbs bit rate. MPEG1 encoding.
NTSC–352 × 240, PAL/SECAM–352 × 288
Video format MPEG1 for DVD+VR, DVD-Video, SVCD
MPEG2 for DVD+R, VCD
54
www.gateway.com
Page 59

TV Standard and video resolution Scan frequency: 60 Hz (NTSC) 50 Hz (PAL/SECAM)
Number of lines: 525 (NTSC) 625 (PAL/SECAM)
DVD-Video:
Horizontal resolution: 720 pixels (NTSC) 720 pixels
(PAL/SECAM)
Vertical resolution: 480 lines (NTSC) 576 lines
(PAL/SECAM)
SVCD:
Horizontal resolution: 480 pixels (NTSC) 480 pixels
(PAL/SECAM)
Vertical resolution: 480 lines (NTSC) 576 lines
(PAL/SECAM)
VCD:
Horizontal resolution: 352 pixels (NTSC) 352 pixels
(PAL/SECAM)
Vertical resolution: 240 lines (NTSC) 288 lines
(PAL/SECAM)
Video performance DA converter: 10-bit/54 MHz
Composite output: 1 Vpp 75 Ohm
S-Video output:
Y=1 Vpp 75 Ohm
C=0.3 Vpp 75 Ohm
Component video output:
Y= 1 Vpp 75 Ohm
=0.7 Vpp 75 Ohm
P
2
=0.7 Vpp 75 Ohm
P
1
Audio format Dolby Digital: (AC3)Multi-channel
DTS: Multi-channel
MPEG1: 2-channel
MPEG2: Multichannel
PCM: 2-channel
Audio performance DA converter: 24-bit/192 KHz
AD converter:24- bit
Signal-Noise (1 kHz): 90 dB
Dynamic range (1 kHz): 60 dB
Channel Separation (1 kHz): 60 dB
Total harmonic distortion (1 kHz): 65 dB
www.gateway.com
55
Page 60

Appendix A:
Tuner format Signal: UHF/VHF/CATV
Connections Front panel:
Power supply AC 100~240V, 50 Hz/60 Hz
Power consumption 36 W
System: NTSC
Video input: RCA jack (yellow)
Audio L/R input: RCA jacks (white/red)
IEEE 1394 input: Mini jack
Back panel:
Video input: RCA jack (yellow)
Audio L/R input: RCA jacks (white/red)
S-Video input: 4-pin Mini DIN
Video output: RCA jack (yellow)
Audio L/R output: RCA jacks (white/red)
S-Video output: 4-pin Mini DIN
Component/Progressive Scan output: Y, P
(Green/Blue/Red)
Digital audio output: Coaxial and Optical
, Pr
b
Operating temperature +35°F to +104°F (+5°C to +40°C)
Operating humidity 5% to 80% RH
Dimensions 16.5 × 2.6 × 10.6 inches (42 × 66 × 269 mm)
Weight 8.8 lbs (4.0 kg)
56
www.gateway.com
Page 61

Safety,
Regulatory, and
Legal Information
Regulatory compliance
statements
United States of America
Federal Communications Commission (FCC)
Unintentional emitter per FCC Part 15
This device has been tested and found to comply with the limits for a
Cl ass B di gital de vice, p urs uan t to P art 15 o f th e FC C rul es. Thes e li mits
are designed to provide reasonable protection against harmful
interference in a residential installation.
B
57
Page 62

Appendix B:
This equipment generates, uses, and can radiate radio frequency energy and, if not installed and
used in accordance with the instructions, may cause harmful interference to radio or television
reception. However, there is no guarantee that interference will not occur in a particular
installation. If this equipment does cause interference to radio and television reception, which can
be determined by turning the equipment off and on, the user is encouraged to try to correct the
interference by one or more of the following measures:
■
Reorient or relocate the receiving antenna
■
Increase the separation between the equipment and receiver
■
Connect the equipment to an outlet on a different circuit from that to which the receiver is
connected
■
Consult the dealer or an experienced radio/TV technician for help.
Compliance Accessories: The accessories associated with this equipment are: shielded video cable.
These accessories are required to be used in order to ensure compliance with FCC rules.
Caution Changes or modifications not expressly approved by
FCC declaration of conformity
Responsible party:
Gateway Companies, Inc.
610 Gateway Drive, North Sioux City, SD 57049
(605) 232-2000 Fax: (605) 232-2023
Product:
■
AR-230
This device complies with Part 15 of the FCC Rules. Operation of this product is subject to the
following two conditions: (1) this device may not cause harmful interference, and (2) this device
must accept any interference received, including interference that may cause undesired operation.
Gateway could void the FCC compliance and negate your
authority to operate the product.
Canada
Industry Canada (IC)
Unintentional emitter per ICES-003
This digital apparatus does not exceed the Class B limits for radio noise emissions from digital
apparatus as set out in the radio interference regulations of Industry Canada.
Le présent appareil numérique n’émet pas de bruits radioélectriques dépassant les limites
applicables aux appareils numériques de Classe B prescrites dans le règlement sur le brouillage
radioélectrique édicté par Industrie Canada.
58
www.gateway.com
Page 63

Laser safety statement
All Gateway systems equipped with CD and DVD drives comply with the appropriate safety
standards, including IEC 825. The laser devices in these components are classified as “Class 1 Laser
Products” under a US Department of Health and Human Services (DHHS) Radiation Performance
Standard. Should the unit ever need servicing, contact an authorized service location.
Warning Use of controls or adjustments or performance of
procedures other than those specified in this manual may
result in hazardous radiation exposure. To prevent
exposure to laser beams, do not try to open the enclosure
of a CD or DVD drive.
Macrovision statement
If your computer has a DVD drive and an analog TV Out port, the following paragraph applies:
This product incorporates copyright protection technology that is protected by method claims of certain U.S.
patents and other intellectual property rights owned by Macrovision Corporation and other rights owners. Use of
this copyright protection technology must be authorized by Macrovision Corporation, and is intended for home
and other limited viewing uses only unless otherwise authorized by Macrovision Corporation. Reverse
engineering or disassembly is prohibited.
California Proposition 65 Warning
Warning This product contains chemicals, including lead, known to
the State of California to cause cancer and/or birth defects
or reproductive harm.
Television antenna connectors protection (for
systems fitted with TV/cable TV tuner cards)
External television antenna grounding
If an outsi de a ntenna or c able sy ste m is t o be conn ect ed to your Gat eway PC, make sur e th at t he
antenna or cable system is electrically grounded to provide some protection against voltage surges
and static charges.
Article 810 of the National Electrical Code, ANSI/NFPSA 70, provides information with regard to
proper grounding of the mast and supporting structure, grounding of the lead-in wire to an
antenna discharge unit, size of grounding conductors, location of antenna discharge unit,
connection to grounding electrodes, and requirements for the grounding electrode.
www.gateway.com
59
Page 64

Appendix B:
Lightning protection
For added protection of any Gateway product during a lightning storm or when it is left
unattended or unused for long periods of time, unplug the product from the wall outlet and
disconnect the antenna or cable system.
Power lines
Do not locate the antenna near overhead light or power circuits, or where it could fall into such
power lines or circuits.
Warning When installing or realigning an outside antenna system,
extreme care should be taken to keep from touching such
power lines or circuits. Contact with them could be fatal.
7
6
5
60
4
3
1
Antenna and satellite grounding
2
Reference Grounding component
1 Electric service equipment
2 Power service grounding electrode system (NEC Art 250, Part H)
3 Ground clamps
4 Grounding conductors (NEC Section 810-21)
5 Antenna discharge unit (NEC Section 810-20)
6 Ground clamp
7 Antenna lead-in wire
www.gateway.com
Page 65

Notices
Copyright © 2003 Gateway, Inc.
All Rights Reserved
14303 Gateway Place
Poway, CA 92064 USA
All Rights Reserved
This publication is protected by copyright and all rights are reserved. No part of it may be reproduced or
transmitted by any means or in any form, without prior consent in writing from Gateway.
The information in this manual has been carefully checked and is believed to be accurate. However, changes are
made periodically. These changes are incorporated in newer publication editions. Gateway may improve and/or
change products described in this publication at any time. Due to continuing system improvements, Gateway is
not responsible for inaccurate information which may appear in this manual. For the latest product updates,
consult the Gateway Web site at www.gateway.com
special, exemplary, incidental, or consequential damages resulting from any defect or omission in this manual,
even if advised of the possibility of such damages.
In the interest of continued product development, Gateway reserves the right to make improvements in this
manual and the products it describes at any time, without notices or obligation.
Trademark Acknowledgments
1-800-GATEWAY, ActiveCPR, ALR, AnyKey, black-and-white spot design, CrystalScan, Destination, DestiVu, EZ
Pad, EZ Point, Field Mouse, Gateway 2000, Gateway Country, gateway.net, Gateway stylized logo, Perfect
Scholar, Solo, TelePath, Vivitron, stylized “G” design, and “You’ve got a friend in the business” slogan are
registered trademarks and black-and-white spotted box logo, GATEWAY, Gateway Astro, Gateway@Work,
Gateway Connected touch pad, Gateway Connected music player, Gateway Cyber:)Ware, Gateway
Education:)Ware, Gateway Flex Case, Gateway Gaming:)Ware, Gateway GoBack, Gateway Gold, Gateway
Learning:)Ware, Gateway Magazine, Gateway Micro Server, Gateway Money:)Ware, Gateway Music:)Ware,
Gateway Networking Solutions, Gateway Online Network (O.N.) solution, Gateway Photo:)Ware, Gateway
Professional PCs, Gateway Profile, Gateway Solo, green stylized GATEWAY, green stylized Gateway logo,
Gateway Teacher:)Ware, Gateway Video:)Ware, HelpSpot, InforManager, Just click it!, Learn@Gateway, Kids
BackPack, SERVE-TO-ORDER, Server Watchdog, the Spotted G Gateway Logo and the Spotted G Logo,
SpotShop, Spotshop.com, and Your:)Ware are trademarks of Gateway, Inc. Intel, Intel Inside logo, and Pentium
are registered trademarks and MMX is a trademark of Intel Corporation. Microsoft, MS, MS-DOS, and Windows
are trademarks or registered trademarks of Microsoft Corporation. All other product names mentioned herein are
used for identification purposes only, and may be the trademarks or registered trademarks of their respective
companies.
. In no event will Gateway be liable for direct, indirect,
www.gateway.com
61
Page 66

Page 67

Page 68

MAN DVD AR-230 USR GDE R0 9/03
 Loading...