

Gateway Convertible Tablet PC User Manual
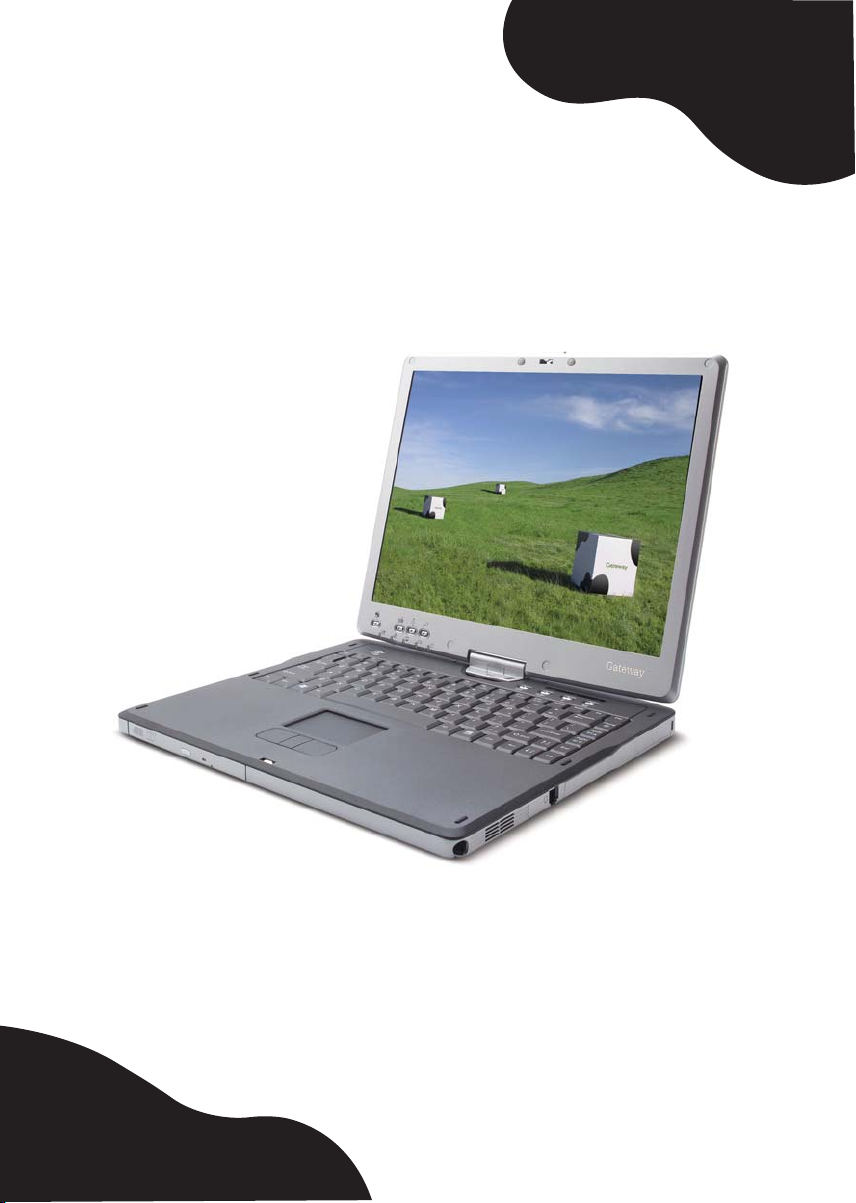
Gateway Convertible Tablet PC
User Guide


Contents
1Getting Help. . . . . . . . . . . . . . . . . . . . . . . . . . . . . . . . . . . . . . . . . . . . . . . 1
Gateway Web site . . . . . . . . . . . . . . . . . . . . . . . . . . . . . . . . . . . . . . . . . . . . 3
Using Support . . . . . . . . . . . . . . . . . . . . . . . . . . . . . . . . . . . . . . . . . . . . 3
Help and Support . . . . . . . . . . . . . . . . . . . . . . . . . . . . . . . . . . . . . . . . . . . . . 5
Searching for a topic . . . . . . . . . . . . . . . . . . . . . . . . . . . . . . . . . . . . . . . 6
BigFix . . . . . . . . . . . . . . . . . . . . . . . . . . . . . . . . . . . . . . . . . . . . . . . . . . . . . . 6
Using Your Computer guide . . . . . . . . . . . . . . . . . . . . . . . . . . . . . . . . . . . . . 7
Online help . . . . . . . . . . . . . . . . . . . . . . . . . . . . . . . . . . . . . . . . . . . . . . . . . . 7
2 Checking Out Your Gateway Convertible Tablet PC. . . . . . . 9
Front . . . . . . . . . . . . . . . . . . . . . . . . . . . . . . . . . . . . . . . . . . . . . . . . . . . . . . 10
Left . . . . . . . . . . . . . . . . . . . . . . . . . . . . . . . . . . . . . . . . . . . . . . . . . . . . . . . 11
Right . . . . . . . . . . . . . . . . . . . . . . . . . . . . . . . . . . . . . . . . . . . . . . . . . . . . . . 12
Back . . . . . . . . . . . . . . . . . . . . . . . . . . . . . . . . . . . . . . . . . . . . . . . . . . . . . . 13
Bottom . . . . . . . . . . . . . . . . . . . . . . . . . . . . . . . . . . . . . . . . . . . . . . . . . . . . 15
Keyboard area . . . . . . . . . . . . . . . . . . . . . . . . . . . . . . . . . . . . . . . . . . . . . . 16
Identifying your model . . . . . . . . . . . . . . . . . . . . . . . . . . . . . . . . . . . . . . . . 18
Gateway model number . . . . . . . . . . . . . . . . . . . . . . . . . . . . . . . . . . . . 18
Gateway serial number . . . . . . . . . . . . . . . . . . . . . . . . . . . . . . . . . . . . 19
Internal wireless label . . . . . . . . . . . . . . . . . . . . . . . . . . . . . . . . . . . . . 19
Microsoft Certificate of Authenticity . . . . . . . . . . . . . . . . . . . . . . . . . . . 19
Finding your specifications . . . . . . . . . . . . . . . . . . . . . . . . . . . . . . . . . . . . . 19
Accessories . . . . . . . . . . . . . . . . . . . . . . . . . . . . . . . . . . . . . . . . . . . . . . . . 20
3Getting Started . . . . . . . . . . . . . . . . . . . . . . . . . . . . . . . . . . . . . . . . . . . 23
Installing the battery . . . . . . . . . . . . . . . . . . . . . . . . . . . . . . . . . . . . . . . . . . 24
Connecting the AC adapter . . . . . . . . . . . . . . . . . . . . . . . . . . . . . . . . . . . . 24
Protecting from power source problems . . . . . . . . . . . . . . . . . . . . . . . 26
Connecting the dial-up modem . . . . . . . . . . . . . . . . . . . . . . . . . . . . . . . . . 27
Connecting to a cable or DSL modem or to an Ethernet ne twork . . . . . . 28
Starting your convertible tablet PC . . . . . . . . . . . . . . . . . . . . . . . . . . . . . . 29
Turning on the Power on Lid Lift feature . . . . . . . . . . . . . . . . . . . . . . 30
Waking up your convertible tablet PC . . . . . . . . . . . . . . . . . . . . . . . . . 31
Turning off your convertible tablet PC . . . . . . . . . . . . . . . . . . . . . . . . . . . . 31
Restarting (rebooting) your convertible tablet PC . . . . . . . . . . . . . . . . . . . 32
Status indicators . . . . . . . . . . . . . . . . . . . . . . . . . . . . . . . . . . . . . . . . . . . . . 33
LED status indicators . . . . . . . . . . . . . . . . . . . . . . . . . . . . . . . . . . . . . . 33
Keyboard status indicators . . . . . . . . . . . . . . . . . . . . . . . . . . . . . . . . . 35
www.gateway.com
i

Using the keyboard . . . . . . . . . . . . . . . . . . . . . . . . . . . . . . . . . . . . . . . . . . .36
Key types . . . . . . . . . . . . . . . . . . . . . . . . . . . . . . . . . . . . . . . . . . . . . . . .37
System key combinations . . . . . . . . . . . . . . . . . . . . . . . . . . . . . . . . . . .38
Buttons . . . . . . . . . . . . . . . . . . . . . . . . . . . . . . . . . . . . . . . . . . . . . . . . . . . . .41
Tablet control buttons . . . . . . . . . . . . . . . . . . . . . . . . . . . . . . . . . . . . . .41
Multi-function buttons . . . . . . . . . . . . . . . . . . . . . . . . . . . . . . . . . . . . . .43
Using the EZ Pad touchpad . . . . . . . . . . . . . . . . . . . . . . . . . . . . . . . . . . . .44
Using the display . . . . . . . . . . . . . . . . . . . . . . . . . . . . . . . . . . . . . . . . . . . . .47
Converting the display from notebook to tablet mode . . . . . . . . . . . . .48
Changing display orientation . . . . . . . . . . . . . . . . . . . . . . . . . . . . . . . . .49
Adjusting brightness . . . . . . . . . . . . . . . . . . . . . . . . . . . . . . . . . . . . . . .50
Using the pen . . . . . . . . . . . . . . . . . . . . . . . . . . . . . . . . . . . . . . . . . . . . . . .51
Storing and removing the pen . . . . . . . . . . . . . . . . . . . . . . . . . . . . . . .51
Adjusting the volume . . . . . . . . . . . . . . . . . . . . . . . . . . . . . . . . . . . . . . . . . .53
Turning your wireless radio on or off . . . . . . . . . . . . . . . . . . . . . . . . . . . . .54
4 Using Windows XP Tablet PC 2005 . . . . . . . . . . . . . . . . . . . . . . .55
Using Windows XP Tablet PC 2005 . . . . . . . . . . . . . . . . . . . . . . . . . . . . . .56
Using Tablet PC extensions . . . . . . . . . . . . . . . . . . . . . . . . . . . . . . . . . . . .57
Calibration . . . . . . . . . . . . . . . . . . . . . . . . . . . . . . . . . . . . . . . . . . . . . . .57
Gestures . . . . . . . . . . . . . . . . . . . . . . . . . . . . . . . . . . . . . . . . . . . . . . . .57
Pen button . . . . . . . . . . . . . . . . . . . . . . . . . . . . . . . . . . . . . . . . . . . . . . .58
Tips . . . . . . . . . . . . . . . . . . . . . . . . . . . . . . . . . . . . . . . . . . . . . . . . . . . .58
Tablet Input Panel (TIP) . . . . . . . . . . . . . . . . . . . . . . . . . . . . . . . . . . . .59
Using speech recognition . . . . . . . . . . . . . . . . . . . . . . . . . . . . . . . . . . .60
Adjusting tablet and pen settings . . . . . . . . . . . . . . . . . . . . . . . . . . . . . . . .61
Programming the buttons . . . . . . . . . . . . . . . . . . . . . . . . . . . . . . . . . . .61
Adjusting the Tablet PC Input Panel Settings . . . . . . . . . . . . . . . . . . .62
5 Using Drives and Ports . . . . . . . . . . . . . . . . . . . . . . . . . . . . . . . . . . .63
Changing modules . . . . . . . . . . . . . . . . . . . . . . . . . . . . . . . . . . . . . . . . . . . .64
Using the DVD drive . . . . . . . . . . . . . . . . . . . . . . . . . . . . . . . . . . . . . . . . . .66
Identifying drive types . . . . . . . . . . . . . . . . . . . . . . . . . . . . . . . . . . . . . .66
Inserting a CD or DVD . . . . . . . . . . . . . . . . . . . . . . . . . . . . . . . . . . . . .67
Playing a CD . . . . . . . . . . . . . . . . . . . . . . . . . . . . . . . . . . . . . . . . . . . . .68
Playing a DVD . . . . . . . . . . . . . . . . . . . . . . . . . . . . . . . . . . . . . . . . . . . .68
Creating CDs . . . . . . . . . . . . . . . . . . . . . . . . . . . . . . . . . . . . . . . . . . . . .68
Using the memory card reader . . . . . . . . . . . . . . . . . . . . . . . . . . . . . . . . . .69
Memory card types . . . . . . . . . . . . . . . . . . . . . . . . . . . . . . . . . . . . . . . .69
Inserting a memory card . . . . . . . . . . . . . . . . . . . . . . . . . . . . . . . . . . . .69
Using a memory card . . . . . . . . . . . . . . . . . . . . . . . . . . . . . . . . . . . . . .70
Removing a memory card . . . . . . . . . . . . . . . . . . . . . . . . . . . . . . . . . . .70
ii
www.gateway.com

Adding and removing a PC Card . . . . . . . . . . . . . . . . . . . . . . . . . . . . . . . . 71
Viewing the display on a projector or monitor . . . . . . . . . . . . . . . . . . . . . . 73
Viewing the display on a television . . . . . . . . . . . . . . . . . . . . . . . . . . . . . . 75
Changing from one display to another . . . . . . . . . . . . . . . . . . . . . . . . 77
Connecting a video camera to your convertible tablet PC . . . . . . . . . . . . 78
6 Managing Power . . . . . . . . . . . . . . . . . . . . . . . . . . . . . . . . . . . . . . . . . 79
Monitoring the battery charge . . . . . . . . . . . . . . . . . . . . . . . . . . . . . . . . . . 80
Recharging the battery . . . . . . . . . . . . . . . . . . . . . . . . . . . . . . . . . . . . . . . . 81
Recalibrating the battery . . . . . . . . . . . . . . . . . . . . . . . . . . . . . . . . . . . . . . 81
Changing batteries . . . . . . . . . . . . . . . . . . . . . . . . . . . . . . . . . . . . . . . . . . . 82
Extending battery life . . . . . . . . . . . . . . . . . . . . . . . . . . . . . . . . . . . . . . . . . 85
Conserving battery power . . . . . . . . . . . . . . . . . . . . . . . . . . . . . . . . . . 85
Using alternate power sources . . . . . . . . . . . . . . . . . . . . . . . . . . . . . . 86
Changing power modes . . . . . . . . . . . . . . . . . . . . . . . . . . . . . . . . . . . . 86
7 Upgrading Your Convertible Tablet PC. . . . . . . . . . . . . . . . . . . 89
Preventing static electricity discharge . . . . . . . . . . . . . . . . . . . . . . . . . . . . 90
Adding or replacing memory . . . . . . . . . . . . . . . . . . . . . . . . . . . . . . . . . . . 91
Adding or replacing memory in the memory bay . . . . . . . . . . . . . . . . 92
Replacing memory under the keyboard . . . . . . . . . . . . . . . . . . . . . . . 95
Replacing the hard drive kit . . . . . . . . . . . . . . . . . . . . . . . . . . . . . . . . . . . 104
8 Using the Optional Port Replicator . . . . . . . . . . . . . . . . . . . . . . 107
Front . . . . . . . . . . . . . . . . . . . . . . . . . . . . . . . . . . . . . . . . . . . . . . . . . . . . . 108
Left . . . . . . . . . . . . . . . . . . . . . . . . . . . . . . . . . . . . . . . . . . . . . . . . . . . . . . 109
Back . . . . . . . . . . . . . . . . . . . . . . . . . . . . . . . . . . . . . . . . . . . . . . . . . . . . . 110
Connecting to the port replicator . . . . . . . . . . . . . . . . . . . . . . . . . . . . . . . 112
Attaching to the port replicator . . . . . . . . . . . . . . . . . . . . . . . . . . . . . 112
Disconnecting from the port replicator . . . . . . . . . . . . . . . . . . . . . . . . 113
Securing your port replicator . . . . . . . . . . . . . . . . . . . . . . . . . . . . . . . . . . 114
9 Maintaining Your Convertible Tablet PC. . . . . . . . . . . . . . . . . 115
Caring for your convertible tablet PC . . . . . . . . . . . . . . . . . . . . . . . . . . . . 116
Display screen . . . . . . . . . . . . . . . . . . . . . . . . . . . . . . . . . . . . . . . . . . 117
Using the Pen . . . . . . . . . . . . . . . . . . . . . . . . . . . . . . . . . . . . . . . . . . 117
Replacing the pen point . . . . . . . . . . . . . . . . . . . . . . . . . . . . . . . . . . . 118
Cleaning your convertible tablet PC . . . . . . . . . . . . . . . . . . . . . . . . . . . . 119
Cleaning the exterior . . . . . . . . . . . . . . . . . . . . . . . . . . . . . . . . . . . . . 119
Cleaning the keyboard . . . . . . . . . . . . . . . . . . . . . . . . . . . . . . . . . . . . 120
Cleaning the convertible tablet PC screen . . . . . . . . . . . . . . . . . . . . 120
www.gateway.com
iii

Cleaning CDs or DVDs . . . . . . . . . . . . . . . . . . . . . . . . . . . . . . . . . . . .120
Protecting your convertible tablet PC from viruses . . . . . . . . . . . . . . . . . .121
Updating Windows . . . . . . . . . . . . . . . . . . . . . . . . . . . . . . . . . . . . . . . . . . .124
Restoring your system . . . . . . . . . . . . . . . . . . . . . . . . . . . . . . . . . . . . . . . .125
Microsoft System Restore . . . . . . . . . . . . . . . . . . . . . . . . . . . . . . . . . .125
Reinstalling programs and drivers . . . . . . . . . . . . . . . . . . . . . . . . . . .126
Restoring your converti ble tablet PC to the origin al configuration . . . 126
10 Troubleshooting . . . . . . . . . . . . . . . . . . . . . . . . . . . . . . . . . . . . . . . . .127
Safety guidelines . . . . . . . . . . . . . . . . . . . . . . . . . . . . . . . . . . . . . . . . . . . .128
First steps . . . . . . . . . . . . . . . . . . . . . . . . . . . . . . . . . . . . . . . . . . . . . . . . .129
Troubleshooting . . . . . . . . . . . . . . . . . . . . . . . . . . . . . . . . . . . . . . . . . . . . .130
Audio . . . . . . . . . . . . . . . . . . . . . . . . . . . . . . . . . . . . . . . . . . . . . . . . . .130
Battery . . . . . . . . . . . . . . . . . . . . . . . . . . . . . . . . . . . . . . . . . . . . . . . . .130
CD drives . . . . . . . . . . . . . . . . . . . . . . . . . . . . . . . . . . . . . . . . . . . . . . .130
Device installation . . . . . . . . . . . . . . . . . . . . . . . . . . . . . . . . . . . . . . . .130
Display . . . . . . . . . . . . . . . . . . . . . . . . . . . . . . . . . . . . . . . . . . . . . . . . .131
DVD drives . . . . . . . . . . . . . . . . . . . . . . . . . . . . . . . . . . . . . . . . . . . . .132
File management . . . . . . . . . . . . . . . . . . . . . . . . . . . . . . . . . . . . . . . . .135
Hard drive . . . . . . . . . . . . . . . . . . . . . . . . . . . . . . . . . . . . . . . . . . . . . .136
Internet . . . . . . . . . . . . . . . . . . . . . . . . . . . . . . . . . . . . . . . . . . . . . . . .137
Keyboard . . . . . . . . . . . . . . . . . . . . . . . . . . . . . . . . . . . . . . . . . . . . . . .138
Memory . . . . . . . . . . . . . . . . . . . . . . . . . . . . . . . . . . . . . . . . . . . . . . . .139
Memory card reader . . . . . . . . . . . . . . . . . . . . . . . . . . . . . . . . . . . . . .139
Modem (cable or DSL) . . . . . . . . . . . . . . . . . . . . . . . . . . . . . . . . . . . .140
Modem (dial-up) . . . . . . . . . . . . . . . . . . . . . . . . . . . . . . . . . . . . . . . . .140
Mouse . . . . . . . . . . . . . . . . . . . . . . . . . . . . . . . . . . . . . . . . . . . . . . . . .144
Networks . . . . . . . . . . . . . . . . . . . . . . . . . . . . . . . . . . . . . . . . . . . . . . .144
Passwords . . . . . . . . . . . . . . . . . . . . . . . . . . . . . . . . . . . . . . . . . . . . . .145
PC Cards . . . . . . . . . . . . . . . . . . . . . . . . . . . . . . . . . . . . . . . . . . . . . . .145
Pen . . . . . . . . . . . . . . . . . . . . . . . . . . . . . . . . . . . . . . . . . . . . . . . . . . .146
Power . . . . . . . . . . . . . . . . . . . . . . . . . . . . . . . . . . . . . . . . . . . . . . . . .146
Printer . . . . . . . . . . . . . . . . . . . . . . . . . . . . . . . . . . . . . . . . . . . . . . . . .147
Sound . . . . . . . . . . . . . . . . . . . . . . . . . . . . . . . . . . . . . . . . . . . . . . . . .149
Touchpad . . . . . . . . . . . . . . . . . . . . . . . . . . . . . . . . . . . . . . . . . . . . . . .149
Video . . . . . . . . . . . . . . . . . . . . . . . . . . . . . . . . . . . . . . . . . . . . . . . . . .150
Telephone support . . . . . . . . . . . . . . . . . . . . . . . . . . . . . . . . . . . . . . . . . . .151
Before calling Gateway Customer Care . . . . . . . . . . . . . . . . . . . . . . .151
Telephone numbers . . . . . . . . . . . . . . . . . . . . . . . . . . . . . . . . . . . . . .152
Self-help . . . . . . . . . . . . . . . . . . . . . . . . . . . . . . . . . . . . . . . . . . . . . . .153
Tutoring . . . . . . . . . . . . . . . . . . . . . . . . . . . . . . . . . . . . . . . . . . . . . . . .153
Training . . . . . . . . . . . . . . . . . . . . . . . . . . . . . . . . . . . . . . . . . . . . . . . .153
iv
www.gateway.com

A Safety, Regulatory, and Legal Information . . . . . . . . . . . . . . 155
Index . . . . . . . . . . . . . . . . . . . . . . . . . . . . . . . . . . . . . . . . . . . . . . . . . . . . . . . 167
www.gateway.com
v

vi
www.gateway.com

Chapter 1
Getting Help
• Using the Gatewa y We b site
• Using Help and Support
•Using BigFix
• Using Your Co mputer guide
• Using online help
1

Chapter 1: Getting Help
Thank y ou for purchasing our
con vertible tablet PC!
Y ou have made an excellent decision choosing Gateway. We are sure that
you will be pleased with the outstanding quality, reliability, and
performance of your new convertible tablet PC. Each and every Gateway
convertible tablet PC uses the latest technology and passes through the
most stringent quality control tests to ensure that you are pr ovided with
the best product possible.
Your new Gateway convertible tablet PC is designed to provide an
exceptional balance of performance and portability. Your convertible
tablet PC uses the latest chipset and mobile processor technologies to
manage the processor speed and power consumption for a greater battery
life experience. This design provides you with maximum performance
when plugged into AC power balanced wi th op timized ba ttery life when
on battery power.
Please read this guide carefully to familiarize yourself with our range of
services and support. We have highlighted some basic care and safety
information to help you keep your convertible tablet PC in good
operating condition.
Gateway stands behind our value propo sition to our customers — to
provide best-of-class service and support in addition to high-quality,
brand-name components at affordable prices. If you ever have a problem,
our knowledgeable, dedicated customer service department will provide
you with fast, considerate service.
We sincerely hope that you will receive the utmost satisfaction and
enjoyment from your new Gateway convertible tablet PC for years to
come.
Thank you again, from all of us at Gateway.
2
www.gateway.com
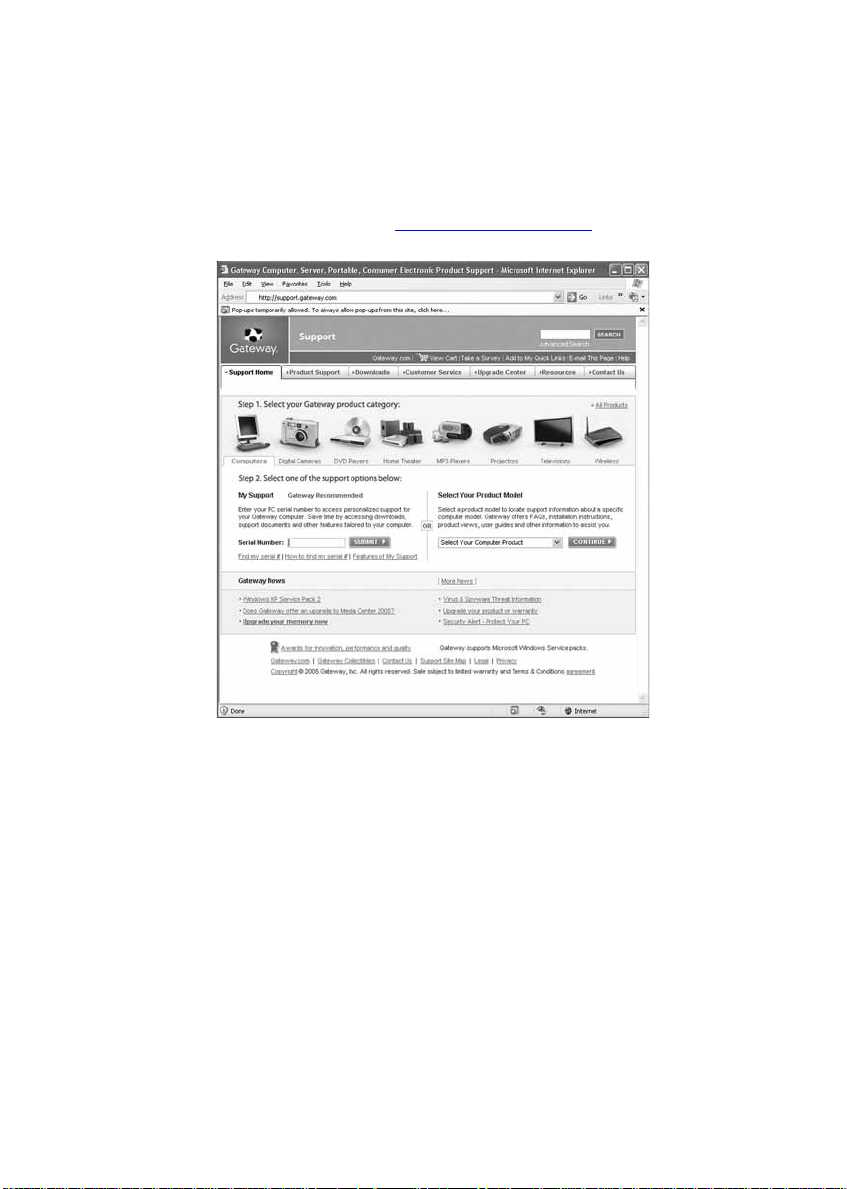
Gateway Web site
Gatewa y W eb site
Gateway's online support is available 24 hours per day, 7 days per week
and provides the most current drivers, product specifications, tutorials,
and personalized information about your convertible tablet PC. Vi sit the
Gateway Support Web site at support.gateway.com
.
Using Support
The Support site is divided into seven major areas:
■ Support Home
■ Product Support
■ Downloads
■ Customer Ser vice
■ Upgrade Center
■ Resources
■ Contact Us
www.gateway.com
3

Chapter 1: Getting Help
Support Home
Tap or click Support Home. To view support documents for your
convertible tablet PC, type your serial number in the
then tap or click
Submit.
Serial Number box,
Tap or click the arrow button to open the
box, then tap or click
documentation, specifications, and guides for all Gateway notebooks.
Notebook Computers to access product
Select Your Computer Product
Product Support
T ap or click Product Support to view a list of all the products that Gateway
supports.
Downloads
Tap or click Downloads to get the latest software updates for BIOS and
driver upgrades. By entering your serial number you get drivers specific
to your convertible tablet PC. Tap or click
through a step-by-step wizard to locate your drivers.
Browse All Downloads to walk
Customer Service
Tap or click Customer Service to view information about your account and
general information about warranties and special offers.
Upgrade Cent er
Tap or click Upgrade Center to view and purchase upgrades for your
convertible tablet PC.
Resources
Tap or click Resources to access utilities to help you manage your
convertible tablet PC.
Contact Us
Tap or click Contact Us to access links to customer care with a live
technician, including chat and e-mail. Tap or click
Gateway telephone numbers for both sales and support. For more
information, see “Telephone support” on page 151.
4
www.gateway.com
Call Us to get a list of
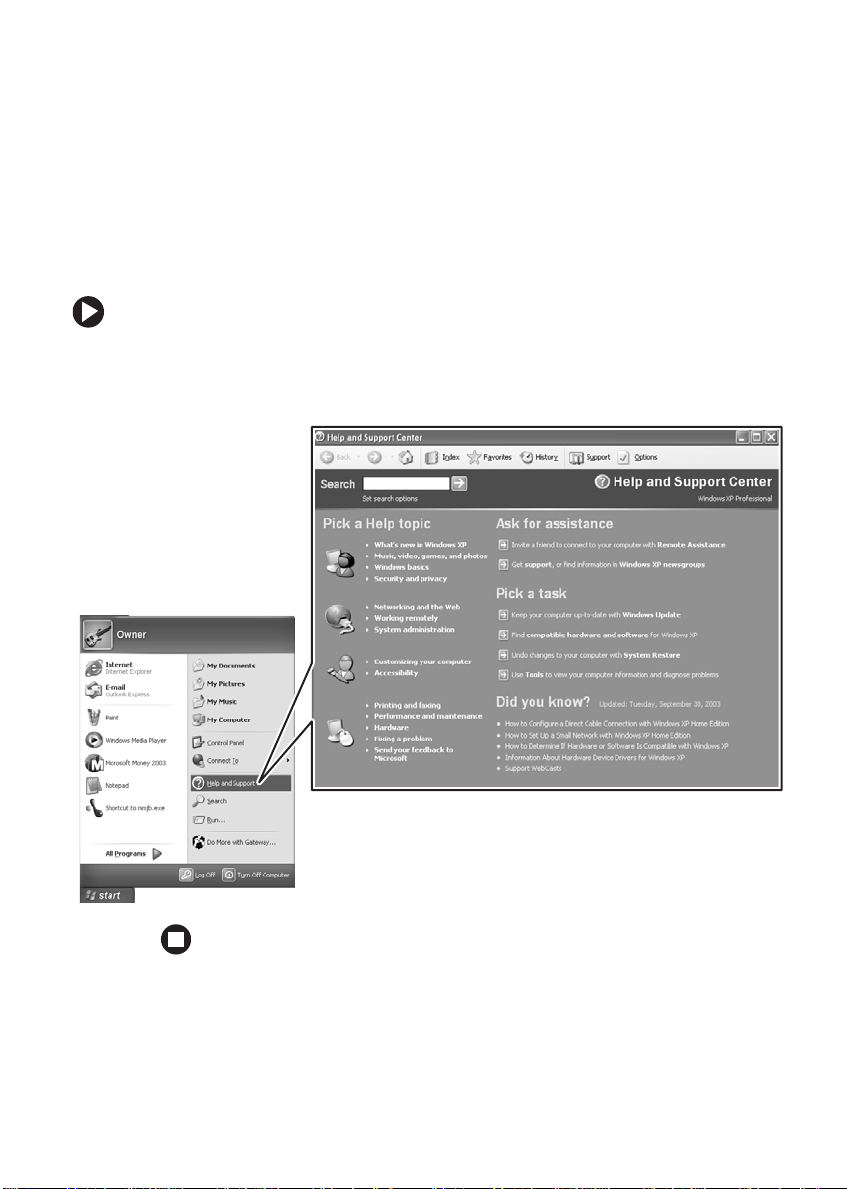
Help and Support
Help and Support
Your convertible tablet PC includes Help and Support, an easily accessible
collection of help information, troubleshooters, and automated support.
Use Help and Support to answer questions about Windows and to help
you quickly discover and use the many features of your Gateway
convertible tablet PC.
To start Help and Support:
■ Tap or click Start, then tap or click Help and Support. Help and Suppor t
opens.
You can find help information by tapping or clicking a link, performing
a search, or browsing the index.
www.gateway.com
5

Chapter 1: Getting Help
Searching for a topic
To search for a topic in Help and Support, type a word or phrase (keyword)
in the
Search box located at the top of any Help and Support screen, then
tap or click the arrow button.
For each search, you receive the following search result types:
■ Suggested Topics - These topics are located in Help and Support and
are relevant to your search to pic.
■ Full-text Search Matches - These topics are located in Help and
Support and contain the words you entered in the
■ Microsoft Knowledge Base - These topics are located on the Microsoft
We b site and contain the words you entered in the
must be connected to the Internet to search for and access these
topics.
To view a list of your search results, tap or click the results header for
the type of results you want to view.
Search box.
Search box. You
To view a topic, tap or click the topic name in the
Search Result s list.
BigFix
Your convertible tablet PC may include BigFix. BigFix monitors your
convertible tablet PC for problems and conflicts. It a utomatically gathers
information about the latest bugs, security alerts, and updates from BigFix
sites on the Internet. Whenever BigFix detects a problem, it alerts you
by flashing the blue taskbar icon. To fix the problem, tap or click on that
icon to open BigFix.
To start BigFix:
■ Tap or click Start, All Programs, Accessories, System Tools, then tap
or click
BigFix.
6
www.gateway.com
Using Your Computer gu ide
To learn more about using BigFix:
■ From the BigFix program, tap or click Help, then tap or click Tutorial.
Using Your Comput er guide
In addition to this guide, the Using Y our Comp uter guide has been included
on your hard drive. The Using Your Computer guide includes information
on using Windows, using the Internet, sending a fax, and changing
power-saving settings as well as other topics.
To acces s the Using Your Computer guide:
■ Tap or click Start, All Programs, then tap or click Gateway
Documentation
.
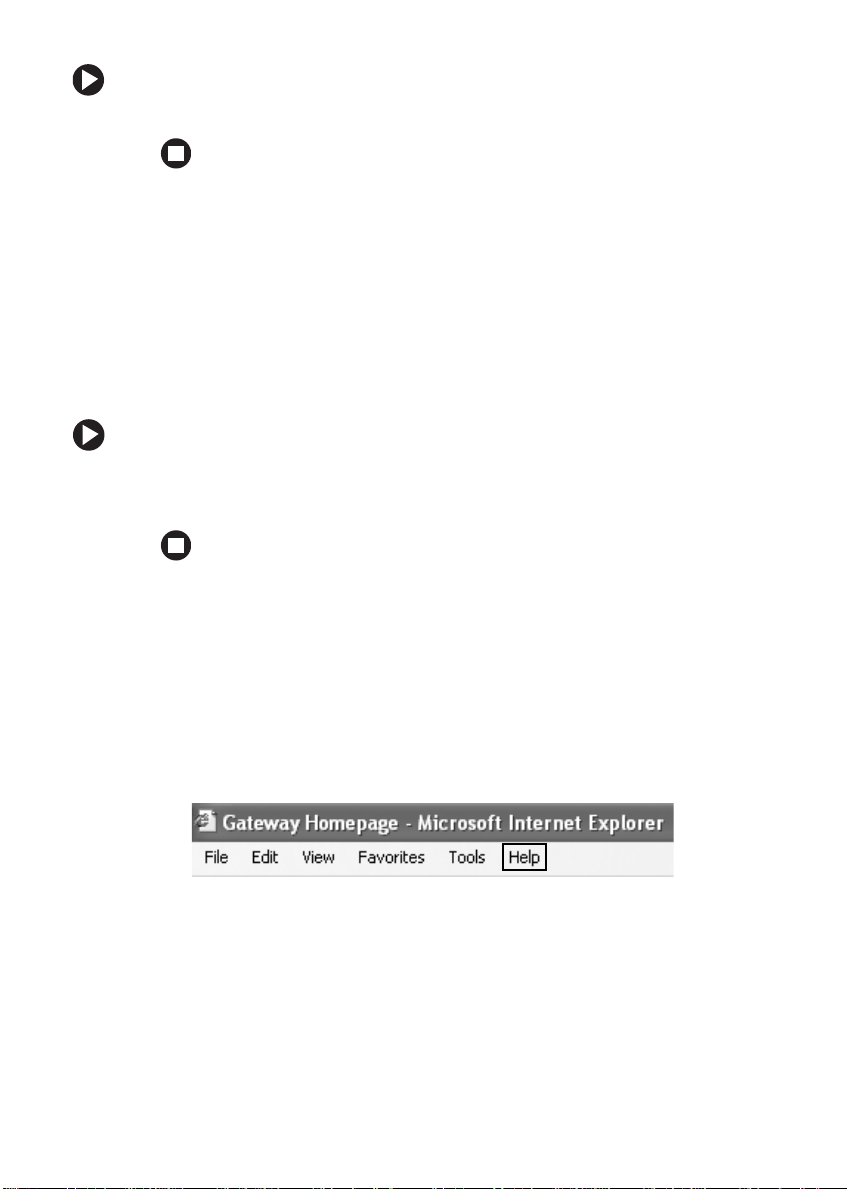
Online help
Many programs provide information online so you can research a topic
or learn how to perform a task while you are using the program. You can
access most online help information by selecting a topic from a
menu or by tapping or clicking a
www.gateway.com
Help button.
Help
7

Chapter 1: Getting Help
You can search for information by viewing the help contents, checking
the index, searching for a topic or keyword, or browsing through the
online help.
8
www.gateway.com

Chapter 2
Checking Out Your Gateway Convertible Tablet PC
• Identifying f eatures
• Locating your con ve rtible tablet PC’ s model
and serial number
• Locating the Microsoft Certificate of
Authenticity
• Locating the specifications f or yo ur
convertible tab let PC
• Purchasing accessories
9
Chapter 2: Checking Ou t Your Gateway Convertib le Tablet PC
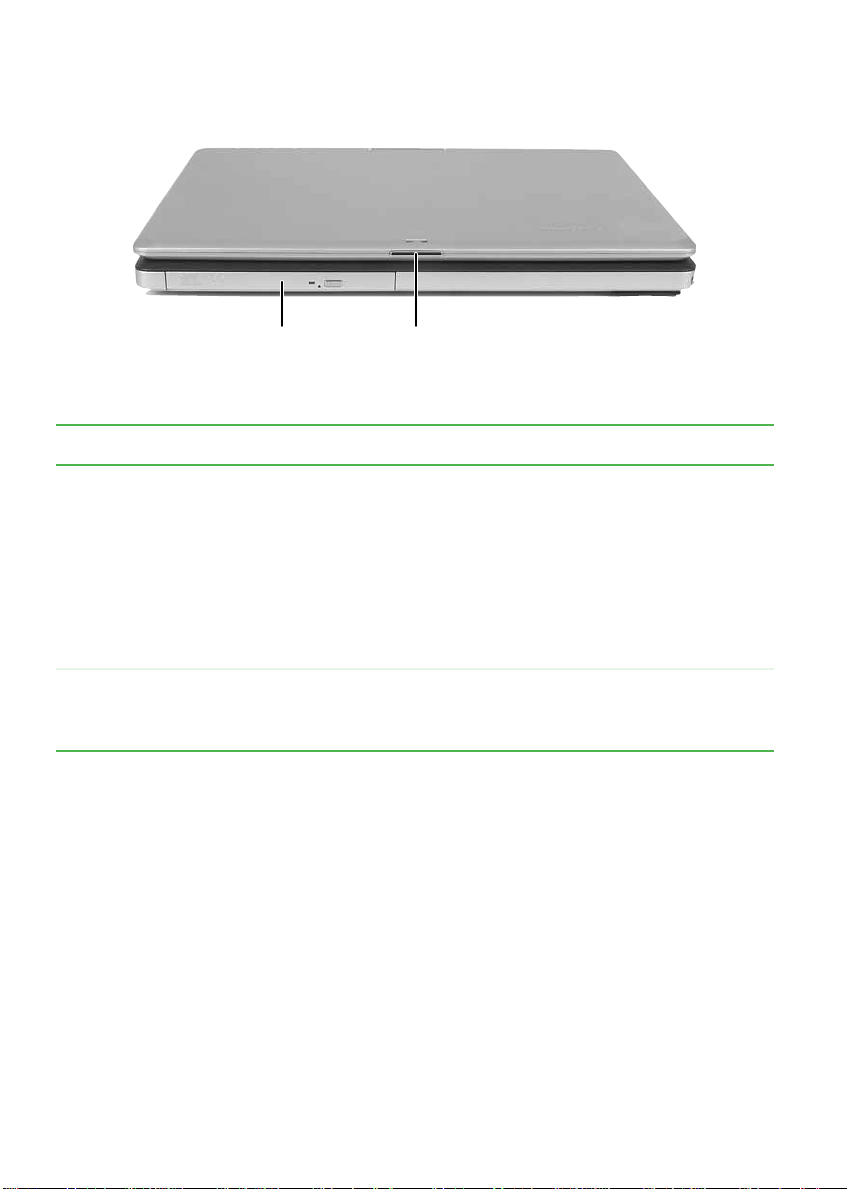
Front
Modular bay
LCD panel
release latch
Component Icon Description
Modular bay Use this bay for a DVD drive or combination DVD/CD-RW drive.
For more information, see “Changing modules” on page 64.
To determine the type of drive i n t he m od ula r bay, examine the
drive tray’s plastic cover and compare the logo to those listed
in “Identifying drive types” on page 66.
Important: Your convertible tablet PC may have come with a
DV D or comb inatio n DVD/CD-RW. T o orde r a diff eren t modul e,
contact Gateway.
LCD panel
release
latch
Open the LCD panel by sliding the release latch.
10
www.gateway.com
Left
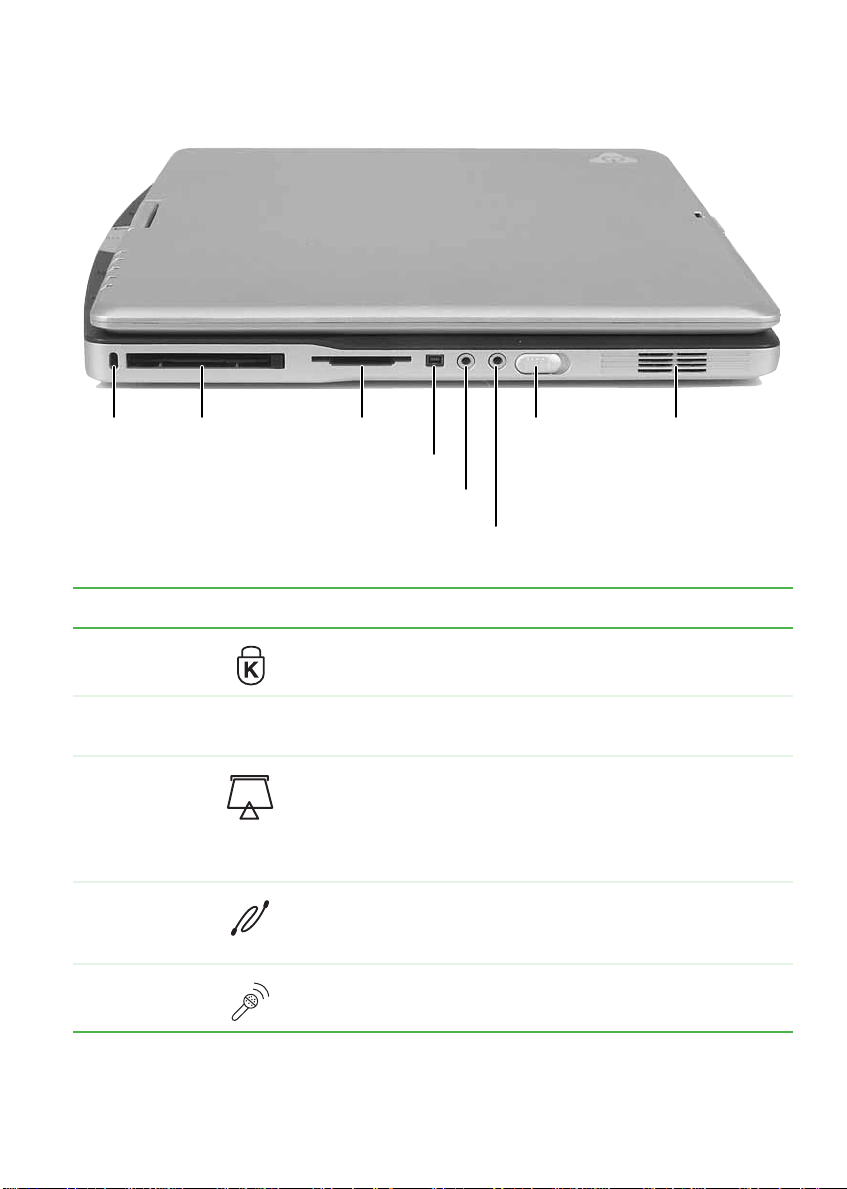
Left
Kensington
lock slot
PC Card
slot
Memory card
reader
IEEE 1394 port
Microphone jack
Headphone jack
Power
switch
Speaker
Component Icon Description
Kensington™
lock slot
PC Card slot Insert one T ype II PC Card into this slot. For more information,
Memory card
reader
IEEE 1394 port Plug an IEEE 1394 (also known as Firewire
Microphone
jack
Secure your convertible tablet PC to an object by connecting
a Kensington cable lock to this slot.
see “Adding and removing a PC Card” on page 71.
Insert a memory card from a digital camera, MP3 pla yer , PDA,
or cellular telephone into the memory card reader. For more
information, se e “Using the memory card reader” on p age 69.
The memory card reader supports Memory Stick
Stick Pro
device (s uch as a dig ital camc order) into th is 4-pin IE EE 1394
port.
Plug a microphone into this jack.
®
, MultiMediaCard™, and Secure Digital™.
®
, Memory
®
or i.Link®)
www.gateway.com
11
Chapter 2: Checking Ou t Your Gateway Convertib le Tablet PC
Component Icon Description
Headphone
jack
Power switch Slide to turn the power on or off. You can also configure the
Speaker Provides audio output when headphones or amplified
Plug amplified speakers or headphones into this jack. The
built-in spea kers are turned off wh en speakers or headphones
are plugged into this jack.
power switch for Stan dby/Resume m ode. For more
information on configuring the power switch mode, see
“Changing Power-Saving Settings” in
which has been included on your hard drive. To access this
guide, tap or click Start, All Programs, then tap or click
Gateway Documentation.
speakers are not plugged in.
Using Your Compute r
Right
Pen Speaker Modem jack Kensington
lock slot
Component Icon Description
Pen Write, tap, and input direct ly on y our co nv ertible tab letPC’s
display using the cordless pen.
Speaker Provides audio output when headphones or amplified
speakers are not plugged in.
12
www.gateway.com
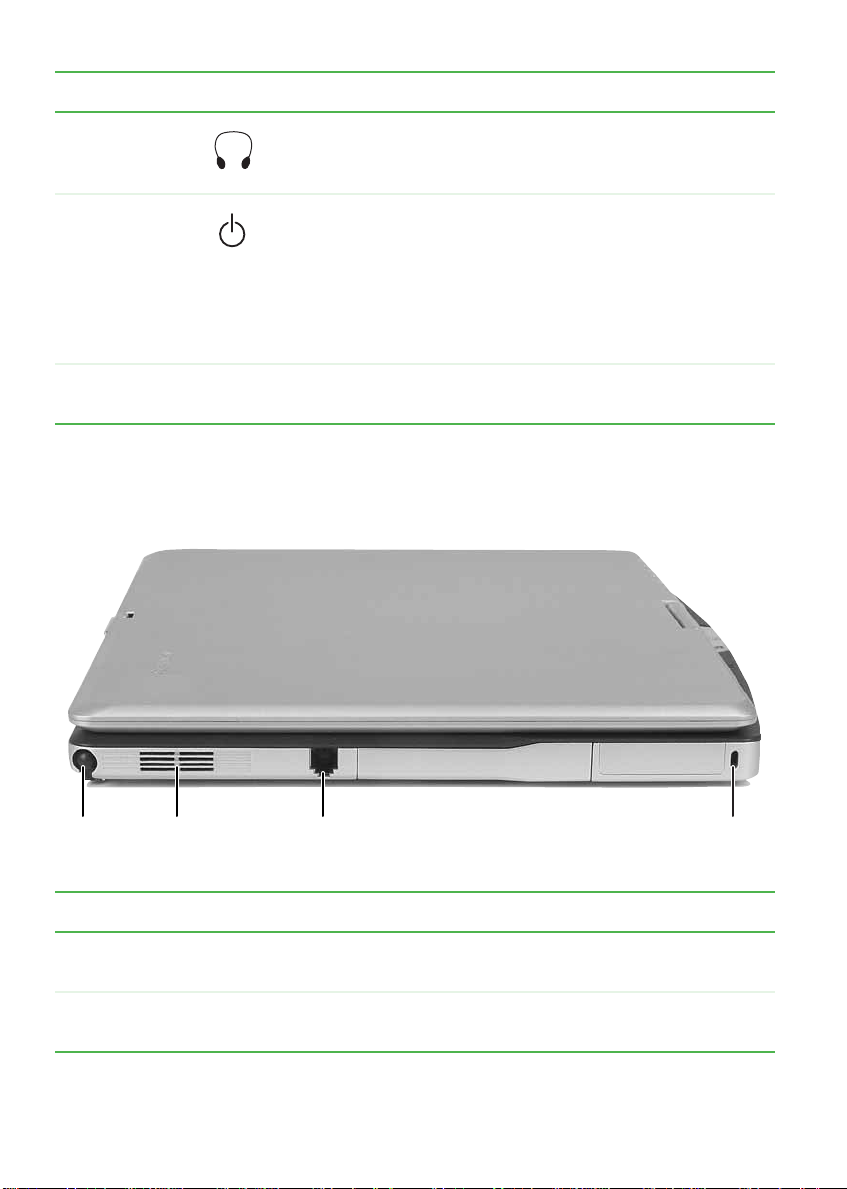
Back
Component Icon Description
Modem jack Plug a modem cabl e into this jack. For more information,
see “Connecting the dial-up modem” on page 27.
Kensington™
lock slot
Secure your convertible tablet PC to an object by
connecting a Kensington cable lock to this slot.
Back
Ventilation
fan
Component Icon Description
Ventilation fan Helps cool internal components.
USB
port
Docking
port
Monitor
port
Warning: Do not work for long periods with the convertible
tablet PC resting on your lap. If the air vents are blocked, the
convertible tablet PC may become hot enough to harm your
skin.
Caution: Do not bloc k or insert objects into these sl ots. If these
slots are blocked, your convertible tablet PC may overheat
resulting in une xpected s hutdown or perma nent damage to t he
conver ti ble t abl et PC.
Caution: Provide adequate space around your conver tible
tablet PC so air vents are not obstructed. Do not use the
convertible tablet PC on a bed, sofa, rug, or other similar
surface.
Ethernet
jack
Power
connector
USB
port
Status
indicators
www.gateway.com
13
Chapter 2: Checking Ou t Your Gateway Convertib le Tablet PC
Component Icon Description
USB ports Plug USB de vices (such a s a diske tte drive , flash driv e, prin ter ,
scanner, camera, keyboard, or mouse) into these ports.
Monitor port Plug an analog VGA monitor or projector into this port. For
more information, see “Viewing the display on a projector or
monitor” on page73.
Docking port Connect the port replicator to this port.
Warning: Power is passed through this port. This docking
connection is certified to UL 1950 for use only with port
replicators designed for your Gateway convertible tablet PC.
Ethernet jack Plug a 10/100/1000 Eth ernet netw ork cable into this ja ck. The
other end of the cable can be plugged into a cable modem,
DSL modem, or an Ethernet network jack. For more
information, see “Connectin g to a c able or DS L mod em or to
an Ethernet network” on page 28.
Power
connector
Status
indicators
Plug the AC adapter cable into this connector.
Inform you of the power status or when a drive is in use. For
more information, see “LED status indicators” on page 33.
14
www.gateway.com

Bottom
System
label
Bottom
Pen
latch
Battery
latch
Reset
hole
Memory
bay
Battery
Hard
drive
bay
Component Icon Description
System label Includes the product mo del number . For more information,
see “Identifying your model” on page 18.
Reset hole Insert a straightened paper clip into this hole to manually
restart your convertible tablet PC.
Memory bay Install a memory module into this bay. For more
information, see “Adding or replacing memory” on
page 91.
Pen latch Slide to release the pen.
Battery latch Slide to release the battery. For more information, see
“Changing batteries” on page 82.
Battery Provides power when the conver tible tablet PC is not
plugged into AC power.
Hard drive bay The hard drive is located in this ba y. For more inf ormation,
see “Replacing the hard drive kit” on page 104.
www.gateway.com
15
Chapter 2: Checking Ou t Your Gateway Convertib le Tablet PC
Ke yboard area
Microphone
Tablet
control
buttons/
LCD panel
status
indicators
Keyboard
Keyboard
multi-function
buttons/
status
indicators
Touchpad
Component Icon Description
Microphone Record audio through this microphone. The built-in
microphone is turned off while an external microphone is
connected. F or the locatio n of your mic rophone jack , see “Left”
on page 11 and “Back” on page 110.
Tablet control
buttons
LCD panel
status
indicators
Keyboard Provides all the features of a full-sized computer keyboard. For
T ouchp ad Provides all the functionality of a mouse. F or more inf ormation,
16
See “ Tablet control butt ons” on pag e 41 for a description of
each button.
Inform you of the power status or when a drive is in use. For
more information, see “LED status indicators” on page 33.
more information, see “Using the keyboard” on page36.
see “Using the EZ Pad touchpad” on page 44.
www.gateway.com

Component Icon Description
Keyboard area
Keyboard
Multi-function
buttons
Keyboard
Status
indicators
Press these buttons to open programs assigned to them.
These buttons are set to open your default e-mail program,
your default Web browser, online help, and the
window . F or more inf ormation, see “Multi-function b utto ns” on
page 43.
Inform you when a button has been pressed that affects how
the keyboard is used. For more information, see “Keyboard
status indicators” on page 35.
My Computer
www.gateway.com
17
Chapter 2: Checking Ou t Your Gateway Convertib le Tablet PC
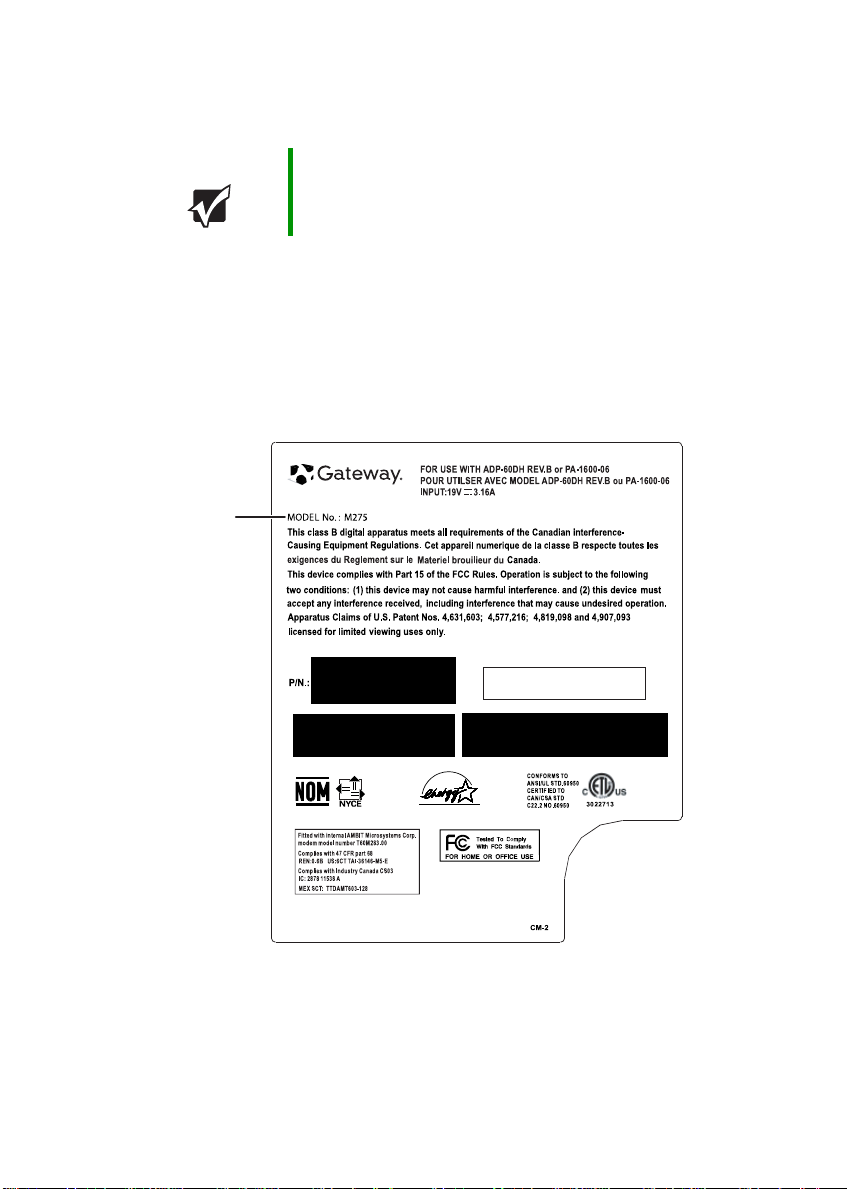
Identifying your model
Important The label s shown in t his sectio n are for infor mationa l
purposes only. Label information v aries b y model, f eatures
ordered, and location.
Gatewa y model number
The label on the bottom of your convertible tablet PC contains
information that identifies your convertible tablet PC model and its
features. Gateway Customer Care will need this information if you call
for assistance.
Gateway
model
number
18
www.gateway.com
Finding your specif ications
Gatew ay serial number
You can locate the Gateway serial number:
■ Printed on a white sticker on the bottom or back of your convertible
tablet PC.
■ Printed on the customer invoice that came with your convertible
tablet PC. The invoice also contains your customer ID number.
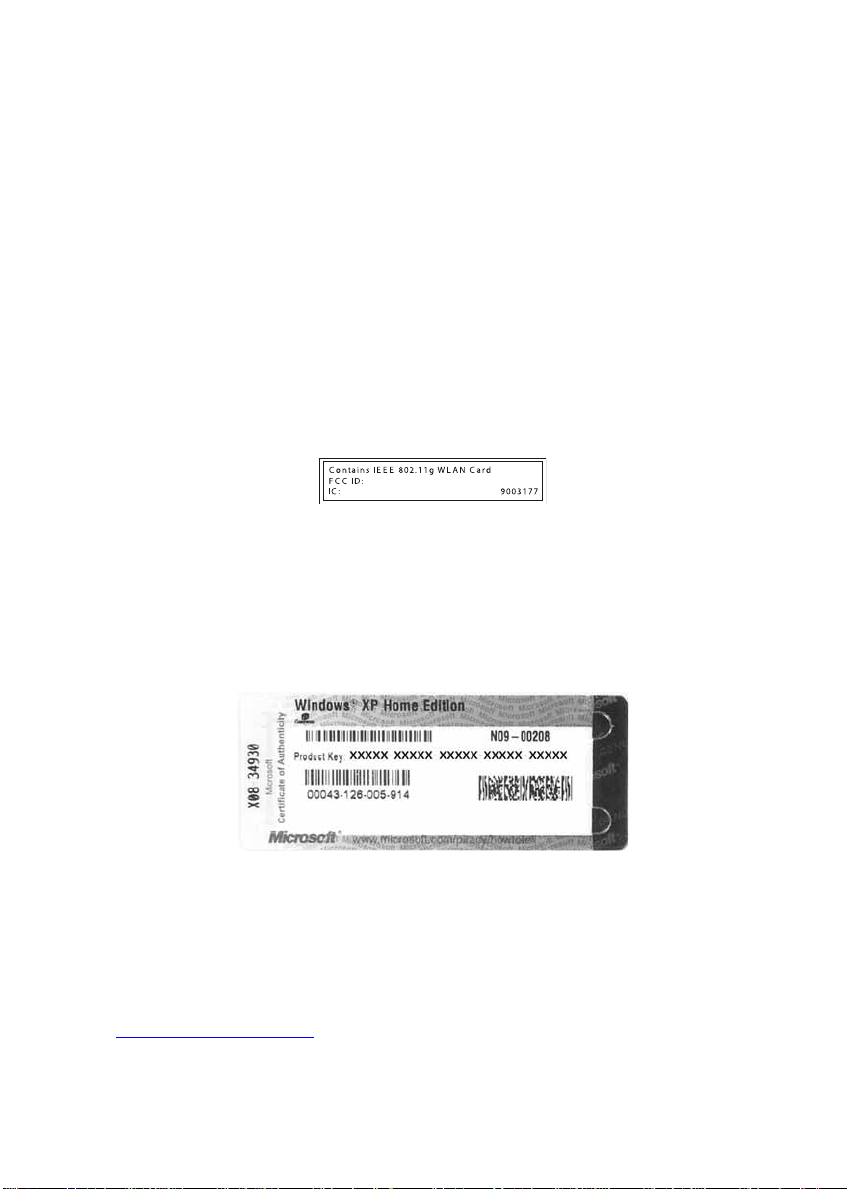
Internal wireless label
A label similar to the following indicates your convertible tablet PC
contains a wireless communications device. The label is located on the
bottom of your convertible tablet PC.
Microsoft Certificate of Authenticity
The Microsoft Certificate of Authenticity label found on the bottom of
your convertible tablet PC includes the product key code for your
operating system.
Finding y our specifications
For more information about your conv ertible t ablet PC, suc h as memo ry
size, memory type, and hard drive size, visit Gateway’s Support site at
support.gateway.com
Gateway documentation and detailed specifications. For more
information, see “Gateway Web site” on page 3.
. The Support site also has links to additional
www.gateway.com
19

Chapter 2: Checking Ou t Your Gateway Convertib le Tablet PC
Accessories
T o order accessories, visit the Accessory Store at accessories.gateway.com.
Batteries and automobile/airplane power adapters
If you run your convertible tablet PC on battery power for extended
periods, you may wan t to buy an addition al batte ry so you c an swap
batteries when necessary. See “Changing batteries” on page 82 for more
information about using an additional battery.
With an automobile/airplane power adapter, you can save battery power
by plugging your convertible tablet PC into an automobile cigarette
lighter or an airplane in-flight power receptacle.
Carrying cases
Gateway has large-capacity c arrying cases if you need ad ditional space
for accessories or supplies.
Memory
Large programs, such as multimedia games or graphic s programs, use a
lot of memory . If your programs are running more slowly than you think
they should, try adding more memory. See “Adding or replacing
memory” on page 91 for more information.
Port replicators
Although you can attach devices directly to your convertible tablet PC,
a port replicator lets you make all of those connections at one time. When
you travel with your convertible tablet PC, you merely disconnect from
the port replicator instead of unplugging all the devices.
A port replicator also provides addition al ports and other expansion
features not included with your convertible tablet PC. See “Using the
Optional Port Replicator” on page 107 for more information about using
a port replicator with your convertible tablet PC.
20
www.gateway.com

Accessories
Printers
You can attach almost any type of printer to your convertible tablet PC.
The most common types are inkjet and laser printers, which print in color
or black and white.
Inkjet printers and cartridges are relatively inexpensive, but they are
slower than laser printers. Using an inkjet color printer, you can print
pictures, banners, and greeting cards, as well as documents.
Laser printers and cartridges are more expensive, but they print much
faster than inkjet printers. Laser printers are better than inkjet printers
when you are printing large documents.
USB flash drive
Use a USB flash drive for storing files or transferring files to another
computer.
www.gateway.com
21

Chapter 2: Checking Ou t Your Gateway Convertib le Tablet PC
22
www.gateway.com
 Loading...