

Page 1

Gateway 901 Series
Family Room Media Center
replacementguide
Page 2

Please check out our eBay auctions for more great
deals on Factory Service Manuals:
Page 3

Page 4

1 Replacing Gateway Family Media Center Components . . . . . . . . . . 1
Identifying the model . . . . . . . . . . . . . . . . . . . . . . . . . . . . . . . . . . . . . . . . . . . . . . . . . 2
Preparing your work space . . . . . . . . . . . . . . . . . . . . . . . . . . . . . . . . . . . . . . . . . . . . 2
Preventing static electricity discharge . . . . . . . . . . . . . . . . . . . . . . . . . . . . . . . . . . . . 3
Preparing the Family Room Media Center . . . . . . . . . . . . . . . . . . . . . . . . . . . . . . . . 4
Opening the Family Media Center case . . . . . . . . . . . . . . . . . . . . . . . . . . . . . . . . . . 5
Closing the Family Media Center case . . . . . . . . . . . . . . . . . . . . . . . . . . . . . . . . . . . 7
Replacing the front bezel . . . . . . . . . . . . . . . . . . . . . . . . . . . . . . . . . . . . . . . . . . . . . 8
Replacing the DVD drive . . . . . . . . . . . . . . . . . . . . . . . . . . . . . . . . . . . . . . . . . . . . . 10
Replacing the DVD drive bezel . . . . . . . . . . . . . . . . . . . . . . . . . . . . . . . . . . . . . . . . 14
Replacing the processor duct . . . . . . . . . . . . . . . . . . . . . . . . . . . . . . . . . . . . . . . . . 16
Replacing the hard drive duct . . . . . . . . . . . . . . . . . . . . . . . . . . . . . . . . . . . . . . . . . 17
Removing the hard drive module . . . . . . . . . . . . . . . . . . . . . . . . . . . . . . . . . . . . . . 18
Replacing the hard drive . . . . . . . . . . . . . . . . . . . . . . . . . . . . . . . . . . . . . . . . . . . . . 20
Replacing the power supply . . . . . . . . . . . . . . . . . . . . . . . . . . . . . . . . . . . . . . . . . . 23
Replacing the modem card . . . . . . . . . . . . . . . . . . . . . . . . . . . . . . . . . . . . . . . . . . . 27
Replacing the video card . . . . . . . . . . . . . . . . . . . . . . . . . . . . . . . . . . . . . . . . . . . . . 29
Replacing the audio card (for FMC-901X model only) . . . . . . . . . . . . . . . . . . . . . . 31
Replacing the TV/FM tuner card . . . . . . . . . . . . . . . . . . . . . . . . . . . . . . . . . . . . . . . 34
Replacing memory . . . . . . . . . . . . . . . . . . . . . . . . . . . . . . . . . . . . . . . . . . . . . . . . . . 36
Replacing the housing fan . . . . . . . . . . . . . . . . . . . . . . . . . . . . . . . . . . . . . . . . . . . . 38
Replacing the front I/O board . . . . . . . . . . . . . . . . . . . . . . . . . . . . . . . . . . . . . . . . . 40
Replacing the input board . . . . . . . . . . . . . . . . . . . . . . . . . . . . . . . . . . . . . . . . . . . . 42
Replacing the battery . . . . . . . . . . . . . . . . . . . . . . . . . . . . . . . . . . . . . . . . . . . . . . . 44
Replacing the fan sink module . . . . . . . . . . . . . . . . . . . . . . . . . . . . . . . . . . . . . . . . 46
Replacing the system board . . . . . . . . . . . . . . . . . . . . . . . . . . . . . . . . . . . . . . . . . . 48
2 Contacting Gateway . . . . . . . . . . . . . . . . . . . . . . . . . . . . . . . . . . . . . . . . . . . . 53
Telephone support . . . . . . . . . . . . . . . . . . . . . . . . . . . . . . . . . . . . . . . . . . . . . . . . . . 54
Before calling Gateway Technical Support . . . . . . . . . . . . . . . . . . . . . . . . . . . 54
Telephone support . . . . . . . . . . . . . . . . . . . . . . . . . . . . . . . . . . . . . . . . . . . . . . 55
Tutoring and training . . . . . . . . . . . . . . . . . . . . . . . . . . . . . . . . . . . . . . . . . . . . . . . . 56
Self-help . . . . . . . . . . . . . . . . . . . . . . . . . . . . . . . . . . . . . . . . . . . . . . . . . . . . . . 56
Tutoring . . . . . . . . . . . . . . . . . . . . . . . . . . . . . . . . . . . . . . . . . . . . . . . . . . . . . . . 56
Training . . . . . . . . . . . . . . . . . . . . . . . . . . . . . . . . . . . . . . . . . . . . . . . . . . . . . . . 57
i
Page 5

ii
Page 6

Replacing Gateway
Family Media Center
Components
Use this service guide to help plan your maintenance tasks
for the Gateway 901 Family Room Media Center.
For information on the Family Room Media Center’s safety
notices and regulatory notices, see the user guide.
© 2003 Gateway, Inc. All rights reserved. Gateway, Gateway Country, the Gateway
stylized logo, and the black-and-white spot design are trademarks or registered
trademarks of Gateway, Inc. in the United States and other countries. All other
brands and product names are trademarks or registered trademarks of their respective
companies.
1
1
Page 7
Replacing Gateway Family Media Center Components
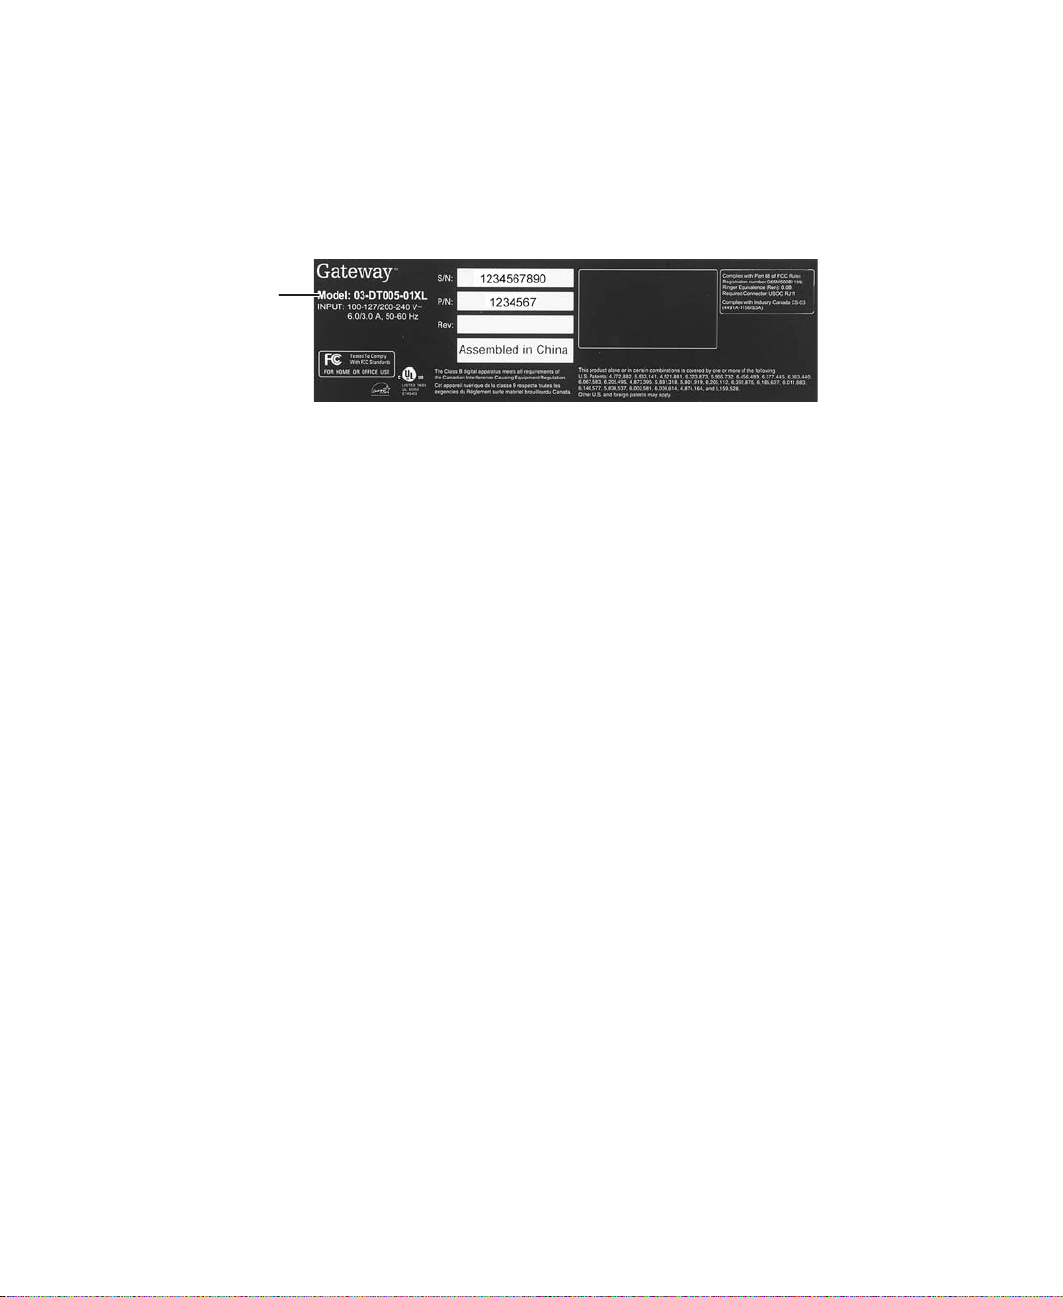
Identifying the model
The label on the bottom of the Family Media Center contains information that
identifies the Family Media Center model and its features.
Gateway
model
number
Preparing your work space
Before performing maintenance on the Family Room Media Center, make sure
that your work space and the Family Room Media Center are correctly prepared.
■ Wear a grounding (ESD) wrist strap, and use a grounded or dissipative work
mat.
■ Use a stable and strong table, and make sure that the table top is large
enough to hold each component as you remove it.
■ Use bright lighting to make part identification easier.
■ Keep your work surface free from clutter and dust that may damage
components.
■ Use a magnetized screwdriver for removing screws.
■ When removing components that are attached to the Family Room Media
Center by a cable, unplug the cable before removing the screws, when
possible, to avoid damaging the cable.
■ As you remove components and screws, lay them toward the rear of your
work surface (behind the Family Room Media Center) or far enough to the
side that your arms do not accidentally brush them onto the floor.
2
www.gateway.com
Page 8

Preventing static electricity discharge
■ To help keep track of screws, try the following:
■ Place each component’s screws in their own section of a parts sorter.
■ Place each component’s screws next to the component on your work
surface.
■ After loosening screws that are deeply recessed in a hole, you can leave
the screws in the holes if you place small pieces of masking tape over
the hole openings. When reassembling the component, just remove
the tape and tighten the screws.
■ When you place flat-headed screws on your work surface, stand them
on their heads to prevent the screws from rolling off the table.
Preventing static electricity
discharge
The components inside the Family Room Media Center are extremely sensitive
to static electricity, also known as electrostatic discharge (ESD).
Warning ESD can permanently damage electrostatic
discharge-sensitive components in the Family Room
Media Center. Prevent ESD damage by following ESD
guidelines every time you open the Media Center case.
Warning To avoid exposure to dangerous electrical voltages and
moving parts, turn off the Family Room Media Center and
unplug the power cord and modem and network cables
before opening the case.
Before replacing components, follow these guidelines:
■ Turn off the Family Room Media Center.
■ Wear a grounding wrist strap (available at most electronics stores) and
attach it to a bare metal part of your workbench or other grounded
connection.
Warning To prevent risk of electric shock, do not insert any object
into the vent holes of the Family Room Media Center.
www.gateway.com
3
Page 9

Replacing Gateway Family Media Center Components
■ Touch a bare metal surface on your workbench or other grounded object.
■ Unplug the power cord and the modem and network cables.
■ Disconnect all peripheral devices and remove any PC Cards.
Before working with Family Room Media Center components, follow these
guidelines:
■ Avoid static-causing surfaces such as carpeted floors, plastic, and packing
foam.
■ Remove components from their antistatic bags only when you are ready
to use them. Do not lay components on the outside of antistatic bags
because only the inside of the bags provide electrostatic protection.
■ Always hold components by their edges. Avoid touching the edge
connectors. Never slide components over any surface.
Preparing the Family Room Media Center
Warning To avoid exposure to dangerous electrical voltages and
moving parts, turn off the Family Room Media Center, and
unplug the power cord, modem, and network cables before
opening the case. Reinstall the cover before you restore
power or reconnect the modem and network cables.
To prepare the Family Room Media Center for maintenance:
■ Disconnect all peripheral devices.
■ Turn off the Family Room Media Center and unplug the power cord and
modem and network cables (if attached).
4
www.gateway.com
Page 10
Opening the Family Media Center case
Opening the Family Media
Center case
Use the following instructions to remove Family Media Center components and
replace them with replacement parts.
Warning To avoid exposure to dangerous electrical voltages and
moving parts, turn off your Family Media Center, then
unplug the power cord and modem cable before opening
the case.
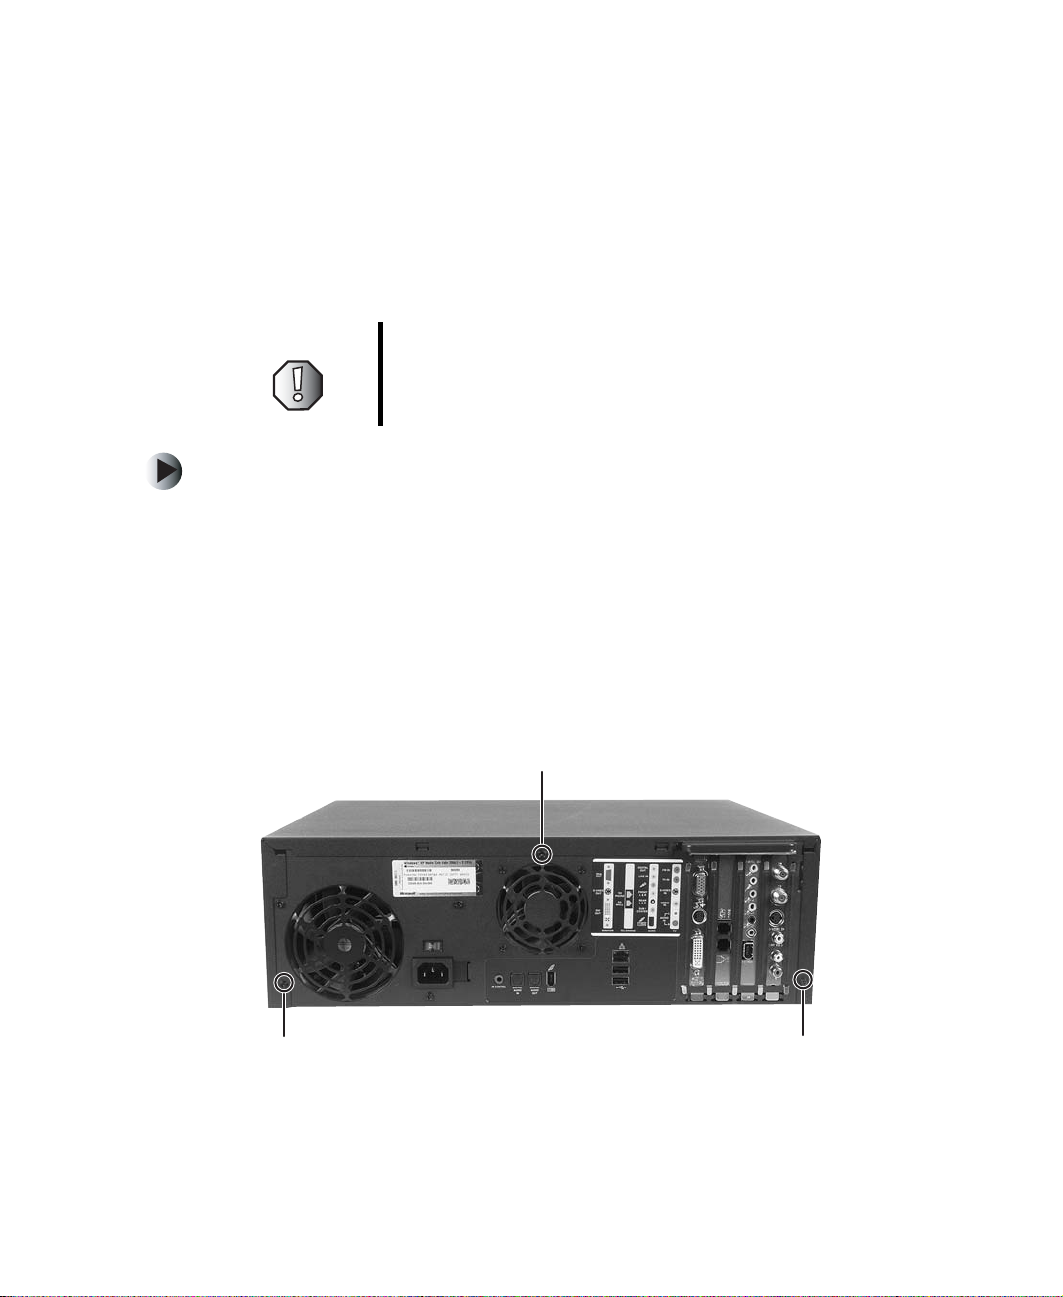
To open the Family Media Center case:
1 Follow the instructions in “Preventing static electricity discharge” on
page 3.
2 Shut down your Family Media Center, then disconnect the power cord and
modem, network, and all peripheral device cables.
3 Press the power button to drain any residual power from your Family Media
Center.
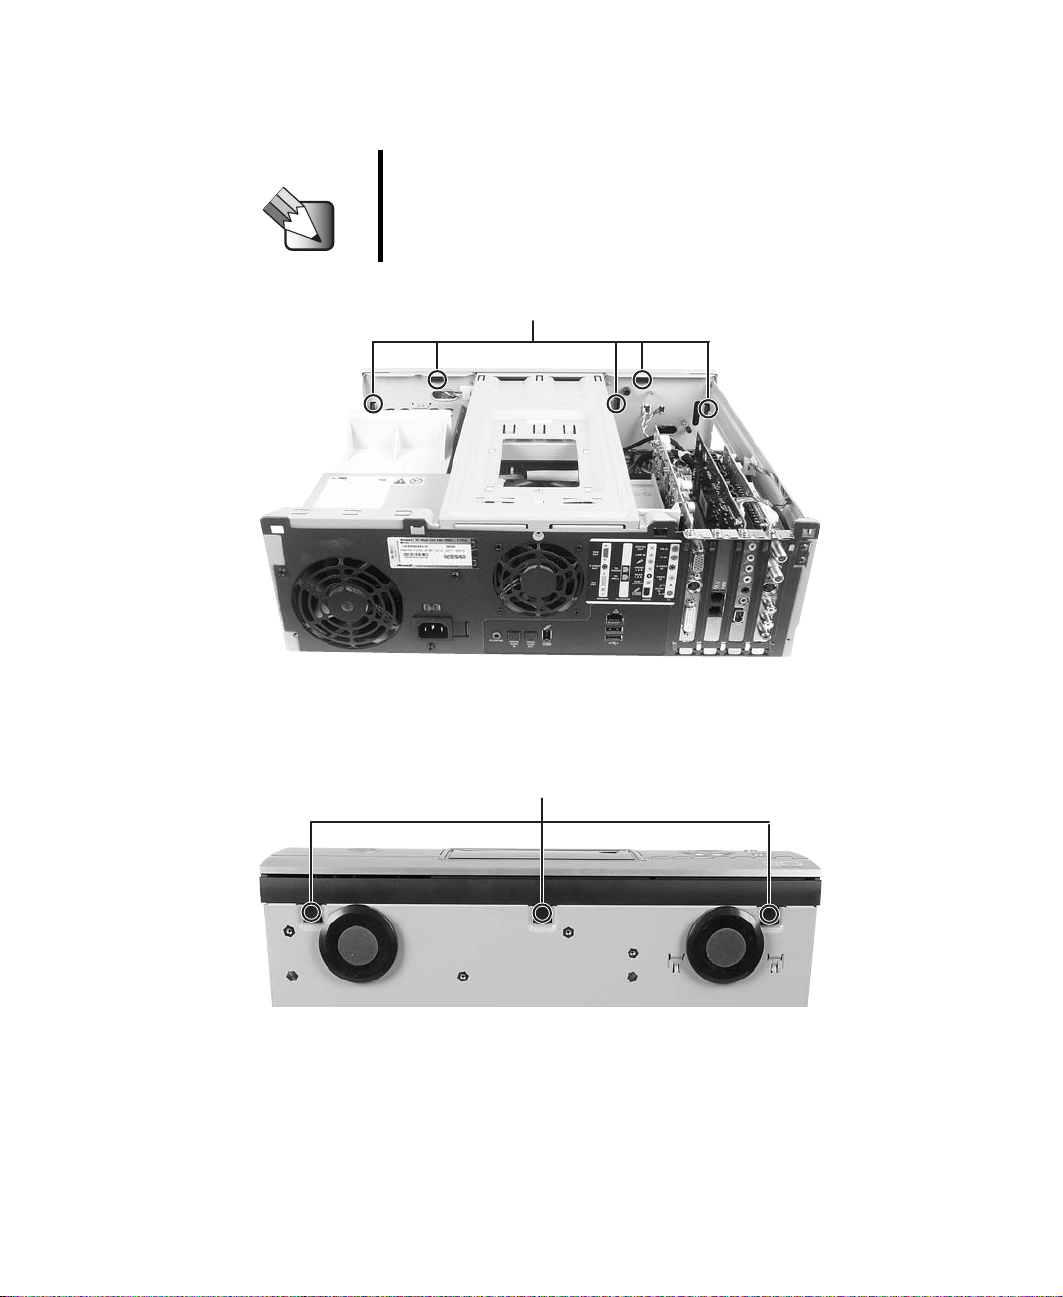
4 Remove the three cover screws.
Screw
Screw Screw
www.gateway.com
5
Page 11
Replacing Gateway Family Media Center Components
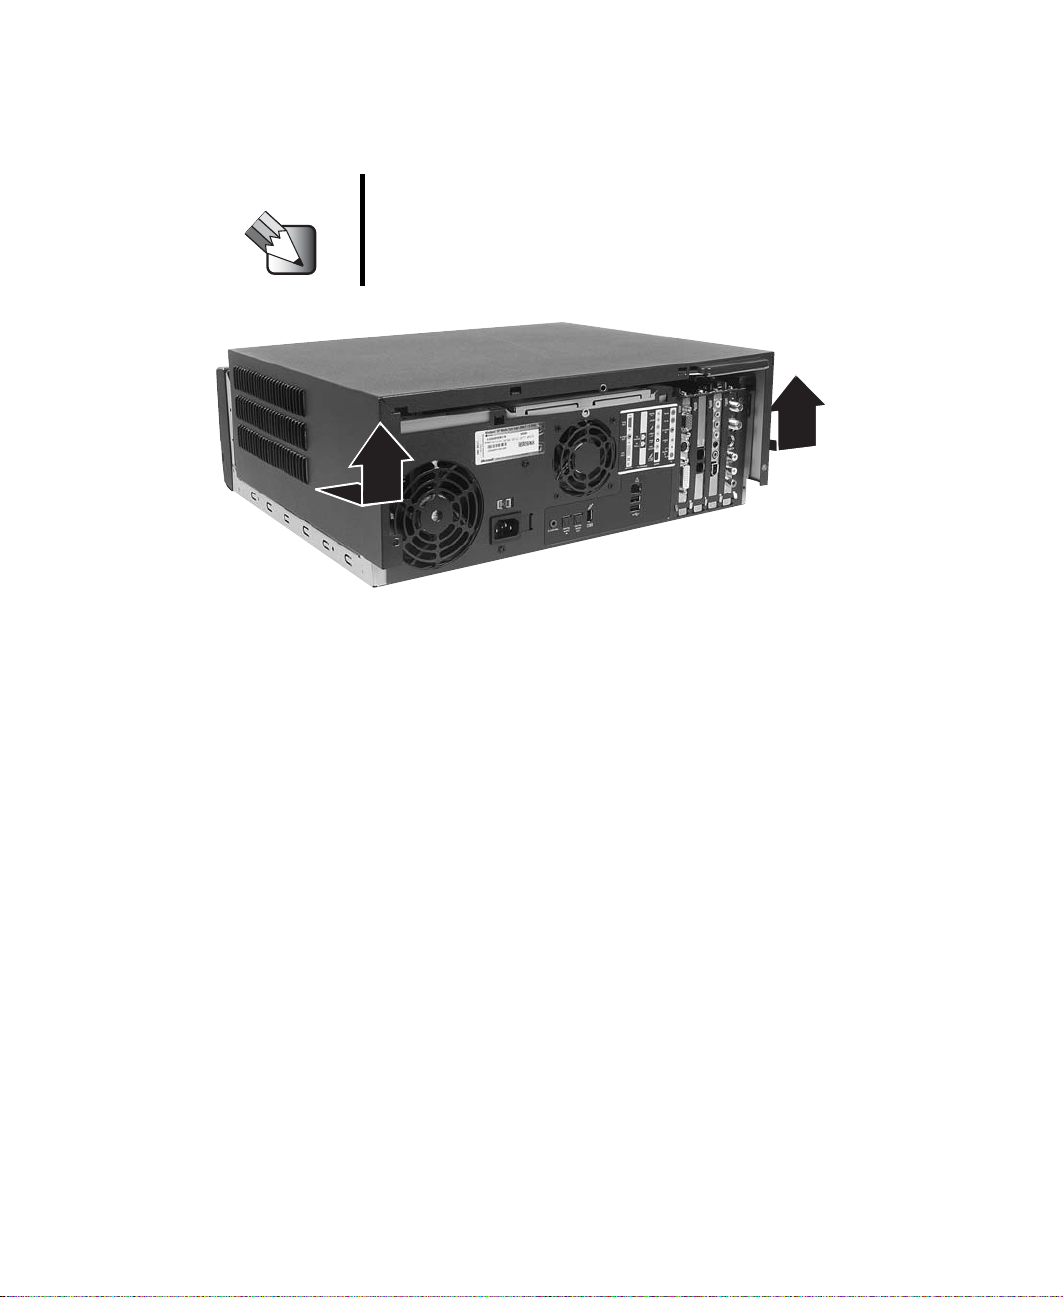
5 Slide the cover about 1 inch toward the back of the case, then lift the cover
from the case.
Tips & Tricks If the cover is difficult to remove, press down on the front
corners of the cover, then slide the cover toward the back
of the case.
6
www.gateway.com
Page 12
Closing the Family Media Center case
Closing the Family Media
Center case
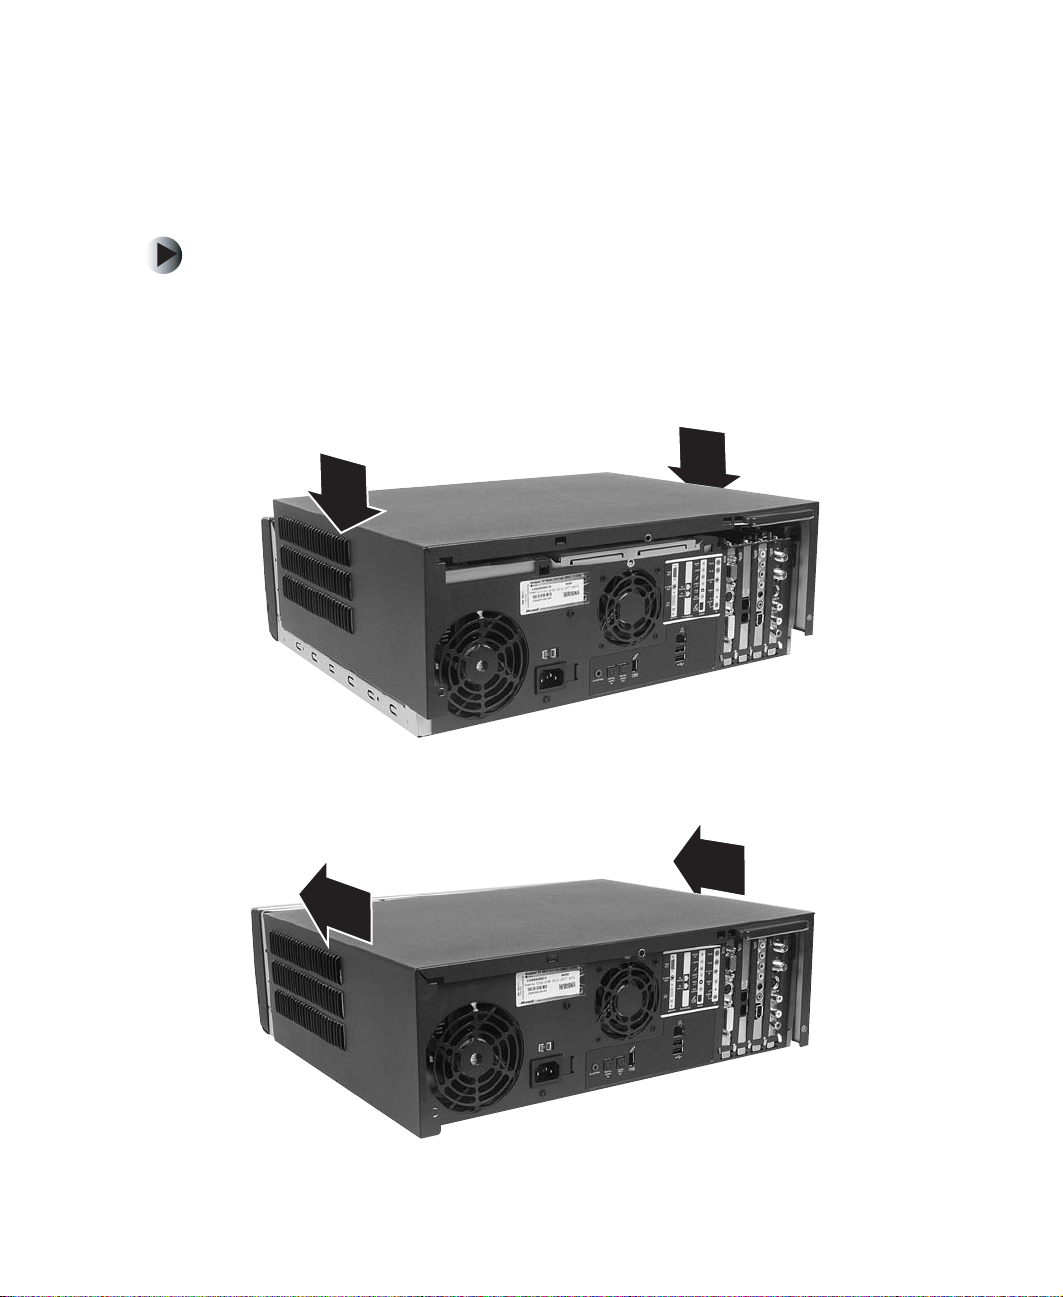
To close the Family Media Center case:
1 Make sure that all of the internal cables are arranged inside the case so
they will not be pinched when you close the case.
2 Set the cover on the case with about a 1-inch gap between the cover and
the front bezel.
3 Slide the cover toward the front of the case until it is closed.
www.gateway.com
7
Page 13

Replacing Gateway Family Media Center Components
4 Reinstall the three cover screws.
5 Reconnect the cables and power cord.
Replacing the front bezel
To replace the front bezel:
1 Follow the instructions in “Preventing static electricity discharge” on
page 3.
2 Shut down your Family Media Center, then disconnect the power cord and
modem, network, and all peripheral device cables.
3 Press the power button to drain any residual power from your Family Media
Center.
4 Remove the case cover by following the instructions in “Opening the
Family Media Center case” on page 5.
8
www.gateway.com
Page 14
Replacing the front bezel
5 Press the five latches inside the front of the case.
Tips & Tricks It may be helpful to release the two tabs on the left side
first, then release the three tabs on right side.
Latches
6 Release the three latches on the bottom of the front bezel, then remove
the front bezel.
Latches
7 Align the three latches on the bottom of the replacement front bezel with
the latch slots on the bottom of the case.
www.gateway.com
9
Page 15

Replacing Gateway Family Media Center Components
8 Align the five latches with the latch slots on the inside front of the case,
then press in on the front bezel to snap the latches into place.
9 Reinstall the case cover by following the instructions in “Closing the
Family Media Center case” on page 7.
10 Reconnect the power cord and modem, network, and all peripheral device
cables.
Replacing the DVD drive
To replace the DVD drive:
1 Follow the instructions in “Preventing static electricity discharge” on
page 3.
2 Shut down your Family Media Center, then disconnect the power cord and
modem, network, and all peripheral device cables.
3 Press the power button to drain any residual power from your Family Media
Center.
10
4 Remove the case cover by following the instructions in “Opening the
Family Media Center case” on page 5.
5 Remove the front bezel by following the instructions in “Replacing the
front bezel” on page 8.
www.gateway.com
Page 16

Replacing the DVD drive
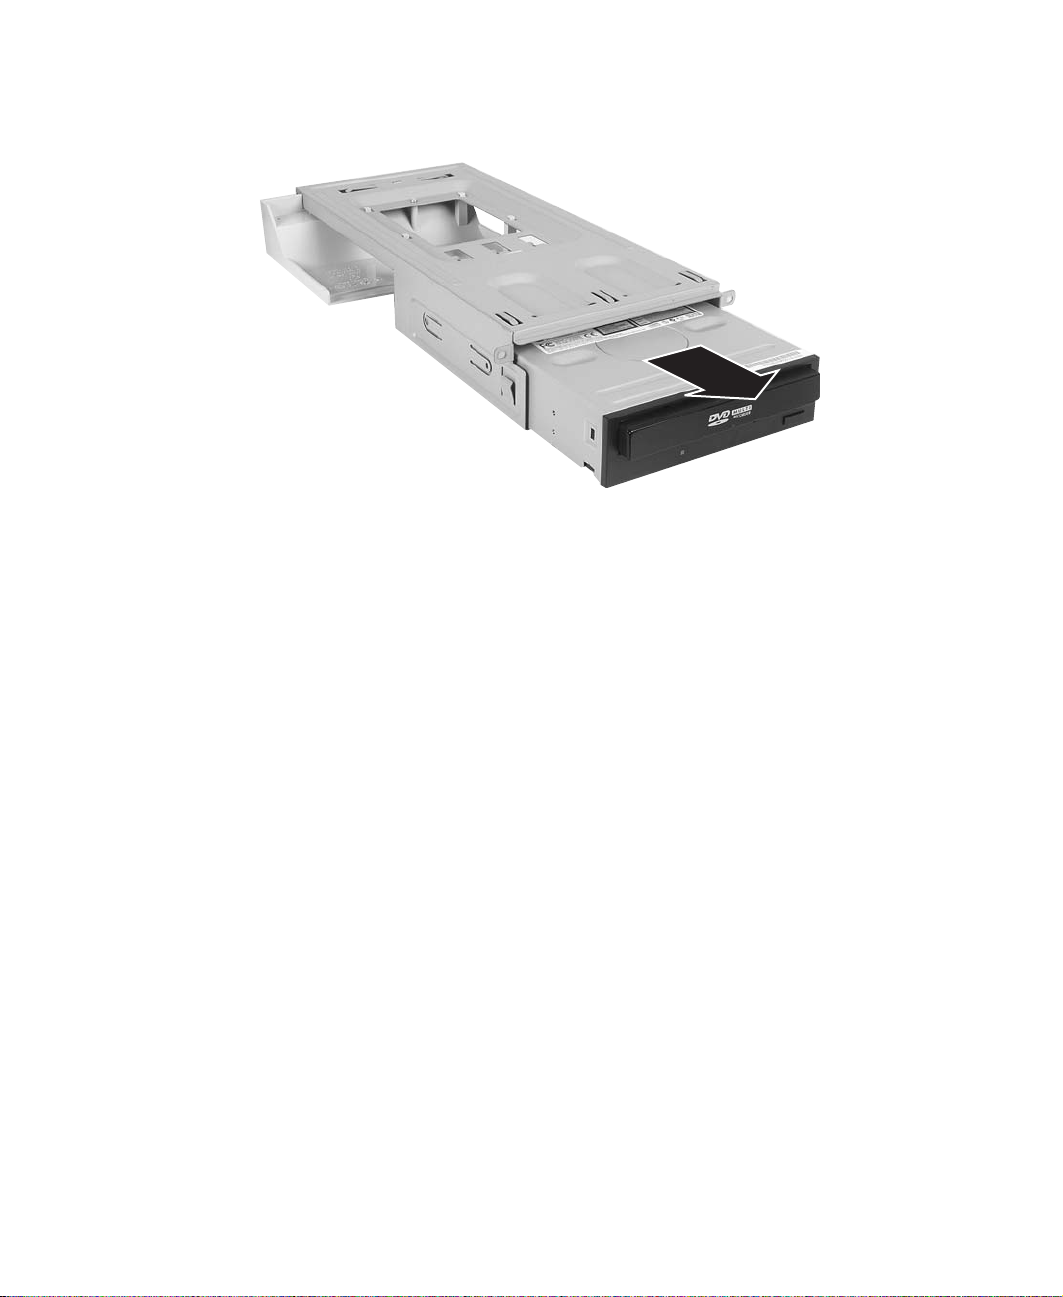
6 Remove the two screws that secure the DVD drive bracket in the case.
Screws
7 Lift the DVD drive bracket away from the case.
www.gateway.com
11
Page 17

Replacing Gateway Family Media Center Components
8 Turn the bracket over, then disconnect the IDE cable and power cable.
9 Remove the four screws that secure the DVD drive in the bracket. There
are two screws on each side of the bracket.
Screws
12
Screws
www.gateway.com
Page 18
Replacing the DVD drive
10 Slide the DVD drive out of the bracket.
11 Slide the replacement DVD drive into the DVD drive bracket.
12 Secure the drive in the bracket with the four screws you removed in Step 9.
13 Reconnect the IDE cable and power cable.
14 Reinstall the two screws that secure the DVD drive bracket in the case.
15 Reinstall the front bezel by following the instructions in “Replacing the
front bezel” on page 8.
16 Reinstall the case cover by following the instructions in “Closing the
Family Media Center case” on page 7.
17 Reconnect the power cord and modem, network, and all peripheral device
cables.
www.gateway.com
13
Page 19
Replacing Gateway Family Media Center Components
Replacing the DVD drive bezel
To replace the DVD drive bezel:
1 Follow the instructions in “Preventing static electricity discharge” on
page 3.
2 Shut down your Family Media Center, then disconnect the power cord and
modem, network, and all peripheral device cables.
3 Press the power button to drain any residual power from your Family Media
Center.
4 Remove the case cover by following the instructions in “Opening the
Family Media Center case” on page 5.
5 Remove the front bezel by following the instructions in “Replacing the
front bezel” on page 8.
6 Remove the DVD drive by following the instructions in “Replacing the
DVD drive” on page 10.
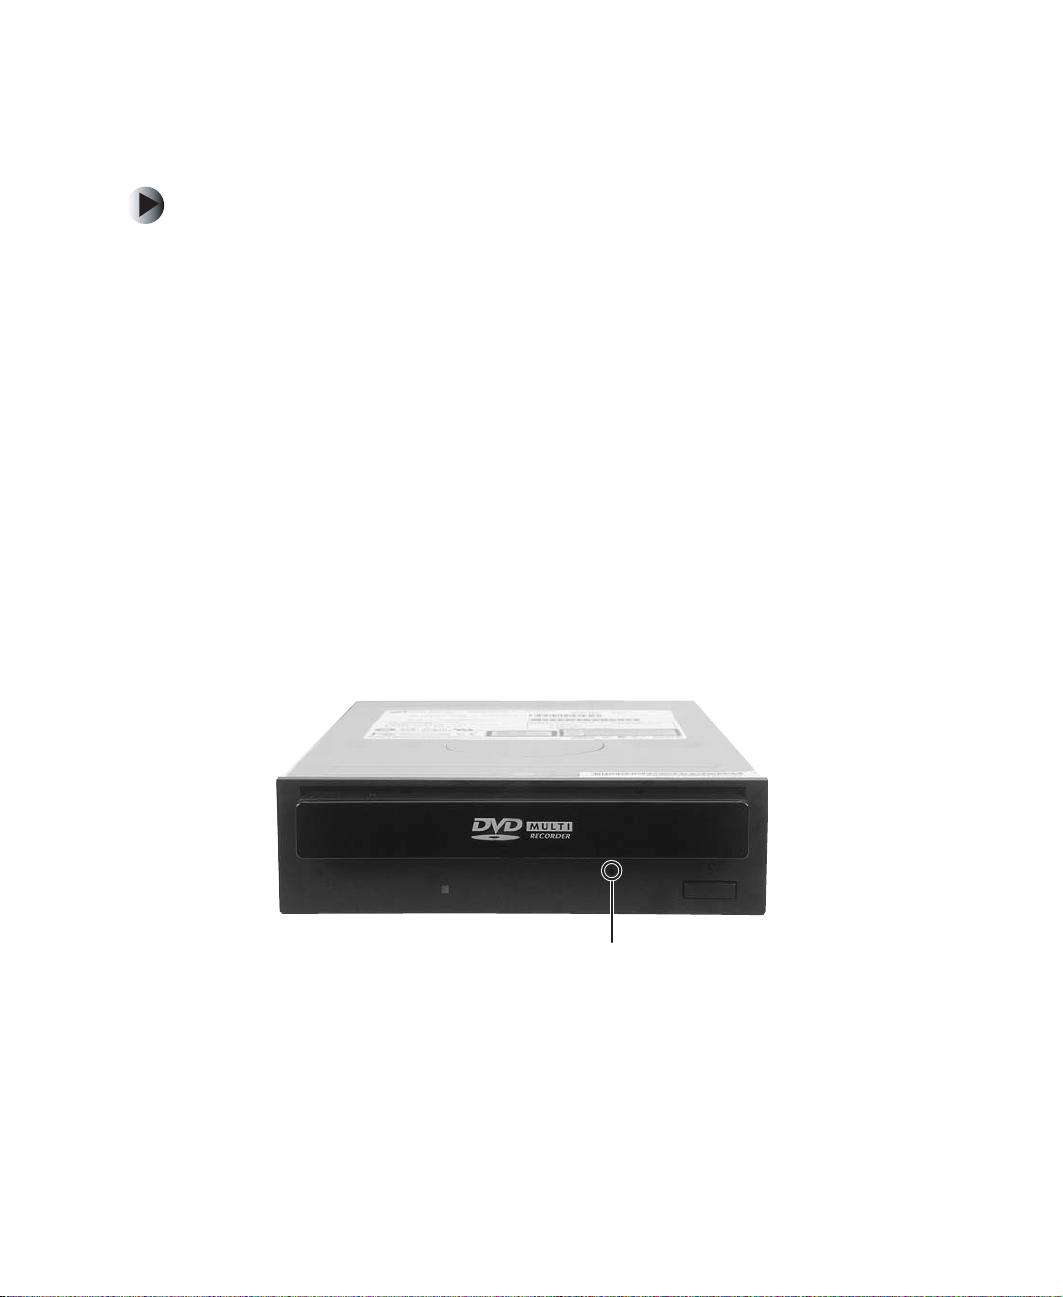
7 Insert a straightened paper clip into the DVD manual eject hole to release
the DVD drive.
14
Manual eject hole
www.gateway.com
Page 20
Replacing the DVD drive bezel
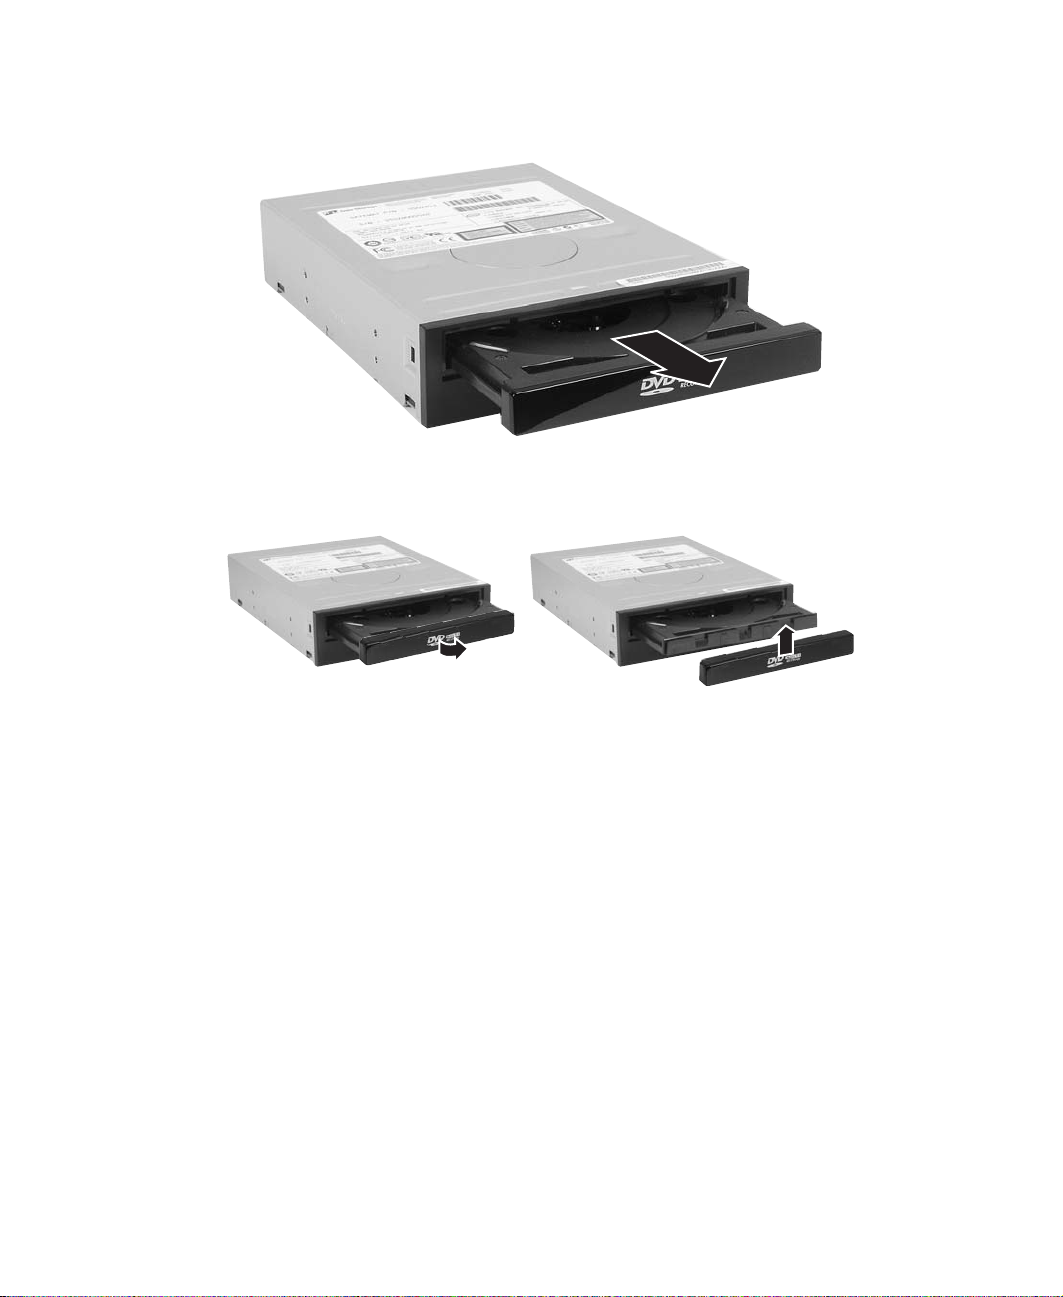
8 Pull the DVD drive tray out.
9 Slightly rotate the DVD drive bezel out and lift up from the DVD tray.
10 Slide the replacement DVD drive bezel onto the front of the DVD drive
tray and snap into place.
11 Close the DVD drive tray.
12 Reinstall the DVD drive by following the instructions in “Replacing the
DVD drive” on page 10.
13 Reinstall the front bezel by following the instructions in “Replacing the
front bezel” on page 8.
14 Reinstall the case cover by following the instructions in “Closing the
Family Media Center case” on page 7.
15 Reconnect the power cord and modem, network, and all peripheral device
cables.
www.gateway.com
15
Page 21

Replacing Gateway Family Media Center Components
Replacing the processor duct
To replace the processor duct:
1 Follow the instructions in “Preventing static electricity discharge” on
page 3.
2 Shut down your Family Media Center, then disconnect the power cord and
modem, network, and all peripheral device cables.
3 Press the power button to drain any residual power from your Family Media
Center.
4 Remove the case cover by following the instructions in “Opening the
Family Media Center case” on page 5.
5 Remove the front bezel by following the instructions in “Replacing the
front bezel” on page 8.
6 Remove the DVD drive bracket by following the instructions in “Replacing
the DVD drive” on page 10. You do not need to remove the DVD drive
from the DVD drive bracket.
16
7 Remove the screw, release the latch, then slide the processor duct forward
to remove.
Release latch
Screw
www.gateway.com
Page 22

Replacing the hard drive duct
8 Slide the replacement processor duct on the DVD drive bracket, then secure
the duct with the screw.
9 Reinstall the DVD drive bracket by following the instructions in “Replacing
the DVD drive” on page 10.
10 Reinstall the front bezel by following the instructions in “Replacing the
front bezel” on page 8.
11 Reinstall the case cover by following the instructions in “Closing the
Family Media Center case” on page 7.
12 Reconnect the power cord and modem, network, and all peripheral device
cables.
Replacing the hard drive duct
To replace the hard drive duct:
1 Follow the instructions in “Preventing static electricity discharge” on
page 3.
2 Shut down your Family Media Center, then disconnect the power cord and
modem, network, and all peripheral device cables.
3 Press the power button to drain any residual power from your Family Media
Center.
4 Remove the case cover by following the instructions in “Opening the
Family Media Center case” on page 5.
www.gateway.com
17
Page 23

Replacing Gateway Family Media Center Components
5 Lift the hard drive duct up and toward the front of the case.
Hard drive duct retention holes
6 Install the replacement hard drive duct. Make sure that the plastic pins fit
firmly in the retention holes in the hard drive module.
7 Reinstall the case cover by following the instructions in “Closing the
Family Media Center case” on page 7.
8 Reconnect the power cord and modem, network, and all peripheral device
cables.
Removing the hard drive module
To replace the hard drive module:
1 Follow the instructions in “Preventing static electricity discharge” on
page 3.
2 Shut down your Family Media Center, then disconnect the power cord and
modem, network, and all peripheral device cables.
3 Press the power button to drain any residual power from your Family Media
Center.
4 Remove the case cover by following the instructions in “Opening the
Family Media Center case” on page 5.
18
www.gateway.com
Page 24

Removing the hard drive module
5 Remove the hard drive duct by following the instructions in “Replacing
the hard drive duct” on page 17.
6 Disconnect the power cable and IDE cable.
7 Remove the two screws located on the top and side of the drive module.
Screw
Screw
www.gateway.com
19
Page 25

Replacing Gateway Family Media Center Components
8 Slide the drive module toward the back of the case, then lift the module
out of the case.
9 Slide the replacement drive module into the case.
10 Reinstall the hard drive duct by following the instructions in “Replacing
the hard drive duct” on page 17.
11 Reinstall the case cover by following the instructions in “Closing the
Family Media Center case” on page 7.
12 Reconnect the power cord and modem, network, and all peripheral device
cables.
Replacing the hard drive
To replace the hard drive:
1 Follow the instructions in “Preventing static electricity discharge” on
page 3.
2 Shut down your Family Media Center, then disconnect the power cord and
modem, network, and all peripheral device cables.
20
www.gateway.com
Page 26

Replacing the hard drive
3 Press the power button to drain any residual power from your Family Media
Center.
4 Remove the case cover by following the instructions in “Opening the
Family Media Center case” on page 5.
5 Remove the hard drive duct by following the instructions in “Replacing
the hard drive duct” on page 17.
6 Remove the hard drive module following the instructions in “Removing
the hard drive module” on page 18.
7 Remove the four screws that secure the hard drive in the drive module.
There are two screws on each side of the drive module.
Screws
Screws
www.gateway.com
21
Page 27

Replacing Gateway Family Media Center Components
8 Slide the hard drive out of the drive module.
9 Slide the replacement hard drive into the drive module.
10 Secure the hard drive in the drive module with four screws.
11 Reinstall the hard drive module by following the instructions in
“Removing the hard drive module” on page 18.
12 Reinstall the hard drive duct by following the instructions in “Replacing
the hard drive duct” on page 17.
13 Reinstall the case cover by following the instructions in “Closing the
Family Media Center case” on page 7.
14 Reconnect the power cord and modem, network, and all peripheral device
cables.
22
www.gateway.com
Page 28

Replacing the power supply
Replacing the power supply
To replace the power supply:
1 Follow the instructions in “Preventing static electricity discharge” on
page 3.
2 Shut down your Family Media Center, then disconnect the power cord and
modem, network, and all peripheral device cables.
3 Press the power button to drain any residual power from your Family Media
Center.
4 Remove the case cover by following the instructions in “Opening the
Family Media Center case” on page 5.
5 Remove the front bezel by following the instructions in “Replacing the
front bezel” on page 8.
6 Disconnect the power cable connected to the DVD drive by following the
instructions in “Replacing the DVD drive” on page 10.
7 Remove the hard drive duct by following the instructions in “Replacing
the hard drive duct” on page 17.
8 Disconnect the power cable connected to the hard drive by following the
instructions in “Removing the hard drive module” on page 18.
www.gateway.com
23
Page 29

Replacing Gateway Family Media Center Components
9 Disconnect the power cables connected to the system board.
10 Disconnect the video card power cable.
11 If there are other power cables that have not been disconnected, disconnect
them.
24
www.gateway.com
Page 30

Replacing the power supply
12 Remove the two screws that secure the power supply to the bottom of the
case.
Screws
13 Remove the three screws that secure the power supply to the back of the
case.
Screw Screw
Screw
www.gateway.com
25
Page 31

Replacing Gateway Family Media Center Components
14 Slide the power supply toward the front of the case and lift it out of the
case.
15 Slide the replacement power supply in the case.
16 Reinstall the three screws that secure the power supply to the back of the
case.
17 Reinstall the two screws that secure the power supply to the bottom of
the case.
18 Connect the power cables to the system board.
19 Connect the power cable to the hard drive by following the instructions
in “Removing the hard drive module” on page 18.
20 Reinstall the hard drive duct by following the instructions in “Replacing
the hard drive duct” on page 17.
21 Connect the power cable connected to the DVD drive by following the
instructions in “Replacing the DVD drive bezel” on page 14.
22 Reinstall the front bezel by following the instructions in “Replacing the
front bezel” on page 8.
26
www.gateway.com
Page 32

Replacing the modem card
23 Reinstall the case cover by following the instructions in “Closing the
Family Media Center case” on page 7.
24 Reconnect the power cord and modem, network, and all peripheral device
cables.
Replacing the modem card
To replace the modem card:
1 Follow the instructions in “Preventing static electricity discharge” on
page 3.
2 Shut down your Family Media Center, then disconnect the power cord and
modem, network, and all peripheral device cables.
3 Press the power button to drain any residual power from your Family Media
Center.
4 Remove the case cover by following the instructions in “Opening the
Family Media Center case” on page 5.
5 Remove the screw that secures the modem card to the case.
Screw
www.gateway.com
27
Page 33

Replacing Gateway Family Media Center Components
6 Remove the modem card. You can slightly seesaw the card end-to-end to
loosen the card, but do not bend the card sideways.
Warning Do not touch the contacts on the bottom part of the modem
card. Touching the contacts can cause electrostatic
damage to the card.
7 Install the replacement modem card into the slot. You can slightly seesaw
the card end-to-end to help insert the card, but do not bend the card
sideways.
8 Secure the modem card with the screw you removed in Step 5.
9 Reinstall the case cover by following the instructions in “Closing the
Family Media Center case” on page 7.
10 Reconnect the power cord and modem, network, and all peripheral device
cables.
28
www.gateway.com
Page 34

Replacing the video card
To replace the video card:
1 Follow the instructions in “Preventing static electricity discharge” on
page 3.
2 Shut down your Family Media Center, then disconnect the power cord and
modem, network, and all peripheral device cables.
3 Press the power button to drain any residual power from your Family Media
Center.
4 Remove the case cover by following the instructions in “Opening the
Family Media Center case” on page 5.
5 Remove the modem card by following the instructions in “Replacing the
modem card” on page 27.
6 Disconnect the video card power cable.
Replacing the video card
www.gateway.com
29
Page 35

Replacing Gateway Family Media Center Components
7 Remove the screw that secures the video card to the case.
Screw
8 Remove the video card. You can slightly seesaw the card end-to-end to
loosen the card, but do not bend the card sideways.
30
Warning Do not touch the contacts on the bottom part of the video
card. Touching the contacts can cause electrostatic
damage to the card.
www.gateway.com
Page 36

Replacing the audio card (for FMC-901X model only)
9 Install the replacement video card into the slot. You can slightly seesaw
the card end-to-end to help insert the card, but do not bend the card
sideways.
10 Connect the video card power cable.
11 Secure the video card with the screw you removed in Step 7.
12 Reinstall the modem card by following the instructions in “Replacing the
modem card” on page 27.
13 Reinstall the case cover by following the instructions in “Closing the
Family Media Center case” on page 7.
14 Reconnect the power cord and modem, network, and all peripheral device
cables.
Replacing the audio card
(for FMC-901X model only)
To replace the audio card:
1 Follow the instructions in “Preventing static electricity discharge” on
page 3.
2 Shut down your Family Media Center, then disconnect the power cord and
modem, network, and all peripheral device cables.
3 Press the power button to drain any residual power from your Family Media
Center.
4 Remove the case cover by following the instructions in “Opening the
Family Media Center case” on page 5.
www.gateway.com
31
Page 37

Replacing Gateway Family Media Center Components
5 Disconnect the two audio cables on the audio card.
6 Remove the screw that secures the audio card to the case.
32
Screw
www.gateway.com
Page 38

Replacing the audio card (for FMC-901X model only)
7 Remove the audio card. You can slightly seesaw the card end-to-end to
loosen the card, but do not bend the card sideways.
Warning Do not touch the contacts on the bottom part of the audio
card. Touching the contacts can cause electrostatic
damage to the card.
8 Install the replacement audio card into the slot. You can slightly seesaw
the card end-to-end to help insert the card, but do not bend the card
sideways.
9 Connect the two audio cables on the audio card.
10 Secure the audio card with the screw you removed in Step 6.
11 Reinstall the case cover by following the instructions in “Closing the
Family Media Center case” on page 7.
12 Reconnect the power cord and modem, network, and all peripheral device
cables.
www.gateway.com
33
Page 39

Replacing Gateway Family Media Center Components
Replacing the TV/FM tuner card
To replace the TV/FM tuner card:
1 Follow the instructions in “Preventing static electricity discharge” on
page 3.
2 Shut down your Family Media Center, then disconnect the power cord and
modem, network, and all peripheral device cables.
3 Press the power button to drain any residual power from your Family Media
Center.
4 Remove the case cover by following the instructions in “Opening the
Family Media Center case” on page 5.
5 Disconnect the cable on the TV/FM tuner card.
34
www.gateway.com
Page 40

Replacing the TV/FM tuner card
6 Remove the screw that secures the TV/FM tuner card to the case.
Screw
7 Remove the TV/FM tuner card. You can slightly seesaw the card end-to-end
to loosen the card, but do not bend the card sideways.
Tips & Tricks The tuner card has long connectors on the back of the card
that may make it difficult to remove. After the card is out
of the card slot, move the card to the side of the card slot,
tilt the front of the card down, slide the card toward the
front of the case, then lift up.
www.gateway.com
35
Page 41

Replacing Gateway Family Media Center Components
Warning Do not touch the contacts on the bottom part of the tuner
card. Touching the contacts can cause electrostatic
damage to the card.
8 Install the replacement TV/FM tuner card into the slot. You can slightly
seesaw the card end-to-end to help insert the card, but do not bend the
card sideways.
9 Connect the cable on the TV/FM tuner card.
10 Secure the TV/FM tuner card with the screw you removed in Step 6.
11 Reinstall the case cover by following the instructions in “Closing the
Family Media Center case” on page 7.
12 Reconnect the power cord and modem, network, and all peripheral device
cables.
Replacing memory
When you replace or upgrade the Family Media Center memory, make sure that
you install the correct type of memory module for your Family Media Center.
Your Family Media Center uses DIMM memory.
To replace the memory:
1 Follow the instructions in “Preventing static electricity discharge” on
page 3.
2 Shut down your Family Media Center, then disconnect the power cord and
modem, network, and all peripheral device cables.
3 Press the power button to drain any residual power from your Family Media
Center.
4 Remove the case cover by following the instructions in “Opening the
Family Media Center case” on page 5.
5 Remove the front bezel by following the instructions in “Replacing the
front bezel” on page 8.
36
www.gateway.com
Page 42

Replacing memory
6 Remove the DVD drive bracket by following the instructions in “Replacing
the DVD drive” on page 10. You do not need to remove the DVD drive
from the DVD drive bracket.
7 Remove the modem card by following the instructions in “Replacing the
modem card” on page 27.
8 Remove the video card by following the instructions in “Replacing the
video card” on page 29.
9 Gently pull the plastic tabs away from the sides of the memory module
and remove it.
10 Align the notches on the new DIMM with the notches on the memory
module bank and press the module firmly into the bank. The tabs on the
sides of the memory module should secure the memory module
automatically. When the module is secure, you hear a click.
11 Reinstall the DVD drive bracket by following the instructions in “Replacing
the DVD drive” on page 10.
www.gateway.com
37
Page 43

Replacing Gateway Family Media Center Components
12 Reinstall the front bezel by following the instructions in “Replacing the
front bezel” on page 8.
13 “Replacing the DVD drive” on page 10.
14 Reinstall the video card by following the instructions in “Replacing the
video card” on page 29.
15 Reinstall the modem card by following the instructions in “Replacing the
modem card” on page 27.
16 Reinstall the case cover by following the instructions in “Closing the
Family Media Center case” on page 7.
17 Reconnect the power cord and modem, network, and all peripheral device
cables.
Replacing the housing fan
To replace the housing fan:
38
1 Follow the instructions in “Preventing static electricity discharge” on
page 3.
2 Shut down your Family Media Center, then disconnect the power cord and
modem, network, and all peripheral device cables.
3 Press the power button to drain any residual power from your Family Media
Center.
4 Remove the case cover by following the instructions in “Opening the
Family Media Center case” on page 5.
5 Remove the front bezel by following the instructions in “Replacing the
front bezel” on page 8.
6 Remove the DVD drive bracket by following the instructions in “Replacing
the DVD drive” on page 10. You do not need to remove the DVD drive
from the DVD drive bracket.
www.gateway.com
Page 44

Replacing the housing fan
7 Disconnect the housing fan cable from the system board.
8 Remove the four housing fan screws.
Screw Screw
Screw Screw
www.gateway.com
39
Page 45

Replacing Gateway Family Media Center Components
9 Remove the housing fan.
10 Install the replacement housing fan, then secure the fan with the four
housing fan screws you removed in Step 8.
11 Reinstall the DVD drive bracket by following the instructions in “Replacing
the DVD drive” on page 10.
12 Reinstall the front bezel by following the instructions in “Replacing the
front bezel” on page 8.
13 Reinstall the case cover by following the instructions in “Closing the
Family Media Center case” on page 7.
14 Reconnect the power cord and modem, network, and all peripheral device
cables.
Replacing the front I/O board
To replace the front I/O board:
1 Follow the instructions in “Preventing static electricity discharge” on
page 3.
2 Shut down your Family Media Center, then disconnect the power cord and
modem, network, and all peripheral device cables.
40
www.gateway.com
Page 46

Replacing the front I/O board
3 Press the power button to drain any residual power from your Family Media
Center.
4 Remove the case cover by following the instructions in “Opening the
Family Media Center case” on page 5.
5 Remove the front bezel by following the instructions in “Replacing the
front bezel” on page 8.
6 Remove the DVD drive bracket by following the instructions in “Replacing
the DVD drive” on page 10. You do not need to remove the DVD drive
from the DVD drive bracket.
7 Disconnect the three cables connected to the front I/O board.
8 Remove the five screws that secure the front I/O board to the case.
Screws
www.gateway.com
41
Page 47

Replacing Gateway Family Media Center Components
9 Slide the front I/O board toward the back of the case, then lift it out of
the case.
10 Install the replacement front I/O board into the case and align the screw
holes with the I/O board standoffs.
11 Secure the front I/O board with the five screws you removed in Step 8.
12 Connect the cables you disconnected from the front I/O board in Step 7.
13 Reinstall the DVD drive bracket by following the instructions in “Replacing
the DVD drive” on page 10.
14 Reinstall the front bezel by following the instructions in “Replacing the
front bezel” on page 8.
15 Reinstall the case cover by following the instructions in “Closing the
Family Media Center case” on page 7.
16 Reconnect the power cord and modem, network, and all peripheral device
cables.
Replacing the input board
To replace the input board:
1 Follow the instructions in “Preventing static electricity discharge” on
page 3.
2 Shut down your Family Media Center, then disconnect the power cord and
modem, network, and all peripheral device cables.
42
www.gateway.com
Page 48

Replacing the input board
3 Press the power button to drain any residual power from your Family Media
Center.
4 Remove the case cover by following the instructions in “Opening the
Family Media Center case” on page 5.
5 Remove the front bezel by following the instructions in “Replacing the
front bezel” on page 8.
6 Disconnect the two cables connected to the input board.
7 Remove the five screws that secure the input board to the case.
Screw Screw
Screw ScrewScrew
www.gateway.com
43
Page 49

Replacing Gateway Family Media Center Components
8 Remove the input board.
9 Install the replacement input board on the case and align the screw holes
with the input board standoffs.
10 Secure the input board with the five screws you removed in Step 7.
11 Connect the cables you disconnected from the input board in Step 6.
12 Reinstall the front bezel by following the instructions in “Replacing the
front bezel” on page 8.
13 Reinstall the case cover by following the instructions in “Closing the
Family Media Center case” on page 7.
14 Reconnect the power cord and modem, network, and all peripheral device
cables.
Replacing the battery
If the Family Media Center clock does not keep time, replace the system battery.
Use a battery of the same size and voltage as the original battery that was in
your Family Media Center.
Warning Danger of explosion if battery is incorrectly replaced.
Replace only with the same or equivalent type
recommended by the manufacturer. Dispose of used
batteries following the manufacturer’s instructions.
44
www.gateway.com
Page 50

Replacing the battery
To replace the battery:
1 Restart your Family Media Center, then press F2 when the Gateway logo
appears. The BIOS Setup utility opens.
2 Write down all the values in the menus and submenus, then exit from the
utility.
3 Shut down your Family Media Center.
4 Follow the instructions in “Preventing static electricity discharge” on
page 3.
5 Disconnect the power cord and modem, network, and all peripheral device
cables.
6 Press the power button to drain any residual power from your Family Media
Center.
7 Remove the case cover by following the instructions in “Opening the
Family Media Center case” on page 5.
8 Locate the old battery on the system board and note its orientation. You
will need to install the new battery the same way.
9 Slide the metal tab toward the back of the case and lift the battery up out
of the battery slot.
www.gateway.com
45
Page 51

Replacing Gateway Family Media Center Components
10 Make sure that the positive (+) side of the new battery is facing toward
the back of the case, then press the battery into the slot until the metal
tab snaps over the battery.
11 Reinstall the case cover by following the instructions in “Closing the
Family Media Center case” on page 7.
12 Reconnect the power cord and modem, network, and all peripheral device
cables.
13 Turn on your Family Media Center.
14 Open the BIOS Setup utility.
15 In the BIOS Setup utility, restore any settings that you wrote down in
Step 2.
16 Save all your settings and exit the BIOS Setup utility.
Replacing the fan sink module
To replace the fan sink module:
1 Follow the instructions in “Preventing static electricity discharge” on
page 3.
2 Shut down your Family Media Center, then disconnect the power cord and
modem, network, and all peripheral device cables.
3 Press the power button to drain any residual power from your Family Media
Center.
4 Remove the case cover by following the instructions in “Opening the
Family Media Center case” on page 5.
5 Remove the front bezel by following the instructions in “Replacing the
front bezel” on page 8.
6 Remove the DVD drive bracket by following the instructions in “Replacing
the DVD drive” on page 10. You do not need to remove the DVD drive
from the DVD drive bracket.
46
www.gateway.com
Page 52

Replacing the fan sink module
7 Disconnect the processor fan.
8 Press one of the processor fan clips down, then outward to release the
processor fan and heat sink. Repeat for the other processor fan clip.
9 Lift the fan sink module off of the processor.
www.gateway.com
47
Page 53

Replacing Gateway Family Media Center Components
10 Remove the plastic cover that covers the heat sink grease on the bottom
of the replacement fan sink module.
11 Align the replacement fan sink module to fit inside the retention module,
then set the fan sink module on the processor.
12 Secure the fan sink module with the processor fan clips. Make sure that
the clips are correctly aligned and secured to hold the fan sink module in
place.
13 Reinstall the DVD drive bracket by following the instructions in “Replacing
the DVD drive” on page 10.
14 Reinstall the front bezel by following the instructions in “Replacing the
front bezel” on page 8.
15 Reinstall the case cover by following the instructions in “Closing the
Family Media Center case” on page 7.
16 Reconnect the power cord and modem, network, and all peripheral device
cables.
Replacing the system board
To replace the system board:
1 Follow the instructions in “Preventing static electricity discharge” on
page 3.
2 Shut down your Family Media Center, then disconnect the power cord and
modem, network, and all peripheral device cables.
3 Press the power button to drain any residual power from your Family Media
Center.
4 Remove the case cover by following the instructions in “Opening the
Family Media Center case” on page 5.
5 Remove the front bezel by following the instructions in “Replacing the
front bezel” on page 8.
6 Remove the DVD drive bracket by following the instructions in “Replacing
the DVD drive” on page 10. You do not need to remove the DVD drive
from the DVD drive bracket.
48
www.gateway.com
Page 54

Replacing the system board
7 Remove the modem card by following the instructions in “Replacing the
modem card” on page 27.
8 Remove the video card by following the instructions in “Replacing the
video card” on page 29.
9 Remove the audio card by following the instructions in “Replacing the
video card” on page 29.
10 Remove the TV/FM tuner card by following the instructions in “Replacing
the TV/FM tuner card” on page 34.
11 Remove the memory by following the instructions in “Replacing memory”
on page 36.
12 Remove the fan sink module by following the instructions in “Replacing
the fan sink module” on page 46.
13 Disconnect the front I/O cable, input board cable, and LED cables.
www.gateway.com
49
Page 55

Replacing Gateway Family Media Center Components
14 Remove the nine screws that secure the system board to the case.
Screw Screw Screw
Screw
Screw
Screw
15 Lift the system board out of the case.
16 Install the replacement system board in the case. Align the system board
mounting holes with the standoffs in the case.
17 Secure the system board with the nine screws you removed in Step 14.
18 Connect the front I/O cable, input board cable, and LED cables.
19 Reinstall the fan sink module by following the instructions in “Replacing
the fan sink module” on page 46.
Screw
Screw
Screw
50
www.gateway.com
Page 56

Replacing the system board
20 Reinstall the memory by following the instructions in “Replacing memory”
on page 36.
21 Reinstall the TV/FM tuner card by following the instructions in “Replacing
the TV/FM tuner card” on page 34.
22 Reinstall the audio card by following the instructions in “Replacing the
video card” on page 29.
23 Reinstall the video card by following the instructions in “Replacing the
video card” on page 29.
24 Reinstall the modem card by following the instructions in “Replacing the
modem card” on page 27.
25 Reinstall the DVD drive bracket by following the instructions in “Replacing
the DVD drive” on page 10.
26 Reinstall the front bezel by following the instructions in “Replacing the
front bezel” on page 8.
27 Reinstall the case cover by following the instructions in “Closing the
Family Media Center case” on page 7.
28 Reconnect the power cord and modem, network, and all peripheral device
cables.
www.gateway.com
51
Page 57

Replacing Gateway Family Media Center Components
52
www.gateway.com
Page 58

Contacting
Gateway
Use this section to learn how to:
■ Get telephone support
■ Use automated troubleshooting systems
■ Get tutoring and training
2
53
Page 59

Chapter 2: Contacting Gateway
Telephone support
Before calling Gateway Technical Support
If you have a technical problem with your Family Media Center, follow these
recommendations before contacting Gateway Technical Support:
■ Make sure that your Family Media Center is connected correctly to a
grounded AC outlet that is supplying power. If you use a power strip, make
sure that it is switched on.
■ If a peripheral device, such as a keyboard or mouse, does not appear to
work, make sure that all cables are plugged in securely.
■ If you have recently installed hardware or software, make sure that you
have installed it according to the instructions provided with it. If you did
not purchase the hardware or software from Gateway, see the
manufacturer’s documentation and technical support resources.
■ If you have “how to” questions about using a program, check:
■ Online Help
54
■ Printed documentation
■ The Microsoft Windows documentation
■ See the troubleshooting section of this chapter.
Warning To avoid bodily injury, do not attempt to troubleshoot your
Family Media Center problem if:
■
Power cords or plugs are damaged
■
Liquid has been spilled into your Family Media Center
■
Your Family Media Center was dropped
■
The case was damaged
Instead, unplug your Family Media Center and contact a
qualified Family Media Center technician.
■ Have your client ID, serial number, and order number available, along with
a detailed description of your problem, including the exact text of any error
messages, and the steps you have taken. For more information, see
“Identifying the model” on page 2.
■ Make sure that your Family Media Center is nearby at the time of your
call. The technician may have you follow appropriate troubleshooting
steps.
www.gateway.com
Page 60

Telephone support
Gateway offers a wide range of customer service, technical support, and
information services.
Automated troubleshooting system
Service description How to reach
Telephone support
Use an automated menu system and your
telephone keypad to find answers to common
problems.
800-846-2118 (US)
877-709-2945 (Canada)
Telephone numbers
You can access the following services through your telephone to get answers
to your questions:
Resource Service description How to reach
Fax on demand
support
Gateway’s
fee-based
software tutorial
service
Gateway
Technical
Support
Order a catalog of documents on common
problems, then order documents by document
numbers. The documents will be faxed to you.
Get tutorial assistance for software issues billed by
the minute.
Talk to a Gateway Technical Support representative
about a non-tutorial technical support question.
(See “Before calling Gateway Technical Support”
on page 54 before calling.)
TDD Technical Support (for hearing impaired) is
available:
Weekdays 6:00 a.m. - 8:00 p.m. Central Time
Weekends 6:00 a.m. - 5:00 p.m. Central Time
800-846-4526 (US)
877-709-2951 (Canada)
800-229-1103 (charged
to your credit card)
900-555-4695 (charged
to your telephone bill)
800-846-2301 (US)
800-846-3609 (Canada
and Puerto Rico)
605-232-2191 (all other
countries)
800-846-1778 (TDD)
America Online Get support for your America Online ISP account. 800-827-6364 (US)
888-265-4357 (Canada)
CompuServe Get support for your CompuServe ISP account. 800-848-8990 (US)
Sales,
accounting, and
warranty
Get information about available systems, pricing,
orders, billing statements, warranty service, or
other non-technical issues.
www.gateway.com
800-846-2000 (US)
888-888-2037 (Canada)
55
Page 61

Chapter 2: Contacting Gateway
Tutoring and training
Gateway's Technical Support professionals cannot provide hardware and
software training or tutorial services. Instead, Gateway recommends the
following tutoring and training resources.
Self-help
If you have how-to questions about using your Gateway-supplied hardware or
software, see the following resources:
■ The printed or online documentation that came with your hardware or
software. In many cases, additional product information and online
documents for Gateway-supplied hardware can be found in our Web site's
Documentation Library.
■ This user's guide.
■ The software publisher's Web site.
■ The hardware manufacturer’s Web site.
Help and
Support
For more how-to information about Windows XP Media
Center 2004, click Start, then click Help and Support.
Type the keyword practice in the HelpSpot Search box
, then click the arrow.
Tut o r i ng
For help on using hardware or software that came with your Gateway Family
Media Center, contact Gateway's fee-based tutorial hotline:
■ 800-229-1103 (rate charged per minute; charged to a major credit card)
■ 900-555-4695 (rate charged per minute; charged to your telephone bill)
56
www.gateway.com
Page 62

Tutoring and training
Training
Gateway provides the following in-person and computerized training:
Resource Service description For more information
In-Store Training
at Gateway
stores
Gateway
Learning
Libraries
Online Training
from
Learn@Gateway
Our friendly and knowledgeable software
trainers can teach you how to use the Internet
and the most popular software programs,
including Microsoft Word, Excel, and
PowerPoint.
A variety of courses and tutorials are available
on CD. Select from several easy-to-use
learning libraries.
More than 450 online courses are available
from Learn@Gateway. All you have to do is go
online and log in. You select the subject
matter, and the learning format (self-paced
tutorials or virtual classrooms), all from the
comfort of your Family Media Center.
www.gateway.com/country
www.gateway.com/training
www.learnatgateway.com/
www.gateway.com
57
Page 63

Chapter 2: Contacting Gateway
58
www.gateway.com
Page 64

Page 65

MAN FMC 901 ASP RPL GDE R0 12/03
 Loading...