


 Loading...
PowerLite® Home Cinema 8100/8500 UB
Home Theater Projector
User’s Guide
Copyright Notice
All rights reserved. No part of this publication may be reproduced, stored in a retrieval system, or transmitted in any form or by any means, electronic, mechanical, photocopying, recording, or otherwise, without the prior written permission of Seiko Epson Corporation. The information contained herein is designed only for use with this Epson product. Epson is not responsible for any use of this information as applied to other products.
Neither Seiko Epson Corporation nor its affiliates shall be liable to the purchaser of this product or third parties for damages, losses, costs, or expenses incurred by purchaser or third parties as a result of: accident, misuse, or abuse of this product or unauthorized modifications, repairs, or alterations to this product, or (excluding the U.S.) failure to strictly comply with Seiko Epson Corporation’s operating and maintenance instructions.
Seiko Epson Corporation shall not be liable for any damages or problems arising from the use of any options or any consumable products other than those designated as Original Epson Products or Epson Approved Products by Seiko Epson Corporation.
Trademarks
Epson is a registered trademark, 1080Perfect is a trademark, and Epson Exceed Your Vision is a registered logomark of Seiko Epson Corporation.
PowerLite and PrivateLine are registered trademarks, DigiScan and AccuCinema are trademarks, and Extra Care and Epson Connection are service marks of Epson America, Inc.
HDMI, the HDMI logo, and High-Definition Multimedia Interface are trademarks or registered trademarks of HDMI Licensing, LLC.
Pixelworks, DNX, and the DNX logo are trademarks of Pixelworks, Inc.
x.v.Color is a trademark of Sony Corporation.
General Notice: Other product names used herein are for identification purposes only and may be trademarks of their respective owners. Epson disclaims any and all rights in those marks.
This information is subject to change without notice.
© 2009 Epson America, Inc. |
9/09 |
|
CPD-27624R1 |
2
Contents
Introduction |
7 |
Projector Parts |
8 |
Remote Control |
10 |
Optional Accessories |
11 |
Registration and Warranty |
11 |
Using This Manual |
12 |
Setting Up the Projector |
13 |
Choosing a Location |
13 |
Installing the Projector |
17 |
Connecting the Cables |
19 |
Connecting Video and Computer Equipment |
19 |
Making Other Connections |
21 |
Installing Batteries in the Remote Control |
22 |
Turning the Projector On and Off |
22 |
Turning On the Projector |
22 |
Turning Off the Projector |
23 |
Selecting the Image Source |
24 |
Positioning the Image |
25 |
Making Basic Adjustments |
27 |
Focusing and Zooming |
27 |
Choosing the Aspect Ratio |
28 |
Choosing the Color Mode |
29 |
Advanced Color Adjustments |
30 |
Adjusting the Gamma Setting |
30 |
Adjusting RGBCMY |
31 |
Locking the Projector |
32 |
Contents 3
Making Detailed Adjustments |
33 |
Using the Menu System |
33 |
Changing How the Menus Display |
34 |
Adjusting the Picture Quality |
35 |
Input Brightness Settings |
35 |
Sharpness and Picture Quality Settings |
37 |
Color Settings |
39 |
Adjustments for Computer Images |
41 |
Selecting Memory Settings and Resetting the Projector |
42 |
Selecting Memory Settings |
42 |
Creating Memory Settings |
43 |
Renaming Memory Settings |
43 |
Deleting Saved Memory Settings |
43 |
Resetting the Projector |
44 |
Customizing Projector Features |
45 |
Image Sizing |
45 |
Screen Options |
46 |
Other Setup Options |
46 |
Maintenance |
49 |
Cleaning the Lens |
49 |
Cleaning the Projector Case |
50 |
Cleaning and Replacing the Air Filter |
50 |
Replacing the Lamp |
52 |
Resetting the Lamp Usage Timer |
55 |
Checking the Projector Status |
55 |
Storing the Projector |
56 |
Transporting the Projector |
56 |
4 Contents
Problem Solving |
57 |
What To Do When the Lights Come On or Flash |
57 |
Solving Picture Problems |
59 |
Solving Remote Control Problems |
62 |
Where to Get Help |
63 |
Specifications |
65 |
General |
65 |
Lamp |
66 |
Remote Control |
66 |
Dimensions |
66 |
Electrical |
66 |
Environmental |
67 |
Safety |
67 |
Compatible Video Formats |
68 |
ESC/VP21 Command Codes |
70 |
Notices |
71 |
Important Safety Information |
71 |
FCC Compliance Statement |
73 |
Declaration of Conformity |
74 |
Epson America, Inc. Limited Warranty |
75 |
Index |
77 |
Contents 5
6 Contents
Introduction
The PowerLite® Home Cinema 8100/8500 UB projector lets you enjoy theater-quality images in the relaxing environment of your own home. Designed especially for home cinema use, it offers these outstanding features:
■Native 1080p (1920 × 1080) resolution, dynamic contrast ratio up to 200000:1 (36000:1 for the Home Cinema 8100), and up to 1600 lumens (Home Cinema 8500 UB) or 1800 lumens (Home Cinema 8100) of brightness (white light output and color light output) for incredibly rich, sharp images in any room lighting
■Auto Iris system that constantly controls the light output based on the gamma and black/white levels of your projected content, for perfectly adjusted images and deepest blacks
■Epson® Crystal Fine 3LCD technology for reliable picture quality, increased contrast ratio and uniform colors
■1080Perfect™ video processing using HQV® Reon-VX technology for more film-like images free of noise or artifacts
■10-bit (Home Cinema 8100) or 12-bit (Home Cinema 8500 UB) color quality for unmatched color accuracy, with over a billion colors available
■Epson AccuCinema™ color management delivered by the built-in optical Cinema Filter blocks out excess light for an expanded, purer color range and sophisticated grayscale tracking
■HDMI™ (High Definition Multimedia Interface™) port for superior, uncompressed digital video
■True 16:9 wide-format projection
■Flexible setup configurations, including front projection and ceiling mounted, with vertical and horizontal offset lens shift
■Seven color modes, including x.v.Color™, to quickly optimize viewing for different lighting environments, and a vast array of custom color adjustments
Introduction 7
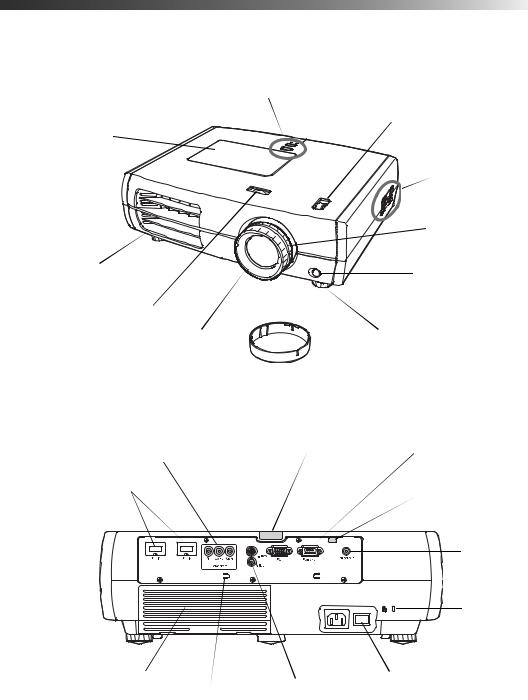
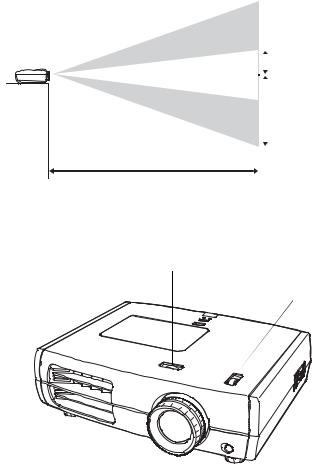
Projector Parts
Front
Control panel (top)
Vertical lens shift dial
Lamp cover
Control panel (side)
Zoom ring
Ventilation slots
Infrared receiver
Horizontal lens shift dial
Adjustable foot
Focus ring
Lens cover
Back
Component |
|
Infrared receiver |
video port |
|
Control (RS-232C) port |
|
PC port |
|
|
S-Video port |
|
|
|
|
HDMI ports |
|
Lamp cover release |
|
|
|
|
|
Trigger out |
|
|
port |
|
|
Kensington® |
|
|
lock port |
Air intake (filter) |
Main power switch |
|
Video port |
||
|
||
|
Cable holder |
|
|
AC power inlet |
8 Introduction
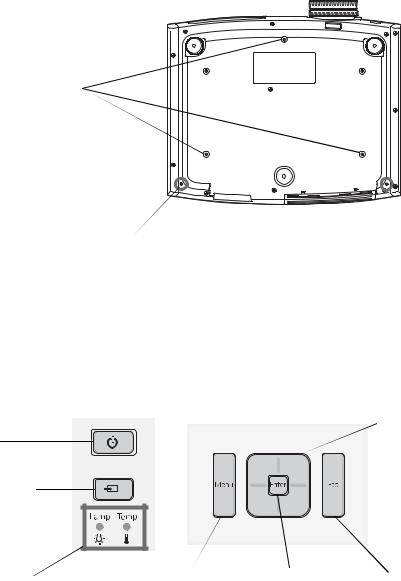
Bottom
Mounting bracket  attachment points
Optional cable cover attachment points (brass colored)
Projector Control Panel
Top control panel |
Side control panel |
Menu navigation Power 
 button
button
Source button Switches the video input source
Warning lights |
Menu button |
Enter button |
Esc button |
|
Displays the |
Selects menu items or |
Exits the current |
|
menus |
opens the line menu |
menu item |
Introduction 9
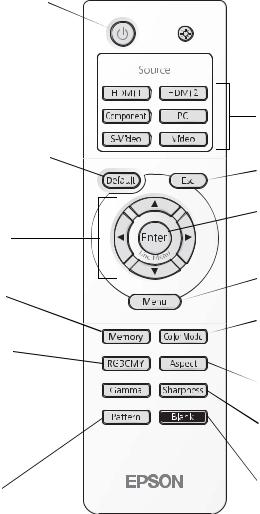
Remote Control
Power button
Turns projector on or off Illumination button Lights the remote control buttons for easy viewing
|
Source buttons |
|
|
Switch between equipment |
|
Default button |
connected to the projector |
|
|
||
Restores default settings |
|
|
when menu is displayed |
Esc (escape) button |
|
|
Exits the current menu item |
|
|
Enter/Line Menu button |
|
Menu navigation |
Selects menu items or opens |
|
the line menu |
||
buttons |
|
|
|
Menu button |
|
Memory button |
Displays the projector’s menus |
|
Recalls custom |
|
|
picture settings |
Color Mode button |
|
|
Optimizes viewing for |
|
RGBCMY button |
different lighting environments |
|
|
||
Adjusts the hue, |
|
|
saturation, and brightness |
Aspect button |
|
for each color |
||
Changes the picture’s aspect ratio |
||
|
||
Gamma button |
Sharpness button |
|
Adjusts the gamma values |
||
of the screen display |
Adjusts image sharpness |
|
Pattern button |
Blank button |
|
Temporarily stops projection or |
||
Displays test patterns |
||
hides the menu screen |
||
to adjust the image |
||
|
10 Introduction
Optional Accessories
Epson provides the following optional accessories for the projector:
Product |
Part number |
|
|
Replacement lamp |
V13H010L49 (ELPLP49) |
|
|
Air filter replacement |
V13H134A21 (ELPAF21) |
|
|
Kensington security lock (anti-theft device) |
ELPSL01 |
|
|
Cable cover |
V12H003002 (ELPCC01W) |
|
|
Projector mount |
ELPHB550 |
|
|
You can purchase accessories from an authorized Epson reseller. To find the nearest reseller, please call 800-GO-EPSON (800-463-7766). To purchase online, visit www.epsonstore.com (U.S. sales) or www.epson.ca (Canadian sales).
Registration and Warranty
Your projector comes with a basic two-year carry-in warranty. For details, see page 75.
In addition, Epson offers free Extra CareSM Home Service. In the unlikely event of an equipment failure, you won’t have to wait for your unit to be repaired. Instead, Epson will ship you a replacement unit anywhere in the United States or Canada. See your Extra Care Home Service brochure for details.
To register, simply follow the registration instructions on the CD, or register online at www.epson.com/webreg. Registering also lets you receive special updates on new accessories, products, and service.
Introduction 11

Using This Manual
This book contains all the information you need to use the projector, in addition to basic setup and maintenance instructions, troubleshooting tips, important safety instructions, specifications, and warranty information.
Please follow these guidelines as you read through the manual:
Warning: Must be followed carefully to avoid bodily injury.
Caution: Must be observed to avoid damage to your equipment.
Note: Contains important information about your projector.
Tip: Contains helpful projection tips.
Need additional help? Take advantage of Epson’s automated support services 24 hours a day at www.epson.com/support. Use this site to view FAQs (Frequently Asked Questions) or product information and e-mail your questions to Epson support.
If you need more help, you can use the Epson PrivateLine® Support service. Call
(800) 637-7661 and enter the PIN on the PrivateLine support card that came with your projector.
12 Introduction
Setting Up the Projector
Follow the instructions in this section to choose a location for the projector, connect the cables, and display an image.
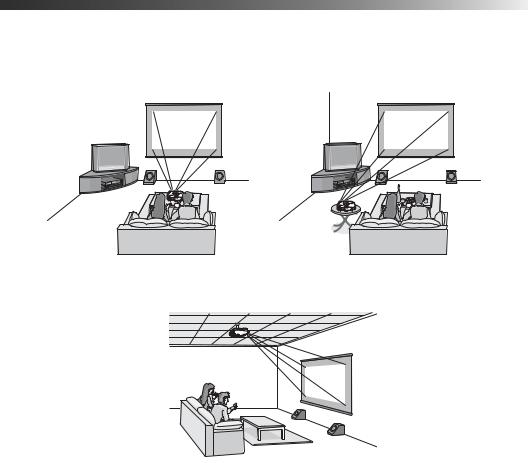
Choosing a Location
You can install the projector for the viewing setups shown below, as well as rear projection.
Center |
|
|
|
|
|
Side |
|
|
|||||
|
|
|
|
|
|
|
|
|
|
|
|
|
|
|
|
|
|
|
|
|
|
|
|
|
|
|
|
Ceiling
Setting Up the Projector 13
Ideally, keep the projector level and place it at a height so its lens is centered between the top and bottom of the screen, as shown below. If this is not possible, use the lens shift dials to reposition the image. As a rule of thumb, you can use lens shift to move the image up or down by nearly its full height, and left or right by about one-half its width (for details, see page 26).
|
|
|
Offset A |
|
|
|
|
|
|
|
|
|
|
|
Offset B |
|
|
|
|
|
|
|
|
|
|
|
|
|
|
|
Offset refers to distance from |
|
|
|
|
|
|
|
|
|
|
|
bottom of image to center of |
Projection distance |
|
|
lens using maximum lens shift. |
If you place the projector off to the side, aim it straight ahead (rather than at the center of the screen), then use the horizontal lens shift dial to center the image on the screen.
Horizontal lens shift dial
Vertical lens shift dial
Caution: Do not try to move the lens by hand, or you may damage the projector. Always use the lens shift dials to change the lens position.
14 Setting Up the Projector
The size of the image is determined by the distance from the projector’s lens to the screen. Depending on your display settings and how you use the Zoom ring, the actual size may differ. Use these tables as a guide for projector placement:
16:9 aspect ratio
|
Diagonal image size |
|
|
Horizontal |
Projection distance |
(width × height) |
Offset A |
Offset B |
Offset |
|
|
|
|
|
2.8 to 6.2 feet |
30 in. (26 × 15 in.) |
6.8 in. |
21.5 in. |
0 to 11.5 in. |
0.87 to 1.88 m |
76.2 cm (66 × 37 cm) |
17 cm |
55 cm |
0 to 29 cm |
|
|
|
|
|
3.8 to 8.3 feet |
40 in. (35 × 20 in.) |
9.1 in. |
28.7 in. |
0 to 15.4 in. |
1.17 to 2.52 m |
101.6 cm (89 × 50 cm) |
23 cm |
73 cm |
0 to 39 cm |
|
|
|
|
|
5.8 to 12.5 feet |
60 in. (51 × 28 in.) |
13.6 in. |
43.0 in. |
0 to 23.1 in. |
1.77 to 3.80 m |
152.4 cm (130 × 75 cm) |
35 cm |
109 cm |
0 to 59 cm |
|
|
|
|
|
7.8 to 16.7 feet |
80 in. (71 × 39 in.) |
18.2 in. |
57.4 in. |
0 to 30.8 in. |
2.38 to 5.0 m |
203.2 cm (180 × 100 cm) |
46 cm |
146 cm |
0 to 78 cm |
|
|
|
|
|
9.8 to 20.9 feet |
100 in. (87 × 47 in.) |
22.7 in. |
71.7 in. |
0 to 38.5 in. |
2.98 to 6.36 m |
254 cm (220 × 120 cm) |
58 cm |
182 cm |
0 to 98 cm |
|
|
|
|
|
11.8 to 25.1 feet |
120 in. (106 × 59 in.) |
27.0 in. |
86.0 in. |
0 to 46.1 in. |
3.59 to 7.64 m |
305 cm (270 × 150 cm) |
69 cm |
219 cm |
0 to 117 cm |
|
|
|
|
|
14.7 to 31.4 feet |
150 in. (130 × 75 in.) |
34.0 in. |
107.6 in. |
0 to 57.7 in. |
4.50 to 9.56 m |
381 cm (330 × 190 cm) |
86 cm |
273 cm |
0 to 14.7 cm |
|
|
|
|
|
19.7 to 41.8 feet |
200 in. (173 × 98 in.) |
45.4 in. |
143.5 in. |
0 to 76.9 in. |
6.01 to 12.76 m |
508 cm (440 × 249 cm) |
115 cm |
364 cm |
0 to 195 cm |
|
|
|
|
|
4:3 aspect ratio
|
Diagonal image size |
|
|
Horizontal |
Projection distance |
(width × height) |
Offset A |
Offset B |
Offset |
|
|
|
|
|
3.5 to 7.6 feet |
30 in. (24 × 18 in.) |
8.3 in. |
26.3 in. |
0 to 14.1 in. |
1.07 to 2.31 m |
76.2 cm (61 × 46 cm) |
21 cm |
67 cm |
0 to 36 cm |
|
|
|
|
|
4.7 to 10.1 feet |
40 in. (32 × 24 in.) |
11.1 in. |
35.1 in. |
0 to 18.8 in. |
1.44 to 3.09 m |
101.6 cm (81 × 61 cm) |
28 cm |
89 cm |
0 to 48 cm |
|
|
|
|
|
7.1 to 15.3 feet |
60 in. (47 × 35 in.) |
16.7 in. |
52.7 in. |
0 to 28.2 in. |
2.18 to 4.66 m |
152.4 cm (120 × 90 cm) |
42 cm |
134 cm |
0 to 72 cm |
|
|
|
|
|
9.6 to 20.4 feet |
80 in. (63 × 47 in.) |
22.2 in. |
70.2 in. |
0 to 37.6 in. |
2.92 to 6.23 m |
203.2 cm (160 × 120 cm) |
56 cm |
178 cm |
0 to 96 cm |
|
|
|
|
|
12 to 25.5 feet |
100 in. (79 × 59 in.) |
27.8 in. |
87.8 in. |
0 to 47.1 in. |
3.66 to 7.79 m |
254 cm (200 × 150 cm) |
71 cm |
223 cm |
0 to 120 cm |
|
|
|
|
|
Setting Up the Projector 15
4:3 aspect ratio
|
Diagonal image size |
|
|
Horizontal |
Projection distance |
(width × height) |
Offset A |
Offset B |
Offset |
|
|
|
|
|
14.4 to 30.7 feet |
120 in. (94 × 71 in.) |
33.0 in. |
105.0 in. |
0 to 56.5 in. |
4.40 to 9.36 m |
305 cm (240 × 180 cm) |
85 cm |
268 cm |
0 to 143 cm |
|
|
|
|
|
18 to 38.4 feet |
150 in. (118 × 91 in.) |
41.7 in. |
131.7 in. |
0 to 70.6 in. |
5.51 to 11.71 m |
381 cm (300 × 230 cm) |
106 cm |
334 cm |
0 to 179 cm |
|
|
|
|
|
24.2 to 51.3 feet |
200 in. (161 × 118 in.) |
55.6 in. |
175.6 in. |
0 to 94.1 in. |
7.36 to 15.62 m |
508 cm (410 × 300 cm) |
141 cm |
446 cm |
0 to 239 cm |
|
|
|
|
|
To determine the exact image size when you know the projection distance (or the exact projection distance when you know the desired image size), you can use the Image Size Calculator. This program is available on the Epson website at www.epson.com/support.
Also keep these considerations in mind:
■Make sure there is plenty of space for ventilation around and under the projector. Do not set the projector on top of loose materials that could block the vents underneath.
■Make sure the projector is within 9.8 feet (3 m) of a grounded electrical outlet or extension cord.
16 Setting Up the Projector
Installing the Projector
To install the projector, you first need to determine the location, based on the size of your screen (maximum diagonal image size). Use the tables on page 15 as a guide to positioning the projector.
To suspend the projector from a ceiling, you will need the optional projector mount designed for the projector. See page 11 for ordering information. Follow the instructions included with the mount to install the projector.
Warning: When installing or adjusting the ceiling mount, do not use adhesives to prevent the screws from loosening and do not use any type of oil or lubricant. These may cause the projector casing to crack and the projector may fall, causing serious injury and serious damage to the projector.
If you install the projector on the ceiling, you will need to invert the picture so that it appears right side up. Follow these steps:
1.Press the Menu button on the remote control.
2.Open the Settings menu, then select Projection.
3.Select Front/Ceiling.
4. Press the Menu button when done.
Note that you can rotate the Epson logo plate 180 degrees when suspending the projector from a ceiling.
If you are planning to use an AV controller with the projector, refer to the table of ESC/VP21 command codes on page 70. In addition, the projector’s Trigger out port can be used to lower a projection screen (see page 47).
Setting Up the Projector 17

The following illustrations show the dimensions of the projector:
Center of lens
5.4 in. |
|
5.8 in. |
136 mm |
2.8 in. |
148 mm |
|
|
|
|
72 mm |
|
0.5 in. |
0.2 in. |
|
4.5 mm |
|
|
12 mm |
|
|
5.2 in. |
|
|
|
|
|
|
131 mm |
|
|
17.7 in. |
|
|
450 mm |
|
11.8 in. |
3.0 in. |
|
300 mm |
|
75 mm |
5.9 in.
150 mm
2.2 in.
56 mm
1.8 in.
45 mm
5.3 in.
135 mm
15.3 in.
390 mm
6.3 in.
160 mm
M4×9mm
18 Setting Up the Projector
Connecting the Cables
Connecting Video and Computer Equipment
You can connect the projector to many types of video equipment, such as a VCR, DVD player, digital tuner, cable or satellite box, video game console, camcorder, or digital camera. You can also connect it to a desktop or laptop PC or Apple® Macintosh® system. For details on compatible video formats, see page 68.
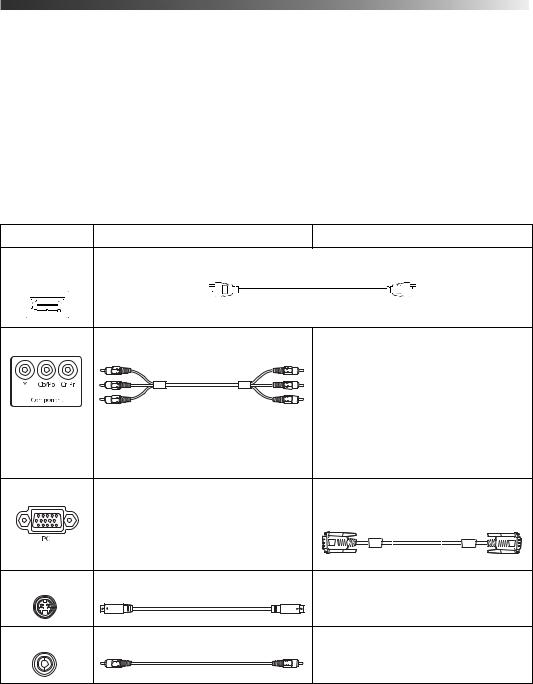
You can connect up to six pieces of video equipment at the same time, using any of the commercially available cables shown below:
Port name |
Video equipment connection |
Computer connection |
HDMI 1/ |
Use an HDMI cable: |
|
HDMI 2 |
|
|
Component |
Use a component video cable |
— |
|
(with RCA-style connectors): |
|
|
Connect the cable to the three |
|
|
component video ports. Match |
|
|
corresponding colors between the |
|
|
cable and the ports. |
|
PC |
— |
Use a Mini D-sub, 15-pin monitor cable |
|
|
to connect to a computer RGB |
|
|
(monitor) port: |
S-Video |
Use an S-video cable: |
— |
Video |
Use an RCA video cable: |
— |
Setting Up the Projector 19
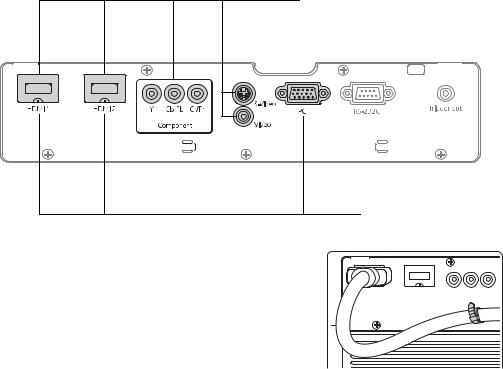
For best results, connect your video equipment to the HDMI port, if possible. If your equipment doesn’t support HDMI, connect it to one of the following ports (highest quality listed first): Component (for component video), S-Video, or Video (for composite video).
Connect video equipment to one of these ports
Connect a computer to one of these ports
When you connect a large or heavy cable to the projector, such as an HDMI cable, it is recommended that you fasten it to one of the two holders using a commercially available cable tie.
20 Setting Up the Projector
Making Other Connections
Connect the power cable and other cables described below, depending on how you plan to use the projector.
■ Plug the power cable into the projector and a grounded electrical outlet.
■ The Trigger out port outputs a 12-volt DC signal when the projector is turned on. This lets a central control system monitor whether the projector is on or off, and can be used to raise or lower your projection screen automatically when the projector is in use.
Connect a 3.5-mm mini jack to the port, as shown. Use the Trigger Out setting to enable the port (see page 47).
■To use an AV controller with the projector, connect a 9-pin null modem serial cable to the RS-232C port. Refer to the table of ESC/VP21 command codes on page 70.
Setting Up the Projector 21
Installing Batteries in the Remote Control
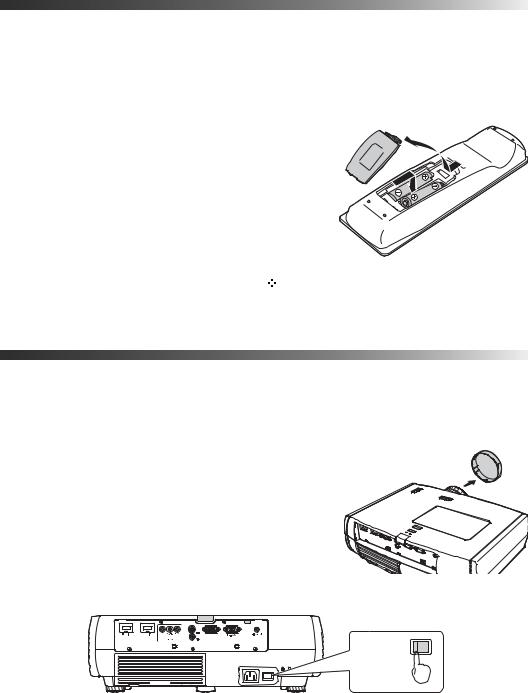
The remote control uses two AA batteries.
Warning: Keep batteries away from children. If a battery is swallowed, contact your doctor immediately.
1. Release the tab and lift open the cover.
2. Insert two new AA batteries as shown.
3. Insert the tab on the cover and press it down until it clicks into place.
Aim the remote control at the screen, or at the front or back of the projector. Make sure you are within 30 feet of the projector.
If you suspect the batteries are weak, press the  illumination button. If the buttons do not glow, replace the batteries.
Turning the Projector On and Off
Turning On the Projector
1. Remove the lens cap.
2. Turn on any connected equipment you plan to use.
3. Turn on the main power switch on the back of the projector.
ON
22 Setting Up the Projector
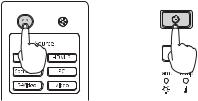
4. Press the P power button on the remote control or projector.
Remote control |
Projector |
||||||
|
|
|
|
|
|
|
|
|
|
|
|
|
|
|
|
|
|
|
|
|
|
|
|
|
|
|
|
|
|
|
|
|
|
|
|
|
|
|
|
Note: To prevent children from turning on the projector, you can use the Child Lock feature. See page 32 for details.
If you’ll be using the projector at an altitude above 4900 feet (1500 meters), turn on High Altitude Mode so the fan can properly cool the projector at the high altitude air pressure. See page 48 for details.
The projector takes about 30 seconds to warm up and display an image. If you don’t see a picture, you may need to change the image source as described on page 24.
Turning Off the Projector
1.Turn off any equipment connected to the projector.
2.Press the P power button on the remote control or projector. When you see a confirmation message, press the P power button again to turn the projector off.
3.When the P power light stops flashing orange and stays on, turn off the projector’s main power switch on the back.
It is now safe to unplug the projector, if necessary.
Caution: Turn off this product when not in use to prolong the life of the projector. Continuous 24-hour-a-day use may reduce the overall life of the product. Never turn off the main power switch without first turning off the projector and letting it cool as described above, or you could damage it and reduce lamp life.
Setting Up the Projector 23
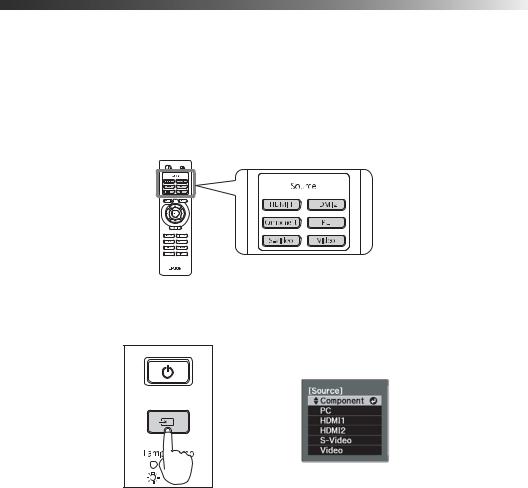
Selecting the Image Source
The source buttons on the projector and remote control let you switch between images from different pieces of equipment connected to the projector (such as a DVD player, cable or satellite box, or video game console).
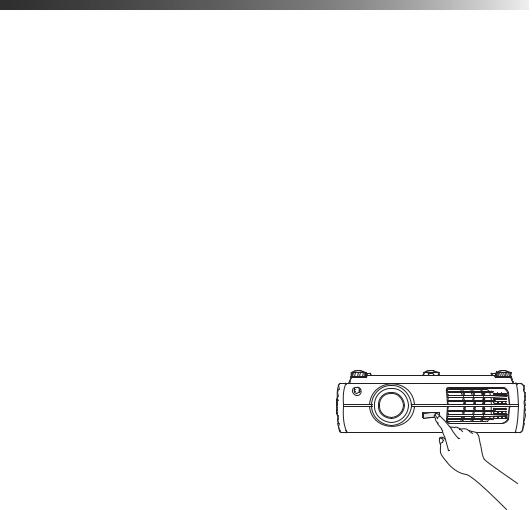
Press the Source button on the remote control that corresponds to the port to which your video source is connected.
If you press the  source button on the projector, you see a list of available sources. Press the
  source button to move through the list and select the desired source.
Note: If an image does not appear, see “Problem Solving” on page 57.
To temporarily turn off the image and darken the screen, press the Blank button on the remote control. Press the Blank button again to return to normal viewing.
24 Setting Up the Projector
Loading...