


ProSense 307/347/367 User's Guide

Contents |
|
ProSense 307/347/367 User's Guide .......................................................................................................... |
7 |
Introduction to Your Product...................................................................................................................... |
8 |
Product Box Contents .......................................................................................................................... |
8 |
Optional Accessories and Replacement Parts ..................................................................................... |
9 |
Notations Used in the Documentation .................................................................................................. |
9 |
Product Buttons.................................................................................................................................. |
10 |
Screen Icons ...................................................................................................................................... |
11 |
Heart Rate Zone Icons ....................................................................................................................... |
13 |
Smartphone Notification Icons ........................................................................................................... |
15 |
Setting Up the Product.............................................................................................................................. |
16 |
Charging the Watch............................................................................................................................ |
16 |
Battery Level Display..................................................................................................................... |
20 |
Turning the Watch On or Off............................................................................................................... |
24 |
Configuring Your Watch ..................................................................................................................... |
24 |
Configuring the Watch Using the Buttons ...................................................................................... |
24 |
Configuring the Watch Using a Smartphone.................................................................................. |
26 |
Acquiring a GPS Signal...................................................................................................................... |
28 |
Connecting the Device to a Smartphone Using Bluetooth.................................................................. |
29 |
Measuring Your Heart Rate................................................................................................................ |
30 |
Calculating Your Stride Length........................................................................................................... |
32 |
Enabling Smartphone Notifications .................................................................................................... |
32 |
Adjusting the Device Display.............................................................................................................. |
34 |
Adjusting the Watch Face and Background Settings..................................................................... |
34 |
Adjusting the Backlight Settings .................................................................................................... |
35 |
Adjusting the Sound and Vibration Settings ....................................................................................... |
36 |
Locking and Unlocking the Watch Buttons ......................................................................................... |
37 |
Measuring and Reviewing Workouts....................................................................................................... |
38 |
Measuring Workouts .......................................................................................................................... |
38 |
Displayable Workout Measurements............................................................................................. |
38 |
Starting Workout Measurement..................................................................................................... |
41 |
3
Stopping Workout Measurement and Saving the Data.................................................................. |
43 |
Recording Laps ............................................................................................................................. |
44 |
Recording Laps During a Run, Walk, or Bike Workout.............................................................. |
45 |
Recording Laps During a Pool Swim Workout .......................................................................... |
46 |
Recording Laps During an Open Water or Indoor Bike Workout............................................... |
46 |
Pausing and Resuming Workout Measurement ............................................................................ |
47 |
Changing Workout Type During Triathlon Measurement............................................................... |
48 |
Monitoring Current Workout Data .................................................................................................. |
48 |
Customizing Workout Measurements with Epson View................................................................. |
49 |
Estimating VO2 Max....................................................................................................................... |
49 |
Controlling Music Playback ................................................................................................................ |
50 |
Using the Stopwatch .......................................................................................................................... |
51 |
Reviewing Workout Data.................................................................................................................... |
52 |
Viewing Workout Data History on Your Watch............................................................................... |
52 |
Measuring and Reviewing Daily Activities .............................................................................................. |
54 |
Activity Measurement and Data Collection......................................................................................... |
54 |
Starting Activity Measurement............................................................................................................ |
54 |
Activity Data Displayed on Your Device......................................................................................... |
55 |
Activities Available for Each Heart Rate Mode............................................................................... |
58 |
Configuring a Target Number of Steps............................................................................................... |
58 |
Configuring a Target Number of Calories to Burn............................................................................... |
60 |
Reviewing Activity Data on Your Watch ............................................................................................. |
60 |
Reviewing Activity Data Using the Epson View App........................................................................... |
61 |
Watch Menu Settings ................................................................................................................................ |
62 |
Time Screen Menus ........................................................................................................................... |
62 |
Measurement Screen Menus ............................................................................................................. |
63 |
Caring for Your Watch .............................................................................................................................. |
66 |
Cleaning Your Watch ......................................................................................................................... |
66 |
Battery Life ......................................................................................................................................... |
67 |
Solving Problems ...................................................................................................................................... |
68 |
Solving Problems Using Your Watch.................................................................................................. |
68 |
Solutions to Watch Screen Problems ............................................................................................ |
68 |
4
Solutions to Watch Charging Problems ......................................................................................... |
69 |
Solutions to Watch Settings Problems........................................................................................... |
69 |
Solutions to GPS Signal Problems ................................................................................................ |
70 |
Solving Problems Using Epson View ................................................................................................. |
70 |
Solutions to Problems Using Epson View...................................................................................... |
71 |
Restarting the Watch.......................................................................................................................... |
71 |
Resetting the Watch ........................................................................................................................... |
72 |
Checking the Firmware Version of Your Watch.................................................................................. |
72 |
Updating Your Watch's Firmware from the Epson View App.............................................................. |
73 |
Updating Your Watch's Firmware from Your Computer...................................................................... |
75 |
Where to Get Help.............................................................................................................................. |
75 |
Technical Specifications .......................................................................................................................... |
77 |
Device Specifications ......................................................................................................................... |
77 |
Optional Accessory Specifications ..................................................................................................... |
79 |
Viewing Safety and Approval Specifications ...................................................................................... |
79 |
Notices ....................................................................................................................................................... |
81 |
Notes on Electromagnetic Waves ...................................................................................................... |
81 |
Copyright Notice................................................................................................................................. |
83 |
Binding Arbitration and Class Waiver ................................................................................................. |
83 |
Trademarks........................................................................................................................................ |
86 |
Copyright Attribution........................................................................................................................... |
87 |
5

ProSense 307/347/367 User's Guide
Welcome to the ProSense 307/347/367 User's Guide.
If you prefer a User's Guide in a different file format, go to epson.com/support (U.S.) or epson.ca/support (Canada), select your product, and select the Manuals and Warranty tab.
7
Introduction to Your Product
Refer to these sections to learn more about your product and this manual.
Product Box Contents
Optional Accessories and Replacement Parts
Notations Used in the Documentation
Product Buttons
Screen Icons
Heart Rate Zone Icons
Smartphone Notification Icons
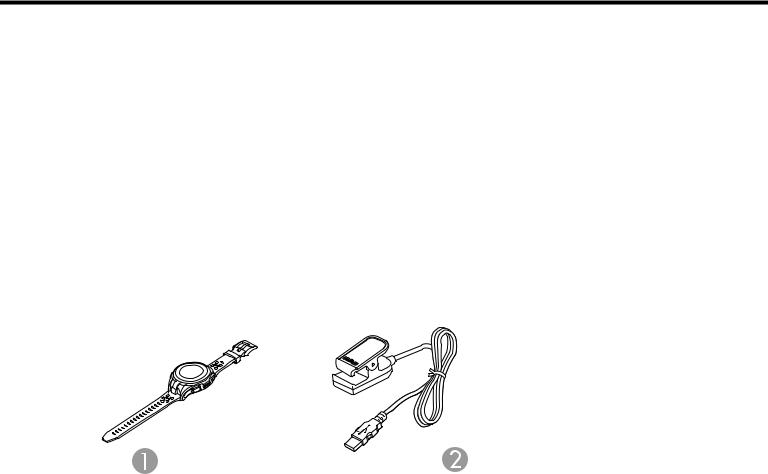
Product Box Contents
Save all the packaging in case you need to ship your product. Always use the original packaging (or equivalent) when shipping.
Make sure your product box included all of these parts:
1ProSense 307, ProSense 347, or ProSense 367 watch
2USB charging clip
Parent topic: Introduction to Your Product
8
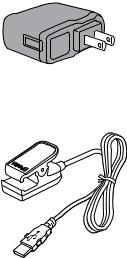
Optional Accessories and Replacement Parts
Epson offers the following optional accessories and replacement parts for your product:
• AC adapter, model SFAC04 (part number: E12E204001)
• USB charging clip, model WPCLP01 (part number: E12E220202)
Parent topic: Introduction to Your Product
Notations Used in the Documentation
Follow the guidelines in these notations as you read your documentation:
•Warnings must be followed carefully to avoid bodily injury.
•Cautions must be observed to avoid damage to your equipment.
•Notes contain important information about your product.
Parent topic: Introduction to Your Product
9
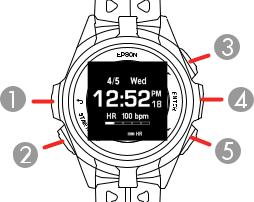
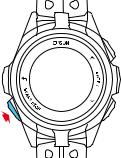
Product Buttons
1 Back button
Press to display the previous screen.
2 Start/Stop button
Hold for 2 seconds to turn the power on or off.
Press to start, pause, or restart workout measurements.
3 Up button
Press to highlight the option above the current option. Hold for 2 seconds to lock or unlock the product buttons. On the Time screen, press to display the Activity screen.
On the Measurement and Activity screens, press to switch between available information screens.
4 Enter button
Press to select the highlighted option.
On the Time screen, press to display the Menu screen. On the Measurement screen, press to record laps.
On the Activity screen, press to display your activity history.
10
5 Down button
Press to highlight the option below the current option.
On the Time screen, press to display the Activity Selection screen.
On the Measurement and Activity screens, press to switch between available information screens.
Parent topic: Introduction to Your Product
Screen Icons
The icons in the table here may appear on your device display screen.
Icon Description
Run mode
Walk mode
Bike mode
Treadmill mode
Pool swimming mode
Open water swimming mode
Triathlon mode
Indoor running mode
Indoor biking mode
Other outdoor activity mode
Other indoor activity mode
Stopwatch mode
GPS connected (watch is locating a GPS signal when the icon is flashing)
Searching for Bluetooth device
Connecting to Bluetooth device
Connected to USB device
Number of steps
11

Icon Description
Distance
Calories burned
Speed
Measuring heart rate
Heart rate
Laps
Pace
Pause
Cadence
Stride
Time
Sprint interval
Rest interval
Distance difference
Time difference
Triathlon transition
Swim stroke rate
Swim stroke time
Swim stroke count
Swim turns/laps
Swim SWOLF score (lap time + lap stroke count)
Start/resume measurement
Measurement failed
12

Icon |
Description |
|
Exercise intensity |
|
|
|
Activity target |
|
High heart rate (normal activities) |
|
Low heart rate (normal activities) |
|
|
|
Deep sleep |
|
Light sleep |
|
|
|
Settings |
|
|
|
Activity history |
|
|
|
Verification |
|
Facebook or other social media notification |
|
|
|
Email notification |
|
|
|
Phone notification |
|
|
|
Calendar notification |
|
|
|
Alarm |
|
|
|
Battery level |
|
Low battery warning |
|
|
|
Charging error |
|
Buttons locked |
|
Buttons unlocked |
Parent topic: Introduction to Your Product
Heart Rate Zone Icons
The icons in the table may appear on your watch screen when monitoring your heart rate during a workout.
13
Icon |
Description |
|
|
|
Heart Rate Zone 1 |
|
|
Gentle exercise intensity, such as walking at a slow pace |
|
|
|
|
|
|
Heart Rate Zone 2
Moderate exercise intensity, such as walking quickly or jogging
Heart Rate Zone 3
Endurance exercise intensity, such as low-intensity running
Heart Rate Zone 4
Strengthening exercise intensity, such as moderate-intensity running
Heart Rate Zone 5
Highest exercise intensity, such as high-intensity running or sprinting
Parent topic: Introduction to Your Product
14

Smartphone Notification Icons
The icons in the table here may appear on your watch display screen when your watch is paired with your smartphone and you receive a phone, email or other service notification.
Icon |
Text |
Description |
|
Calling or Missed Call |
Your watch displays the first 10 characters of the caller's name if |
|
|
your watch's display language is English and the caller's contact |
|
|
information is saved in your smartphone. If your watch is set to |
|
|
another language or the contact isn't saved, the caller's phone |
|
|
number is displayed. |
|
Your watch displays the first 10 characters of the sender's email |
|
|
|
address and subject. |
|
Text |
Your watch displays the first 10 characters of the sender's text |
|
|
message. |
|
Schedule |
Displays a scheduled event if your watch is set up to trigger a |
|
|
schedule notification. |
|
Your watch displays the first 10 characters of the notification text |
|
|
|
if your watch's display language is English. If your watch is set to |
|
||
|
another language, only the notification icon appears on your |
|
|
|
|
|
LINE |
watch. |
|
|
|
|
|
|
|
Other |
|
Parent topic: Introduction to Your Product
15

Setting Up the Product
Follow the instructions in these sections to set up your product for use.
Charging the Watch
Turning the Watch On or Off
Configuring Your Watch
Acquiring a GPS Signal
Connecting the Device to a Smartphone Using Bluetooth
Measuring Your Heart Rate
Calculating Your Stride Length
Enabling Smartphone Notifications
Adjusting the Device Display
Adjusting the Sound and Vibration Settings
Locking and Unlocking the Watch Buttons
Charging the Watch
Before using your watch, you need to charge its battery using the USB charging clip and either the optional AC adapter or a computer with a USB port capable of charging external devices.
It takes approximately 2.5 to 3.5 hours to fully charge your watch, depending on your charging method.
Charge your watch in an environment with a temperature from 41 to 95 °F (5 to 35 °C).
Note: If you charge your watch in an environment outside the required temperature range, you see this screen on your watch:
16
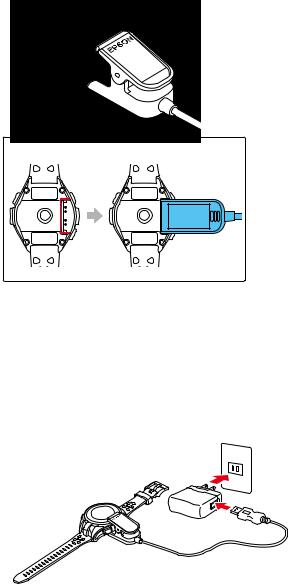
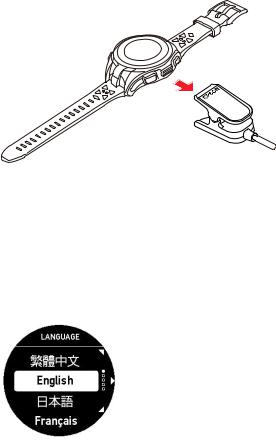
1.Attach the USB charging clip to your watch as shown below. The charging clip should fit into the groove at the back of your watch.
Caution: Do not attach the USB charging clip to your watch if either the clip or your watch are wet or dirty. This may cause corrosion, communication failures, or other problems.
2.Connect the USB charging clip to one of the following devices:
•AC adapter: Connect the USB charging clip to the USB port on the optional AC adapter and plug the AC adapter into an electrical outlet.
17
Caution: Only use the optional AC adapter that is compatible with your product to charge your watch, or the watch may not charge or operate correctly.
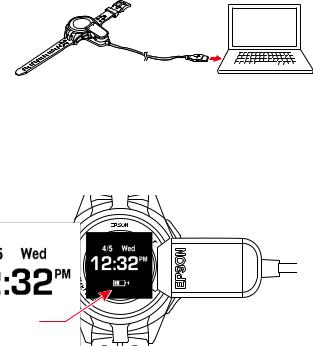
•Computer: Connect the USB charging clip to a USB port on your computer that is capable of charging external devices.
Note: USB charging from a computer port may not work with all computers. Do not connect the USB charging clip to a USB hub or other intermediate device.
Charging begins and you see a screen displaying the battery level on your watch.
If you connected your watch to a computer where you have already installed the Epson View Uploader software, the software starts automatically on your computer. Close the software window as necessary.
18
3.When charging is complete and the watch screen displays the message Completed, you can open the clip fully and disconnect the USB charging clip from your watch.
Note: Do not disconnect the USB charging clip before your watch is fully charged or the battery icon may not accurately display the remaining level of power in the battery.
Note: If you continue to charge the watch after the battery level reaches 100%, the watch engages an overcharge prevention feature to protect your watch.
4.Disconnect the USB cable from the AC adapter or your computer, and unplug the AC adapter if you used it.
If this is the first time you have charged your watch, you see the Language screen:
5. Press the  Up or
Up or  Down button to select your language and press the
  Enter button.
19
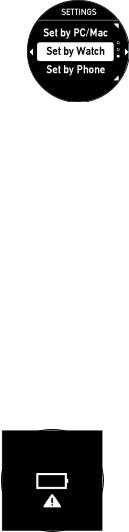
You see the Settings screen:
6. Configure your watch using one of the available methods. Battery Level Display
Parent topic: Setting Up the Product
Related concepts
Battery Life
Related references
Solutions to Watch Charging Problems
Related topics
Configuring Your Watch
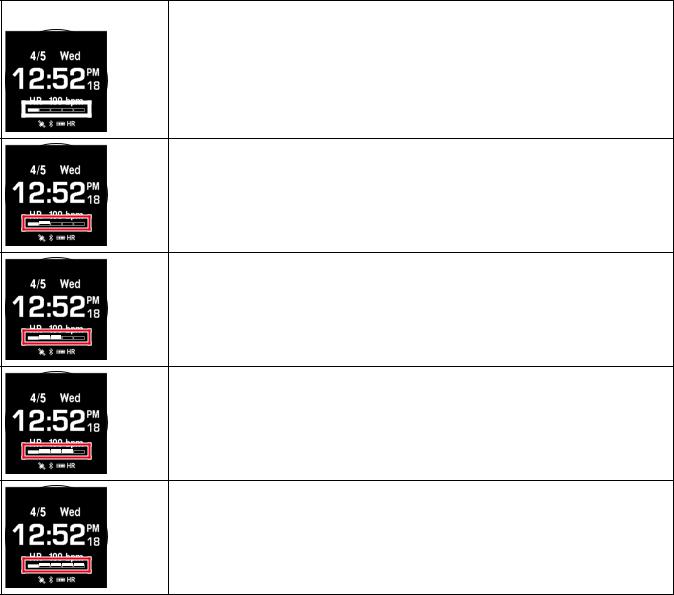
Battery Level Display
The battery icon on your device screen displays the remaining level of power in the battery. When the battery is low, you see this screen:
(Press any button to return to the Time screen.) When the battery is too low, the screen may go blank.
20
Caution: Charge your device at least once every 6 months when you are not using the device; long-term storage of the device with a low battery may degrade battery performance.
The operating time for the battery varies depending on the device settings you are using, as described in the tables here.
Note: The Light setting is Off in all of the estimates shown.
Continuous workout time left (approximate)
Battery icon |
Operating time |
Settings used |
|
ProSense 307: |
Update Frequency: Per Second |
|
8 to 16 hours |
Meas. HR setting: On |
|
ProSense 347/367: |
|
|
18 to 36 hours |
|
|
ProSense 307: |
Update Frequency: Per Second or Wrist turn |
|
10 to 20 hours |
Meas. HR setting: On or Off |
|
ProSense 347/367: |
|
|
21 to 42 hours |
|
|
ProSense 307: |
Update Frequency: Wrist turn |
|
12 to 24 hours |
Meas. HR setting: Off |
|
ProSense 347/367: |
|
|
25 to 50 hours |
|
21

Battery icon |
Operating time |
Settings used |
|
ProSense 307: |
Update Frequency: Per Second |
|
3 to 8 hours |
Meas. HR setting: On |
|
ProSense 347/367: |
|
|
7 to 18 hours |
|
|
ProSense 307: |
Update Frequency: Per Second or Wrist turn |
|
4 to 10 hours |
Meas. HR setting: On or Off |
|
ProSense 347/367: |
|
|
8 to 21 hours |
|
|
ProSense 307: |
Update Frequency: Wrist turn |
|
5 to 12 hours |
Meas. HR setting: Off |
|
ProSense 347/367: |
|
|
10 to 25 hours |
|
|
ProSense 307: |
Update Frequency: Per Second |
|
1.5 to 3 hours |
Meas. HR setting: On |
|
ProSense 347/367: |
|
|
3.5 to 7 hours |
|
|
ProSense 307: |
Update Frequency: Per Second or Wrist turn |
|
2 to 4 hours |
Meas. HR setting: On or Off |
|
ProSense 347/367: |
|
|
4 to 8 hours |
|
|
ProSense 307: |
Update Frequency: Wrist turn |
|
2.5 to 5 hours |
Meas. HR setting: Off |
|
ProSense 347/367: |
|
|
5 to 10 hours |
|
22

Battery icon |
Operating time |
Settings used |
|
||
|
ProSense 307: |
Update Frequency: Per Second |
|
||
|
0 to 1.5 hours |
Meas. HR setting: On |
|
||
|
ProSense 347/367: |
|
|
|
|
|
0 to 3.5 hours |
|
|
|
|
|
ProSense 307: |
Update Frequency: Per Second or Wrist turn |
|||
|
0 to 2 hours |
Meas. HR setting: On or Off |
|
||
|
ProSense 347/367: |
|
|
|
|
|
0 to 4 hours |
|
|
|
|
|
ProSense 307: |
Update Frequency: Wrist turn |
|
||
|
0 to 2.5 hours |
Meas. HR setting: Off |
|
||
|
ProSense 347/367: |
|
|
|
|
|
0 to 5 hours |
|
|
|
|
Continuous time display left; approximate |
|
||||
|
|
|
|
|
|
Setting |
30 days |
|
7 days |
5 days |
|
Daily Activity Tracking |
Off |
|
On (Meas. HR setting: |
On (Meas. HR setting: |
|
|
|
|
|
Auto) |
Continuous) |
Auto Sleep Mode |
On |
|
On |
On |
|
Auto Search |
Off |
|
Off |
Off |
|
Bluetooth |
Off |
|
On |
On |
|
Note: Operation time also varies depending on the operating environment's effects on GPS reception.
Parent topic: Charging the Watch
Related concepts
Battery Life
Related references
Solutions to Watch Charging Problems
23
Turning the Watch On or Off
To turn on the watch, press and hold the  Start/Stop button for at least 2 seconds.
The watch also turns on automatically when you connect the USB charging clip connected to a power source.
At the Time screen, press and hold the  Start/Stop button for at least 2 seconds and select Yes to turn it off.
Parent topic: Setting Up the Product
Configuring Your Watch
Before using your watch, you need to configure it for use by selecting basic settings. Follow the instructions in these sections to configure your watch.
Configuring the Watch Using the Buttons
Configuring the Watch Using a Smartphone
Parent topic: Setting Up the Product
Configuring the Watch Using the Buttons
You can configure your watch using the watch buttons.
Note: You can change these settings after you complete initial setup from the Settings menu on the My Watch screen in the Epson View app. For more information on using the Epson View app, see the online help.
24

1. After charging your watch and selecting the language of the screens, you see the Settings screen.
2.Press the  Enter button to select Set by Watch.
3.Press the  Up or
Up or  Down button to highlight the options you want for the following settings, and press the
  Enter button to select them.
•Height
•Weight
•Gender
•Current date
•DST (Daylight Savings Time)
•Time Zone
•Current time
Note: If you need to edit any selected settings, press the  Back button.
4. When you see this screen, you can select to set the current time automatically or manually.
• Select Set by GPS to set the time automatically
25
Note: To set the time automatically, you must be outdoors with no obstacles overhead.
• Select Manual to set the time manually
5.When you finish selecting settings, select Completed. You see the Time screen:
Parent topic: Configuring Your Watch
Related references
Time Screen Menus
Configuring the Watch Using a Smartphone
You can configure your watch using the Epson View app on your smartphone.
1.After charging your watch or resetting it, you see the Language screen. Select your language and press the  Enter button.
26

You see this screen:
2.Select Set by Phone and press the  Enter button.
A screen displaying a code appears on the watch screen. Make a note of the code.
3.Download the Epson View app from your smartphone's app store.
4.Do one of the following:
•Launch the app and follow the on-screen instructions to create an account.
•Log in to your existing Epson View account.
You see the Initial Settings screen on your smartphone.
5.Select your watch model from the list on your smartphone.
6.Follow the on-screen instructions to pair your watch and your smartphone.
7.Follow the on-screen instructions to configure these settings:
•Height
•Weight
•Gender
•Current date
•Current time
When you finish setting the time and see this screen on your watch, configuration is complete:
27
 Loading...