


Pro L12000QNL/L12002QNL
User's Guide

Contents |
|
Pro L12000QNL/L12002QNL User's Guide .............................................................................................. |
11 |
Introduction to Your Projector ................................................................................................................. |
12 |
Projector Features.............................................................................................................................. |
12 |
Additional Components ................................................................................................................ |
13 |
Additional Projector Software and Manuals................................................................................... |
14 |
Optional Equipment and Replacement Parts................................................................................. |
15 |
Notations Used in the Documentation ................................................................................................ |
16 |
Where to Go for Additional Information .............................................................................................. |
16 |
Projector Part Locations ..................................................................................................................... |
17 |
Projector Parts - Front/Top ............................................................................................................ |
17 |
Projector Parts - Side/Rear............................................................................................................ |
18 |
Projector Parts - Base.................................................................................................................... |
19 |
Projector Parts - Interface Ports .................................................................................................... |
20 |
Projector Parts - Control Panel ...................................................................................................... |
23 |
Projector Parts - Remote Control................................................................................................... |
24 |
Setting Up the Projector ........................................................................................................................... |
27 |
Projector Placement........................................................................................................................... |
27 |
Projector Setup and Installation Options ....................................................................................... |
29 |
Installing the Projector in a Mount.................................................................................................. |
30 |
Protecting the Built-in Camera....................................................................................................... |
32 |
Projection Distance........................................................................................................................ |
32 |
Projector Connections........................................................................................................................ |
34 |
Connecting to Video Sources ........................................................................................................ |
35 |
Connecting to an HDMI Video Source ...................................................................................... |
35 |
Connecting to a Component Video Source ............................................................................... |
35 |
Connecting to an SDI Video Source.......................................................................................... |
36 |
Connecting to Computer Sources.................................................................................................. |
37 |
Connecting to a Computer for VGA Video................................................................................. |
37 |
Connecting to a Computer for HDMI Video............................................................................... |
38 |
Connecting to a Computer for DVI-D Video .............................................................................. |
38 |
3
Connecting to a Computer for DisplayPort Video...................................................................... |
39 |
Connecting to an HDBaseT Transmitter ....................................................................................... |
40 |
Connecting to an External Computer Monitor................................................................................ |
41 |
Attaching and Removing a Lens......................................................................................................... |
41 |
Attaching a Lens ........................................................................................................................... |
42 |
Removing a Lens .......................................................................................................................... |
46 |
Installing Batteries in the Remote Control .......................................................................................... |
47 |
Using the Projector on a Network ............................................................................................................ |
50 |
Wired Network Projection................................................................................................................... |
50 |
Connecting to a Wired Network ..................................................................................................... |
50 |
Selecting Wired Network Settings ................................................................................................. |
51 |
Wireless Network Projection .............................................................................................................. |
54 |
Using a QR Code to Connect a Mobile Device .............................................................................. |
54 |
Using Quick Wireless Connection (Windows)................................................................................ |
56 |
Selecting Wireless Network Settings Manually.............................................................................. |
57 |
Wireless LAN Menu Settings .................................................................................................... |
60 |
Selecting Wireless Network Settings in Windows.......................................................................... |
62 |
Selecting Wireless Network Settings on Mac ................................................................................ |
63 |
Setting Up Wireless Network Security ........................................................................................... |
63 |
Setting Up Projector Network E-Mail Alerts ........................................................................................ |
65 |
Network Projector E-mail Alert Messages ..................................................................................... |
67 |
Selecting Other Network Settings....................................................................................................... |
67 |
Setting a Static IP Address on the LCD Screen.................................................................................. |
68 |
Controlling a Networked Projector Using a Web Browser .................................................................. |
70 |
Web Control Options ..................................................................................................................... |
72 |
Viewing an Image Capture of the Displayed Image from a Remote Location ............................... |
78 |
Using Crestron Connected................................................................................................................. |
82 |
Setting Up Crestron Connected..................................................................................................... |
83 |
Controlling a Networked Projector Using Crestron Connected...................................................... |
84 |
Art-Net Channel Definitions................................................................................................................ |
86 |
Registering a Digital Certificate on the Projector ................................................................................ |
91 |
Importing a Web Server Certificate Using the Projector Menus..................................................... |
92 |
Registering Digital Certificates from a Web Browser ..................................................................... |
93 |
4
Digital Certificate Types................................................................................................................. |
94 |
Using Basic Projector Features ............................................................................................................... |
97 |
Turning On the Projector .................................................................................................................... |
97 |
Turning Off the Projector .................................................................................................................... |
99 |
Selecting the Language for the Projector Menus.............................................................................. |
101 |
Adjusting the Image Height .............................................................................................................. |
102 |
Resizing the Image with the Zoom Button ........................................................................................ |
103 |
Focusing the Image Using the Focus and Distortion Buttons ........................................................... |
103 |
Setting the Screen Type................................................................................................................... |
105 |
Adjusting the Image Position Using Lens Shift ................................................................................. |
106 |
Adjusting the Image Position Using Screen Position........................................................................ |
109 |
Displaying a Test Pattern ................................................................................................................. |
110 |
Image Shape.................................................................................................................................... |
111 |
Correcting Image Shape with H/V Keystone................................................................................ |
111 |
Correcting Image Shape with Quick Corner ................................................................................ |
113 |
Correcting Image Shape with Curved Surface ............................................................................ |
115 |
Correcting Image Shape with Corner Wall................................................................................... |
120 |
Correcting Image Shape with Point Correction............................................................................ |
123 |
Selecting an Image Source .............................................................................................................. |
125 |
Remote Control Operation ............................................................................................................... |
127 |
Projection Modes ............................................................................................................................. |
128 |
Changing the Projection Mode Using the Remote Control .......................................................... |
128 |
Changing the Projection Mode Using the Menus......................................................................... |
129 |
Image Aspect Ratio .......................................................................................................................... |
130 |
Changing the Image Aspect Ratio ............................................................................................... |
130 |
Available Image Aspect Ratios .................................................................................................... |
131 |
Color Mode....................................................................................................................................... |
132 |
Changing the Color Mode............................................................................................................ |
132 |
Available Color Modes................................................................................................................. |
133 |
Adjusting the Brightness................................................................................................................... |
133 |
Constant Brightness Usage Hours .............................................................................................. |
135 |
Adjusting Luminance Controls.......................................................................................................... |
137 |
Adjusting Gamma............................................................................................................................. |
139 |
5
Setting the Date and Time................................................................................................................ |
141 |
Date and Time Settings ............................................................................................................... |
142 |
Adjusting Projector Features ................................................................................................................. |
143 |
Shutting Off the Picture Temporarily ................................................................................................ |
143 |
Stopping Video Action Temporarily .................................................................................................. |
144 |
Projector Security Features.............................................................................................................. |
144 |
Password Security Types ............................................................................................................ |
145 |
Setting a Password ................................................................................................................. |
145 |
Selecting Password Security Types........................................................................................ |
147 |
Entering a Password to Use the Projector............................................................................... |
148 |
Saving a User's Logo Image to Display................................................................................... |
149 |
Locking the Projector's Lens Settings and Buttons...................................................................... |
151 |
Unlocking the Projector's Buttons ........................................................................................... |
152 |
Locking the Remote Control Buttons .......................................................................................... |
153 |
Installing a Security Cable ........................................................................................................... |
154 |
Projecting Two Images Simultaneously............................................................................................ |
154 |
Input Sources for Split Screen Projection .................................................................................... |
156 |
Using Advanced Image Adjustment Features .................................................................................. |
156 |
Creating Image Presets............................................................................................................... |
157 |
Adjusting Detail Enhancement .................................................................................................... |
158 |
Adjusting the Color Convergence (Panel Alignment)................................................................... |
159 |
Adjusting the Color Tone (Color Uniformity) ................................................................................ |
161 |
Running Light Source Calibration ................................................................................................ |
163 |
Using Multiple Projectors ................................................................................................................. |
165 |
Multiple Projector Adjustment Overview ...................................................................................... |
165 |
Projector Identification System for Multiple Projector Control ...................................................... |
166 |
Setting the Projector ID........................................................................................................... |
167 |
Setting the Remote Control ID ................................................................................................ |
167 |
Tiling Images into One Image...................................................................................................... |
169 |
Configuring Tiling Automatically.............................................................................................. |
169 |
Configuring Tiling Manually..................................................................................................... |
172 |
Blending the Image Edges .......................................................................................................... |
174 |
Adjusting the Black Level ............................................................................................................ |
176 |
6
Matching Tint and Brightness (Screen Matching) ....................................................................... |
180 |
Matching the Screens Automatically....................................................................................... |
181 |
Matching the Screens Manually ............................................................................................. |
182 |
Scaling an Image......................................................................................................................... |
184 |
Saving Settings to Memory and Using Saved Settings .................................................................... |
185 |
Saving a Scheduled Event ............................................................................................................... |
188 |
Viewing Scheduled Events .......................................................................................................... |
189 |
Editing a Scheduled Event........................................................................................................... |
190 |
Copying Menu Settings Between Projectors .................................................................................... |
191 |
Saving Settings to a USB Flash Drive.......................................................................................... |
192 |
Transferring Settings from a USB Flash Drive ............................................................................. |
194 |
Saving Settings to a Computer .................................................................................................... |
195 |
Transferring Settings from a Computer ....................................................................................... |
197 |
Adjusting the Menu Settings .................................................................................................................. |
200 |
Using the Projector's Menus............................................................................................................. |
200 |
Image Quality Settings - Image Menu .............................................................................................. |
202 |
Input Signal Settings - Signal Menu.................................................................................................. |
206 |
Projector Feature Settings - Settings Menu...................................................................................... |
210 |
Projector Setup Settings - Extended Menu....................................................................................... |
214 |
Projector Network and Camera Settings - Network Menu ................................................................ |
222 |
Projector Information Display - Info Menu ........................................................................................ |
224 |
Event ID Code List....................................................................................................................... |
227 |
Projector Reset Options - Reset Menu............................................................................................. |
228 |
Maintaining and Transporting the Projector ......................................................................................... |
230 |
Projector Maintenance ..................................................................................................................... |
230 |
Cleaning the Lens........................................................................................................................ |
230 |
Cleaning the Projector Case........................................................................................................ |
231 |
Air Filter and Vent Maintenance .................................................................................................. |
231 |
Cleaning the Air Filters and Air Intake Vents........................................................................... |
232 |
Replacing the Air Filters.......................................................................................................... |
236 |
Replacing the Remote Control Batteries ..................................................................................... |
239 |
Transporting the Projector................................................................................................................ |
241 |
7
Solving Problems .................................................................................................................................... |
245 |
Projection Problem Tips ................................................................................................................... |
245 |
Projector Light Status ....................................................................................................................... |
246 |
Viewing Projector Status Information ............................................................................................... |
251 |
Projector Status Display Messages ............................................................................................. |
253 |
Using the Projector Help Displays .................................................................................................... |
257 |
Solving Image Problems .................................................................................................................. |
258 |
Solutions When No Image Appears............................................................................................. |
258 |
Solutions When "No Signal" Message Appears........................................................................... |
260 |
Displaying From a PC Laptop ................................................................................................. |
260 |
Displaying From a Mac Laptop ............................................................................................... |
261 |
Solutions When "Not Supported" Message Appears ................................................................... |
261 |
Solutions When Only a Partial Image Appears............................................................................ |
262 |
Solutions When the Image is Not Rectangular ............................................................................ |
263 |
Solutions When the Image Contains Noise or Static ................................................................... |
263 |
Solutions When the Image is Fuzzy or Blurry .............................................................................. |
264 |
Solutions When the Image Brightness or Colors are Incorrect .................................................... |
264 |
Solutions When Automatic Adjustments are not Applied Correctly.............................................. |
265 |
Solving Projector or Remote Control Operation Problems ............................................................... |
266 |
Solutions to Projector Power or Shut-Off Problems ..................................................................... |
267 |
Solutions to Remote Control Problems........................................................................................ |
268 |
Solutions to Password Problems ................................................................................................. |
269 |
Solving Network Problems ............................................................................................................... |
269 |
Solutions When Wireless Authentication Fails ............................................................................ |
270 |
Solutions When You Cannot Access the Projector Through the Web ......................................... |
270 |
Solutions When the Image Contains Static During Network Projection ....................................... |
271 |
Solutions When Network Alert E-Mails are Not Received............................................................ |
271 |
Where to Get Help............................................................................................................................ |
272 |
Technical Specifications ........................................................................................................................ |
273 |
General Projector Specifications ...................................................................................................... |
273 |
Projector Light Source Specifications............................................................................................... |
275 |
Remote Control Specifications ......................................................................................................... |
276 |
Projector Dimension Specifications.................................................................................................. |
276 |
8
Projector Electrical Specifications .................................................................................................... |
276 |
Projector Environmental Specifications............................................................................................ |
277 |
Projector Safety and Approvals Specifications................................................................................. |
278 |
Safety and Approvals Specifications for Latin America .................................................................... |
278 |
Supported Video Display Formats.................................................................................................... |
279 |
Notices ..................................................................................................................................................... |
284 |
Recycling.......................................................................................................................................... |
284 |
Important Safety Information ............................................................................................................ |
284 |
Important Safety Instructions............................................................................................................ |
284 |
Laser Safety Information ............................................................................................................. |
287 |
Laser Light Source Warning ....................................................................................................... |
289 |
List of Safety Symbols (corresponding to IEC60950-1 A2)............................................................... |
290 |
FCC Compliance Statement............................................................................................................. |
294 |
Binding Arbitration and Class Waiver ............................................................................................... |
295 |
Trademarks...................................................................................................................................... |
298 |
Copyright Notice............................................................................................................................... |
298 |
A Note Concerning Responsible Use of Copyrighted Materials................................................... |
299 |
Copyright Attribution.................................................................................................................... |
299 |
9
Pro L12000QNL/L12002QNL User's Guide
Welcome to the Pro L12000QNL/L12002QNL User's Guide.
For a printable PDF copy of this guide, click here.
11

Introduction to Your Projector
Refer to these sections to learn more about your projector and this manual.
Projector Features
Notations Used in the Documentation
Where to Go for Additional Information
Projector Part Locations
Projector Features
The Pro L12000QNL and Pro L12002QNL projectors include these special features:
Bright, high-resolution projection system
•Up to 12000 lumens of brightness (white light output and color light output)
Note: Color brightness (color light output) and white brightness (white light output) will vary depending on usage conditions. Color light output measured in accordance with IDMS 15.4; white light output measured in accordance with ISO 21118.
•Native 4K resolution (3840 × 2160)
Flexible connectivity
•Wired and wireless network support for projection, monitoring, and control via remote network computer
•Variety of connection methods for a computer or video device including HDMI, DVI-D, SDI, and HDBaseT
•Ports for connecting an external monitor
Easy-to-use setup and operation features
•Interchangeable bayonet lens options available
•Project images side by side from two separate input sources
•Create one large seamless display when projecting from multiple projectors using Edge Blending
•Epson's Instant Off and Direct Power On features for quick setup and shut down
•Support for Crestron Connected and Art-Net network monitoring systems
12
•Network message broadcast system to project timely messages to all networked projectors (Windows only)
Additional Components
Additional Projector Software and Manuals
Optional Equipment and Replacement Parts
Parent topic: Introduction to Your Projector
Additional Components
Depending on how you plan to use the projector, you may need to obtain additional components.
Note: To connect a Mac that does not include a compatible video output port, you need to obtain an adapter that allows you to connect to an input port on the projector. Contact Apple for compatible adapter options. To connect a smartphone or tablet, you may need to obtain an adapter that allows you to connect to the projector. This allows you to mirror your smartphone or tablet screens, watch movies, and more. Contact your device manufacturer for compatible adapter options.
Unless listed as available from Epson in this table, see your local computer or electronics dealer for purchase information.
Signal or connection |
Additional component necessary |
type |
|
Component video |
D-sub, 15-pin, component-to-VGA video cable or adapter |
|
Available for purchase from Epson or an authorized Epson reseller. |
HDMI |
Compatible HDMI cable |
|
Available for purchase from Epson or an authorized Epson reseller. |
VGA |
Compatible VGA computer cable |
DVI-D |
Compatible DVI-D cable |
HDBaseT |
Compatible 100Base-TX LAN cable |
SDI |
Compatible BNC video cable |
DisplayPort |
Compatible DisplayPort cable (with optional DisplayPort interface board |
|
installed) |
Parent topic: Projector Features
13

Additional Projector Software and Manuals
After connecting and setting up the projector, install the projector software as necessary. You may need to install it from a software CD, if included, or download the software and manuals as necessary.
You can install the projector software programs listed here and view their manuals for instructions on using them.
Note: If you still need help after checking this manual and the sources listed here, you can use the Epson PrivateLine Support service to get help fast. For details, see "Where to Get Help."
Projector software |
Manual |
Description |
Epson Projector |
Epson Projector |
Lets you monitor and control your projector |
Management (Windows |
Management Operation |
through the network. |
only) |
Guide |
You can download the latest software and |
|
|
|
|
|
documentation from the Epson web site. Go to |
|
|
epson.com/support (U.S.) or epson.ca/support |
|
|
(Canada) and select your projector. |
Epson iProjection |
Epson iProjection |
Lets you project the computer screens of |
(Windows/Mac) |
Operation Guide |
users over a network. |
|
(Windows/Mac) |
You can download the latest software and |
|
|
|
|
|
documentation from the Epson web site. Go to |
|
|
epson.com/support (U.S.) or epson.ca/support |
|
|
(Canada) and select your projector. |
Epson Projector |
Epson Projector |
Lets you manage multiple Epson projectors |
Professional Tool |
Professional Tool |
simultaneously |
(Windows only) |
Operation Guide |
You can download the latest software and |
|
|
|
|
|
documentation from the Epson web site. Go to |
|
|
epson.com/support (U.S.) or epson.ca/support |
|
|
(Canada) and select your projector. |
— |
Open Source Software |
You can download this document from the |
|
License |
Epson web site. Go to epson.com/support |
|
|
(U.S.) or epson.ca/support (Canada) and |
|
|
select your projector. |
Parent topic: Projector Features |
|
|
14
Optional Equipment and Replacement Parts
You can purchase screens, other optional accessories, and replacement parts from an Epson authorized reseller. To find the nearest reseller, call 800-GO-EPSON (800-463-7766) in the U.S. or 800-807-7766 in Canada. Or you can purchase online at epsonstore.com (U.S. sales) or epsonstore.ca (Canadian sales).
Epson offers the following optional accessories and replacement parts for your projector:
Option or part |
Part number |
Air filter (ELPAF58) |
V13H134A58 |
HDBaseT Transmitter (ELPHD01) |
V12H547020 |
HDMI/DVI-D interface board (ELPIF01) |
V12H917F01 |
SDI interface board (ELPIF02) |
V12H918F01 |
DisplayPort interface board (ELPIF03) |
V12H916F01 |
Remote control cable set (ELPKC28) |
V12H005C28 |
Ultra short-throw lens (ELPLX02) |
V12H004X02 |
White ultra short-throw lens (ELPLX02W) |
V12H004Y02 |
Short-throw #1 zoom lens (ELPLU03) |
V12H004U03 |
Short-throw #1 zoom lens (ELPLU03S) |
V12H004UA3 |
Short-throw zoom lens (ELPLU04) |
V12H004U04 |
Wide-throw #1 zoom lens (ELPLW05) |
V12H004W05 |
Wide-throw zoom lens (ELPLW06) |
V12H004W06 |
Wide-throw zoom lens (ELPLW08) |
V12H004W08 |
Middle throw zoom lens #2 (ELPLM09) |
V12H004M09 |
Middle-throw zoom lens (ELPLM15) |
V12H004M0F |
Middle-throw zoom lens (ELPLM10) |
V12H004M0A |
Middle-throw zoom lens (ELPLM11) |
V12H004M0B |
Long throw zoom lens (ELPLL08) |
V12H004L08 |
Standard zoom lens (ELPLS04) |
V12H004S04 |
Short throw zoom lens (ELPLU02) |
V12H004U02 |
15
Option or part |
Part number |
Rear-projection wide lens (ELPLR04) |
V12H004R04 |
Wide zoom lens (ELPLW04) |
V12H004W04 |
Middle-throw zoom lens #1 (ELPLM06) |
V12H004M06 |
Middle-throw zoom lens #2 (ELPLM07) |
V12H004M07 |
Long-throw zoom lens (ELPLL07) |
V12H004L07 |
Epson Stacking and Rigging Frame (ELPMB59) |
V12H996A01 |
Parent topic: Projector Features
Notations Used in the Documentation
Follow the guidelines in these notations as you read your documentation:
•Warnings must be followed carefully to avoid bodily injury.
•Cautions must be observed to avoid damage to your equipment.
•Notes contain important information about your projector.
•Tips contain additional projection information.
Parent topic: Introduction to Your Projector
Where to Go for Additional Information
Need quick help on using your projector? Here's where to look for help:
•epson.com/support (U.S.), epson.ca/support (Canada), or epson.com.jm/support (Caribbean)
View FAQs (frequently asked questions) and e-mail your questions to Epson technical support 24 hours a day.
•If you still need help after checking this manual and any other sources listed here, you can use the Epson PrivateLine Support service to get help fast. For details, see "Where to Get Help."
Parent topic: Introduction to Your Projector
Related references
Where to Get Help
Related topics
Solving Problems
16

Projector Part Locations
Check the projector part illustrations to learn about the parts on your projector.
Projector Parts - Front/Top
Projector Parts - Side/Rear
Projector Parts - Base
Projector Parts - Interface Ports
Projector Parts - Control Panel
Projector Parts - Remote Control
Parent topic: Introduction to Your Projector
Projector Parts - Front/Top
1Cap for lens cover
2Built-in camera
3Projection lens
4Lens cover
17
5Air filter covers
6Remote receivers
7Status lights
8Replacement lens cover (for certain lenses)
9Holes for optional mounting
Parent topic: Projector Part Locations
Related topics
Attaching and Removing a Lens
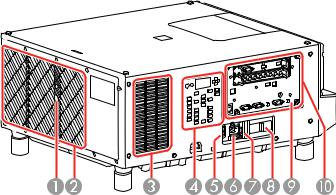
Projector Parts - Side/Rear
1Remote receiver
2Exhaust vent
3Air intake vent
4Control panel
5Power switch
6AC inlet
7Power cord holder
18
8Built-in camera protection plate
9Kensington security slot
10Interface ports
Parent topic: Projector Part Locations
Related tasks
Installing the Projector in a Mount
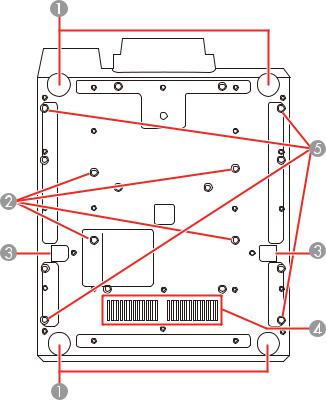
Projector Parts - Base
1 Projector feet
19

2Ceiling mounting holes
3Drop-prevention wire installation points
4Air intake vent
5Transportation eye bolt holes
Parent topic: Projector Part Locations
Related tasks
Installing a Security Cable
Transporting the Projector
Projector Parts - Interface Ports
1Slot 1 for installing an interface board (HDMI/DVI-D interface board described below)
2Slot 2 for installing an SDI interface board (described below)
3HDBaseT port
4Network LAN port
5Computer In port
6Computer Out port
20
7Cable clip slot (for commercially available cable tie)
8RS-232C port
9Remote port
10Service port
11USB-A port
HDMI/DVI-D Interface Board
1DVI-D In port
2HDMI In port
3DC Out port
SDI Interface Board
Note: The SDI1 In and SDI1 Out ports support single-link 12G-SDI signals. The projector supports quad-link signals. When inputting a quad-link 3G-SDI signal, set the SDI Settings > Link Type setting in the Extended menu to the correct setting for your SDI signals.
1SDI1 In port
2SDI2 In port
21
3SDI3 In port
4SDI4 In port
5SDI1 Out port
6SDI2 Out port
7SDI3 Out port
8SDI4 Out port
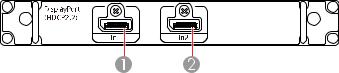
Optional DisplayPort Interface Board
1DisplayPort In1 port
2DisplayPort In2 port
Caution: Do not attempt to install or remove your projector's interface board. Static electricity or other interference may damage the projector or cause it to malfunction. Contact Epson to have an interface board installed or removed.
Parent topic: Projector Part Locations
Related references
Optional Equipment and Replacement Parts
Projector Setup Settings - Extended Menu
22
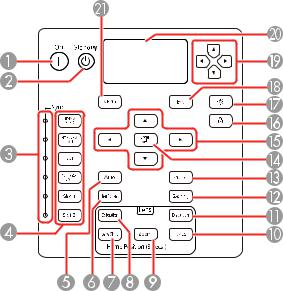
Projector Parts - Control Panel
1On button (turns on the projector)
2Standby button (turns off the projector)
3Sync. lights (indicate the selected image source)
4Sync. buttons (select an image source)
5Auto button (automatically adjusts computer images)
6Test Pattern button (displays a test pattern)
7Lens Shift button (adjusts the image position)
8Calibration button (starts lens calibration)
9Zoom button (changes the image size)
10Focus button (adjusts the image focus)
11Distortion button (corrects image distortion)
12Geometry button (adjusts the image shape)
23
13Shutter button (turns input signal on or off temporarily)
14Enter button (selects options)
15Arrow buttons (move through on-screen options; adjust the focus, zoom, and lens shift)
16Lock button (displays the Control Panel Lock screen)
17Light button (lights up the control panel buttons and LCD screen temporarily)
18Esc button (cancels/exits functions)
19Arrow buttons (select LCD screen settings)
20LCD screen (displays projector status information)
21Menu button (accesses projector menu system)
Parent topic: Projector Part Locations
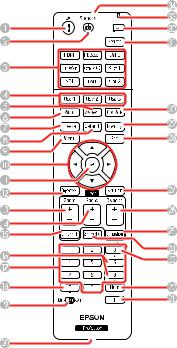
Projector Parts - Remote Control
24
1On button (turns on the projector)
2Standby button (turns off the projector)
3Source buttons (select an image source)
4User1, User2, and User3 buttons (open menu assigned by user)
5Aspect button (selects the image aspect ratio)
6Auto button (automatically adjusts computer images)
7Freeze button (stops video action)
8Default button (resets settings to their default values in the projector menu system)
9Menu button (accesses projector menu system)
10Arrow buttons (move through on-screen options and move pointer)
11Enter button (selects options)
12On-Screen button (displays or hides the on-screen menus or messages)
13Zoom button (changes the image size)
14Focus button (adjusts the image focus)
15Lens Shift button (adjusts the image position)
16Page up and down buttons (scroll through image files when projecting from a computer over a network connection, or change the displayed test pattern)
17Numeric buttons (enter numbers)
18ID button (hold down and use numeric keys to select projector to control)
19ID switch (selects control of one or all projectors from the remote control)
20Remote port (connects to a remote control cable)
21i button (displays the Info menu)
22Num button (hold down and use numeric keys to enter numbers)
23Test Pattern button (displays a test pattern)
24Geometry button (corrects image shape)
25Calibration button (starts lens calibration)
26Distortion button (corrects image distortion)
27Shutter button (turns signal on or off temporarily)
25
28Esc button (cancels/exits functions and moves to previous menu levels)
29Memory button (saves and applies presets)
30Color Mode button (selects display modes)
31Search button (searches for connected sources)
32Light button (lights up the remote control buttons temporarily)
33Indicator light (lights up when the remote control is in use)
34Remote control signal emitter (emits remote control signals)
Parent topic: Projector Part Locations
26
Setting Up the Projector
Follow the instructions in these sections to set up your projector for use.
Projector Placement
Projector Connections
Attaching and Removing a Lens
Installing Batteries in the Remote Control
Projector Placement
You can place the projector on almost any flat surface to project an image.
You can also install the projector in a ceiling mount if you want to use it in a fixed location.
Keep these considerations in mind as you select a projector location:
•Place the projector on a sturdy, level surface or install it using a compatible mount.
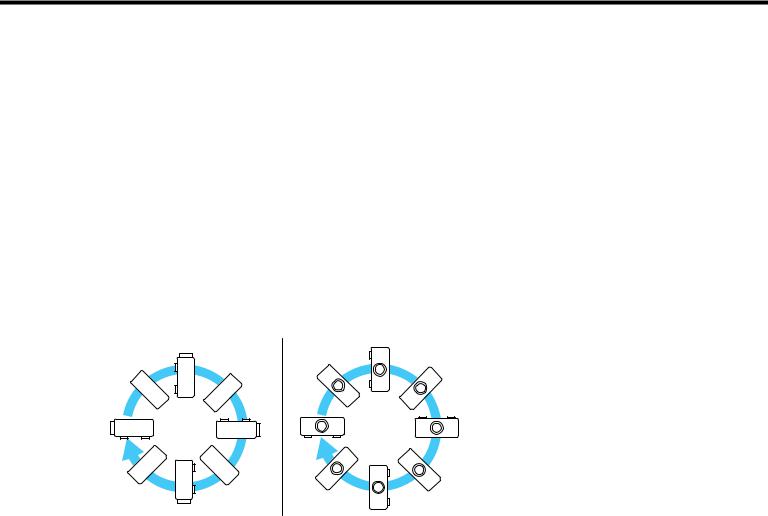
•Install the projector at any angle. There is no vertical or horizontal limit to how the projector can be installed.
•Leave plenty of space around and under the projector for ventilation as described here, and do not place it on top of or next to anything that could block the vents.
•Place the projector parallel to the screen.
•Position the projector within reach of a grounded electrical outlet or extension cord.
27

Caution: Be sure to leave the following amount of space around the projector to avoid blocking the air exhaust and intake vents.
1 |
7.87 inches (20 cm) |
2 19.7 inches (50 cm)
Caution: If you are setting up the projector with the intake vent facing down or placing the projector in a mount, be sure to leave the following amount of space around the projector.
13.9 inches (10 cm)
27.87 inches (20 cm)
Note: When setting up multiple projectors, leave the following amount of space between the projectors.
1 19.7 inches (50 cm)
28
If you are stacking multiple projectors, follow these guidelines:
•Do not stack more than two projectors.
•Tilt the projectors only within the extendable range of the feet.
•Make sure all of the projector's feet sit firmly on the projector below.
Projector Setup and Installation Options
Installing the Projector in a Mount
Protecting the Built-in Camera
Projection Distance
Parent topic: Setting Up the Projector
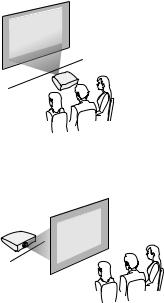
Projector Setup and Installation Options
You can set up or install your projector in the following ways:
Front
Rear
29
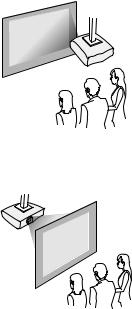
Front ceiling
Rear ceiling
If you project from the ceiling or from the rear, select the correct Projection setting and, if necessary, adjust the OSD Rotation setting.
Parent topic: Projector Placement
Related references
Projector Setup Settings - Extended Menu
Installing the Projector in a Mount
When installing the projector in an optional mount, follow these guidelines:
30
 Loading...