


 Loading...
PowerLite® Pro Cinema
LS9600e/LS10000 User's Guide

Contents |
|
PowerLite Pro Cinema LS9600e/LS10000 User's Guide .......................................................................... |
9 |
Introduction to Your Projector ................................................................................................................. |
10 |
Projector Features.............................................................................................................................. |
10 |
Product Box Contents.................................................................................................................... |
11 |
Additional Components ................................................................................................................ |
12 |
Optional Equipment and Replacement Parts................................................................................. |
13 |
Warranty and Registration Information .......................................................................................... |
14 |
Notations Used in the Documentation ................................................................................................ |
14 |
Where to Go for Additional Information .............................................................................................. |
14 |
Projector Part Locations ..................................................................................................................... |
15 |
Projector Parts - Front/Top ............................................................................................................ |
15 |
Projector Parts - Rear .................................................................................................................... |
16 |
Projector Parts - Interface Ports .................................................................................................... |
17 |
Projector Parts - Base.................................................................................................................... |
18 |
Projector Parts - Control Panel and Projector Lights ..................................................................... |
19 |
Projector Parts - Remote Control................................................................................................... |
20 |
Setting Up the Projector ........................................................................................................................... |
24 |
Projector Placement........................................................................................................................... |
24 |
Projector Setup and Installation Options ....................................................................................... |
24 |
Projection Distance........................................................................................................................ |
26 |
Removing and Attaching the Cable Cover.......................................................................................... |
28 |
Projector Connections........................................................................................................................ |
29 |
Connecting to Video Sources ........................................................................................................ |
29 |
Connecting to an HDMI Video Source ...................................................................................... |
30 |
Attaching and Removing the HDMI Cable Clip.......................................................................... |
30 |
Connecting to an MHL-Compatible Device ............................................................................... |
31 |
Connecting to a Component Video Source ............................................................................... |
32 |
Connecting to a Composite Video Source ................................................................................ |
32 |
Connecting to Computer Sources.................................................................................................. |
33 |
Connecting to a Computer for VGA Video................................................................................. |
33 |
3
Connecting to a Computer for HDMI Video............................................................................... |
34 |
Connecting to External Speakers .................................................................................................. |
34 |
Connecting to a Trigger Out Port ................................................................................................... |
35 |
Installing Batteries in the Remote Control .......................................................................................... |
36 |
Using the Projector on a Network ............................................................................................................ |
38 |
Wired Network Monitoring and Control............................................................................................... |
38 |
Connecting to a Wired Network ..................................................................................................... |
38 |
Selecting Wired Network Settings ................................................................................................. |
39 |
Restricted IP Addresses ........................................................................................................... |
42 |
Setting Up Projector Network E-Mail Alerts ........................................................................................ |
42 |
Network Projector E-mail Alert Messages ..................................................................................... |
44 |
Setting Up Network Monitoring .......................................................................................................... |
44 |
Controlling a Networked Projector Using a Web Browser .................................................................. |
45 |
Using Basic Projector Features ............................................................................................................... |
48 |
Turning On the Projector .................................................................................................................... |
48 |
Turning Off the Projector .................................................................................................................... |
50 |
Viewing 3D Images ............................................................................................................................ |
51 |
Pairing the 3D Glasses with the Projector...................................................................................... |
53 |
Charging the 3D Glasses............................................................................................................... |
54 |
3D Viewing Range......................................................................................................................... |
55 |
Selecting the Language for the Projector Menus................................................................................ |
55 |
Adjusting the Image Height ................................................................................................................ |
56 |
Adjusting the Image Position Using Lens Shift .............................................................................. |
57 |
Image Shape...................................................................................................................................... |
59 |
Adjusting Keystone with the Control Panel .................................................................................... |
59 |
Resizing the Image with the Zoom Feature ........................................................................................ |
60 |
Focusing the Image with the Lens Button........................................................................................... |
61 |
Adjusting the Color Convergence (Panel Alignment) ......................................................................... |
62 |
Remote Control Operation ................................................................................................................. |
65 |
Selecting an Image Source ................................................................................................................ |
67 |
Projection Modes ............................................................................................................................... |
69 |
Changing the Projection Mode Using the Menus........................................................................... |
69 |
Image Aspect Ratio ............................................................................................................................ |
70 |
4
Changing the Image Aspect Ratio ................................................................................................. |
70 |
Available Image Aspect Ratios ...................................................................................................... |
71 |
Color Mode......................................................................................................................................... |
72 |
Changing the Color Mode.............................................................................................................. |
73 |
Available Color Modes................................................................................................................... |
73 |
Adjusting the Lens Iris ................................................................................................................... |
74 |
Changing the Super-resolution Setting .............................................................................................. |
75 |
Changing the Super-resolution/4K Enhancement Setting .................................................................. |
76 |
Using Picture in Picture ...................................................................................................................... |
77 |
Available Picture in Picture Options............................................................................................... |
79 |
Adjusting Projector Features ................................................................................................................... |
80 |
Shutting Off the Picture Temporarily .................................................................................................. |
80 |
Locking the Projector's Buttons .......................................................................................................... |
81 |
Unlocking the Projector's Buttons.................................................................................................. |
82 |
Saving Settings to Memory and Using Saved Settings ...................................................................... |
82 |
Saving the Lens Position and Using Saved Lens Positions................................................................ |
83 |
Using WirelessHD ..................................................................................................................................... |
86 |
WirelessHD Transmission Range ...................................................................................................... |
86 |
WirelessHD Remote Control Operation.............................................................................................. |
89 |
Connecting the WirelessHD Transmitter ............................................................................................ |
90 |
Viewing WirelessHD Content ............................................................................................................. |
92 |
Switching WirelessHD Sources.......................................................................................................... |
93 |
Using the WirelessHD Picture in Picture Feature ............................................................................... |
94 |
Adjusting the Menu Settings .................................................................................................................... |
95 |
Using the Projector's Menus............................................................................................................... |
95 |
Image Quality Settings - Image Menu ................................................................................................ |
97 |
Input Signal Settings - Signal Menu.................................................................................................. |
100 |
Projector Feature Settings - Settings Menu...................................................................................... |
105 |
Projector Memory Options - Memory Menu...................................................................................... |
112 |
Projector Information Display - Info Menu ........................................................................................ |
113 |
Projector Reset Options - Reset Menu............................................................................................. |
114 |
5
Maintaining and Transporting the Projector ......................................................................................... |
116 |
Projector Maintenance ..................................................................................................................... |
116 |
Cleaning the Lens........................................................................................................................ |
116 |
Cleaning the 3D Glasses............................................................................................................. |
117 |
Cleaning the Projector Case........................................................................................................ |
117 |
Air Filter and Vent Maintenance .................................................................................................. |
117 |
Cleaning the Air Filter.............................................................................................................. |
118 |
Replacing the Air Filter............................................................................................................ |
122 |
Replacing the Remote Control Batteries ..................................................................................... |
125 |
Transporting the Projector................................................................................................................ |
127 |
Solving Problems .................................................................................................................................... |
128 |
Projection Problem Tips ................................................................................................................... |
128 |
Projector Light Status ....................................................................................................................... |
128 |
Solving Image Problems .................................................................................................................. |
132 |
Solutions When No Image Appears............................................................................................. |
132 |
Solutions When "No Signal" Message Appears........................................................................... |
133 |
Displaying From a PC Laptop ................................................................................................. |
133 |
Displaying From a Mac Laptop ............................................................................................... |
134 |
Solutions When "Not Supported" Message Appears ................................................................... |
134 |
Solutions When Only a Partial Image Appears............................................................................ |
134 |
Solutions When the Image is Not Rectangular ............................................................................ |
135 |
Solutions When the Image Contains Noise or Static ................................................................... |
135 |
Solutions When the Image is Fuzzy or Blurry .............................................................................. |
136 |
Solutions When the Image Brightness or Colors are Incorrect .................................................... |
136 |
Solutions to Panel Alignment Problems....................................................................................... |
137 |
Solutions When a 3D Image Does Not Display Correctly ............................................................ |
137 |
Solutions When a WirelessHD Source Does Not Display Correctly............................................. |
138 |
Solving Projector or Remote Control Operation Problems ............................................................... |
139 |
Solutions to Projector Power or Shut-Off Problems ..................................................................... |
139 |
Solutions to Problems with the Remote Control........................................................................... |
139 |
Solving Network Problems ............................................................................................................... |
140 |
Solutions When Network Alert E-Mails are Not Received............................................................ |
140 |
Solutions When You Cannot Access the Projector Through the Web ......................................... |
141 |
6
Where to Get Help............................................................................................................................ |
141 |
Technical Specifications ........................................................................................................................ |
143 |
General Projector Specifications ...................................................................................................... |
143 |
Projector Light Source Specifications............................................................................................... |
145 |
Remote Control Specifications ......................................................................................................... |
145 |
Projector Dimension Specifications.................................................................................................. |
145 |
Projector Electrical Specifications .................................................................................................... |
146 |
Projector Environmental Specifications............................................................................................ |
147 |
Projector Safety and Approvals Specifications................................................................................. |
147 |
Supported Video Display Formats.................................................................................................... |
148 |
Notices ..................................................................................................................................................... |
152 |
Recycling.......................................................................................................................................... |
152 |
Important Safety Information ............................................................................................................ |
152 |
Laser Safety Information .................................................................................................................. |
153 |
Laser Optical Path ....................................................................................................................... |
154 |
Important Safety Instructions............................................................................................................ |
154 |
Restriction of Use ........................................................................................................................ |
157 |
FCC Compliance Statement............................................................................................................. |
157 |
Wireless Telegraphy Act Regulations.......................................................................................... |
158 |
Trademarks...................................................................................................................................... |
158 |
Open Source Software License........................................................................................................ |
159 |
Copyright Notice............................................................................................................................... |
203 |
A Note Concerning Responsible Use of Copyrighted Materials................................................... |
204 |
Copyright Attribution.................................................................................................................... |
204 |
7

PowerLite Pro Cinema LS9600e/LS10000 User's Guide
Welcome to the PowerLite Pro Cinema LS9600e/LS10000 User's Guide.
9

Introduction to Your Projector
Refer to these sections to learn more about your projector and this manual.
Projector Features
Notations Used in the Documentation
Where to Go for Additional Information
Projector Part Locations
Projector Features
The PowerLite Pro Cinema LS9600e and LS10000 projectors include these special features:
Bright, high-resolution projection system
•PowerLite Pro Cinema LS9600e: Up to 1300 lumens of color brightness (color light output) and 1300 lumens of white brightness (white light output)
PowerLite Pro Cinema LS10000: Up to 1500 lumens of color brightness (color light output) and 1500 lumens of white brightness (white light output)
Note: Color brightness (color light output) and white brightness (white light output) will vary depending on usage conditions. Color light output measured in accordance with IDMS 15.4; white light output measured in accordance with ISO 21118.
•1080p native resolution
•Images up to 300 inches (7.62 m) for projection on any wall or screen
•Laser light source provides Absolute black level and precision detail
•Super-resolution enhances low resolution images to 1920 × 1080 and sharpens blurred images
•4K Enhancement projects 4K images using "4K Enhancement Technology", creating ultra-high definition images (PowerLite Pro Cinema LS10000)
Full 3D projection
•Active 3D projection with RF active shutter glasses
•Supports side-by-side, top-and-bottom, and frame packing 3D formats
Flexible connectivity
• Two HDMI ports for video device or computer connections
10
•Watch both HDMI sources simultaneously with Picture-In-Picture mode
•One MHL (Mobile High-definition Link)-compatible HDMI port on the WirelessHD Transmitter for highquality audio and video from tablets and smartphones (PowerLite Pro Cinema LS9600e)
Easy-to-use setup and operation features
•Laser light source provides up to 30,000 hours of operation
•Powered lens memory function for maintaining constant height for up to five different aspect ratios
•Vertical and horizontal lens shift, and vertical keystone correction buttons for flexible projector placement
•2.1× optical zoom ratio for improved zooming capability
Product Box Contents
Additional Components
Optional Equipment and Replacement Parts
Warranty and Registration Information
Parent topic: Introduction to Your Projector
Product Box Contents
Save all the packaging in case you need to ship the projector. Always use the original packaging (or equivalent) when shipping.
Make sure your projector box included all of these parts:
11
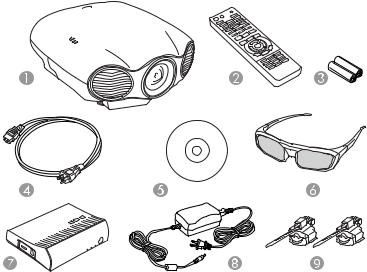
1Projector
2Remote control
3Remote control batteries (two AA alkaline)
4Power cord
5Projector documentation CD
63D glasses (2 pairs)
7WirelessHD Transmitter (PowerLite Pro Cinema LS9600e)
8WirelessHD Transmitter AC adapter (PowerLite Pro Cinema LS9600e)
9HDMI cable clamps (2)
Parent topic: Projector Features
Additional Components
Depending on how you plan to use the projector, you may need to obtain the following additional components:
•To receive a component video signal, you need a compatible component cable. You can purchase one from Epson or an authorized Epson reseller.
12
•To receive an HDMI signal, you need a compatible HDMI cable. You can purchase one from Epson or an authorized Epson reseller.
Note: To connect a Mac that includes only a Mini DisplayPort, Thunderbolt port, or Mini-DVI port for video output, you need to obtain an adapter that allows you to connect to the projector's HDMI port. Contact Apple for compatible adapter options.
•To receive an HDMI signal via MHL, you need an MHL-compatible device, an MHL cable, or an HDMI cable and an MHL adapter compatible with your device. Devices with an integrated MHL connector may not require a cable (PowerLite Pro Cinema LS9600e).
•To receive and view a 3D signal, you need a compatible HDMI cable. You can purchase one from Epson or an authorized Epson reseller. If your video source is a 3D Blu-ray disc, you also need a Bluray player that supports 3D playback. See your local computer or electronics dealer for purchase information.
Parent topic: Projector Features
Optional Equipment and Replacement Parts
You can purchase screens, other optional accessories, and replacement parts from an Epson authorized reseller. To find the nearest reseller, call 800-GO-EPSON (800-463-7766). Or you can purchase online at epsonstore.com (U.S. sales) or epson.ca (Canadian sales).
Epson offers the following optional accessories and replacement parts for your projector:
Option or part |
Part number |
Replacement air filter |
V13H134A39 |
RF 3D glasses (ELPGS03) |
V12H548006 |
Projector ceiling mount |
CHF2500 |
Belkin PureAV HDMI audio video cable, 6 ft |
AV22300-06 |
Belkin PureAV HDMI audio video cable, 3 ft |
AV22300-03 |
Belkin Pro Series VGA/SVGA cable, 10 ft |
F3H982-10 |
Kensington security lock |
ELPSL01 |
In addition to the accessories listed above, 1-year and 2-year extended service plans are available.
Parent topic: Projector Features
13
Related tasks
Replacing the Air Filter
Warranty and Registration Information
Your projector comes with a basic warranty that lets you project with confidence. For details, see the warranty brochure that came with your projector.
In addition, Epson offers free Extra Care Home Service. In the unlikely event of an equipment failure, you won’t have to wait for your unit to be repaired. Instead, Epson will ship you a replacement unit anywhere in the United States, Canada, or Puerto Rico. See the Extra Care Home Service brochure for details.
Register your product online using the projector CD or at this site: epson.com/webreg
Registering also lets you receive special updates on new accessories, products, and services.
Parent topic: Projector Features
Notations Used in the Documentation
Follow the guidelines in these notations as you read your documentation:
•Warnings must be followed carefully to avoid bodily injury.
•Cautions must be observed to avoid damage to your equipment.
•Notes contain important information about your projector.
•Tips contain additional projection information.
Parent topic: Introduction to Your Projector
Where to Go for Additional Information
Need quick help on using your projector? Here's where to look for help:
•epson.com/support (U.S) or epson.ca/support (Canada)
View FAQs (frequently asked questions) and e-mail your questions to Epson technical support 24 hours a day.
•If you still need help after checking this manual and the sources listed above, you can use the Epson PrivateLine Support service to get help fast. For details, see "Where to Get Help".
Parent topic: Introduction to Your Projector
14
Projector Part Locations
Check the projector part illustrations to learn about the parts on your projector.
Projector Parts - Front/Top
Projector Parts - Rear
Projector Parts - Interface Ports
Projector Parts - Base
Projector Parts - Control Panel and Projector Lights
Projector Parts - Remote Control
Parent topic: Introduction to Your Projector
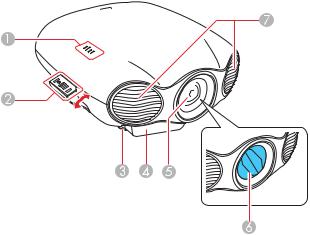
Projector Parts - Front/Top
1Projector status lights
2Control panel
3Front adjustable foot
4WirelessHD receiver (PowerLite Pro Cinema LS9600e)
5Lens
6Lens shutter
15
7 Air exhaust vents
Parent topic: Projector Part Locations
Projector Parts - Rear
1Remote receiver
2Projector ports
3Cable clamp
4Cable cover screw holes
5Air intake/Air filter cover
Parent topic: Projector Part Locations
16

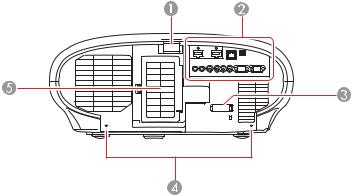
Projector Parts - Interface Ports
1HDMI1 / HDMI2 ports
2HDMI cable clamp slots (2)
3LAN port
4Service port
5RS-232C port
6PC port (VGA)
7Component ports
8Trigger out 1 and Trigger out 2 ports
9Video port
Parent topic: Projector Part Locations
17
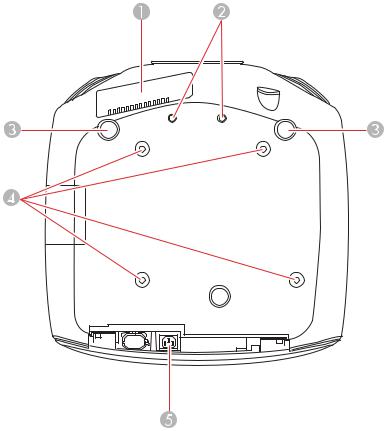
Projector Parts - Base
1Air intake vent
2Screw holes for anamorphic lens
3Adjustable front feet
4Mounting bracket holes
5Power inlet
Parent topic: Projector Part Locations
18
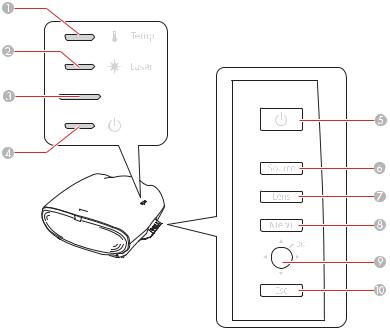
Projector Parts - Control Panel and Projector Lights
1Temp light
2Laser light
3Status light
4Power light
5Power button
6Source button (cycles through the list of sources)
7Lens button (cycles through the lens adjustment options)
8Menu button (accesses configuration menus)
9Directional thumbstick (push in for OK button; controls menu selection and keystone adjustment)
10Esc button
19
Parent topic: Projector Part Locations
Related references
Projector Light Status
Projector Parts - Remote Control
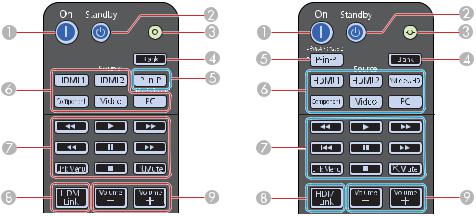
Top buttons
Left: PowerLite Pro Cinema LS10000
Right: PowerLite Pro Cinema LS9600e
1On button (turns on projector)
2Standby button
3Illumination button (lights the remote control)
4Blank button (turns off video projection)
5P-in-P button (controls the Picture-in-Picture mode for HDMI inputs)
6Source buttons (select specific video input sources)
7HDMI Link control buttons (control playback and other features of connected devices that support the HDMI CEC standard)
8HDMI Link button (displays the settings menu for HDMI Link)
20
9 Volume up/down buttons (adjust volume for devices connected via HDMI Link)
Center buttons
1Lens button (cycles through the lens adjustment options)
2Color Mode button (selects display modes)
32D/3D button (cycles between 2D and 3D modes)
4Arrow buttons (move though on-screen options)
5Enter button (selects options)
6Default button (returns selected setting to default value)
7Menu button (accesses projector menu system)
8Esc button (cancels/exits functions)
Bottom buttons
Left: PowerLite Pro Cinema LS10000
21
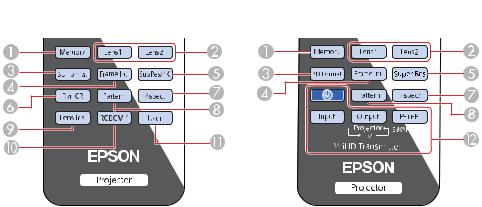
Right: PowerLite Pro Cinema LS9600e
1Memory button (accesses the Memory menu)
2Lens 1 / Lens 2 buttons (loads a saved lens position)
33D Format button (changes the 3D format)
4Frame Int button (adjusts the Frame Interpolation setting)
5SupRes/4K button (PowerLite Pro Cinema LS10000; reduces blurring around the edges of images when viewing 3D content, or adjusts the 4K Enhancement setting for ultra-high-definition images)
Super Res button (PowerLite Pro Cinema LS9600e; reduces blurring around the edges of images)
6Dyn Cr button (PowerLite Pro Cinema LS10000; sets Dynamic Contrast)
7Aspect button (selects the image aspect ratio)
8Pattern button (displays a test pattern)
9Lens Iris button (PowerLite Pro Cinema LS10000; adjusts the contrast of the image by restricting the amount of light entering the lens)
10RGBCMY button (PowerLite Pro Cinema LS10000; adjusts hue, saturation, and brightness for each RGBCMY color)
11User button (PowerLite Pro Cinema LS10000; customizable for different functions)
12WirelessHD transmitter control buttons (PowerLite Pro Cinema LS9600e; controls WirelessHD Transmitter functions)
22
Parent topic: Projector Part Locations
23
Setting Up the Projector
Follow the instructions in these sections to set up your projector for use.
Projector Placement
Removing and Attaching the Cable Cover
Projector Connections
Installing Batteries in the Remote Control
Projector Placement
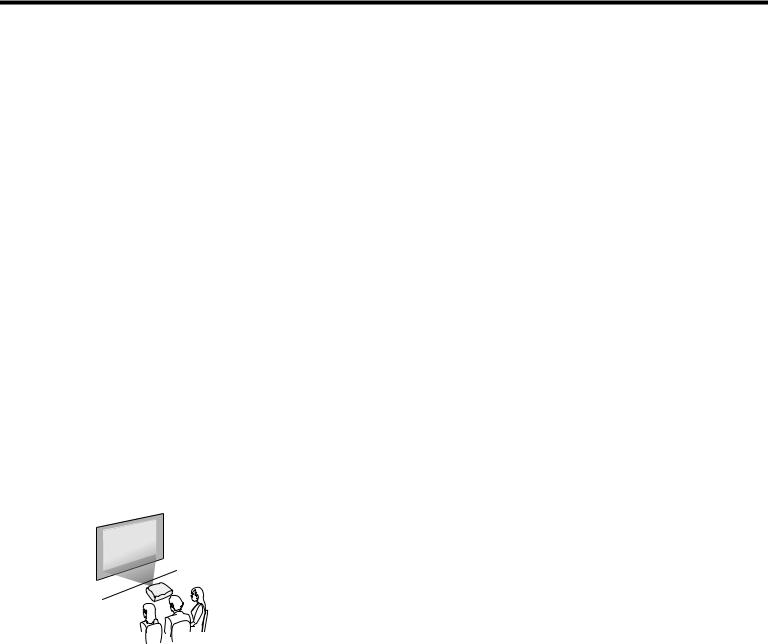
You can place the projector on almost any flat surface to project an image.
You can also install the projector in a ceiling mount if you want to use it in a fixed location. Keep these considerations in mind as you select a projector location:
•Place the projector on a sturdy, level surface or install it using a compatible mount.
•Leave plenty of space around and under the projector for ventilation, and do not place it on top of or next to anything that could block the vents.
•Position the projector within reach of a grounded electrical outlet or extension cord.
Projector Setup and Installation Options
Projection Distance
Parent topic: Setting Up the Projector
Projector Setup and Installation Options
You can set up or install your projector in the following ways:
Front
24
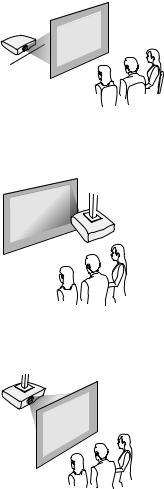
Rear
Front Ceiling
Rear Ceiling
Wherever you set up the projector, make sure to position it squarely in front of the center of the screen, not at an angle, if possible. If the projector cannot be centered in front of the screen, use lens shift to reposition the image instead of using keystone correction for better image quality.
If you project from the ceiling or from the rear, be sure to select the correct Projection option in the projector's menu system.
25
Parent topic: Projector Placement
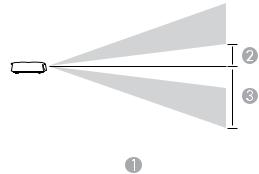
Projection Distance
The distance at which you place the projector from the screen determines the approximate size of the image. The image size increases the farther the projector is from the screen, but can vary depending on the zoom factor, aspect ratio, and other settings.
Use the tables here to determine approximately how far to place the projector from the screen based on the size of the projected image. (Conversion figures may have been rounded up or down.)
4:3 Aspect Ratio Image or Screen
Screen or image size |
Projection distance (1) |
Offset from lens center |
Offset from lens center |
|
Wide to Tele |
(2) |
(3) |
|
|
|
|
40 inches (101.6 cm) |
53.9 to 115.7 inches |
9.4 inches (24 cm) |
33.5 inches (85 cm) |
|
(137 to 294 cm) |
|
|
60 inches (152.4 cm) |
81.5 to 174.8 inches |
14.6 inches (37 cm) |
50.4 inches (128 cm) |
|
(207 to 443 cm) |
|
|
80 inches (203.2 cm) |
109 to 232.7 inches |
19.3 inches (49 cm) |
67.3 inches (171 cm) |
|
(277 to 591 cm) |
|
|
100 inches (254 cm) |
137 to 291.3 inches |
24 inches (61 cm) |
83.9 inches (213 cm) |
|
(348 to 740 cm) |
|
|
26
Screen or image size |
Projection distance (1) |
Offset from lens center |
Offset from lens center |
|
Wide to Tele |
(2) |
(3) |
|
|
|
|
120 inches (304.8 cm) |
164.6 to 350 inches |
28.7 inches (73 cm) |
100.8 inches (256 cm) |
|
(418 to 889 cm) |
|
|
150 inches (381 cm) |
205.9 to 437.8 inches |
35.8 inches (91 cm) |
126 inches (320 cm) |
|
(523 to 1112 cm) |
|
|
200 inches (508 cm) |
275.2 to 583.9 inches |
48 inches (122 cm) |
168.1 inches (427 cm) |
|
(699 to 1483 cm) |
|
|
16:9 Aspect Ratio Image or Screen |
|
|
|
|
|
|
|
Screen or image size |
Projection distance (1) |
Offset from lens center |
Offset from lens center |
|
Wide to Tele |
(2) |
(3) |
|
|
|
|
40 inches (101.6 cm) |
43.7 to 94.5 inches |
7.9 inches (20 cm) |
27.6 inches (70 cm) |
|
(111 to 240 cm) |
|
|
60 inches (152.4 cm) |
66.5 to 142.1 inches |
11.8 inches (30 cm) |
41.3 inches (105 cm) |
|
(169 to 361 cm) |
|
|
80 inches (203.2 cm) |
89 to 189.8 inches |
15.7 inches (40 cm) |
54.7 inches (139 cm) |
|
(226 to 482 cm) |
|
|
100 inches (254 cm) |
111.4 to 237.8 inches |
19.7 inches (50 cm) |
68.5 inches (174 cm) |
|
(283 to 604 cm) |
|
|
120 inches (304.8 cm) |
134.3 to 285.4 inches |
23.6 inches (60 cm) |
82.3 inches (209 cm) |
|
(341 to 725 cm) |
|
|
150 inches (381 cm) |
168.1 to 357.5 inches |
29.5 inches (75 cm) |
103.2 inches (262 cm) |
|
(427 to 908 cm) |
|
|
180 inches (457.2 cm) |
202 to 429.1 inches |
35.4 inches (90 cm) |
123.6 inches (314 cm) |
|
(513 to 1090 cm) |
|
|
Parent topic: Projector Placement
27

Removing and Attaching the Cable Cover
Before you can connect equipment to your projector, you need to remove the cable cover. 1. Remove both of the cable cover screws (screwdriver not included).
2. Lift off the cable cover.
28
To attach the cable cover, slide it into position and tighten the screws.
Parent topic: Setting Up the Projector
Projector Connections
You can connect the projector to a variety of computer, video, and audio sources to display presentations, movies, or other images, with or without sound.
•For video projection, connect devices such as DVD players, gaming consoles, streaming devices, digital cameras, smartphones, and tablets with compatible video output ports.
Note: To connect a smartphone or tablet, you may need to obtain an adapter that allows you to connect to the projector. This allows you to mirror your smartphone or tablet screens, watch movies, and more. Contact your device manufacturer for compatible adapter options.
•Connect any Windows or Mac computer that has a standard video output (15-pin VGA monitor) port, or HDMI port.
Caution: If you will use the projector at altitudes above 4921 feet (1500 m), turn on High Altitude Mode to ensure the projector's internal temperature is regulated properly.
Connecting to Video Sources
Connecting to Computer Sources
Connecting to External Speakers
Connecting to a Trigger Out Port
Parent topic: Setting Up the Projector
Connecting to Video Sources
Follow the instructions in these sections to connect video devices to the projector.
Connecting to an HDMI Video Source
Attaching and Removing the HDMI Cable Clip
Connecting to an MHL-Compatible Device
Connecting to a Component Video Source
Connecting to a Composite Video Source
Parent topic: Projector Connections
29

Connecting to an HDMI Video Source
If your video source has an HDMI port, you can connect it to the projector using an optional HDMI cable. The HDMI connection provides the best image quality.
1.Connect the HDMI cable to your video source's HDMI output port.
2.Connect the other end to one of the projector's HDMI ports.
Note: If you connected a game console, it may take a few seconds for your image to appear when you switch to the game console's input source. To reduce the potential lag in response time to game commands, set your game console's output format to a progressive signal of 480p, 720p, or higher. See your game console documentation for instructions.
You can also select the Fast Image Processing setting to reduce lag time.
Note: When an audio/video source that meets the HDMI CEC standard is connected to the projector's HDMI port, you can use the projector's remote control to control certain features of the linked device by pressing the HDMI Link button on the remote control and setting HDMI Link to On.
Parent topic: Connecting to Video Sources
Related tasks
Attaching and Removing the HDMI Cable Clip
Attaching and Removing the HDMI Cable Clip
You can install the HDMI cable clip that came with your projector to provide additional support to the HDMI cable.
1. Plug in the HDMI cable.
30
Loading...