


EFLS527UTT0
Table of contents
 Loading...
Electrolux EFLS527UTT0, EFLW427UIW0, EFLS627UTT0, EFLS627UIW0, EFLS527UTT1 Owner’s Manual
...
EN FRONT LOAD WASHER
FR LAVEUSE Á CHARGEMENT FRONTAL
ES LAVADORA DE CARGA FRONTAL
USE & CARE GUIDE
GUIDE D’UTILISATION ET D’ENTRETIEN
GUÍA DE USO Y CUIDADO
A16331601 July 2019
2
Important Safety Information
Please read and save
this guide
Thank you for choosing Electrolux, our
premium brand in home appliances. This
Use & Care Guide
ment to customer satisfaction and product
quality throughout the service life of your
new appliance.
is part of our commit-
Keep a record for quick
reference
Purchase date
Electrolux serial number
Electrolux model number
Electrolux model series*
* The series number can be found
within the Model number (example
EFLS627UTT= 600 series).
Table of contents
Important Safety Information .................2
Features ...............................................6
Pre-Installation Requirements ...............7
Installation ..........................................11
Controls and Settings ......................... 18
Operating Instructions ........................28
Normal Operating Sounds .................. 33
Stain Removal Guide .......................... 34
Care and Cleaning .............................. 36
Troubleshooting .................................. 41
Limited Warranty ................................47
Questions?
For toll free telephone support or online
support in the US and Canada contact:
U.S.
1-877-4ELECTROLUX (1-877-435-3287)
www.electroluxappliances.com
Canada
1-800-265-8352
www.electroluxappliances.ca
NOTE
Registering your product with
Electrolux enhances our ability to
serve you. You can register online at
www.electroluxappliances.com, by
sending your Product Registration Card
in the mail, or PHOTOREGISTERSM
using a smart phone. See registration
card for details.
NOTE
The instructions appearing in this
Use & Care Guide
cover every possible condition and
situation that may occur. Common sense
and caution must be practiced when
installing, operating and maintaining any
appliance.
are not meant to
WARNING
For your safety the information in this manual must be followed to minimize the risk of
fire or explosion or to prevent property damage, personal injury or loss of life. Do not
store or use gasoline or other flammable vapors and liquids in the vicinity of this or any
other appliance.
READ ALL INSTRUCTIONS BEFORE OPERATING THIS WASHER.
SAVE THESE INSTRUCTIONS FOR FUTURE REFERENCE.
©2019 Electrolux Major Appliances All rights reserved.
Important Safety Information
Important safety instructions
3
Safety precautions
DO NOT attempt to install or operate
your unit until you have read the safety
precautions in this manual. Safety items
throughout this manual are labeled with a
Danger, Warning, or Caution based on the
risk type.
DANGER
DANGER indicates an imminently
hazardous situation which, if not avoided,
will result in death or serious injury.
WARNING
WARNING indicates a potentially
hazardous situation which, if not avoided,
could result in death or serious injury.
Definitions
This is the safety alert symbol. It is
used to alert you to potential personal
injury hazards. Obey all safety messages
that follow this symbol to avoid possible
injury or death.
CAUTION
CAUTION indicates a potentially
hazardous situation which, if not avoided,
may result in minor or moderate injury.
IMPORTANT
Indicates installation, operation, or
maintenance information which is
important but not hazard-related.
WARNING - RISK OF FIRE
To reduce the risk of fire, electrical shock, or injury to persons when using this washer,
comply with the warnings listed below. Failure to comply with these Important Safety
Information and warnings could result in property damage, serious personal injury, or death.
Prevent fire
• DO NOT wash items that have been
previously cleaned in, soaked in, or
spotted with gasoline, cleaning solvents,
kerosene, cooking oils, waxes, or other
flammable or explosive substances.
DO NOT store these items on or near
the washer. These substances give off
vapors or chemical reactions that could
ignite or explode.
• DO NOT put oily or greasy rags or
clothing on top of the washer. These
substances give off vapors that could
ignite the materials.
• DO NOT add gasoline, cleaning
solvents, or other flammable or explosive
substances to the wash water. These
substances give off vapors that could
ignite or explode.
• Under certain conditions, hydrogen gas
may be produced in a hot water system
that has not been used for 2 weeks or
more. HYDROGEN GAS IS EXPLOSIVE.
If the hot water system has not been
used for such a period, before using the
washer, turn on all hot water faucets
and let the water flow from each for
several minutes. This will release any
accumulated hydrogen gas. Hydrogen
gas is flammable; DO NOT smoke or use
an open flame during this time.
• DO NOT store or use gasoline or other
flammable vapors or liquids in the vicinity
of this or any other appliance.
• Failure to comply with these warnings
could result in fire, explosion, serious
bodily injury and/or damage to the
rubber or plastic parts of the washer.
• DO NOT continue to use the washer if
you hear squeaking, grinding, rubbing or
other unusual noises. This could be
a sign of mechanical breakdown and
lead to fire or serious injury. Contact a
qualified technician immediately.
4
Important Safety Information
Protect children
• DO NOT allow children to play on or
in the washer. Close supervision of
children is necessary when the washer
is used near children. As children grow,
teach them the proper, safe use of all
appliances.
• Destroy the carton, plastic bag and
other packing materials after the washer
is unpacked. Children might use them
for play. Cartons covered with rugs,
bedspreads or plastic sheets can
become airtight compartments.
• Keep laundry products out of children’s
reach. To prevent personal injury,
observe all warnings on product labels.
• Before the washer is removed from
service or discarded, remove the washer
door to prevent accidental entrapment.
• Failure to comply with these warnings
could result in serious personal injuries.
Risk of child entrapment
Child entrapment and suffocation are not
problems of the past. Junked or abandoned
washers and dryers are still dangerous –
even if they will sit for “just a few days”. If
you are getting rid of your old washer or
dryer, please follow the instructions below to
help prevent accidents.
We strongly encourage responsible
appliance recycling/disposal methods.
Contact your State/Provence Energy
Office, Local Electric and Water Utilities or
Conservation Program Office or visit
www.energystar.gov/recycle for more
information on recycling your old washer
or dryer.
Before you throw away your old
washer or dryer:
• Remove doors
• Remove the electric power cord
• Secure all hoses and drain pipes to
prevent water from leaking out and
creating a slip hazard.
Prevent injury
• To prevent shock hazard and assure
stability during operation, the washer
must be installed and electrically
grounded by a qualified service person
in accordance with local codes.
Installation instructions are packed in
the washer for installer’s reference. Refer
to the Installation sections of this guide
for detailed grounding procedures. If the
washer is moved to a new location, have
it checked and reinstalled by
a qualified service person.
• To prevent personal injury or damage
to the washer, the electrical power
cord of the washer must be plugged
into a properly grounded and polarized
3-prong outlet. The third grounding
prong must never be removed. Never
ground the washer to a gas pipe. DO
NOT use an extension cord or an
adaptor plug.
WARNING
FIRE/ELECTRICAL SHOCK HAZARD
Avoid fire hazard or electrical shock. DO
NOT use an adaptor plug or extension
cord or remove grounding prong from
electrical power cord. Failure to follow
this warning can cause serious injury, fire
or death.
WARNING
Improper grounding of the washer may
cause serious injury or death. Check with a
licensed electrician if you are in doubt as to
whether the appliance is properly grounded.
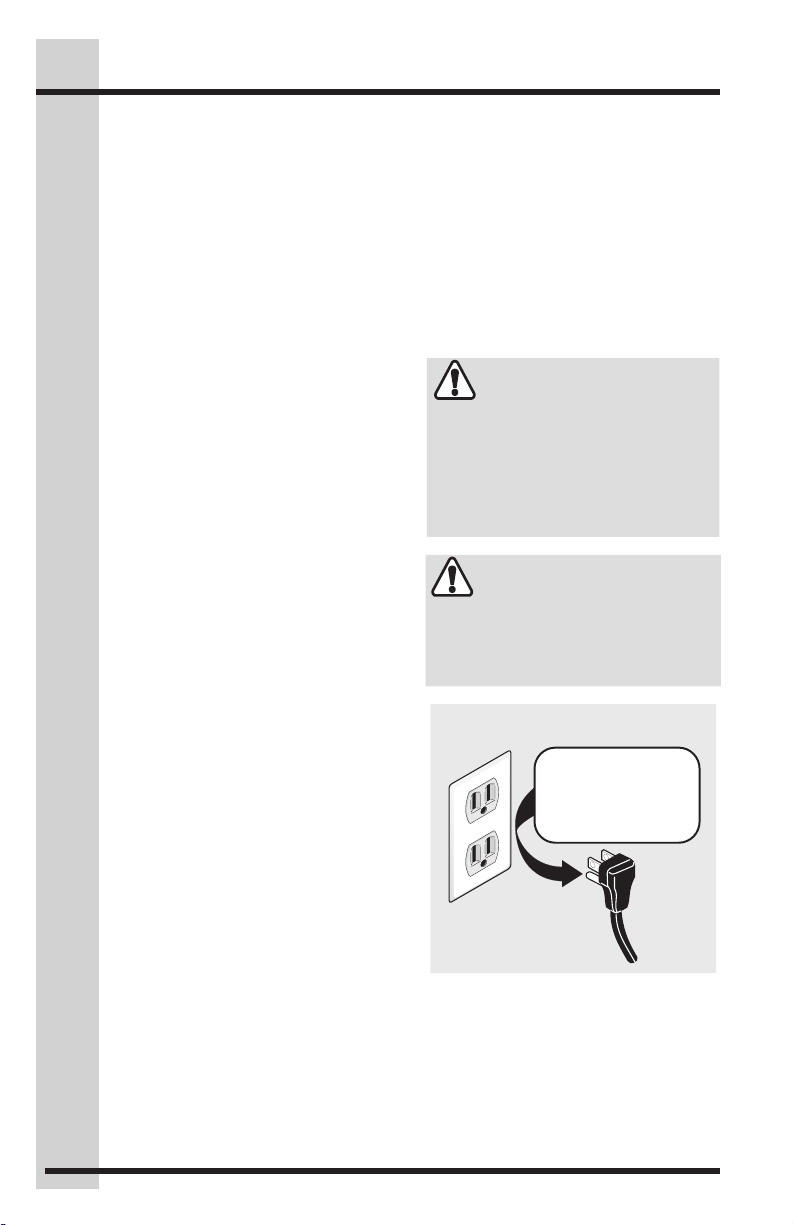
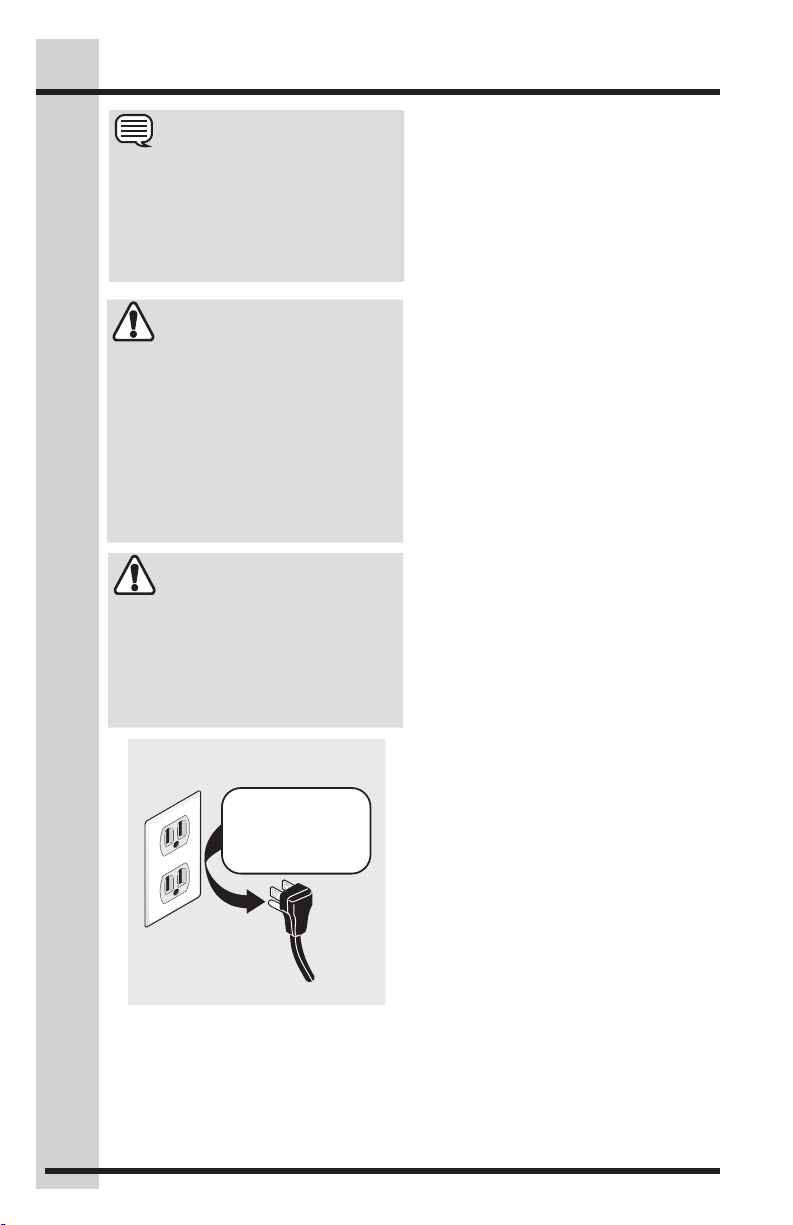
Grounding type wall receptacle
Do not, under
any circumstances,
cut, remove,
or bypass the
grounding prong.
Power cord with
3-prong grounded plug
• Follow package directions when using
laundry products. Incorrect usage can
produce poisonous gas - resulting in
serious injury or death.
• DO NOT combine laundry products
for use in 1 load unless specified on
the label.
Important Safety Information
5
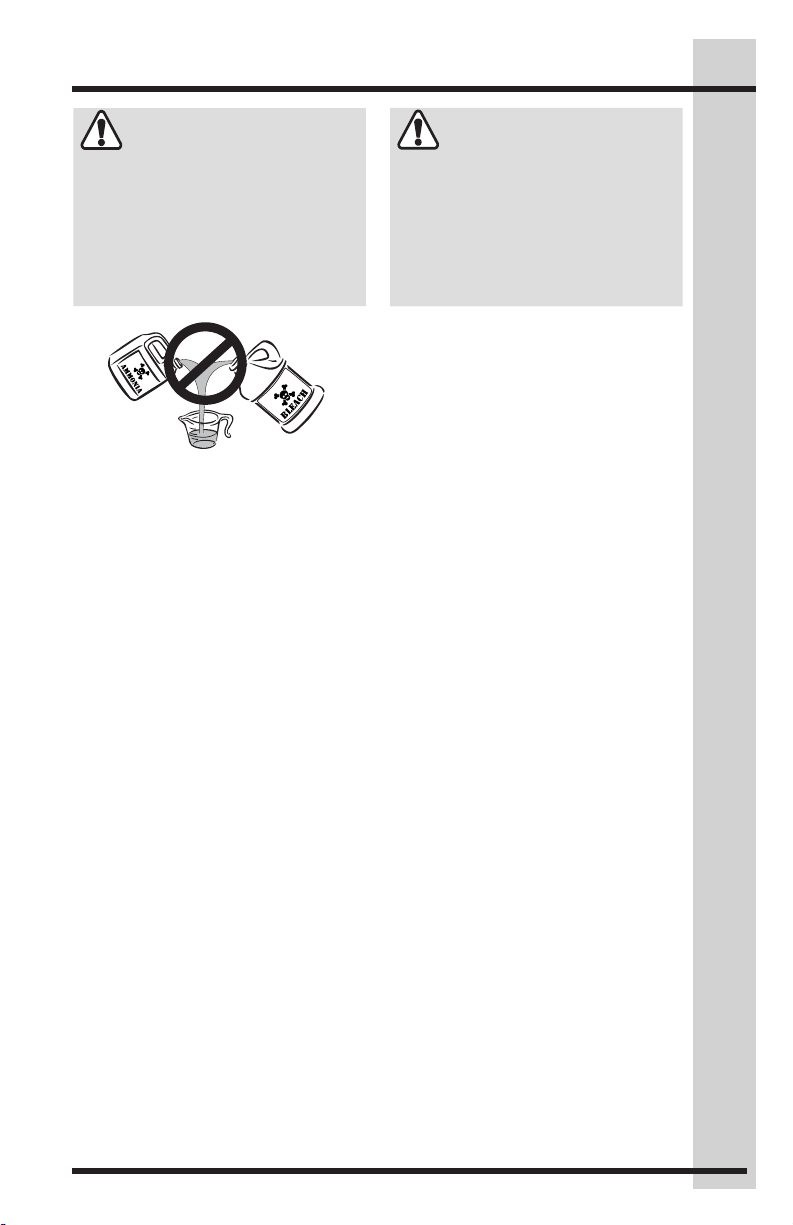
WARNING
HARMFUL VAPOR HAZARD
DO NOT use or mix liquid chlorine bleach
with other household chemicals such
as toilet cleaners, rust removers, acids
such as vinegar, or products containing
ammonia. These mixtures can produce
dangerous fumes which can cause
serious injury or death.
Prevent injury and damage to
the washer
To prevent serious personal injury and
damage to the washer:
• All repairs and servicing must be
performed by an authorized service
technician unless specifically
recommended in this
Use only authorized factory parts.
• DO NOT tamper with controls.
• DO NOT install or store the washer
where it will be exposed to the weather.
• DO NOT install on carpet. Install washer
on a solid floor. It may be necessary to
reinforce the floor to prevent vibration or
movement.
• To reduce the risk of electric shock,
disconnect this appliance from the
power supply before attempting any
user maintenance. Turning the controls
to the OFF position does not disconnect
this appliance from the power supply.
• To prevent injury, DO NOT reach into
the washer while parts are moving.
• This washer is equipped with an
electrical overload protector. The motor
will stop if it becomes overheated.
• Failure to comply with these warnings
could result in serious personal injuries.
Use & Care Guide
WARNING
RISK OF INJURY
DO NOT WASH: Water resistant and
water repellent clothing or other materials. Failure to follow these instructions
may result in an abnormal vibrating and
out-of-balance condition that could result in physical injury, property damage,
and/or appliance damage.
.
6
Cycle
(400/500/600 se
S
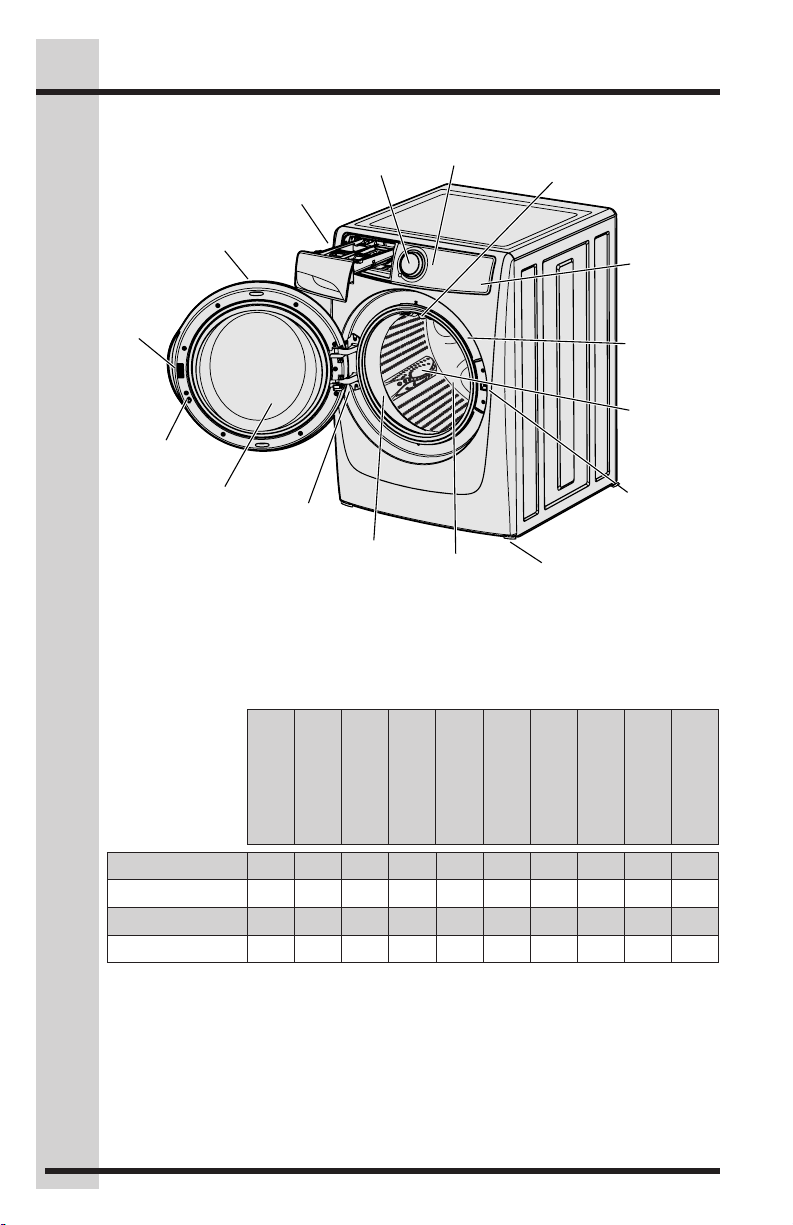
Wash Drum
Features
Reversible Door
models only)
Door
triker
Door Stand
Ventilation
Inner glass with
small article
redistribution ramp
ries
Laundry Products
Dispenser
Wide-Angle
Door Hinge
Flexible door
LED
Display
gasket
Selector
(select models only)
Stainless Steel
Drum Light
Door Latch with
Adjustable
Leveling Legs
Control
Lock
Serial # and
Model #
Cascading
Wash Vanes
Safety Lock
Not all cycles, options, or features listed are available on every model.
Refer to the table below for an overview of features available for each model series.
drum light
door reversibility
3 compartment
dispenser
Adaptive
Dispenser™
detergent pack
option
sanitize
stain treatment
perfect steam
wrinkle release
300 Series
400 Series
500 Series
600 Series
no no yes no no no no no no no
no yes no yes no no yes no yes 20
yes yes no yes yes yes yes yes yes 18
yes yes no yes yes yes yes yes yes 15
Full descriptions of all available settings and options can be found in the following
sections:
Model series ....................................18
Settings chart - 300 series washer ..19
Settings chart - 400 series washer ..20
Settings chart - 500 series washer ..21
Cycle selection ................................23
Cycle settings ..................................23
Cycle options ..................................25
Other features ................................26
Settings chart - 600 series washer ..22
fast wash
min
min
min
Pre-Installation Requirements
box wrench
Installation Checklist
Shipping Hardware
Foam shipping support (under wash
tub) removed and stored
Shipping bolts and spacers removed
from rear of appliance and stored
Hole plugs (shipped in bag in drum)
installed in holes in backsheet
Leveling
Washer is level, side-to-side and
front-to-back
Cabinet is sitting solid on all corners
Water Supply
Use only new hoses and verify
rubber sealing washers are installed
HOT supply is connected to HOT
inlet and COLD supply is connected
to COLD inlet
HOT and COLD water supply
turned on
No leaks present at water supply
connections or appliance inlet
connections - recheck in 24 hours
7
Drain
Stand pipe or wall drain height
minimum 24”
Verify anti-siphon disc is attached
toward end of drain hose
Drain hose secured in place with
cable tie (shipped in drum)
Door Reversal
Follow detailed instructions in
this guide
Test hinge and latch for function
Electrical Power
House power turned on
Washer plugged in
Final Checks
Installation instructions and Use
& Care Guide read thoroughly
Door locks and water enters drum
when cycle starts
Registration card sent in
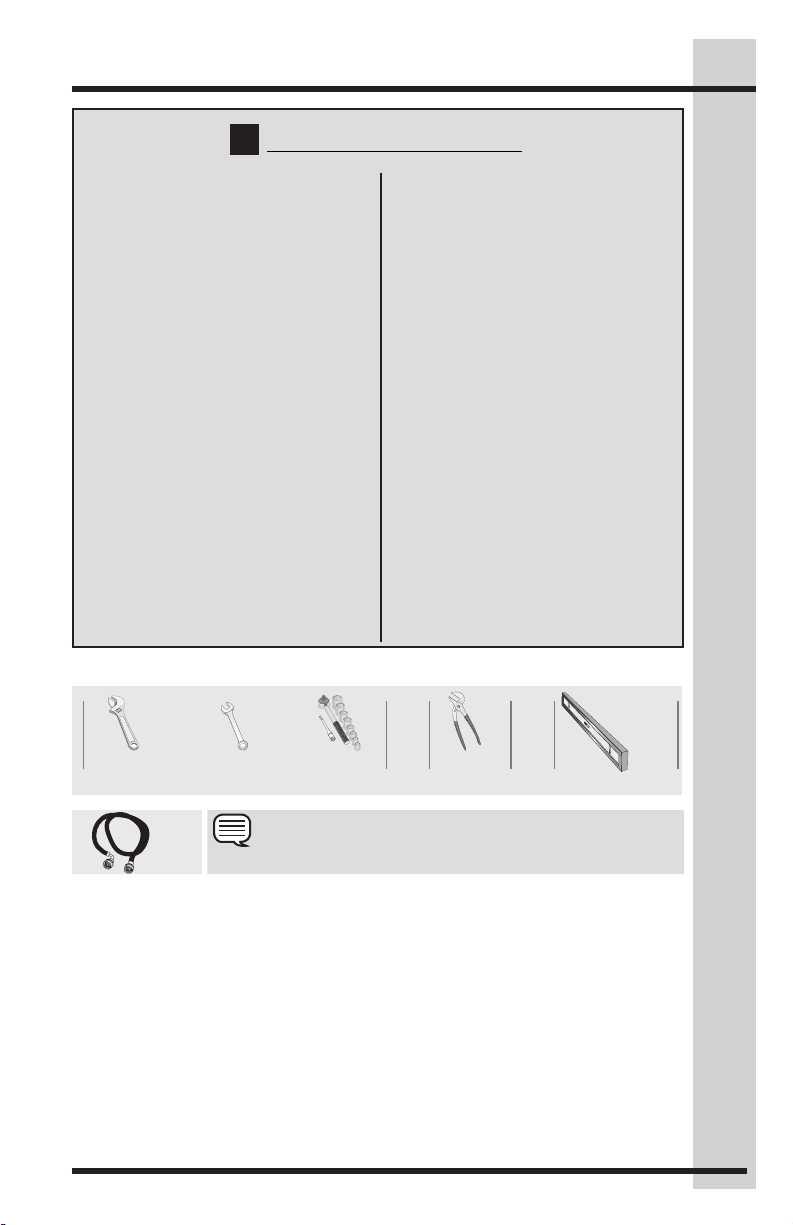
Tools and materials needed for installation:
OR OR AND AND
Adjustable
wrench
3/8" or
10 mm
Inlet
Hose
(x2)
Hoses are not included with washer purchase.
Ratchet and
socket set
NOTE
Adjustable
Electrical system requirements
CIRCUIT - Individual, properly polarized
and grounded 15 amp. branch circuit
fused with 15 amp. time delay fuse or
circuit breaker.
POWER SUPPLY - 2 wire, with ground,
120 volt single phase, 60 Hz, Alternating
Current.
OUTLET RECEPTACLE - Properly
grounded 3-prong receptacle to be
located so the power supply cord is
accessible when the washer is in an
installed position.
pliers
Carpenter’s level
8
Pre-Installation Requirements
NOTE
Because of potentially inconsistent
voltage capabilities, the use of this
washer with power created by gas
powered generators, solar powered
generators, wind powered generators or
any other generator other than the local
utility company is not recommended.
WARNING
ELECTRIC SHOCK HAZARD
Certain internal parts are intentionally
not grounded and may present a risk
of electrical shock if contacted during
installation. Do not contact the following
parts while the appliance is energized
• Pump
• Drive motor
• Electrical control boards
• Water valves
WARNING
ELECTRICAL SHOCK HAZARD
Improper connection of the equipment
grounding conductor can result in a
risk of electrical shock. Check with a
licensed electrician if you are in doubt
as to whether the appliance is properly
grounded.
Grounding type wall receptacle
Do not, under
any circumstances,
cut, remove,
or bypass the
grounding prong.
Power cord with
3-prong grounded plug
Grounding requirements
1. The washer MUST be grounded.
In the event of malfunction or
breakdown, grounding will reduce the
risk of electrical shock by a path of
least resistance for electrical current.
2. Since your washer is equipped with
a power supply cord having an
equipment-grounding conductor and
a grounding plug, the plug MUST be
plugged into an appropriate, copper
wired receptacle that is properly
installed and grounded in accordance
with all local codes and ordinances
or in the absence of local codes, with
the National Electrical Codes, ANSI/
NFPA 70 (latest edition), or in Canada,
the Canadian electrical code C22.1
part 1. If in doubt, call a licensed
electrician. DO NOT cut off or alter the
grounding prong on the power supply
cord. In situations where a two-slot
receptacle is present, it is the owner’s
responsibility to have a licensed
electrician replace it with a properly
grounded three prong grounding type
receptacle.
Water supply requirements
Hot and cold water faucets MUST be
installed within hose length of your
washer’s water inlet. The faucets MUST be
3/4 inch (1.9 cm) with threading for laundry
hose connection. Water pressure MUST
be between 20 and 120 psi. Pressure
difference between hot and cold cannot be
more than 10 psi. Your water department
can advise you of your water pressure.
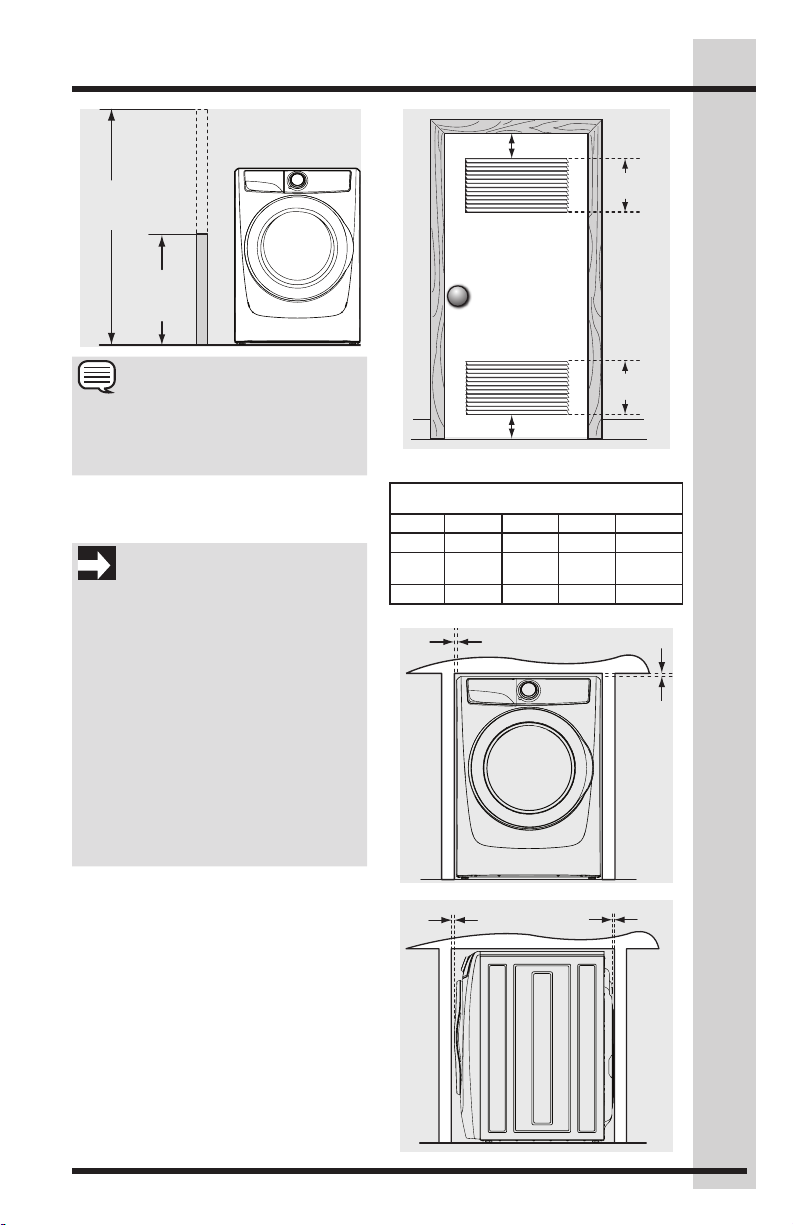
Drain system requirements
1. Drain capable of eliminating 17 gals
(64.3 L) per minute.
2. A standpipe diameter of 1-1/4 in.
(3.18 cm) minimum.
3. The standpipe height above the floor :
Minimum height: 24 in. (61 cm)
Maximum height: 96 in. (244 cm).
1"
(2.5 cm)
0"
96"
(244 cm)
max.
24"
(61 cm)
min.
Pre-Installation Requirements
3"
(7.6cm)
60 sq. in.
(387.1cm²)
9
NOTE
Drain hose length is 59 in. (150 cm). For
installations requiring a longer drain hose,
use hose P/N 137098000, available from
an authorized parts distributor.
Clearance requirements
IMPORTANT
DO NOT INSTALL YOUR WASHER:
1. In an area exposed to dripping water
or outside weather conditions.
2. In an area where gasoline or other
flammables are kept or stored.
3. On carpet. Floor MUST be solid with
a maximum slope of 1 inch (2.5 cm).
To minimize vibration or movement,
reinforcement of the floor may be
necessary.
4. On top of another washer or on top
of a dryer. Do not stack a dryer on
top of washer already installed on
pedestal.
Installation in a recess or closet
If washer and dryer are installed in the
same closet, door ventilation is required: A
minimum of 120 square inches (774.2 cm²)
of opening, equally divided at the top and
bottom of the door, is required. Louvered
openings should be located 3 inches
(7.6 cm) from bottom and top of door. Air
openings are required to be unobstructed
when a door is installed. A louvered door
with equivalent air openings for the full
length of the door is acceptable.
60 sq. in.
(387.1cm²)
3"
(7.6cm)
closet door
MINIMUM INSTALLATION CLEARANCES -
Alcove 0” (0 cm) 0” (0 cm) 0” (0 cm) n/a
Under-
Counter
Closet 0” (0 cm) 0” (0 cm) 0” (0 cm) 1” (2.5 cm)
0"
(0 cm)
Inches (cm)
SIDES REAR TOP FRONT
0” (0 cm) 0” (0 cm) 0” (0 cm) n/a
0"
(0 cm)
(0 cm)
10
(135.5 cm)
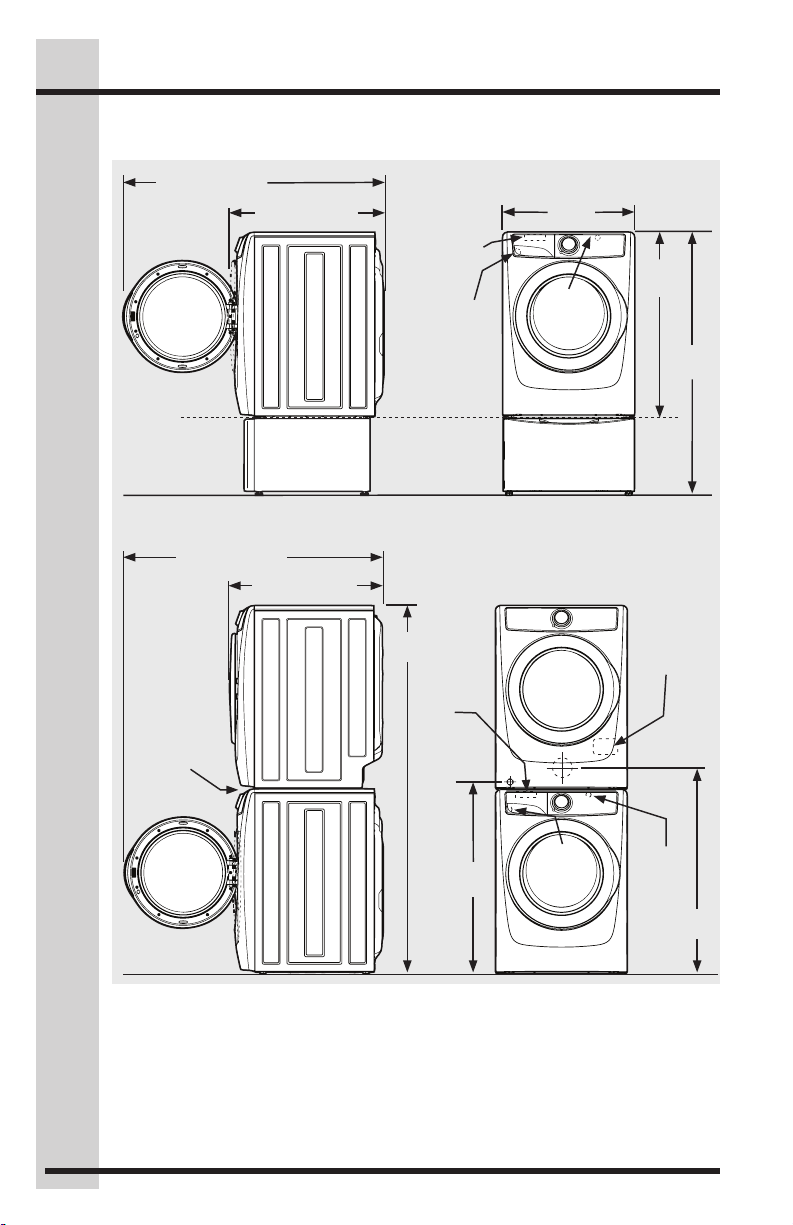
Pre-Installation Requirements
Washer dimensions
(136 cm)*
53.5"
to clear open door
freestand washer
on floor
floor line
washer mounted on
optional pedestal
floor line
53.5" (136 cm)*
to clear open door
approved
stacking kit
(STACKIT7X)
required for
stacked
installation
32" (81.25 cm)*
to front of closed door
32" (81.25 cm)*
to front of closed door
water supply
connection on
rear of unit
drain hose on
rear of unit
75.75"
(192.5 cm)
water supply
connection
on rear
of unit
gas supply
pipe on rear
of gas unit
3
27.0"
(68.5 cm)
power
cord
on rear
of unit
1
38.0"
(96.5 cm)
53.25"
electrical
supply on
rear of unit
centerline
height for
rear vent
3
39.0"
(99 cm)
drain
hose on
rear of
unit
2
power
cord on
rear of
unit
(105 cm)
1
41.0"
floor line
*
Connection of water inlet hose on steam dryer adds 3/4 in. (2 cm) to installation depth.
1
Power supply cord length on washer approximately 60 inches (152.5 cm).
2
Drain hose length on washer approximately 59 inches (150 cm).
3
Power supply cord length on gas dryer or electric Canadian dryer approximately 60
inches (152.5 cm).

Installation
11
Unpacking the washer
WARNING
SUFFOCATION HAZARD
Dispose of the carton and plastic bags after
the washer is unpacked. Children might use
them for play. Cartons covered with rugs,
bedspreads, or plastic sheets can become
airtight chambers causing suffocation. Place
all materials in a garbage container or make
materials inaccessible to children.
1. Temporarily
remove door
tape.
2. Open washer
door and
remove
everything from
the drum.
3. Close door and
reapply door
tape.
4. Using a rug,
blanket or piece
of cardboard to
protect the floor,
carefully lay the
washer on its
back.
6. Carefully
return the
washer to
an upright
position.
7. Carefully move the washer to within 4
feet (1 m) of its final location.
WARNING
ELECTRIC SHOCK HAZARD
Certain internal parts are intentionally
not grounded and may present a risk
of electrical shock if contacted during
installation.
Do not contact the following parts while
the appliance is energized
• Pump
• Drive motor
• Electrical control boards
• Water valves
IMPORTANT
Save styrofoam base and shipping plug
for use to help prevent washer damage
during any future moves.
IMPORTANT
DO NOT place the washer onto its back
without the shipping bolts.
CAUTION
EXCESSIVE WEIGHT HAZARD
To avoid back or other injury, have more
than one person move or lift the washer.
5. Remove styrofoam base and shipping
plug and set them aside.
IMPORTANT
DO NOT tip washer upside down onto its
top or onto its right side for any reason.
12
Installation
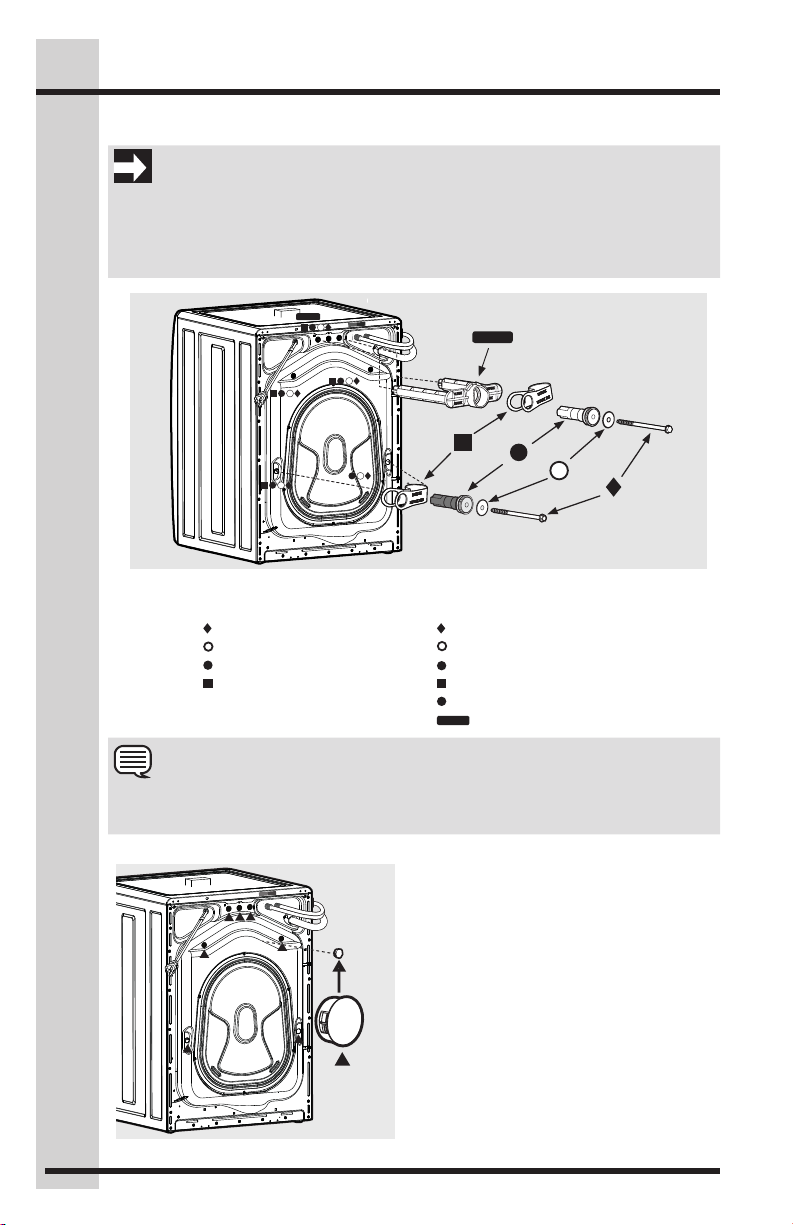
Removing shipping hardware
IMPORTANT
Failure to remove shipping hardware completely could result in damage to the
appliance, damage to your home, or unexpected washing results.
Save all shipping bolts and spacers for future use. If the washer is to be transported at a
later date, the shipping hardware must be reinstalled to help prevent shipping damage
COLD Water Hose
HOT Water Hose
FRIA
CALIENTE
FROIDE
CHAUDE
*
* on select models
*
For 300 Series:
Remove all of the following:
4 BOLTS
4 SHIMS
4 BLACK SPACERS
3 P CLAMPS
For 400, 500, and 600 Series:
Remove all of the following:
5 BOLTS
5 SHIMS
4 BLACK SPACERS
4 P CLAMPS
1 WHITE SPACER*
1 SHIPPING FORK*
NOTE
Rubber expansion material on spacers may need time to relax before they can be easily
pulled through shipping hole.
COLD Water Hose
HOT Water Hose
FRIA
CALIENTE
FROIDE
CHAUDE
x7
Installing hole plugs
Locate hole plugs in the small bag
supplied with washer instruction guides.
Insert them in the holes in the washer back
panel where the shipping hardware has
been removed.
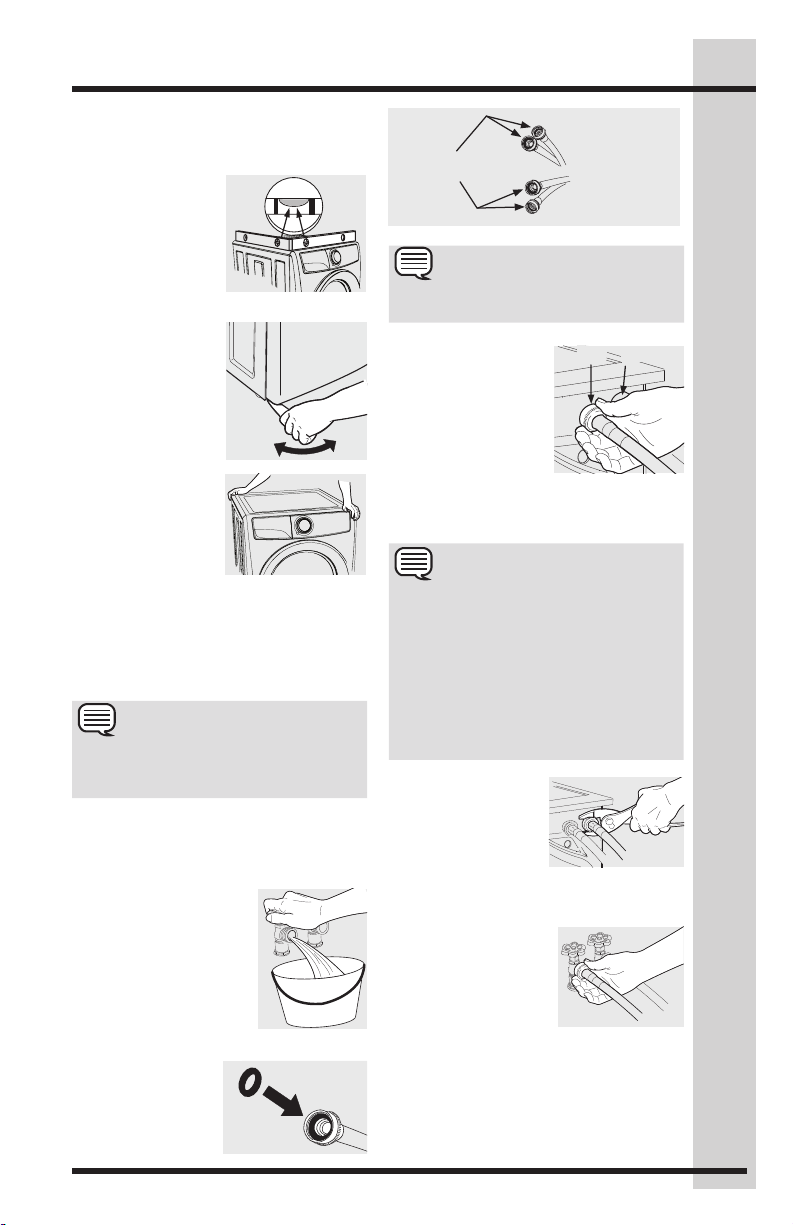
Leveling the washer
Excessive noise and vibration can be
prevented by properly leveling the washer.
1. For free standing
installation and
with the washer
within 4 feet
(1 m) of its final
location, place
a level on top of
the washer.
2. Use an
adjustable
wrench to adjust
the leveling
legs so the
washer is level
front-to-rear and
side-to-side, and
stable cornerto-corner.
3. Press down
on alternate
corners and
sides and feel
for the slightest
movement.
Adjust the appropriate leg(s) so the
washer sits solidly on the floor on
ALL four legs. Keep the leveling leg
extension at a minimum for best
performance of the washer.
NOTE
For pedestal installations, see additional
installation instructions included with the
pedestal.
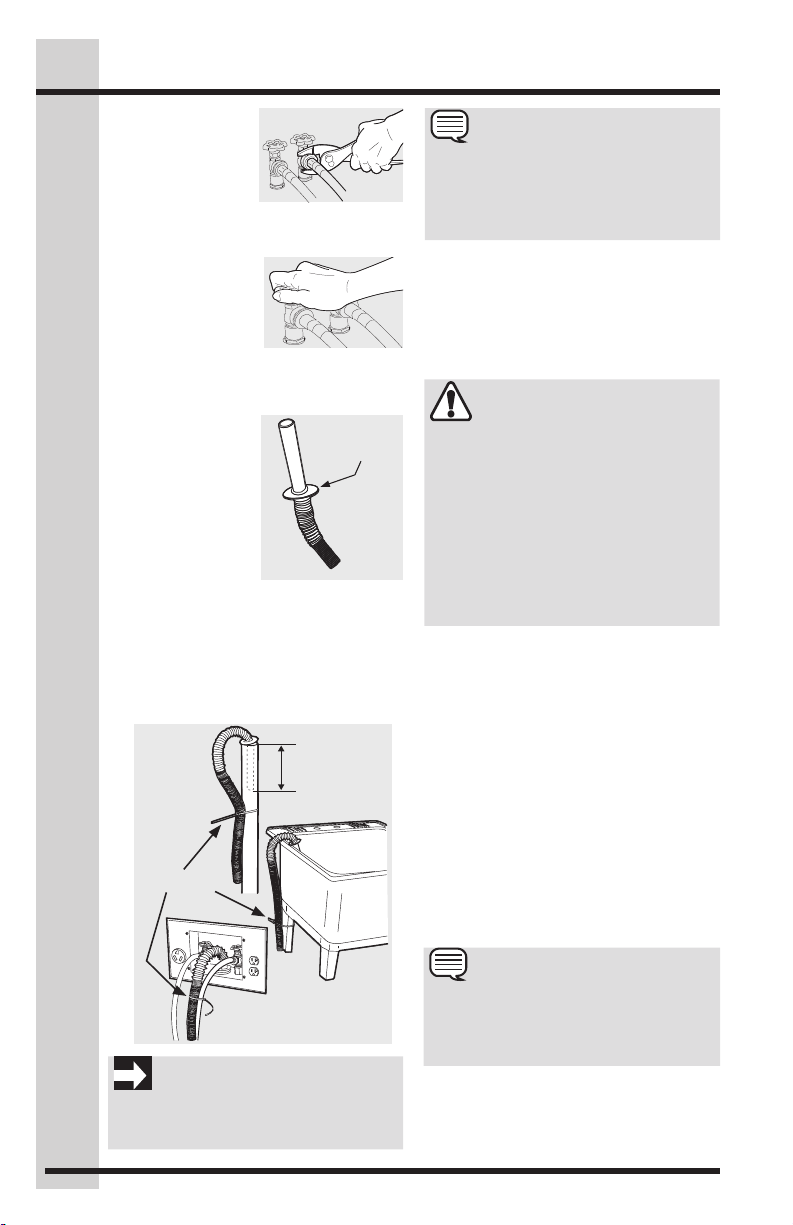
Connecting the water
1. Run some water
from the hot and
cold faucets to flush
the water lines and
remove particles that
might clog the water
valve screens and
to determine which
faucet is hot and
which is cold supply.
2. Check to ensure
that the inlet
hoses have the
rubber washer
firmly in place.
Installation
Rubber Washers
Must Be Present
NOTE
Hoses are not included with washer purchase.
3. Connect the
HOT inlet hose
to the HOT
inlet connection
on the washer
and the COLD
inlet hose to
the COLD inlet
connection on
the washer.
IMPORTANT
The cold water inlet will have a blue cap
cover on the inlet connection and the
hot water inlet will have a red cap cover
on the inlet connection. Additionally,
depending on the model, the hot and
cold inlet connections will be marked
with either an adhesive label or markings
directly on the unit to indicate which side
is cold and which side is hot.
4. Tighten by hand
until snug. Then
tighten each
supply connection
another 2/3 turn
with pliers.
Do not cross thread or overtighten these connections.
5. Connect the HOT
inlet hose to the
HOT water supply
and the COLD inlet
hose to the COLD
water supply.
USE ONLY
NEW HOSES
Cold Hot
Cold inlet shown
on left side (select
models only)
13
14
Installation
6. Tighten by
hand until snug.
Then tighten
each supply
connection
another 2/3
turn with pliers. Do not bend, kink or
pinch water inlet hoses.
7. Turn on the water
and check for
leaks.
Connecting the drain
1. Verify the antisiphon disc is
in place.
2. Form a “U”
shape on the
end of the drain
hose with the
hose pointed
toward the
drain. Place
the formed end in a laundry tub or a
standpipe and secure the drain hose
with the cable tie (provided in the
enclosure package) to the standpipe,
inlet hose, laundry tub, etc. so the
hose does not pull out from the force
of the water.
Cable Tie
Anti-Siphon
Disc
Insert Less
Than 8.5"
(21.5 cm)
NOTE
The standpipe inside diameter must be
1-1/4” (3.2 cm) minimum. There must be
an air gap around the drain hose in the
standpipe. A snug hose fit can cause a
siphoning action.
Completing the installation
1. Plug the power cord into a grounded
outlet.
WARNING
ELECTRICAL SHOCK HAZARD
Improper connection of the equipment
grounding conductor can cause an electrical shock that may result in serious injury or death. Check with a licensed electrician if you are in doubt as to whether the
appliance is properly grounded.
See
Electrical System Requirements
Grounding Requirements
instruction for additional information.
2. Turn on the power at a circuit breaker/
fuse box.
3. Carefully slide the washer to its final
position. Recheck for level and rock
corners for stability.
washer.
Remove and discard door
tape.
4. Run the washer through a complete
cycle, checking for water leaks and
proper operation.
5. If you have any questions during
initial operation, please review the
“Troubleshooting” section before
calling for service.
6. Place these instructions in a location
near the washer for future reference.
sections of this
See Leveling the
and
IMPORTANT
Check to ensure the power is off at a
circuit breaker/fuse box before plugging
the power cord into an outlet.
NOTE
A wiring diagram and technical data
sheet are located under the washer top
panel, on top of the detergent dispenser
housing.
Installation
Reversing the door
NOTE
Door reversibility is available only on 400, 500, or 600 series models.
IMPORTANT
BEFORE YOU REVERSE WASHER DOOR:
1. Be sure you have adequate swing area before
reversing door.
2. Gather your tools - including a screw driver with a
#2 square bit and plastic knife (or small, flat prying
tool that won’t damage paint).
3. Protect flat work surface, such as top of washer
or floor near washer, with a soft cloth or towel.
4. Be sure washer is unplugged from power source!
WARNING
ELECTRICAL SHOCK HAZARD
Failure to disconnect power source before servicing could result in personal injury or
even death.
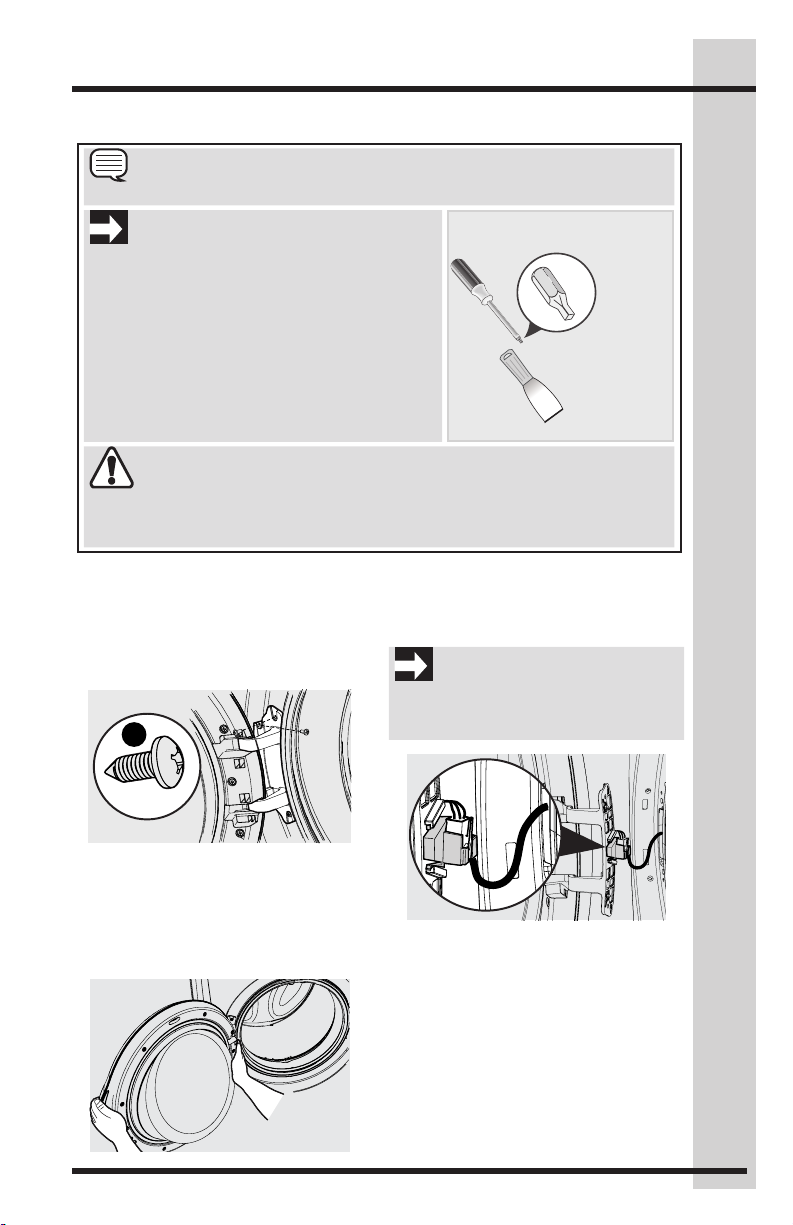
Tools needed for reversal:
Screwdriver
with #2
square bit
Plastic knife
15
Removing door assembly
1. Completely open the door to expose
all four hinge screws.
2. Remove all four hinge screws with #2
square bit driver. Save for reinstalling
later.
x4
Fine Thread
3. Hold the door with one hand
supporting the handle area and one
hand supporting the hinge. While
supporting the door at the hinge, press
firmly with the other hand until the
locating pins on the back of the hinge
plate dislocate from the front panel.
4. While supporting the door with one
hand, pinch the tabs to release the
plastic terminal cap from the hinge
plate.
IMPORTANT
Take care not to pull the door away from
the washer until you remove the wiring
harness terminal cap.
5. Set the door face down on a flat
surface protected by soft cloth or
towel.
Loading...