


Contents
For the user |
|
For the installer |
|
Safety information |
3 |
Technical data |
13 |
– Installation and servicing |
|
Unpacking the machine |
14 |
– Child safety |
|
||
|
– Damages |
|
|
– During use |
|
|
|
|
– Accessories supplied |
|
|
– At the end of the dryer’s life |
|
|
|
|
– Optional extra accessories |
|
|
Description of the appliance |
4-5 |
|
|
– Identification of materials |
|
||
Using your appliance |
6 |
Installation |
15-16 |
– Before you use the dryer for the first time |
– Positioning |
|
|
– Capacity |
|
– Electrical supply |
|
– Examples of laundry item weights |
|
– Wall mounting |
|
General information |
7 |
Rukowodstwo po \kspluatacii |
17 |
Program chart |
8 |
|
|
– Consumption |
|
|
|
The indicator lights |
9 |
|
|
Maintenance |
10-11 |
|
|
– The filters |
|
|
|
– The condenser |
|
|
|
– Emptying the water tank |
|
|
|
If the machine is not working |
12 |
|
|
Service |
13 |
|
|
– Service and spare parts |
|
|
|
- 2 -

 Safety information
Before installing and first using the tumble dryer, read this instruction booklet carefully, including its hints and warnings. To avoid unnecessary mistakes and accidents, it is important to ensure that all people using the dryer are thoroughly familiar with its operation and safety features.
Save these instructions and make sure they remain with the tumble dryer if it is moved or sold, so that everyone using it through its life can be properly informed on appliance use and safety.
Installation and servicing
●All installation and service work done on the product must be carried out by a qualified technician. Work performed by persons with inadequate knowledge may adversely affect the satisfactory functioning of the product and may cause personal injury or damage. Before any work is carried out on the tumble dryer, it must be isolated from the electrical supply. To do this the power plug must be removed from the wall socket.
●The machine is heavy, so take care when moving it.
●If the dryer is installed in a bathroom without fixed wiring to the electrical supply, an earth leakage circuit breaker (or RCD) must be used.
●The power cable must be plugged into an earthed socket, which must be easily accessible. Permanent installation must only be carried out by an authorized electrician.
●If the power cord is damaged, it must be replaced by a special cord or assembly available from the manufacturer or its service agent.
●Make sure that the power cable is not nipped or otherwise damaged when moving the machine in connection with installation or cleaning etc.
●The ventilation opening at the bottom of the door should not be obstructed if the dryer is on a carpeted floor.
●The adjustable feet must not be removed, these ensure that the underside of the dryer is ventilated.
●Servicing and repairs must be carried out by a service company authorised by the supplier. Use only spare parts supplied by these. Never try to repair the machine yourself.
Child safety
●The tumble dryer should be used by adults only. Do not let children play with the controls or other parts of it.
●Keep all packaging well away from children.
●Before loading the machine, check that there are no foreign objects or pets inside the drum.
During use
●This dryer is intended only for normal domestic drying of laundry and only in accordance with these instructions. Using it for other purposes could lead to physical injury or damage to property and invalidate the guarantee.
●Do not overload the dryer (see “Using your appliance”).
●Never start the dryer unless the fluff filter is clean and correctly in place, or if the fluff filter is damaged (this could cause overheating or damage your laundry).
●Get into the habit of cleaning the condenser at regular intervals. Keeping the condenser as clean as possible makes the dryer more efficient and means shorter drying times.
●Laundry which has been in contact with chemicals such as dry cleaning fluid and similar, should not be dried in the machine, since volatile chemicals can be a fire risk.
●The following items/materials should not be dried in the machine either:
–Pillows, cushions, down-filled items etc. (these cause a build-up of heat and can make the dryer overheat)
–Wool, on account of its tendency to mat
–Especially sensitive textiles, such as synthetic curtains, silk etc.
–Garments made of foam rubber or rubber-like materials must not be dried in the machine.
●Always switch off and unplug the appliance after use. When removing the electrical plug, grip the plug, not the lead.
At the end of the dryer’s life
The symbol on the product or on its packaging indicates that this product may not be treated as household waste. Instead it shall be handed over to the applicable collection point for the recycling of electrical and electronic equipment. By ensuring this product is disposed of correctly, you will help prevent potential negative consequences for the environment and human health, which could otherwise be caused by inappropriate waste handling of this product. For more detailed information about recycling of this product, please contact your local city office, your household waste disposal service or the shop where you purchased the product.
- 3 - |
822 61 13-62 |

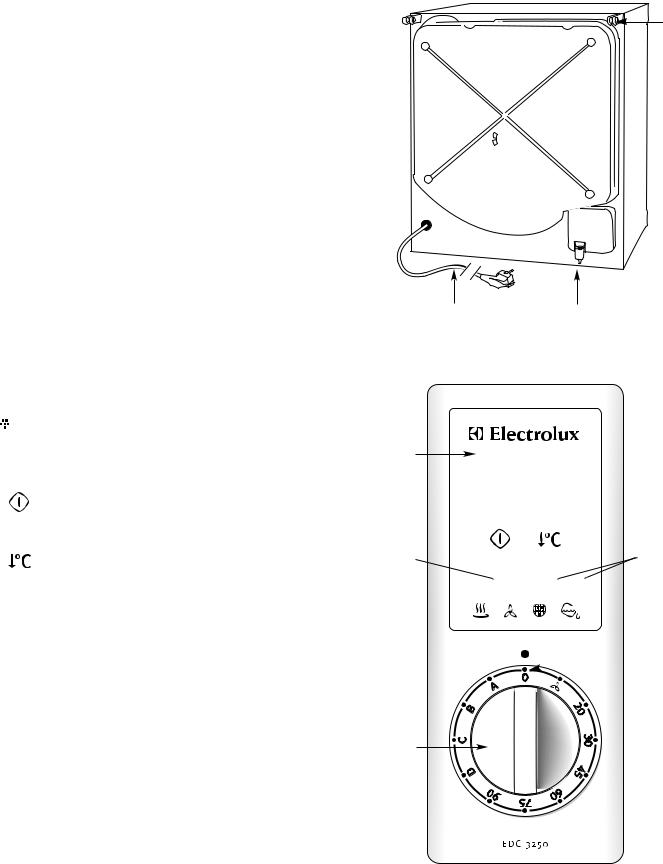
Description of the appliance
1.Door Latch (push the knob to the right to open)
Avoid opening the door while a program is in progress.
2.Space for programme chart
(Self-adhesive label)
3.Control panel
4.Warm air discharge
5.Air ducts - These should not be obstructed.
6.Condenser
This is built into the door and needs to be cleaned at regular intervals.
7.Filters
Should be cleaned before or after each load. The fluff filter is behind the coarse filter and can be removed for cleaning.
8.Adjustable feet
If the dryer is not being wall mounted the feet need to be adjusted so that the dryer is level.
9.Rating plate
10.Drum
11.Electrical lead
12.Holder for wall mounting console
2 
 1
1
3
4
|
5 |
|
6 |
10 |
|
|
|
|
7 |
9 |
|
|
|
|
|
14 |
2 |
|
- 4 - |
8 |
|
|
Description of the appliance
13. Connector for drain hose
There is a drain hose as an extra accessory for you who want and can connect the tumble dryer directly to a drain outlet. Fix the hose to the connector (13) after releasing the hose clip and removing the plug. When a drain hose is fitted, the water tank will not be filled with water.
14. Water tank for condensed water
This fills up with the water condensed by the dryer and should be emptied after each load. When the tank is full, a warning light (D) will flashing and a buzzer will sound. The dryer will stop automatically and will not restart until the tank has been emptied. If the dryer should stop on account of a full tank during an automatic program and you fail to empty the tank within 5 minutes, the program may not be able to continue successfully. If this happens, the current program will need to be cancelled and a new one started. For this reason it is best always to check that the tank is empty before starting to dry a new load.
• Lights (see also chapter ”The indicator lights”).
 A. Lit during drying stage.
 B. Lit during cool-down stage.
 C. Flash alternately during anticrease stage.
 D. Flashes when water tank is full.
• Buttons
E.Start button. After selecting program, press and hold the start button intil one of the indicator lights comes on (1-2 seconds).
F.Button for reduced heat for timed programs.
If this button is pressed, the drying heat will be reduced and the load will dry at a lower temperature. Suitable for especially delicate textiles.
• Program selector
G.For selecting electronic or timed drying programs (see also chapter ”Program chart”).
• Cancel program
H.If the program selector is turned to this position during a program, the program will be cancelled and a different program can then be selected.
To start the new program, press the start button.
12
11 13
3
E 


 F
F
B C A 


 D
D
 H
H
G
- 5 -
Using your appliance
Before using the dryer for the first time
Dampen some clean pieces of unwanted cloth and dry them for about 15 minutes the very first time, to make sure that there is no dust or dirt in the dryer.
1.Check that the dryer is connected to the electrical supply.
2.Open the door by pushing the knob to the right (A).
3.Check that the fluff filter (B) is clean and that the coarse filter (C) is lowered and has snapped into place.
4.Check that the water tank (D) is empty and pushed correctly into place.
5.Put the load for drying into the machine. Make sure that it is right inside the drum. Do not mix synthetics with natural materials.
6.Close the door.
7.Use the Program selector (E) to select the type of drying program required, either automatic or timed.
8.Press the start button (F) inwards.
It is advisable not to open the door during a programme as this could cause water to leak from the machine.
Capacity (dry items) |
|
Cotton |
max. 3,4 kg |
Synthetics |
max. 1,5 kg |
Examples of laundry item weights
(dry items)
To help you load your tumble dryer correctly, here are some examples of average garment or item weights. These are based on cotton goods.
Bathrobe |
~1.2 kg |
Duvet cover |
~0.7 kg |
Sheet |
~0.5 kg |
Blouse |
~0.1 kg |
Towel (Terry) |
~0.2 kg |
Shirt |
~0.2 kg |
Nightdress |
~0.2 kg |
Pyjamas |
~0.2 kg |
Underpants |
~0.1 kg |
Underpants (long) |
~0.3 kg |
Pillow-case |
~0.2 kg |
Socks |
~0.1 kg |
C |
A |
B |
F |
E |
D |
- 6 - |

General washing and drying information
Sorting
Always sort loads for drying according to the type of fabric (check the care labels) and how much you want to dry them. Load items loosely into the drum. Do up zip fasteners and tie loose ribbons, tapes or fabric belts. Close any tapes or fasteners on duvet covers and pillow cases to prevent smaller items from getting trapped inside.
Starched items
Laundry which has been starched can also be dried in a tumble dryer. For best results you should choose a drying time which ensures that the items are still slightly damp, e.g. by following the recommendations to achieve “damp dry (for ironing)”. After removing the load, wipe the drum clean with a damp cloth. Then dry the drum to remove any last traces of starch.
Spinning (water extraction)
Loads should be well spun. We recommend that you use a washing machine with a minimum spin speed of 800 rpm, or a separate spin-dryer (“Hydro-extractor”) if available. The higher the spin speed, the faster your tumble dryer will dry the load and the more energyefficient the whole process will be.
Even permanent press garments such as shirts should be spun for 10 to 30 seconds before tumble drying.
Getting the load size right
An overloaded tumble dryer will cause creasing. Drying loads which are too small is uneconomical.
Fluff
The first time you use the tumble dryer, you will probably be surprised at the amount of fluff produced. This is perfectly normal, and does not mean that your tumble dryer is wearing out your clothes. When garments are worn and washed by hand or machine, fibres and fluff are released, but remain on the surface of the material. If dried outdoors on a line these fibres will be blown away by the wind. In a tumble dryer the fluff is collected in the filter and accumulates through the drying process. This is very significant to those who suffer from asthma or allergies.
Items which should not be tumble dried
Items which are especially delicate, such as curtains of synthetic fabric, woollen garments, silk, textiles with a metal component, nylon socks/stockings. Garments made mostly from foam rubber or rubber-like materials must NOT be dried in the tumble dryer.
Obviously, you must not dry garments in the machine which are unsuitable for tumble drying. These are usually labelled with this symbol.
Garments which have been treated with flammable liquids (benzine, alcohol, stain removal products) should not be dried in the tumble dryer on account of the risk of fire. Always follow the recommendations of the garment/item manufacturer.
Tumble drying beneficial
Dry flat
Shrinkage
Depending on their quality, tricot fabrics in particular vary considerably in their tendency to shrink. To avoid shrinking, garments should not be overdried. Where it occurs, shrinkage can sometimes be rectified by stretching. We recommend that you bear possible shrinkage in mind when choosing the size of new tricot garments.
- 7 -

Program chart
The programs can be divided into two types: automatic programs and timed programs.
The automatic programs (A – D) switch off the tumble dryer when the load has been dried to the extent required. The timed programs are for special requirements or finishing drying individual items. Using these, the dryer will continue to dry through the time you have set, unless the load is dry before that time has elapsed. When the load is dry the program switches automatically to a cool-down stage of 9 minutes. If the load is not removed from the dryer at the end of the cool-down stage, an anti-crease stage of 30 minutes will then start automatically to keep the load in motion, thereby preventing creasing.
Type of dry laundry and |
How dry? |
Program |
Load weight, |
Spun at approx. |
||
load weight |
kg |
800 rpm |
||||
|
|
before drying |
||||
|
|
|
|
|||
|
|
|
|
|
|
|
Cotton, max. 3,4 kg. |
|
A |
3,4 |
105 |
- 120 |
|
Non-delicate items. |
Extra dry |
2.0 |
80 |
- 90 |
||
|
|
1,0 |
55 |
- 65 |
||
|
|
|
|
|
||
Cotton, max. 3,4 kg. |
|
B |
3,4 |
95 - 110 |
||
Towelling (terry), tricot e.d. |
Cupboard dry |
2.0 |
70 |
- 80 |
||
|
|
1,0 |
50 |
- 60 |
||
|
|
|
|
|
|
|
Cotton, max. 3,4 kg. |
|
C |
3,4 |
80 |
- 95 |
|
Bed linen, towels e.d. |
Iron dry |
2.0 |
55 |
- 75 |
||
|
|
1,0 |
45 |
- 55 |
||
|
|
|
|
|
|
|
Synthetics, max 1,5 kg. |
|
|
1,5 |
45 |
- 55 |
|
Automatic heat reduction. |
|
D |
||||
Cupboard dry |
1,0 |
40 |
- 50 |
|||
|
||||||
Delicate items. |
|
|
0,7 |
38 |
- 48 |
|
|
|
|
|
|
||
|
|
|
|
|
|
|
Timed drying |
Depends on |
20 - 90 |
|
|
|
|
Cotton, max. 3,4 kg. |
time set |
|
|
|
||
|
|
|
|
|||
|
|
|
|
|
|
|
Timed drying. |
Depends on |
|
|
|
|
|
Synthetics, max. 1,5 kg. |
20 - 90 |
|
|
|
||
Reduce heat by pressing the |
time set |
|
|
|
||
|
|
|
|
|||
button in the control panel. |
|
|
|
|
|
|
|
|
|
|
|
|
|
Cool-down program, |
|
|
|
|
|
|
lasts 9 minutes. |
|
|
|
|
|
|
|
|
|
|
|
|
|
Consumption according to the EN 61121 Europa standard
Energy |
2,47 kWh/3,4 kg cotton |
The consumer information on the energy declaration is in accordance with directive EEC 92/75 and refers to the 90 minutes timed programme.
- 8 -

The indicator lights
The indicator lights on the panel have three possible statuses: fixed light, flashing slowly and flashing rapidly. The table below explains the meanings of the various lights or combinations of lights.
Fixed light
|
|
|
|
|
Drying stage in progress. |
● |
|
|
|
|
|
|
|
|
Cool-down stage in progress. |
|
● |
|
|
|
|
|
|
|
Flashing slowly
|
Door open during drying stage. |
|
● |
|
|
|
|
|
|
|
|
|
|
|
|
|
|
|
|
|
|
|
|
|
|
|
|
|
|
|
|
|
|
|
|
|
Door open during cool-downg stage. |
|
|
|
|
● |
|
|
|
|
|
|
|
|
|
|
|
|
|
|
|
|
|
|
|
|
|
|
|
|
|
|
|
|
|
|
Anti-crease stage will run for 30 min. |
|
|
|
|
|
|
|
|
|
|
|
|
|
|
|
|
|
|
|
|
|
|
|
|
|
alternately |
|
|
|
|
||||
|
The lights will go on flashing until the |
|
|
|
|
|
|
|
|
|
|
|
|||||
|
|
|
|
|
|
|
|
|
|
|
|
|
|
|
|
|
|
|
door is opened. |
|
|
|
|
|
|
|
● |
|
|
● |
|
||||
|
|
|
|
|
|
|
|
|
|
|
|
||||||
|
|
|
|
|
|
|
|
|
|
|
|
|
|
|
|
|
|
|
Water tank full (buzzer). |
|
|
|
|
|
|
|
|
|
|
|
|
● |
|
||
|
|
|
|
|
|
|
|
|
|
|
|
|
|
|
|
||
|
Water tank full and door open. |
|
( ● ) |
|
( ● ) |
|
|
|
|
|
|
|
|
|
|
||
|
|
|
|
|
|
|
|
|
|
|
|
|
|
|
|
|
|
|
Alarm, program selector is between two |
|
● |
|
|
● |
|
|
● |
|
|
● |
|
|
|
||
|
programs. If not, call service. |
|
|
|
|
|
|
|
|
|
|
||||||
|
in sequence |
in sequence |
in sequence |
in sequence |
|
||||||||||||
|
|
|
|||||||||||||||
|
|
|
|
|
|
|
|
|
|
|
|
|
|
|
|
|
|
Flashing rapidly
|
* The door has been opened during |
● |
|
|
|
|
the drying stage and closed again. |
|
|
|
|
|
|
|
|
|
|
|
|
|
|
|
|
|
* The door has been opened during |
|
|
|
|
|
the cool-down stage and closed |
|
● |
|
|
|
again. |
|
|
|
|
|
|
|
|
|
|
|
The water tank has been emptied. |
( ● ) |
|
|
|
|
* The door has been opened and |
( ● ) |
|
|
|
|
closed again. |
|
|
|
|
|
|
|
|
|
|
( ● ) Depending on whether the dryer was in the drying or cool-down stage when the door was opened and whether the water tank was full/was emptied.
*For the children safety, the dryer will not restart automatically while a program is still in progress if the door has been opened and then closed again – the indicator light will flash rapidly. First make quite sure that the drum contains nothing other than the load of laundry before restarting the dryer by pressing the start button.
- 9 -

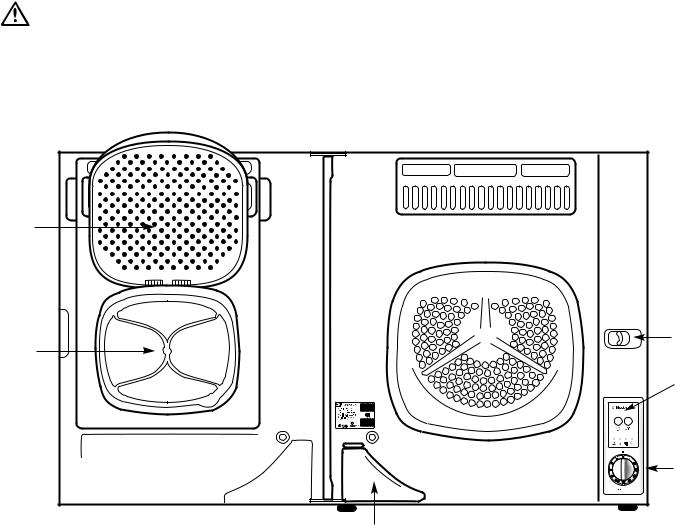
Maintenance
The filters
For your tumble dryer to function correctly, the filters need to be cleaned before or after every load dried.
To clean them:
1.Open the door.
2.Open the coarse filter upwards (Fig. A).
3.Brush the fluff off the fluff filter, which is under the coarse filter (Fig. B). Sometimes you may need to remove the fluff filter to clean it on both sides.
Make sure that you put the fluff filter back correctly after cleaning, before closing the coarse filter.
Never start the dryer unless the fluff filter is clean and correctly in place, or if the fluff filter is damaged (this could cause overheating).
The condenser
As in all types of tumble dryer, the air circulated through the dryer picks up fluff. As a result, some fluff will accumulate in the condenser, so it needs to be cleaned occasionally.
To clean the condenser:
1.Open the door and open the coarse filter upwards.
2.Remove the fluff filter and close the coarse filter again.
3.Grasp the recesses at the top of the condenser with your fingers and use your thumbs to press against the door (Fig. C & D).
The condenser will come free, allowing you to lift it outwards/upwards. Be careful not to damage the sensitive aluminium section.
4.Turn it upside down and clean it on both sides, using a vacuum cleaner. Remove the red drain plug on the lower edge of the condenser (Fig E). Lay the condenser flat and fill it with water through the filter opening. Now leave the condenser to soak in water for about 5 minutes, then shower both sides with hot water. (Fig. F).
Dry the condenser carefully afterwards. Don’t forget to put back the red drain plug (Fig. G).
5.Put the condenser back in the dryer. Make sure that its base is lined up in the slots in the condenser cavity inside the dryer door.
Press the condenser carefully into place until you feel and hear a gentle “snap”. Put back the fluff filter and close the coarse filter.
A
B
C
D
E
F
G
- 10 -
 Loading...