


EDH3498RDL

EDH3498RDL
................................................ .............................................
EN TUMBLE DRYER USER MANUAL 2
FR SÈCHE-LINGE NOTICE D'UTILISATION 18
DE WÄSCHETROCKNER BENUTZERINFORMATION 36
SV TORKTUMLARE BRUKSANVISNING 54

www.electrolux.com
2
CONTENTS
1. SAFETY INSTRUCTIONS . . . . . . . . . . . . . . . . . . . . . . . . . . . . . . . . . . . . . . . . . . . . . . . . . . 3
2. PRODUCT DESCRIPTION . . . . . . . . . . . . . . . . . . . . . . . . . . . . . . . . . . . . . . . . . . . . . . . . . 5
3. CONTROL PANEL . . . . . . . . . . . . . . . . . . . . . . . . . . . . . . . . . . . . . . . . . . . . . . . . . . . . . . . 6
4. PROGRAMMES . . . . . . . . . . . . . . . . . . . . . . . . . . . . . . . . . . . . . . . . . . . . . . . . . . . . . . . . . 7
5. OPTIONS . . . . . . . . . . . . . . . . . . . . . . . . . . . . . . . . . . . . . . . . . . . . . . . . . . . . . . . . . . . . . . 8
6. SETTINGS . . . . . . . . . . . . . . . . . . . . . . . . . . . . . . . . . . . . . . . . . . . . . . . . . . . . . . . . . . . . 10
7. DAILY USE . . . . . . . . . . . . . . . . . . . . . . . . . . . . . . . . . . . . . . . . . . . . . . . . . . . . . . . . . . . . 11
8.
HINTS AND TIPS . . . . . . . . . . . . . . . . . . . . . . . . . . . . . . . . . . . . . . . . . . . . . . . . . . . . . . . 12
9. CARE AND CLEANING . . . . . . . . . . . . . . . . . . . . . . . . . . . . . . . . . . . . . . . . . . . . . . . . . . . 13
10.
TROUBLESHOOTING . . . . . . . . . . . . . . . . . . . . . . . . . . . . . . . . . . . . . . . . . . . . . . . . . . . . 16
11. TECHNICAL DATA . . . . . . . . . . . . . . . . . . . . . . . . . . . . . . . . . . . . . . . . . . . . . . . . . . . . . . 17
WE’RE THINKING OF YOU
Thank you for purchasing an Electrolux appliance. You’ve chosen a product that brings with it
decades of professional experience and innovation. Ingenious and stylish, it has been designed
with you in mind. So whenever you use it, you can be safe in the knowledge that you’ll get great
results every time.
Welcome to Electrolux.
Visit our website for:
Get usage advice, brochures, trouble shooter, service information:
www.electrolux.com
Register your product for better service:
www.electrolux.com/productregistration
Buy Accessories, Consumables and Original spare parts for your appliance:
www.electrolux.com/shop
CUSTOMER CARE AND SERVICE
We recommend the use of original spare parts.
When contacting Service, ensure that you have the following data available.
The information can be found on the rating plate. Model, PNC, Serial Number.
Warning / Caution-Safety information
General information and tips
Environmental information
Subject to change without notice.

ENGLISH 3
1.
SAFETY INSTRUCTIONS
Before the installation and use of the appliance, carefully read the supplied instructions. The manufacturer is not responsible if an incorrect installation and
use causes injuries and damages. Always
keep the instructions with the appliance
for future reference.
1.1 Children and vulnerable
people safety
WARNING!
Risk of suffocation, injury or permanent disability.
• This appliance can be used by children
aged from 8 years and above and persons with reduced physical, sensory or
mental capabilities or lack of experience
and knowledge if they have been given
supervision or instruction for the operation of the appliance by a person who is
responsible for their safety.
• Do not let children play with the appliance.
• Keep all packaging away from children.
• Keep all detergents away from children.
• Keep children and pets away from the
appliance door when it is open.
• Cleaning and user maintenance shall
not be made by children without supervision.
1.2 Installation
• Remove all the packaging.
• Do not install or use a damaged appliance.
• Obey the installation instruction supplied with the appliance.
• Make sure that the floor where you install the appliance is flat, stable, heat
resistant and clean.
• Do not install or use the appliance
where the temperature is less than 5°C
or higher than 35°C.
• Do not install the appliance behind a
lockable door, a sliding door or a door
with a hinge on the opposite side,
where the appliance door can not be
fully opened.
• Always be careful when you move the
appliance because it is heavy. Always
wear safety gloves.
• Always move the appliance vertically.
• The rear surface of the appliance must
be put against the wall.
• Make sure that there is air circulation
between the appliance and the floor.
• Make sure the carpet does not obstruct
the ventilation openings in the base of
the appliance (if applicable).
• Exhaust air must not be discharged into
a flue which is used for exhausting
fumes from appliances burning gas or
other fuels. (if applicable)
• If the tumble dryer is put on top of a
washing machine, use the stacking kit.
The stacking kit, available from your authorized vendor, can be used only with
the appliance specified in the instructions, supplied with the accessory.
Read it carefully before installation (Refer to the Installation leaflet).
• Ensure you have good ventilation in the
installation room to avoid the back flow
of gases into the room from appliances
burning other fuels, including open fires.
• The appliance can be installed as freestanding or below the kitchen counter
with correct space (Refer to the Installation leaflet).
• When the appliance is put in its permanent position, check if it is fully level
with the aid of a spirit level. If it is not,
adjust the feet until it is.
Electrical connection
WARNING!
Risk of fire and electrical shock.
• The appliance must be earthed.
• Make sure that the electrical information
on the rating plate agrees with the power supply. If not, contact an electrician.
• Always use a correctly installed shockproof socket.
• Do not use multi-plug adapters and extension cables.
• Make sure not to cause damage to the
mains plug and to the mains cable.

www.electrolux.com
4
• Connect the mains plug to the mains
• Do not pull the mains cable to discon-
• Do not touch the mains cable or the
• This appliance complies with the E.E.C.
1.3 Use
• Use this appliance in a household only.
• Do not change the specification of this
• The final part of the drying cycle occurs
• If you use fabric softener or similar
• Do not run the appliance without a filter.
• Wipe away lint that has accumulated
• Do not dry the damaged items which
• Do not dry items such as foam rubber
• Before drying items that have been in
Should the appliance power supply cable need to be replaced, this must be
carried out by our Service Centre.
socket only at the end of the installation. Make sure that there is access to
the mains plug after the installation.
nect the appliance. Always pull the
mains plug.
mains plug with wet hands.
Directives.
WARNING!
Risk of fire, explosion, electric
shock or damage to the appliance
appliance.
without heat (cool down cycle) to ensure that the items will not be damaged.
If you stop the appliance before the end
of the drying cycle, immediately remove
and spread out all items, so that the
heat can dissipate.
products, obey the instructions on the
packaging.
Clean the lint filter before or after each
use.
around the appliance.
contain padding or fillings.
(latex foam), shower caps, waterproof
textiles, rubber backed articles and
clothes or pillows fitted with foam rubber pads..
contact with substances such as cooking oil, acetone, alcohol , petrol, kerosene, spot removers, turpentine, waxes
and wax removers, wash them in hot
water with an extra amount of detergent.
• Do not dry items in the appliance if industrial chemicals have been used for
cleaning.
• Make sure that no gas lighters or
matches have been left in the pockets
of the clothing.
• Only dry fabrics which are applicable to
dry in the tumble dryer. Follow the instructions on the fabric label.
• Do not dry not washed items in the appliance.
• If you have washed your laundry with a
stain remover start an extra rinse cycle
before you start the dryer.
• Do not drink or prepare food with the
condensed water. It can cause health
problems to people and pets.
• Do not sit or stand on the open door.
• Obey the maximum load volume of 9 kg
(refer to the “Programme chart” chapter).
• Do not dry dripping wet clothes in the
tumble dryer.
1.4 Care and Cleaning
WARNING!
Risk of injury or damage to the
appliance.
• Before maintenance, deactivate the appliance and disconnect the mains plug
from the mains socket.
• Do not use water spray and steam to
clean the appliance.
• Clean the appliance with a moist soft
cloth. Only use neutral detergents. Do
not use abrasive products, abrasive
cleaning pads, solvents or metal objects.
1.5 Internal light
WARNING!
Risk of injury.
Visible LED radiation, do not look
directly into the beam.
The type of light bulb or halogen
lamp used for this appliance, is
only for household appliances. Do
not use it for house lighting.
To replace the internal light, contact the Service.
1.6 Disposal
WARNING!
Risk of injury or suffocation.
• Disconnect the appliance from the
mains supply.
• Cut off the mains cable and discard it.
• Remove the door catch to prevent children and pets to get closed in the appliance.
Compressor
WARNING!
Risk of damage of the appliance.
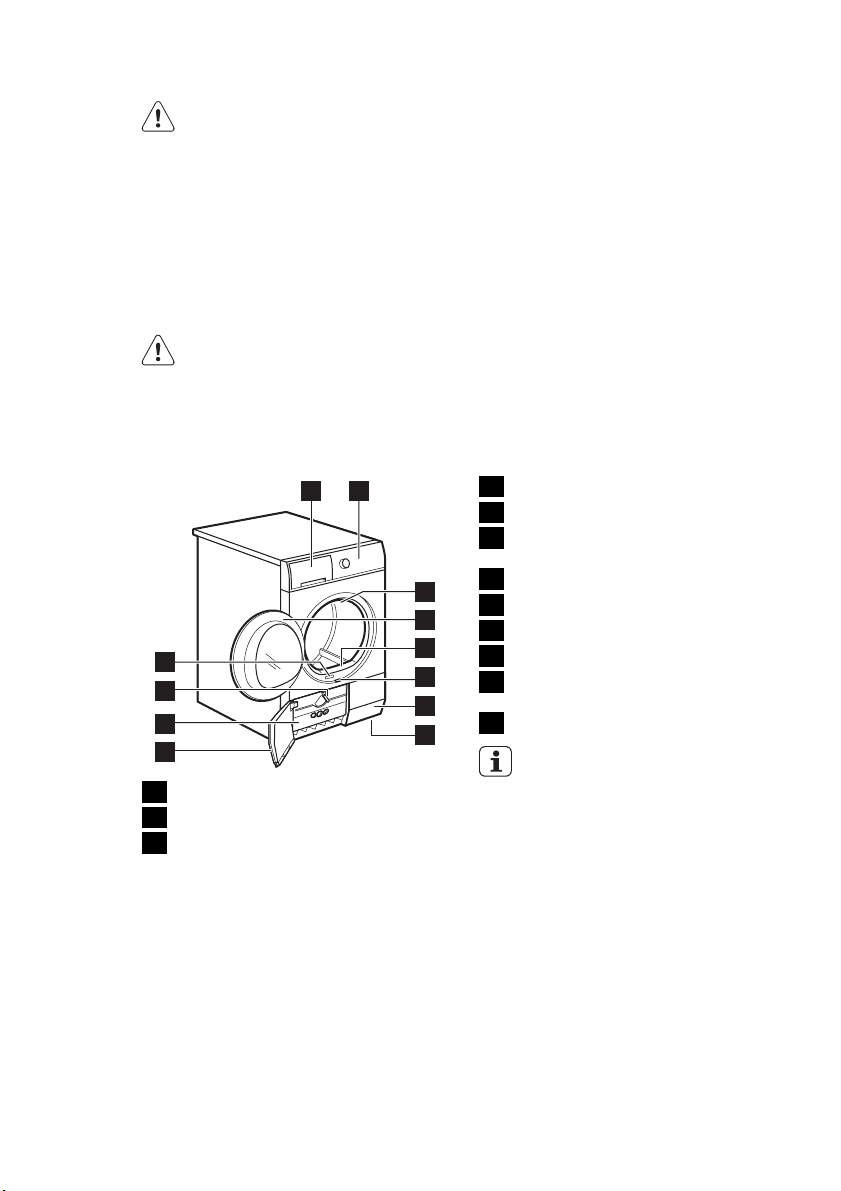
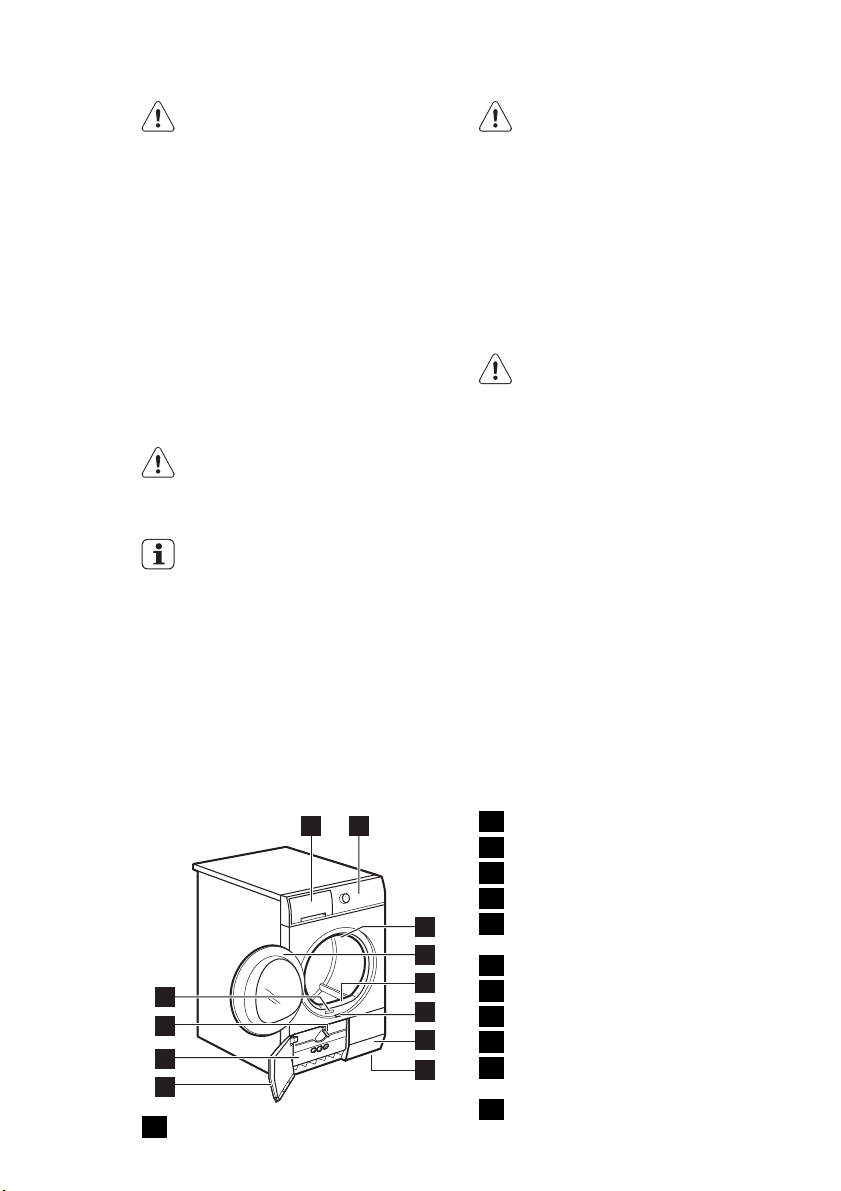
2. PRODUCT DESCRIPTION
1 2
12
11
10
9
Water container
1
Control panel
2
Internal light
3
• The compressor and its system in the
tumble dryer is filled with the special
agent which is free from fluoro-chlorohydrocarbons. This system must stay
tight. The damage of the system can
cause a leakage.
Load door
4
Primary Filter
5
The button to open the heat exchang-
6
er door
Airflow slots
3
4
5
6
7
8
7
Adjustable feet
8
Heat exchanger door
9
Heat exchanger cover
10
The knob to lock the heat exchanger
11
cover
Rating plate
12
The load door can be installed by
the user in the opposite side. It
can help to easily put and remove
the laundry or if there is a limit to
install the appliance (see separate
leaflet).
ENGLISH 5
www.electrolux.com
6
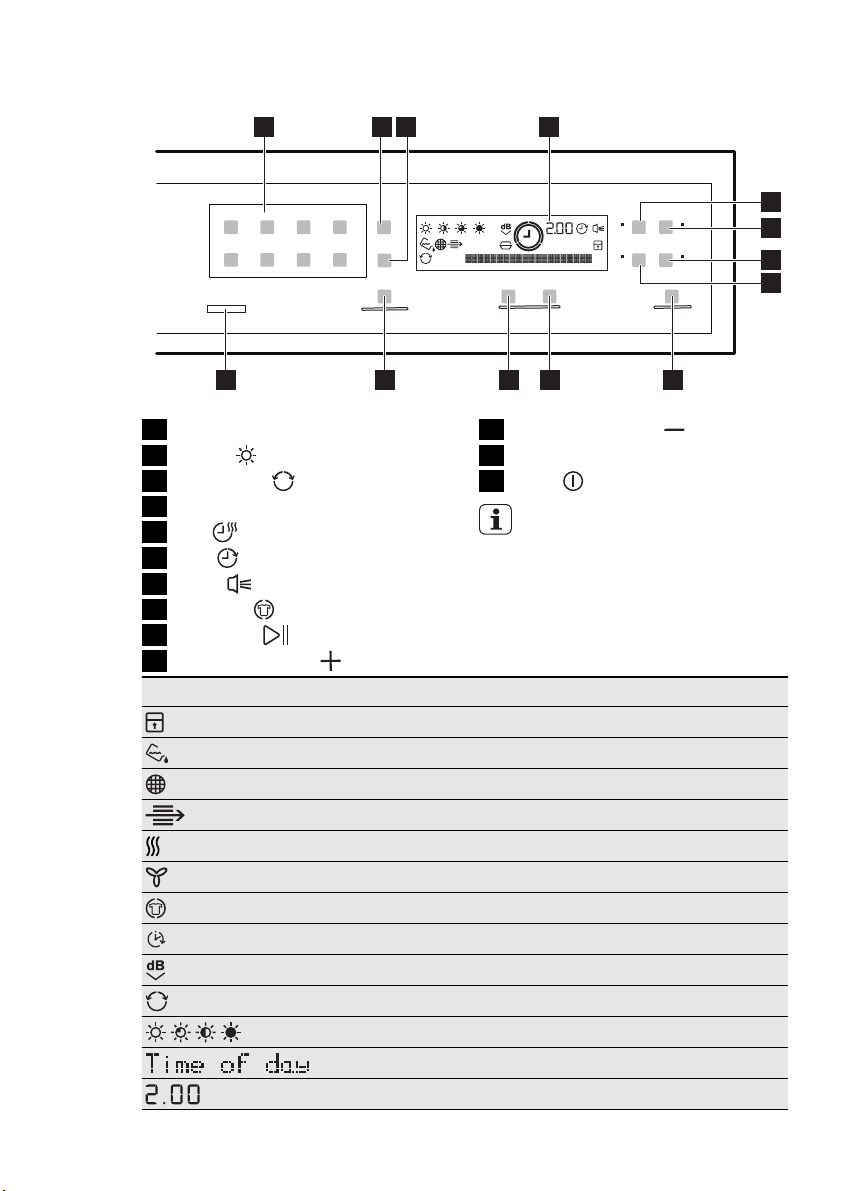
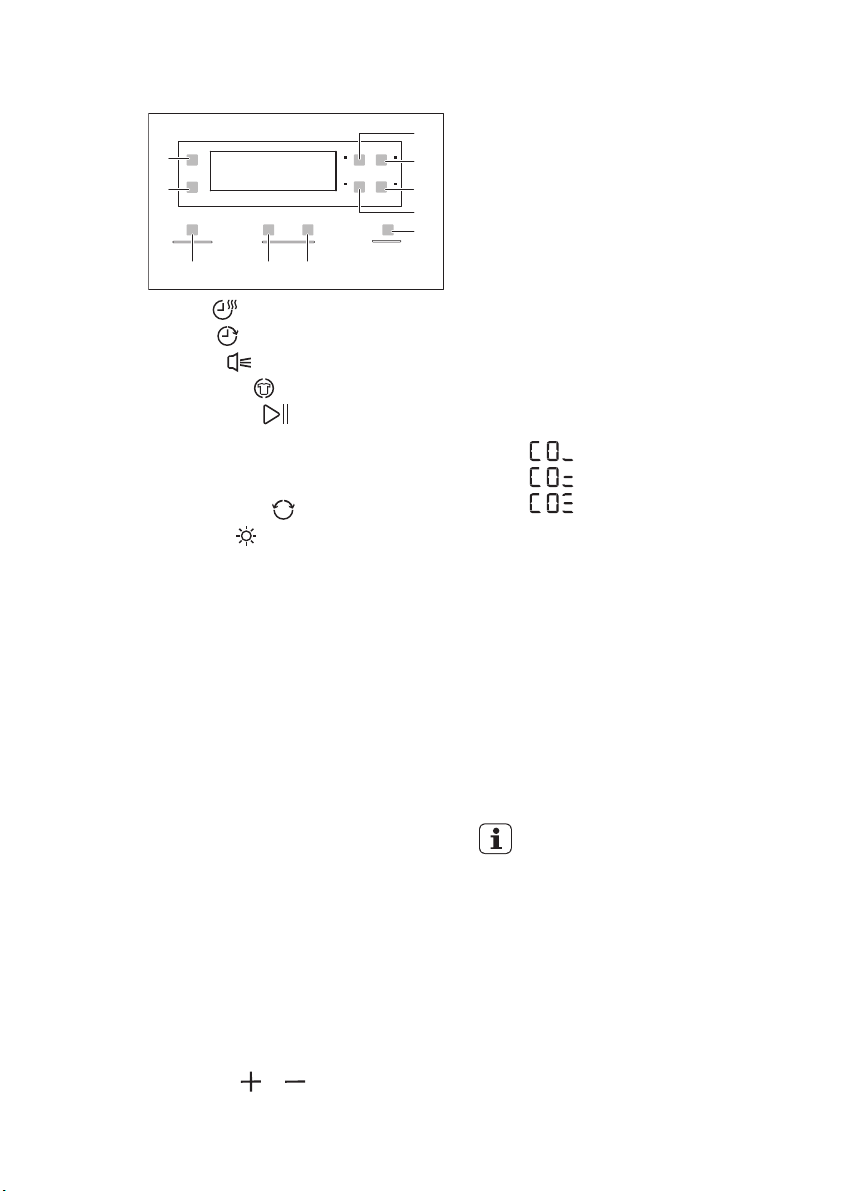
3. CONTROL PANEL
1
Programme touchpad
1
Dryness touchpad
2
Reverse Plus touchpad
3
Display
4
Time touchpad
5
Delay touchpad
6
Buzzer touchpad
7
Anticrease touchpad
8
Start/Pause touchpad
9
Rack Time increase touchpad
10
2
11
12
13
43
Rack Time decrease touchpad
MyFavourite+ touchpad
On/Off button
Touch the touchpads with your
finger in the area with the symbol
or the name of the option.
Do not wear gloves when you operate with the control panel.
Make sure that the control panel
is always clean and dry.
Indicators Description
Child lock.
Water container.
Filter.
Condenser.
Drying phase.
Cooling phase.
Crease guard phase.
Delay start.
Extra Silent.
Reverse plus.
Drying level
Text bar.
Programme duration.
5
6
7
8
910111213

Indicators Description
-
4. PROGRAMMES
ENGLISH 7
Delay start duration.
Programmes
Cotton
Synthetic
Sports
Duvet
Drying Rack
5)
Wool
4)
Rapid
Cottons Extra Silent
Jeans
Delicates
Type of load / Load (max.)1) / Fabric mark
Drying level: Extra Dry , Strong Dry , Cupboard
2)3)
Dry
, Iron Dry 2)/ 9kg /
Drying level: Extra Dry , Cupboard Dry 2), Iron Dry
2)
/ 3,5kg /
Sportswear, thin and light fabrics, microfiber, polyester,
which are not ironed. / 2kg /
To dry one or two duvet and pillows (with feather, down or
synthetic fillings). / 3kg /
Gentle drying washable woollens and sport shoes (see separate user manual provided with Drying Rack). / 1kg (or 1
pair of sport shoes)
Wool fabrics. Gentle drying washable woollens. Remove
immediately the items when the programme is completed.
To get laundry more dried press the
Wool touchpad
again and again to increase the programme duration. / 1kg
To dry cotton and synthetic fabrics, uses low temperature. /
2kg /
Others
6)
Gently dry cottons items with the noise decreased to the
minimum. The programme can be used at night. Drying lev-
Extra Dry , Strong Dry , Cupboard Dry / 9kg /
el:
Leisure clothing such as jeans, sweat-shirts of different material thicknesses (e.g. at the neck, cuffs and seams). / 9kg
/
Delicate fabrics. / 3kg /
www.electrolux.com
8
Programmes
Easy Iron
Time Drying
Refresh
1)
The maximum weight refers to dry items.
2)
For test institutes only: Standard programmes for tests are specified in the EN 61121
document.
3)
In accordance to 932/2012. The Cotton “Cupboard dry” is the “Standard Cotton
Programme”. It is suitable to dry wet normal cotton laundry and it is the most efficient
programme in terms of energy.
4)
Only with the Drying Rack
5)
The wool drying cycle of this tumble drying machine has been tested and approved by The
Woolmark Company. The cycle is suitable to dry wool garments, which are labelled "hand
wash" provided that the garments are washed in a Woolmark endorsed hand washing
cycle and tumble dried according to the instructions issued by the manufacturer. M1129
6)
Press the
the view on the display
5. OPTIONS
Type of load / Load (max.)1) / Fabric mark
Easy care fabrics for which a minimum of ironing is necessary. The drying results can be different from one type of
fabric to the other. Shake the items before you put them in
the appliance. When the programme is completed, Immediately remove the items and put them on a hanger. / 1 kg
(or 5 shirts) /
With this programme you can use the option Time and set
the programme duration. / 9kg /
Refreshing a textiles that were in storage. / 1kg
Others touchpad again and again until the necessary programme come into
5.1 Time
This option is applicable only to the Time
Drying programme. You can set the programme duration, from a minimum of 10
minutes to a maximum of 2 hours. The
setting of the duration is related to the
quantity of laundry in the appliance.
We recommend that you set a short duration for small quantities of laundry or for
only one item.
5.2 Anticrease
Extends of 60 minutes the standard anticrease phase (30 minutes) at the end of
the drying cycle. This function prevents
the laundry from creases. The laundry can
be removed during the anticrease phase.
5.3 Dryness
This function helps to get the laundry
more dried.
There are 4 possible selections:
Extra Dry
Strong Dry (for Cotton only)
Cupboard Dry
Iron Dry
5.4 Reverse Plus
To dry more lightly the sensitive and temperature sensitive textiles (e.g. acrylic, viscose). This function helps also to decrease the creases on the laundry. For
fabrics with the symbol
label.
on the fabric
5.5 Rack Time Drying
This option is applicable only to the Drying
Rack programme. You can set the programme duration, from a minimum of 30
minutes to a maximum of 4 hours. The
setting of the duration is related to the
quantity of laundry in the appliance.
ENGLISH 9
We recommend that you set a short duration for small quantities of laundry or for
only one item.
5.6 Buzzer
When the buzzer function is activated,
you can hear the buzzer at the:
•cycle end
• start and end of crease guard phase
• cycle interruption
The buzzer function is by default always
on. You can use this function to activate
or deactivate the sound.
You can activate the Buzzer option with all programmes.
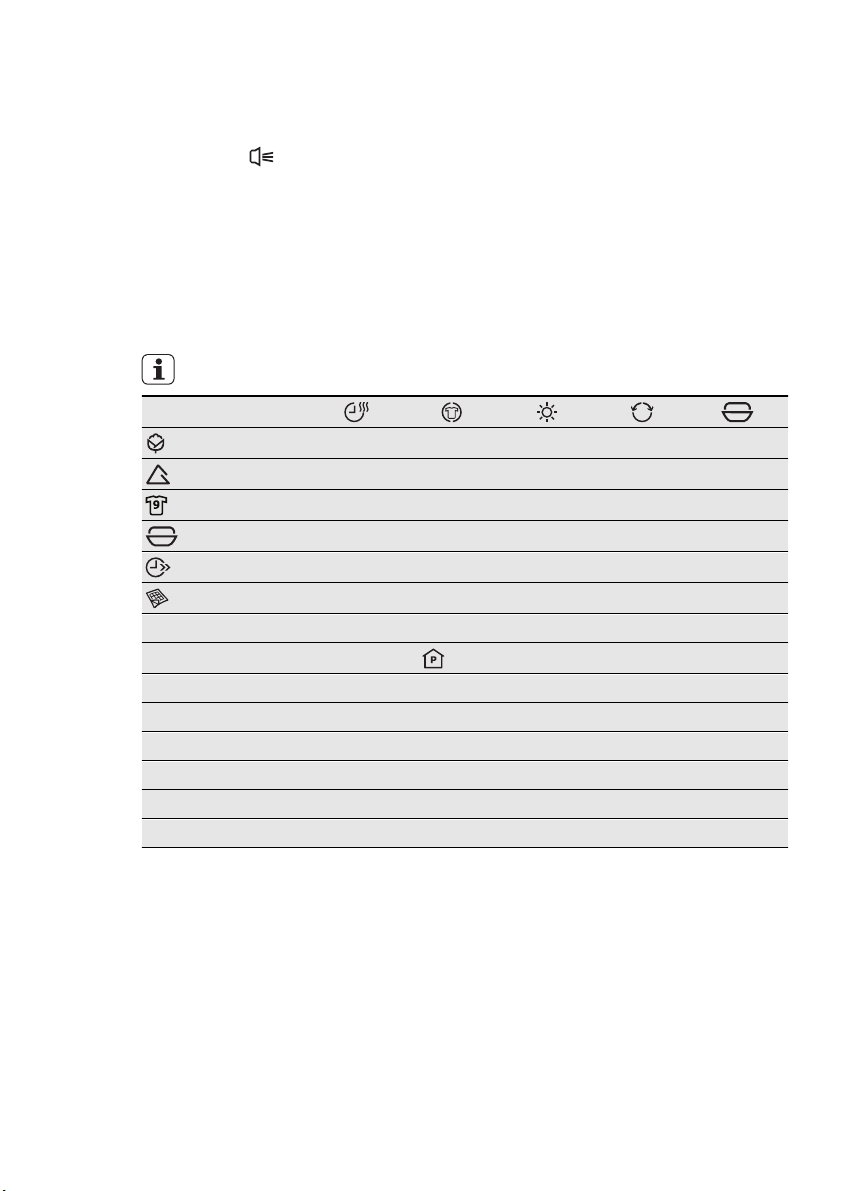
5.7 MyFavourite+
The first time you activate the appliance, if
you press My Favourite+ the display
shows that the memory is empty.
The appliance can memorise automatically the most used programmes after some
uses.
With this touchpad you can set one of the
3 most used washing programmes.
Press MyFavourite+ one time to set My
Favourite 1
Press MyFavourite+ two time to set My
Favourite 2
Press MyFavourite+ three time to set My
Favourite 3
Programmes
Cotton
Synthetic
Sports
Drying Rack
Rapid
Duvet
■ ■
■ ■ ■
■
■
■
Wool
Others
Cottons Extra Silent ■ ■
Jeans ■
Delicates ■
Easy Iron ■
Time Drying ■ ■
Refresh ■
www.electrolux.com
10
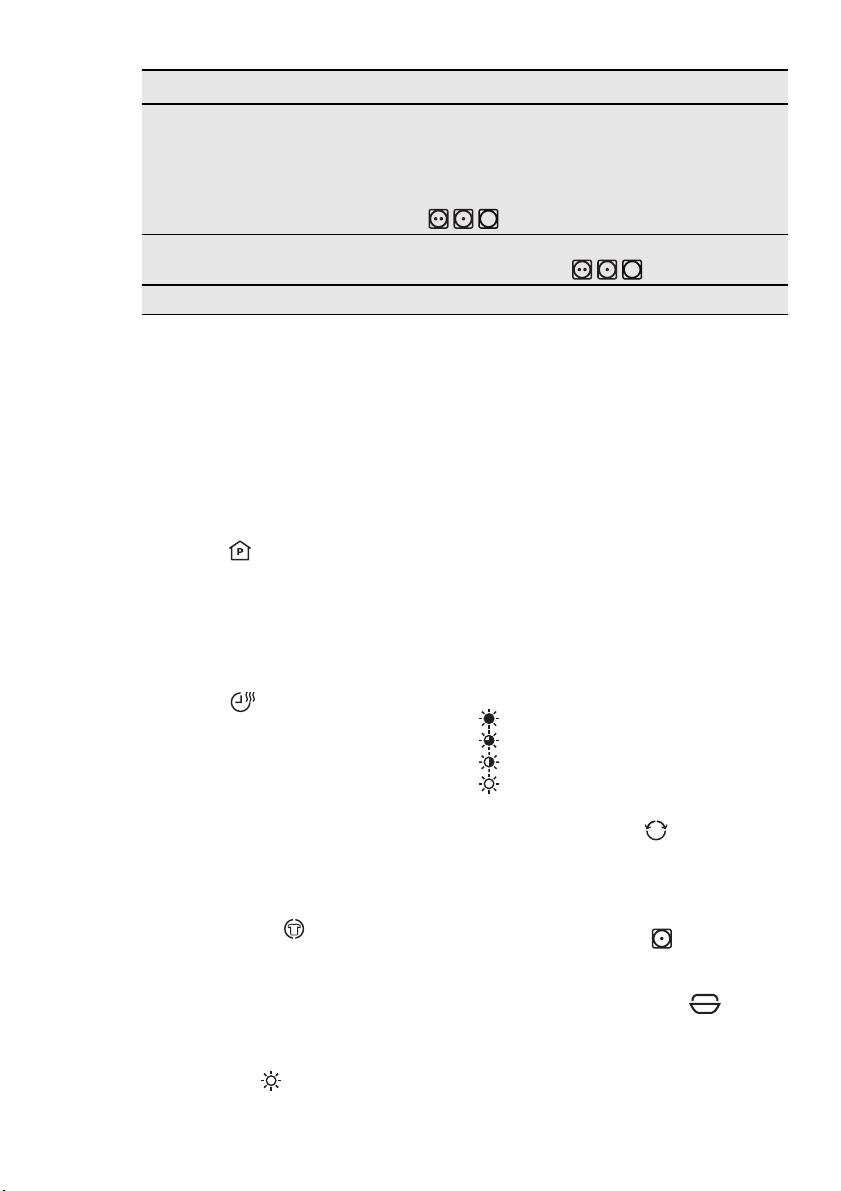
6. SETTINGS
J
I
A)
Time touchpad
B)
Delay touchpad
C)
Buzzer touchpad
D)
Anticrease touchpad
E)
Start/Pause touchpad
F)
Rack Time increase touchpad
G)
Rack Time decrease touchpad
H)
MyFavourite+ touchpad
I)
Reverse Plus touchpad
J)
Dryness touchpad
6.1 Child lock function
This option prevents children to play with
the appliance while a programme operates. The programme knob and the
touchpads are locked. Only the on/off
button is unlocked.
Activating the child lock option
1.
Press the on/off button to activate the
appliance.
2.
Press and hold touchpads (A) and (D)
at the same time until the child lock indicator comes on.
• It is possible to deactivate the child
lock option while a programme operates. Press and hold the same
touchpads until the child lock indicator goes off.
6.2 Language
Setting the language
1.
Press and hold touchpads (B) and (C)
at the same time until previously selected language comes on.
2.
Press the
your language.
To memorise the selection press the E
touchpad.
FGH
or touchpad to set
6.3 Water hardness and
A
conductivity
B
Water hardness is different for different lo-
C
cations. Water hardness has an effect on
D
the water conductivity and on the con-
E
ductivity sensor of the appliance. If you
know, the value of the water conductivity
you can adjust the sensor in order to have
better drying results.
Adjusting the conductivity sensor
1. Press the on/off button to activate the
appliance
2. Press and hold touchpads (A) and (B)
at the same time until one of the these
indicators comes on:
•
•
•
3.
Press the touchpad (E) again and
again until the indicator of the correct
level comes on.
4. To confirm the adjustment, press and
hold touchpads (A) and (B) at the
same time for approximately 2 seconds.
(low <300 μS/cm)
(moderate 300-600 μS/cm)
(high >600 μS/cm)
6.4 The indicator of the water
container
By default, the indicator of the water container is on. It comes on when the programme is completed or when it is necessary to empty the water container.
If the “Draining kit” is installed, the
appliance automatically drains the
water from the water container. In
this condition we recommend that
you deactivate the indicator of the
water container.
Refer to the supplied leaflet for
available accessories.
Deactivating the water container
indicator
1. Press the on/off button to activate the
appliance
2.
Press and hold touchpads (J) and (I)
at the same time until the display
shows one of these 2 configurations:

•
The indicator
cator
– The indicator of the water con-
tainer is off. After approximately 4
seconds, the 2 indicators go off .
7. DAILY USE
is off and the indi-
is on.
ENGLISH 11
•
The indicators
on.
– The indicator of the water con-
tainer is on. After approximately 4
seconds, the 2 indicators go off
and are
Before you use the appliance for
the first time do one of these operations:
• Clean the tumble dryer drum
with a moist cloth.
• Start a short programme (e.g.
30 minutes) with moist laundry.
At the beginning of drying cycle
(3-5 min.) there could be a slightly
higher sound level. It is because of
start of the compressor that is
normal for compressor powered
appliances such: refrigerators,
freezers .
7.1 Language
The first time you activate the appliance
the default language comes into the view
on the display. You can confirm it or set
the different language.
To set the different language:
1.
Press the
your language
2.
To memorise the selection press the
Start/Pause touchpad.
You can change the language each time
you want ( see Settings chapter).
or touchpad to set
7.2 Starting a programme
without delay start
1.
Prepare the laundry and load the ap-
pliance.
2. Press the on/off button to activate the
appliance.
3. Set the correct programme and op-
tions for the type of load.
• The display shows the programme
duration.
4.
Press the Start/Pause touchpad, the
programme starts.
CAUTION!
Make sure that when you close
the door, the laundry does not
catch between the appliance door
and the rubber seal.
7.3 Starting the programme with
delay start
1.
Set the correct programme and options for the type of load.
2. Press the delay start button again and
again until the display shows the delay
time you want to set.
• You can delay the start of a pro-
gramme from a minimum of 30 minutes to a maximum of 20 hours.
3. Press the Start/Pause touchpad, the
countdown starts. The display shows
the countdown of the delay start.
• When the countdown is completed,
the programme starts.
7.4 Auto Off function
To decrease the energy consumption, this
function automatically deactivates the appliance:
• After 5 minutes if you do not start the
programme.
• After 5 minutes from the end of the pro-
gramme.
7.5 Change a programme
1. Press the on/off button to deactivate
appliance
2. Press the on/off button to activate the
appliance.
3. Set the programme.
www.electrolux.com
12
7.6 At the end of the
programme
When the programme is completed,
• An intermittent acoustic signal operates.
•
The indicator
• The Start/Pause indicator is on.
The appliance continues to operate with
the crease guard phase for approximately
other 30 minutes.
The crease guard phase removes creases
from your laundry.
You can remove the laundry before the
crease guard phase is completed. We
recommend, for better results, that you
is on.
8. HINTS AND TIPS
remove the laundry when the phase is almost completed or completed.
When the crease guard phase is completed:
•
The indicator
• Start/Pause indicator goes off.
1. Press the on/off button to deactivate
the appliance.
2.
Open the appliance door.
3. Remove the laundry.
4.
Close the appliance door.
Always clean the filter and empty
the water container when a programme is completed.
is on.
8.1 Preparing the laundry
• Close the zippers.
• Close the fasteners of the duvet covers.
• Do not keep ties or ribbons loose (e.g.
apron ribbons). Tie them before you
start a programme.
• Remove all items from the pockets.
• If an item has the internal layer made of
cotton, turn it inside out. Make sure that
the cotton layer is always external.
• We recommend that you set the correct programme applicable for the type
of fabrics that are in the appliance.
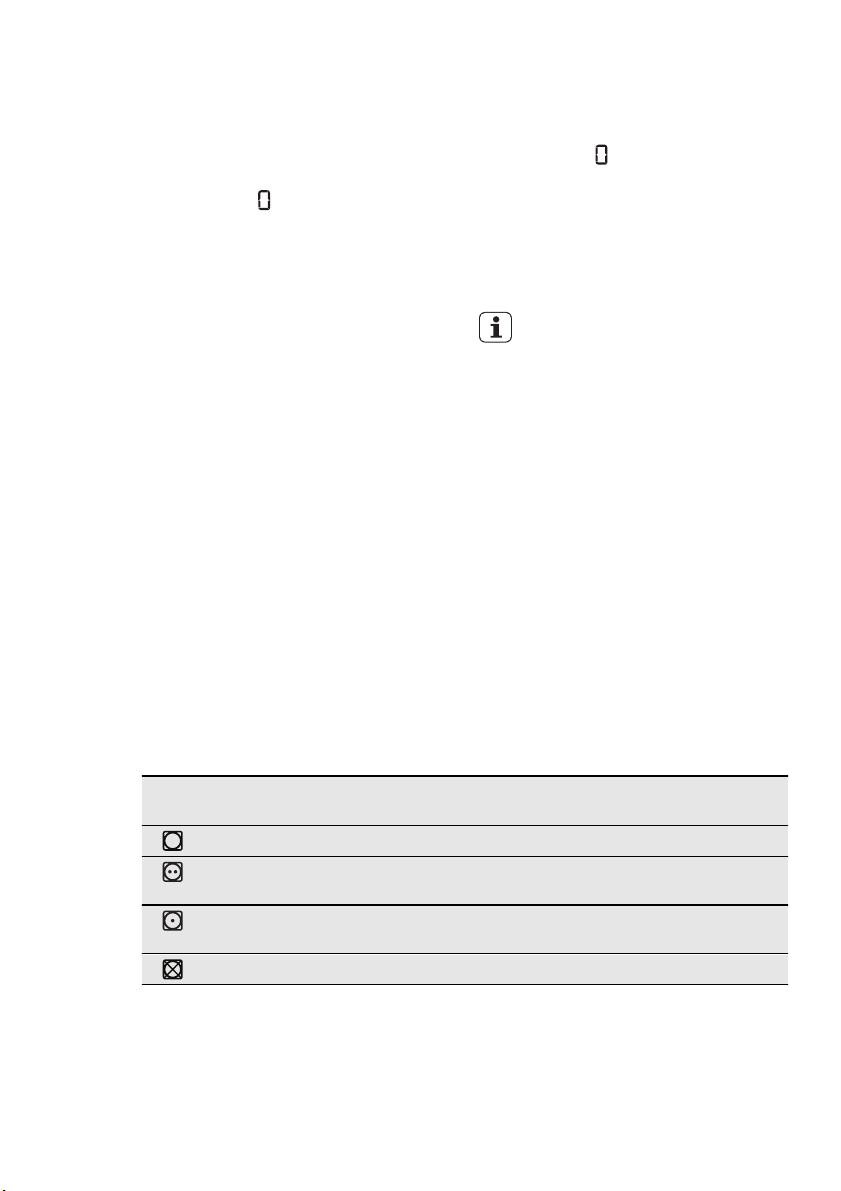
Fabric
label
Description
Laundry that is applicable for tumble dryer.
Laundry that is applicable for tumble dryer. Set the programme with
standard temperature.
Laundry that is applicable for tumble dryer. Set the programme with low
temperature.
Laundry that is not applicable for tumble dryer.
• Do not put fabrics with strong colours
together with fabrics with light colours.
Strong colours can bleed.
• Use an applicable programme for cotton jersey and knitwear to prevent the
items to shrink.
• Make sure that the laundry weight is
not more than the maximum weight
that is in the programme table.
• Dry only the laundry that is applicable
for tumble dryer. Refer to the fabric label on the items.
9. CARE AND CLEANING
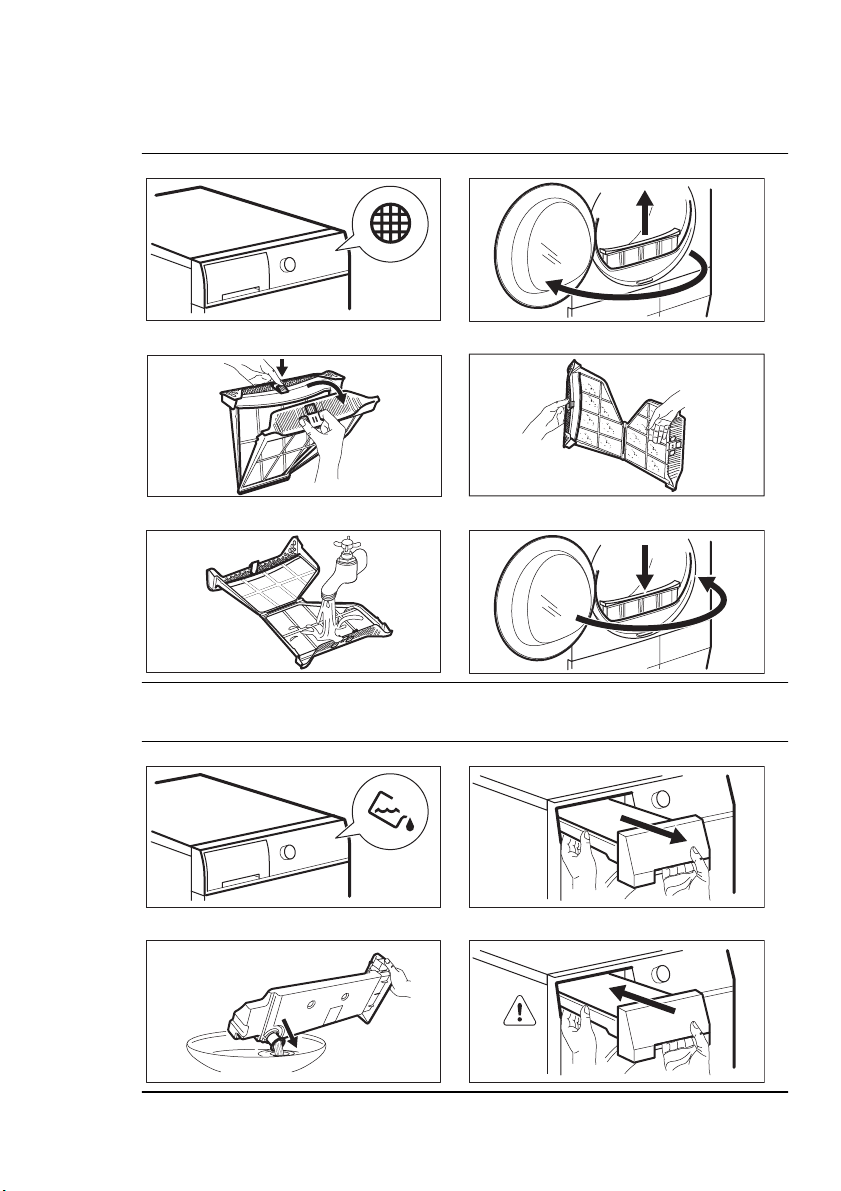
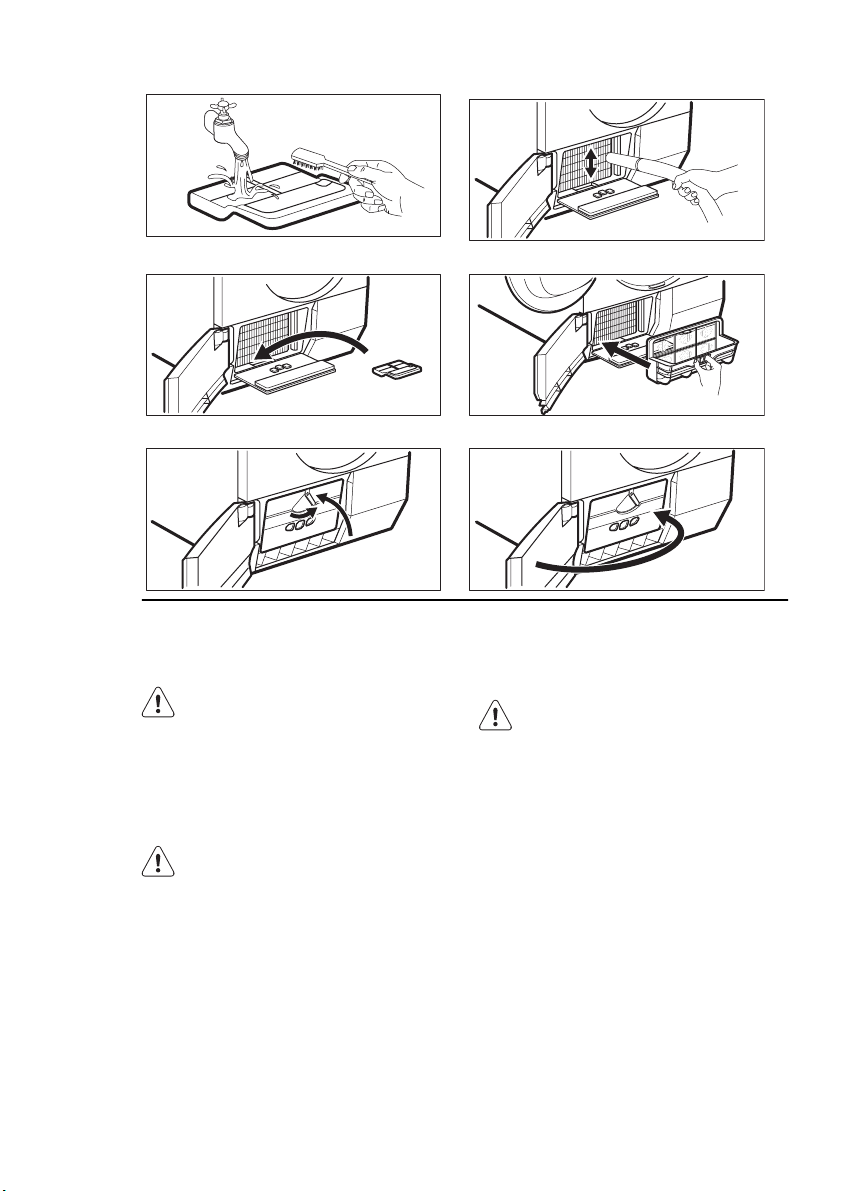
9.1 Cleaning the filter
1. 2.
ENGLISH 13
2
1
3.
1
2
5. 6.
9.2 Draining the water container
1. 2.
4.
1
2
3. 4.
11
22
www.electrolux.com
14
1.
You can use the water from the
water container as an alternative
to distilled water (e.g. for steam
ironing). Before you use the water,
remove dirt residues with a filter.
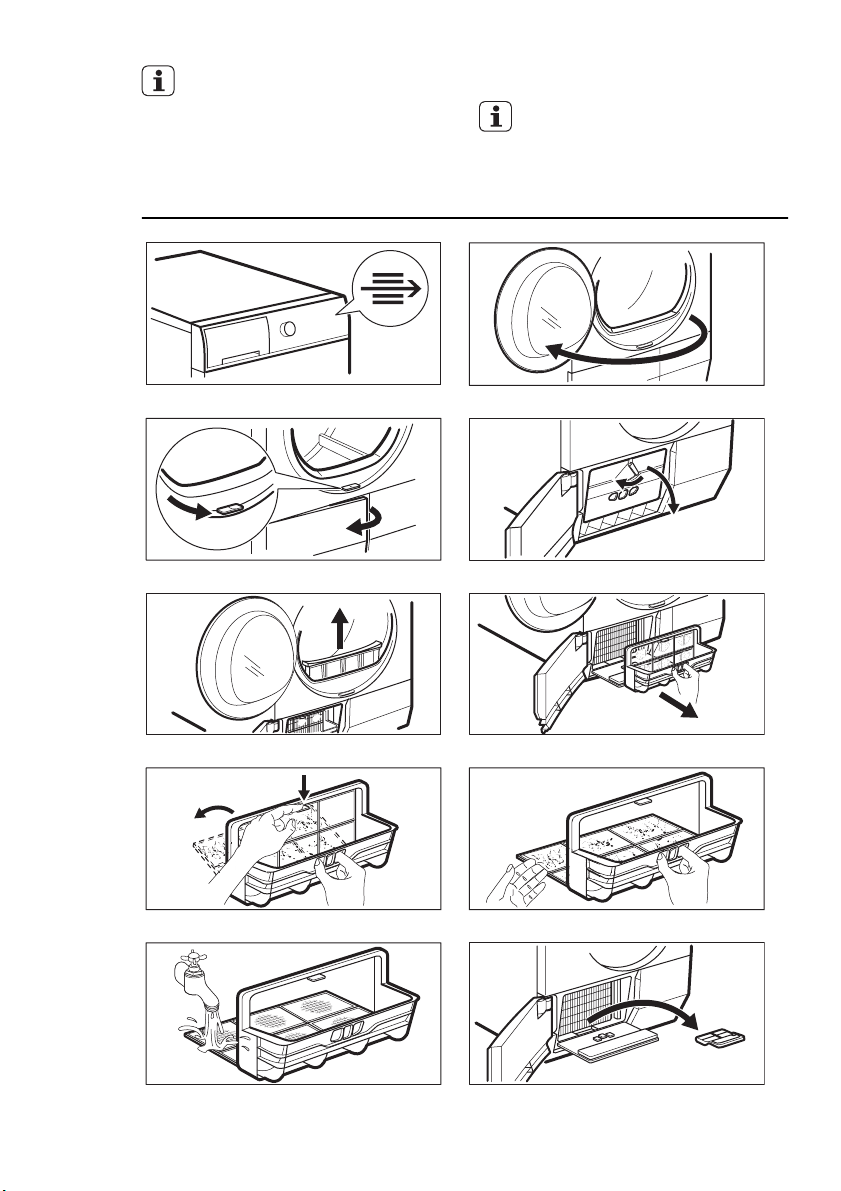
9.3 Cleaning the condenser filter
The frequency to clean the filters
is related to the laundry type and
its quantity.
If you dry with the maximum load,
clean the filters after each 3 cycles.
2.
3.
1
5. 6.
7.
2
9. 10.
1
2
4.
8.
1
22
11
ENGLISH 15
11.
13. 14.
15.
121).
16.
2
1)
If necessary, one time for each 6 months, remove the fluff from the heat exchanger
compartment. You can use a vacuum cleaner.
9.4 Cleaning the drum
WARNING!
Disconnect the appliance before
you clean it.
Use a standard neutral soap detergent to
clean the inner surface of the drum and
drum ribs. Dry the cleaned surfaces with a
soft cloth.
CAUTION!
Do not use abrasive materials or
steel wool to clean the drum.
Use a moist cloth to clean. Dry the
cleaned surfaces with a soft cloth.
CAUTION!
Do not use furniture cleaning
agents or cleaning agents which
can cause corrosion to clean the
appliance.
9.6 Cleaning the airflow slots
Use a vacuum cleaner to remove the fluff
from the airflow slots.
9.5 Cleaning the control panel
and housing
Use a standard neutral soap detergent to
clean the control panel and housing.

www.electrolux.com
16
10. TROUBLESHOOTING
10.1
Problem Possible solution
You cannot activate the appliance. Make sure that the mains plug is connec-
Make sure that there is not a damaged
The programme does not start. Press Start/Pause .
Make sure that the appliance door is
The appliance door does not close. Make sure that the installation of the filter is
Make sure that the laundry does not catch
The appliance stops during operation.
The display shows a long programme duration.
Make sure that the filter is clean.
The laundry is too wet. Spin the laundry in
Make sure that the room temperature is
The display shows a short programme duration.
The display shows Err. If you want to set a new programme, de-
Make sure that the options are applicable
The display shows E51) Deactivate and activate the appliance.
1)
After maximum 5 hours, the programme ends automatically
10.2 If the drying results are not
satisfactory
• The set programme was incorrect.
• The filter is clogged.
• The condenser is clogged.
1)
ted to the mains socket.
fuse in the fuse box.
closed.
correct.
between the appliance door and the rubber seal.
Make sure that the water container is empty. Press Start/Pause to start the programme again.
Make sure that the weight of the laundry is
applicable to the duration of the programme.
the washing machine again.
not too warm.
Set the Time Drying or the Extra Dry pro-
gramme.
activate and activate the appliance.
to the programme.
Start a new programme. If the problem occurs again, contact the Service.
• There was too much laundry in the appliance.
• The drum is dirty.
• Incorrect setting of the conductivity
sensor.
• The airflow slots are clogged.

11. TECHNICAL DATA
Dimensions (mm) Width / Height / Depth 850 x 600 x 600
Max. depth
(with the appliance door open)
Max. width
(with the appliance door open)
Electrical connection Voltage 230 V
Frequency 50 Hz
Fuse 4 A
Total power 900 W
Drum volume 118 l
Weight of the appliance 57 kg
Laundry: max. weight 9 kg
Type of use Household
Ambient temperature Min. 5 °C
Max. 35 °C
Energy consumption
Annual energy consumption
Energy efficiency class A++
Power consumption Left-on mode 0,05 W
Off-mode 0,05 W
1)
With reference to EN 61121. 9 kg of cotton centrifuged at 1000 rpm.
2)
Energy consumption per year in kWh, based on 160 drying cycles of the standard cotton
programme at full and partial load, and the consumption of the low-power modes. Actual
energy consumption per cycle will depend on how the appliance is used (REGULATION
(EU) No 392/2012).
1)
1090 mm
950 mm
kWh/cycle 2,23 kWh
2)
259 kWh
ENGLISH 17
12. ENVIRONMENT CONCERNS
Recycle the materials with the symbol
. Put the packaging in applicable
containers to recycle it.
Help protect the environment and human
health and to recycle waste of electrical
and electronic appliances. Do not dispose
appliances marked with the symbol
with the household waste. Return the
product to your local recycling facility or
contact your municipal office.

www.electrolux.com
18
SOMMAIRE
1. INSTRUCTIONS DE SÉCURITÉ . . . . . . . . . . . . . . . . . . . . . . . . . . . . . . . . . . . . . . . . . . . . 19
2. DESCRIPTION DE L'APPAREIL . . . . . . . . . . . . . . . . . . . . . . . . . . . . . . . . . . . . . . . . . . . . 21
3. BANDEAU DE COMMANDE . . . . . . . . . . . . . . . . . . . . . . . . . . . . . . . . . . . . . . . . . . . . . . . 22
4. PROGRAMMES . . . . . . . . . . . . . . . . . . . . . . . . . . . . . . . . . . . . . . . . . . . . . . . . . . . . . . . . 23
5. OPTIONS . . . . . . . . . . . . . . . . . . . . . . . . . . . . . . . . . . . . . . . . . . . . . . . . . . . . . . . . . . . . . 25
6. RÉGLAGES . . . . . . . . . . . . . . . . . . . . . . . . . . . . . . . . . . . . . . . . . . . . . . . . . . . . . . . . . . . . 26
7. UTILISATION QUOTIDIENNE . . . . . . . . . . . . . . . . . . . . . . . . . . . . . . . . . . . . . . . . . . . . . . 28
8.
CONSEILS . . . . . . . . . . . . . . . . . . . . . . . . . . . . . . . . . . . . . . . . . . . . . . . . . . . . . . . . . . . . 29
9. ENTRETIEN ET NETTOYAGE . . . . . . . . . . . . . . . . . . . . . . . . . . . . . . . . . . . . . . . . . . . . . . 30
10.
EN CAS D'ANOMALIE DE FONCTIONNEMENT . . . . . . . . . . . . . . . . . . . . . . . . . . . . . . . . 33
11. CARACTÉRISTIQUES TECHNIQUES . . . . . . . . . . . . . . . . . . . . . . . . . . . . . . . . . . . . . . . . 34
NOUS PENSONS À VOUS
Merci d'avoir choisi ce produit Electrolux. Avec ce produit, vous bénéficiez de dizaines d'années
d'expérience professionnelle et d'innovation. Ingénieux et élégant, il a été conçu sur mesure pour
vous. Grâce à cet appareil, vous savez que chaque utilisation vous apportera satisfaction.
Bienvenue chez Electrolux.
Visitez notre site Internet pour :
Obtenir des conseils d'utilisation, des brochures, de l'aide, des informations :
www.electrolux.com
Enregistrer votre produit pour obtenir un meilleur service :
www.electrolux.com/productregistration
Acheter des accessoires, consommables et pièces de rechange d'origine pour votre
appareil :
www.electrolux.com/shop
SERVICE APRÈS-VENTE
N'utilisez que des pièces de rechange d'origine.
Avant de contacter le service, assurez-vous de disposer des informations suivantes :
Vous trouverez ces informations sur la plaque signalétique. Modèle, PNC, numéro de série.
Avertissement/Attention : consignes de sécurité.
Informations générales et conseils
Informations écologiques
Sous réserve de modifications.

FRANÇAIS 19
1.
INSTRUCTIONS DE SÉCURITÉ
Avant d'installer et d'utiliser cet appareil,
lisez soigneusement les instructions fournies. Le fabricant ne peut être tenu pour
responsable des dommages et blessures
liés à une mauvaise installation ou utilisation. Conservez toujours cette notice avec
votre appareil pour vous y référer ultérieurement.
1.1 Sécurité des enfants et des
personnes vulnérables
AVERTISSEMENT
Risque d'asphyxie, de blessure ou
d'invalidité permanente.
• Cet appareil n'est pas destiné à être
utilisé par des enfants ou des personnes dont les capacités physiques, sensorielles ou mentales, ou le manque
d'expérience et de connaissance les
empêchent d'utiliser l'appareil sans risque lorsqu’ils sont sans surveillance ou
en l’absence d’instruction d’une personne responsable qui puisse leur assurer une utilisation de l’appareil sans
danger.
• Ne laissez pas les enfants jouer avec
l'appareil.
• Ne laissez pas les emballages à la portée des enfants.
• Ne laissez pas les détergents à la portée des enfants.
• Tenez les enfants et les animaux éloignés du hublot de l'appareil lorsque celui-ci est ouvert.
• Les enfants ne doivent pas nettoyer ni
entreprendre une opération de maintenance sur l'appareil sans surveillance.
1.2 Installation
• Retirez l'intégralité de l'emballage.
• N'installez pas et ne branchez pas un
appareil endommagé.
• Suivez scrupuleusement les instructions
d'installation fournies avec l'appareil.
• Assurez-vous que le sol sur lequel vous
installez l'appareil est plat, stable, résistant à la chaleur et propre.
• N'installez pas l'appareil ou ne l'utilisez
pas dans un endroit où la température
ambiante est inférieure à 5 °C ou supérieure à 35 °C.
• L'appareil ne doit pas être installé derrière une porte à serrure, une porte
coulissante ni une porte battante dotée
d'une charnière du côté opposé à l'appareil qui pourrait empêcher l'ouverture
complète du hublot.
• Soyez toujours vigilants lorsque vous
déplacez l'appareil car il est lourd. Portez toujours des gants de sécurité.
• Déplacez toujours l'appareil à la verticale.
• La surface arrière de l'appareil doit être
positionnée contre la paroi.
• Assurez-vous que de l'air circule entre
l'appareil et le sol.
• Assurez-vous que les aérations se trouvant à la base de l'appareil (si présentes) ne sont pas bouchées par de la
moquette.
• L'air d'échappement ne doit pas être
déchargé dans un tuyau utilisé pour les
fumées d'échappement d'appareils à
combustion de gaz et autres combustibles.
• Si le sèche-linge est placé au-dessus
d'un lave-linge, utilisez le kit de superposition. Le kit de superposition, disponible auprès d'un revendeur agréé, ne
peut être utilisé qu'avec l'appareil indiqué dans les instructions (fournies avec
l'accessoire). Lisez attentivement les
instructions avant de procéder à l'installation (reportez-vous au livret d'installation).
• Aérez suffisamment la pièce pour éviter
le reflux de gaz provenant d'appareils
utilisant d'autres combustibles, y compris les flammes nues.
• L'appareil peut être installé de façon
autonome ou sous un plan de travail de
cuisine si un espace correct est disponible (reportez-vous au livret d'installation).
• Une fois l'appareil installé à son emplacement permanent, vérifiez qu'il est
bien de niveau à l'aide d'un niveau à
bulle. S'il n'est pas de niveau, réglez les
pieds jusqu'à ce qu'il le soit.

www.electrolux.com
20
Branchement électrique
• L'appareil doit être relié à la terre.
• Vérifiez que les données électriques fi-
• Utilisez toujours une prise de courant
• N'utilisez pas d'adaptateurs multiprises
• Veillez à ne pas endommager la fiche
• Ne connectez la fiche d'alimentation à
• Ne tirez jamais sur le câble d'alimenta-
• Ne touchez jamais le câble d'alimenta-
• Cet appareil est conforme aux directi-
1.3 Utilisation
• Utilisez cet appareil uniquement dans
• Ne modifiez pas les caractéristiques de
• Le cycle de séchage se termine par une
AVERTISSEMENT
Risque d'incendie ou d'électrocution.
gurant sur la plaque signalétique correspondent à celles de votre réseau. Si
ce n'est pas le cas, contactez un électricien.
de sécurité correctement installée.
ni de rallonges.
secteur ni le câble d'alimentation. Le
remplacement du cordon d'alimentation de l'appareil doit être effectué par
notre service après-vente.
la prise de courant qu'à la fin de l'installation. Assurez-vous que la prise de
courant est accessible une fois l'appareil installé.
tion électrique pour débrancher l'appareil. Tirez toujours sur la prise.
tion ou la prise avec des mains mouillées.
ves CEE.
AVERTISSEMENT
Risque d'incendie, d'explosion, de
choc électrique ou d'endommagement de l'appareil
un environnement domestique.
cet appareil.
phase sans chauffage (cycle de refroidissement) pour éviter que le linge ne
subisse des dommages.
Si vous arrêtez l'appareil avant la fin du
cycle de séchage, retirez et étalez immédiatement tous les articles afin que
la chaleur puisse se dissiper.
• Si vous utilisez un assouplissant ou des
produits similaires, respectez les instructions figurant sur l'emballage.
• N'utilisez pas l'appareil sans filtre. Nettoyez le filtre à peluches avant ou après
chaque utilisation.
• Retirez les peluches accumulées dans
l'appareil.
• Ne séchez pas d'articles endommagés
contenant un rembourrage ou un garnissage.
• N'utilisez pas cet appareil pour sécher
des articles en mousse de caoutchouc
(mousse de latex), bonnets de bains,
textiles imperméables, articles doublés
en caoutchouc ou vêtements et taies
d'oreiller rembourrés de mousse de
caoutchouc.
• Avant de sécher des articles ayant été
en contact avec des produits tels que
huile de cuisson, acétone, alcool, essence, kérosène, produit détachant, térébenthine, cire ou décapant pour cire,
nettoyez-les avec de l'eau chaude et
une plus grande quantité de lessive.
• Ne séchez pas d'articles sur lesquels
ont été utilisés des produits de nettoyage chimiques industriels.
• Vérifiez que les poches des vêtements
à sécher ne contiennent pas de briquet
à gaz ni d'allumettes.
• Séchez uniquement les textiles adaptés
au séchage dans un sèche-linge. Suivez les instructions figurant sur l'étiquette des textiles.
• Ne faites sécher que du linge propre
dans l'appareil.
• Si vous avez lavé votre linge avec un
produit détachant, lancez un cycle de
rinçage supplémentaire avant de démarrer le sèche-linge.
• N'utilisez pas l'eau de condensation
pour préparer des boissons ni pour cuisiner. Elle peut entraîner des problèmes
de santé chez les personnes et les animaux domestiques.
• Ne montez pas sur le hublot ouvert de
votre appareil ; ne vous asseyez pas
dessus.
• Respectez la charge maximale de 9 kg
(reportez-vous au chapitre « Tableau
des programmes »).
• N'introduisez pas de linge non essoré
dans le sèche-linge.
FRANÇAIS 21
1.4 Entretien et nettoyage
AVERTISSEMENT
Risque de blessure corporelle ou
de dommages matériels.
• Avant toute opération d'entretien, éteignez l'appareil et débranchez la prise
secteur.
• Ne pulvérisez pas d'eau ni de vapeur
pour nettoyer l'appareil.
• Nettoyez l'appareil avec un chiffon doux
humide. Utilisez uniquement des produits de lavage neutres. N'utilisez pas
de produits abrasifs, de tampons à récurer, de solvants ou d'objets métalliques.
1.5 Éclairage interne
AVERTISSEMENT
Risque de blessure.
Rayonnement DEL visible, ne fixez
pas directement le faisceau.
Les ampoules classiques ou halogènes utilisées dans cet appareil
sont destinées uniquement à un
usage avec des appareils ménagers. Ne les utilisez pas pour
éclairer votre logement.
Pour remplacer l'éclairage intérieur, contactez le service aprèsvente.
1.6 Mise au rebut
AVERTISSEMENT
Risque de blessure ou d'asphyxie.
• Débranchez l'appareil de l'alimentation
électrique.
• Coupez le câble d'alimentation au ras
de l'appareil et mettez-le au rebut.
• Retirez le dispositif de verrouillage de la
porte pour empêcher les enfants et les
animaux de s'enfermer dans l'appareil.
Compresseur
AVERTISSEMENT
Risque de dommage de l'appareil.
• Dans le sèche-linge, le compresseur et
son système sont remplis d'un agent
spécial ne contenant pas d'hydrochlorofluorocarbures. Ce circuit doit rester
hermétique. Tout endommagement du
circuit peut entraîner une fuite.
2. DESCRIPTION DE L'APPAREIL
1 2
3
4
12
11
10
9
Bac d'eau de condensation
1
5
6
7
8
Bandeau de commande
2
Éclairage interne
3
Hublot
4
Filtre principal
5
Touche d'ouverture de la trappe du
6
condenseur thermique
Fentes de circulation d'air
7
Pieds réglables
8
Trappe du condenseur thermique
9
Cache du condenseur thermique
10
Manette de verrouillage du cache du
11
condenseur thermique
Plaque signalétique
12

www.electrolux.com
22
L'utilisateur peut installer le hublot
de sorte qu'il s'ouvre dans l'autre
sens. Cela est utile si l'espace autour de l'appareil est restreint et
rend le chargement et le retrait du
linge difficile (voir brochure fournie
séparément).
3. BANDEAU DE COMMANDE
1
Touche de programme
1
Touche Dryness (Degré de séchage)
2
Touche Reverse Plus (Rotation plus)
3
Affichage
4
Touche Time (Durée)
5
Touche Delay (Départ différé)
6
Touche Buzzer (Alarme)
7
Touche Anticrease (Anti-froissage)
8
Touche Start/Pause (Départ/Pause)
9
2
11
12
13
43
Touche de diminution de durée de
séchage avec le panier spécial
Touche MyFavourite+ (Mon program-
me préféré)
Touche Marche/Arrêt
Appuyez sur les touches, dans la
zone portant le symbole ou le
nom de l'option.
Ne portez pas de gants lorsque
vous utilisez le bandeau de commande.
Assurez-vous que le bandeau de
commande est toujours propre et
sec.
Touche d'augmentation de durée du
10
séchage avec le panier spécial
Voyants Description
Sécurité enfants.
Bac à eau.
Filtre.
Condenseur.
Phase de séchage.
5
6
7
8
910111213
 Loading...