


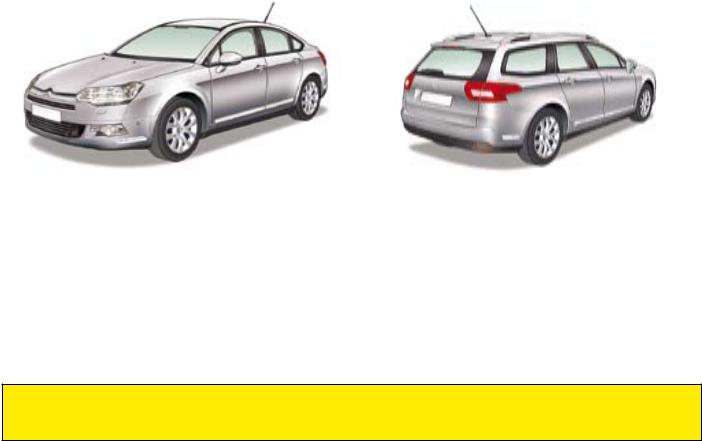
CITROËN C5
Owner’s handbook

Citroën and Total
A partnership of expertise
For 39 years, the research teams of Citroën and Total have combined their know-how to offer you the best engine/ lubricant combination available.
Cutting edge technology for your benefit.
With Total, you can be sure to have chosen the benchmark oil that best guarantees your Citroën’s performance and lifeexpectancy.
A partnership for the environment
Total oils support Citroën’s advances in fuel economy, and C02 and harmful emission reductions.
The development of new generation oils specially adapted for Particle Filters, like TOTAL ACTIVA/ QUARTZ INEO ECS can reduce C02 emissions by a tonne* and save a tank of fuel each year**.
*Official C02 emissions reduction of 4g per km (approx. 6g per mile). Corresponds to a reduction in C02 emissions of 1 tonne throughout the life of the vehicle, on a private diesel vehicle with an average life expectancy estimated at 250 000 km (approx. 160 000 miles). Source: TOTAL. **Or
30L, average quantity of fuel required to fill a tank at a petrol station. Result obtained using TOTAL
ACTIVA/QUARTZ INEO ECS oil instead of a traditional 15W-40 oil, on a CITROËN C4 1.6HDi, whose average fuel consumption is 58.9 mpg (4.8L/100km), travelling 18 000km (approx. 12 000
miles) per year. Source: TOTAL. .
A partnership of success
Competitive successes in the national rallies of the World Rally Championship bear testament to the performance and efficiency of the Citroën – Total partnership.
prefers
CAFEINE - TOTAL LUBRIFIANTS, Le Diamant B, 16 rue de la République, 92922 PARIS LA DEFENSE - 552 006 454 RCS Nanterre - www.lubrifiants.total.com
This handbook is compiled on the basis of all the equipment (whether standard or optional) that is available, and of the technical specifications that were known at the time of going to print.
The level of equipment on your vehicle depends on the model, the options chosen and the country where the vehicle is marketed.
Some of the equipment mentioned in this handbook may only become available at a later date. Descriptions and illustrations are given without obligation.
AUTOMOBILES CITROËN reserves the right to modify its models and their equipment without necessarily being bound to update the present handbook.
The trained, professional staff of the CITROËN network are at your disposal to answer any questions you may have.
We wish you safe and enjoyable motoring in your new CITROËN.
This handbook is an integral part of the vehicle. Keep it where it can be easily consulted.
Do not forget to pass it on to the new owner, should you sell your vehicle.

X7-GB-3008
Edition 03-2008
We thank you and congratulate you for choosing to drive a new CITROËN. Please read this handbook carefully before taking to the road. It contains essential information about driving your vehicle and operating its equipment, as well as other important advice to be rigorously followed. The types of equipment your vehicle possesses will be dependent on its version, on the options you have chosen as well as on the country where it was marketed. The handbook also contains all you need to know about the servicing and routine maintenance of your vehicle, thus assuring both your safety and the reliability of your new CITROËN, a thorough knowledge of which will enable you to enjoy driving to the full.
Depending on the version of your vehicle and the options it possesses, as well as on its date of marketing, some of the functions or types of equipment described in this handbook may not be present on the vehicle.

|
C o n t e n t s |
I |
4-21 |
IN BRIEF |
|
Exterior................................................. |
4 |
Opening............................................. |
5-6 |
Interior................................................... |
7 |
Dashboard..................................... |
8 10 |
Getting started................................ |
1 -12 |
Visibility............................................... |
13 |
Ventilation........................................... |
14 |
Monitoring...................................... |
15-16 |
Passenger safety ................................ |
17 |
Driving.......................................... |
18 21 |
II |
22-91 |
Driving
Remote control.............................. |
|
22-23 |
Keys.................................................... |
|
24 |
Anti-intrusion alarm....................... |
|
25-26 |
Steering lock - |
|
|
Ignition - Starter................................ |
|
27 |
Starting............................................... |
|
28 |
Instrument panel..................... |
29 33-41 |
|
Warning lamps.............................. |
|
29 33 |
Diesel particulate filter system............ |
33 |
|
Instrument panel ......................... |
|
34 41 |
Trip computer ................................ |
|
34-35 |
Navigation .......................................... |
|
35 |
Checks / Oil level................................ |
|
36 |
Maintenance indicator................... |
|
37-38 |
Main Menu.......................................... |
|
39 |
Vehicle parameters............................. |
|
40 |
Fixed centred controls |
|
|
steering wheel............................. |
|
42-43 |
Signalling..................................... |
|
44 46 |
Bend lighting....................................... |
|
47 |
Xenon dual function directional |
|
|
headlamps - Angled lighting............. |
|
48 |
Wipers........................................... |
|
49-50 |
Windows.............................................. |
|
51 |
Steering column adjustment - |
|
|
Seat belt height adjustment................... |
|
52 |
Front seats ................................... |
|
53 55 |
Memorisation of |
|
driver's adjustments......................... |
56 |
Rear view mirrors........................... |
57-58 |
Multifunction display.................... |
59 62 |
Manual gearbox ................................. |
63 |
Automatic gearbox....................... |
64 67 |
Cruise control................................. |
68-69 |
Speed limiter.................................. |
70-71 |
Tyre deflation detection.................. |
72-73 |
Brakes.................................................. |
74 |
Electric parking brake.................. |
75 81 |
Hill start assist.................................... |
82 |
Manual parking brake......................... |
83 |
Electronic stability programme........... |
84 |
“Hydractive III+” suspension.......... |
85-86 |
Lane Departure Warning System....... |
87 |
Parking assistance........................ |
88-89 |
Parking space sensor.................... |
90-91 |

III |
92-125 |
Comfort |
|
Access........................................... |
92-94 |
Automatic air conditioning......... |
95 102 |
General........................................ |
95 96 |
Monozone.................................... |
9799 |
Dual-zone ................................ |
100 102 |
Programmable heating.............. |
103-105 |
Rear seats................................. |
106-107 |
Airbags.............................................. |
108 |
Child safety ....................................... |
109 |
Child restraints.......................... |
1 0 1 3 |
Interior lighting.......................... |
1 4 1 6 |
Interior comfort......................... |
1 7 1 9 |
Boot (saloon)..................................... |
1 0 |
Boot (Tourer) ..................................... |
121 |
Luggage cover blind (Tourer)............ |
122 |
Cargo net (Tourer)............................ |
1 3 |
Sunroof (saloon)............................... |
124 |
Panoramic roof (Tourer).................... |
1 5 |
C o n t e n t s |
|
|
IV |
126-143 |
|
Radio |
|
|
Audio/telematics system................... |
|
1 6 |
RDS audio compact disc system...... |
127 |
|
Button controls.................................. |
|
1 8 |
Controls at the steering wheel.......... |
|
1 9 |
General functions - |
|
|
Audio adjustments.......................... |
|
130 |
Radio source............................... |
131-132 |
|
RDS system............................... |
133-134 |
|
CD/CD MP3 source................... |
135-136 |
|
CD changer source ........................... |
|
137 |
Bluetooth®................................. |
138 140 |
|
HiFi system........................................ |
|
141 |
Frequently-asked questions....... |
142-143 |
|
V |
144-160 |
|
Maintenance |
|
|
Bonnet release.................................. |
|
144 |
Petrol engines .......................... |
145 146 |
|
Diesel engines.......................... |
147 148 |
|
Levels........................................ |
149-150 |
|
Diesel injection equipment.......... |
151-152 |
|
Capacities ......................................... |
|
153 |
12V battery................................ |
154-155 |
|
Fuses....................................... |
156 160 |
|
VI |
161-179 |
Practical advice |
|
Fuel................................................... |
161 |
Changing bulbs ........................ |
162 171 |
Safety recommendations................... |
172 |
Puncture kit........................................ |
173 |
Changing a wheel .................... |
174 176 |
Towing – Lifting................................. |
177 |
Very cold protection .......................... |
178 |
Snow guard........................................ |
179 |
VII |
180-188 |
Technical specifications |
|
General...................................... |
180-181 |
Fuel consumption...................... |
182-183 |
Dimensions (saloon).................. |
184-185 |
Dimensions (Tourer).................. |
186-187 |
Vehicle identification......................... |
188 |
Alphabetical index............... |
189 |
|
|
I-xxIV |
.............User Precautions |
||

E x t e r i o r
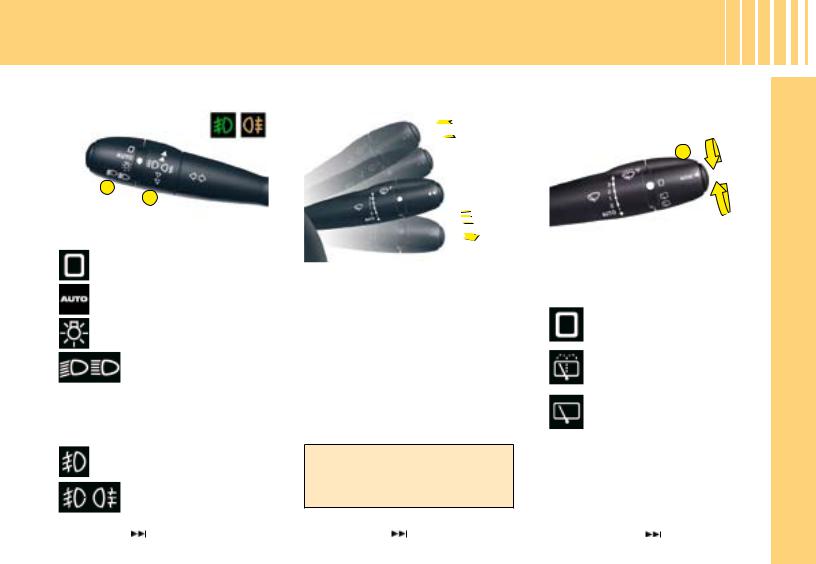
The Xenon dual-function directional I headlamps
This function automatically provides you with extra visibility on bends. This lighting is linked with the angular lighting which maximises the area lit at intersections and when parking.
48
Glass panoramic roof (Tourer)
This provides you with improved brightness in the passenger compartment.
Glass sun roof (saloon)
This also provides you with improved ventilation in the passenger compartment.
 124-125
IN BRIEF
Lane Departure Warning System
This driving assistance device warns you when you unwittingly cross a lane marking.
87
Parking assistance (visual + sound)
This function warns you, whilst manoeuvring, by detecting obstacles located in front of and behind the vehicle.
88
Tyre deflation detection
This function monitors the pressure of each tyre and warns you of tyres that are punctured or deflated.
72

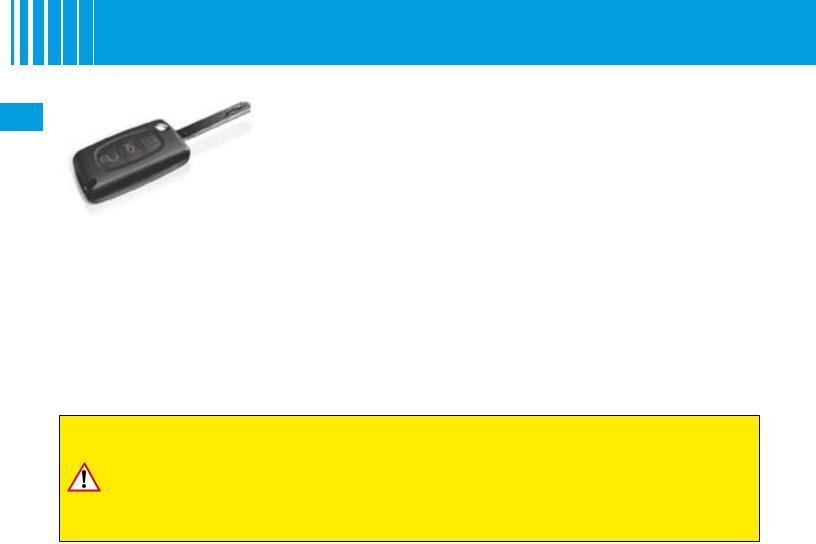
Remote control key
C B A
D |
A.Key release / storage. B.Locking of the vehicle. C.Unlocking of the vehicle. D.Guide-me-home lighting.
22
O p e n i n g
Opening the boot
E |
E |
Press upwards on the lever E.
The boot automatically locks when the vehicle is moving at a speed of over 10 km/h (6 mph), even if automatic central locking is deactivated. It is unlocked when a door is opened or when the central locking button is pressed (speed lower than 10 km/h (6mph)).
Fuel tank
F
To open the fuel flap, press on the top left part of it, then pull from the edge.
Locking filler cap
Turn the key a quarter turn to lock and unlock the filler cap.
When refuelling, place the cap on hook F.
Tank capacity: approximately 71 litres
I
IN BRIEF
93 |
161 |
O p e n i n g
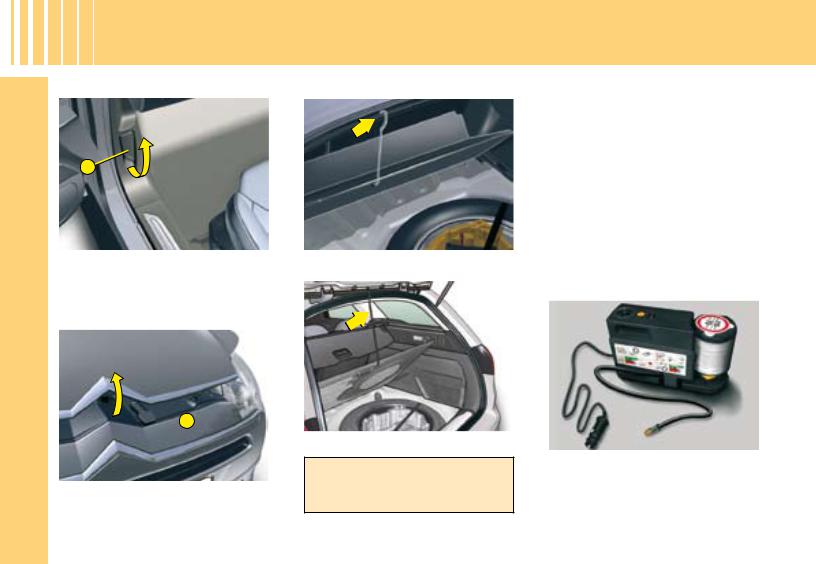
Bonnet release |
Spare wheel |
I
A
IN BRIEF
This operation should only be performed while the vehicle is stationary.
Open the door.
To unlock, pull release lever A.
 B
B
Lift up lever B, then raise the bonnet.
 144
144
Saloon
Tourer
Note: The tools are to be found in a protective holder inside the spare wheel.
 174
174
Access to the spare wheel
To access the spare wheel:
1.Lift up the boot floor using the strap (saloon) or the retractable hook (Tourer).
2.Fold back the boot carpet (saloon).
3.Attach the hook to the upper section of the boot.
4.To remove the spare wheel, detach the strap then push the wheel forwards, before lifting it out.
Puncture kit
The puncture repair kit is a complete system including a compressor and a setting product.
 173
173
Interior
Dual-zone automatic air conditioning
This function enables you to adjust the comfort levels of the driver and the front passenger independently. It is also automatically regulated depending on the external climatic conditions.
 100
100
Parking space sensor
The “Parking Space Sensor” func- |
I |
||
tion assists you in finding a parking |
|||
space. |
|
||
|
|
90 |
|
|
|
||
|
|
||
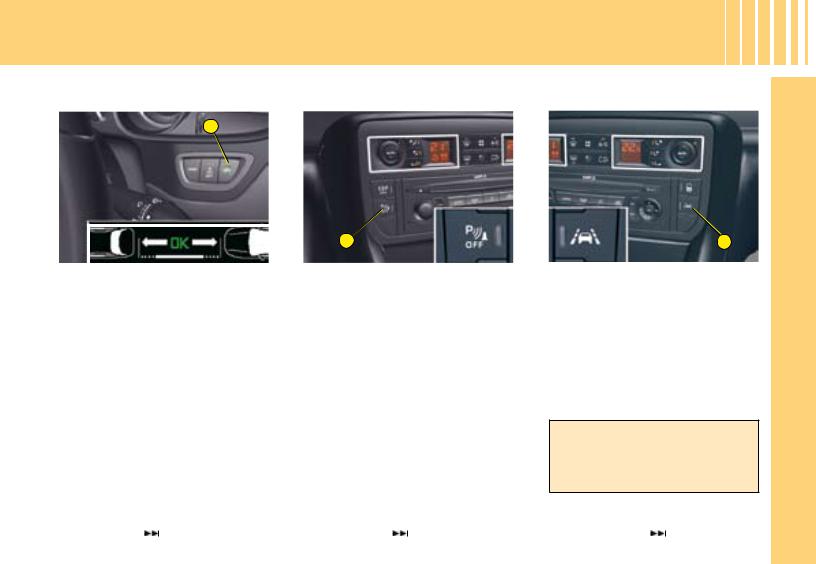
Audio and communication systems
This equipment benefits from the lat - est technology: MP3 compatible RD4 radio, Bluetooth® hands-free kit, NaviDrive ( See NaviDrive instructions).
 126
126
IN BRIEF
Electric parking brake
The electric parking brake combines automatic engagement when the engine is switched off, and automatic release when the vehicle is set in motion (automatic function activated by default).
Note: Manual locking/unlocking is possible.
75
I
IN BRIEF
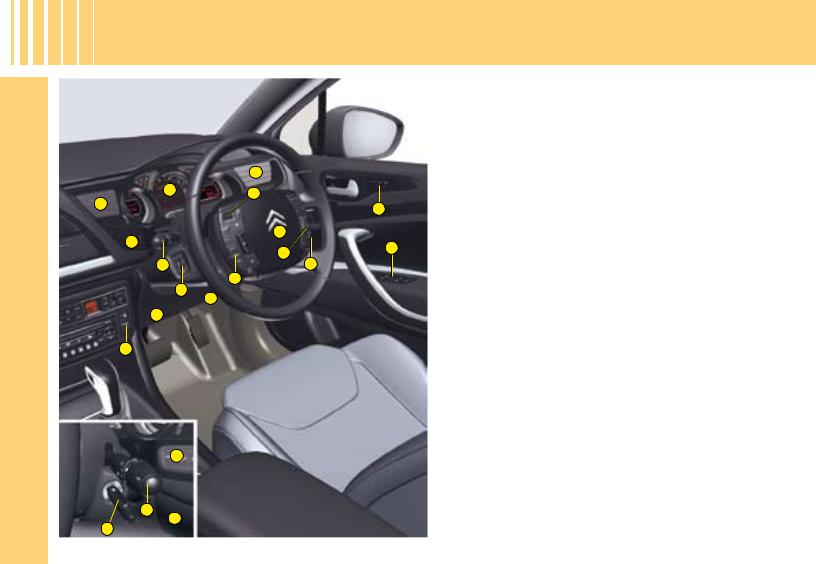
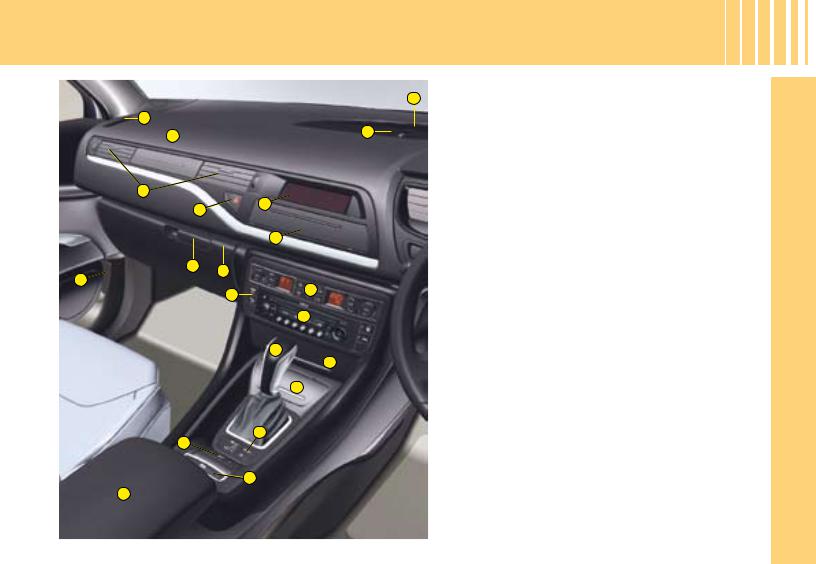
D a s h b o a r d
9
10
11
19 |
8
7
6
 4
4
5 |
3
20
15
16
14 |
|
18 |
|
12 |
17 |
|
13 |
||
|
1Electric windows / rear view mirrors / Child safety controls
2Memorisation of driver’s seat, rear view mirrors and air conditioning settings
3Controls at the steering wheel:
-Speed limiter
-Cruise control
4Horn
5Audio/telematic controls under steering wheel
2 |
6 |
Driver's airbag |
|
||
|
7 |
Navigation controls |
1 |
8 |
Driver's air vent |
9Instrument panel
10Driver's air vent
11Lighting control
12Windscreen wiper / Screen wash controls
13Ignition switch
14Controls:
-Locking/unlocking of doors and boot
-Lane Departure Warning System
15Steering column adjustment
16Knees airbag
17Oddments tray
18Checks / Anti-intrusion alarm / Parking space sensor controls
19Lighting / Direction indicators / Foglamp / Voice recognition controls
20Manual headlamp height adjustment
D a s h b o a r d
24 |
23
25 |
|
41 |
27 |
|
|
|
|
|
|
|
40 |
29 |
28 |
|
26 |
|
|
|
39 |
|
|
30 |
|
|
|
|
|
|
38 |
|
|
36 |
|
|
37 |
|
|
35 |
31 |
34 |
32 |
33
21 |
22
21 Sunlight sensor
22 Soft diffusion air conditioning adjustment knob
23 Passenger's airbag
24 Side window demister
26 Bonnet release
25 Passenger's air vents
27 Hazard lamps button
28Key switch:
-Passenger’s airbag activation/deactivation
29Glovebox:
-Vehicle document storage
-Audio-video sockets
-Fusebox access flap
30ESP / Parking assistance controls
31Automatic gearbox SPORT/SNOW mode controls
32Electric parking brake
33Armrest with cup-holder
34Suspension controls:
-Ground clearance adjustment
-Sport mode
35Ashtray with lighter
36Gear lever
37Storage
38Radio mono CD or NaviDrive
39Air conditioning controls
40Storage
41Multifunction display
I
IN BRIEF
D a s h b o a r d
I
IN BRIEF
10
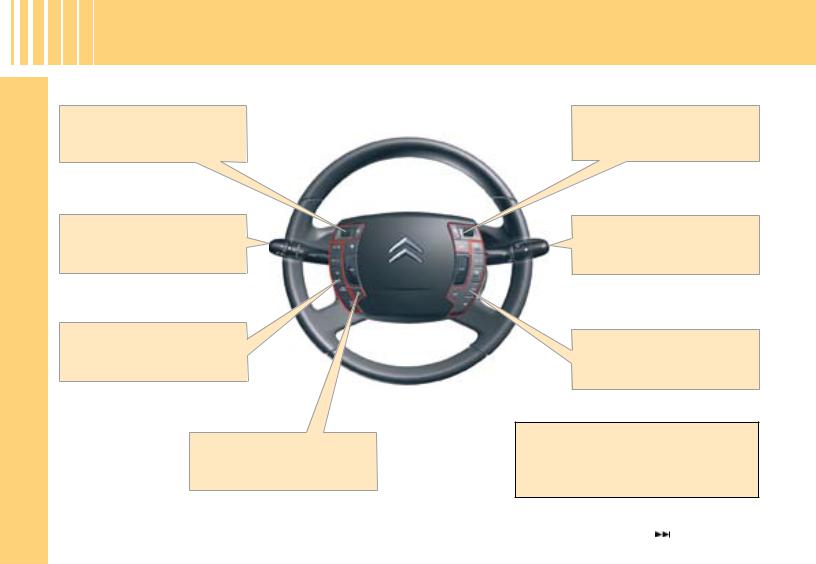
Instrument panel menu
Activation of voice recognition or reminder of navigation guidance
Cruise control and Speed limiter
Telephone
Multifunction display menu
MODE: selection of the type of information displayed on multifunction screen.
Audio
The “SET +, PAUSE, VOL+, MUTE” buttons are located so that you can use them without needing to take your eyes off the road.
42
G e t t i n g s ta rt e d
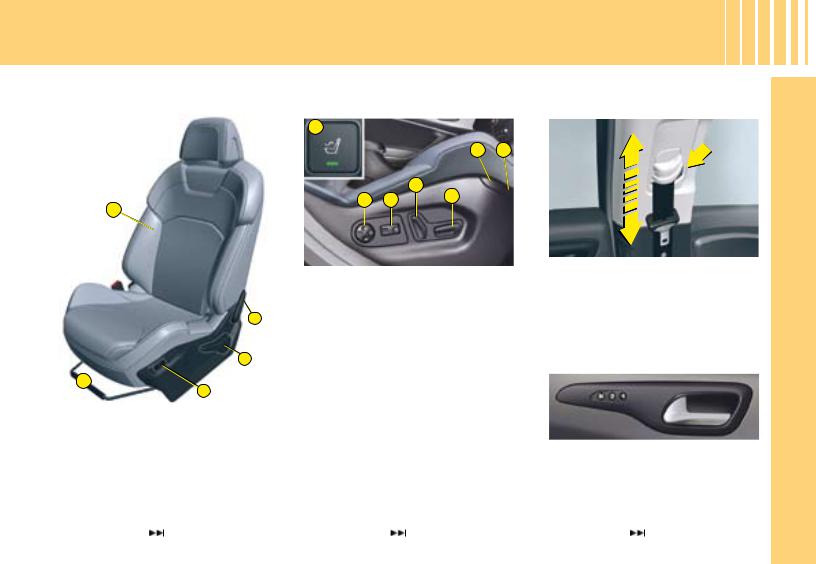
Front seats
Manual adjustments
E |
A
B
D
C
A.Adjustment of the backrest angle.
B.Adjustment of the seat height and angle.
C.Heated seat control.
D.Longitudinal adjustment of seat.
E.Adjustment of the backrest lumbar support.
53
Electrical adjustments
J
J |
K |
G
I H F
F.Seat height and slide adjustments.
G.Adjustment of the backrest angle.
H.Adjustment of top of backrest.
I.Adjustment of 2 axis lumbar support.
J.Massage function.
K.Heated seat control.
54
Seat belt height adjustment
I
The correct positioning of the belt |
BRIEF |
|
strap is through the middle of the |
||
shoulder . See “Seat belts”. |
|
|
To adjust the seat belt for height, |
||
compress the control and slide |
it |
|
in the desired direction. |
|
|
|
|
IN |
Memorisation
The Memorisation function allows you to programme the driver’s seat, rear view mirrors and air conditioning settings.
56 |
11 |
|
G e t t i n g s ta rt e d
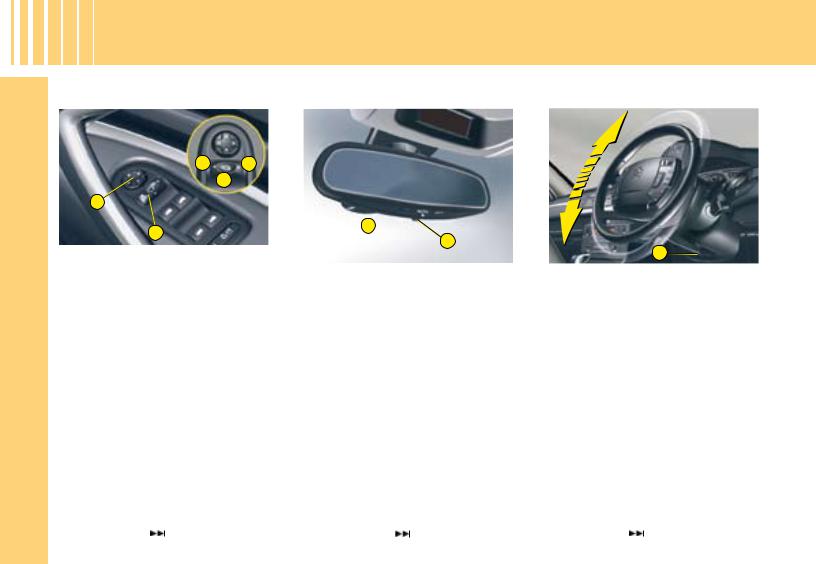
Electric exterior rear view mirrors
I
a b c
2 |
BRIEF |
|
1 |
1. |
Selection of rear view |
|
|
mirror: |
|
a - Left hand side. |
||
b - Right hand side. |
||
c - Foldback / Deployment. |
||
IN |
2. |
Directional control for |
|
mirror selected |
|
|
|
|
Automatic electrochrome |
Steering column adjustment |
rear view mirror |
|
3
4
This automatically and progressively adapts to day-time or nighttime use.
Operation
Switch on the ignition and press button 4.
•Warning lamp 3 on: automatic mode.
•Warning lamp 3 off: automatic mode stopped. The mirror remains in its lightest definition.
A
With the vehicle at rest, unlock the steering wheel by pushing control A forwards.
Adjust the height and the reach of the steering wheel, then lock the position by pulling the lever upwards.
12 |
58 |
57 |
52 |
|
V i s i b i l i t y
Lighting |
Front wipers |
A
B
Ring A
Lamps off.
Automatic lighting of headlamps.
Sidelamps.
Dipped beams/main beams.
Pull the control stalk towards you to change between dipped beam and main beam.
Ring B
Front foglamps on.
Front foglamps and rear foglamps on.
45-46
Control positions 2. Rapid wipe.
1. Normal wipe.
I. Intermittent wipe. 0. Off.
One press downwards:
•AUTO: Automatic wipe activated.
•Single wipe.
Screen wash
Pull the screen wipe control stalk towards you.
Note: If the ignition has been switched off for around 1 minute, it is necessary to re-activate automatic wiping.
49
Rear wipers (Tourer)
C
Rotate control C to the desired position.
Off
Intermittent wipe
Screen wash
50
I
IN BRIEF
13
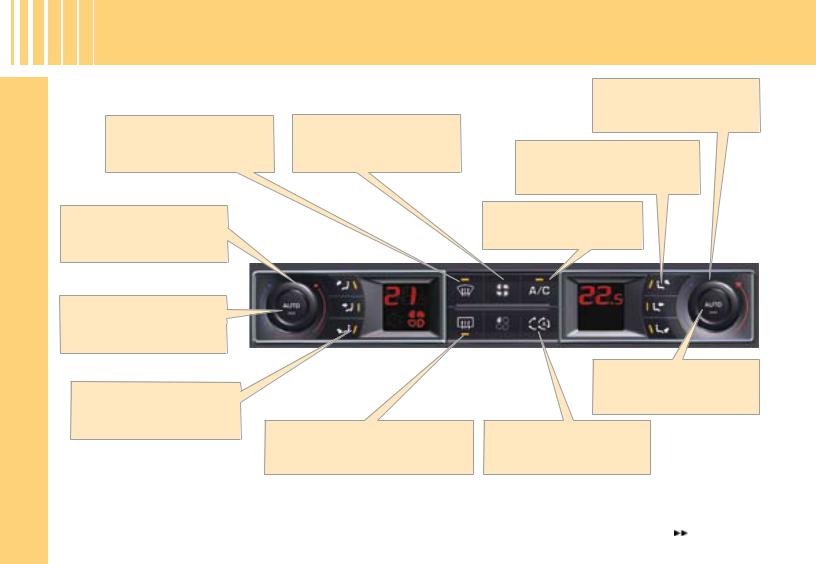
V e n t i l at i o n
I
IN BRIEF
Automatic air conditioning
Front demisting - deicing
Adjustment of temperature on passenger's side
Passenger's side automatic operation
Adjustment of air distribution on passenger's side
Adjustment
of temperature on driver's side
Adjusting the air flow
Adjustment of air distribution on driver's side
Activation/deactivation
of air conditioning
Driver's side automatic operation
Rear and external rear view |
Air recirculation - |
mirrors demisting - deicing |
Entry of air from outside |
|
Note: It is recommended to use automatic mode by pressing on the “AUTO” button. |
|
14 |
|
|
|
97 |
|
|
||
|
|
|
|
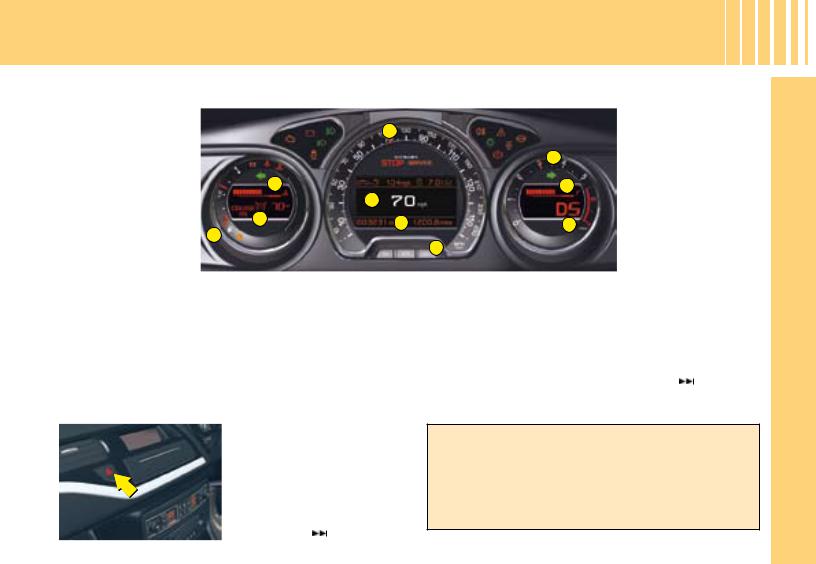
M o n i t o r i n g |
||
|
Instrument panel |
||
|
D |
|
|
|
|
|
H |
C |
E |
|
I |
|
|
|
|
B |
F |
|
J |
A |
|
||
|
G |
|
|
|
|
|
|
A. Fuel gauge and low fuel warning lamp. |
|
G. Trip mileage recorder reset button. |
|
B. Cruise control/speed limiter information. |
H. Rev counter. |
||
C. Coolant temperature. |
|
I. |
Engine oil temperature. |
D. Speed indicator. |
|
J. |
Display of automatic gearbox information. |
E.Instrument panel.
F.Mileage recorder.
29
Hazard warning lamps
The hazard lamps can also be used with the ignition switched off.
44
Note:
•When the ignition is switched on, the orange and red warning lamps light up.
•When the engine is running, these warning lamps should go out.
•If any warning lamps remain lit, refer to the relevant page.
I
IN BRIEF
15
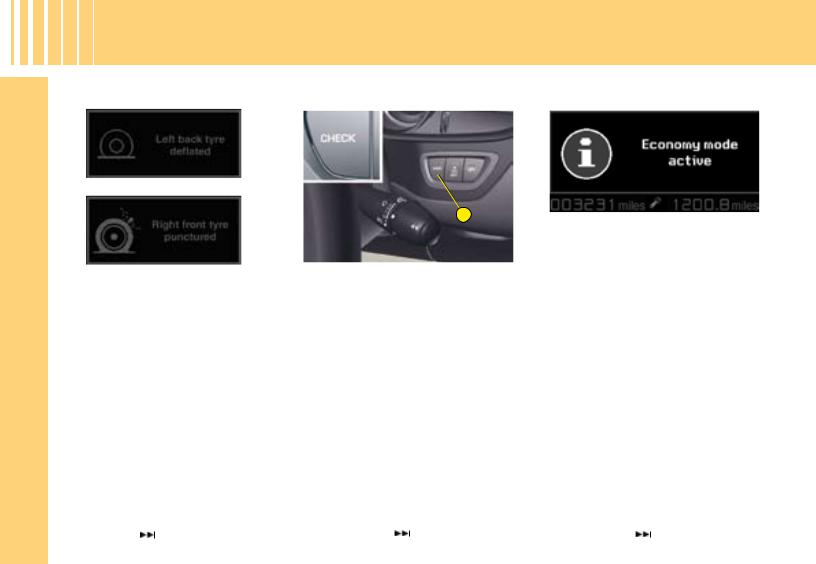
M o n i t o r i n g
Tyre deflation detection |
Log of alerts |
Economy mode |
I
IN BRIEF
The tyre deflation detection system is a driving aid which informs you of the condition of your tyres.
It does not replace either vigilance or responsibility on the part of the driver.
A |
This function allows you to display the log of alerts.
Press on button A. The following messages appear consecutively on the instrument panel screen:
•Tyre pressure check.
•Maintenance indicator reminder.
•Display of message alerts.
•Oil level check.
When the engine is stopped, some functions (audio system, screen wipe, electric windows, sunroof, electric seats, telephone, video, interior lighting etc.) are only electrically supplied for a maximum period of 30 minutes, to avoid discharging the battery.
Once this period is over, a message is displayed on the instrument panel screen and the active functions are placed on standby.
These functions will be automatcially reactivated when the vehicle is restarted.
16 |
72 |
36 |
27 |
|
PA S S E N G E R S A F E T Y
Seat belts and front passenger's airbag
C D E H
A B F G
The seat belt fastened/unfastened status for each seat category is indicated by the lighting or flashing of the warning lamps linked to each position:
A.Non-fastened / unfastened front and/or rear seat belts warning lamp.
B.Front left-hand seat belt warning lamp.
C.Front right-hand seat belt warning lamp.
D.Rear right-hand seat belt warning lamp.
E.Central rear seat belt warning lamp.
F.Rear left-hand seat belt warning lamp.
G.Front passenger's airbag deactivation warning lamp.
H.Front passenger's airbag activation warning lamp.
32
Front passenger's airbag deactivation
I
In order to be able to use a rearfacing child seat in the front passenger's seat position, it is imperative to deactivate the passenger's airbag.
For that:
•With the ignition switched off, insert the key into the switch I.
•Turn the key to the “ OFF” position, the passenger's airbag is deactivated.
The front passenger's airbag deactivation warning lamp G lights up when the ignition is switched on.
 108
108
Child safety
I
J
This deactivates the controls in the |
BRIEF |
rear of the vehicle, both for the rear |
|
windows and for opening the rear |
|
doors from the inside. The electric |
|
child safety device is activated by |
|
pressing on button J. |
|
The activation of the function is |
IN |
indicated by a message on the |
|
instrument panel screen and the |
|
light on button J. |
17
51

|
D r i v i n g |
Electric parking brake |
Hill start assist |
I |
B |
|
|
A |
|
Automatic operation
BRIEF |
The |
electronic parking |
brake |
releases automatically and pro- |
|||
gressively when you press the |
|||
|
accelerator. With the vehicle sta- |
||
|
tionary, the parking brake is auto- |
||
|
matically applied when the engine |
||
|
is switched off. |
|
|
|
|
Before leaving the |
|
IN |
|
vehicle, check that |
|
|
warning lamp |
A (!) |
|
|
(red) on the instru- |
||
|
ment panel is permanently lit and |
||
|
that warning lamp P (red) on con- |
||
|
trol |
B is lit. |
|
|
|
|
|
|
|
Never leave a child alone |
|
|
|
inside the vehicle |
with |
|
|
the ignition on, as they |
|
|
|
could release the parking |
|
|
|
brake. |
|
18 |
|
|
|
|
|
|
|
Manual operation
The MANUAL application/release of the parking brake is possible permanently by pulling/pushing control B.
Before leaving the vehicle, check that warning lamp A (!) (red) on the instru-
ment panel is permanently lit and that warning lamp P (red) on control B is lit.
With the engine running, if you leave the vehicle, manually apply the parking brake.
75
To aid starting on a gradient, your vehicle is equipped with a system which keeps it immobilised for a short time (about 2 seconds), the approximate time it takes to move your foot from the brake pedal to the accelerator pedal.
This function is only active when:
•The vehicle is completely stationary, with your foot on the brake pedal.
•In particular conditions on a slope.
•With the driver's door closed.
Do not leave the vehicle while it is being held in the temporary immobilisation hill start assist phase.
82
D r i v i n g
Speed limiter |
Cruise control |
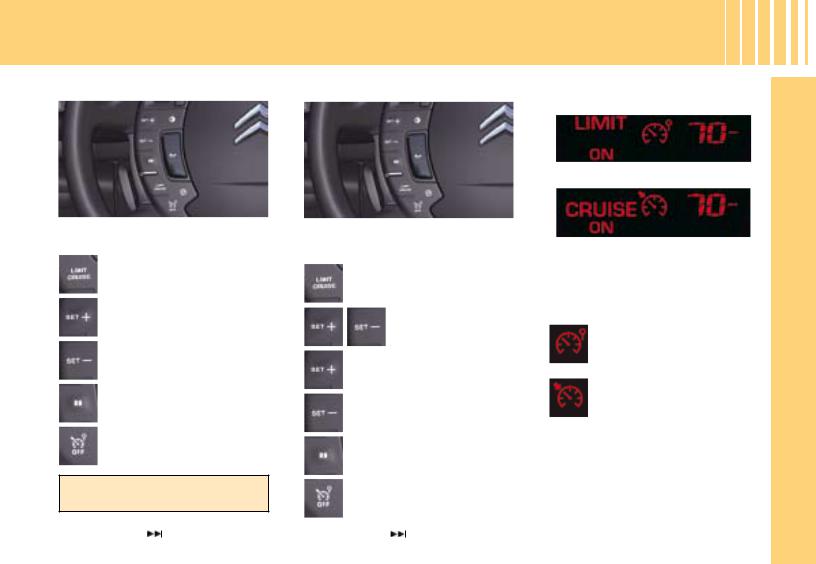
This system allows you to choose a maximum speed that you do not wish to exceed.
Selection of “ LIMIT”: Activation of speed limiter mode.
“SET +”: Increase of the
maximum speed.
“SET -”: Reduction of the maximum speed.
Suspension or resumption of mode.
Deactivation.
The chosen speed is memorised.
Note: The chosen speed must be higher than 30 km/h (20 mph).
70
This system allows you to maintain a constant vehicle speed programmed by the driver.
Selection of “CRUISE”: Activation of cruise control mode.
“SET”: Memorisation of the speed (system paused).
“SET +”: Increase of the memorised speed (system ON).
“SET -”: Reduction of the memorised speed (system ON).
Suspension or resumption of mode.
Deactivation.
68
Instrument panel display
I
The speed limiter or cruise control |
BRIEF |
mode is displayed on the instru- |
|
ment panel when selected. |
|
Speed limiter |
IN |
|
|
Cruise control |
|
Cruise control is active on the |
|
|
higher gears of the gearbox. The |
|
|
chosen speed must be |
higher |
19 |
than 40 km/h (25 mph). |
|
|
|
|
|
Direction indicators - “Motorway” function
I
BRIEF |
Move the stalk briefly upwards or |
downwards, without going beyond |
|
IN |
the resistance point; the direction |
indicators will flash 3 times. |
|
|
20 |
44 |
|
D r i v i n g
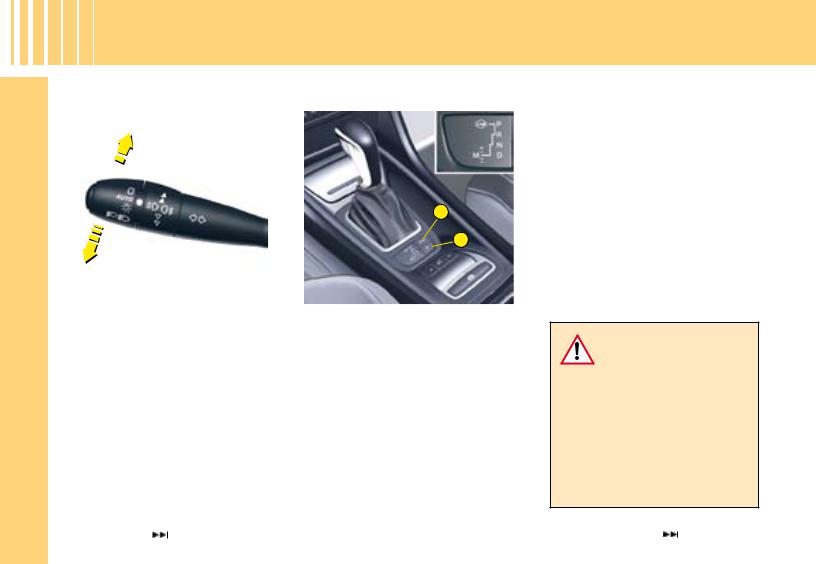
Automatic gearbox
A
B
Positions
P:Parking.
R: Reverse gear. N: Neutral.
D: Automatic mode. M: Sequential mode.
The automatic gearbox offers you:
-Operation in auto-active mode , with automatic adaptation to your style of driving as well as to the road profile (Position D).
-Operation in sequential mode, with manual gear changing ( Position M).
-Operation in automatic SPORT mode (Position D) and press button A.
-Operation in automatic SNOW mode (Position D) and press button B.
For safety:
The gear lever can only be disengaged from position P if you are pressing the brake pedal.
When a door is opened, an audible signal sounds if the gear selector is not in position P.
Before leaving the vehicle, make absolutely certain that position P is selected.
64
|
D r i v i n g |
Parking space sensor |
Parking assistance (visual |
|
and sound) |
A |
|
B
You can select the “Parking Space Sensor” by pressing button A, which flashes when next to the space to be measured, with a speed lower than 20 km/h (12 mph) and at a distance of less than 1.5 m from the space.
The fixed lighting of the warning lamp indicates that this function is selected.
You can activate/deactivate the parking assistance by pressing button B. When the parking assistance is inactive, the warning lamp on button B is lit up.
90 |
88 |
Lane Departure Warning
System
I
C |
BRIEF |
|
|
This device is designed for use on |
|
motorways and dual carriageways, |
|
and operates only at speeds above |
|
80 km/h (50 mph). |
|
A press on button C activates the |
|
function, the warning lamp on the |
IN |
button lights up. |
|
|
Note: The system does not alert you if one of your direction indicators is operating and for approx. 20 seconds after the direction indicator has stopped.
87 |
21 |
|
R e m o t e c o n t r o l
A |
B |
C |
D |
II
E |
Note:
•The simultaneous use of other high frequency equipment (mobile telephones, domestic alarms, etc.) may momentarily hinder the operation of the remote control.
•If there is a permanent fault, the remote control has to be reinitialised. See “Changing remote control batteries”.
22
Central unlocking
A press on button A unlocks your vehicle.
This is confirmed by rapid flashing of the direction indicators and lighting of the interior lamp (provided this function is active). This also deploys the exterior rear view mirrors.
Central locking / Closing of windows and sunroof / Deadlocking
•A short press on button C locks your vehicle.
•A long press on button C locks your vehicle and closes the windows and the sun roof.
•2 successive presses on button C will deadlock the vehicle. It is then impossible to open the doors, either from the inside or from the outside.
This operation is confirmed by the direction indicators illuminating for approx. 2 seconds and by the interior lamp switching off. This also folds the exterior rear view mirrors.
If any of the doors, or the boot, is open or not properly closed, the central locking does not operate.
With the vehicle stationary and the engine switched off, locking is signalled by the flashing of the interior locking control warning lamp.
Guide-me-home lighting
A press on button B activates the guide-me-home lighting (lighting of the sidelamps, dipped beams, registration plate lights for around 1 minute).
A second press prior to the end of this timing cancels the guide-me- home lighting.
If closing the windows and sun roof using the remote control, the user must make sure that no person is preventing the windows and/or sun roof from closing properly.
It is dangerous to operate the deadlocking when a person is inside the vehicle as unlocking is impossible from the inside without the remote control.

R e m o t e c o n t r o l
Electric boot opening
Pressing button E opens the boot.
Locating of the vehicle
To locate the vehicle in a carpark, press button C. Locating of the vehicle is confirmed by:
•The flashing of the direction indicators for a few seconds.
•The interior lighting coming on. The vehicle remains locked.
Folding and ejecting the key
Button D is for folding and ejecting the key from its housing in the remote control.
If you do not press on button D, you could damage the key mechanism.
Changing the remote control battery
Unclip the cover to gain access to the battery.
Battery: CR 0523 de 3 V.
Re-initialisation of the remote control
After a change of battery, it is nec- |
II |
essary to re-initialise the remote |
|
control. To do that, switch on the |
|
ignition and immediately press but- |
|
ton C of your remote control until |
|
you achieve the desired result. |
|
This may take some ten seconds. |
|
Note: Make a careful note of the numbers for the keys and for the remote control on theASSISTANCE card. Keep this in a safe place.
Do not throw away used batteries. Return them to a CITROËN dealer or take them to an authorised recycling facility (camera shops, etc).
Except when reinitialising, the remote control cannot function while the key is in the ignition, even when switched off.
Warning: by inadvertently actioning the remote control, when for example it is in your pocket, you can unlock the vehicle without your realising it.
However, if none of the doors is opened within thirty seconds following an unlocking, the doors will automatically relock.
Warning: there is a risk of damage if the replacement battery is not the correct one.
Only use batteries that are identical or equivalent to those approved by CITROËN.
23
K e y s
II
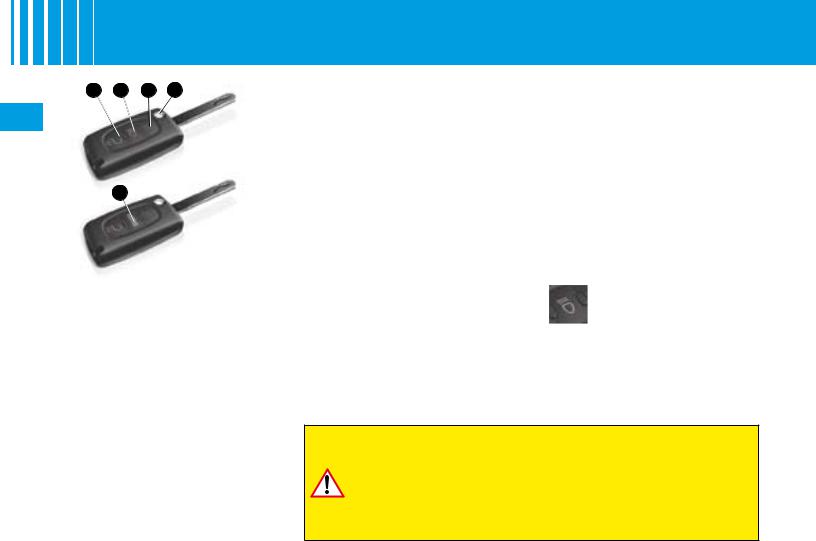
Electronic immobiliser key
The key operates all the vehicle’s locks as well as the ignition.
The key can be used to deactivate the front passenger’s airbag. See “Airbags”.
Central locking using the key
Briefly turn the key in the door lock.
The vehicle is locked.
Deadlocking: Central locking using the key
A second immediate action with the key deadlocks the vehicle. It is then impossible to open the doors from the interior or exterior.
Note:
•With the vehicle stationary and the engine switched off, locking is signalled by the flashing of the interior locking control warning lamp.
•If any of the doors, or the boot, is open or not properly closed, the central locking does not operate.
Electronic immobiliser
The ELECTRONIC IMMOBILI SER DEVICE locks the engine supply system.
The system activates automatically as the key is removed from the ignition.
All the vehicle’s keys contain an electronic immobiliser device.
After you switch on the ignition, a dialogue starts between the key and the electronic immobiliser device.
If the key is not recognised, you cannot start the vehicle
If this occurs, leave your vehicle immobilised and contact a CITROËN dealer.
Never attempt to modify the electronic immobiliser’s electrical circuit, as this could render your vehicle undriveable.
It is dangerous to operate the deadlocking when a person is inside the vehicle as unlocking is impossible from the inside without the remote control.
|
The key number is on the label attached to the key. |
|
Should the key be lost or modified (addition, cancellation or replacement), you must contact a CITROËN |
24 |
dealer, with all of the vehicle keys in your possession as well as your proof of identity. |
|
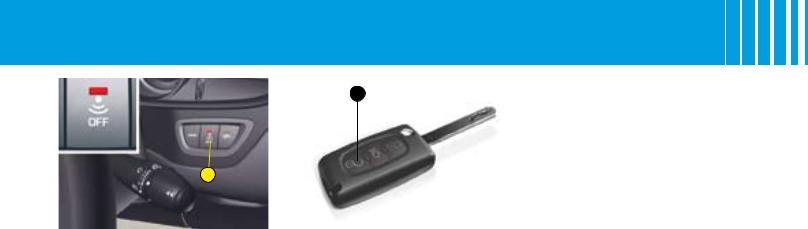
A n t i - i n t r u s i o n a l a r m
A |
The anti-intrusion alarm provides:
•Exterior perimeter protection by means of detectors on the vehicle access points (doors, boot, bonnet).
•Electrical supply protection.
• Interior volumetric protection by means of ultrasonic sensors (detecting movement inside the passenger compartment). This can be deactivated using the control A.
•Anti-lifting protection by means of sensors.
B
The installation also has a siren, and a warning lamp on the control A which is visible from outside the vehicle, indicating the three possible statuses of the alarm.
•Alarm not active (disarmed), warning lamp off.
•Alarm active (armed), the warning lamp flashes slowly.
•Alarm triggered (signalling an intrusion), the warning lamp flashes rapidly if the alarm is deactivated by a press on the control B. It stops as soon as you switch on the ignition.
Note: If there is a malfunction, the warning lamp remains permanently on.
Deactivation of the alarm usng the remote control
The alarm is disarmed when you |
II |
unlock the vehicle (with a press on |
|
button B on the remote control). |
|
Deactivation of the alarm with the key
Unlock the doors with the key. The siren triggers. Enter the vehicle, insert the key in the ignition and turn it to the drive position to stop the siren. Otherwise the siren will continue for approximately 30 seconds.
25
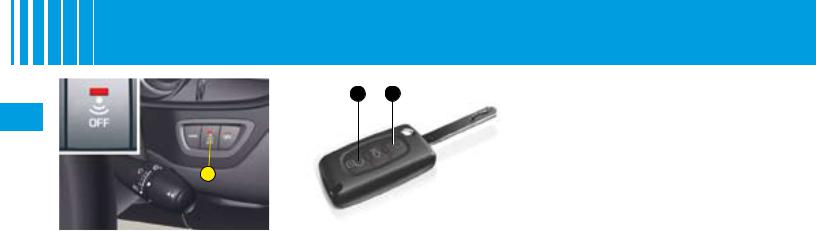
A n t i - i n t r u s i o n a l a r m
B C
II
A |
Operating the alarm
First make sure all the doors are closed.
The alarm is armed by pressing button C on the remote control.
With the alarm armed, the protections are active after 5 seconds (perimeter) and 45 seconds (volumetric).
When the alarm is armed (on standby), any intrusion will trigger the siren for 30 seconds, accompanied by the direction indicators lighting up.
The alarm then goes back on standby. The triggering remains memorised. The warning lamp on button A flashes quickly when the alarm is deactivated by pressing the unlocking button B. This flashing stops when you switch on the ignition.
26
The siren is also triggered if there is a cutting of the electrical supply. To stop it, restore the electrical supply then press on the unlocking button B.
Note:
•If you want to lock your vehicle without arming the alarm, just lock with the key only.
•If you lock your vehicle and a door, or the boot, is still open, the central locking does not operate but the alarm will arm itself after approx. 45 seconds.
Note: The siren is automatically deactivated (for example for disconnecting the battery) as soon as the vehicle is unlocked using the remote control.
Deactivating the volumetric detection
You can operate the alarm with perimeter protection only, by deactivating the volumetric protection (if for example you wish to leave an animal in the vehicle).
Deactivation of the volumetric detection
Switch off the ignition.
Within 10 seconds, press button A until the warning lamp remains on permanently.
Exit the vehicle.
Lock or deadlock the vehicle with the remote control locking button.
The light on button A flashes once a second.
Note: It is recommended to deactivate the volumetric detection when washing the vehicle in order to prevent the random triggering of the alarm.
Automatic activation (depending on country)
The alarm is armed automatically, 2 minutes after the last door, or the boot, has been closed.
In order to prevent the alarm from triggering when you open one of the doors or the boot, it is essential to press the unlocking button B again on the remote control.
 Loading...