


I |
|
|
|
|
|
D A S H B O A R D |
|
|
|
|
|
|||||
1 |
2 |
3 |
4 |
5 |
6 |
7 |
8 |
9 |
10 11 12 13 |
14 |
15 16 |
17 18 |
19 |
20 |
21 |
22 |
IN BRIEF
39 |
38 |
37 |
36 |
35 |
|
|
|
|
|
|
|
|
|
|
34 |
28 |
27 |
26 |
25 |
24 |
23 |
|
|
|
|
33 |
29 |
|
|
|
|
|
|
|
|
|
32 |
30 |
|
|
|
|
|
|
|
|
|
31 |
|
|
|
|
|
|
4

1Storage drawer (right and left).
2Side window demister vent (right and left).
3Loudspeaker (Tweeter) (right and left).
4Passenger’s airbag.
5Control for central locking of doors and boot.
6Multifunction display.
7Centre air vents.
8Controls:
•Trip mileage recorder reset button.
•Dashboard lighting.
•Display of alerts and Status of functions.
9Instrument panel.
10Hazard lamps control.
11Scented air freshener.
12Controls:
•Lighting.
•Direction indicators.
•Front foglamps.
•Foglamps.
13Controls for speed limiter and cruise control.
D A S H B O A R D
14Tachometer / Automatic gearbox display.
15Signalling confirmation warning lamps.
16Driver’s airbag.
17Radio-CD controls.
18Controls:
•Windscreen wiper.
•Screen wash.
•Rear screen wiper.
•Trip computer.
19Controls:
•ESP.
•Parking assistance.
•Lane Departure Warning System.
•Anti-intrusion alarm.
20Lateral air vent (right and left).
21Headlamps adjustment.
22Controls:
•Rear view mirrors.
•Windows.
•Child safety.
23Oddments poket.
24Steering lock and ignition switch.
25Optional function controls.
26Horn.
27Optional function controls.
28Steering column adjustment lever.
29Air conditioning or heating/ ventilation.
30Gear lever.
3112 volt accessory socket
(150 W max.).
32Cigar lighter.
33Handbrake.
34Ashtray.
35Radio-CD or NaviDrive radio navigation.
36Carrier bag hook.
37Key-operated switch:
•Passenger’s airbag activation/deactivation.
38Lower glovebox.
•Fuse box access.
39Bonnet release lever.
I
IN BRIEF
5
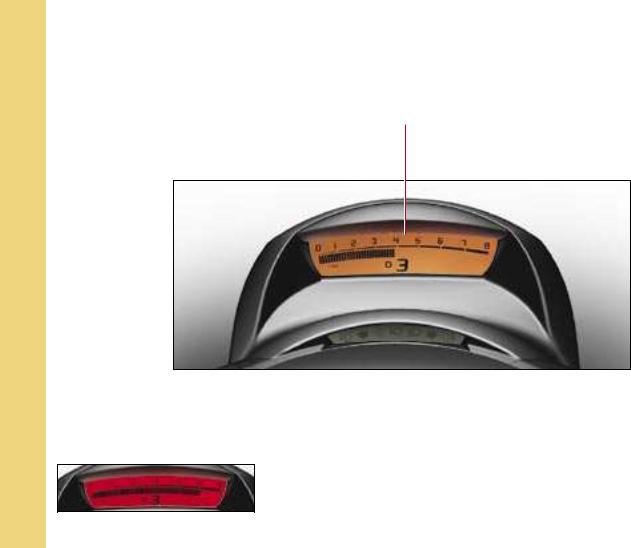
I T A C H O M E T E R
Display of engine speed
(during the running-in period, see “Running-in”)
and display of gear engaged and automatic gearbox status
IN BRIEF
Approaching maximum engine speed, the screen changes from orange to red, to indicate the necessity to engage a higher gear.
6

I N S T R U M E N T |
P A N E L |
On opening of the driver’s door or unlocking with the remote control, for approx. 30 seconds there is activation of the instrument panel and rev counter and display of the mileage counters and if applicable the maintenance symbol.
Central display
1Fuel gauge
2Range
3Trip mileage recorder
4Speed limiter and cruise control settings
5Speed indicator
6Maintenance indicator, on switching on ignition, then total mileage counter
7Checking the engine oil level
8Coolant temperature
I
IN BRIEF
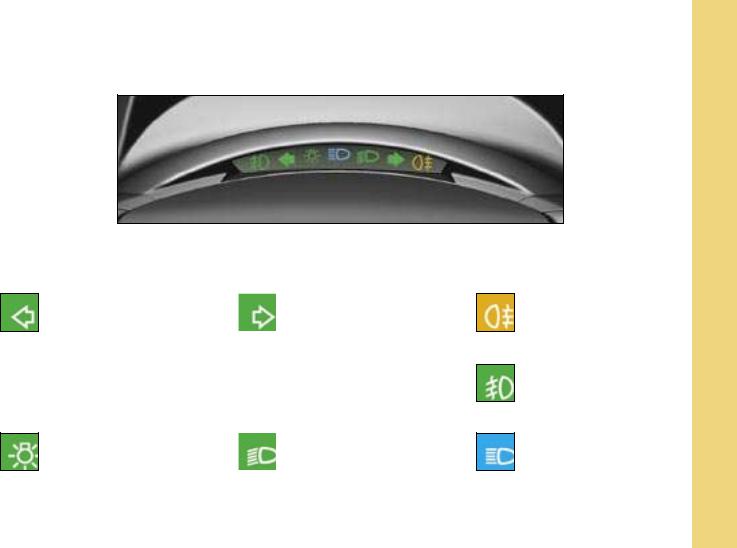
Display of warning |
Trip mileage |
|
Display of alerts |
Display of warning |
lamps |
recorder reset |
|
and Status of |
lamps |
|
button |
|
functions |
|
|
|
|
|
|
|
Display lighting rheostat |
|
||
|
With vehicle lamps on, press to adjust. |
|
||
If after increasing the brightness you wish to reduce it, you have first to increase it to the maximum then release. |
||||
|
Next you can reduce the brightness. |
|
||
|
|
And vice versa. |
7 |
|
|
|
|
|
|
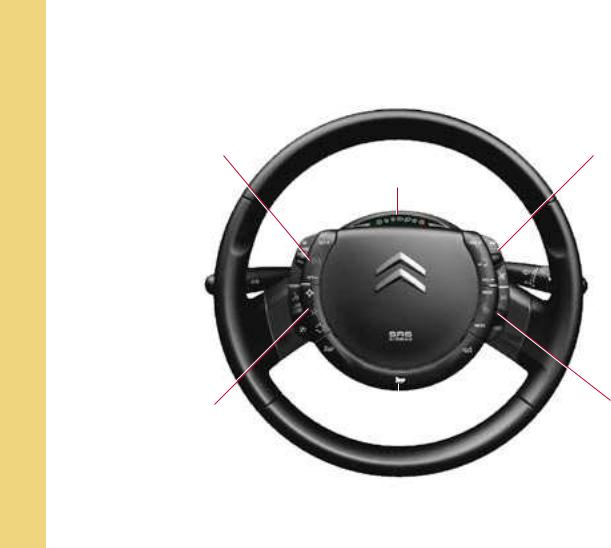
I
F I X E D C E N T R E D |
C O N T R O L S |
S T E E R I N G |
W H E E L |
Controls for speed limiter |
Audio system controls |
and cruise control |
Lighting |
|
|
|
and signalling |
|
warning lamps |
IN BRIEF
Optional function controls |
|
|
Multifunction |
|
Horn |
display controls |
|
8
F I X E D |
C E N T R E D |
C O N T R O L S |
S T E E R I N G |
W H E E L |
|
Controls for speed limiter |
|
Audio system controls |
and cruise control |
|
|
|
|
See Chapter IV |
|
|
or your NaviDrive |
30/33 |
|
instructions |
|
|
|
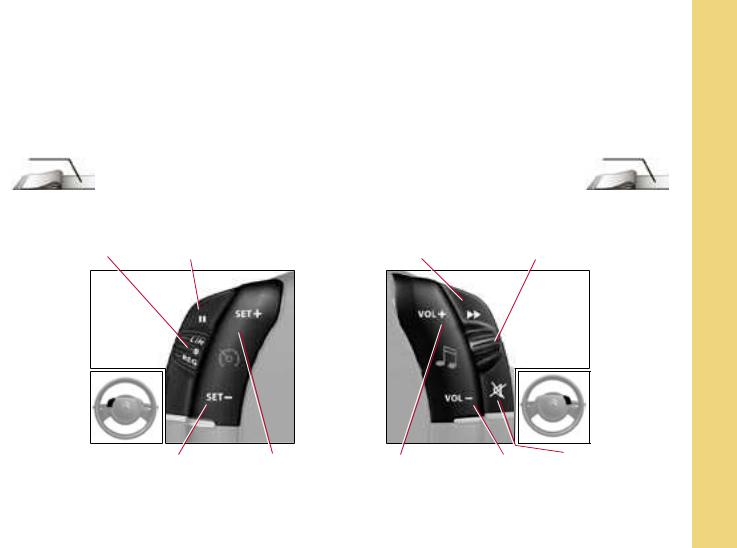
I
Selection of cruise |
Activation of speed |
|
|
limiter and Deactivation / |
Search of higher |
Scrolling of |
|
control or speed |
Reactivation of cruise |
||
limiter |
control and speed limiter |
frequencies |
memorised stations |
To decrease |
To increase |
To increase |
To decrease |
Mute |
the speed / To |
the speed / To |
the sound |
the sound |
|
activate cruise |
activate cruise |
volume |
volume |
|
control |
control |
|
|
|
IN BRIEF
9
I
BRIEFIN
Display lighting rheostat
49
F I X E D C E N T R E D |
C O N T R O L S |
S T E E R I N G |
W H E E L |
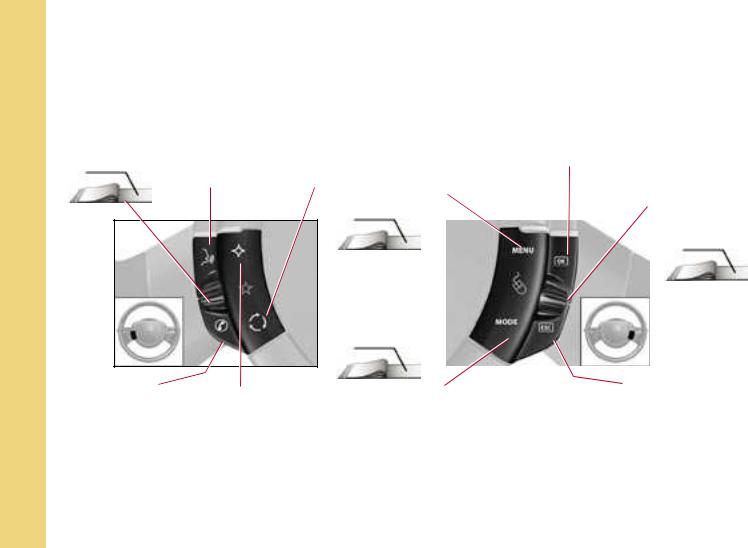
Optional function controls
Starting voice recognition
(See Chapter IV or your NaviDrive instructions) Air recirculation
84-86
49
|
Multifunction display controls |
||
|
Validation of the function selected or |
||
|
of the value modified |
||
|
|
Pick up / hang up |
|
(See Chapter IV or your NaviDrive instructions) |
|||
Access to the |
Scrolling in the |
||
“Main menu”* |
multifunction |
||
|
|
display |
|
|
|
|
50-57 |
|
|
|
|
|
|
|
|
10
Telephone pick-up / hang-up (See Chapter IV or your NaviDrive instructions)
Display of the «Directory» menu (See Chapter IV or your NaviDrive instructions)
Personal button:
-Black panel (default function), or
-Interior lamp switching on / off, or
-Log of alerts, or
-Status of functions
For display of the personalisation menu relating to this button, give a long press on it.
Selection of type of information displayed on the right of the screen (radio, trip computer, navigation / guidance, etc.) and for screen A, choice of activation / deactivation of your functions and choice of your adjustments
To cancel the current operation or to return to the previous screen
*In compliance with national legislation in some countries the “Menu” control is deactivated during driving.
W A R N I N G L A M P S
I
|
Lighting and signalling warning lamps |
||
LH direction indicator |
|
|
RH direction indicator |
|
|
||
See “Signalling” |
|
|
See “Signalling” |
|
|
|
|
All the direction indicators flash simultaneously when the hazard warning lamps are switched on.
Sidelamps |
|
Dipped beam |
|
||
See “Signalling” |
|
See “Signalling” |
|
|
If this warning lamp flashes, |
|
it is indicating a malfunctioning of |
|
|
the directional headlamps. |
|
|
Contact a CITROËN dealer. |
|
Foglamps (rear)
See “Signalling”
Foglamps (front)
See “Signalling”
Main beam
See “Signalling”
IN BRIEF
11
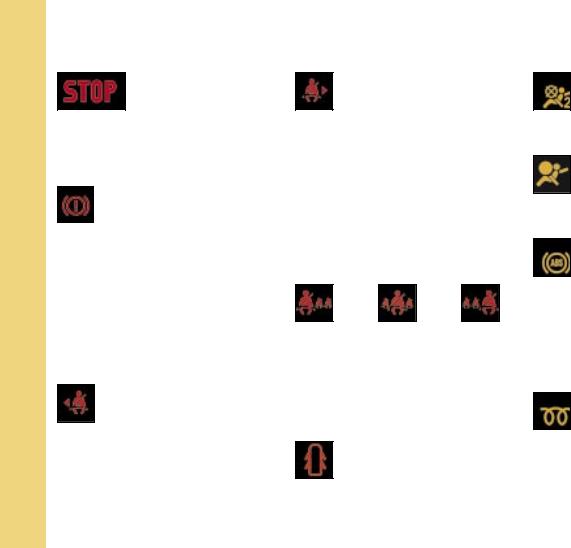
I
IN BRIEF
W A R N I N G L A M P S
Imperative stop warning lamp
When the warning lamp comes on, it is imperative to stop the vehicle and
switch off the engine. Contact a CITROËN dealer.
This lamp is accompanied by a STOP symbol on the display.
Warning lamp for handbrake, brake fluid level and braking distribution fault.
When the engine is running, this warning lamp indicates that the handbrake is applied or incompletely released, that the brake fluid level is insufficient, or that the braking system is malfunctioning.
If the warning lamp remains lit when the handbrake is released, stop immediately and contact a CITROËN Dealer. (See “Brakes”).
Front LH seat belt not fastened
This lamp comes on if the LH seat belt is not fastened when the ignition is switched on
and while the vehicle is moving at up to 20 km/h (approx. 12 mph). Above 20 km/h (12 mph), the warning lamp flashes for around 120 seconds. Then it remains on.
Front RH seat belt not fastened
When you switch on the ignition, the warning lamp remains on if the front passenger seat belt is not fastened. It goes out when the engine is running,
doors closed, after 30 seconds.
Then it comes on, if the belt is not fastened, while the vehicle is moving at up to 20 km/h (approx. 12 mph).
Above 20 km/h (12 mph), the warning lamp flashes for around 120 seconds.
Rear seat belts not fastened
Operation is identical to that of the front passenger’s seat belt warning lamp.
Doors open detection
This warning lamp, when the engine is running, comes on if a door, the bonnet and/or the boot is open.
Front passenger’s airbag deactivation warning lamp
See “Airbags”.
Front / side airbag fault warning lamp
See “Airbags”.
Anti-lock Braking
System
The ABS warning lamp lights when the ignition is switched on and should go out
after a few seconds.
If the warning lamp does not go out, there may be a system malfunction. (See “Brakes”).
Diesel Preheater
See the instructions for starting the engine.
Refer to Chapter II “Starting”.
12
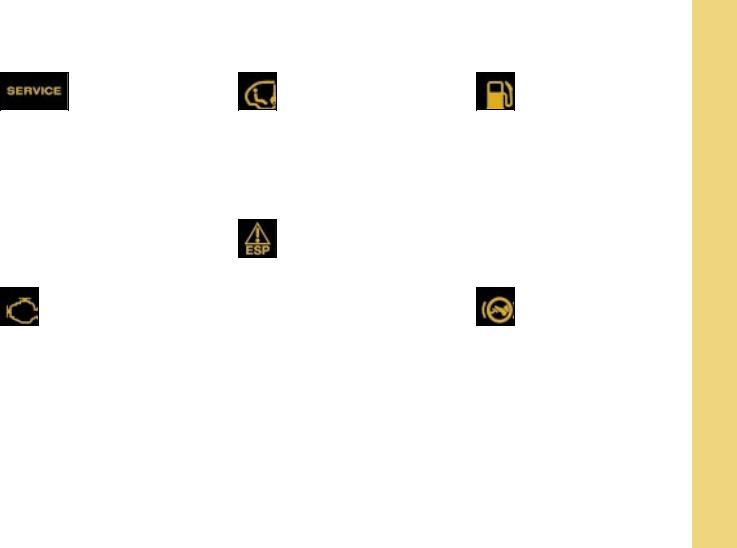
SERVICE warning lamp
This warning lamp serious fault.remains on for a
Contact a CITROËN dealer as soon as possible
The lamp stays on only for a short time for a minor fault.
Contact a CITROËN dealer if necessary.
To learn the origin of the corresponding alert message, refer to the «Log of alerts» (see chapter II) or your NaviDrive instructions.
Depollution system warning lamp
If it flashes or lights up while you are driving, this indicates a depollution system
operating fault.
Urgently consult a CITROËN Dealer.
W A R N I N G L A M P S I
Child safety warning lamp
At each activation, either manual or via the window control panel, this lamp lights up and then goes out approx. 10 sec-
onds after the engine is started.
ESP/ASR warning lamp
In operation
When either the ESP or ASR system is brought into operation, the ESP/ASR warning
lamp flashes.
In the event of a problem
When the vehicle is moving, the lighting of the ESP/ASR warning lamp indicates that the system is malfunctioning.
Contact a CITROËN dealer.
Deactivation
Illumination of the ESP/ASR warning lamp and of the ESP control, means that the system is deactivated.
See «ESP».
Low fuel level warning lamp
When the fuel tank is full, all the indicator bars are
illuminated.
If the fuel low warning lamp comes on, there remain around 7 litres of fuel in the tank and 2 or 3 bars will flash in the instrument panel.
If the last bar disappears, there are only around 2 litres of fuel in the tank.
“Foot-on-brake” starting warning lamp for (6 speed) Electronic Gearbox System
During the engine starting phase, this flashes if you are not pressing the brake pedal.
See “(6 speed) Electronic Gearbox System”.
This warning lamp may flash in the instrument panel to remind you to apply the brake when engaging reverse gear.
IN BRIEF
13
I
IN BRIEF
14
Direction indicators
Left: move the stalk downwards. Right: move the stalk upwards.
Movement of the steering wheel returns the stalk to the off position automatically.
Headlamp flash
Pull the stalk towards you to flash headlamps.
The headlamp flash operates even with the ignition off.
Horn
Press at the bottom of the steering wheel fixed hub.
S I G N A L L I N G
Hazard warning lamps
Simultaneous operation of the direction indicators.
Only use these if there is danger, for example when you have to stop suddenly or in unusual driving conditions.
They also operate without the ignition being on.
Emergency lighting of hazard warning lamps
Sudden vehicle deceleration automatically causes the hazard warning lamps to activate.
These cease automatically when you reaccelerate or manually if you press the hazard warning lamps control on the dashboard.
Sound signal for lamps left on
This is heard when the driver’s door is opened, ignition switched off, to indicate that lamps are still on.
It stops when the door is closed, the lamps are switched off, or the ignition is switched on.
This signal is inactive if the automatic lighting / guide-me-home headlamps are activated.
The direction indicators will not work when the hazard warning lamps are in use.
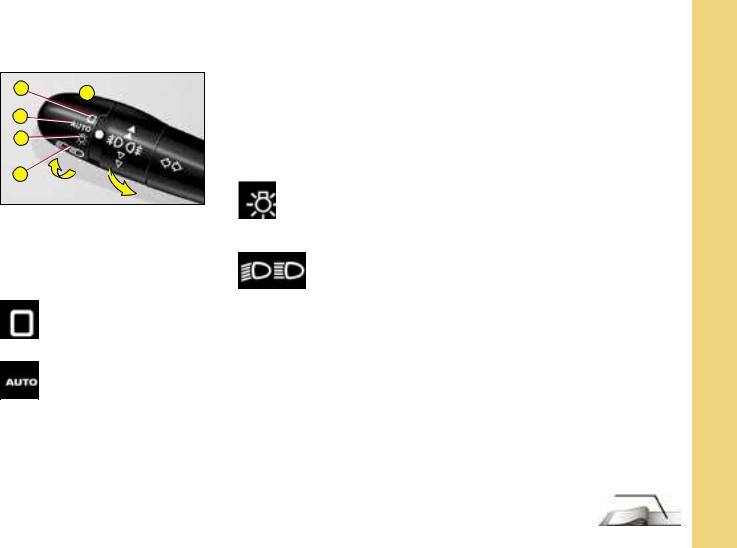
1 |
A |
|
|
2 |
|
3 |
|
4 |
|
Lighting control switch |
|
1Stop
2Automatic lighting
3Sidelamps
4Dipped beam / Main beam
All lighting off
Turn the barrel A forward.
Automatic lighting of headlamps
Sidelamps |
and |
dipped |
beams |
||||
come |
on |
automatically in condi- |
|||||
tions |
of |
poor |
ambient |
light or |
|||
when the wipers are in continuous |
|||||||
operation. |
|
|
|
|
|
||
They |
go out as |
soon as |
the light |
||||
is |
again |
|
sufficient |
or |
approx. |
||
5 minutes |
|
after |
the |
wipers have |
|||
stopped. |
|
|
|
|
|
||
S I G N A L L I N G |
|||||
To activate this |
function, place |
||||
control A on position |
2. |
||||
Do not |
cover |
the |
brightness |
||
sensor, |
which |
is visible from |
|||
the outside of the |
windscreen, |
||||
behind |
the interior rear view |
||||
mirror. |
|
|
|
|
|
Turn the barrel A forward. |
|||||
|
Sidelamps on |
||||
|
|||||
|
|
|
|||
Turn the barrel A forward. |
|||||
|
|
|
Dipped beams / |
||
|
|
|
|||
|
|
|
main beams on |
||
|
|
|
|
||
Pull the |
stalk |
towards you to |
|||
change from dipped beam to main |
|||||
beam and vice versa. |
|||||
Guide-me-home lighting |
|
|
This function lights |
your |
head- |
lamps, for example |
to illuminate |
|
your exit from a car park. |
|
|
This function is activated: |
|
|
•Manually by pulling the lighting stalk towards you, ignition switched off.
•Automatically, provided that:
-the automatic headlamp lighting has been activated,
-the guide-me-home lighting has been activated. For this, select in the “Main menu”, then in “PersonalisationConfiguration”, the lighting and signalling sub-menu and then activate the function.
See |
chapter |
“Multifunction dis- |
||||
play” |
|
|
|
|
|
|
Note: |
|
It |
is |
possible |
to |
|
modify the duration |
of the guide- |
|||||
me-home |
lighting |
(approx. |
60, |
|||
30 |
or |
15 |
seconds) |
in the menu |
||
“Personalisation-Configuration”. |
||||||
For |
screen |
A, the duration |
is |
|||
fixed. |
|
|
|
|
|
|
38/50-57
I
IN BRIEF
15

I
IN BRIEF
16
A
Vehicles equipped with FRONT FOGLAMPS AND REAR FOGLAMPS
(Ring A)
They operate when sidelamps, dipped beams or main beams are switched on.
For a vehicle equipped with rear foglamps:
-1 touch forwards: switches on rear foglamps.
-1 touch rearwards: switches off rear foglamps.
S I G N A L L I N G
For a vehicle equipped with front and rear foglamps:
-1 touch forwards: switches on front foglamps.
-2nd touch forwards: switches on rear foglamps.
-1 touch rearwards: switches off rear foglamps.
-2nd touch rearwards: switches off front foglamps.
Note:
The rear foglamps must only be used when visibility is severely reduced (fog, snow).
Headlamps adjustment
You are advised to adjust the aim of the headlamps in accordance with vehicle load.
In the dashboard on the right hand side of the steering column.
0Empty
1Lightly laden
2Half laden
3Fully laden
Note: Vehicles equipped with Xenon headlamps have automatic headlamp adjustment as a function of vehicle load.
In conditions of poor visibility, if the ambient brightness does not trigger the automatic lighting, it is up to you to switch on your dipped beams manually, as well as your foglamps.
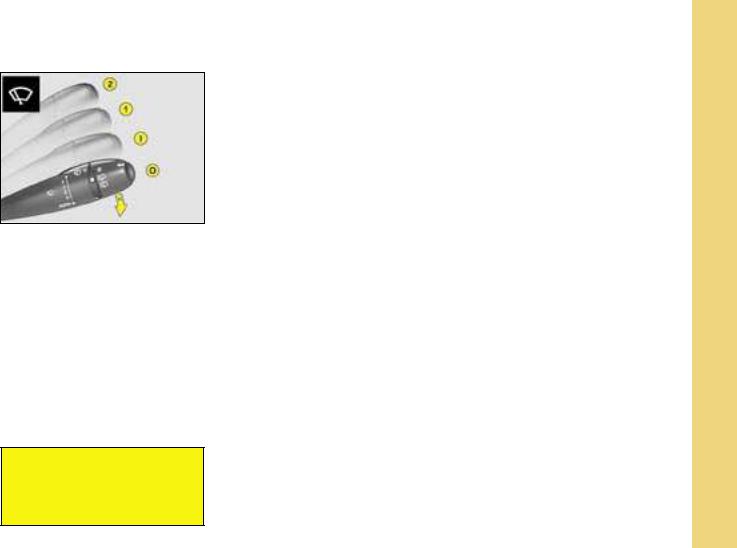
Windscreen wiper stalk 2 Fast speed
1 Normal speed I Intermittent
0 Stop
Press downward for:
-automatic wipe,
-single wipe.
As a safety precaution, the wiper system is deactivated approx.
1 minute after the ignition has been switched off.
S C R E E N W I P E |
I |
|
Position I: The timing of the intermittent wipe adjusts automatically to the |
|
|
speed of the vehicle. |
|
|
Position 1 or 2: when stationary, the windscreen wiper speed automati- |
|
|
cally reduces. |
|
|
As a safety precaution, the wiper system is deactivated approx. |
|
|
1 minute after the ignition has been switched off. |
|
|
On switching the ignition back on, to reactivate the function: |
|
|
- return to the Stop position, |
|
|
- change to the position desired. |
BRIEF |
|
- Go to position I then return to position 0 or, |
||
Vehicle fitted with a rain sensor. |
|
|
Press downwards: Automatic wipe activated. |
|
|
Note: A press downwards triggers a single wipe, but without deactivating |
|
|
automatic wipe. |
|
|
Deactivation of automatic wipe: |
|
|
- Stop the engine. |
IN |
|
WARNING: |
||
|
||
Do not cover the rain sensor, which is visible from the outside of the |
|
|
wind-screen, behind the interior rear view mirror. |
|
|
For vehicle washing, it is essential to switch off the ignition or deactivate |
|
|
the automatic wipe. |
|
17
I
IN BRIEF
18
B
A
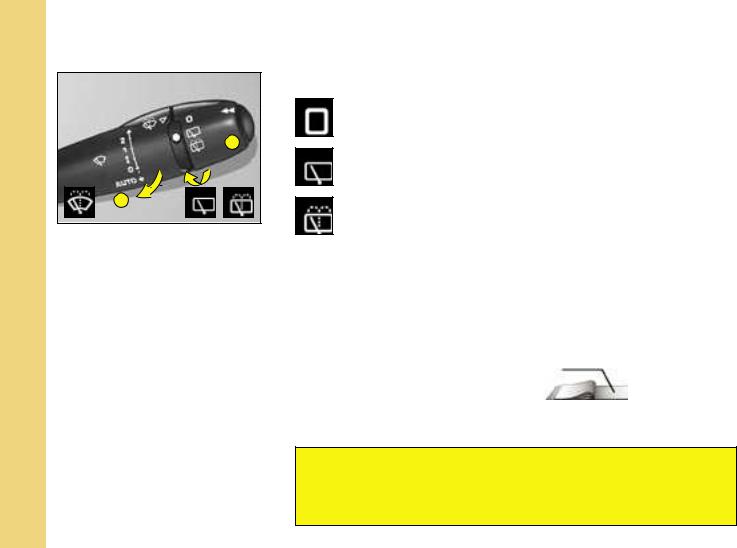
A - Windscreen washer
To operate the windscreen wash, pull the wiper stalk towards you.
Screen wash is accompanied by a timed screen wipe, the headlamp wash also operates if dipped beams are switched on.
S C R E E N W I P E
B - Rear screen wiper
To deactivate
Intermittent rear wipe.
Timed rear screen wash / wipe.
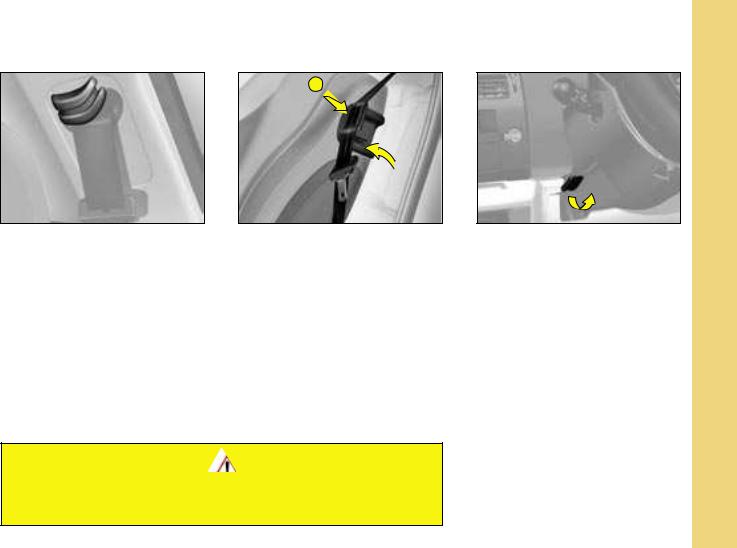
Changing the wiper blades
The wipers should be stopped in the maintenance position (during replacement).
For this, switch off the ignition then, within one minute, action the wiper stalk. The wipers will position themselves to the centre of the windscreen.
After replacement, the wipers resume their normal position once the ignition has been switched on and there is an action on the wiper stalk.
Automatic operation
This function is active when the windscreen wipers are operating and you engage reverse gear.
Activation / deactivation of this function is possible in the menu
“Personalisation - Configuration” 51/54 of the “Main menu”.
Deactivation may be necessary when a bicycle-carrier is installed on the tailgate.
Always check that the windscreen and rear screen wipers can operate freely, for example if fitting a bicycle carrier,
or in freezing temperatures.
Remove any accumulation of snow from the base of the windscreen.
S E A T B E L T S T E E R I N G
H E I G H T C O L U M N
A D J U S T M E N T A D J U S T M E N T
I
Seat belt height adjustment (5-door model)
The correct positioning for the seat belt anchorage is mid-shoul- der height (see chapter USER PRECAUTIONS).
To adjust it, pinch the control and slide it in the desired direction.
A
Holding the seat belt (3-door model)
Raise then lock part A, to retain the seat belt buckle when it is unfastened.
It is necessary to remove the seat belt from the buckle retainer before moving the seat to access the rear seat positions.
Both the height and reach of the steering wheel can be adjusted.
With the vehicle at rest, first adjust the seat to the most suitable position, then adjust the position of the steering wheel.
See “Driving position”.
Unlock the steering by pulling the control towards you. Adjust the steering wheel position then lock by pushing the control fully downwards.
If you press firmly downwards on your steering wheel after locking, you may hear a slight click. The steering is then in its definitive position.
IN BRIEF
As a matter of safety, these actions should not be attempted when the vehicle is moving.
19
I |
F R O N T |
S E A T S |
BRIEFIN
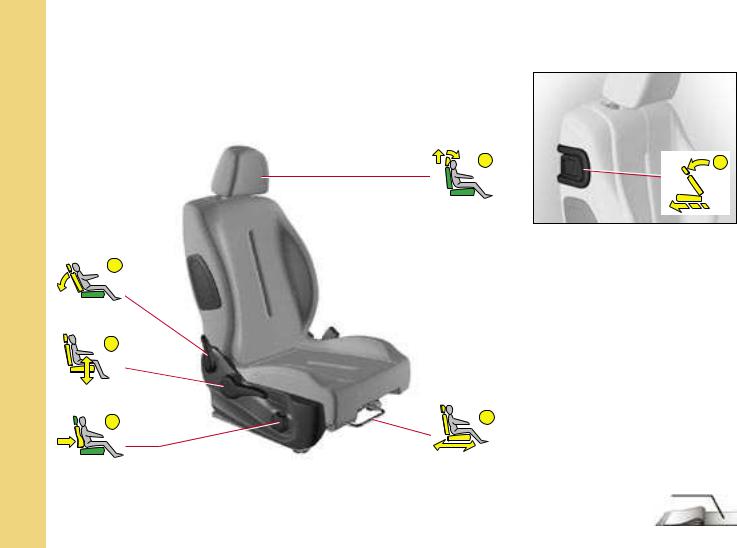
1 |
6 |
5
4
3 |
2 |
|
86
20

F R O N T S E A T S I
Manual adjustments
1 |
Head restraint |
|
To raise, pull upwards. To lower, press on the unlocking button and on the head restraint. The |
||
|
||
|
adjustment is correct when the upper edge of the restraint is level with the top of your head. The |
|
|
head restraint is also angle-adjustable. |
|
|
To remove, press on the unlocking button and pull upwards. |
|
|
Note: Never drive the vehicle without the head restraints fitted. |
|
2 |
Reach |
|
Lift the control bar and adjust to the desired position. |
||
|
||
3 |
Lumbar supports |
|
Turn the control and adjust to the desired position. |
||
|
||
4 |
Driver’s seat height |
|
Raise or lower the control the number of times required to obtain the desired position. |
||
|
||
5 |
Backrest angle |
|
Use the control A to adjust the backrest angle. |
||
|
||
|
It is possible to recline the backrest to an angle of 45° by tilting it until it locks; press the control to |
|
|
unlock. |
IN BRIEF
6Access to the rear seats
To access or exit the rear seat positions, tilt the control 6 towards the front to fold the front seat back-rest and slide the front seat forwards.
Afterwards the front seat will revert to its initial position. Make sure that the seat is securely locked in place.
Note: This control holds the seat belt in position (see preceding page). |
21 |
I |
|
F R O N T S E A T S |
||
|
|
|
Electrically operated |
|
|
|
|
||
|
|
|
adjustments |
|
|
|
|
|
Adjustment of seat height, |
|
|
1 |
|
angle and reach |
|
2 |
Adjustment of backrest |
||
|
|
|
|
angle and lumbar support |
|
|
|
|
|
BRIEF |
|
Raise or lower the front of control 1 to make the front of the seat |
|
cushion higher or lower. |
|
|
|
|
|
|
lower.Raise or lower the rear of control 1 to make the seat higher or |
|
|
|
IN |
|
Action control 1 to the front or to the rear to move the seat for- |
|
||
|
||
|
ward or back. |
|
|
|
Pushangle.the top of control 2 forward or back to adjust the backrest
Raiseport. or lower control 2 to increase or decrease the lumbar sup-
Note: The seats can still be moved on a temporary basis:
-when opening one of the front doors.
-after switching off the ignition.
Heated seats
The front seats can be heated independently. Use the controls placed on the sides of the seats, turning them to select one of three heating levels:
0:Stop.
1:Gentle heat.
2:Medium heat.
3:Strong heat.
The seat temperature will adjust accordingly.
Note: The heated seats will only operate when the engine is running.
22
F R O N T S E A T S I
M
2
1
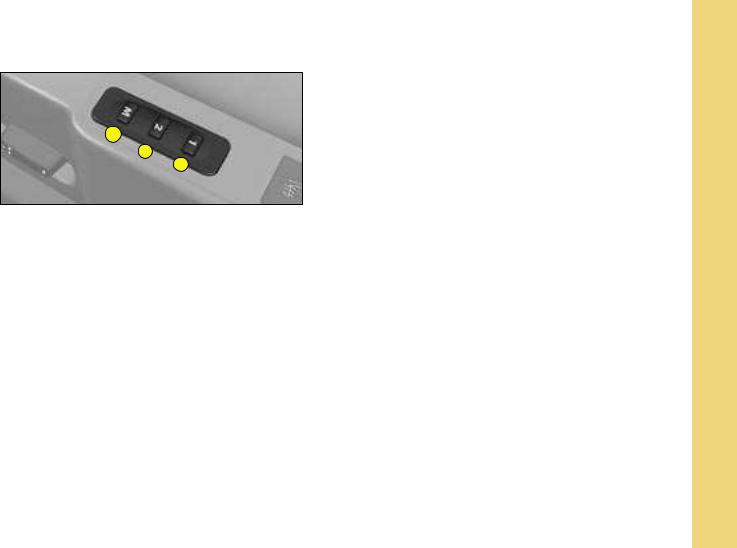
Memorisation of driving positions
You have the possibility to memorise two driving positions, via the buttons M/1 and M/2.
Memorisation using the buttons
To memorise, using the buttons located on the side of the seat:
-turn the ignition key to the drive position (2nd notch),
-adjust your seat and your exterior rear view mirrors,
-press on button M then immediately on button 1 «first driving position» or on button 2 «second driving position».
The memorisation is recognised by an audible signal. Memorising of a new position cancels the previous one.
Recall of a memorised driving position Vehicle stopped (ignition on or engine running)
-Press briefly on button 1 or 2 to recall the corresponding memorised position.
Note: after five consecutive recalls of a memorised position, this function will be deactivated until the engine is started.
Vehicle moving
- Keep button 1 or 2 pressed to recall the corresponding memorised position.
IN BRIEF
23
I
I N T E R I O R R E A R V I E W M I R R O R
IN BRIEF
24
Manual interior mirror
The lever on the lower edge enables you to place the rear view mirror in either of two positions:
Day position: the lever is not visible.
Night position (antidazzle): the lever is visible.
1 2
Automatic photochromic interior rear view mirror
This provides an automatic and progressive changing between day use and night use.
To avoid causing dazzle, the mirror automatically becomes darker as a function of the intensity of light coming from the rear. It becomes lighter as soon as brightness diminishes, thus ensuring optimal vision.
To operate
Switch on the ignition and press control 1.
-Warning lamp 2 on: automatic mode.
-Warning lamp 2 off: automatic mode stopped. The mirror remains in its lightest definition.
Note: for optimal vision, the mirror lightens automatically when reverse gear is engaged.
Permit holder
The athermic windscreen incorporates a zone located either side of the rear view mirror base, to allow the reading of access cards (e.g. motorway toll passes).
1
2
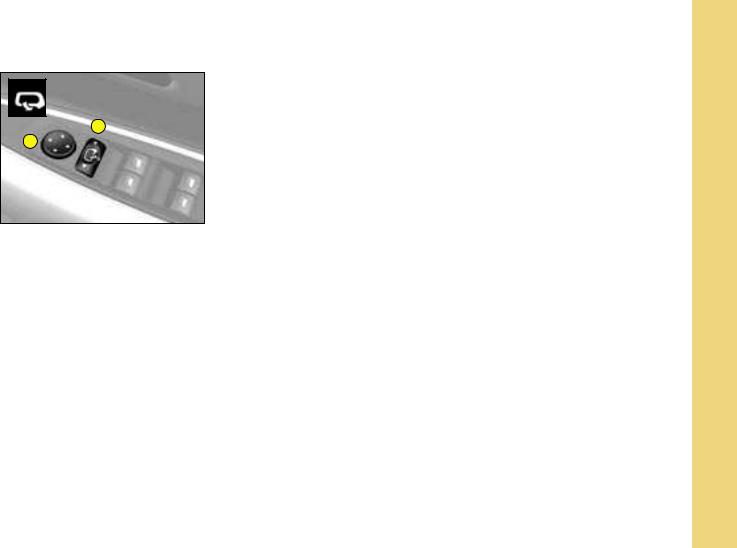
Adjustment of rear view mirrors
Functions with ignition switched on.
From the driver’s position, select the rear view mirror via the control 1, then adjust in the four directions by moving the control 2.
Deicing of rear view mirrors is coupled with electric demisting of the rear screen.
D O O R M I R R O R S
Fold-back of door mirrors
When the vehicle is parked, the door mirrors can be folded back either manually or electrically.
Electric fold-back
From the central position, one press towards the rear on control 1 folds the rear view mirrors back.
To return them to the initial position, press again on the control towards the rear.
Automatic fold-back
Automatic fold-back operates when you lock the doors with the remote control.
The opposite movement applies when you unlock the doors, except if you operated fold-back before switching off the ignition.
Note: Automatic fold-back of the rear view mirrors can be deactivated. Consult your CITROËN dealer.
Adjustment of the indexed positions for the passenger’s and driver’s rear view mirrors
With the engine running:
-Select the rear view mirror using control 1.
-Engage reverse gear, the mirror glass automatically positions itself to improve your vision of the pavement.
-If necessary, adjust the mirror to your preference using the electric control 2.
Deactivation of the rear view mirror indexing function
To deactivate the function, move control 1 to the central position.
I
IN BRIEF
25
I
IN BRIEF
26
Electric operation
The driver uses the controls located on the door to operate the vehicle’s electric windows.
Note: the electric windows can also be operated for a limited time after the ignition has been switched off (including after the front doors have been opened).
Sequential control
An action on the control to the first notch causes a window movement which stops as soon as the control is released. An action on the control to the second notch causes the window to close or open fully, a further press on the control stops the movement.
W I N D O W S
Anti-pinch device
An anti-pinch device stops the window from rising. If it meets an obstacle, it goes back down.
After a battery disconnection or in the event of a malfunction, you have to re-initialise the anti-pinch function:
-Lower the window fully using the control, then close. It will rise only a few centimetres.
-Press repeatedly on the control until the window is fully closed. Warning: During this operation, the anti-pinch protection does not work.
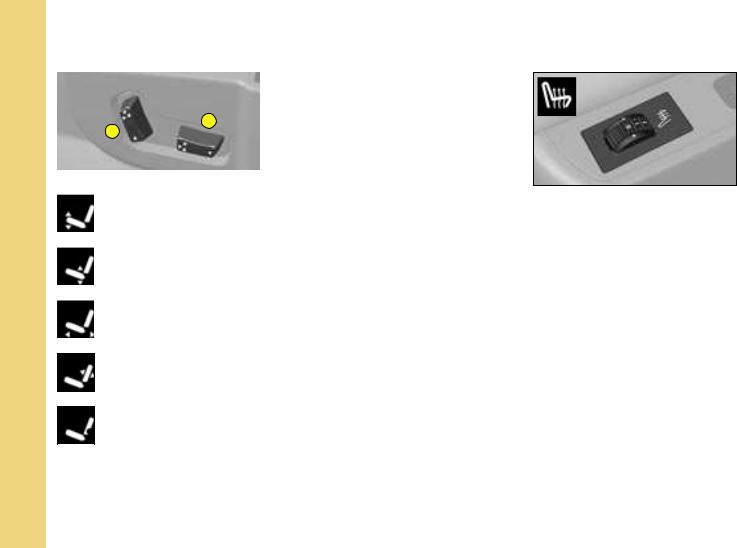
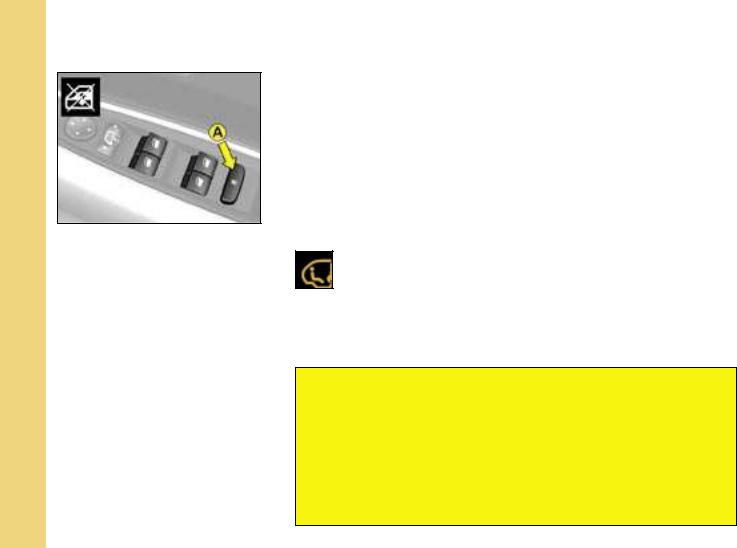
Child safety
This prevents the rear windows from being operated, and the rear doors from being opened, from the rear seat positions.
It is activated by means of a press on control A located on the electric windows control panel. The warning lamp in the instrument
panel lights up for approx. 10 seconds.
Each time the ignition is switched on, the warning lamp comes on for approx. 10 seconds.
Opening of the doors from the outside and operation of the rear electric windows remain possible from the front of the vehicle.
ALWAYS PAY ATTENTION TO WHERE CHILDREN ARE WHEN
OPENING OR CLOSING WINDOWS.
-Always remove the ignition key when leaving the vehicle, even for short periods.
-If the driver is operating the passenger’s electric window control, the driver should ensure that no passenger is obstructing the window from closing.
-The driver should check that the electric windows are used properly by the passengers.
-Should there be any risk of a person becoming trapped by a window closing, you should immediately reverse the window movement. To do this, reverse the position of the control concerned.
I
IN BRIEF
30
3 4
1
2
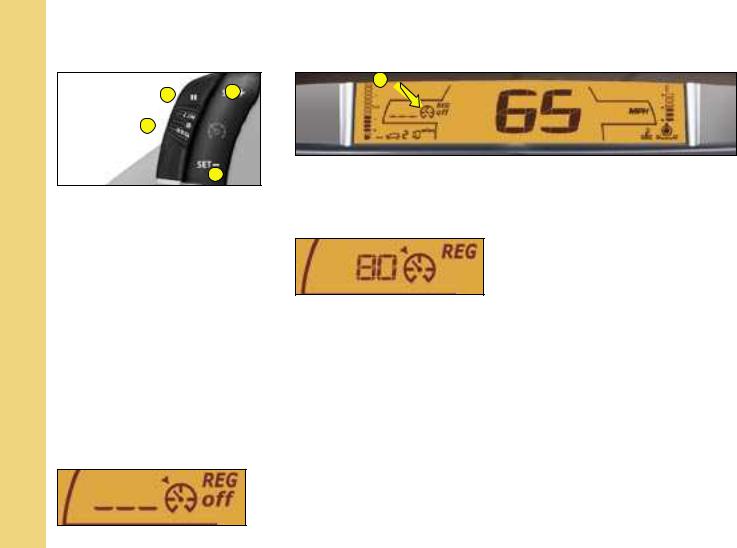
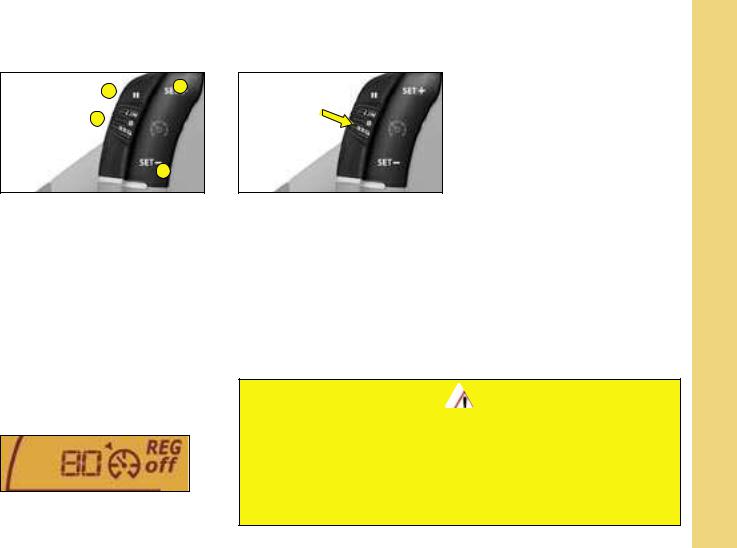
This driving assistance function allows you to drive at the speed of your choce without the need to action the accelerator. It is available at speeds above 40 km/h (25 mph), in the higher gears only.
Control A for cruise control is located below the lighting/signalling stalk.
Note: Information relating to the cruise control is displayed in zone A of the instrument panel.
To select the function
Turn control 1 to position “REG”.
To select a cruising speed
At the time you select the function via the control 1, there is no cruise speed previously memorised:
C R U I S E C O N T R O L
A
Accelerate to the desired speed, then press button 2 or button 4. The cruise speed will then be memorised and displayed in zone A on the instrument panel.
You can then release the accelerator pedal. The vehicle will automatically keep to that chosen speed.
Note: The vehicle speed may vary slightly from that memorised.
Adjustment of the memorised speed while cruise control is in operation
To adjust the memorised speed, displayed in zone A, press on:
-button 4 to increase the speed,
-button 2 to decrease the speed.
Note: you can use successive presses to modify the cruise speed in steps of 1 km/h and a continuous press to jump in steps of 5 km/h.
To exceed the cruise speed temporarily
While cruise control is in use, it is always possible to go above the cruise speed simply by pressing the accelerator pedal (for example to overtake another vehicle). The speed displayed in zone A flashes.
You have only to release the accelator pedal to return to your cruise speed.
Note: if during cruise control the system cannot keep to the cruise speed (e.g. on a steep descent), then the speed flashes. If necessary, brake to curb your speed.
C R U I S E C O N T R O L
I
3 4
1
2
Deactivation of cruise control with memorised speed
-Either by pressing the brake pedal or the clutch pedal.
-Or with a press on button 3.
-Or when ESP or ASR is active.
Note: cruise control is disengaged when the gear lever is in neutral position.
These actions bring up the display “OFF” in zone A in the instrument panel.
These actions do not cancel your cruise speed which remains displayed on the instrument panel.
Reactivation of cruise control
-by recalling the memorised speed:
Following a deactivation, press on button 3. Your vehicle automatically resumes the memorised cruise speed displayed in zone A.
-by selecting the current speed:
Press on button 2 or 4 as soon as the desired speed is reached. The information “OFF” will then disappear from zone A.
To cancel the function
-by moving the control from position “REG” to position 0.
-by stopping the engine.
The cruise speed chosen previously is no longer memorised.
In the event of a malfunction, a message is displayed, accompanied by a sound signal and lighting of the SERVICE warning lamp.
Consult your CITROËN dealer.
IN BRIEF
Cruise control must only be used where road conditions permit driving at a constant speed.
Do not use it on congested roads or when weather and road conditions are poor.
The driver must still remain attentive and in complete control of the vehicle.
You are recommended to keep your feet within range of the pedals.
31
I
IN BRIEF
32
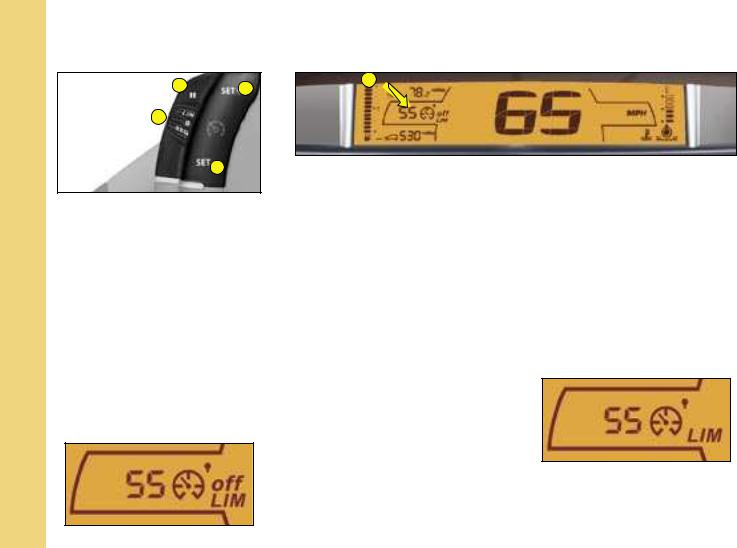
3 4
1
2
This driving assistance device allows you to select a maximum speed that you wish not to exceed. This has to be a speed greater than 30 km/h (approx. 20 mph).
The speed limiter controls are located on the steering wheel.
Note: The information relating to the limiter is displayed in zone A of the instrument panel.
To select the function
Turn control 1 to position “LIM”.
On selection of the function, the last speed memorised and the information “OFF” will appear:
S P E E D L I M I T E R
A
To adjust the maximum speed
Provided the engine is running, you can adjust the memorised maximum speed, with short or long presses on:
-button 4 to increase the memorised maximum speed,
-button 2 to decrease the memorised maximum speed.
Note: successive presses modify the memorised speed in steps of 1 km/h (1 mph), a continuous press in steps of 5 km/h (3 mph).
Activation of the maximum speed
When the desired maximum speed is displayed, press button 3 to activate the limitation.
The information “OFF” then disappears from zone A.
While the function is active, pressing the accelerator pedal will not enable you to go beyond the programmed speed unless you press the pedal hard down past the tight spot (see “Temporary exceeding of the maximum speed”).
Note: The vehicle speed may vary slightly from that memorised.

Deactivation of the maximum speed
Press button 3.
The information “OFF” will appear on the instrument panel screen.
This action does not cancel the memorised maximum speed, which remains displayed in zone A of the instrument panel.
S P E E D L I M I T E R
Temporary override of the maximum speed
You can exceed the memorised maximum speed at any time by pressing the accelerator pedal hard down past the tight spot.
During the time the limit speed is being exceeded, the displayed speed flashes.
You have only to release the accelerator pedal to return below the maximum speed, thus keeping the function active.
Note: if during speed limitation, the system cannot keep to the maximum speed (especially on a steep descent or if you accelerate too hard) the speed flashes. Adapt your speed as necessary.
The function will re-engage when your speed has returned below the desired maximum.
To stop the function
-move the control from position “LIM” to position 0.
-or stop the engine.
The speed that you chose is memorised.
In the event of a malfunction, a message is displayed, accompanied by a sound signal and lighting of the SERVICE warning lamp. Consult your CITROËN dealer.
I
IN BRIEF
A floor carpet not recommended by CITROËN risks sliding under the accelerator pedal, thus preventing you from pressing past the tight spot.
It will then be impossible to exit from the desired limitation, unless by acting on the steering wheel control.
The driver must still remain attentive and in complete control of the vehicle.
33
I
IN BRIEF
6 - S P E E D E L E C T R O N I C G E A R B O X S Y S T E M
The 6-speed electronic gearbox offers you a choice of two driving modes :
-automatic mode,
-manual mode, with two methods of control : the controls under the steering wheel and the gear selector on the central console.
For each of these two modes, a Sport option, corresponding to a more dynamic driving style, is also available.
61 65
Reverse gear
|
|
|
|
|
Neutral |
|
|
|
|
|
|
|
|
When the vehicle is mov- |
|
||
|
|
|
|
|
ing, do not select this |
|
||
|
|
|
|
|
||||
|
|
|
position, even momentarily. |
|
||||
|
|
|
|
|
Automatic mode |
|
||
|
|
|
|
|
|
|||
|
|
|
|
|
Sport option |
|
|
|
|
|
|
|
|
|
|
||
|
|
|
|
|
|
|
||
|
|
|
|
|
|
|
|
|
|
|
Manual mode |
|
|
|
|||
|
|
|
|
|
||||
|
|
|
|
|
|
|
|
|
• Manual gear changing using the selector : |
or |
• Manual gear changing using the controls |
||||||
|
- push the selector to change up a gear, |
|
under the steering wheel: |
|||||
|
- pull the selector to change down a gear. |
|
An action on one of the controls under the steering |
|||||
|
|
|
|
|
|
|
wheel «+» or «-» gives you an immediate change |
|
|
|
|
|
|
|
|
of gear. |
|
Note : During heavy acceleration, a higher gear will not engage if the driver does not action the gear selector or the controls under the steering wheel.
34
6 - S P E E D E L E C T R O N I C G E A R B O X S Y S T E M
I
Starting the vehicle
-To start the engine, the gear selector has to be in position N.
-Press the brake pedal.
-Action the starter.
-When the engine is running, select R, A or M as required.
-Check the position you have engaged in the rev counter.
Note : If the vehicle has been stationary for a long time, or if you have pressed the brake pedal a number of times while stationary, it will be necessary to press the brake pedal hard down in order to authorise the engine to start.
Engaging reverse gear
Only engage reverse gear when the vehicle is completely stationary.
•When the vehicle is moving at very low speed, if reverse gear is requested (position R), this will be taken into account only when the vehicle stops.
The «foot on brake» warning lamp may flash in the instrument panel to remind you to brake.
•If vehicle is moving at high speed and reverse gear is requested, the warning lamp «N» will flash and your vehicle will go automatically into neutral. To re-engage a gear, you have only to return the gear selector to position A or M.
Note : A sound signal indicates when reverse gear is engaged.
If parking assistance is deactivated, the sound signal for reverse gear engaged is absent.
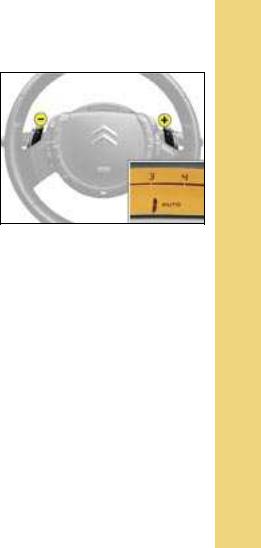
Temporary manual mode
In automatic mode, a touch on the controls under the steering wheel «+» or «-» lets you change gear immediately.
The warning lamp «AUTO» remains displayed in the rev counter.
In the absence of any new action, automatic mode reactivates depending on the driving conditions.
IN BRIEF
35

I
IN BRIEF
H I L L S T A R T A S S I S T
( w i t h 6 s p e e d e l e c t r o n i c g e a r b o x s y s t e m )
To aid starting on a gradient, your vehicle is equipped with a system which keeps it temporarily immobilised.
It keeps the brakes applied for a brief moment, precisely the time taken for moving your foot from the brake pedal to the accelerator pedal.
This function is only active when the vehicle has been completely stationary, with your foot on the brake pedal, in particular conditions on a slope.
Note :
The hill start assist function cannot be deactivated.
Display of these warning lamps indicates a malfunctioning of the hill start assist function.
On an ascending slope, with the vehicle stationary, the vehicle is held for a brief moment when you release the brake pedal, provided you are in A or M.
On a descending slope, provided the vehicle is stationary and reverse gear is engaged, the vehicle is held for a brief moment when you release the brake pedal.
Warning : do not exit the vehicle during the hill start assist phase.
36
 Loading...