


I |
6 |
D a s h b o a r d
|
1 |
2 |
3 |
4 |
5 |
6 |
7 |
8 |
9 |
10 11 |
12 |
13 |
14 |
15 16 17 18 19 20 |
21 |
22 |
IN BRIEF
|
38 |
37 |
36 |
30
35 34 33
30 |
29 |
28 |
27 |
26 |
25 |
24 23 |
31 |
|
|
|
|
|
|
32 |
|
|
|
|
|
|

1Lateral air vents.
2Side window demister vent.
3Loudspeaker (Tweeter).
4Passenger’s airbag.
5Interior temperature sensor.
6Locking of the rear electric windows.
7Centre air vents.
8Controls:
•Air conditioning automatic.
9• Hazard warning lamps.
•Doors and tailgate central locking control (vehicle with ESP).
10Sunlight sensor.
11Digital display.
12Controls:
•Air conditioning.
•Rear screen demister.
13• Doors and tailgate central locking control (vehicle without ESP).
•ESP.
D a s h b o a r d
14Controls:
•Lighting
•Direction indicators
•Front foglamps
•Foglamp
•Navigation recall.
15Cruise control / speed limiter.
16Driver's airbag.
17Horn.
18Loudspeaker (Tweeter).
19Radio control under the steering wheel.
20Side window demister vent.
21Controls:
•Windscreen wiper
•Screen wash
•Rear screen wiper
•Trip computer.
22Side air vent.
23Key-operated switch:
•Passenger's airbag activation/deactivation.
24Electric door mirrors adjustment.
25Fuse box and glasses holder cover.
|
|
|
7 |
I |
|
26 |
• Dashboard |
lighting rheo- |
|
||
|
stat. |
|
|
|
|
|
• Headlamps adjustment. |
|
|||
27 |
Rear electric window controls. |
|
|||
28 |
Steering |
lock |
and ignition |
|
|
|
switch. |
|
|
|
|
29 |
Steering |
column adjustment |
F |
||
EI |
|||||
|
lever. |
|
|
||
|
|
|
|
||
30 |
Front electric window controls. |
R |
|||
|
|
|
|
||
31 |
Cigar lighter. |
|
B |
||
|
Control: |
|
|
|
|
|
• Heated seats. |
N |
|||
32 |
Ashtray. |
|
|
||
|
|
I |
|||
|
|
|
|
||
33 |
Centre console storage box. |
|
|||
34 |
Control: |
|
|
|
|
|
• Heated seats. |
|
|||
35 |
Gear lever. |
|
|
||
36 |
Radio housing or oddments |
|
|||
|
pocket. |
|
|
|
|
37 |
Glovebox. |
|
|
||
38 |
Bonnet release lever. |
|
|||
|
|
|
|
|
|

W A R N I N G L A M P S
9 I
Sidelamps
See “Signalling”
Dipped beam
See “Signalling”
Main beam
See “Signalling”
Foglamps
See “Signalling”
Front foglamps
See “Signalling”
LH direction indicator
RH direction indicator
See “Signalling”
All the direction indicators flash simultaneously when the hazard warning lamps are switched on.
Front passenger’s airbag deactivation warning lamp
See “Airbags”
Airbag warning lamp
A warning lamp in the instrument panel lights for a few seconds each time the igni-
tion is switched on. If there is a fault, it flashes for a few minutes then remains permanently on. In this case, or if it does not light at all, consult your CITROËN Dealer at the earliest opportunity.
Engine autodiagnosis
If it flashes or lights while the engine is running, it indicates a fault within the fuel injection, ignition or antipollution systems.
Consult a CITROËN dealer as soon as possible.
Handbrake and low brake fluid level warning
When the engine is running, this warning lamp indicates that the handbrake is applied or incompletely released, that the brake fluid level is insufficient, or that the braking system is malfunctioning.
If the warning lamp lights, stop immediately and contact the nearest CITROËN dealer.
See Chapter “Brakes” and Chapter “Levels”.
IN BRIEF
I 10
W A R N I N G L A M P S
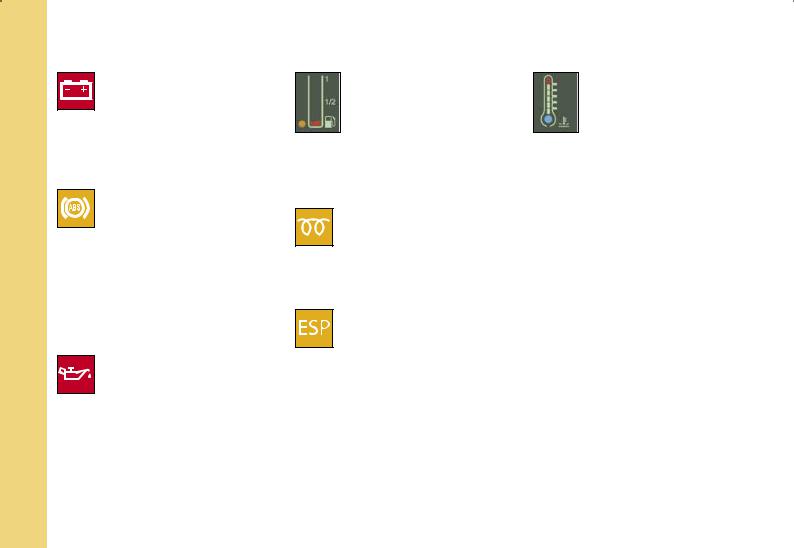
Battery charge
Should not be lit when the engine is running. If it lights permanently, contact
a CITROËN Dealer.
F |
Antilock Braking Sys- |
|
E |
tem |
|
The ABS warning lamp |
||
I |
||
lights when the ignition is |
||
R |
||
switched on and should go out af- |
||
ter a few seconds. |
||
B |
||
If the warning lamp does not go |
||
out, there may be a system mal- |
||
|
||
IN |
function. (See Chapter “Brakes”). |
|
|
Engine oil pressure
If it lights while you are driving, stop the engine, check the level, (see
Chapter “Levels”). If it remains lit despite the level being correct, contact a CITROËN Dealer.
Low fuel level warning lamp
If this comes on permanently, on horizontal ground, there remain around 8 litres in the case of a petrol vehicle, approx. 5 litres for a
diesel vehicle.
Diesel Preheater
See the instructions for starting the engine.
Refer to Chapter II “Start-
ing”.
ESP warning lamp
Coolant temperature warning lamp
If the red warning lamp lights, stop immediately,
turn off the engine, the cooling fan may continue to operate for a certain
time. Let the engine cool down, taking the precautions indicated (see Chapter “Levels”).
Contact a CITROËN dealer.
In operation
If either the ESP or traction control (ASR) is active, the ESP warning lamp flashes.
In the event of a problem
When the vehicle is moving, the lighting of the ESP warning lamp, accompanied by the message “ESP/ASR NOT IN USE” on the multifunction screen, indicates a malfunctioning of the system. Contact a CITROËN dealer
Deactivation
Lighting of the ESP warning lamp on deactivation of the system is accompanied by the message “ESP/ASR DEACTIVATED” on the multifunction screen.
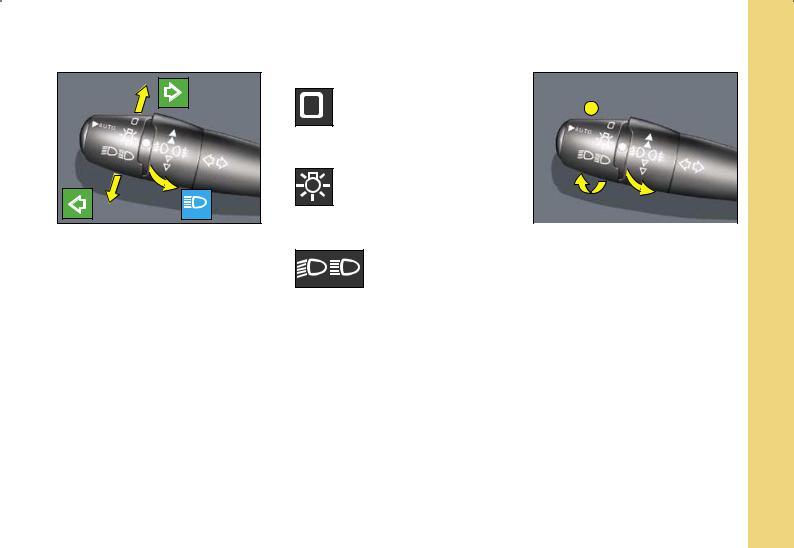
Direction indicators
Left: move the stalk downwards. Right: move the stalk upwards. Movement of the steering wheel returns the stalk to the off position automatically.
Headlamp flash
Pull the stalk towards you to flash headlamps.
The headlamp flash operates even with the ignition off.
Horn
Press one of the spokes of the steering wheel.
S i g n a l l i n g
Lighting control switch
All lighting off
Turn the barrel A forward.
Sidelamps
Turn the barrel A forward.
Dipped/main beam Dipswitch
Pull the stalk towards you to change from dipped beam to main beam and vice versa.
Audible warning - lamps left on
If the lamps have been left on when a front or rear door is opened and the ignition is off, a warning buzzer sounds. This warning will stop on closing the door, on turning the lamps off or on switching on the ignition.
Timed lighting of the headlamps
With the ignition switched off, the headlamps can be switched on for one minute by pulling the stalk towards you, after which they are automatically turned off. This function is of particular use for leaving the vehicle when parked in a poorly lit area.
11 I
A
|
IEF |
|
|
||
Automatic lighting of headlamps |
R |
|
Sidelamps and dipped beam light |
||
B |
||
automatically whenever natural |
||
light conditions are poor or when |
|
|
the windscreen wipers are in con- |
N |
|
tinuous operation. |
||
They extinguish when natural light |
||
I |
||
is sufficient or when the wipers |
||
|
||
cease operating. |
|
To activate or deactivate the function
-With the engine switched off, place the ignition key in the “Accessories” position.
-Place the lighting stalk in position 0.
- Press at the end of the control. A sound signal (beep) accompanied by a message confirms that the function is activated.
Do not cover the brightness detector located at the bottom of the centre of the windscreen, visible from outside the vehicle.
I 12 |
S i g n a l l i n g |
|
|
|
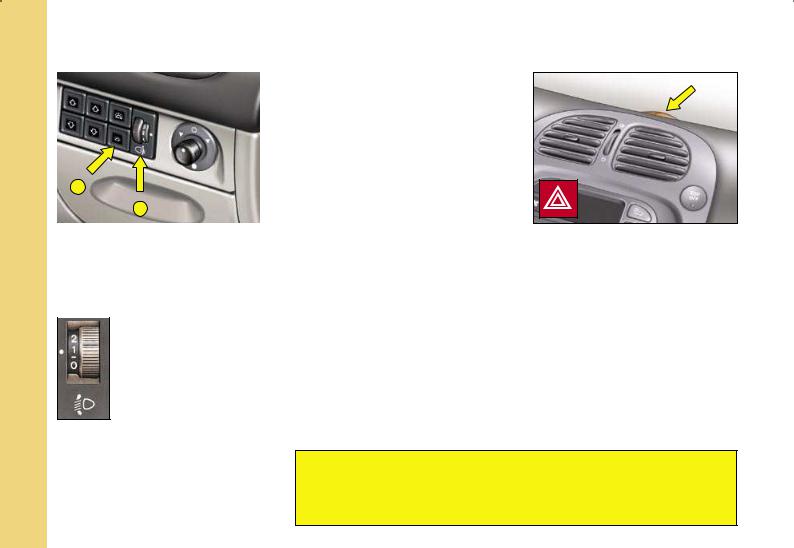
Hazard warning lamps |
|
|
|
|
Operates the direction indicators si- |
|
|
|
|
multaneously. |
|
|
|
|
Use only in case of danger, |
|
|
|
|
emergency stop or in hazardous |
|
F |
|
|
conditions. |
|
A |
Also operates with the ignition off. |
|||
|
|
|
||
IE |
|
B |
|
|
|
|
|
||
|
|
|
||
R |
A - Dashboard lighting |
|
||
The lighting intensity of the dashboard display can be adjusted. |
||||
B |
||||
Move the rheostat control. |
|
|||
IN |
|
B - Headlamps adjustment |
||
|
||||
|
|
|||
You are advised to adjust the aim of the headlamps in accordance with vehicle load.
Position 0: Driver only, or driver + one passenger. Position –: Driver + 2 passengers.
Position 1: Driver + 4 passengers.
Position 2: Driver + 4 passengers + luggage. Position 3: Driver only + maximum authorised load.
Emergency lighting of hazard warning lamps
Sudden braking or abrupt deceleration will provoke automatic operation of the hazard warning lamps.
These will go out automatically on acceleration or manually by pressing the hazard warning lamp button on the dashboard.
The direction indicators will not work when the hazard warning lamps are in use.

B
Vehicles with REAR FOGLAMPS (Barrel B)
Rear foglamps off
Turn the barrel B forward.
Rear foglamps on
The warning lamp will illuminate. The rear foglamps will only operate if the dipped or main beam headlamps are on.
Switch off automatically when the sidelamps are turned off.
S i g n a l l i n g |
13 I |
Vehicles with
FRONT AND REAR FOGLAMPS (Barrel C)
Front and rear foglamps off
|
|
|
C |
F |
||
Turn the barrel C forward. |
||||||
IE |
||||||
|
|
|
|
|
||
|
|
|
|
|
||
|
Front foglamps on |
|||||
|
R |
|||||
|
|
|
|
|
||
|
|
|
|
|
||
The front foglamps will only operate if the sidelamps, dipped or main beam |
B |
|||||
headlamps are switched on. |
||||||
|
||||||
Turn barrel C towards the front. |
IN |
|||||
|
|
Front and rear foglamps on |
||||
|
|
|||||
|
|
|
||||
|
|
|
|
|
|
|
These will only operate with sidelamps or dipped beams on.
Switching off lamps:
1st action rearwards: rear foglamps switch off. 2nd action rearwards: front and rear foglamps off.
NOTE: The rear foglamps must only be used when visibility is severely reduced (fog, snow).
In foggy conditions, if ambient light is not poor enough for the lamps to come on automatically, it is up to the driver to switch on dipped beams manually, and to select foglamps if required.
I
I N B R I E F
14
3
2
1
0
4
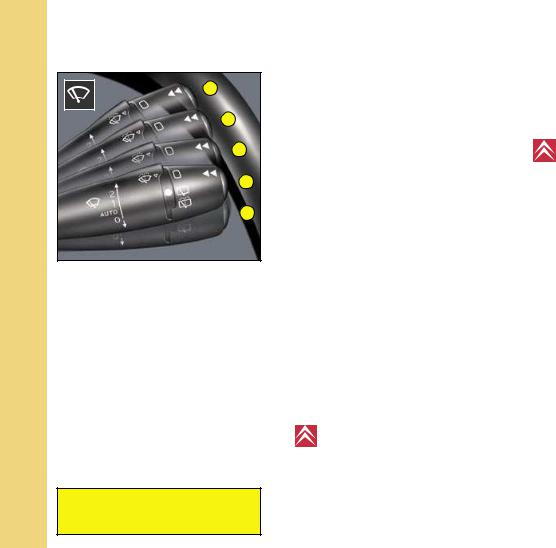
Windscreen wiper stalk 3 Fast speed 2 Normal speed
1 Intermittent or automatic wipe
0 Stop
4 Single wipe – Press the stalk downwards
Vehicle not fitted with a rain sensor.
Position 1: The timing of the intermittent wipe adjusts automati-
cally to the speed of the vehicle. Note: In position 2 or 3: when
stationary, the windscreen wiper speed automatically reduces.
For safety, the wiper system is deactivated when the ignition is switched off.
V I S I B I L I T Y
Vehicle fitted with a rain sensor.
Position 1: Intermittent wipe intervals adjust automatically ac-
cording to rain intensity.
Note: In position 2 or 3: when sta tionary, the windscreen wiper speed automatically reduces.
For safety, the wiper system is deactivated when the ignition is switched off.
When switching the ignition on,
to reactivate the function: - return to the Stop position,
- change to the desired position.
The activation of the function is signalled by one wipe.
Advice
WARNING:
Do not cover the rain sensor, which is situated at bottom centre of the windscreen and visible from the driving position.
Advice
Washing the vehicle: switch off the ignition.
A sound alert (beep) accompanied by a message when you activate the automatic wipe mode, indicates that this system is malfunctioning.
The windscreen wipers can be stopped in maintenance position (for repairs).
For this, switch off ignition, push the wash/wipe control stalk downwards. To return to the stop position, simply move the stalk again.
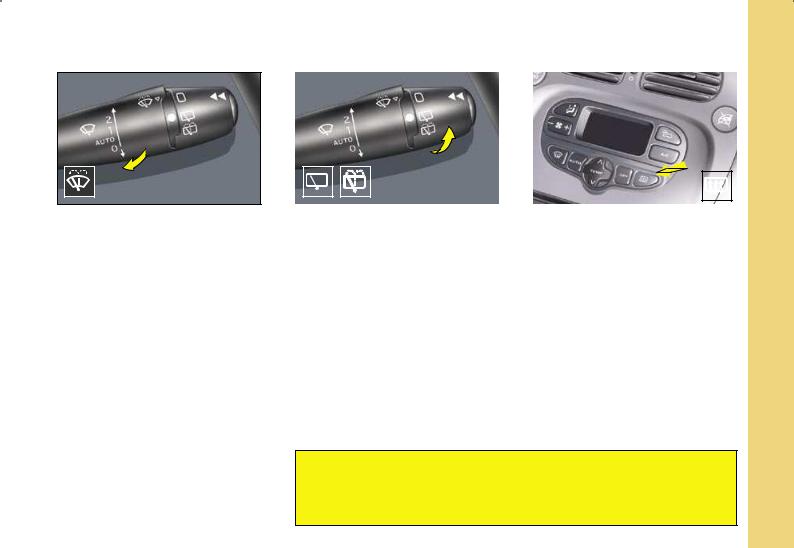
Windscreen washer
Pull the stalk towards you to operate a timed wash/wipe sequence (three cycles).
|
V I S I B I L I T Y |
15 |
|
|||||
|
|
|
|
|
|
|
|
|
|
|
|
|
|
|
|
|
|
|
|
|
|
|
|
|
|
|
|
|
|
|
|
|
|
|
|
|
|
|
|
|
|
|
|
|
|
|
|
|
|
|
|
|
|
Rear screen wipe 1st position - Stop
2nd position – Intermittent rearwipe
3rd position - Wash and timedrear wipe
Automatic operation
When the windscreen wipers are operating and on engaging reverse gear.
Rear screen demister
Only operates if the engine is running.
Press the control once to start electric demisting of the rear screen (and exterior rear view mirrors).
Switches off automatically after approx. twelve minutes to prevent excessive consumption of power.
Press the control once to stop demisting.
Always check that the windscreen and rear screen wipers can operate freely, for example if fitting a bicycle carrier,
or in freezing temperatures.
Remove any accumulation of snow from the base of the windscreen.
I
IN BRIEF
I
NI B IR FE
16 |
F R O N T |
S E A T S |
|
|
|
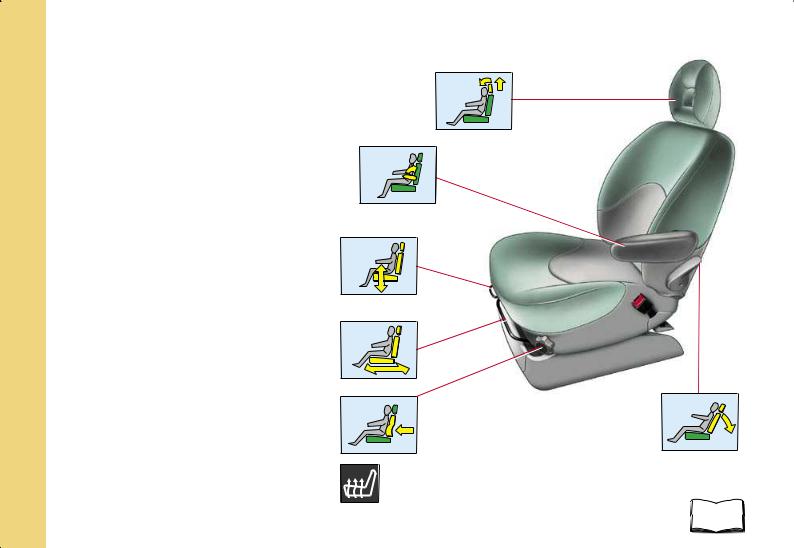
Head restraint |
|
|
Height and angle adjustable. |
|
|
To remove, press on the unlocking button and pull up- |
|
|
wards. |
|
|
Armrest |
|
|
Can be lifted up and removed : tilt to 45°, press |
|
|
the button located between the armrest and the |
|
|
side of the backrest, and pull out. |
|
|
Driver's seat height |
|
|
Use the control to adjust to the required po- |
|
|
sition. |
|
|
Reach |
|
|
Lift the control bar and adjust to the desired |
|
|
position. |
|
|
Lumbar supports |
|
Backrest angle |
Turn the control and adjust to the desired |
Use the control to adjust the back- |
|
position. |
|
rest angle. |
Heated seats |
|
The front seats can be heated individually. Use the controls |
|
located on the dashboard. |
|
The temperature is automatically regulated. |
67 |
The heated seats will only operate when the engine is |
|
running. |
|
S T E E R I N G C O L U M N A D J U S T M E N T |
17 I |
The height of the steering wheel can be adjusted to suit the driver.
With the vehicle at rest first adjust the seat to the most suitable position (see “Driving position”).
Unlock the steering wheel by pushing the control forwards.
Adjust the steering wheel then lock by pulling the control downwards and towards you.
I N BRI EF
As a matter of safety, these actions should not be attempted when the vehicle is moving.
I
I N B R I E F
18
A
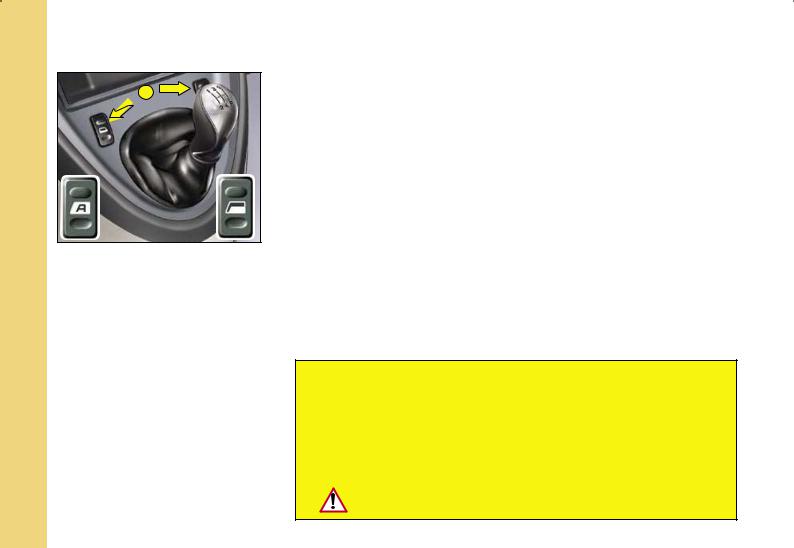
Electric operation
From the driver’s position, the switches on the centre console allow the front windows of the vehicle to be opened and closed.
W I N D O W S
Driver's window
Sequential control
One touch on A makes the window close or open fully, a second touch stops the movement.
A long press causes a window movement which stops as soon as you release.
Anti-pinch on the driver’s window
An antipinch device stops the window from rising if it meets an obstacle, and reverses the direction.
After a battery disconnection or a malfunction, you should reinitialise the anti-pinch function:
-Press control A to open the window fully, then press to close it again, it will rise only a few centimetres. Press A again until the window closes fully.
If the window re-opens in an erratic manner when you try to close it, press control A repeatedly until the window closes fully.
Warning: during this operation the anti-pinch protection is not in force.
Always remove the ignition key when leaving the vehicle, even for short periods.
If pinching occurs during operations on the electric windows, you should reverse the movement of the glass. To do this, press on the control concerned.
When the driver actions the controls of the passenger windows, he should first make sure that passengers are not obstructing the closing of the glass.
The driver should ensure that the passengers operate the electric windows correctly.
ALWAYS PAY ATTENTION TO WHERE CHILDREN
ARE WHEN OPENING OR CLOSING WINDOWS.
W I N D O W S |
19 I |
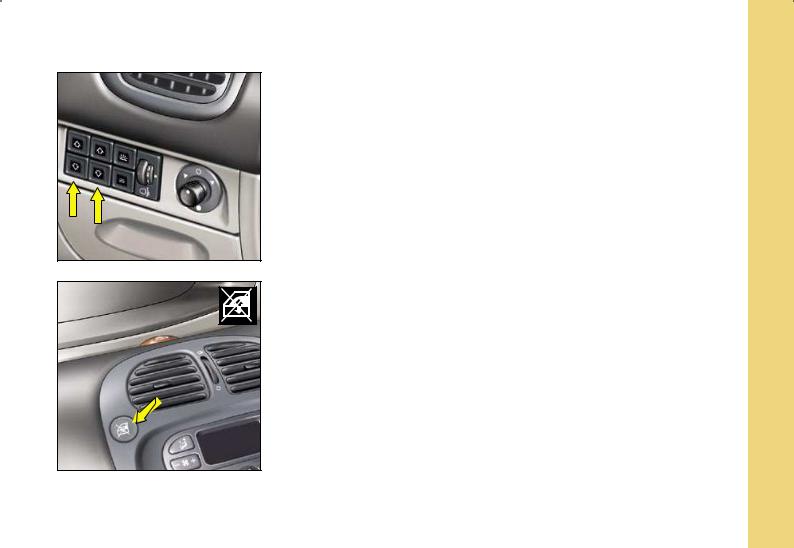
Rear electric control
The electric rear windows can be actioned using the switches located on the dashboard and those on the vehicle’s rear doors.
Child safety precaution
One switch can deactivate the rear window controls.
Always remove the ignition key when leaving the vehicle, even for short periods.
I N B R I E F
I 20 |
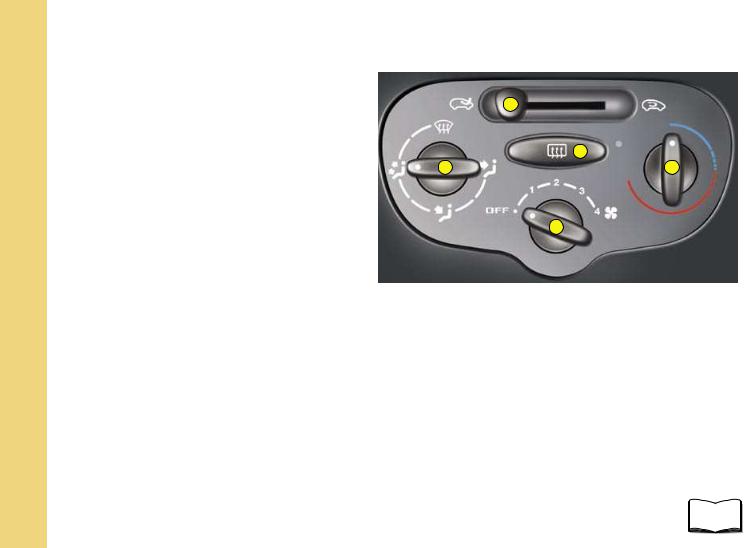
V E N T I L A T I O N – H E A T I N G |
I N B R I E F
1 - Air distribution |
|
|
|
|
|
||
|
Air flow to the face level vents. |
|
2 |
|
|
||
|
|
|
|
|
Air flow to the footwells and rear |
|
|
|
|
|
|
|
|
|
|
|
seat positions. |
|
5 |
|
Air flow to the footwells and winds- |
1 |
4 |
|
|||
|
|
|
|
|
creen and side windows. |
|
|
|
Air flow to the windscreen and side |
|
3 |
|
|
||
|
|
||
|
windows. |
|
|
|
Deicing - demisting |
|
|
|
|
|
|
The air distribution from the blower can be adjusted at will by placing the control 1 in any intermediate position.
Whatever the position chosen, it is always possible to obtain air from the air vents.
2 - Entry of exterior air / Air recirculation
3 - Adjustment of the air blower speed
4 - Adjustment of the blown air temperature
5 - Demisting of rear screen
62

V E N T I L A T I O N – H E A T I N G |
21 |
|
M A N U A L A I R C O N D I T I O N I N G |
||
|
Air conditioning
The air conditioning only operates when the engine is running.
Press the switch on the dashboard. Warning lamp on = in operation
Entry of exterior air
Air recirculation
This position prevents the entry of unpleasant odours into the vehicle.
It should be cancelled as soon as possible to renew the air in the passenger compartment as well as to allow demisting.
To enhance the efficiency and rapidity of the air conditioning in very hot weather, use the air recirculation position.
Move the control 2 fully to the right and place the air blower control 3 in an intermediate position.
This function should be cancelled when it is no longer needed, to allow renewal of the air in the cabin.
2
3
Deicing – demisting of the windscreen and front side windows
- Place the controls for temperature and air flow on maximum,
- close the central air vents, - operate the air conditioning.
Note : you should not be in Air Recirculation.
63
I
I N B R I E F
I |
22 |
V E N T I L A T I O N – H E A T I N G |
|
M A N U A L A I R C O N D I T I O N I N G |
|||
|
|
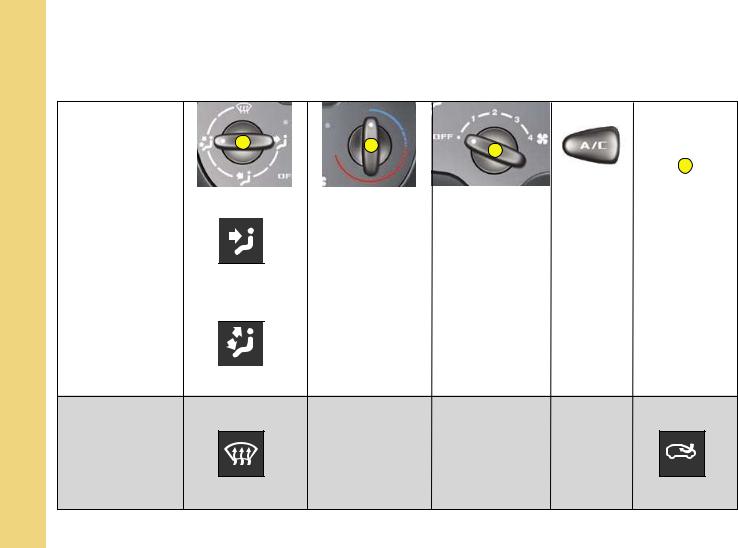
To obtain the best results from the system, we recommend :
I N B R I E F
|
|
|
1 |
|
|
4 |
|
|
|
|
|
|
|
|
|
|
|
|
|
|
|
|
|
|
|
|
|
|
|
|
|||||
|
For ... |
|
|
|
|
|
3 |
|
|
|
|
|
|
|
|||
|
|
|
|
|
|
|
|
|
|
|
|
|
2 |
|
|
|
|
|
|
|
|
|
|
|
|
|
|
|
|
|
|
|
|
|
|
|
|
|
|
|
|
|
|
|
|
|
|
|
|
|
|
|
|
|
|
|
|
|
|
|
|
|
|
|
|
|
|
|
|
|
|
|
|
|
|
|
|
|
|
|
|
|
|
|
|
|
|
||
|
|
|
|
|
|
|
|
|
|
|
|
|
|
|
|
||
|
|
|
|
|
|
All cold |
|
|
MAX. to start with, |
|
|
|
|
|
|
|
|
|
COLD |
|
|
|
|
to start with, |
|
then personal |
ON |
|
|
|
|
|
|
||
|
|
|
|
|
|
|
then personal |
|
|
|
|
|
|
|
|
||
|
|
|
|
|
|
adjustments |
|
adjustments |
|
|
|
|
|
|
|
||
|
|
|
|
|
|
|
|
|
|
|
|
|
|
|
|||
|
|
|
|
|
|
|
|
|
|
|
|
|
|
|
|
||
|
|
|
|
|
|
|
|
|
|
To start with |
|
||||||
|
|
|
|
|
|
|
|
|
|
|
|
|
|||||
|
|
|
|
|
|
|
|
|
|
|
|
|
|
|
|
|
|
|
|
|
|
|
|
All hot |
|
|
|
|
|
|
|
|
|
|
|
|
|
|
|
|
|
|
|
|
|
|
|
|
|||||
|
|
|
|
|
|
|
|
MAX. to start with, |
|
|
|
|
|
|
|
||
|
HOT |
|
|
|
|
to start with, |
|
then personal |
– |
|
|
|
|
|
|
||
|
|
|
|
|
|
|
then personal |
|
|
|
|
|
|
|
|
||
|
|
|
|
|
adjustments |
|
adjustments |
|
|
|
|
|
|
|
|||
|
|
|
|
|
|
|
|
|
|
|
|
|
|
|
|||
|
|
|
|
|
|
To start with |
|
DEICING |
|
|
|
|
|
|
|
|
All hot |
MAX. |
ON |
|
|
DEMISTING |
|
|
|
|
|
Note : with automatic air conditioning, we recommend you to select AUTO operation.
I 24 |
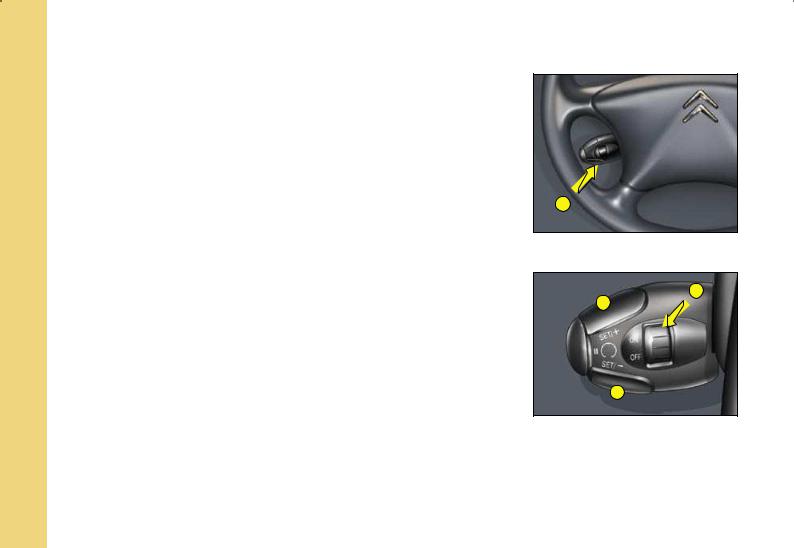
C R U I S E C O N T R O L - O N / O F F |
I N B R I E F
This driving assistance device enables you to drive at a constant speed of your choice, only in the highest gears and above a minimum speed of 40 to 60 km/h (25 to 40 mph) depending on engine versions.
The cruise control operates only with:
-Gear lever in fourth or fifth gear (manual gearbox).
-Selector on D (automatic gearbox).
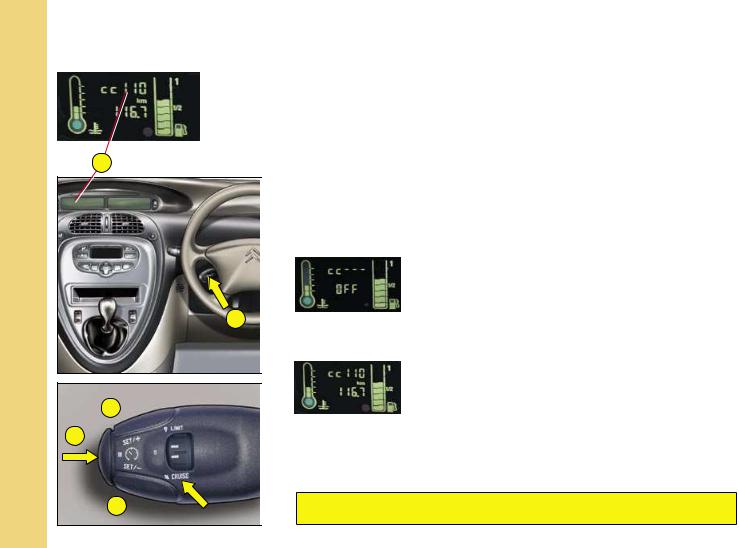
The cruise control stalk A is located below the direction indicator/lighting switch.
To activate: turn the switch 1 to the ON position.
To deactivate: turn the switch 1 to the OFF position.
To select a cruising speed
Depress the accelerator until the desired speed is reached. Press the rear of either button 2 or button 4 of control A. The speed is regulated and memorised.
While cruise control is in force, it is still possible to depress the accelerator pedal to go faster than the memorised speed (for example to overtake another vehicle).
Take your foot off the pedal to return automatically to the memorised speed. A short press on the rear of button 4 will increase the speed slightly.
A short press on the rear of button 2 will decrease the speed slightly.
A
1
4
2
C R U I S E C O N T R O L - O N / O F F |
25 |
|
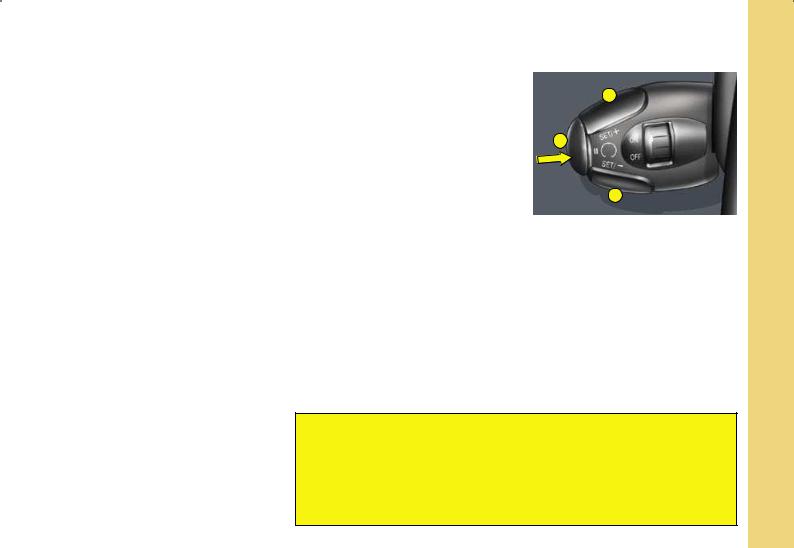
Disengaging cruise control |
|
|
|
|
|
The cruise control will be disengaged: |
|
4 |
- Either by depressing the clutch pedal or brake pedal, |
|
|
|
|
|
- Or when either ESP or traction control is operating. |
|
|
- Or by pressing button 3 located on the end of control A, |
3 |
|
These actions do not cancel the memorised speed. |
|
|
|
|
|
Recalling the memorised speed |
|
2 |
|
|
|
After a disengagement, press once on button 3. Your vehicle will return to the |
|
|
|
|
|
last speed memorised. |
|
|
To increase the memorised speed
By a long press on the rear of button 4 of control A until you reach the desired speed. Release the button, the new speed is then memorised.
To decrease the memorised speed
Give a long press on the rear on button 2 of control A until the desired speed is obtained (above 25mph). Release the button, the new speed is memorised.
To deactivate cruise control
-Either, when stopped, switch off ignition.
-Or turn the cruise control switch to the OFF position.
Cruise control must only be used where road conditions permit driving at a constant speed. Do not use it on congested roads or when weather and road conditions are poor.
The driver must still remain attentive and in complete control of the vehicle.
You are recommended to keep your feet within range of the pedals.
I
I N B R I E F
I
I N B R I E F
26
B
4  3
3
2 
C R U I S E C O N T R O L / « C R U I S E » |
|||
|
|
This driving assistance function allows you to drive at the speed of your |
|
|
|
choIce without the need to action the accelerator. |
|
|
|
It is available at speeds above 40 km/h (25 mph), in the higher gears |
|
|
|
only. |
|
|
|
Control A for cruise control is located below the lighting/signalling control |
|
|
|
stalk. |
|
|
|
Note: Information relating to the cruise control is displayed in zone B |
|
|
|
on the display. |
|
|
|||
|
|
To select the function |
|
|
|
Turn control 1 to the « CRUISE » position. |
|
|
|
To select a cruise speed |
|
|
|
|
On selection of the function via control 1, no cruise |
|
|
|
|
|
|
|
speed has yet been memorised. |
A |
|
|
|
|
Accelerate to the desired speed, then give a short press on button 2 or |
||
|
|
||
|
|
button 4. |
|
|
|
|
The cruise speed is then memorised. It is displayed |
|
|||
|
|
|
in zone B on the screen. |
|
|||
|
|
|
The trip mileage recorder then displays. |
|
|
You can then release the accelerator pedal. The vehicle will |
|
|
|
automatically keep to that chosen speed |
|
|
|
Note : The vehicle speed may vary slightly from that memorised. |
|
|
|
Cruise control should only be used when the traffic |
|
|
|
conditions permit driving at a constant speed. |
|
|
|
|
|
C R U I S E C O N T R O L / « C R U I S E » |
27 I |
Reactivation of cruise control - By recalling the memorised cruise speed :
Following a deactivation, press on control 3.
Your vehicle automatically resumes the memorised cruise speed which is displayed in zone B.
Note: if the memorised cruise speed is a lot higher than the speed at which the vehicle is currently moving, the vehicle will accelerate up to the memorised speed.
- By selecting the current speed :
Give a short press on button 2 or 4, once you are travelling at your desired speed.
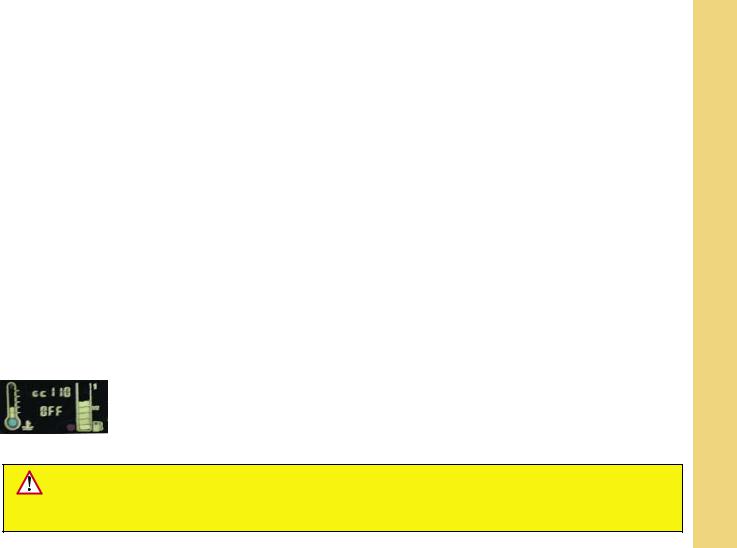
The information « OFF » then disappears from the screen.
To cancel the function
- By moving the control from position « CRUISE » to position 0.
- By stopping the engine.
The cruise speed chosen previously is no longer These actions bring up the memorised.
information « OFF » in zone B of the In the event of a malfunction, a message appears, accompanied by a sound signal.
Contact a CITROËN dealer.
I N B R I E F
Do not use this function on congested roads or when weather or road conditions are poor.
The driver must remain attentive and in complete control of the vehicle.
You are recommended to keep your feet within range of the pedals.
Cruise control must only be used where road conditions permit driving at a constant speed.
I
I N B R I E F
28
B
4 
3
2 
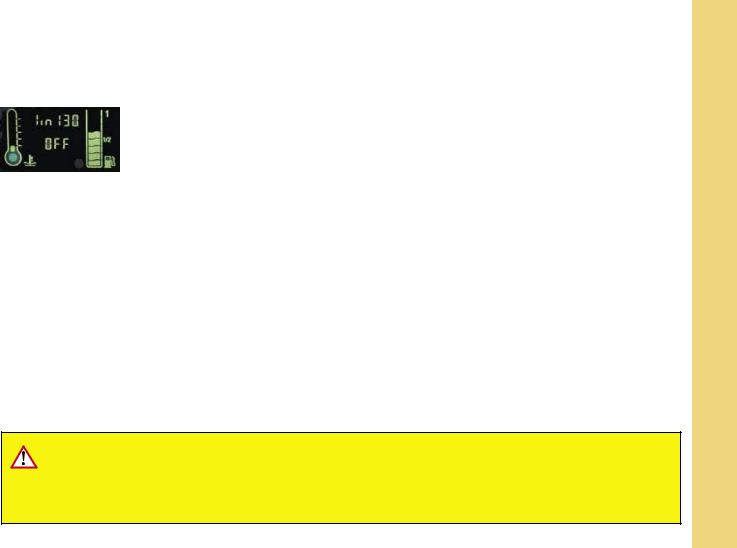
S P E E D L I M I T E R / « L I M I T » |
||||
|
This driving assistance function allows you to choose a maximum speed |
|||
|
that you wish not to exceed. This has to be a speed greater than 30 km/h |
|||
|
(approx. 20 mph). |
|||
|
Control A for the speed limiter is located below the lighting/signalling |
|||
|
control stalk. |
|||
|
Note: The information relating to the speed limiter is shown in zone B on |
|||
|
the screen. |
|||
|
To select the function |
|||
|
Turn control 1 to the position « LIMIT ». |
|||
|
|
|
On selection of the function via control 1, the last |
|
|
|
|
||
|
|
|
speed memorised is displayed. |
|
|
|
|
|
|
|
To adjust the maximum speed |
|||
|
Provided the engine is running, you adjust the memorised speed by pressing : |
|||
|
- button 4 to increase the memorised speed, |
|||
A |
- button 2 to decrease the memorised speed. |
|||
Note: successive presses will modify the speed in steps of 1 km/h and a |
||||
|
||||
|
continuous press in steps of 5 km/h. |
|||
|
Activation of the maximum speed |
|||
|
As you see the desired maximum speed displayed, press control 3 to activate |
|||
1 |
the limitation. |
|||
|
|
The information « OFF » then disappears from zone B. |
||
|
|
|
||
|
|
|
The trip mileage recorder is shown. |
|
|
|
|
|
|
|
While the function is active, action on the accelerator pedal will not |
|||
|
permit the programmed speed to be exceeded, unless you press the |
|||
|
pedal hard down to go beyond the tight spot (see «Temporary override of |
|||
|
the maximum speed»). |
|||
|
Note : the vehicle speed may vary slightly from that memorised. |
|||
|
|
|
|
|
S P E E D L I M I T E R / « L I M I T » |
29 I |
To deactivate the maximum speed
Press button 3 at the end of the control A.
This action brings up the information « OFF » on the screen. This action does not cancel the memorised speed which remains displayed in zone B.
Temporary override of the maximum speed
It is possible at any time to drive at above the memorised maximum speed by pressing the pedal hard down to go beyond the tight spot.
All the time the speed is being exceeded, the displayed speed flashes.
You have only to release the accelerator pedal to return below the limit speed, making the function active again.
Note : if during speed limitation the system is unable to keep to the memorised speed (e.g. on a steep descent or under heavy acceleration), then the speed flashes. Adapt your speed as necessary.
The function will reactivate when your speed is again below the desired limit speed.
To cancel the function
- By moving the control from position « LIMIT » to position 0. - By stopping the engine. The speed chosen previously is memorised. In the event of a malfunction, a message appears, accompanied by a sound signal.
Contact a CITROËN dealer.
A floor mat not approved by CITROËN may risk sliding forward under the accelerator pedal and preventing you from pressing beyond the tight spot. It will then be impossible to exit the speed limitation, except by actioning the control under the steering wheel.
The driver must remain attentive and keep complete control of the vehicle.
I N B R I E F
I 30 |
R E A R V I E W M I R R O R S |
I N B R I E F
1 2
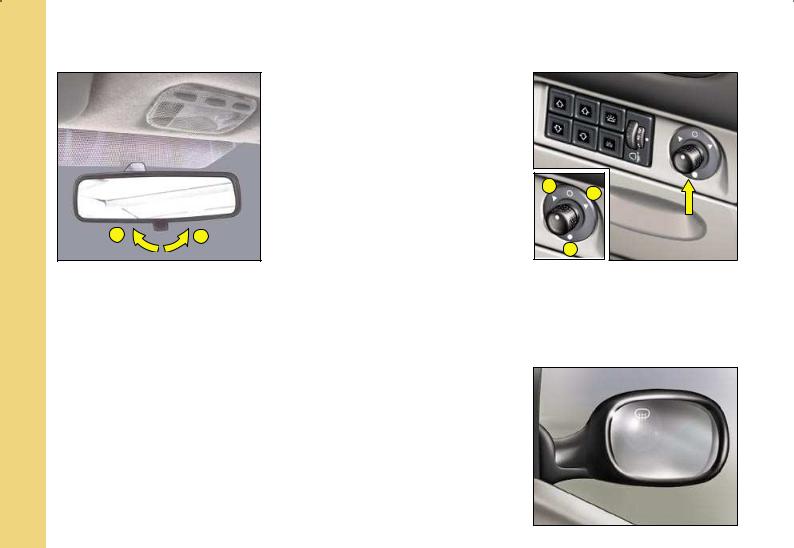
Interior rear view mirror
The lever on the lower edge enables you to place the rear view mirror in either of two positions:
1 - Day position: the lever is not visible.
2 - Night position (anti-dazzle): the lever is visible.
Electrically - controlled door mirrors
Your vehicle is equipped with electric door mirrors.
Set the position for the selected door mirror:
-1 Left hand door mirror
-2 Right hand door mirror
Move the control in the four directions to set the position.
The defrosting of the exterior rear view mirrors is linked to the electrical demisting of the rear window.
Folding back the door mirrors
To fold them, place the control on position 3.
To return them, move the control to one of the other positions.
The glass in the rear view mirrors is aspherical to enlarge the lateral field of vision.
Objects viewed are thus in reality closer than they may appear to be.
This should be taken into account when assessing distance.
II
R e m o t e c o n t r o l
31 II
A B
Note For safety reasons, a buzzer will sound if you have switched off the ignition and opened the driver’s door without previously removing the ignition key.
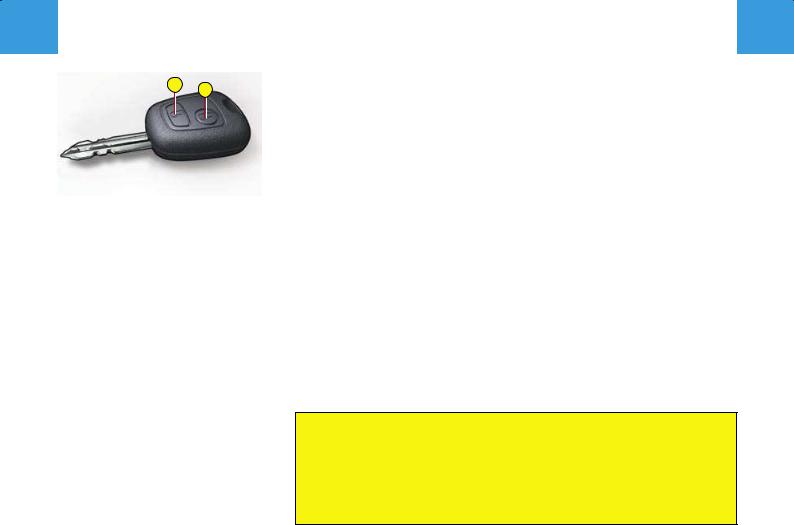
Central locking
The remote control locks and unlocks the doors and tailgate. Press once on button A to lock or button B to unlock.
If it does not work first time, then try again.
These operations are confirmed by the direction indicators:
-Unlocking: Rapid flashing of direction indicators, interior lamp comes on.
-Locking: Direction indicators come on for approx. two seconds, interior lamp goes out (if function active).
If one of the doors or the tailgate is open or not correctly closed, the central locking does not operate.
Locating of the vehicle
To locate the vehicle in a car park, press button A, the interior lamp lights up and the direction indicators flash for a few seconds (vehicle remaining locked).
Note: The vehicle location function has a greater range than that of the unlocking function.
Except when reinitialising, the remote control cannot function while the key is in the ignition, even when switched off.
Warning: Activating the transmitter (even if in your pocket) whilst still within range could cause the doors to unlock without your knowledge.
However, if none of the doors is opened within thirty seconds of unlocking, the doors will automatically relock.

II 32
R e m o t e c o n t r o l
II
Remote control
The remote control transmitter emits a high frequency signal which offers the following advantages:
-does not require aiming at the receiver in the vehicle.
-can be operated from behind the vehicle and penetrates any load on board.
-has a range of several metres.
Note: The simultaneous use of other high frequency equipment (mobile telephones, domestic alarms...) may momentarily hinder the operation of the remote control In the event of a permanent fault, the remote control should be reinitialised.
See: “Changing the remote control battery”.
Remote control battery used up
Accompanied by an audible signal, this information is provided by a message on the multifunction screen.
Changing the remote control battery
Unscrew and detach the cover to access the battery. Battery: CR 1620 3V.
The remote control must be reinitialised after changing the batteries.
For this, switch on the ignition and press one of the buttons on your remote control until the required action is achieved. This manoeuvre may take some ten seconds.
To protect your vehicle against theft
Before leaving your vehicle:
-Completely close all windows and do not leave objects visible inside.
-Remove the ignition key, turn the steering wheel to engage the steering lock and lock all doors.
The remote control key numbers are given on the special card provided for this purpose.
Keep it in a safe place.
Do not throw away the old batteries.
They should be returned to the CITROËN dealer or deposited in a recognised recycling facility
(camera shops etc).

II
Note: The key can be used to deactivate the front passenger’s airbag (see “Airbag”).
K e y s |
33 |
II |
|
|
|
Electronic immobiliser key
The key operates all the vehicle’s locks as well as the ignition.
Central locking using the key
The key can be used in the driver’s door to activate the locking and unlocking of the doors and tailgate.
The central locking will not operate if a door is open, or not properly closed.
Note: Locking causes the interior lamps to go out, and a diode in the hazard warning lamp button to flash.
If the diode fails to flash after about ten seconds, consult your CITROËN Dealer. Unlocking the vehicle causes the front interior lamps to come on.
The ELECTRONIC IMMOBILISER locks the engine’s supply system.
The system arms automatically when the key is removed from the igntiion. All the vehicle’s keys contain an electronic immobiliser device.
Only your keys can start your vehicle. Insert your key into the ignition.
After the ignition is switched on, a dialogue commences between the key and the electronic immobiliser device.
If the key is not recognised, starting is impossible.
The key number is on the label attached to the key. Should you lose your key or remote control,
the CITROËN dealer network can supply replacements.
II 34
C O D E c a r d |
II |
|
|
|
|
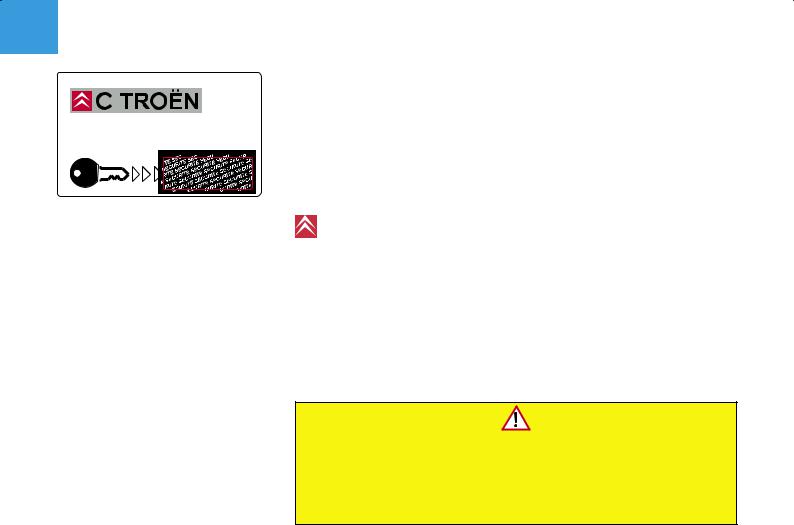
CODE card
A confidential card is given to the new owner when he takes delivery of his new vehicle.
This card bears a hidden access code for the use of the CITROËN dealer when maintaining the electronic immobiliser device.
Do not scratch the protective strip, the security of the immobiliser system depends on the information below remaining covered.
Should the card be lost, the immobiliser device can no longer be considered secure.
In the event of a change of vehicle ownership, it is essential for the new owner to possess the CODE card.
Never leave it in the vehicle.
Advice
Keep the coded card bearing your personal electronic immobiliser number in a safe place (never in the vehicle).
Should you lose your key or remote control, the CITROËN dealer network can supply replacements using these numbers.
If any key modifications become necessary (addition, cancellation or replacement of the key), you must take the confidential card together with all the keys to a CITROËN dealer.
Never attempt to modify the electronic immobiliser's electrical circuit, as that could render your vehicle undriveable.Should the confidential card become lost, a Citroën dealer would have to undertake a major repair.
II |
S T E E R I N G L O C K – I G N I T I O N - S T A R T E R 35 |
II |
|
|
|
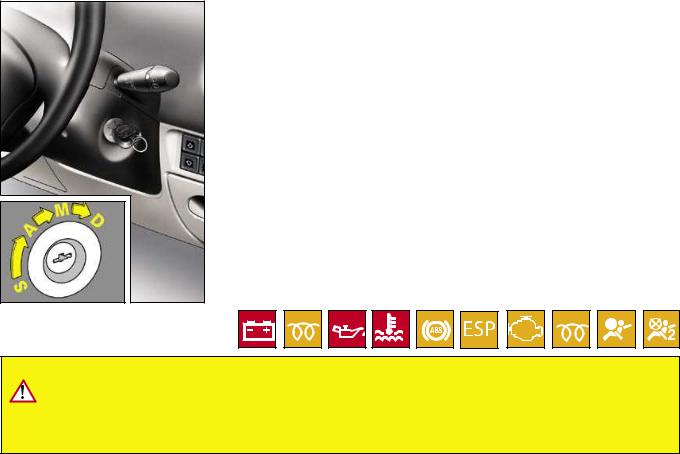
• S : Steering lock
To unlock the steering, move the steering wheel slightly while turning the key. Do not use undue force. After you remove the key, turn your steering wheel until it locks. The key can only be removed in position S.
• A : Accessories
This allows use of certain electrical accessories. The battery charge warning lamp lights up.
The steering is unlocked by turning the key to position A (moving the steering slightly if necessary).
• M : Drive
The following warning lamps come on : battery charge, handbrake, oil pressure, engine coolant temperature.
Depending on the version of your vehicle, the following warning lamps should also light up: ABS, ESP, brake fluid level, engine autodiagnosis, preheater (Diesel), airbags, front passenger’s airbag deactivation.
If one of these warning lamps does not light up, this indicates a malfunction.
• D : Starter
Release the key as soon as the engine has started. Never the action the starter while the engine is running. Starting and stopping the engine : see « Starting ».
The above warning lamps are tested with the ignition key in the drive position.
NEVER REMOVE THE IGNITION KEY UNTIL THE ENGINE HAS COMPLETELY STOPPED.
IT IS IMPERATIVE ALWAYS TO KEEP THE ENGINE RUNNING IN ORDER TO RETAIN THE BRAKING AND STEERING ASSISTANCE (risk of the steering lock engaging and loss of the safety features).
When the vehicle is stopped and the engine switched off, after you remove the ignition key turn the steering wheel slightly so as to engage the steering lock.
II 36
S t a r t i n g |
II |
|
|
Ensure that the gear lever is in neutral (manual gearbox) or in position P or N (automatic gearbox).
PETROL
Starting the engine
-Do not depress the accelerator pedal.
-Operate the starter motor (maximum 10 seconds) until the engine starts.
-At temperatures below 0°C, depress the clutch pedal to ease starting, then release it slowly. Release the key as soon as the engine starts.
Note: If it does not work at first, switch off the ignition, wait for ten seconds, then operate the starter again as described above.
DIESEL
Starting the engine
Turn the key to the starter position, wait for the preheater warning lamp to go out, then operate the starter until the engine is running (not more than 10 seconds).
If the engine does not start, switch off the ignition then recommence the procedure.
In temperatures below 0°C, declutch while turning the engine over to facilitate starting. Afterwards slowly release the clutch pedal.
Note: During starting, do not touch the accelerator.
Advice
Vehicles equipped with a Turbo
Turbo equipped engines MUST be allowed to return to idle for several seconds before switching off the ignition. Failure to do so could cause serious damage to the turbo unit.
Flicking the throttle pedal as the ignition is turned off can lead to severe damage to the turbo unit.
DO NOT RUN THE ENGINE IN A SPACE THAT IS ENCLOSED OR INSUFFICIENTLY VENTILATED.
I
IN BRIEF
8 |
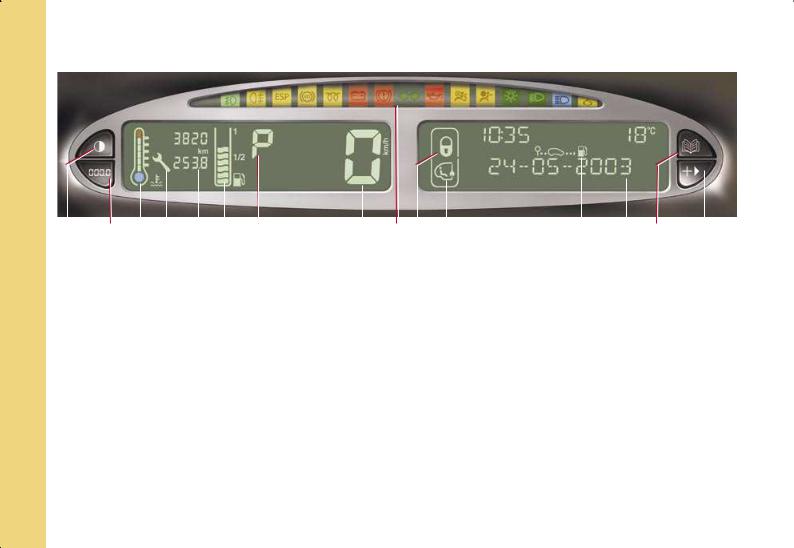
M u l t i f u n c t i o n |
d i s p l a y |
|
|
|
|
|
|
|
|
|
|
|
|
|
|
|
|
|
|
|
|
|
|
|
|
|
|
|
|
|
|
|
|
|
|
|
|
|
|
|
|
|
|
|
|
|
|
|
|
|
|
|
|
|
|
|
|
|
|
|
|
|
|
|
|
|
|
|
|
|
|
|
|
|
|
|
|
|
|
|
|
|
|
|
|
|
|
|
|
|
|
|
|
|
|
|
|
|
1 |
2 3 4 5 6 |
7 |
8 |
9 10 11 |
12 |
13 14 |
15 |
|||||||||||
1 |
Night driving control. |
|
|
|
9 |
Warning lamps. |
|
|
|
|
|
|
||||||
2Trip mileage recorder reset button.
3Coolant temperature gauge.
4Maintenance indicator.
5Trip mileage recorder / Total mileage recorder.
Cruise control / speed limiter display
6 |
Fuel gauge. |
7 |
Automatic gearbox display. |
8 |
Speed indicator. |
10Central locking indicator.
11Child safety lock indicator.
12Trip computer.
13Message zone.
14Control for accessing the display functions.
15Control for adjusting the display functions.
 Loading...