


 Loading...
Handbook

On-line handbook
Referring to the handbook on-line also gives you access to the latest information available, easily identified by the bookmark, associated with this symbol:
Select one of the following means of access to
view your handbook on-line...
Find your handbook on the Citroën website, under "MyCITROËN".
This personal and customisable space allows you to establish direct and special contact with
CITROËN.
If the "MyCITROËN" function is not available on the Citroën public website for your country, you can find your handbook at the following address:
http://service.citroen.com/ddb/
Select:
 the language,
 the vehicle, its body style,
 the print edition of your handbook appropriate for the date of registration of your vehicle.
Scan this code for direct access to your handbook.

We draw your attention to the following...
Reading the detailed sections is essential to make the most of your vehicle, in complete safety.
Your vehicle is fitted with only some of the equipment described in this document, depending on the trim level, version and the specifications for the country in which it is sold.
The fitting of electrical equipment or accessories which are not recommended by CITROËN may result in a failure of your vehicle's electronic system. Contact a CITROËN dealer for information on the recommended equipment and accessories.
Key
safety warning
additional information
contributes to the protection of the environment
refer to the page indicated
Citroën has a presence on every continent, a complete product range,
bringing together technology and a permanent spirit of innovation, for a modern and creative approach to mobility.
We thank you and congratulate you on your choice.
At the wheel of your new vehicle, getting to know each system, each control, each setting, makes your trips, your journeys
more comfortable and more enjoyable.
Happy motoring!

Contents
Overview
Eco-driving
Monitoring
.
.
Ventilation Heating
Manual air conditioning Front demist - defrost Digital air conditioning
Rear screen demist - defrost Scented air freshener
Front seats Rear seats Mirrors
Steering wheel adjustment
|
|
|
|
|
|
|
|
Comfort |
|
|
|
Visibility |
|
||
|
39 |
|
Lighting controls |
66 |
|||
41 |
|||||||
LED lamps |
70 |
||||||
41 |
|||||||
Headlamp adjustment |
70 |
||||||
43 |
|||||||
Wiper controls |
71 |
||||||
44 |
|||||||
Courtesy lamps |
74 |
||||||
46 |
|||||||
Interior mood lighting |
75 |
||||||
47 |
|||||||
Boot lamp |
75 |
||||||
48 |
|||||||
|
|
|
|
||||
50 |
|
|
|
|
|||
51 |
|
|
|
|
|||
52 |
|
|
|
|
|||
Instrument panels |
10 |
|
|
|
|
|
|
|
|
|
Access |
|
|
|
|
Fittings |
|
||||
Indicator and warning lamps |
12 |
|
|
|
|
|
|
|
|
|
Remote control key |
53 |
Interior fittings |
76 |
|||||||
Adjustment buttons |
25 |
|||||||||
Trip computer |
27 |
Window controls |
57 |
Boot fittings |
81 |
|||||
|
|
Doors |
59 |
|
|
|
|
|||
|
|
Boot |
62 |
|
|
|
|
|||
|
|
Fuel tank |
63 |
|
|
|
|
|||
|
|
Misfuel prevention (Diesel) |
65 |
|
|
|
|
|||
Child safety
Multifunction screens
Monochrome screen A |
30 |
Monochrome screen C |
33 |
16/9 colour screen (eMyWay) |
37 |
Child seats |
83 |
Deactivating the passenger's front airbag |
86 |
ISOFIX child seats |
91 |
Child lock |
95 |

|
|
|
|
|
|
|
|
|
|
Contents |
||
|
|
|
|
|
|
|
|
|
|
|
|
|
Safety |
|
|
|
|
Checks |
|
|
|
Technical data |
|
||
Direction indicators |
96 |
Bonnet |
132 |
|
Petrol engines |
181 |
||||||
Hazard warning lamps |
96 |
Running out of fuel (Diesel) |
133 |
|
||||||||
|
Petrol weights |
182 |
||||||||||
Horn |
97 |
Petrol engines |
134 |
|
||||||||
|
LPG engines |
184 |
||||||||||
Emergency or assistance call |
97 |
Diesel engines |
135 |
|
||||||||
|
LPG weights |
185 |
||||||||||
Tyre under-inflation detection |
98 |
|
Checking levels |
136 |
|
|||||||
|
|
Diesel engines |
186 |
|||||||||
Braking assistance systems |
102 |
|
Checks |
139 |
|
|||||||
|
|
Diesel weights |
188 |
|||||||||
Trajectory control systems |
103 |
|
|
|
|
|
|
|||||
|
|
|
|
|
|
Dimensions |
190 |
|||||
Front seat belts |
104 |
|
|
|
|
|
|
|||||
|
|
|
|
|
|
Identification markings |
191 |
|||||
Airbags |
106 |
|
|
|
|
|
|
|||||
|
|
|
|
|
|
|
|
|
|
|||
|
|
|
|
|
|
|
|
|
|
|
|
|
|
Driving |
|
|
|
Practical information |
|
|
|
Audio and telematics |
|||||
Parking brake |
110 |
Temporary puncture repair kit |
141 |
|
Emergency or assistance |
193 |
|||||||
6-speed manual gearbox |
110 |
Changing a wheel |
146 |
|
eMyWay |
195 |
|||||||
Electronic gearbox |
111 |
Snow chains |
153 |
Audio system |
249 |
||||||||
Automatic gearbox |
115 |
Changing a bulb |
154 |
|
|
|
|
|
|
||||
Gear shift indicator |
119 |
Changing a fuse |
161 |
|
|
|
|
|
|
||||
Stop & Start |
120 |
|
Battery |
168 |
|
|
|
|
|
|
|||
Hill start assist |
123 |
|
Energy economy mode |
171 |
|
|
|
|
|
|
|||
Speed limiter |
124 |
|
Changing a wiper blade |
172 |
|
|
|
|
. |
|
|||
Cruise control |
126 |
|
Towing the vehicle |
173 |
|
|
|
|
|
||||
|
|
|
Visual search |
|
|||||||||
Rear parking sensors |
128 |
|
Towing a trailer |
175 |
|
|
|
||||||
Reversing camera |
130 |
|
Audio pre-equipment |
177 |
|
|
|
|
|
|
|||
|
|
|
|
|
Accessories |
179 |
|
|
|
|
|
|
|
|
. |
Alphabetical index |

Overview
Exterior
Zenith windscreen
This large windscreen provides incomparable visibility and light in the passenger compartment.
 77
77
Stop & Start
This system puts the engine temporarily into standby during stops in the traffic (red lights, traffic jams, etc...). The engine restarts automatically as soon as you want to move off. The Stop &
Start system reduces fuel consumption, exhaust emissions and the noise level when stationary.
 120
120
Temporary puncture repair kit
This kit is a complete system consisting of a compressor and sealant cartridge, to allow the temporary repair of a tyre.
 141
141
Rear parking sensors / Reversing camera
When reversing, these systems detect and provide a warning for any obstacles located behind the vehicle.
 128 / 130
4

Interior
Interior mood lighting
This subdued passenger compartment lighting improves visibility inside the vehicle in low lighting conditions. It comprises several lamps, located in the automatic day/night mirror support and in the lower dashboard storage compartment.
 75
75
Gear shift indicator
Depending on the driving conditions and your driving style, this system may suggests when to change up to reduce your fuel consumption.
 119
119
Overview .
Scented air freshener
The scented air freshener diffuses the selected fragrance throughout the passenger compartment from its location in the ventilation system.
 47
47
Digital air conditioning
After setting the desired level of comfort, the system then automatically controls this level according to the ambient conditions.
 44
44
 Audio and communication systems
This equipment benefits from the latest technology: MP3 compatible Audio system, USB port, Bluetooth hands-free system, eMyWay with 16/9 colour screen, auxiliary inputs, Hi-Fi audio system.
 193
193
5
Overview
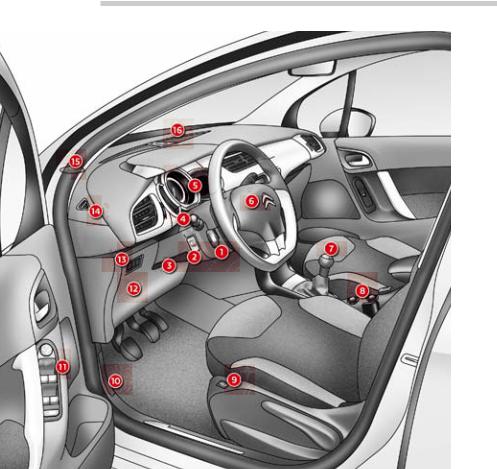
Instruments and controls
1.Cruise control / speed limiter controls.
2.Headlamp height adjustment.
3.Steering wheel adjustment control.
4.Lighting and direction indicator control stalk.
5.Instrument panel.
6.driver's airbag. Horn.
7.Gear lever.
8.12 V accessory socket USB port / auxiliary socket.
9.Heated seat control.
10.bonnet release lever.
11.door mirror controls.
Electric window controls.
Rear doors and electric windows deactivation switch.
12.Fusebox.
13.Stop & Start deactivation switch. Electronic stability deactivation switch
(DSC/ASR)
Under-inflation detection reinitialisation switch (depending on version).
14.Front door window demisting/defrosting vent.
15.Speaker (tweeter).
16.Windscreen demisting/defrosting vent.
6

Overview .
Instruments and controls
1.Steering lock and ignition.
2.Audio equipment steering wheel controls.
3.Wiper / screenwash / trip computer control stalk.
4.Microphone.
5.Scented air freshener.
6.Central locking switch.
7.Multifunction screen.
8.Hazard warning lamps switch.
9.Central adjustable air vents.
10.Sunshine sensor
Hi-Fi audio system central speaker.
11.Passenger's airbag.
12.Side adjustable air vent.
13.Glove box / Passenger's airbag deactivation / Audio/video sockets.
14.Parking brake.
15.Central armrest with storage.
16.Upper and lower storage.
17.audio system or eMyWay.
18.Heating / air conditioning controls.
7

Eco-driving
 Eco-driving
Eco-driving is a range of everyday practices that allow the motorist to optimise their fuel consumption and CO2 emissions.
Optimise the use of your gearbox
With a manual gearbox, move off gently and change up without waiting.
During acceleration change up early.
With an automatic or electronic gearbox, give preference to automatic mode and avoid pressing the accelerator pedal heavily or suddenly.
The gear shift indicator invites you engage the most suitable gear: as soon as the indication is displayed in the instrument panel, follow it straight away.
For vehicles fitted with an electronic or automatic gearbox, this indicator appears only in manual mode.
Drive smoothly
Maintain a safe distance between vehicles, use engine braking rather than the brake pedal, and press the accelerator progressively. These practices contribute towards a reduction in fuel consumption and CO2 emissions and also helps reduce the background traffic noise.
If your vehicle has cruise control, make use of the system at speeds above 25 mph (40 km/h) when the traffic is flowing well.
Control the use of your electrical equipment
Before moving off, if the passenger compartment is too warm, ventilate it by opening the windows and air vents before using the air conditioning. Above 30 mph (50 km/h), close the windows and leave the air vents open.
Remember to make use of equipment that can help keep the temperature in the passenger compartment down (sunroof and window blinds...). Switch off the air conditioning, unless it has automatic regulation, as soon as the desired temperature is attained.
Switch off the demisting and defrosting controls, if not automatic. Switch off the heated seat as soon as possible.
Switch off the headlamps and front foglamps when the level of light does not require their use.
Avoid running the engine before moving off, particularly in winter; your vehicle will warm up much faster while driving.
As a passenger, if you avoid connecting your multimedia devices
(film, music, video game...), you will contribute towards limiting the consumption of electrical energy, and so of fuel.
Disconnect your portable devices before leaving the vehicle.
8
Eco-driving .
Limit the causes of excess consumption
Spread loads throughout the vehicle; place the heaviest items in the bottom of the boot, as close as possible to the rear seats.
Limit the loads carried in the vehicle and reduce wind resistance (roof bars, roof rack, bicycle carrier, trailer...). Use a roof box in preference. Remove roof bars and roof racks after use.
At the end of winter, remove snow tyres and refit your summer tyres.
Observe the recommendations on maintenance
Check the tyre pressures regularly, when cold, referring to the label in the door aperture, driver's side.
Carry out this check in particular:
-before a long journey,
-at each change of season,
-after a long period out of use.
Don't forget the spare wheel and the tyres on any trailer or caravan.
Have your vehicle serviced regularly (engine oil, oil filter, air filter, passenger compartment filter...) and observe the schedule of operations recommended in the maintenance and warranty guide.
With a BlueHDi Diesel engine, if the SCR system is faulty your vehicle becomes polluting; go to a CITROËN dealer or a qualified workshop without delay to have the emissions of nitrous oxides brought back to the legal level.
When refuelling, do not continue after the third cut-off of the nozzle to avoid any overflow.
At the wheel of your new vehicle, it is only after the first 1 800 miles (3 000 kilometres) that you will see the fuel consumption settle down to a consistent average.
9

Monitoring
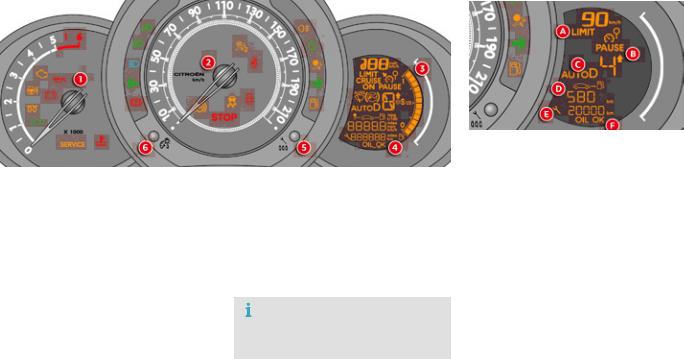
Instrument panels with manual gearbox
Panel grouping together the vehicle operation indication dials and warning lamps.
Dials Screen
1.Rev counter.
Indicates the speed of rotation of the engine (x 1 000 rpm).
2.Vehicle speed.
Indicates the current speed of the moving vehicle (mph or km/h).
3.Fuel level.
Indicates the quantity of fuel remaining in the tank.
4.Screen.
5.Display management button
Servicing information.
adjust the time and choose units. Reset the service indicator.
6.Instrument panel lighting button. adjusts the brightness of the lighting of the instruments and controls.
For more information, refer to the section on the button or function and its associated display.
A.Ambient temperature.
(°Celsius or °Fahrenheit)
B.Gear shift indicator.
C.Time.
D.Engine oil level indicator.
Appears a few seconds after switching on the ignition, then disappears.
E.Trip computer.
F.Service indicator.
(miles or km) then,
Total mileage.
These two functions are displayed successively when switching on the ignition.
10
|
Monitoring |
|
|
|
|
|
|||
|
||||
Instrument panels for electronic or automatic gearboxes |
1 |
|||
|
||||
Panel grouping together the vehicle operation indication dials and warning lamps. Depending on the version, the instrument panel may have permanent back-lighting.
Dials |
Screen |
1.Rev counter.
Indicates the speed of rotation of the engine (x 1 000 rpm).
2.Vehicle speed.
Indicates the current speed of the moving vehicle (mph or km/h).
3.Fuel level.
Indicates the quantity of fuel remaining in the tank.
4.Screen.
5.Display management button
Alternates display between range and trip mileage recorder.
Servicing information.
Resets the selected function to zero (trip distance recorder or service indicator).
6.Instrument panel lighting button. adjusts the brightness of the lighting of the instruments and controls.
For more information, refer to the section on the button or function and its associated display.
A.Speed limiter
(mph or km/h) or
Cruise control.
B.Gear shift indicator.
C.Electronic or automatic gearbox information.
D.Range
(miles or km) or
Trip mileage recorder.
E.Service indicator
(miles or km), then
Total mileage recorder.
These two functions are displayed successively when switching on the ignition
F.Engine oil level indicator.
Appears a few seconds after switching on the ignition, then disappears.
11
Monitoring
Indicator and warning lamps
Visual indicators informing the driver that a system is in operation (operation or deactivation indicator lamps) or of the occurrence of a fault
(warning lamp).
When the ignition is switched on
Certain warning lamps come on for a few seconds when the vehicle's ignition is switched on.
When the engine is started, these same warning lamps should go off.
If they remain on, before moving off, refer to the information on the warning lamp concerned.
Associated warnings
The illumination of certain warning lamps may be accompanied by an audible signal and a message in the multifunction screen.
The warning lamps may come on continuously
(fixed) or flash.
Certain warning lamps may come on in one of two different modes. Only by relating the type of illumination to the operating status of the vehicle can it be ascertained whether the situation is normal or whether a fault has occurred.
Operation indicator lamps
If one of the following indicator lamps comes on, this confirms that the corresponding system has come into operation.
Warning/indicator lamp |
is on |
Cause |
Action / Observations |
|
|
|
|
|
|
|
Left-hand direction |
flashing with buzzer. |
The lighting stalk is pushed down. |
|
|
indicator |
|
|
|
|
|
|
|
|
|
Right-hand |
flashing with buzzer. |
The lighting stalk is pushed up. |
|
|
direction indicator |
|
|
|
|
|
|
|
|
|
Hazard warning |
flashing with audible |
The hazard warning lamps switch, |
The left-hand and right-hand direction indicators and |
|
lamps |
signal. |
located on the dashboard, has been |
their associated indicator lamps flash simultaneously. |
|
|
|
operated. |
|
|
|
|
|
|
|
Sidelamps |
fixed. |
The lighting stalk is in the |
|
|
|
|
"Sidelamps" position. |
|
|
|
|
|
|
12

|
|
|
|
|
|
|
|
Monitoring |
|
|
||
|
|
|
|
|
|
|
|
|
||||
|
|
|
|
|
|
|
|
|||||
|
|
|
|
|
|
1 |
||||||
|
Warning/indicator lamp |
is on |
Cause |
Action / Observations |
|
|
|
|||||
|
|
|
|
|
|
|
|
|
|
|
|
|
|
|
|
|
Dipped beam |
fixed. |
The lighting stalk is in the "Dipped |
|
|
|
|
|
|
|
|
|
|
headlamps |
|
beam headlamps" position. |
|
|
|
|
|
|
|
|
|
|
|
|
|
|
|
||||
|
|
|
|
Main beam |
fixed. |
The lighting stalk is pulled towards |
Pull the stalk to return to dipped beam headlamps. |
|
|
|
||
|
|
|
|
headlamps |
|
you. |
|
|
|
|
|
|
|
|
|
|
|
|
|
|
|
||||
|
|
|
|
Front foglamps |
fixed. |
The front foglamps are switched on |
Turn the ring on the lighting control stalk rearwards |
|
|
|
||
|
|
|
|
|
|
using the ring on the lighting control |
twice to switch off the front foglamps. |
|
|
|
|
|
|
|
|
|
|
|
stalk. |
|
|
|
|
|
|
|
|
|
|
|
|
|
|
|
||||
|
|
|
|
Rear foglamps |
fixed. |
The rear foglamps are switched on. |
Turn the ring on the stalk rearwards to switch off the |
|
|
|
||
|
|
|
|
|
|
|
|
rear foglamps. |
|
|
|
|
|
|
|
|
|
|
|
|
|
||||
|
|
|
|
Diesel engine |
fixed. |
The key is at position 2 (ignition on) in |
Wait until the warning lamp goes off before starting. |
|
|
|
||
|
|
|
|
pre-heating |
|
the ignition switch. |
The period of illumination of the warning lamp is |
|
||||
|
|
|
|
|
|
|
|
determined by the climatic conditions (up to about |
|
|||
|
|
|
|
|
|
|
|
thirty seconds in extreme climatic conditions). |
|
|||
|
|
|
|
|
|
|
|
If the engine does not start, switch the ignition off and |
|
|||
|
|
|
|
|
|
|
|
then on, wait until the warning lamp goes off again, |
|
|||
|
|
|
|
|
|
|
|
then start the engine. |
|
|
|
|
|
|
|
|
|
|
|
|
|
||||
|
|
|
|
Parking brake |
fixed. |
The parking brake is applied or not |
Release the parking brake to switch off the warning |
|
||||
|
|
|
|
|
|
properly released. |
lamp, keeping your foot on the brake pedal. |
|
|
|
|
|
|
|
|
|
|
|
|
|
Observe the safety recommendations. |
|
|
|
|
|
|
|
|
|
|
|
|
For more information on the parking brake, refer to the |
|
|||
|
|
|
|
|
|
|
|
corresponding section. |
|
|
|
|
|
|
|
|
|
|
|
|
|
|
|
|
|
13

Monitoring
Warning/indicator lamp |
is on |
Cause |
Action / Observations |
|
|
|
|
|
|
|
Engine coolant |
fixed blue |
On starting the engine, it indicates |
After a few minutes driving, it swiches off to indicate |
|
temperature |
|
that the engine is cold. |
that the engine temperature is normal. |
|
|
|
|
In order to protect your engine, avoid driving too hard |
|
|
|
|
until the warning lamp has switched off. |
|
|
|
|
|
|
Stop & Start |
fixed. |
When the vehicle stops (red lights, |
The warning lamp goes off and the engine restarts |
|
|
|
traffic jams, ...) the Stop & Start system |
automatically in START mode, as soon as you want to |
|
|
|
has put the engine into STOP mode. |
move off. |
|
|
|
|
|
|
|
flashes for a few |
STOP mode is temporarily |
For more information on special cases with STOP |
|
|
seconds, then goes |
unavailable. |
mode and START mode, refer to the "Stop & Start" |
|
|
off. |
or |
section. |
|
|
|
START mode is invoked |
|
|
|
|
automatically. |
|
|
|
|
|
|
14
|
|
|
|
|
|
Monitoring |
|
|
||
|
|
|
|
|
|
|
||||
|
|
|
|
|
|
|||||
|
|
|
|
|
|
1 |
||||
|
Warning/indicator lamp |
is on |
Cause |
Action / Observations |
|
|
|
|||
|
|
|
|
|
|
|
||||
|
|
Foot on the |
fixed. |
The brake pedal must be pressed. |
With an electronic gearbox, press the brake pedal to |
|
|
|
||
|
|
brake pedal |
|
|
|
start the engine (lever in position N). |
|
|
|
|
|
|
|
|
|
|
With an automatic gearbox, with the engine running, |
|
|||
|
|
|
|
|
|
press the brake pedal before releasing the parking |
|
|||
|
|
|
|
|
|
brake, to unlock the lever and come out of position P. |
|
|||
|
|
|
|
|
|
If you wish to release the parking brake without |
|
|||
|
|
|
|
|
|
pressing the brake pedal, this warning lamp will |
|
|||
|
|
|
|
|
|
remain on. |
|
|
|
|
|
|
|
|
|
|
|
||||
|
|
|
flashing. |
With an electronic gearbox, if you |
Use the brake pedal and/or the parking brake. |
|
|
|
||
|
|
|
|
hold the vehicle on an incline using |
|
|
|
|
|
|
|
|
|
|
the accelerator for too long, the |
|
|
|
|
|
|
|
|
|
|
clutch overheats. |
|
|
|
|
|
|
|
|
|
|
|
|
|
|
|
|
|
|
|
Automatic |
fixed. |
The wiper control is pushed |
Automatic front wiping is activated. |
|
|
|
|
|
|
|
wiping |
|
downwards. |
|
|
|
|
|
|
|
|
|
|
|
|
|
|
|
|
|
15
Monitoring
Deactivation indicator lamps
If one of the following indicator lamps comes on, this confirms that the corresponding system has been switched off intentionally.
This is may be accompanied by an audible signal and a message on the multifunction screen.
Warning/indicator lamp |
is on |
Cause |
Action / Observations |
|
|
|
|
|
|
|
Passenger's |
fixed. |
The control, located in the glove box, |
Set the control to the ON position to activate the |
|
airbag system |
|
is set to the OFF position. |
passenger's front airbag. |
|
|
|
The passenger's front airbag is |
In this case, do not fit a child seat in the rearward |
|
|
|
deactivated. |
facing position. |
|
|
|
You can install a "rearward facing" |
|
|
|
|
child seat, unless there is a fault with |
|
|
|
|
the operation of the airbags (Airbag |
|
|
|
|
warning lamp on). |
|
|
|
|
|
|
|
Dynamic |
fixed. |
The button, located at the bottom |
Press the button to activate the DSC/ASR. Its |
|
stability control |
|
left of the dashboard, is pressed. Its |
indicator lamp goes off. |
|
(DSC/ASR) |
|
indicator lamp is on. |
The DSC/ASR system is activated automatically when |
|
|
|
The DSC/ASR is deactivated. |
the vehicle is started. |
|
|
|
DSC: dynamic stability control. |
If deactivated, the system is reactivated automatically |
|
|
|
ASR: anti-slip regulation. |
from around 30 mph (50 km/h). |
|
|
|
|
|
16
Warning lamps
When the engine is running or the vehicle is being driven, the illumination of one of the following warning lamps indicates a fault which requires action on the part of the driver.
Monitoring
Any fault resulting in the illumination of a warning lamp must be investigated further by 1 reading the associated message in the multifunction screen.
If you encounter any problems, do not hesitate to contact a CITROËN dealer or a qualified workshop.
Warning/indicator lamp |
is on |
Cause |
Action / Observations |
||
|
|
|
|
|
|
|
|
STOP |
fixed, alone or |
Illumination of the warning lamp is |
Stop as soon as it is safe to do so as the engine may |
|
|
|
associated with |
associated with a serious braking |
cut out when driving. |
|
|
|
another warning lamp, |
system or engine coolant temperature |
Park, switch off the ignition and call a CITROËN |
|
|
|
accompanied by an |
problem. |
dealer or a qualified workshop. |
|
|
|
audible signal and |
|
|
|
|
|
a message on the |
|
|
|
|
|
screen. |
|
|
|
|
Service |
temporarily. |
Minor problems have occurred for |
Identify the problem by reading the message shown in the |
|
|
||||
|
|
|
|
which there is no specific warning |
screen, such as, for example: |
|
|
|
|
lamp. |
- the engine oil level, |
|
|
|
|
|
- the screenwash level, |
|
|
|
|
|
- the remote control battery, |
|
|
|
|
|
- saturation of the particle emission filter on Diesel vehicles |
|
|
|
|
|
(refer to the "Particle emissions filter (Diesel)" section). |
|
|
|
|
|
For any other faults, contact a CITROËN dealer or a qualified |
|
|
|
|
|
workshop. |
|
|
|
|
|
|
|
|
|
fixed. |
Major problems have occurred for |
Identify the problem by reading the message shown |
|
|
|
|
which there is no specific warning |
in the screen and contact a CITROËN dealer or a |
|
|
|
|
lamp. |
qualified workshop. |
|
|
|
|
|
|
17

Monitoring
Warning/indicator lamp |
is on |
Cause |
Action / Observations |
||
|
|
|
|
|
|
|
|
Braking |
fixed, associated with |
The braking system fluid level is too |
You must stop as soon as it is safe to do so. |
|
|
||||
|
|
|
the STOP warning |
low. |
Top up with brake fluid recommended by CITROËN. |
|
|
|
lamp. |
|
If the problem persists, have the system checked by a |
|
|
|
|
|
CITROËN dealer or a qualified workshop. |
|
|
|
|
|
|
+ |
|
fixed, associated with |
The electronic brake force distribution |
You must stop as soon as it is safe to do so. |
|
|
|
|
the STOP and ABS |
(EBFD) system has a fault. |
Have it checked by a CITROËN dealer or a qualified |
|
|
|
warning lamp. |
|
workshop. |
|
|
|
|
|
|
|
|
Anti-lock |
fixed. |
The anti-lock braking system has a |
The vehicle retains conventional braking. |
|
|
Braking System |
|
fault. |
Drive carefully at reduced speed and contact a |
|
|
(ABS) |
|
|
CITROËN dealer or a qualified workshop without |
|
|
|
|
|
delay. |
|
|
|
|
|
|
|
|
Electronic |
flashing. |
The ESP/ASR regulation is operating. |
The system optimises traction and improves the |
|
|
stability |
|
|
directional stability of the vehicle. |
|
|
programme |
|
|
|
|
|
fixed. |
Unless it has been deactivated |
Have it checked by a CITROËN or a qualified |
|
|
|
(ESP/ASR) |
|||
|
|
|
|
(button pressed and its indicator lamp |
workshop. |
|
|
|
|
on) the ESP/ASR system has a fault. |
|
|
|
|
|
|
|
|
|
Engine |
flashing. |
The engine management system has |
Risk of destruction of the catalytic converter. |
|
|
autodiagnosis |
|
a fault. |
Have it checked by a CITROËN dealer or a qualified |
|
|
system |
|
|
workshop. |
|
|
|
|
|
|
|
|
|
fixed. |
The emission control system has a |
The warning lamp should go off when the engine is started. |
|
|
|
|
fault. |
If it does not go off, contact a CITROËN dealer or |
|
|
|
|
|
qualified workshop without delay. |
|
|
|
|
|
|
18
|
|
|
|
|
|
|
|
Monitoring |
|
|
|||
|
|
|
|
|
|
|
|
|
|||||
|
|
|
|
|
|
|
|
||||||
|
|
|
|
|
|
1 |
|||||||
|
Warning/indicator lamp |
is on |
Cause |
Action / Observations |
|
|
|
||||||
|
|||||||||||||
|
|
|
|
|
|
|
|
|
|||||
|
|
|
|
Low fuel level |
fixed. |
When it first comes on there remains |
You must refuel as soon as possible to avoid running |
|
|||||
|
|
|
|||||||||||
|
|
|
|
|
|
approximately 5 litres of fuel in the |
out of fuel. |
|
|
|
|
||
|
|
|
|
|
|
tank. |
This warning lamp will come on every time the ignition |
|
|||||
|
|
|
|
|
|
||||||||
|
|
|
|
|
|
|
|
is switched on, until a sufficient addition of fuel is |
|
||||
|
|
|
|
|
|
|
|
made. |
|
|
|
|
|
|
|
|
|
|
|
|
|
Fuel tank capacity: approximately 50 litres (petrol), |
|
||||
|
|
|
|
|
|
|
|
46 litres (Diesel) or 37 litres (LPG); depending on |
|
||||
|
|
|
|
|
|
|
|
version: approximately 30 litres (petrol or Diesel). |
|
||||
|
|
|
|
|
|
|
|
Never continue to drive until you run out of fuel as |
|
||||
|
|
|
|
|
|
|
|
this could damage the emission control and injection |
|
||||
|
|
|
|
|
|
|
|
systems. |
|
|
|
|
|
|
|
|
|
|
|
|
|
|
|
|
|
||
|
|
|
|
Maximum coolant |
fixed. |
The temperature of the cooling |
Stop as soon as it is safe to do so. |
|
|
|
|
||
|
|
|
|
temperature |
|
system is too high. |
Wait until the engine has cooled down before topping |
|
|||||
|
|
|
|
|
|
|
|
up the level, if necessary. |
|
|
|
|
|
|
|
|
|
|
|
|
|
If the problem persists, contact a CITROËN dealer or |
|
||||
|
|
|
|
|
|
|
|
qualified workshop. |
|
|
|
|
|
|
|
|
|
|
|
|
|
|
|
|
|
||
|
|
|
|
Engine oil |
fixed. |
There is a fault with the engine |
You must stop as soon it is safe to do so. |
|
|
|
|
||
|
|
|
|
pressure |
|
lubrication system. |
Park, switch off the ignition and contact a CITROËN |
|
|||||
|
|
|
|
|
|
|
|
dealer or a qualified workshop. |
|
|
|
|
|
|
|
|
|
|
|
|
|
|
|||||
|
|
|
|
Battery charge |
fixed. |
The battery charging circuit has a |
The warning lamp should go off when the engine is |
|
|
|
|||
|
|
|
|
|
|
fault (dirty or loose terminals, slack or |
started. |
|
|
|
|
||
|
|
|
|
|
|
cut alternator belt, ...). |
If it does not go off, contact a CITROËN dealer or a |
|
|||||
|
|
|
|
|
|
|
|
qualified workshop. |
|
|
|
|
|
|
|
|
|
|
|
|
|
|
|
|
|
|
|
19
Monitoring
Warning/indicator lamp |
is on |
Cause |
Action / Observations |
||||
|
|
|
|
|
|
|
|
|
|
|
|
Door(s) open |
fixed if the speed is |
A door or the boot is still open. |
Close the door or boot. |
|
|
|
|
|
below 6 mph (10 km/h). |
|
|
|
|
|
|
|
|
|
|
|
|
|
|
|
fixed and accompanied |
|
|
|
|
|
|
|
by an audible signal |
|
|
|
|
|
|
|
if the speed is above |
|
|
|
|
|
|
|
6 mph (10 km/h). |
|
|
|
|
|
|
|
|
|
|
|
|
|
|
Airbags |
temporarily. |
This lamp comes on for a few |
This lamp should go off when the engine is started. |
|
|
|
|
|
|
seconds when you turn on the |
If it does not go off, contact a CITROËN dealer or a |
|
|
|
|
|
|
ignition, then goes off. |
qualified workshop. |
|
|
|
|
|
|
|
|
|
|
|
|
|
fixed. |
One of the airbag or seat belt |
Have it checked by a CITROËN dealer or a qualified |
|
|
|
|
|
|
pretensioner systems has a fault. |
workshop. |
|
|
|
|
|
|
|
|
|
|
|
|
Seat belt not |
fixed then flashing |
The driver and/or the front passenger |
Pull the strap then insert the tongue in the buckle. |
|
|
|
|
fastened / |
accompanied by an |
has not fastened or has unfastened |
|
|
|
|
|
unfastened |
increasing audible |
their seat belt. |
|
|
|
|
|
|
signal. |
|
|
|
|
|
|
|
|
|
|
|
|
|
|
Power steering |
fixed. |
The power steering has a fault. |
Drive carefully at reduced speed. |
|
|
|
|
|
|
|
Have it checked by a CITROËN dealer or a qualified |
|
|
|
|
|
|
|
|
|
|
|
|
|
|
|
workshop. |
|
|
|
|
|
|
|
|
20
|
|
|
|
Monitoring |
|
|
|
|
|
|
|
|
|||||
|
|
|
|
|||||
|
|
|
|
1 |
||||
|
Warning/indicator lamp is on |
Cause |
Action / Observations |
|
|
|||
|
||||||||
Water in Diesel |
fixed. |
The Diesel fuel filter contains water. |
Risk of damage to the injection system on Diesel |
|
|
|
engines. |
|
|
|
Contact a CITROËN dealer or a qualified workshop |
|
|
|
without delay. |
Particle |
fixed, accompanied by |
This indicates that the particle |
As soon as driving conditions allow, regenerate the |
emissions filter |
an audible signal. |
emissions filter is starting to become |
filter by driving at a speed of at least 35 mph (60 km/h) |
(Diesel) |
|
saturated. |
until the warning lamp goes off (see the "Checks - |
|
|
|
Particle emissions filter" section). |
|
fixed, accompanied by |
This indicates the low level of the |
Have the reservoir topped up as soon as possible by |
|
an audible signal. |
additive reservoir. |
a CITROËN dealer or a qualified workshop (see the |
|
|
|
"Checks - Additive level" section). |
Under-inflation |
fixed, accompanied by |
The pressure in one or more wheels |
Check the pressure of the tyres as soon as possible. |
|
an audible signal and |
is too low. |
This check should preferably be carried out when the |
|
a message. |
|
tyres are cold. |
|
|
|
You must reinitialise the system after the adjustment |
|
|
|
of one or more tyre pressures and after changing one |
|
|
|
or more wheels. |
|
|
|
For more information, refer to the "Under-inflation |
|
|
|
detection" section. |
+ |
flashing then fixed, |
The system has fault: the tyre |
Check the tyre pressures as soon as possible. |
|
accompanied by the |
pressures are no longer monitored. |
have the system checked by a CITROËN dealer or a |
|
Service warning lamp. |
|
qualified workshop. |
21

Monitoring
Service indicator
System which informs the driver when the next service is due, in accordance with the manufacturer's servicing schedule.
The point at which the service is due is calculated from the last indicator zero reset. It is determined by two parameters:
-the distance travelled,
-the time elapsed since the last service.
More than 1800 miles (3000 km) remain before the next service is due
When the ignition is switched on, no service information appears in the screen.
Between 600 miles (1 000 km) and 1800 miles (3 000 km) remain before the next service is due
For a few seconds after the ignition is switched on, the spanner symbolising the service operations comes on. The distance recorder display line indicates the distance remaining before the next service is due.
Example: 1 700 miles (2 800 km) remain before the next service is due.
For a few seconds after the ignition is switched on, the screen indicates:
A few seconds after the ignition is switched on, the spanner goes off; the distance recorder resumes its normal operation. The screen then indicates the total and trip distances.
Less than 600 miles (1 000 km) remain before the next service is due
Example: 560 miles (900 km) remain before the next service is due.
For a few seconds after the ignition is switched on, the display indicates:
A few seconds after the ignition is switched on, the distance recorder resumes its normal operation. The spanner remains on to indicate that a service must be carried out soon.
22

Service overdue
For a few seconds after the ignition is switched on,the spanner flashes to indicate that the service must be carried out as soon as possible. Example: the service is overdue by 180 miles (300 km).
For a few seconds after the ignition is switched on, the display indicates:
A few seconds after the ignition is switched on, the distance recorder resumes its normal operation. The spanner remains on.
The distance remaining may be weighted by the time factor, depending on the driver's driving habits. Therefore, the spanner may also come on if you have exceeded the period since the last service, indicated in the maintenance and warranty guide.
Service indicator zero reset
After each service, the service indicator must be reset to zero.
The procedure for resetting to zero is as follows:
Fswitch off the ignition,
Fpress and hold the trip distance recorder zero reset button,
Fswitch on the ignition; the distance recorder display begins a countdown,
Fwhen the display indicates "=0", release the button; the spanner disappears.
Monitoring 1
Following this operation, if you wish to disconnect the battery, lock the vehicle and wait at least five minutes for the zero reset to be taken into account.
Retrieving the service information
You can access the service information at any time.
FPress the trip distance recorder zero reset button.
The service information is displayed for a few seconds, then disappears.
23

Monitoring
Engine oil level indicator*
On vehicles fitted with an electric oil level indicator, information on the oil level is displayed in the instrument panel for a few seconds when the ignition is switched on, after the service information.
The level shown will only be correct if the vehicle is on level ground and the engine has been off for more than
30minutes.
*Depending on version.
Oil level correct
Oil level low
This is indicated by the flashing of "OIL", accompanied by illumination of the service warning lamp, an audible signal and a message.
If the low oil level is confirmed by a check using the dipstick, the level must be topped up to prevent damage to the engine.
Refer to the "Checking levels" section.
Oil level indicator fault
This is signaled by the flashing of "OIL--". Contact a CITROËN dealer or a qualified workshop.
In the event of a fault with the electric oil level indicator, the engine oil level is no longer monitored.
While the system is faulty, you should check the engine oil level using the manual dipstick located under the bonnet.
Refer to the "Checking levels" section.
24

|
|
Monitoring |
|
|
|
|
|||
|
|
|||
Distance recorders |
Clock |
1 |
The total and trip distances are displayed for thirty seconds when the ignition is switched off, when the driver's door is opened and when the vehicle is locked or unlocked.
When traveling abroad, you may have to change the units of distance: the display of road speed must be in the official units (miles or km) for the
country. The change of units is done via the screen configuration menu, with the vehicle stationary.
Total distance recorder
It measures the total distance travelled by the vehicle since its first registration.
Trip distance recorder
It measures the distance travelled since it was reset to zero by the driver.
FWith the ignition on, press the button until zeros appear.
Adjusting the time - Choice of units
To adjust the time of the clock and choose the units used by the screen, use the right-hand button on the instrument panel, carrying out the operations in the following order:
Fpress the button for more than two seconds: the minutes flash,
Fpress the button to increase the minutes,
Fpress the button for more than two seconds: the hours flash,
Fpress the button to increase the hours,
Fpress the button for more than two seconds:
24H or 12H is displayed,
Fpress the button to select 24H or 12H,
Fpress the button for more than two seconds:
°C or °F is displayed,
Fpress the button to select °C or °F,
Fpress the button for more than two seconds
to complete the adjustments.
After approximately 30 seconds without any action, the screen returns to the normal display.
25

Monitoring
Lighting dimmer
System for manual adjustment of the brightness of the instruments and controls in relation to the exterior brightness.
Activation
When the lighting is on:
Fpress the button to change the brightness of the instruments and controls,
Fwhen the level of brightness required is reached, release the button.
Deactivation
When the lighting is off, or in day mode on vehicles fitted with daytime running lamps, pressing the button does not have any effect.
Black panel
System allowing certain displays to be switched off for night driving.
The instrument panel remains illuminated with only the vehicle speed and cruise control or speed limiter information, if in use.
If there is an alert or a change in a function or to a setting, the black panel mode is interrupted.
Activation
FWith the lighting on, press the left hand button of the instrument panel several times to progressively reduce the dashboard lighting level.
FPress the button again to reduce the lighting to the minimum level and switch off the interior mood lighting.
FPress the button again to activate the black panel.
26

Trip computer
System that gives you information on the current journey (range, fuel consumption…).
Screen in the instrument panel
Monochrome screen A
* Available only with the monochrome screen A.
Information displays
FPress the button, located at the end of the wiper stalk, to display the various items of trip computer information in succession.
The trip computer provides the following information:
-range,
-current fuel consumption,
-the Stop & Start time counter*,
Monitoring 1
-distance travelled,
-average fuel consumption,
-average speed.
FThe next press then returns you to the normal display.
Zero reset
FPress the control for more than two seconds to reset to zero the distance travelled, the average fuel consumption and the average speed.
27

Monitoring
Monochrome screen C
16/9 colour screen (eMyWay)
Information displays
FPress the button, located at the end of the wiper stalk, to display the various trip computer tabs in succession:
-the current information tab with:
●the range,
●the current fuel consumption,
●the distance remaining to be travelled or the Stop & Start time counter.
-the trip "1" tab with:
●the distance travelled,
●the average fuel consumption,
●the average speed, for the first trip.
-the trip "2" tab with:
●the distance travelled,
●the average fuel consumption,
●the average speed, for the second trip.
FPressing the button again returns you to the normal display.
Trip zero reset
FWhen the trip required is displayed, press the button on the end of the wiper stalk for
more than two seconds.
Trips "1" and "2" are independent but their use is identical.
For example, trip "1" can be used for daily figures, and trip "2" for monthly figures.
28
Loading...