


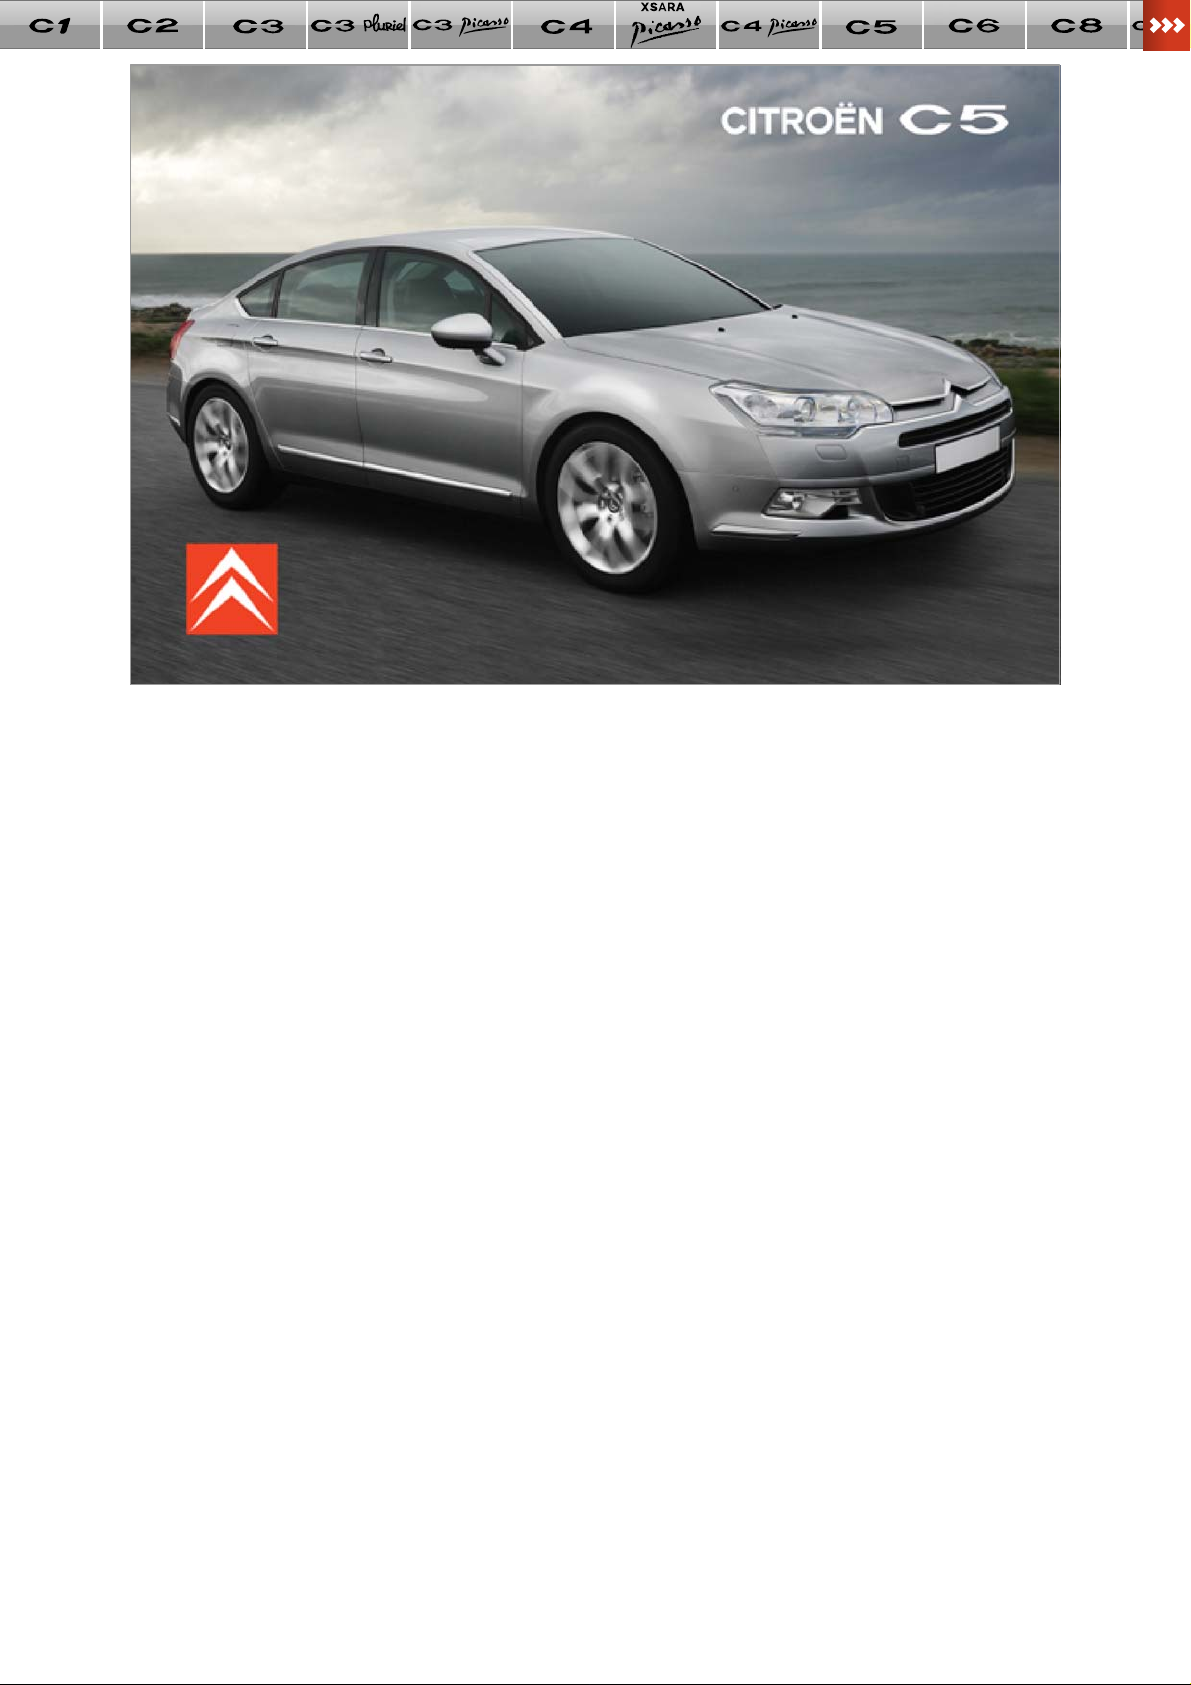
C5
4
F A M I L I A R I S A T I O N
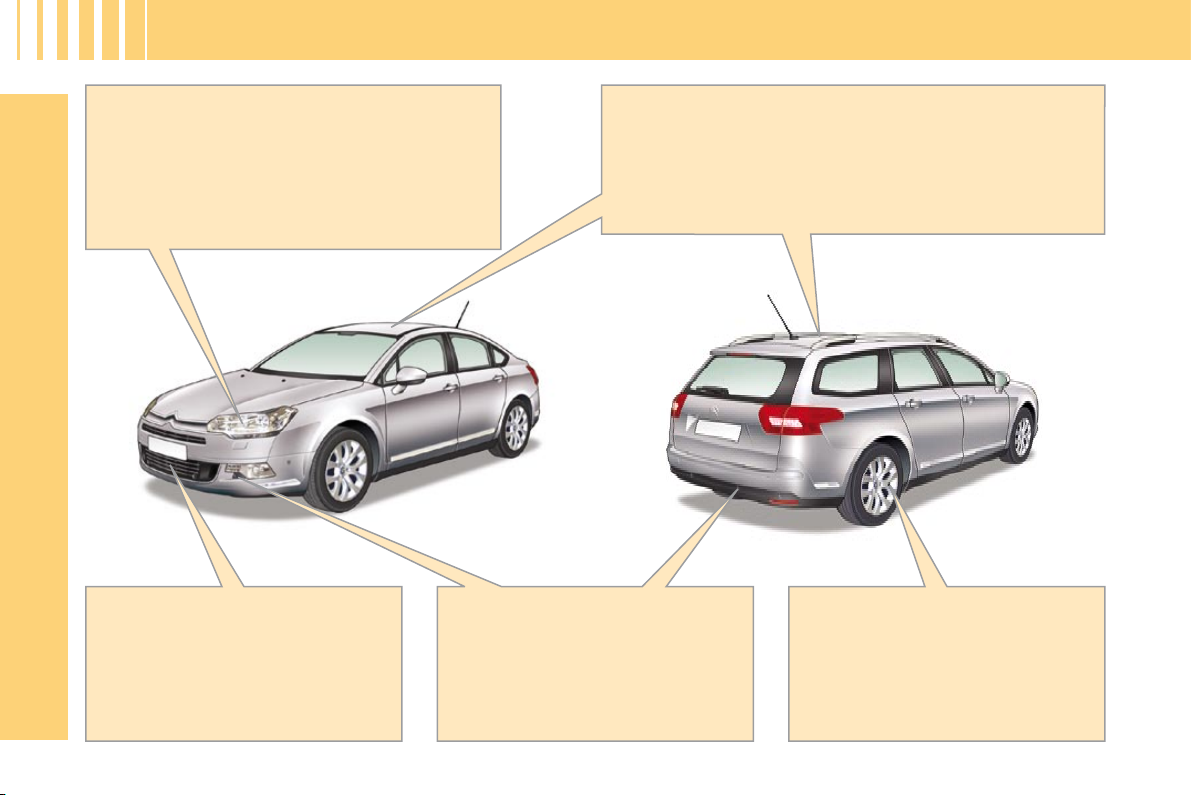
E X T E R I O R
The Xenon dual-function directional
headlamps
This function automatically provides you with
extra visibility on bends. This lighting is linked
with the angular lighting which maximises the
area lit at intersections and when parking.
Lane departure warning system
This driving assistance device
warns you when you unwittingly
cross a lane marking.
Parking assistance
(visual + sound)
This function warns you if an
obstacle is detected in front of or
behind the vehicle.
Tyre defl ation detection
This function checks the pressure
of the tyres automatically while
driving.
Glass panoramic roof (Tourer)
This provides you with perfect brightness in the
passenger compartment.
Glass sun roof (Saloon)
This also provides you with improved ventilation in the
passenger compartment.
88
79-80
142 145 111
5
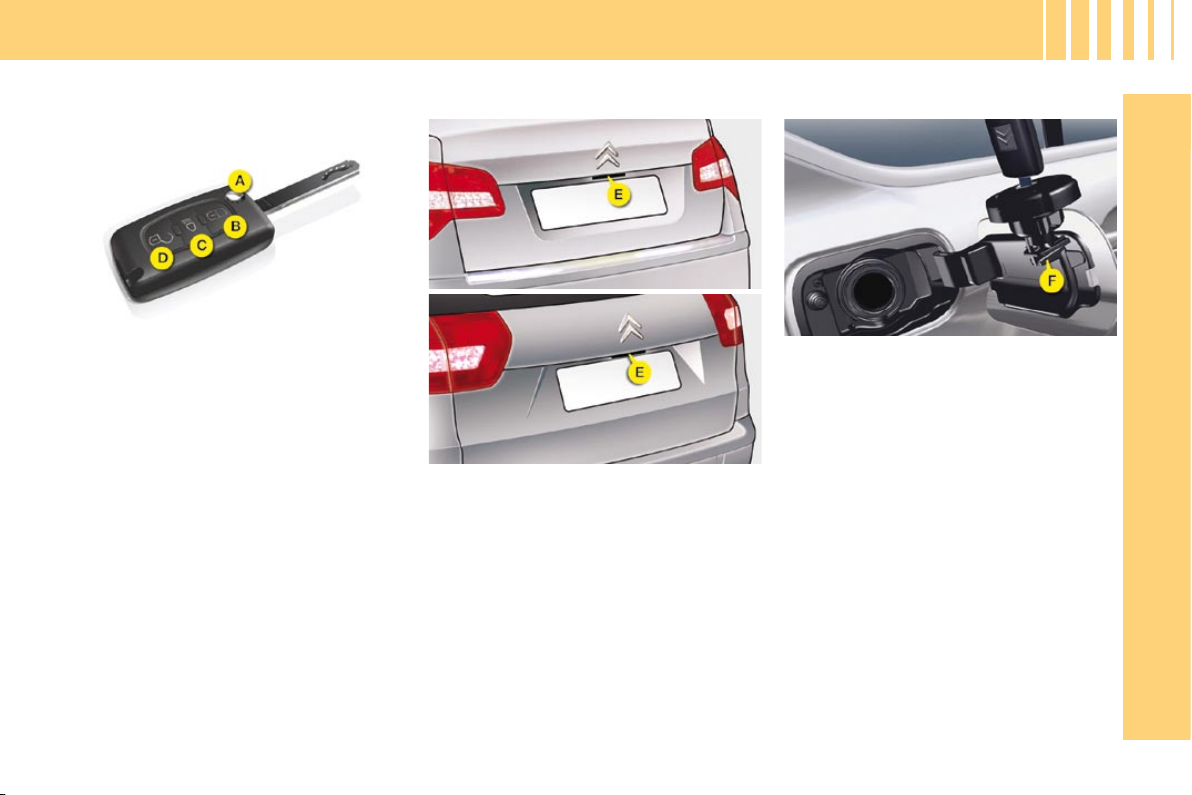
F A M I L I A R I S A T I O N
A. Key release/storage.
B. Normal locking of the vehicle (a single
press) or deadlocking of the vehicle
(two presses in succession).
C. Guide-me-home lighting.
D. Unlocking of the vehicle.
To open the fuel fl ap, press on the top
left part of it, then pull from the edge.
Press upwards on the lever E .
Opening the boot
76-77
81
O P E N I N G
Remote control key Fuel tank
64
Locking filler cap
Turn the key a quarter turn to lock
and unlock the fi ller cap.
When refuelling, place the cap on hook F .
Tank capacity: approximately 71 litres.
The boot automatically locks when the
vehicle is moving at a speed of over
6 mph (10 km/h), even if automatic cen-
tral locking is deactivated. It is unlocked
when a door is opened or when the cen-
tral locking button is pressed (speed
lower than 6 mph (10 km/h).
6
F A M I L I A R I S A T I O N
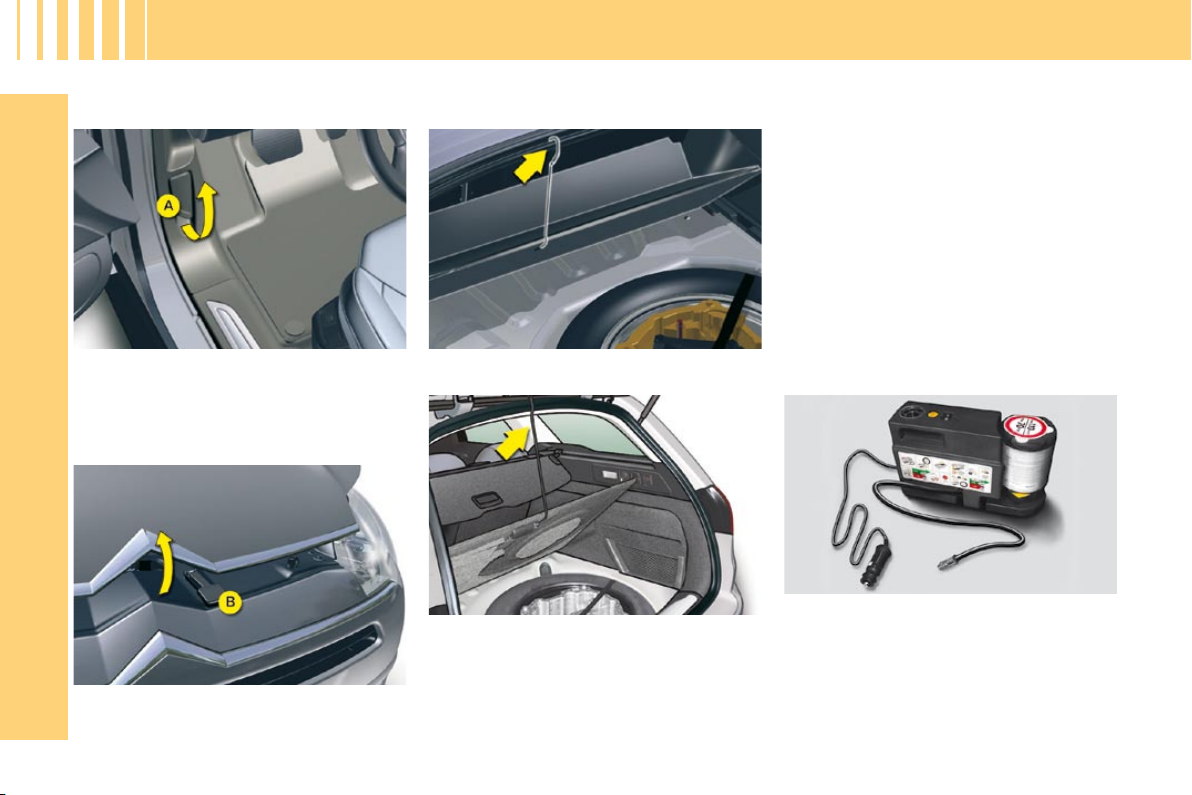
This operation should only be per-
formed while the vehicle is stationary.
Open the driver's door.
Pull release lever A to unlock.
Bonnet release
O P E N I N G
Lift up lever B , then raise the bonnet.
Saloon
Tourer
Spare wheel
The tools are to be found in a protective
holder inside the spare wheel.
165
Access to the spare wheel
To access the spare wheel:
Lift up the boot fl oor using the strap
(Saloon) or the retractable hook
(Tourer).
Fold back the boot carpet (Saloon).
Attach the hook to the upper section
of the boot.
To remove the spare wheel, detach
the strap then push the wheel for-
wards, before lifting it out.
Puncture kit
The puncture repair kit is a complete
system including a compressor and a
setting product.
161
150

7
F A M I L I A R I S A T I O N
123
I N T E R I O R
Electronic parking brake
The electronic parking brake combines automatic engagement when
the engine is switched off, and automatic release when the vehicle is
set in motion (automatic function activated by default).
Manual locking/unlocking is possible.
Parking space sensor
The "Parking space sensor" func-
tion assists you in fi nding a parking
space.
Dual-zone automatic air conditioning
This air conditioning system enables you to
adjust the comfort levels of the driver and the
front passenger independently.
Audio and communication systems
This equipment benefi ts from the latest tech-
nology: MP3 compatible radio, Bluetooth
®
hands-free kit, NaviDrive 3D, MyWay.
48 207
143

8
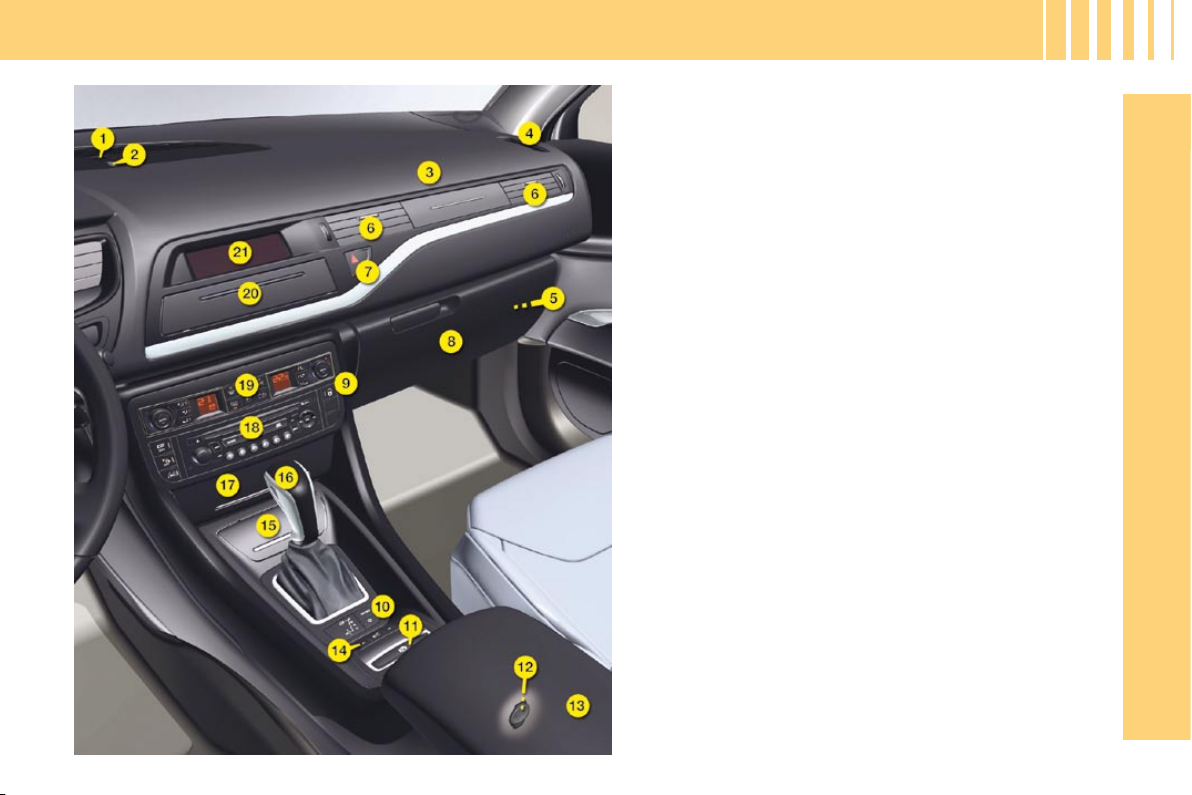
F A M I L I A R I S A T I O N
D A S H B O A R D
1. Electric windows/rear view mirrors/Child safety
controls.
2. Memorisation of driver’s seat and rear view mirrors
settings.
3. Bonnet release.
4. Controls at the steering wheel:
- Speed limiter
- Cruise control
5. Horn.
6. Audio/telematic controls under steering wheel.
7. Driver's airbag.
8. Navigation controls for the audio/telematics and
trip computer systems.
9. Driver's air vent.
10. Instrument panel.
11. Driver's air vent.
12. Windscreen wiper/screen wash controls.
13. Ignition switch.
14. ESP/parking assistance/lane departure warning
system controls.
15. Steering column adjustment.
16. Knees airbag.
17. Oddments tray or programmable heater controls.
Fusebox access fl ap.
18. Checks/Anti-intrusion alarm/Parking space sensor
controls.
19. Lighting/Direction indicators/Foglamp/Voice
recognition controls.
20. Manual headlamp height adjustment.
9
F A M I L I A R I S A T I O N
D A S H B O A R D
1. Sunlight sensor.
2. Soft diffusion air conditioning adjustment knob.
3. Passenger's airbag.
4. Side window demister.
5. Ignition key in the glovebox:
- Passenger’s airbag activation/deactivation
6. Passenger's air vents.
7. Hazard lamps button.
8. Glovebox:
- Vehicle document storage
- Audio-video sockets
9. Doors and boot locking/unlocking control.
Programmable heating indicator.
10. Automatic gearbox SPORT/SNOW mode controls.
11. Electronic parking brake.
12. USB reader socket.
13. Armrest with cup-holder.
14. Suspension controls:
- Ground clearance adjustment
- Sport mode
15. Ashtray with lighter.
16. Gear lever.
17. Storage.
18. Audio and telematics system.
19. Air conditioning controls.
20. Storage.
21. Multifunction screen.
10
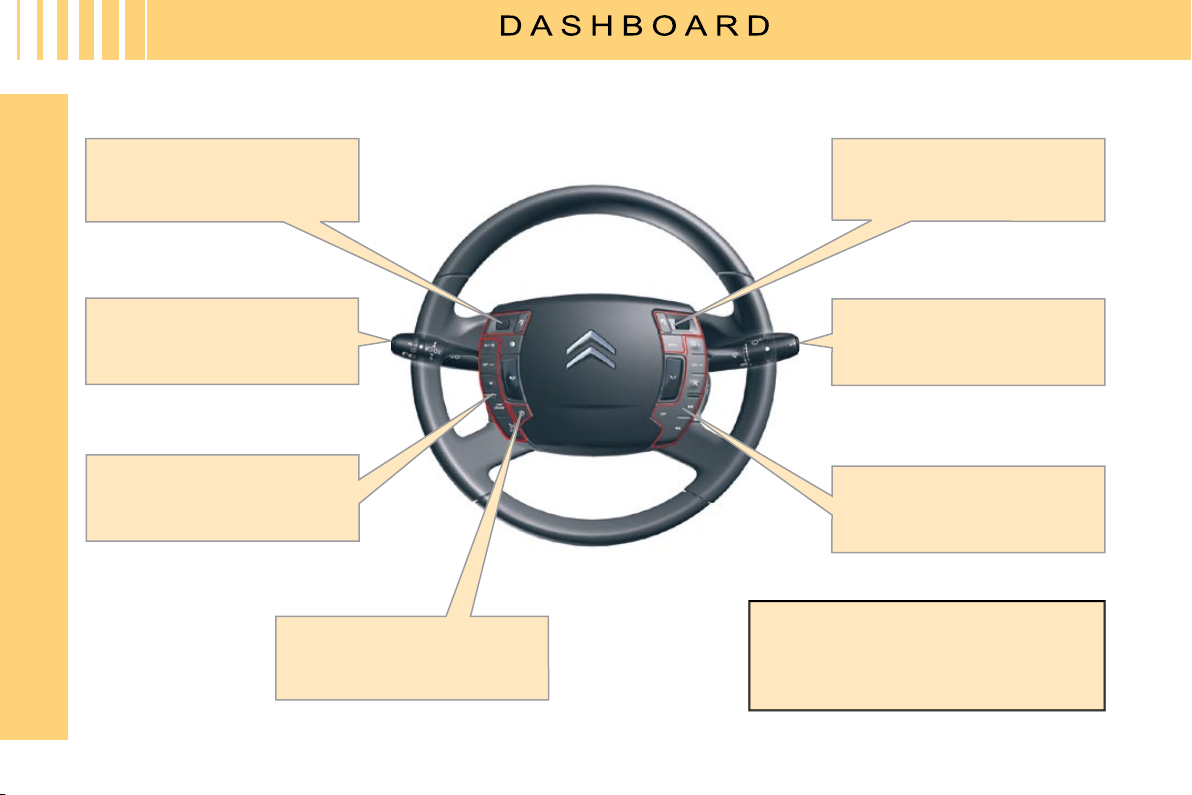
F A M I L I A R I S A T I O N
D A S H B O A R D
Audio.
Instrument panel menu.
Multifunction screen menu.
Telephone.
Cruise control and
speed limiter.
The " SET +, PAUSE, VOL+, MUTE "
buttons have touch-sensitive identifi ca-
tion to make them easier to use.
Activation of voice
recognition or reminder of
navigation guidance.
MODE: selection of the type
of information displayed on
multifunction screen.
136
11
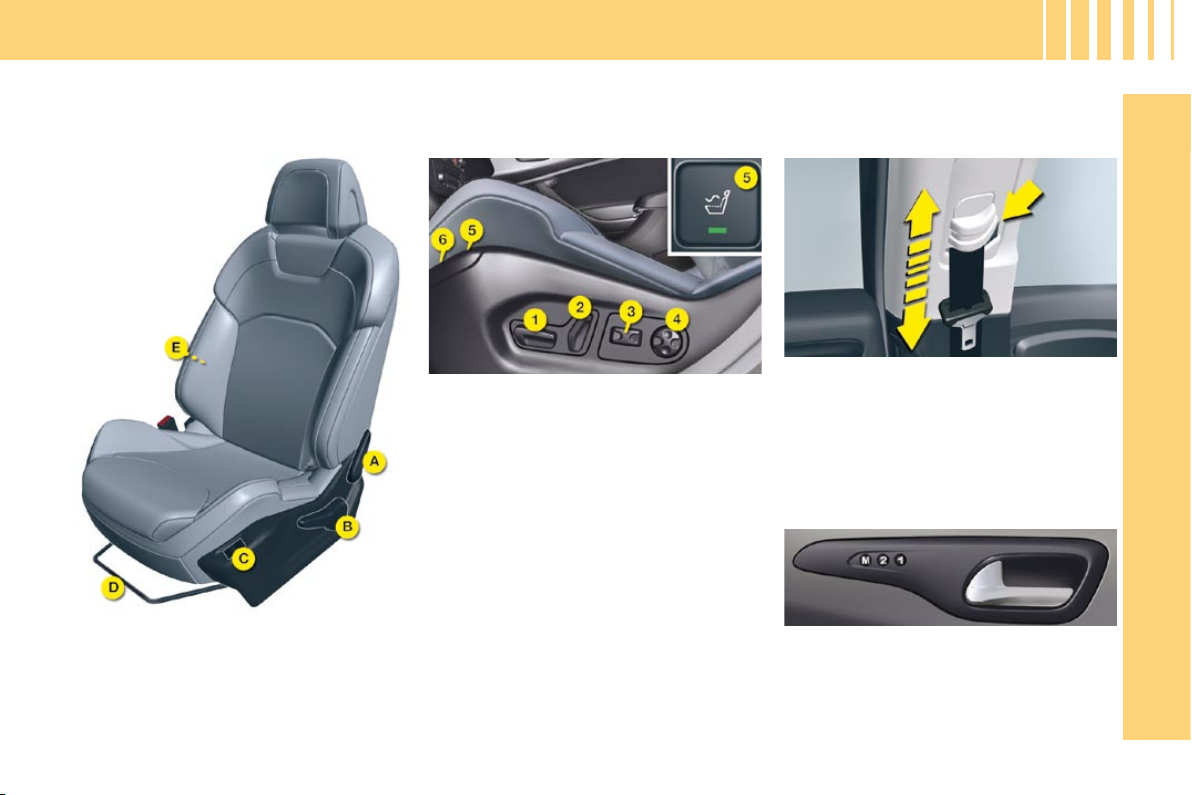
F A M I L I A R I S A T I O N
G E T T I N G S T A R T E D
1. Seat cushion height, angle and slide
adjustments.
2. Adjustment of the backrest angle.
3. Adjustment of top of backrest.
4. Adjustment of 1 axis lumbar support.
5. Massage function.
6. Heated seat control.
A. Adjustment of the backrest angle.
B. Adjustment of the seat height.
C. Heated seat control.
D. Longitudinal adjustment of seat.
E. Adjustment of the backrest lumbar
support.
Memorisation
The Memorisation function allows you to
programme the driver’s seat, rear view
mirrors and air conditioning settings.
The correct position of the upper seat
belt anchorage places the belt across
the middle of the shoulder.
To adjust the seat belt for height,
compress the control and slide it in
the desired direction.
Seat belt height adjustment Front seats
Electrical adjustments Manual adjustments
56
57
116
59
12
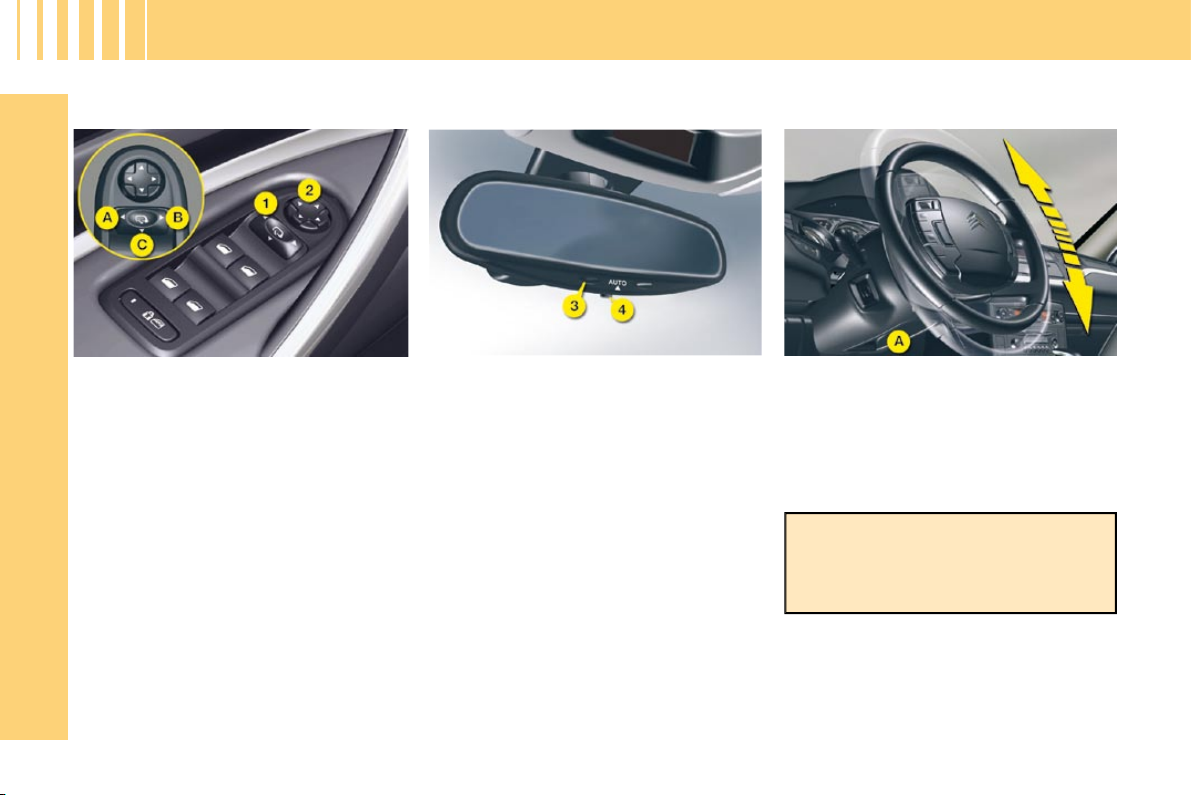
F A M I L I A R I S A T I O N
G E T T I N G S T A R T E D
Electrochrome interior rear
view mirror
Unlock the steering wheel by pushing
control A forwards.
Adjust the height and the reach of
the steering wheel, then lock the po-
sition by pulling the lever upwards.
Steering column adjustment Electric exterior rear view
mirrors
1. Selection of rear view mirror:
A. Left hand side.
B. Right hand side.
C. Foldback/Deployment.
2. Directional control for mirror se-
lected .
61
Operation
Switch on the ignition and press
button 4 .
-
Warning lamp 3 on: automatic mode.
- Warning lamp 3 off: automatic
mode stopped. The mirror remains
in its lightest defi nition.
62
63
As a safety precaution, these opera-
tions must not be carried out while
moving.
13
F A M I L I A R I S A T I O N
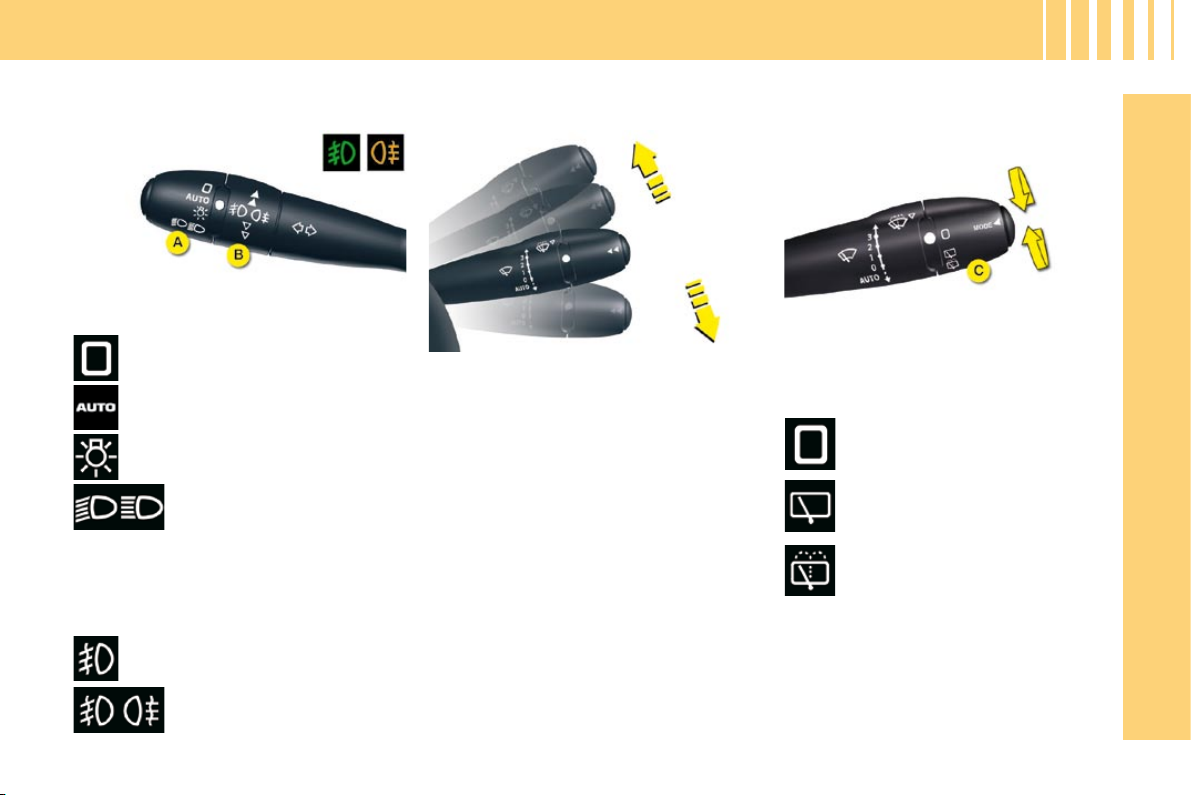
V I S I B I L I T Y
Front wipers
Control positions
2 Rapid wipe.
1 Normal wipe.
I Intermittent wipe.
0 Off.
Lighting
Sidelamps.
Dipped beams/main beams.
Lamps off.
Pull the control stalk towards you
to change between dipped beam
and main beam.
Front foglamps and rear
foglamps on.
Front foglamps on.
Automatic lighting of headlamps.
Rear wipers (Tourer)
Rotate control C to the desired posi-
tion.
Off
Intermittent wipe
Screen wash
Ring A
Ring B
83
Screen wash
Pull the screen wipe control stalk
towards you.
89-90
89
One press downwards:
- AUTO: Automatic wipe activated.
- Single wipe.
If the ignition has been switched off
for around 1 minute, it is necessary to
reactivate automatic wiping.
14
F A M I L I A R I S A T I O N
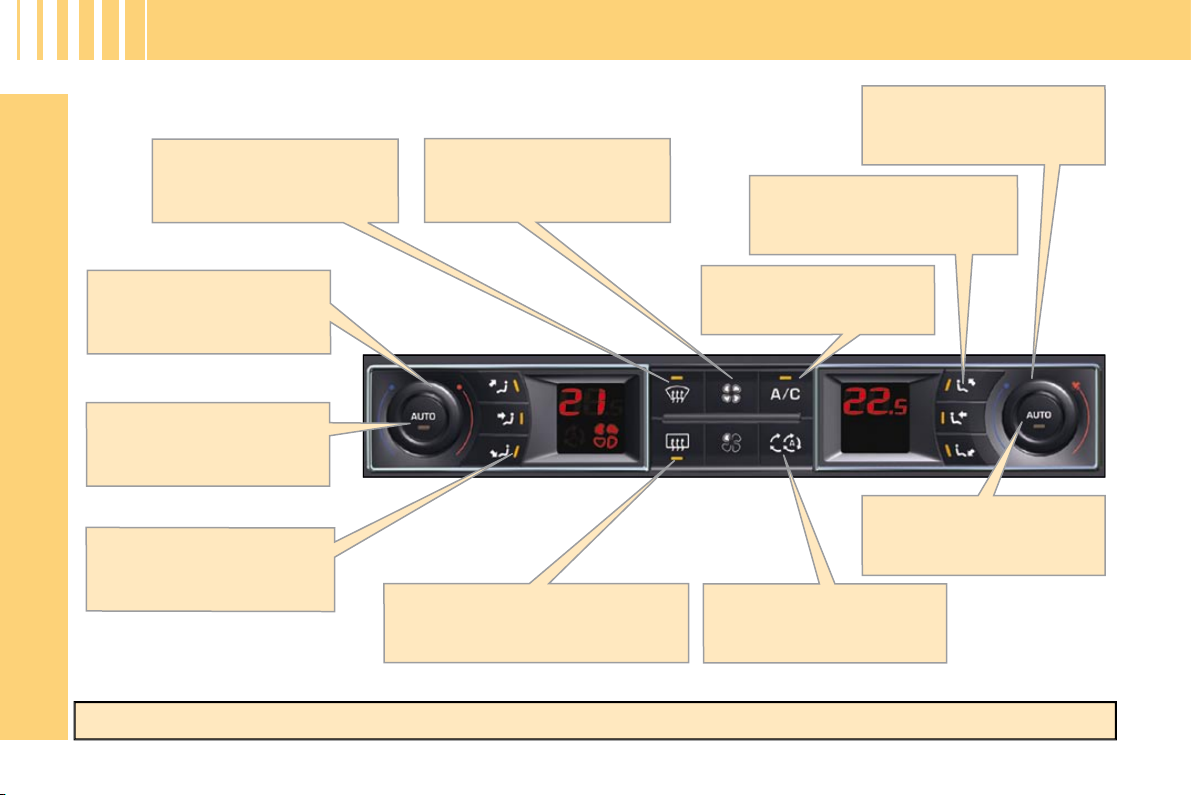
V E N T I L A T I O N
Dual zone automatic air conditioning
Adjustment of air
distribution on driver's side.
Passenger's side
automatic operation.
Adjustment of temperature
on driver's side.
Adjustment of air distribution
on passenger's side.
Rear and external rear view
mirrors demisting - deicing.
Air recirculation - entry of
air from outside.
Front demisting - deicing.
Driver's side automatic
operation.
It is recommended to use automatic mode by pressing on the " AUTO " button.
Adjustment of temperature
on passenger's side.
Activation/deactivation of
air conditioning.
Adjusting the air fl ow.
48
15
F A M I L I A R I S A T I O N
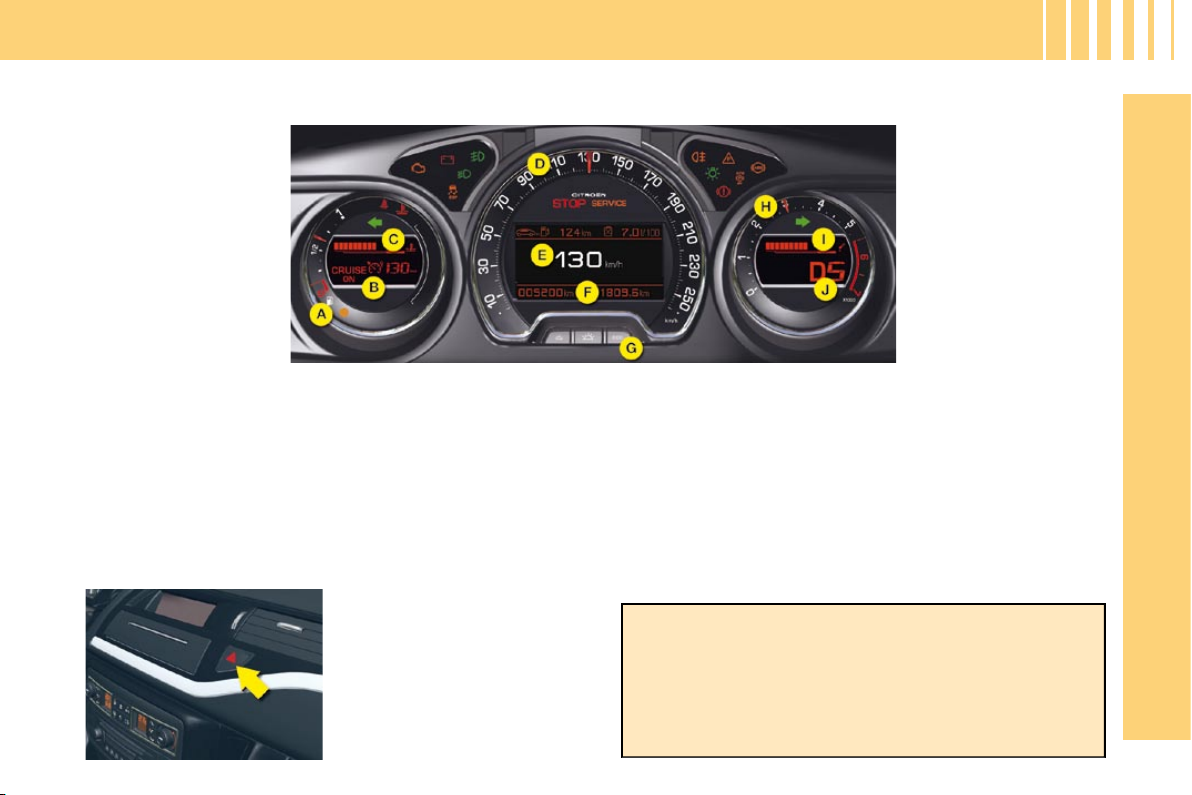
M O N I T O R I N G
Instrument panel
The hazard lamps can also
be used with the ignition
switched off.
A. Fuel gauge and low fuel warning lamp.
B. Cruise control/speed limiter information.
C. Coolant temperature.
D. Speed indicator.
E. Instrument panel.
F. Mileage recorder.
G. Trip mileage recorder reset button.
H. Rev counter.
I. Engine oil temperature.
J. Display of automatic gearbox information.
- When the ignition is switched on, the orange and
red warning lamps light up.
- When the engine is running, these warning lamps
should go out.
- If any warning lamps remain lit, refer to the
"Instruments and controls" section.
Hazard warning lamps
22
110
16
F A M I L I A R I S A T I O N
M O N I T O R I N G
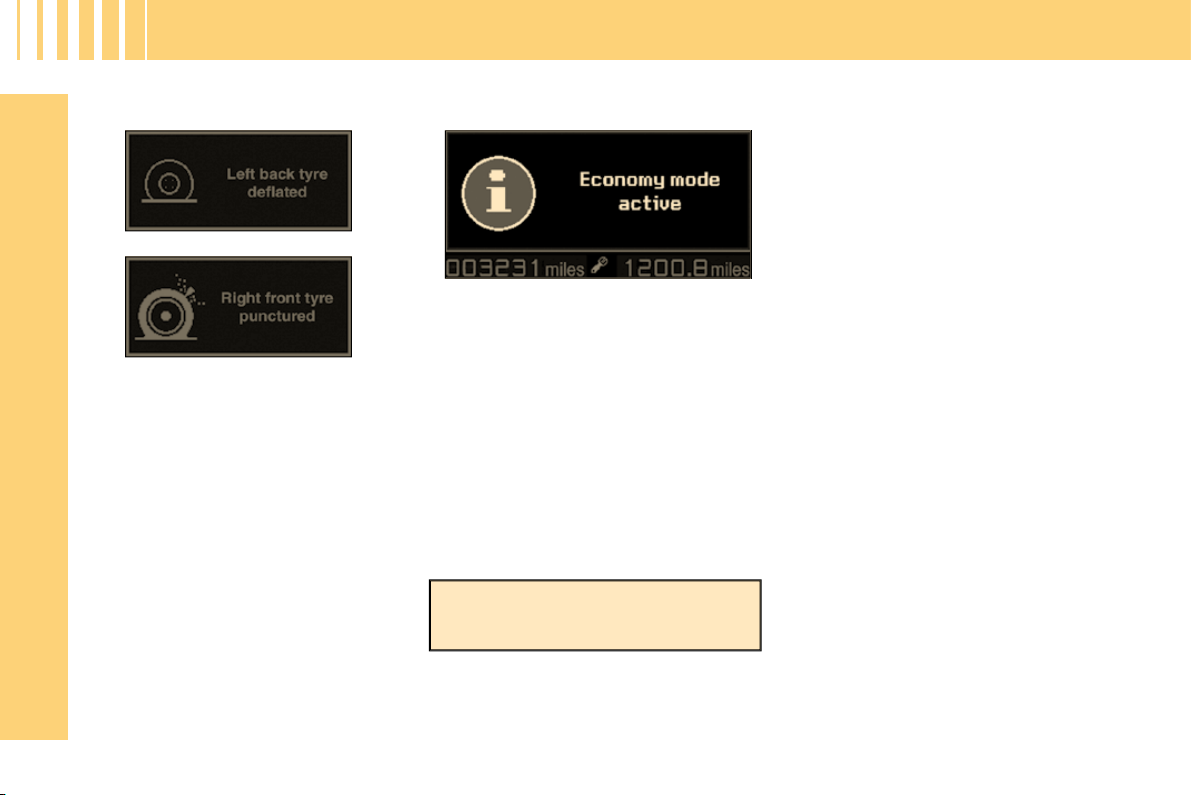
Tyre deflation detection
The tyre defl ation detection system is
a driving aid which informs you of the
condition of your tyres.
It does not replace either vigilance or
responsibility on the part of the driver.
Economy mode
After switching off the engine, some
systems (radio, wipers, electric
windows, opening roof, electric seats,
telephone, video, interior lighting,
motorised tailgate, etc.) are supplied
electrically for a maximum of no more
than around one hour, so as to avoid
discharging the battery.
This period may be reduced
considerably if the battery's state of
charge is low.
Once this period is over, a message is
displayed on the instrument panel screen
and the active functions are placed on
standby.
These functions will be automatically rea-
ctivated when the vehicle is restarted.
111
185
17
F A M I L I A R I S A T I O N
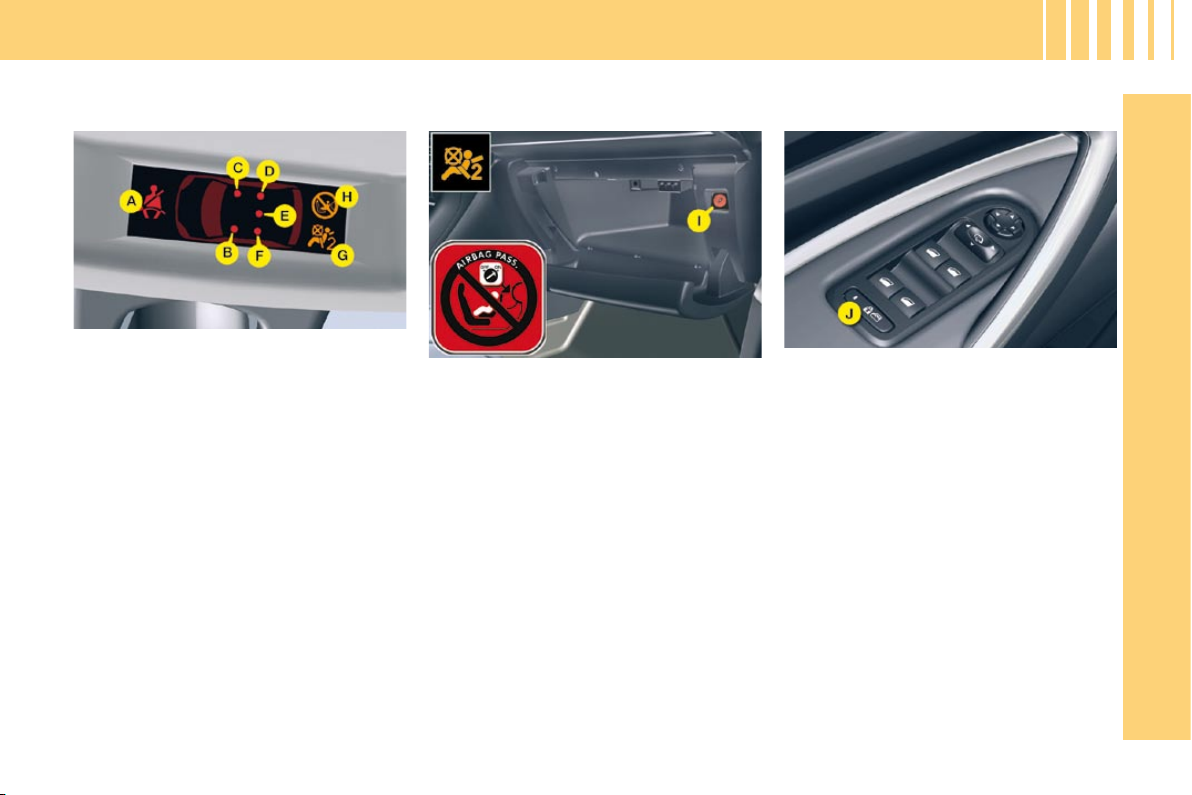
P A S S E N G E R S A F E T Y
Front passenger's airbag
deactivation
Child safety Seat belts and front
passenger's airbag
The seat belt fastened/unfastened
status for each seat category is indicated
by the lighting or fl ashing of the warning
lamps linked to each position:
A. Non-fastened/unfastened front and/
or rear seat belts warning lamp.
B. Front left-hand seat belt warning
lamp.
C. Front right-hand seat belt warning
lamp.
D. Rear right-hand seat belt warning
lamp.
E. Central rear seat belt warning
lamp.
F. Rear left-hand seat belt warning
lamp.
G. Front passenger's airbag
deactivation warning lamp.
H. Front passenger's airbag activation
warning lamp.
31
In order to be able to use a rearwards-
facing child seat in the front passenger's
seat position, it is imperative to deactivate
the passenger's airbag.
For that:
With the ignition switched off, insert
the key into the switch I .
Turn the key to the "OFF" position, the
passenger's airbag is deactivated.
The front passenger's airbag deactiva-
tion warning lamp G lights up when the
ignition is switched on.
119
This deactivates the controls in the rear
of the vehicle, both for the rear windows
and for opening the rear doors from the
inside. The electric child safety device
is activated by pressing on button J .
The activation of the function is indicated
by a message on the instrument panel
screen and the light on button J .
109

18
F A M I L I A R I S A T I O N
Electric parking brake
Never leave a child alone in-
side the vehicle with the igni-
tion on, as they could release
the parking brake.
Hill start assist
Manual operation
The MANUAL application/release of the
parking brake is possible permanently
by pulling/pushing control B .
Before leaving the ve-
hicle, check that warn-
ing lamp A (!) (red) on
the instrument panel
is permanently lit and that warning
lamp P (red) on control B is lit.
With the engine running, if
you leave the vehicle, manu-
ally apply the parking brake.
Do not leave the vehicle while
it is being held in the tempo-
rary immobilisation hill start
assist phase.
To aid starting on a gradient, your vehicle
is equipped with a system which keeps
it immobilised for a short time (about 1
second), the approximate time it takes
to move your foot from the brake pedal
to the accelerator pedal.
This function is only active when:
- The vehicle is completely stationary,
with your foot on the brake pedal.
- In particular conditions on a slope.
- With the driver's door closed.
Before leaving the ve-
hicle, check that warn-
ing lamp A (!) (red) on
the instrument panel
is permanently lit and that warning
lamp P (red) on control B is lit.
Automatic operation
The electronic parking brake releases
automatically and progressively when
you press the accelerator. With the
vehicle stationary, the parking brake
is automatically applied when the
engine is switched off.
D R I V I N G
123
130

19
F A M I L I A R I S A T I O N
This system allows you to maintain a
constant vehicle speed programmed by
the driver.
Cruise control
Speed limiter
This system allows you to choose a maxi-
mum speed that you do not wish to exceed.
The chosen speed must be higher
than 20 mph (30 km/h) .
Cruise control is active on the higher
gears of the gearbox. The chosen
speed must be higher than 25 mph
(40 km/h).
Instrument panel display
The speed limiter or cruise control
mode is displayed on the instrument
panel when selected.
Cruise control
Speed limiter
Selection of "LIMIT":
Activation of speed limiter
mode.
"SET +" : Increase of the
maximum speed.
"SET -": Reduction of the
maximum speed.
Suspension or resumption of
mode.
Deactivation.
The chosen speed is
memorised.
"SET": Memorisation
of the speed (system
paused).
Selection of " CRUISE
:
Activation of cruise control
mode.
"SET +" : Increase of the
memorised speed (system ON).
"SET -" : Reduction of the
memorised speed (system ON).
Suspension or resumption of
mode.
Deactivation.
D R I V I N G
138 140
20
F A M I L I A R I S A T I O N
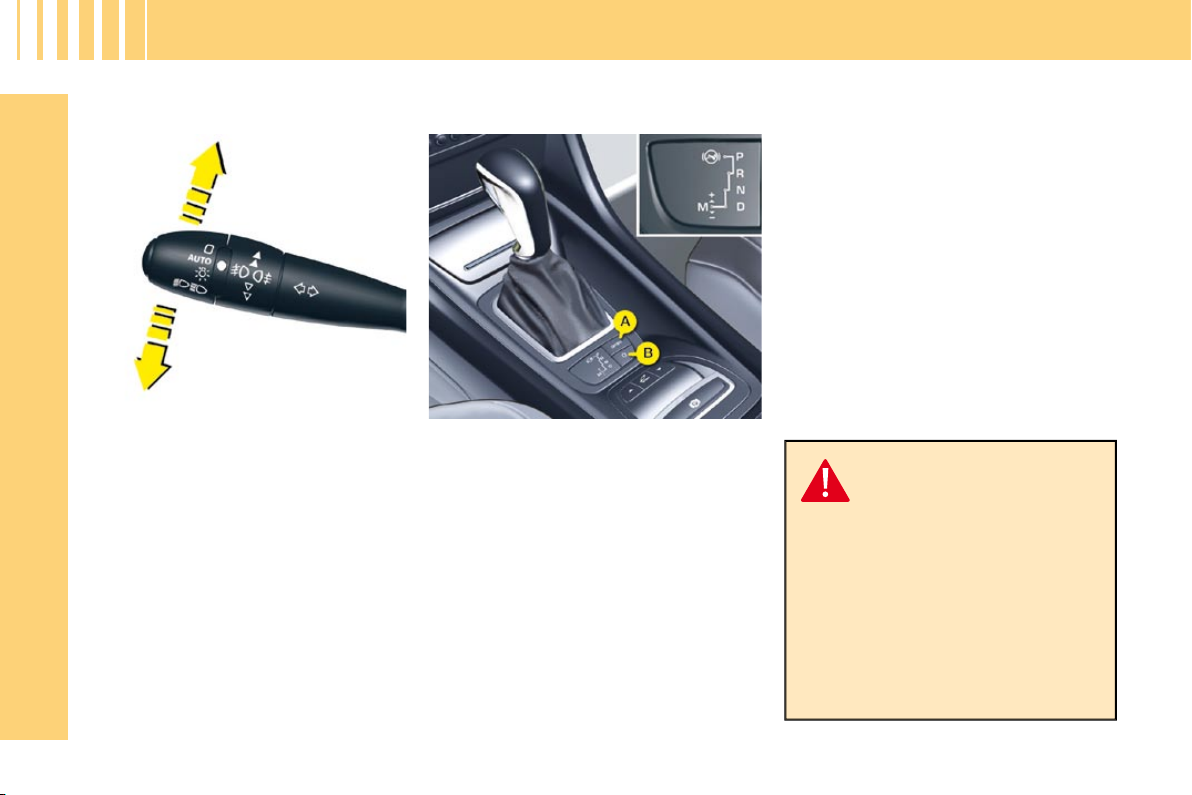
Move the stalk briefl y upwards or
downwards, without going beyond
the resistance point; the direction
indicators will fl ash 3 times.
Positions
P: Parking.
R: Reverse gear.
N: Neutral.
D: Automatic mode.
M: Sequential mode.
The automatic gearbox offers you:
- Operation in auto-active mode ,
with automatic adaptation to your
style of driving as well as to the road
profi le ( Position D ).
- Operation in sequential mode , with
manual gear changing ( Position M ).
- Operation in automatic SPORT
mode (Position D) and press but-
ton A .
- Operation in automatic SNOW
mode (Position D) and press but-
ton B .
For safety:
The gear lever can only be
disengaged from position P
if you are pressing the
brake pedal.
When a door is opened, an audible
signal sounds if the gear selector is
not in position P.
Before leaving the vehicle, make
absolutely certain that position P is
selected.
Direction indicators -
"Motorway" function
Automatic gearbox
D R I V I N G
110
131
21
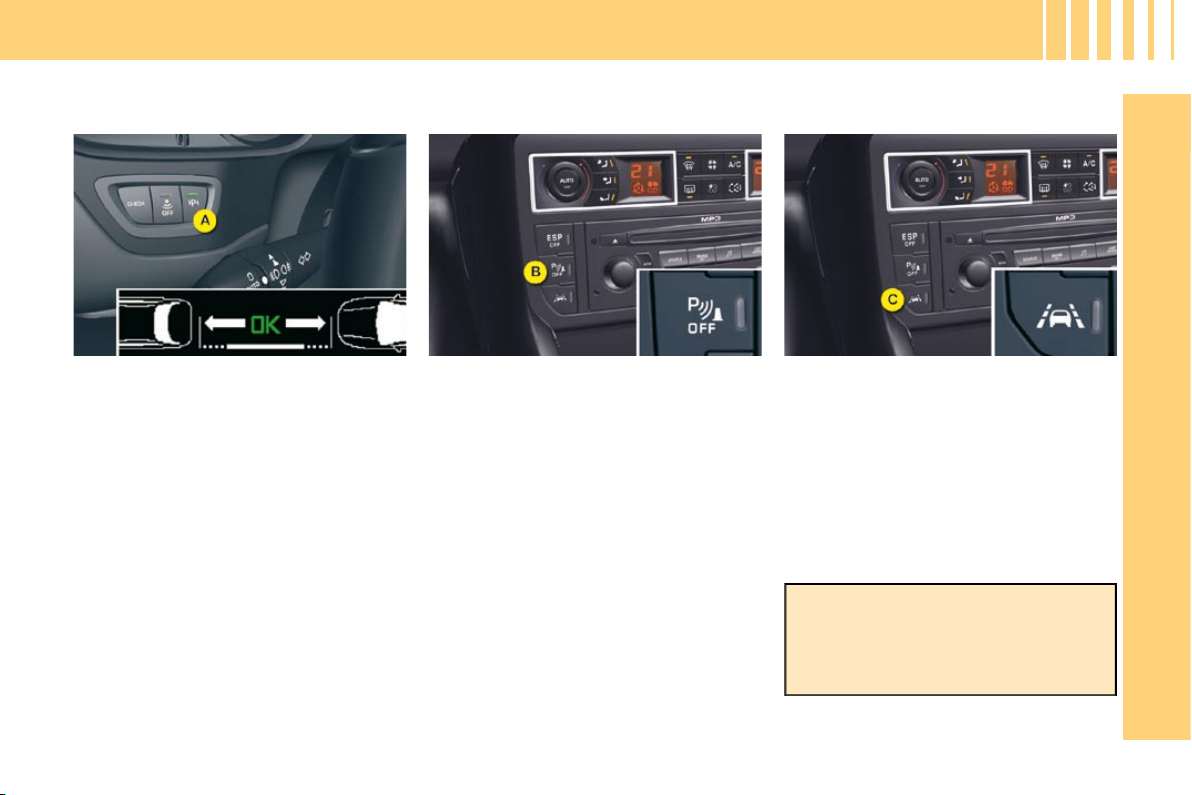
F A M I L I A R I S A T I O N
You can activate/deactivate the parking
assistance by pressing button B . When
the parking assistance is inactive, the
warning lamp on button B is lit up.
Parking assistance
(visual and sound)
Parking space sensor
You can select the "Parking space
sensor" by pressing button A , direction
indicator activated on the side of the
space to be measured, with a speed
lower than 6 mph (10 km/h) and at a
distance of less than 1.5 m from the
space.
The fi xed lighting of the warning lamp
indicates that this function is selected.
D R I V I N G
143
145
This device is recommended on
motorways and dual carriageways, and
operates only at speeds above 50 mph
(80 km/h).
A press on button C activates the
function, the warning lamp on the button
lights up.
Lane departure warning system
The system does not alert you if one
of your direction indicators is operating
and for approx. 20 seconds after the
direction indicator has stopped.
142
22
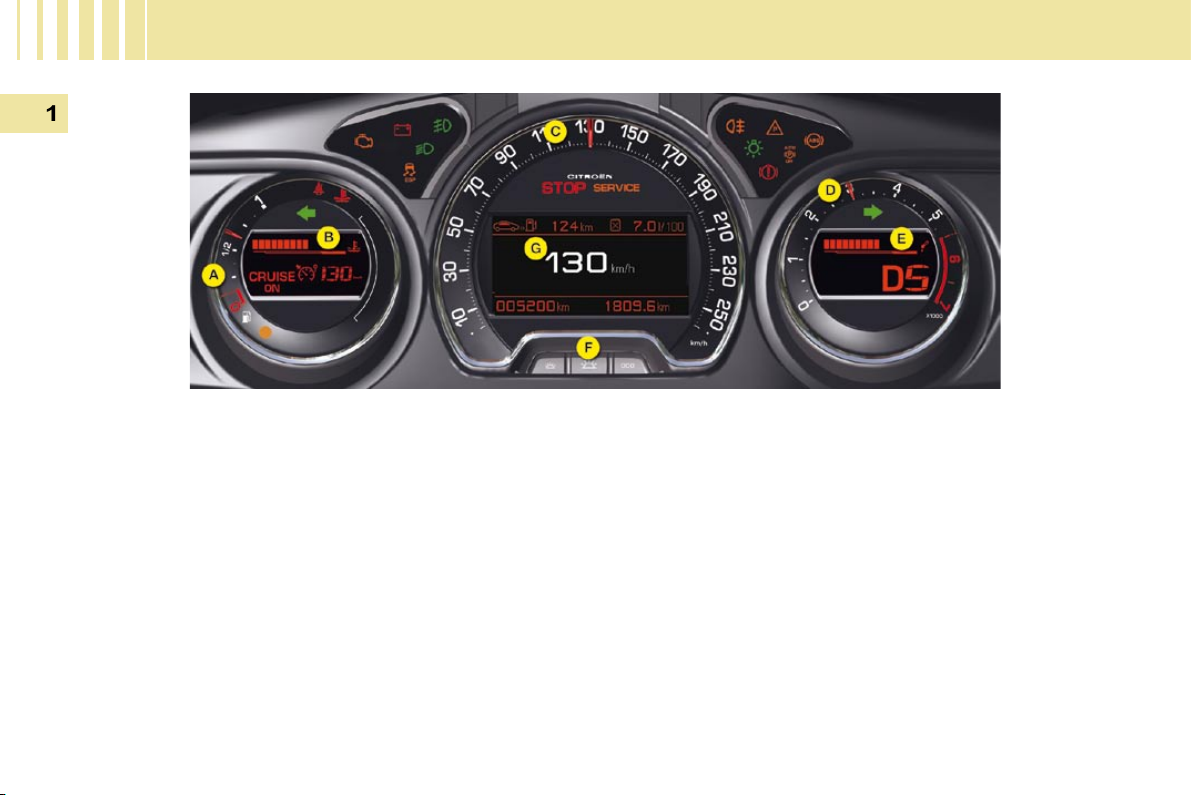
I N S T R U M E N T S a n d C O N T R O L S
Panel grouping together the dials and vehicle operation indicator and warning lights.
A. Fuel gauge
B. Indicator:
● Coolant temperature
● Cruise control/Speed limiter
information
C. Speed indicator
D. Rev counter
E. Indicator:
● Engine oil temperature
● Gear selector position and gear
engaged (Automatic gearbox)
F. Controls:
● Lighting rheostat
● Resetting to zero of trip mileage
computer and maintenance
indicator
G.
Instrument panel screen indicating:
● Depending on the page selected
with the left-hand control knob
on the steering wheel:
- Digital speed
- Trip computer
- Navigation (guidance)
information
- Display of message alerts
- Engine oil level check
- Maintenance indicator
● Permanently:
- Trip mileage recorder
- Total mileage recorder
23
I N S T R U M E N T S a n d C O N T R O L S
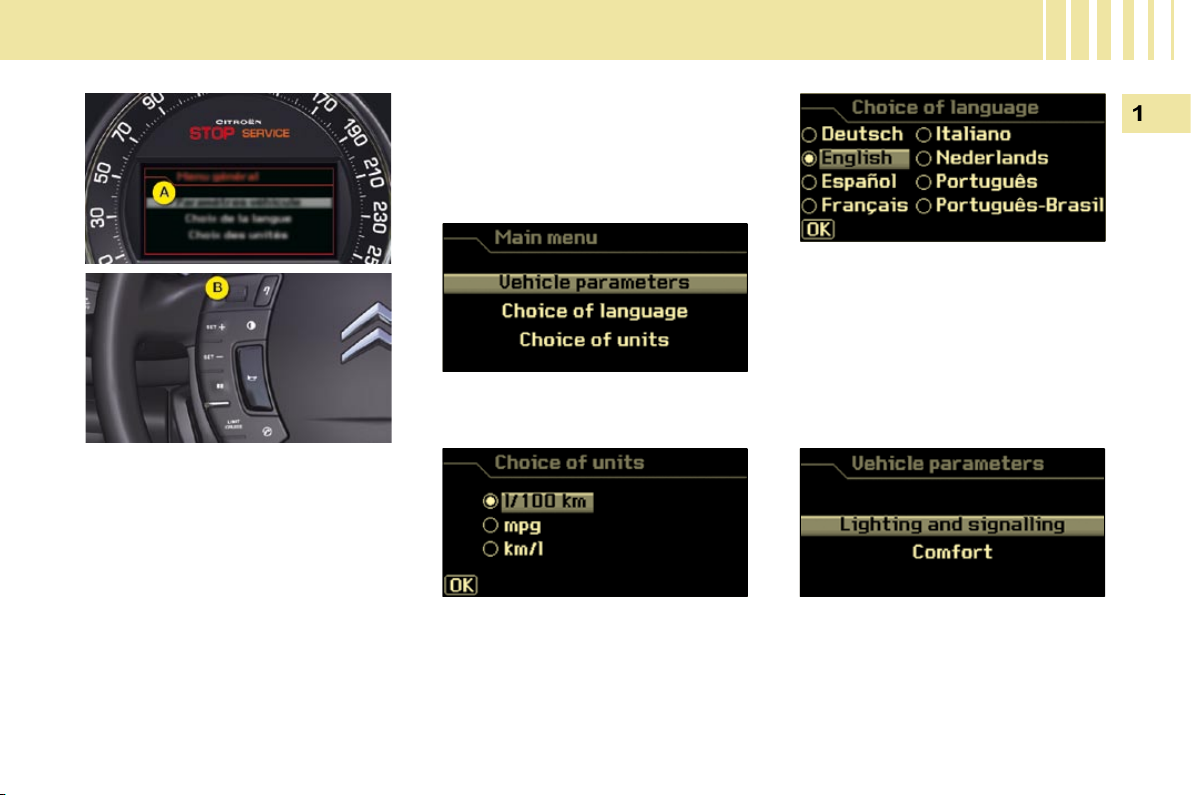
"Choice of language" menu
This allows you to choose the display
and voice recognition language.
"Choice of units" menu
This allows you to choose metric or
imperial units.
The main menu allows you to pro-
gramme certain vehicle and instrument
panel functions:
Main menu
The instrument panel A is located in
the centre of the dashboard.
- With the vehicle stationary, you
can access the main menu of
the instrument panel by quickly
pressing on the left-hand rotating
control B on the steering wheel.
- Whilst driving, the message
"Action impossible whilst
driving" is displayed on the in-
strument panel if you try to open
the main menu.
"Vehicle parameters" menu
This allows you to access the pa-
rameters relating to:
- The vehicle lighting.
- The comfort levels in the vehicle.

24
I N S T R U M E N T S a n d C O N T R O L S
"Lighting" menu
Once you have selected this menu,
you can:
Activate/deactivate the lighting
of the daytime-running lamps .
Activate/deactivate the guide-
me-home lighting and adjust its
duration.
Activate/deactivate the dual-
function Xenon directional head-
lamps.
"Comfort" menu
Once you have selected this menu,
you can:
Activate/deactivate the driver's
welcome lighting function.
Select the unlocking of all the
doors or just the driver's door.
Activate/deactivate the auto-
matic engaging of the electronic
parking brake.
25
I N S T R U M E N T S a n d C O N T R O L S
TRIP COMPUTER
System which provides current in-
formation concerning the route trav-
elled (range, consumption, etc.)
Data displays
Route zero reset
The trip computer is displayed on
the instrument panel display.
Turn the left-hand dial A on the
steering wheel to display the various
trip computer tabs in succession:
- the current information tab is
displayed in zone B of the in-
strument panel, with:
● the range,
● the current consumption,
- the route "1" tab is displayed
in zone C of the instrument
panel, with:
● the distance travelled,
● the average consumption,
● the average speed,
for the fi rst route.
- the route "2" tab is displayed
in zone C of the instrument
panel, with:
● the distance travelled,
● the average consumption,
● the average speed,
for the second route.
When the route required is dis-
played, press the left-hand dial
on the steering wheel for more
than two seconds.
The routes "1" and "2" are inde-
pendent but their use is identical.
Route "1" permits, for example, daily
calculations, and route "2" monthly
calculations.

26
I N S T R U M E N T S a n d C O N T R O L S
A few definitions…
Range
(km or miles)
Current consumption
(l/100 km or km/l or mpg)
Average consumption
(l/100 km or km/l or mpg)
Distance travelled
(km or miles)
Average speed
(km/h or mph)
This indicates the distance which
can still be travelled with the fuel re-
maining in the tank in relation to the
average consumption over the last
few miles (kilometres) travelled.
This fi gure may increase following
a change in the style of driving or
the relief, resulting in a signifi cant
change in the current consump-
tion.
When the range falls below 20 miles
(30 km), dashes are displayed. After
fi lling with at least 5 litres of fuel,
the range is recalculated and is dis-
played when it exceeds 60 miles
(100 km).
If dashes are displayed continu-
ously while driving in place of the
digits, contact a CITROËN dealer.
This function is only displayed from
20 mph (30 km/h).
This is the average quantity of fuel con-
sumed during the last few seconds.
This is the average quantity of fuel
consumed since the last trip computer
zero reset.
This indicates the distance travelled
since the last trip computer zero reset.
This is the average speed calculat-
ed since the last trip computer zero
reset (ignition on).

27
I N S T R U M E N T S a n d C O N T R O L S
Return to the main
instrument panel screen
display
Successive rotations of the left-hand
control knob on the steering wheel
allow you to return to the main instru-
ment panel screen display (vehicle
speed), via the navigation informa-
tion screen, then the screen display-
ing only the total mileage and the trip
mileage (bottom of screen).
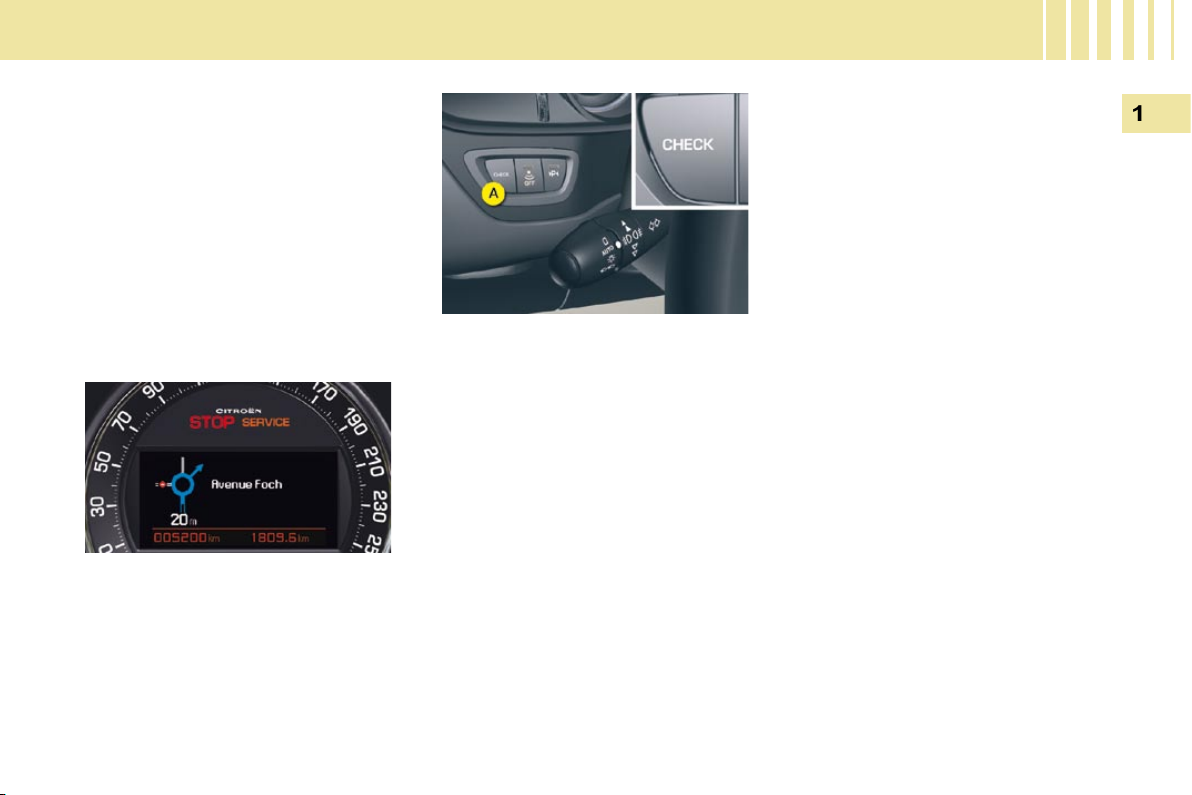
Display of navigation
information on instrument
panel screen
You can display navigation informa-
tion on the instrument panel screen
by rotating the left-hand knob on the
steering wheel.
Log of alerts
This function allows you to display
the log of alerts.
Press on button A .
The following messages appear
consecutively on the instrument
panel screen:
- Tyre pressure check.
- Maintenance indicator reminder.
- Display of message alerts.
- Oil level check.
27
I N S T R U M E N T S a n d C O N T R O L S
Return to the main
instrument panel screen
display
Successive rotations of the left-hand
control knob on the steering wheel
allow you to return to the main instru-
ment panel screen display (vehicle
speed), via the navigation informa-
tion screen, then the screen display-
ing only the total mileage and the trip
mileage (bottom of screen).
Display of navigation
information on instrument
panel screen
You can display navigation informa-
tion on the instrument panel screen
by rotating the left-hand knob on the
steering wheel.
Log of alerts
This function allows you to display
the log of alerts.
Press on button A .
The following messages appear
consecutively on the instrument
panel screen:
- Tyre pressure check.
- Maintenance indicator reminder.
- Display of message alerts.
- Oil level check.

28
I N S T R U M E N T S a n d C O N T R O L S
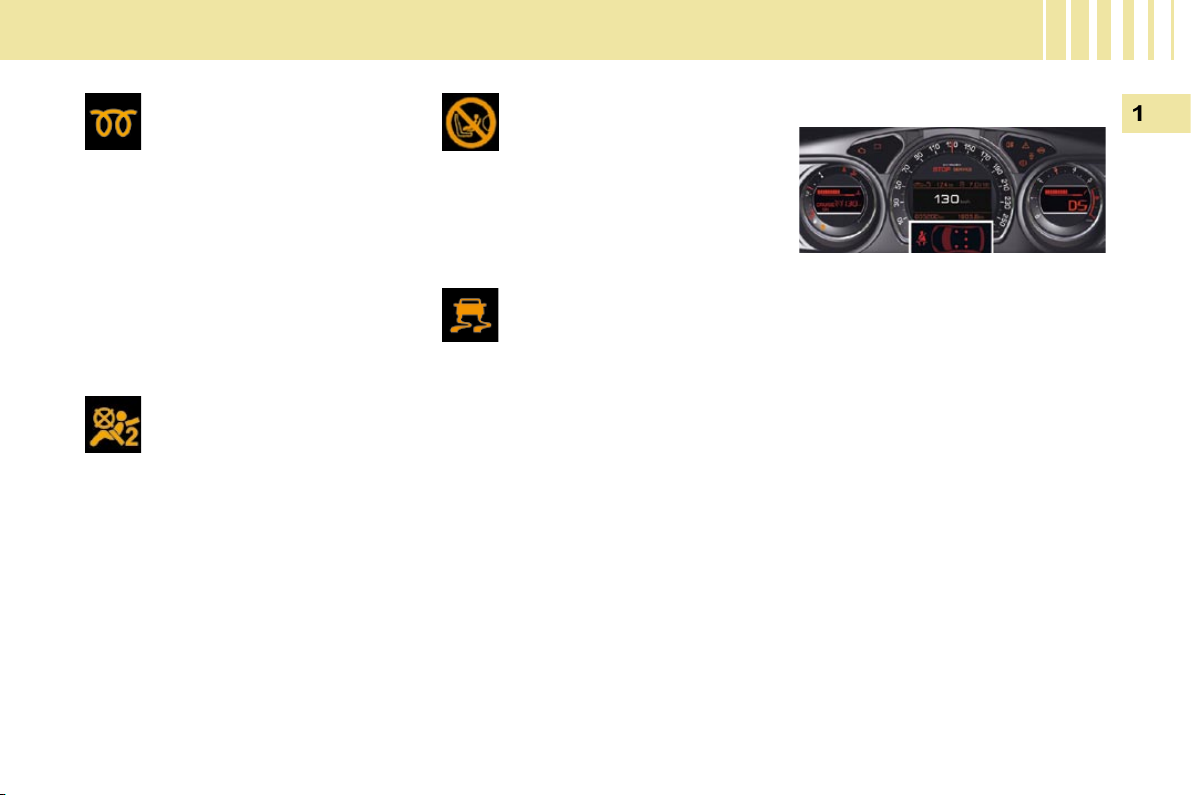
Indicator and warning lights
When the ignition is switched on
The warning lights come on for a
few seconds when the vehicle's ig-
nition is switched on.
When the engine is started, these
warning lights should switch off.
Operation indicator lights
Visual indicators informing the driver
that a system is in operation (opera-
tion or deactivation indicator lights)
or of the occurrence of a fault (warn-
ing light).
1. Front fog lamps.
2. Left-hand direction
indicator.
3. Side lights.
4. Main beam headlamps.
5. Dipped headlamps.
6. Right-hand direction
indicator.
7. Rear fog lamps.
29
I N S T R U M E N T S a n d C O N T R O L S
Deactivation warning lights
If one of the following warning lights
comes on, this confi rms that the
corresponding system has been
switched off intentionally.
Passenger's air bag system
deactivation
Dynamic stability control
(ESP/ASR) deactivation
The ESP/ASR system is put
into service automatically
when the vehicle is started.
A specifi c button, located
in the centre of the fascia, permits
deactivation of the system. This is
confi rmed by continuous lighting of
this warning light and of the indicator
light on the button.
From approximately 30 mph (50 km/h),
the system is reactivated automatically.
Warning lights Diesel engine pre-heating
Wait until this is switched off before
operating the starter.
When the engine is running or the
vehicle is moving, the lighting of
one of the following warning lights
indicates the occurrence of a fault
requiring intervention on the part of
the driver.
Any fault resulting in the displaying
of a warning light must be the sub-
ject of further diagnostics by reading
the associated message on the mul-
tifunction display.
Should you encounter any prob-
lems, do not hesitate to contact a
CITROËN dealer.
Front passenger's airbag
activation
If this comes on temporarily when
the ignition is switched on, it indi-
cates that the front passenger's air-
bag is active.
The passenger's air bag
system is put into service
automatically when the ve-
hicle is started.
A specifi c control, located in the glove
box, permits deactivation of the sys-
tem. This is confi rmed by continuous
lighting of this warning light on the
instrument panel or a message on
the multifunction screen.
 Loading...