


E X T E R I O R
I
Parking assistance
Audible and/or visual front parking
assistance.
64
IN BRIEF
2 buttons
Pull the handle of the sliding door to trigger its electrical opening.
16
4
Lefthand door
Righthand door
4 buttons
A press on either of the buttons allows you to electrically open the corresponding sliding door.
Fuel lap open
With the fuel l ap open during refuelling, a safety system restricts the opening of the sliding door.
122
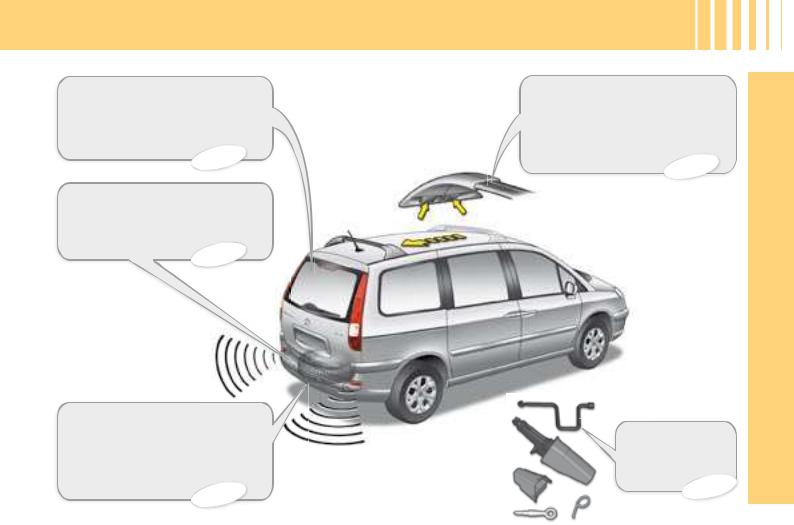
Tailgate
Remote control locking and unlocking. Pull the handle and lift up the tailgate.
69
Parking assistance
Audible and/or visual rear parking assistance.
64
Spare wheel
Secure the punctured wheel to the l oor using the cable. Re-
close the cover to the opening.
130
E X T E R I O R
I
Transverse roof bars
Disengage the four levers, slide the rails in then lock the levers.
129
IN BRIEF
Wheelbrace.
Jack.
Towing eye.
130
5

I N T E R I O R
I
IN BRIEF
|
|
|
|
I N T E R I O R |
|
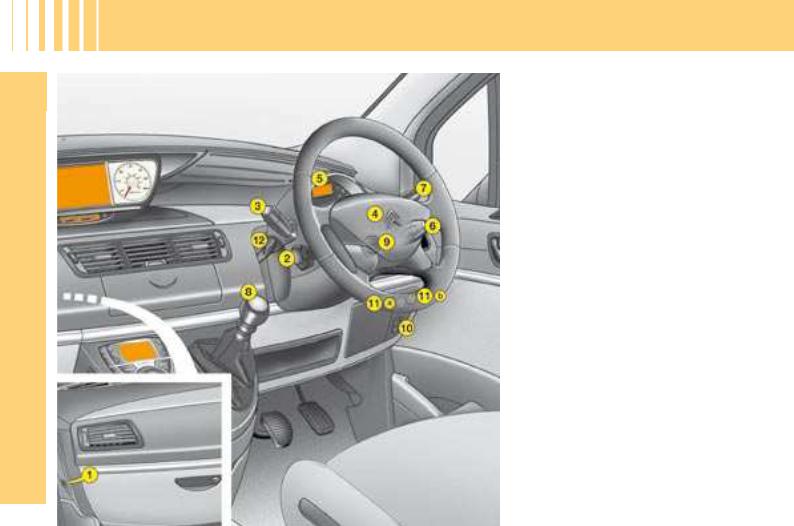
1. |
Electric rear view mirror |
12. |
Adjustable side air vent. |
||
|
controls. |
13. |
Battery / Fuse box. |
||
|
- |
Electric window controls. |
|||
|
|
|
|||
|
- |
Deactivation of rear electric |
14. |
Passenger’s airbag. |
|
|
|
window controls. |
15. |
Lower passenger’s glove |
|
2. |
Upper driver’s glove box. |
||||
|
box / CD changer. |
||||
3. |
Adjustable central air vents. |
16. |
Air conditioning controls. |
||
4. |
RD4 radio or GPS NaviDrive |
17. |
Cigar lighter / 12 V accessory |
||
|
radio telephone with shutter. |
|
socket. |
||
5. |
Instrument panel / Large |
18. |
Hazard warning lamps. |
||
|
colour screen. |
19. Oddments tray or additional |
|||
6. |
Sunlight and cabin |
||||
|
telematics control. |
||||
|
temperature sensor. |
20. |
Refrigerated compartment. |
||
7. |
Upper passenger’s glove box. |
||||
21. |
Ashtray / Bottle-holder. |
||||
8. |
Windscreen deicing and |
||||
22. |
Seat adjustment control. |
||||
|
demisting vent. |
||||
9. |
Loudspeaker (tweeter). |
23. |
Storage. |
||
10. |
Window deicing and |
24. |
Fuse box. |
||
|
demisting vent. |
25. |
Parking brake – left-hand |
||
|
|
|
|||
11. |
Passenger’s airbag |
|
side. |
||
|
deactivation switch (if i tted). |
|
|
||
26.Bonnet opening (under cover) – left-hand side.
27.Acoustic windscreen.
DATE AND TIME
ADJUSTMENT
35-36
ADDITIONAL HEATING
With the engine idle or with the vehicle stationary it is usual to notice a whistling noise and some minor
emissions (steam / odours).
71
I
IN BRIEF
7
I
IN BRIEF
D A S H B O A R D
1. Volumetric alarm deactivation switch.
2. Cruise control / speed limiter controls.
3. Lighting, direction indicator controls.
4. Driver’s airbag. Horn.
5. Multifunction display.
6. Radio controls under steering wheel.
7. Screen wipe / screen wash / trip computer controls.
8. Gear lever.
9. Ignition.
10. Headlamp height adjustment.
11. a/ ESP/ASR activation/ deactivation button.
b/ Parking assistance activation/deactivation button.
12. Steering column adjustment control.
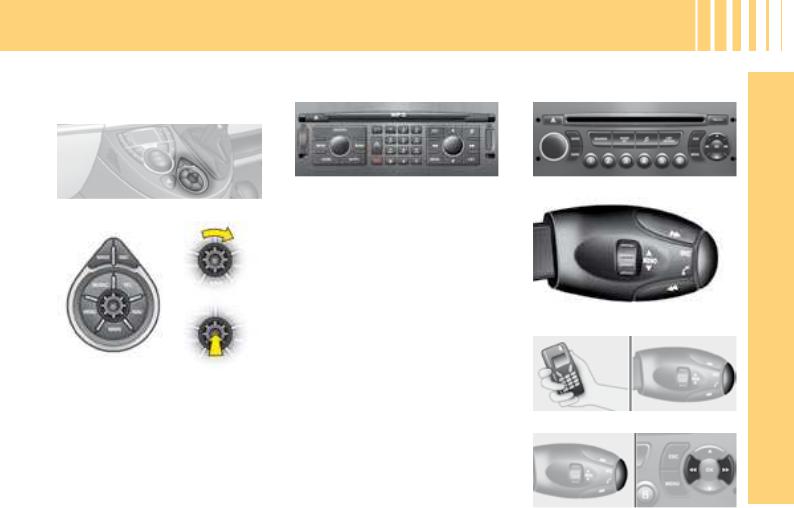
Easy-to-use control for accessing the NaviDrive functions.
selection
validation
NaviDrive : see NaviDrive handbook.
RD4 : see CD radio handbook.
D A S H B O A R D
NaviDrive
TheNaviDrivesystemincorporates a hard drive with a capacity of 10 Gb, for storing your music. The Jukebox function allows you to listen to up to 10 hours of selected music. The detailed map of Europe is stored on this hard drive, without the need for a CD. This is displayed on the colour screen and offers you a 3D view. The GSM hands-free telephone gives you access, via your SIM card, to the CITROËN Emergency service (conditions apply).
RD4
HANDS-FREE KIT
Receive a call
I
IN BRIEF
Make a call |
|
|

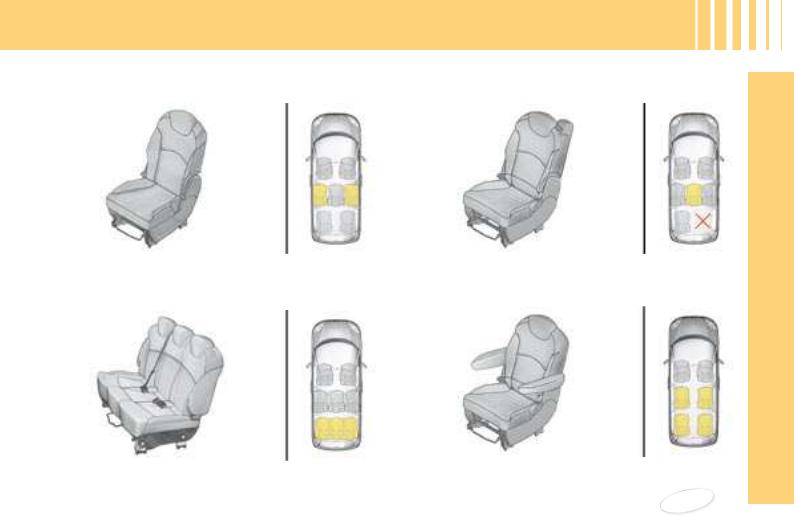
Driver’s seat
I
Manually adjustable seat
BRIEF |
|
IN |
Electrically |
adjustable seat |
G E T T I N G S TA R T E D
1.Longitudinal adjustment.
2.Backrest angle.
3.Seat height.
4.Lumbar support.
5.Head restraint height and anlgle.
Rotating the seat
Pull the button on the end of the parking brake forwards. The parking brake lever goes back down. You can now rotate the seat. To resume normal operation of the parking
brake, pull the lever upwards until it clicks into place.
89-90
10
G E T T I N G S TA R T E D
Other types of seats
Matching side seats |
Central rear seat |
Rear benchseat |
Captain’s chair |
I
IN BRIEF
93
11
G E T T I N G S TA R T E D
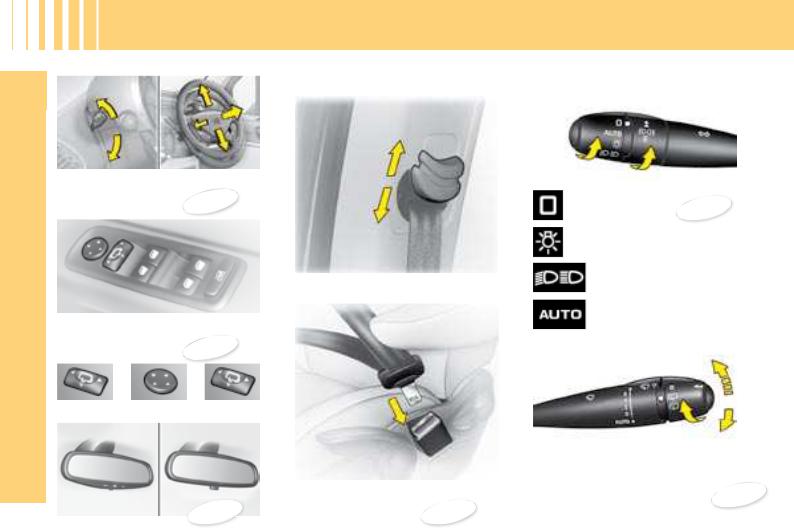
Seat belts
I
Adjust the height and the reach of
the steering wheel.
44
BRIEF |
Height adjustment. |
|
|
IN |
Electronic external rear view mir- |
rors. |
|
|
47 |
Visibility
Lamps off
39
Sidelamps
Main beams (blue)
Dipped beams (green)
AUTO, automatic lighting of headlamps
Screen wipe controls
Select |
Adjust |
Reposition |
|
|
|
|
|
|
control |
|
|
|
|
|
|
|
|
2 |
fast |
|
|
|
|
|
1 |
normal |
|
|
|
|
|
I |
intermittent |
|
|
|
|
Locking. |
0 |
off |
42 |
|
|
|
|
single wipe. |
||
|
|
46 |
45 |
|
|
|
12 |
|
AUTO, push the stalk |
|
|||
|
|
|
|
|||
|
|
|
|
downwards. |
|
|
|
|
|
|
|
|
|
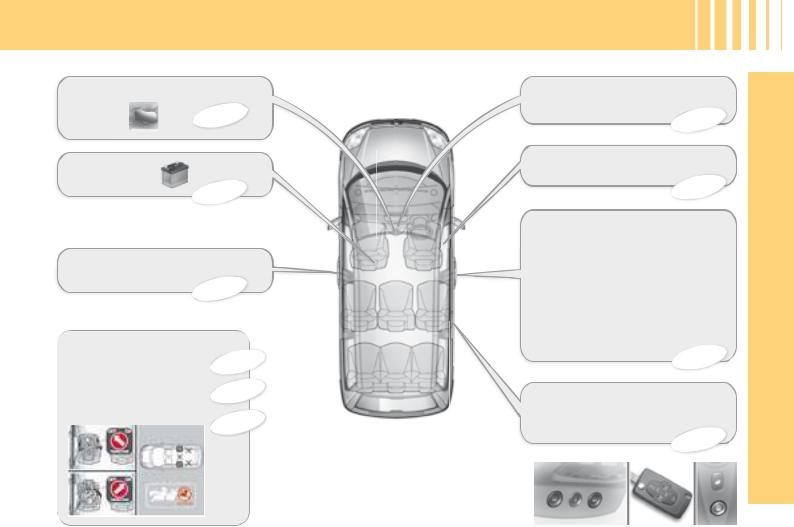
PA S S E N G E R S A F E T Y
Child monitoring mirror
83
Battery
115
Electric windows / Anti-pinch
48
CHILD SAFETY
Anti-pinch. |
48 |
Child monitoring mirror. 83
Child seats.
87
Deactivation of front passenger’s airbag
86
Parking brake
56
Bonnet opening controls
The bonnet opening control is a red handle under the bonnet. Release the bonnet from the inside of the vehicle, then go to the front of the vehicle and put your hand under the logo to open and support the bonnet, insert the bonnet stay correctly into its housing.
106
Opening
Sliding side doors from the inside.
67
I
IN BRIEF
13
I
IN BRIEF
Transforming
Seat coni guration is explained in Chapter III of this handbook. To correctly move a seat, follow the steps in order as described in the handbook. Move the head restraint to its lowest position, fold the backrest onto the seat cushion, ensuring that its resting position is compatible with the seat type. Place the front feet of the seat in
line with the sliders or the locking catches on the l oor before starting
to re-engage the rear feet.
93
V E N T I L A T I O N
Air conditioning
Automaticwithseparateregulation. Press, AUTO is displayed, this is the normal operating mode.
74
Manual adjustment. Press on the on/off control . Choose the distribution mode.
72
14

V E N T I L A T I O N
Manual Air Conditioning – advice on settings |
|
|
|
I |
||
To obtain the maximum beneit from the system, we recommend : |
Air |
|
|
|||
|
|
|||||
If I want ... |
Air distribution Temperature |
Air low |
AC |
|||
recirculation |
||||||
|
|
|
|
|
||
Warm |
BRIEF |
|
|
Cold |
IN |
|
|
Deicing |
|
Demisting |
|
With Automatic Air Conditioning, you are advised to use the AUTO function, whatever your requirements.
Switch off air recirculation once the ambient air is of an acceptable quality.
15
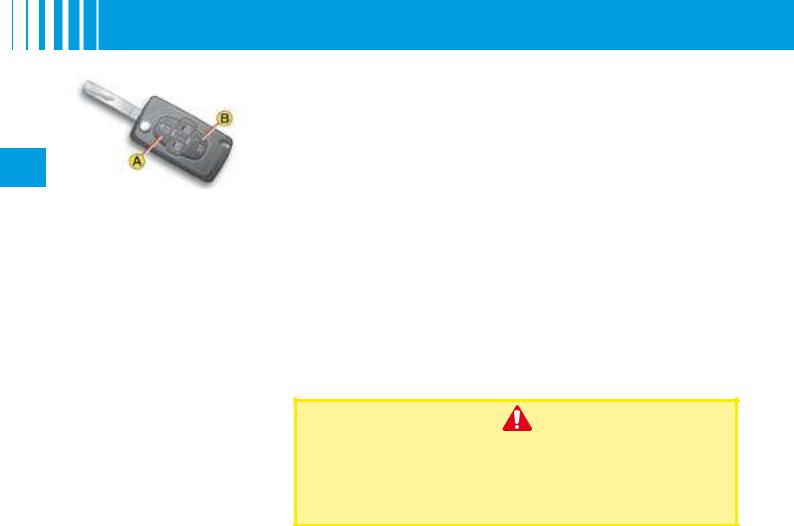
R E M O T E C O N T R O L
II
Note : The simultaneous use of other high frequency equipment (mobile telephones, domestic alarms...) may momentarily hinder the operation of the remote control.
In the event of a permanent fault, the remote control should be reinitialised. See “Changing the remote control battery”.
Locating of the vehicle
To locate the vehicle on a carpark, press button A, the interior
lamps come on and the direction indicators lash for a few seconds.
The vehicle remains locked.
1
Central unlocking
A short press on button B unlocks your vehicle.
This operation is conirmed by rapid lashing of the direction indicators and
lighting of the interior lamp (if the function is activated). This also deploys the exterior rear view mirrors.
Central locking - Closing of windows and sliding of sun roofs - Deadlocking
-A short press on button A locks your vehicle.
-A long press on button A locks your vehicle, closes the windows and slides the sun roofs. The sun roofs stop in the partially open position. To close completely, use the interior sunroof control (see page 105).
This operation is conirmed by the direction indicators illuminating for approx. two seconds and by the interior lamp switching off. The exterior rear view mirrors will also fold back.
If any of the doors or the boot is open or not properly closed, the central locking does not operate.
For vehicles equipped with deadlocking, two successive presses on button A have the effect of deadlocking the vehicle. It is then impossible to open the doors, either from the inside or the outside.
When operating the windows and sun roofs by means of the remote control, the user must make sure that nobody is obstructing the windows or sun roofs from closing properly.
It is dangerous to operate the deadlocking when a person is in the vehicle as unlocking is impossible from the inside (without the remote control).
R E M O T E C O N T R O L
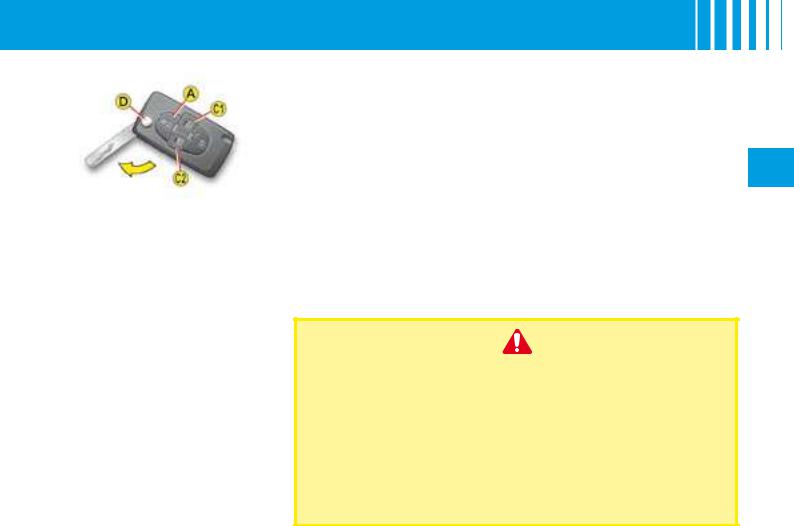
Opening/closing of the electric sliding side doors
A long press on one of the C controls (C1 for right hand door, C2 for left hand door) opens or closes the corresponding electric sliding door.
Note: if the vehicle is locked, a long press on one of the C controls unlocks the vehicle and opens the corresponding electric sliding door.
Folding and ejection of the key
Button D is for folding and ejecting the key from its housing in the remote control.
If you do not press on button D, you could damage the mechanism.
HF remote control battery discharged
This information is given by a message on the MULTIFUNCTION DISPLAY, accompanied by a sound signal and by lighting of the SERVICE warning
lamp.
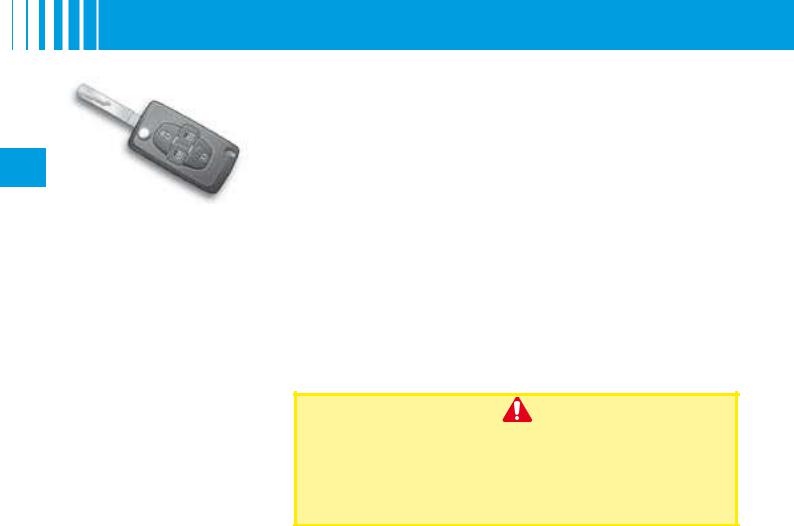
Changing the remote control battery |
|
Detach the housing to access the battery. |
|
Battery: CR 1 20: 3V. |
II |
Re-initialisation of the remote control
After a change of battery, the remote control has to be re-initialised. To do this, switch on the ignition and immediately press button A on your
remote control until it operates the action required. This can take some ten seconds.
Note: Make a careful note of the numbers for the keys and for the remote control on the ASSISTANCE card. Keep this in a safe place.
Do not throw away the old batteries. They should be returned to the CITROËN dealer or deposited in a recognised recycling facility
(camera shops etc).
Except when reinitialising, the remote control cannot function while the key is in the ignition, even when switched off.
Warning: By inadvertently actioning the remote control, when for example it is in your pocket, you can unlock the vehicle without your realising it.
However, if none of the doors are opened within thirty seconds following an unlocking, the doors will automatically relock.
Warning: There is a risk of damage if the replacement battery is not the correct one.
Only use batteries that are identical or equivalent to those approved by CITROËN.
17
II
Electronic immobiliser key
The key operates all the vehicle’s locks as well as the ignition.
Note: For safety reasons, a buzzer will sound if you have switched
off the ignition and opened the driver’s door without previously
removing the ignition key.
The key can be used to deactivate the front passenger’s airbag (see “Airbag”).
1
K E Y S
Central locking using the key
A brief action with the key locks the vehicle.
Deadlocking: Central locking using the key
A second action straightaway with the key deadlocks the vehicle. It is then impossible to open the doors from either inside or outside the vehicle.
Note: With the vehicle stationary and the engine switched off, locking is signalled by the lashing of the interior locking control warning lamp.
If any of the doors, or the boot, is open or not properly closed, central locking does not operate.
Electronic immobiliser
The ELECTRONIC IMMOBILISER device locks the engine supply system.
The system activates automatically as the key is removed from the ignition.
All the vehicle’s keys contain an electronic immobiliser device.
After you switch on the ignition, a dialogue starts between the key and the electronic immobiliser device.
If the key is not recognised, starting is not possible.
If this occurs, leave your vehicle immobilised and contact a CITROËN dealer.
It is dangerous to operate the deadlocking when a person is in the vehicle as unlocking is impossible from the inside (without the remote control).
The key number is on the label attached to the key.
Should you lose your key or remote control, the CITROËN dealer network can supply replacements.
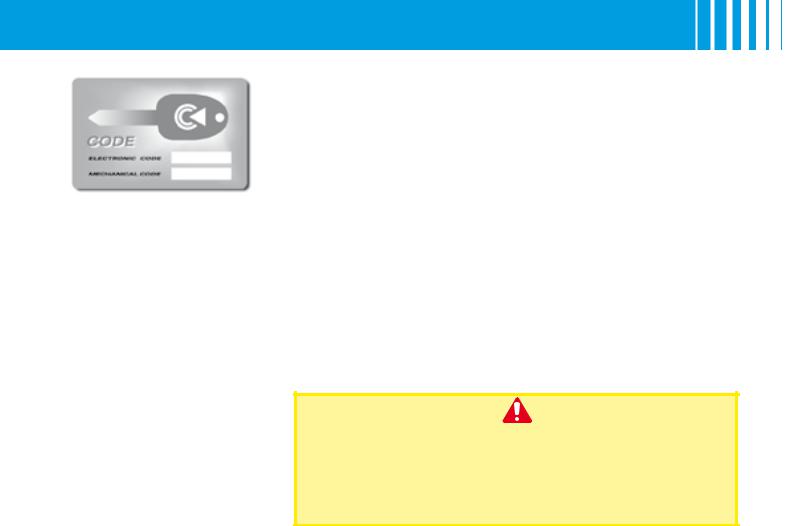
A conidential card is given to the new owner when he takes delivery of his new vehicle.
This card bears a hidden access
code for the use of the CITROËN dealer when maintaining the
electronic immobiliser device.
Do not scratch the protective strip, the security of the immobil-
iser system depends on the infor- mation below remaining covered.
Should the card be lost, the immobiliser device can no longer be considered secure.
C O D E C A R D
In the event of a change of vehicle ownership, it is essential for the new owner to possess the CODE card.
Never leave it in the vehicle.
|
Advice |
|
|
|
|
Keep the code card bearing your personal electronic immobiliser number |
II |
|
in a safe place (never in the vehicle). |
|
|
If any key modiications become necessary (addition, cancellation or |
|
|
replacement of the key), you must take the conidential card together with |
|
|
all the keys to a CITROËN dealer. |
|
|
Also, for any operation on your vehicle’s electronic systems, CITROËN |
|
|
may need to request this card from you. |
|
|
Never attempt to modify the electronic immobiliser’s electrical circuit, as that could render your vehicle undriveable.
Should the conidential card become lost, a CITROËN dealer would have to undertake a major repair.
1

A N T I - I N T R U S I O N A L A R M
II
Your vehicle may be equipped with an ANTI-INTRUSION ALARM.
This ensures:
• Exterior perimeter protection by means of detectors on the
access points (doors, tailgate, bonnet) as well as on the
electrical supply.
• Interior volumetric protection by means of ultrasonic sensors (detecting movement inside the passenger compartment).
This can be deactivated using control 1.
The installation also includes a siren and a warning lamp 2 visible
from the outside, indicating the three possible alarm statuses:
•Alarm not armed (not on standby), warning lamp off.
•Alarm armed (on standby), the warning lamp lashes slowly.
•Alarm triggered (signal of an intrusion), the warning lamp lashes rapidly if the alarm is disarmed with a press on
. It stops lashing as
soon as you switch on thebutton B
ignition.
NOTE: if there is a malfunction the warning lamp comes on permanently.
Disarming the alarm using the remote control
The alarm is disarmed when you unlock the vehicle (by pressing button B on the remote control).
Disarming the alarm using the key
Unlock the doors with the key. The
siren is triggered. Enter the vehicle and switch on the ignition to stop the siren. Otherwise the siren will
continue for about 30 seconds.
20

A N T I - I N T R U S I O N A L A R M
Operation of the alarm
First make sure that all the vehicle’s doors are closed.
The alarm is armed by pressing button A on the remote control.
When the alarm is armed, the protections become active within 5 seconds (perimeter) and 45 seconds
(volumetric).
Provided the alarm is armed, any intrusion triggers the siren for 30 seconds, accompanied by the illumination of the direction indicators.
The alarm then reverts to armed status, but the
deployment remains memorised and is signalled by the rapid lashing of the alarm warning lamp 2 when you press the unlocking button B. The lashing stops when you switch on the ignition.
The siren is also triggered if there is a cutting out of the electrical supply. To stop it, restore the electrical supply then press the unlocking button B.
NOTE:
•If you wish to lock your vehicle without arming the alarm, just lock the vehicle with the key.
•If you try to lock your vehicle when a door or the boot is still open, the central locking will not operate, but your alarm becomes armed after approx. 45 seconds.
NOTE: the siren is automatically disarmed (for example if you need to disconnect the battery) immediately after you unlock the vehicle using the remote control.
Deactivation of volumetric detection |
|
The alarm is able to operate with only perimeter |
|
protection if you deactivate the volumetric protection |
|
(if for example you wish to leave an animal in the |
|
vehicle). |
|
To do this, switch off the ignition, then press immediately |
|
on control 1 for at least one second. |
|
The warning lamp 2 should be on permanently. It will |
II |
start to lash when the alarm activates. |
|
Arm the alarm by locking your vehicle using the remote |
|
control. |
|
Automatic activation (depending on country) |
|
The alarm arms automatically 2 minutes after the boot |
|
or the last door is closed. |
|
In order to prevent the alarm then being triggered |
|
by a door or the boot being opened, it is essential to |
|
press again on the unlocking button B on the remote |
|
control. |
|
21
S T E E R I N G L O C K - I G N I T I O N -
S TA R T E R
II
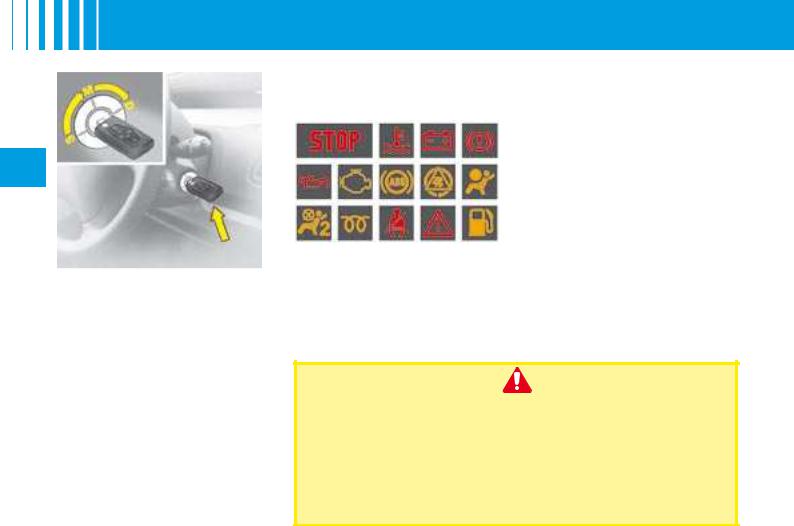
S: IGNITION
To free the steering lock, gently action the steering wheel while turning the key, without using
undue force.
When removing the key, turn the steering wheel until the steering
locks. The key can only be removed from position S.
M: DRIVE POSITION
The steering is freed (by turning the key to position M, action the steering gently if necessary).
22
Depending on the version of your vehicle, the following warning
lamps are tested:
If one of these warning lamps does not light up, this indicates a malfunction.
D: STARTING
Release the key immediately the
engine has started. Never action it while the engine is running.
STARTING AND STOPPING THE ENGINE
See “Starting”.
ECONOMY MODE
In order not to discharge the bat- tery when the engine is stopped,
your vehicle goes automatically into economy mode after a max-
imum of 30 minutes. Economy mode is conirmed by a message
on the screen.
The electrical components relating to comfort and also the head-
lamps (not sidelamps or hazard warning lamps) are switched off
automatically.
To reactivate them, it is necessary to start the engine.
NEVER REMOVE THE IGNITION KEY BEFORE THE VEHICLE
COMES TO A COMPLETE STOP.
ALWAYS DRIVE WITH THE ENGINE RUNNING SO THAT YOU RETAIN THE BRAKING ASSISTANCE AND POWER STEERING
(risk of engaging the steering lock and losing safety features).
When parking, remove the ignition key and carefully turn the steering wheel until the steering lock engages.
S T A R T I N G
Ensure that the gear lever is in neutral (manual gearbox) or in position P or N (automatic gearbox).
PETROL |
|
|||
Starting the engine |
|
|||
Do not depress the accelerator pedal. |
|
|||
Operate the starter motor (maximum 10 seconds) until the engine starts. |
|
|||
II |
||||
In temperatures below 0°C, depress the clutch pedal to ease starting, then release it slowly.. |
||||
Note: If it does not work at irst, switch off the ignition, wait for ten seconds, then operate the starter again as |
|
|||
|
||||
described above. |
|
|||
DIESEL |
|
|||
Starting the engine |
|
|||
Turn the key to the starter position, wait for the preheater warning lamp to go out, then operate the starter until the |
|
|||
engine is running. |
|
|||
If the engine does not start, switch off the ignition then recommence the procedure. |
|
|||
In temperatures below 0°C, depress the clutch pedal to ease starting, then release it slowly. |
|
|||
Note: During starting, do not touch the accelerator. |
|
|||
|
Advice |
|
||
|
|
|||
|
|
|
||
Vehicles equipped with a Turbo: |
|
|||
Turbo equipped engines must be allowed to return to idle for several seconds before switching off the ignition. |
|
|||
Failure to do so could cause serious damage to the turbo unit. |
|
|||
Flicking the accelerator pedal as the ignition is turned off can lead to severe damage to the turbo unit. |
|
|||
|
|
|
|
|
|
DO NOT RUN THE ENGINE IN AN ENCLOSED OR POORLY VENTILATED AREA |
|
|
|
|
|
|
23 |
|
D R I V E R ’ S I N S T R U M E N T PA N E L
MAINTENANCE INDICATOR
It tells you when the next service is due, in conformity with the maintenance schedule in the Maintenance guide. This information is calculated as a function of two parameters: the mileage covered, and the time elapsed since
the last service.
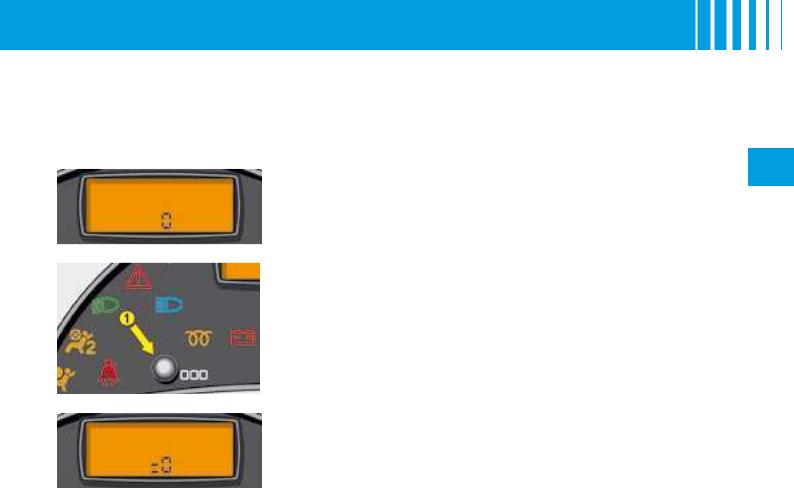
Functioning
From switching on the ignition and for a few seconds, the spanner
IIsymbol for maintenance lights
up; the instrument panel tells you how many miles remain before the next service.
For example: you have the following distance left to travel before the next service:
Afew seconds after that, the engine oil level indicator is displayed, then the total mileage recorder resumes
its normal role. The instrument panel shows you the total and trip mileage counters.
Functioning if the distance to the next service is less than 1 000 km
(approx. 600 miles)
Each time the ignition is switched on, and for ive seconds, the main- tenance symbol and the mileage will lash.
Example: before the next service
there remain: 500 km (approx.
300 miles). When you switch on the ignition and for 5 seconds after that, the instrument panel indicates:
A few seconds after that, the en- gine oil level indicator is displayed, then the total mileage recorder resumes its normal role and the maintenance symbol remains lit up.
It informs you that a service is imminently due. The instrument panel gives you the total and trip mileages.
Functioning if the service interval is exceeded
Each time the ignition is switched
on, the maintenance symbol and the extra mileage travelled (with a minus in front) will lash.
For example: the preset service distance has been exceeded by 300 km (approx. 1 0 miles). Your vehicle must be serviced as soon as possible.
A few seconds after you have |
|
switched on |
the ignition, the |
total mileage |
recorder returns |
to its normal operation and the maintenance symbol remains illuminated.
2
M A I N T E N A N C E I N D I C AT O R
Maintenance intervals
If your vehicle is used in particularly harsh conditions, it is necessary to select the maintenance schedules for
“special operating conditions” (see the Maintenance Guide) which consist of more frequent services.
II
Note: the maintenance spanner will come on, and the display will read ‘’0’’ if the maximum length of time between services is attained before the
mileage limit is reached.
Resetting the maintenance indicator to zero
Your dealer will perform this operation after each service. However, if
you intend to service the vehicle yourself, the procedure for resetting the maintenance indicator is as follows:
-Switch off the ignition.
-Press and hold down button 1.
-Switch on the ignition.
-The distance remaining until the next service lashes.
-Keep button 1 pressed until the display shows “=0” and the maintenance spanner disappears.
27
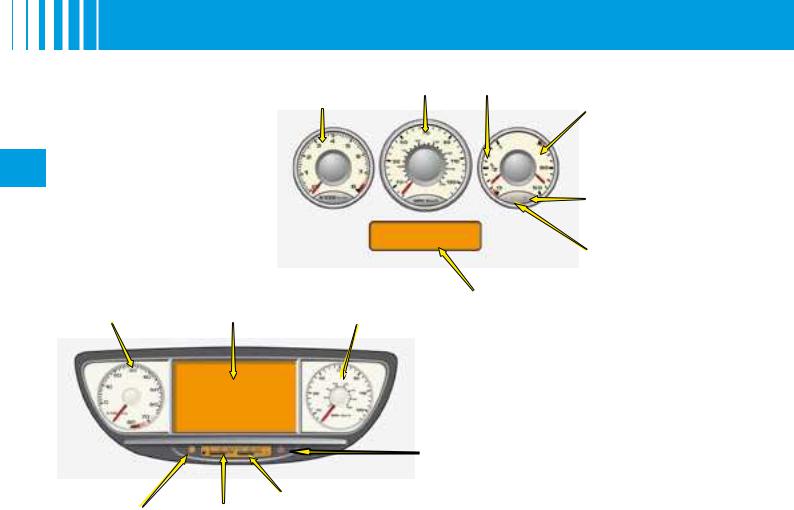
C E N T R A L I N S T R U M E N T PA N E L
Rev counter |
Speed |
Fuel |
(In the period of running- |
indicator |
gauge |
in, see “Running-in”.) |
|
|
Coolant temperature gauge
II
3-PART INSTRUMENT PANEL
NaviDrive Speed MULTIFUNCTION
indicator DISPLAY
Rev counter
(In the period of running-in, see “Running-in”.)
Coolant temperature warning lamp
Low fuel level warning
MULTIFUNCTION
DISPLAY
BIG SCREEN INSTRUMENT
PANEL
Coolant temperature warning lamp
|
Low fuel level |
Fuel |
Coolant temperature |
2 |
gauge |
||
warning |
gauge |
|
C E N T R A L I N S T R U M E N T PA N E L
Big screen instrument panel
3-part instrument panel
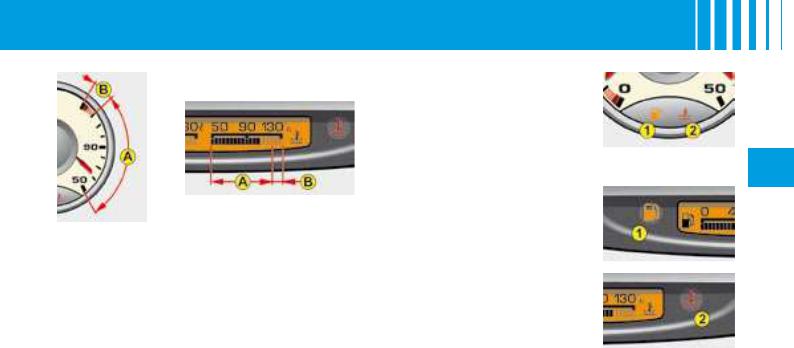
Coolant temperature gauge
With the needle or indicator in zone A, the temperature is correct.
If the needle or indicator enters zone B, the temperature is too high. The central STOP alert warning lamp and the engine coolant level or temperature warning lamp
both light up, accompanied by an audible signal and a message on the multifunction screen.
It is essential to stop the vehicle.
1 - Low fuel level warning
If the warning lamp comes on, accompanied by a message on the MULTIFUNC-
TION DISPLAY, you still have fuel suficient for ap-
prox. 30 miles.
If it lashes, this indicates a malfunctioning of the fuel gauge.
Consult your CITROËN dealer.
2 - Coolant temperature warning lamp
The STOP warning lamp lashes when the coolant temperature warning lamp
is lit.
The lighting of this warning lamp is accompanied by an audible signal and a message on the MULTIFUNCTION DISPLAY.
3-part instrument panel II
Big screen instrument panel
It is essential to stop the vehicle, contact a CITROËN dealer.
Engine coolant level too low
Engine coolant level too low is indicated by an audible signal and a message on the MULTIFUNCTION DISPLAY.
2
C E N T R A L I N S T R U M E N T PA N E L
II
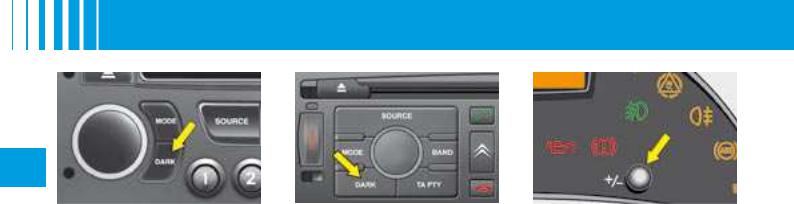
Night driving control
-A irst press on the DARK button puts the display to sleep. Only the time and the temperature remain displayed.
-A second press switches off the display and the instrument panel with the exception of the speedometer, its central display and the information on automatic gearbox and cruise control / speed limiter if these have been activated.
Note: Timed lighting of functions if you:
-Press any of the display controls.
-Select Radio-CD.
-Operate any of the air conditioning controls. All the displays light up if there is an alert.
-A third press brings back normal lighting.
Lighting rheostat
When the vehicle lamps are on,
press on the button to alter the brightness for the warning lamps
display, the instrument panel, the air conditioning panel and the multifunction screen. When the lighting reaches the minimum (or maximum) adjustment, release the button then press again to increase it (or decrease it).
As soon as the lighting reaches the desired intensity, release the button.
30
W A R N I N G L A M P S
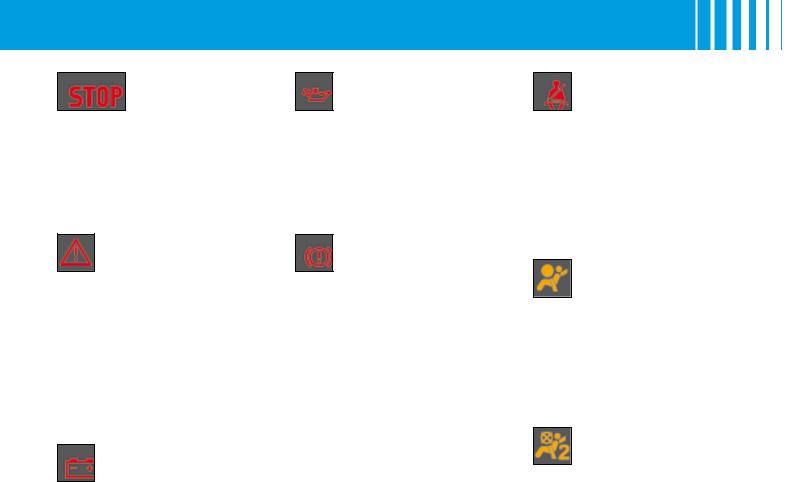
Imperative stop warning lamp
When the warning lamp comes on, it is
imperative to stop the vehicle and switch off the engine.
This lamp is accompanied by a STOP symbol on the display.
Contact a CITROËN dealer.
SERVICE warning lamp
This warning lamp remains
on for as long as the fault associated with the alert
message is present (this in the case of a serious fault).
Contact a CITROËN dealer as soon as possible
The lamp stays on only for a short time for a minor fault.
Contact a CITROËN dealer.
To recall the corresponding alert message, see “Log of alerts”.
Battery charge
Should not be lit when the engine is running. If it lights permanently, contact
a CITROËN dealer.
Engine oil pressure and temperature warning lamp
If it lights while you are driving, stop the engine, check the level, (see Chapter IV - “Levels”).
If it remains lit despite the level being correct, contact a CITROËN dealer.
Warning lamp for
handbrake, brake luid level and braking
distribution fault.
When the engine is running, this warning lamp indicates that the
handbrake is applied or incom-
pletely released, that the brake luid level is insuficient, or that the
braking system is malfunctioning.
If the warning lamp remains lit when the handbrake is released,
stop immediately and contact a CITROËN dealer.
Driver’s and/or passenger’s seat belt not fastened warning lamp
Comes on |
if the |
driver’s and/ |
|
or passenger’s seat belt is not |
|
||
fastened. |
|
|
|
|
|
|
|
The lighting of the warning lamp |
II |
||
is accompanied by a sound |
|
||
signal and a message for about |
|
||
|
|||
90 seconds |
when |
the vehicle |
|
exceeds a speed of 25 km/h (approx. 15 mph).
Airbags warning lamp
It comes on for a few
seconds every time you switch on the ignition.
Airbags malfunction
Flashing indicates that the airbags are malfunctioning.
Contact a CITROËN dealer as soon as possible.
Passenger’s airbag deactivation
If the passenger’s airbag is deactivated, the warning
lamp remains on.
31
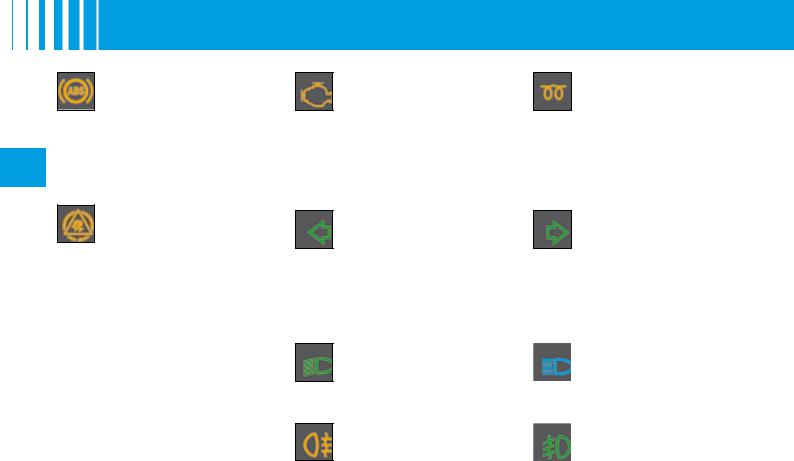
Anti-lock Braking
System
The ABS warning lamp lights when the ignition is switched on and should go out
after a few seconds.
If the warning lamp does not
IIgo out, there may be a system malfunction. (See Chapter II - “Brakes”).
ESP/ASR warning lamp
In operation
When either the ESP or
ASR system is brought into opera- tion, the ESP/ASR warning lamp lashes.
In the event of a problem
Should there be a malfunction-
ing of the systems, the ESP/ASR warning lamp comes on, ac-
companied by a message on the MULTIFUNCTION DISPLAY and by an audible signal. Consult a CITROËN dealer to have the system checked.
Deactivation
On deactivating the ESP/ASR sys-
tem, the lighting of the ESP/ASR warning lamp is accompanied by
an audible signal and the message ESP/ASR DEACTIVATED on the multifunction screen.
W A R N I N G L A M P S
Depollution system warning lamp
If it lashes or lights up while you are driving, this
indicates that the depollution system has a functioning problem.
Contact a CITROËN dealer as soon as possible.
LH direction indicator
See “Signalling”
Diesel Preheater
See the instructions for starting the engine.
Refer to section II - Driving “Starting”.
RH direction indicator
See “Signalling”
All the direction indicators lash simultaneously when the hazard warning lamps are switched on.
Dipped beam |
|
Main beam |
See “Signalling” |
|
See “Signalling” |
|
|
|
Foglamps |
|
Front foglamps |
See “Signalling” |
|
See “Signalling” |
|
|
|
32
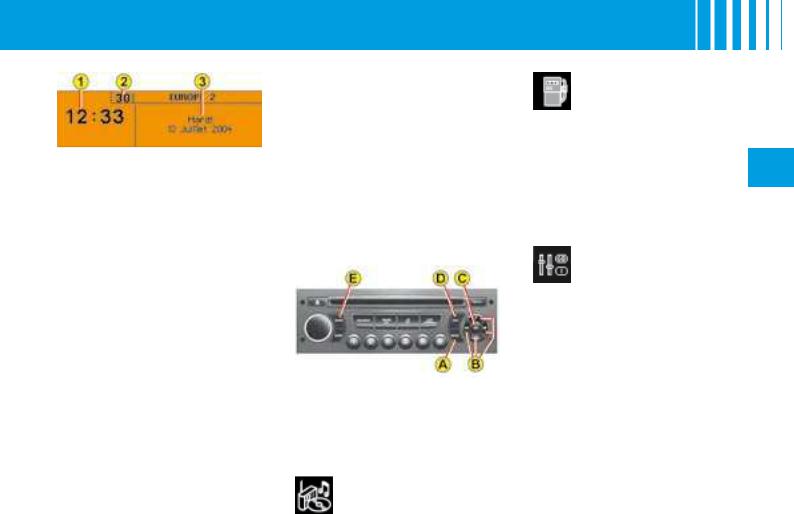
M U LT I F U N C T I O N D I S P L AY
The driver is advised not to
manipulate the controls described below while driving.
1 - Time.
2 - Ambient temperature
3 - Date and Display zone
If the outside temperature is between +3°C and -3°C, the temperature display lashes (risk
of ice).
Note: The outside temperature displayed may be higher than the actual temperature if the vehicle is standing in bright sunshine.
D i s p l a y C
Controls
A - Access to the “Main menu”
B - Scrolling in the display menus.
C - Validation and Selection in
the menus, of the function chosen or value modiied
D - Cancellation of the operation or return to the previous display.
E - Selection of the type of information you wish to see
permanently displayed (date, radio-CD, trip computer) on the right of the screen
Main menu
Press control A to display the “Main menu” for the multifunction
screen. Using this menu, you have access to the following functions:
Radio-CD
(See radio-CD handbook)
Trip computer, giving you:
-Distance to your destination.
-Access to log of alerts (list of the alerts that have been previously signalled).
-Access to the status of functions, for example activation/ deactivation of automatic
headlamp lighting, daytime- running lamps, ESP, windscreen wipe.
Personalisation -
Coniguration, allowing you to activate or deactivate:
-the triggering of rear wipe
-the automatic guide-me-home lighting
-the automatic lighting of headlamps
-automatic lighting of daytimerunning lamps
Also to choose:
-Brightness, the time, the date, units.
-The display language.
Note : activation/deactivation of automatic lighting of daytime-run- ning lamps is available depending on the country of marketing.
II
33

M U LT I F U N C T I O N D I S P L AY
TRIP COMPUTER
To enter the distance to be travelled in the trip computer:
-Press on A.
-Use B to select the trip computer icon, then conirm with a press on C.
II - Select your entry of distance, using B. Conirm your choice with a press on C.
-To choose the distance, select the igure to be modiied, using B, then conirm with a press on C.
-Use B to adjust the value then validate with a press on C.
-Validate on “OK” on the display.
To access the log of alerts in the trip computer:
-Press on A.
-Use B to select the trip computer icon, then conirm with a press on C.
-Select the log of alerts.
-When the list is displayed, scroll down by pressing B.
-Press on D, to return to the permanent display.
To access the status of functions, proceed in a similar manner.
D i s p l a y C
PERSONALISATION and
CONFIGURATION
To activate/deactivate rear screen wipe when engaging reverse gear :
-Press A.
-Select the “Personalisation-
Coniguration” icon using B, then conirm your choice by pressing C.
-Then select the vehicle parameters sub-menu.
Conirm by pressing C.
-Using B, select rear screen wipe.
Conirm by pressing C.
-Then by pressing C, select/de- select rear screen wipe to acti- vate/deactivate.
-Validate using “OK” on the display.
To activate/deactivate the automatic guide-me-home lighting:
-Press on A.
-Use B to select the icon
“Personalisation - Coniguration” then conirm your choice with a press on C.
-Then select the sub-menu for vehicle parameters. Conirm your choice with a press on C.
-Using B, select lighting and signalling. Conirm your choice with a press on C.
-Then with a press on C, select/ deselect guide-me-home lighting to activate or deactivate it. After activation, choose the duration: press on C then use B to select the duration and press on C.
-Validate on “OK” on the display.
To activate/deactivate the automatic lighting of headlamps, proceed in a similar manner.
34

M U LT I F U N C T I O N D I S P L AY
To adjust the display brightness:
-Press on A.
-Use B to select the icon
“Personalisation - Coniguration” then conirm your choice with a press on C.
-Select the display coniguration using B. Conirm with a press on C.
-Select the adjustment of brightness. Conirm with a press on C.
-Use B to select normal or other
display mode, then validate with a press on C. To adjust
the brightness, select the symbols “+” or “-” and conirm your adjustment with a press on C.
-Validate on “OK” on the display.
D i s p l a y C
To adjust the date and the time:
-Press on A.
-Use B to select the icon
“Personalisation - Coniguration” then conirm your choice with a press on C.
-Select the display coniguration using B. Conirm with a press on C.
-Select the date and time
adjustment, using B, then conirm with a press on C.
-Use B to select the values to be modiied. Conirm with a press on C.
-Make your adjustments using B, validating each adjustment with a press on C.
-Validate on “OK” on the display.
To choose units:
-Press on A.
-Use B to select the icon
“Personalisation - Coniguration” then conirm your choice with a press on C.
-Select the display coniguration using B. Conirm with a press II on C.
-Then select the sub-menu for
Units. Conirm with a press
on C.
- Using B, select the unit |
to |
be modiied (Temperature |
or |
Consumption) then validate with
a press on C.
- Validate on “OK” on the display.
Note: This choice concerns all the types of information (fuel consumption, speed, etc.) that appear on the displays.
To choose the language:
-Press on A.
-Use B to select the icon
“Personalisation - Coniguration” then conirm your choice with a press on C.
-Select the choice of language, using B.
-Using B, select the desired
language and validate your choice with a press on C.
-Validate on “OK” on the display.
35
 Loading...