


On-line owner's handbook
You can find your handbook on the CITROËN website, under "MyCitroën".
This personal and customisable space allows you to establish direct and special contact with CITROËN.
Referring to the owner's handbook on-line also gives you access to the latest information available, easily identified by the bookmark, associated with this symbol:
If the "MyCitroën" function is not available on the CITROËN public website for your country, you can find your handbook at the following address:
http://service.citroen.com
Select:
 The Vehicle documentation link in the home page (no registration is needed),
 the language,
 the vehicle, its body style,
 the print edition of your handbook appropriate for the date of registration of your vehicle.
You have access to your handbook on line, together with the latest information, identified by the symbol:
We draw your attention to the following...
Your vehicle is fitted with only some of the equipment described in this document, depending on the trim level, version and the specifications for the country in which it is sold.
The fitting of electrical equipment or accessories which are not recommended by CITROËN may result in a failure of your vehicle's electronic system. Please note this specific warning and contact a CITROËN dealer to be shown the recommended equipment and accessories.
Key
safety warning
additional information
contributes to the protection of the environment
refer to the page indicated
Key
This key will enable you to identify the special features of your vehicle:
C4 Picasso
 Grand C4 Picasso
 Grand C4 Picasso with 5 seats
 Grand C4 Picasso with 7 seats
CITROËN has a presence on every continent,
a complete product range,
bringing together technology and a permanent spirit of innovation, for a modern and creative approach to mobility.
We thank you and congratulate you on your choice.
At the wheel of your new vehicle,
getting to know each system, each control, each setting, makes your trips, your journeys
more comfortable and more enjoyable.
Happy motoring!
243

Contents |
|
|
|
|
|
|
|
|
|
|
|
|
|
|
|
|
|
Access |
|
Driving |
|
||
Familiarisation |
|
|
|
||||
|
|
|
|
|
|
||
|
|
Electronic key - remote control |
61 |
Starting-switching off the engine |
|
||
|
|
"Keyless Entry and Starting" |
64 |
with the electronic key |
135 |
||
|
|
system |
Starting-switching off the engine with the |
|
|||
|
|
Central locking |
72 |
"Keyless Entry and Starting" system |
137 |
||
|
|
Doors |
73 |
Electric parking brake |
141 |
||
|
|
Boot |
75 |
Hill start assist |
148 |
||
|
|
Motorised tailgate |
76 |
5-speed manual gearbox |
149 |
||
Eco-driving |
|
Alarm |
79 |
6-speed manual gearbox |
149 |
||
|
|
Electric windows |
82 |
6-speed electronic gearbox system |
150 |
||
|
|
|
|
Automatic gearbox |
154 |
||
|
|
|
|
Gear shift indicator |
159 |
||
|
|
|
|
Stop & Start |
160 |
||
|
|
|
|
Display of inter-vehicle time |
163 |
||
|
|
|
|
Speed limiter |
168 |
||
|
|
|
|
Cruise control |
171 |
||
Monitoring |
|
Comfort |
|
Active cruise control |
174 |
||
|
|
Collision risk alert |
182 |
||||
7-inch touch screen tablet |
26 |
Front seats |
84 |
||||
Lane departure warning system |
185 |
||||||
Instrument panels |
33 |
Rear seats |
92 |
Blind spot sensors |
186 |
||
Indicator and warning lamps |
38 |
Seat modularity |
99 |
Parking sensors |
189 |
||
Adjustment buttons |
54 |
Mirrors |
101 |
Reversing camera |
191 |
||
Setting the date and time |
57 |
Steering wheel adjustment |
103 |
360 Vision |
192 |
||
Trip computer |
59 |
Ventilation |
104 |
Park Assist |
194 |
||
|
|
Heating |
106 |
|
|
|
|
|
|
Manual dual-zone air conditioning |
107 |
|
|
|
|
|
|
Dual-zone digital air conditioning |
109 |
|
|
|
|
|
|
Rear screen demist - defrost |
115 |
|
|
|
|
|
|
Scented air freshener |
116 |
|
|
|
|
|
|
Interior fittings |
118 |
|
|
|
|
|
|
Rear multimedia |
127 |
|
|
|
|

|
|
|
|
|
|
Contents |
|
|
|
|
|
|
|
|
|
Visibility |
|
|
Practical information |
|
|
Technical data |
|
Lighting controls |
202 |
Temporary puncture repair kit |
260 |
Petrol engines |
323 |
||
Automatic illumination of headlamps |
207 |
Changing a wheel |
268 |
Petrol weights |
324 |
||
Automatic headlamp dipping |
208 |
Snow chains |
278 |
Diesel engines |
325 |
||
Daytime running lamps |
210 |
Changing a bulb |
279 |
Diesel weights |
328 |
||
Headlamp adjustment |
211 |
Changing a fuse |
288 |
Dimensions |
331 |
||
Directional lighting |
213 |
12 V battery |
295 |
Identification markings |
333 |
||
Wiper controls |
214 |
Energy economy mode |
298 |
|
|
|
|
Screenwash |
216 |
Changing a wiper blade |
299 |
|
|
|
|
Automatic rain sensitive wipers |
217 |
Towing the vehicle |
300 |
|
|
|
|
Courtesy lamps |
219 |
Towing a trailer |
302 |
|
|
|
|
Panoramic sunroof |
220 |
Roof bars |
304 |
|
|
|
|
Interior mood lighting |
221 |
Very cold climate screen |
306 |
|
|
|
|
|
|
Accessories |
307 |
|
|
|
|
Audio and telematics
Safety |
|
|
|
|
|
|
Emergency or assistance |
335 |
|
|
|
|
Checks |
||||
|
|
2 |
|
|
Touch screen tablet |
337 |
||
|
|
Bonnet |
310 |
|||||
Hazard warning lamps |
222 |
|
|
|||||
Horn |
222 |
Petrol engines |
311 |
|
|
|||
Emergency or assistance call |
223 |
Diesel engines |
312 |
|
|
|||
Warning triangle |
223 |
Fuel |
313 |
|
|
|||
Tyre under-inflation detection |
224 |
Misfuel prevention (Diesel) |
315 |
|
|
|||
ESC system |
227 |
Running out of fuel (Diesel) |
317 |
Alphabetical index |
|
|||
Seat belts |
230 |
Checking levels |
318 |
|
|
|||
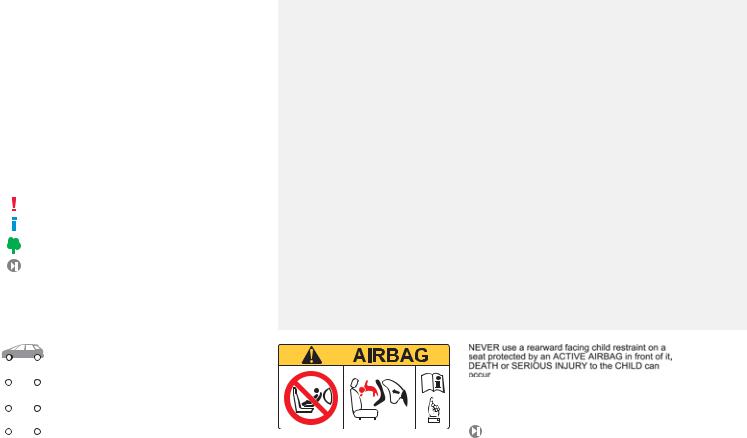
Airbags |
235 |
Checks |
321 |
|
|
|||
Child seats |
241 |
|
|
|
|
|
|
|
ISOFIX mountings |
252 |
|
|
|
|
|
|
|
Child lock |
259 |
|
|
|
|
Visual search |
|
|
Familiarisation
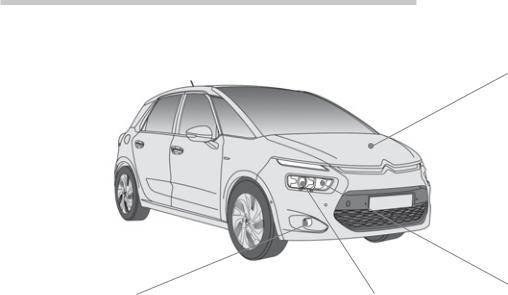
Exterior
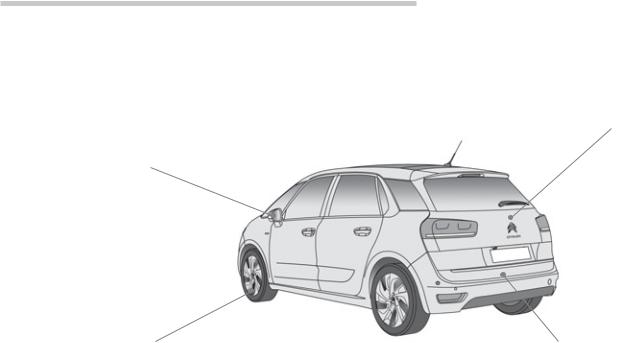
Electronic key: Keyless Entry and Starting
A system that allows the unlocking, locking and starting of the vehicle by keeping the key on your person and in the defined zone.
 64
64
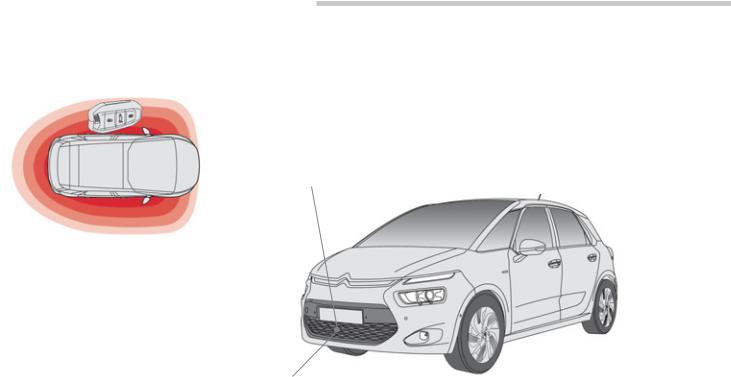
Distance alert
Using a radar located at the front of the vehicle, this system provides:
-the Display of the inter-vehicle time, to help the driver maintain a safe distance between their vehicle and the one in front,
 163
163
-the triggering of a Collision risk alert, to warn the driver, in certain driving conditions, that their vehicle is at risk of collision with the vehicle in front.
 182
182
Active cruise control
This system makes it possible, in addition to automatically holding the vehicle at a speed programmed by the driver, to maintain a safe distance from the vehicle in front, by using engine braking only. A radar is located at the front of the vehicle.
The driver can also programme an inter-vehicle time to maintain.
 174
174
4
Exterior
Cornering lighting
At low speed, this additional lighting increases the driver's field of vision in corners, junctions, when parking... by switching on the corresponding front foglamp.
 212
212
Directional lighting
This lighting system automatically turns the beams of the headlamps in the direction of a corner, to improve the quality of the lighting.
 213
213
Familiarisation .
Stop & Start
This system puts the engine temporarily into standby during stops in the traffic (traffic lights, traffic jams, etc...). The engine restarts automatically as soon as you want to move off. The Stop & Start system reduces fuel
consumption and exhaust emissions, as well as noise levels when stationary.
 160
160
Automatic headlamps
System that automatically dips the headlamps according to the lighting and traffic conditions, using a camera located in the interior rear view mirror.
 208
208
5
Familiarisation
Exterior
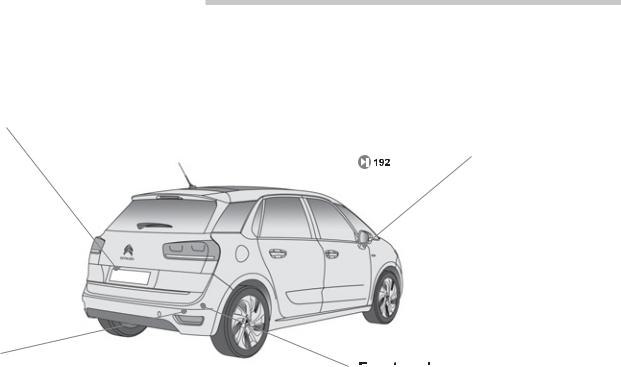
Reversing camera
This system is activated automatically on engaging reverse and provides an image in the instrument panel.
 191
191
Park Assist
This system provides active assistance when parking: it detects a parking space and then controls the vehicle's steering to park the vehicle.
 194
194
360 Vision
This system provides an image in the instrument panel of the near surroundings of your vehicle, using cameras located at the front and rear of the vehicle and under the door mirrors.
Front and rear parking sensors
This system provides warnings when manoeuvring forwards and backwards by detecting obstacles in front of and behind the vehicle.
 189
189
6
Exterior
Blind spot sensors
In certain driving conditions, this system detects the presence of vehicles in the blind spots. You are alerted by the illumination of a warning lamp in the corresponding mirror.
 186
186
Under-inflation detection
This system continuously monitors the pressures in the tyres and alerts you in the event of an under-inflated tyre.
 224
224
Familiarisation .
Motorised tailgate
This system simplifies the opening and closing of the boot by means of motorisation of the tailgate.
 76
76
Temporary puncture repair kit
This kit is a complete system, consisting of a compressor and a sealant cartridge, for the temporary repair of a tyre.
 260
260
7
Familiarisation
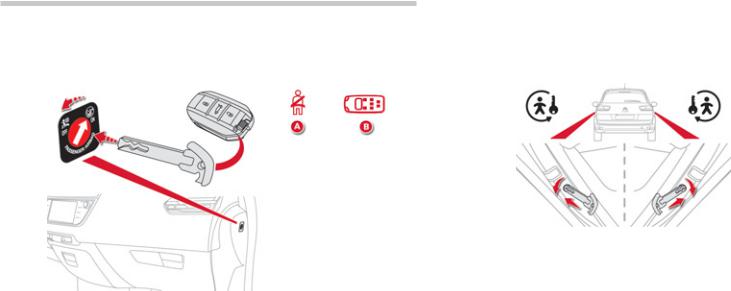
Access
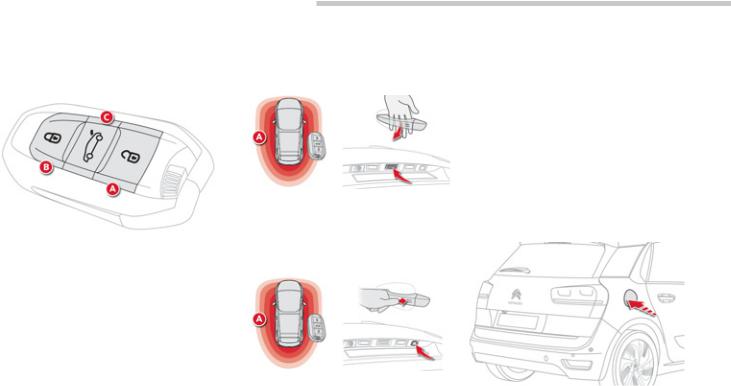
Electronic key - Remote control
A.Unlocking the vehicle.
B.Locking the vehicle.
C.Unlocking of the vehicle and, depending on version, release of or opening the motorised tailgate.
 61
61
Keyless Entry and Starting Motorised tailgate
Unlocking - opening
With the electronic key on your person, in the defined zone A, pass a hand behind one of the front door handles to unlock the vehicle, then pull the door handle to open the door or press the opening control on the tailgate.
Locking
With the electronic key in the defined zone A, press with a finger or thumb on one of the front door handles (at the markings) to lock the
vehicle or on the opening control on the tailgate.
 64
64
This system allows the tailgate to be opened remotely using motorisation.
The motorisation of the tailgate can be activated or deactivated.
Ensure that there is enough space behind the vehicle for the movement of the tailgate.
 76
76
Fuel tank
With the vehicle unlocked, press on the rear of the filler flap to open it.
Tank capacity: around 57 litres (petrol) or 55 litres (Diesel).
 313
313
8
Interior
Panoramic sunroof
This glazed roof increases the light in the passenger compartment. It is fitted with an electric blind.
 220
220
Massage system
This system provides a lumbar massage for a period of about 60 minutes. The massage is delivered in 6 cycles of 10 minutes each.
 89
89
Electric parking brake
It combines the functions of automatic application on switching off the engine and automatic release when moving off.
The driver can intervene at any time to apply or release the parking brake, by operating the control lever.
 141
141
Familiarisation .
7-inch touch screen tablet
It provides access to the heating and air conditioning controls, to settings for vehicle systems, to controls for the audio, navigation and telematic systems and to the display configuration settings...
 26
26
Electric leg rest
It provides additional comfort for the front passenger.
 90
90
9
Familiarisation
Interior
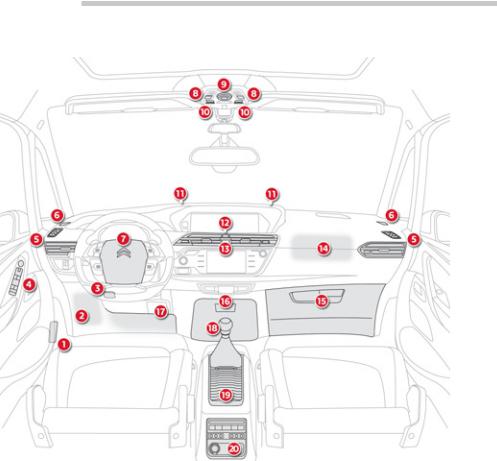
1.Bonnet release lever.
2.Fusebox.
3.Steering wheel adjustment controls.
4.Door mirror controls.
Electric window controls.
5.Side adjustable air vents. Side window demisting vents.
6. Quarter light demisting windows.
7. Driver's airbag. Horn.
8.Courtesy lamp and map reading lamps.
9.Panoramic glass roof panel blind control.
10.CITROËN Localised Emergency Call - CITROËN Localised Assistance Call (depending on country of sale).
11.Windscreen demisting/defrosting vent.
12. Scented air freshener.
13. Central adjustable air vents. 14. Passenger's airbag.
15. Glove box.
16. Central storage.
Audio sockets, 12V accessory socket (120 W max), 230V socket (120 W max).
17.Storage below steering wheel (handbook pack).
18.Gear lever (manual gearbox).
19. Console (fixed/removable). 20. Storage or rear multi-media.
Rear 12 V accessory socket (120 W max.).
10
Familiarisation .
Instruments and controls
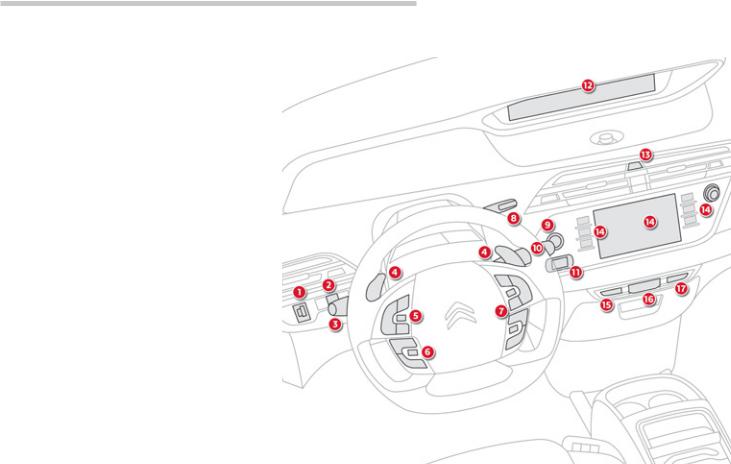
1.Headlamp height adjustment.
2.Deactivation of volumetric alarm monitoring, or
Ticket holder.
3.Lighting and direction indicator stalk
4.Steering mounted controls (6-speed electronic gearbox system/automatic gearbox).
5. Speed limiter / cruise control / active cruise control controls.
6. Other steering mounted controls (depending on equipment).
7.Audio system, telephone and navigation (depending on equipment) steering mounted controls.
8.Gear selector lever (electronic gearbox system/automatic gearbox).
9.START/STOP button (engine starting).
10. Wiper / screenwash / trip computer stalk. 11. Electronic key reader.
12. Instrument panel.
13. Hazard warning lamps.
14. Touch screen tablet controls.
15. Deactivation of the DSC system. 16. Electric parking brake control. 17. Central locking control.
11
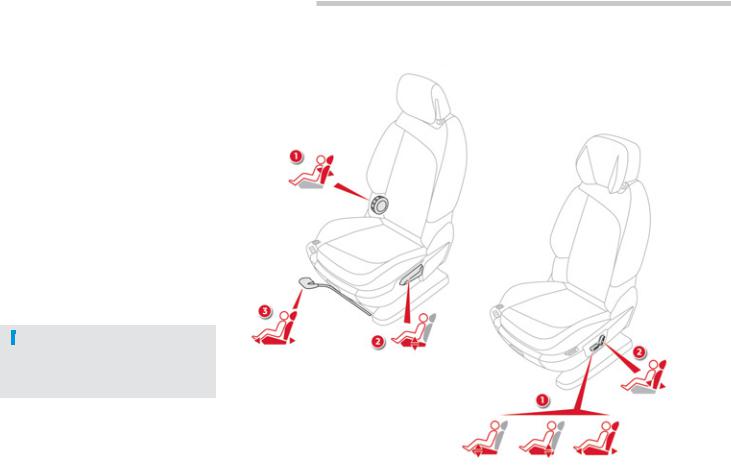
Familiarisation
Sitting comfortably
Driver's seat
Manual adjustments
1.Adjustment of the backrest angle of the driver's seat.
2.Adjustment of the cushion height of the driver's seat.
3.Forwards-backwards adjustment.
 84
84
Electric adjustments
1.Adjustment of the cushion angle and height, and forwards-backwards position.
2.Adjustment of the backrest angle.
 86
86
Other functions...
Lumbar adjustment.
Massage function.
Heated seats.
12
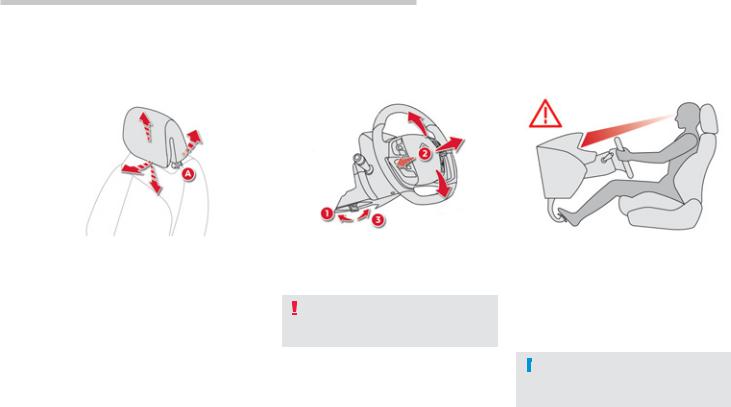
Sitting comfortably
Head restraint adjustment Steering wheel adjustment
To raise it, pull it upwards.
To lower it, press on the lug A and on the head restraint at the same time.
To incline it, move the bottom forwards or backwards.
 88
88
1.Release.
2.Adjust for height and reach.
3.Lock.
As a safety precaution, these operations must only be carried out when stationary.
 103
103
Familiarisation .
Correct driving position
Before taking to the road, adjust in the following order:
-the position of the driver's seat (longitudinal, height),
-the height of the driver's head restraint,
-the height and reach of the steering wheel.
Once these adjustments have been made, check that you can see the instrument panel clearly from your driving position.
13

Familiarisation
Sitting comfortably
Door mirrors
Adjustment
A.Selection of the mirror to adjust.
B.Adjustment of the mirror position in four directions.
C.De-selection of the mirror.
 101
101
Other functions available...
Folding / Unfolding.
Automatic dipping of the mirror in reverse for parking.
Blind spot monitoring.
Rear view mirror
Manual day/night model
1. Selection of the "day" position of the mirror. 2. Adjustment of the mirror.
Automatic day/night model
A.Brightness detection in automatic day/night mode.
B. Adjustment of the mirror.
 102
102
14

|
|
|
Familiarisation . |
|
|
|
|
Sitting comfortably |
|
|
Outer rear seat belts |
Front seat belts |
Centre rear seat belt in the |
||
|
2nd row (fastening) |
(stowing) |
|
Pull the webbing and insert the tongue A in the right hand buckle.
Insert tongue B in the left hand buckle.
Guide the belt in and place the tongue on the magnet of the outer anchorage.
 231, 232
1.Fastening the buckle.
2.Height adjustment
Squeeze the control to slide it.
 230 231
15
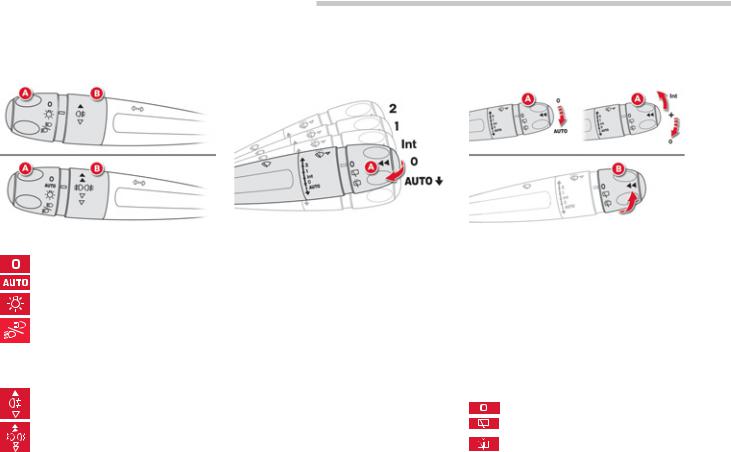
Familiarisation
Seeing clearly
Lighting
Ring A
Lighting off/daytime running lamps.
Automatic illumination of headlamps.
Sidelamps.
Dipped / main beam headlamps.
 203
203
Ring B
Rear foglamps only.
Front and rear foglamps.
 204
204
Wipers
Stalk A: windscreen wipers
2. Fast wipe.
1. Normal wipe. Int. Intermittent wipe. 0. Off.
AUTO Automatic wiping.
Single wipe: pull the stalk briefly towards you.
 214
214
Switching on "AUTO"
Press the stalk downwards.
Switching off "AUTO"
Press the stalk downwards again or place the stalk in another position (Int, 1 or 2).
 217
217
Ring B: rear wiper
Park.
Intermittent wipe.
Wash-wipe.
 215
215
16
Passenger safety
Passenger's front airbag Seat belt warning lamps
A. Warning lamp for not fastened (front seat belts) and unfastened (all seat belts).
B. Seat belt location indicator.
 233
233
1.Insert the key (integral to the electronic key).
2.Select the position:
"OFF" (deactivation), with "rear facing" child seat,
"ON" (activation), with front passenger or "forwards facing" child seat.
3.Remove the key keeping the switch in the new position.
 236
236
Familiarisation .
Manual child lock
This manual device prevents opening of the rear doors by the interior door handles.
The control is located on the edge of each rear door.
 259
259
17
Familiarisation
Driving safely
Operation
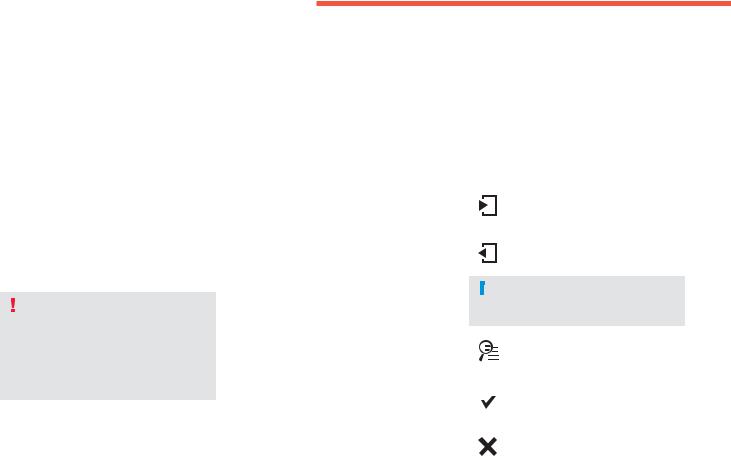
Use the buttons arranged on each side of the touch screen tablet for access to the menus, then press on the virtual buttons in the touch screen tablet.
From the primary page, use this button for access to the secondary
page.
Use this button to return to the primary page.
Use this button for access to additional information and to the settings for certain functions.
Use this button to confirm.
Use this button to quit.
 26
26
Touch screen tablet menus
"Air conditioning".
"Driving assistance".
"Media".
"Navigation".
"Configuration".
"Connected services".
"Telephone".
Do not use pointed objects on the touch screen tablet.
Do not touch the screen with wet hands.
Use a clean soft cloth to clean the touch screen tablet.
18
Driving safely
Starting the engine
With the electronic key
Place the gear selector lever at N for vehicles with an electronic gearbox, P or N for vehicles with an automatic gearbox or neutral for vehicles with a manual gearbox. Insert the electronic key in the reader. Press the brake pedal on vehicles with electronic gearbox or depress the clutch pedal fully on vehicles with manual gearbox.
Press the "START/STOP" button briefly. The steering column unlocks and the engine starts.
With the Keyless Entry and Starting system
Place the gear selector lever at N for vehicles with an electronic gearbox, P or N for vehicles with an automatic gearbox or neutral for vehicles with a manual gearbox With the electronic key inside the vehicle (it is not necessary to place it in the reader), press the brake pedal on vehicles with electronic gearbox or depress the clutch pedal fully on vehicles with manual gearbox.
Press the "START/STOP" button briefly. The steering column unlocks and the engine starts.
|
135 |
|
137 |
|
|
Maintain pressure on the brake pedal until the engine starts.
Familiarisation .
Switching off the engine
With the electronic key
Immobilise the vehicle.
Place the gear selector lever at N for vehicles with an electronic gearbox, P or N for vehicles with an automatic gearbox or neutral for vehicles with a manual gearbox. Press the "START/STOP" button briefly. The engine stops and the steering column locks.
Remove the electronic key from the reader.
 136
136
With the Keyless Entry and Starting system
Immobilise the vehicle.
Place the gear selector lever at N for vehicles with an electronic gearbox, P or N for vehicles with an automatic gearbox or neutral for vehicles with a manual gearbox. With the electronic key inside the vehicle, press the "START/STOP" button.
The engine stops and the steering column locks.
 138
138
19
Familiarisation
Driving safely
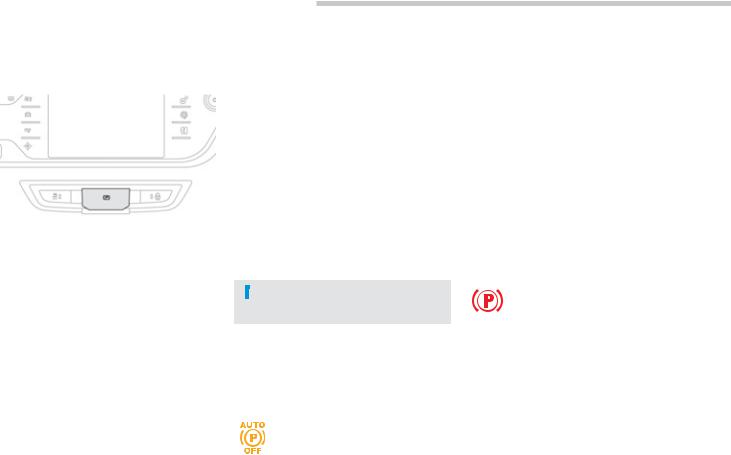
Electric parking brake
Manual application / release
Manual application of the parking brake is possible by briefly pulling the control lever. With the ignition on or the engine running, press the brake pedal and while maintaining this pressure, briefly push the control lever to release the parking brake.
Automatic application / release
First ensure that the engine is running and the driver's door is properly closed.
The parking brake is released automatically
and progressively with the movement of the  141 vehicle.
With the vehicle at rest, the parking brake is applied automatically on switching off the
ignition by pressing the START/STOP button.
If this warning lamp is on in the instrument panel, the automatic application / release is deactivated; apply and release the parking brake manually.
Before leaving the vehicle, check that the brake warning lamp in the instrument panel and the P warning lamp in the control lever are on fixed (not flashing)
20
Driving safely
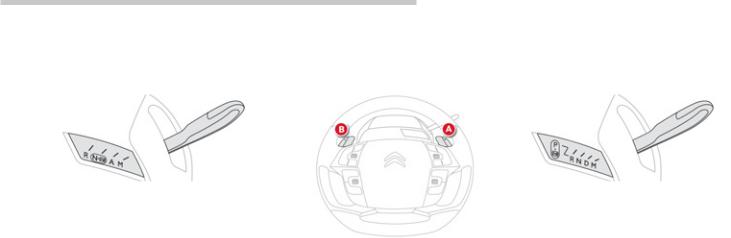
6-speed electronic gearbox system
Gear selector positions
R |
Reverse. |
N |
Neutral. |
A |
Automated mode. |
M |
Manual mode |
Using the steering-mounted control paddles "A" and "B":
-changing gear in manual mode,
-temporarily taking control in automated mode.
Starting
Check that the gear selector is in position N. Press firmly on the brake pedal and press the "START/STOP" button.
 150
150
Familiarisation .
Automatic gearbox
Gear selector positions
P |
Park. |
R |
Reverse. |
N |
Neutral. |
D |
Automatic mode. |
M |
Manual mode. |
Using the steering-mounted control paddles "A" and "B":
-changing gear in manual mode,
-temporarily taking control in automatic mode.
Starting
Check that the gear selector is in position P or N Press firmly on the brake pedal and press the "START/STOP" button".
To come out of position P, press the brake pedal before moving the gear selector.
 154
154
21

Familiarisation
Driving safely
Stop & Start
Going into engine STOP mode
The " ECO" warning lamp comes on in the instrument panel and the engine automatically goes into standby:
with a manual gearbox, at speeds below 12 mph (20 km/h), when you put the selector lever into neutral, and you release the clutch pedal,
-with a 6-speed electronic gearbox, at speeds below 5 mph (8 km/h), when you press the brake pedal or when you put the selector lever in position N
with an automatic gearbox, with the vehicle stationary, when you press the brake pedal or when you put the selector lever in position N.
In some circumstances, STOP mode may not be available; the "ECO" warning lamp flashes for few seconds, then goes off.
 160
160
Going into engine START mode
The "ECO" warning lamp goes off and the engine restarts automatically:
with a manual gearbox, when you fully depress the clutch pedal,
with a 6-speed electronic gearbox:
●selector lever in position A or M, when you release the brake pedal,
●or selector lever in position N and brake pedal released, when you change to position A or M
●or when you engage reverse.
with an automatic gearbox:
●selector lever in position D or M, when you release the brake pedal,
●or selector lever in position N and brake pedal released, when you change to position D or M,
●or when you engage reverse.
 161
161
22
Driving safely
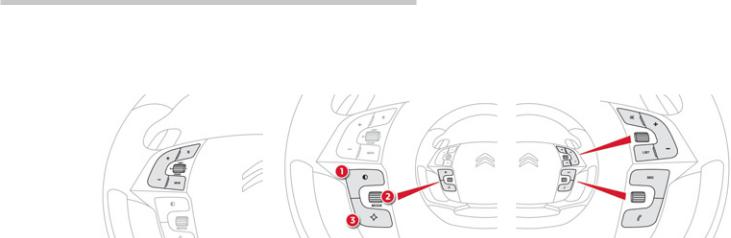
Steering wheel with integrated controls
Controls for speed limiter / cruise control / active cruise control
 168, 171, 174
Other controls
1. Black panel (black screen).
 56
56
2. Control of the display mode of the type 2 instrument screen.
 35, 37
3.Courtesy lamp on / off.
 219
219
or
Park Assist
 194
194
Familiarisation .
Audio system controls
or
Audio system and telephone controls
 341
341
Audio system, navigation and telephone controls
 341
341
23

Familiarisation
 Eco-driving
Eco-driving is a range of everyday practices that allow the motorist to optimise their fuel consumption and CO2 emissions.
|
|
|
|
|
Optimise the use of your gearbox |
Control the use of your electrical |
|||
|
|
equipment |
|
|
With a manual gearbox, move off gently and change up without waiting. During acceleration change up early.
With an automatic or electronic gearbox, give preference to automatic mode and avoid pressing the accelerator pedal heavily or suddenly.
The gear shift indicator invites you to change up: as soon as the indication to change up is displayed in the instrument panel, follow it straight away.
With an electronic or automatic gearbox, this indicator appears only in manual mode.
Drive smoothly
Maintain a safe distance between vehicles, use engine braking rather than the brake pedal, and press the accelerator progressively. These practices contribute towards a reduction in fuel consumption and CO2 emissions and also helps reduce the background traffic noise.
If your vehicle has cruise control, make use of the system at speeds above 25 mph (40 km/h) when the traffic is flowing well.
Before moving off, if the passenger compartment is too warm, ventilate it by opening the windows and air vents before using the air conditioning. Above 30 mph (50 km/h), close the windows and leave the air vents
open.
Remember to make use of equipment that can help keep the temperature in the passenger compartment down (sunroof and window blinds...).
Switch off the air conditioning, unless it has automatic digital regulation, as soon as the desired temperature is attained.
Switch off the demisting and defrosting controls, if not automatic. Switch off the heated seat as soon as possible.
Switch off the headlamps and front foglamps when the level of light
does not require their use.
Avoid running the engine before moving off, particularly in winter; your vehicle will warm up much faster while driving.
As a passenger, if you avoid connecting your multimedia devices (film, music, video game...), you will contribute towards limiting the consumption of electrical energy, and so of fuel.
Disconnect your portable devices before leaving the vehicle.
24

Familiarisation .
Limit the causes of excess consumption
Spread loads throughout the vehicle; place the heaviest items in the bottom of the boot, as close as possible to the rear seats.
Limit the loads carried in the vehicle and reduce wind resistance (roof bars, roof rack, bicycle carrier, trailer...). Use a roof box in preference. Remove roof bars and roof racks after use.
At the end of winter, remove snow tyres and refit your summer tyres.
Observe the recommendations on maintenance
Check the tyre pressures regularly, when cold, referring to the label in the door aperture, driver's side.
Carry out this check in particular:
-before a long journey,
-at each change of season,
-after a long period out of use.
Don't forget the spare wheel and the tyres on any trailer or caravan.
Have your vehicle serviced regularly (engine oil, oil filter, air filter...) and observe the schedule of operations recommended by the manufacturer.
When refuelling, do not continue after the third cut-off of the nozzle to avoid any overflow.
At the wheel of your new vehicle, it is only after the first 1 800 miles
(3 000 kilometres) that you will see the fuel consumption settle down to a consistent average.
25
Monitoring
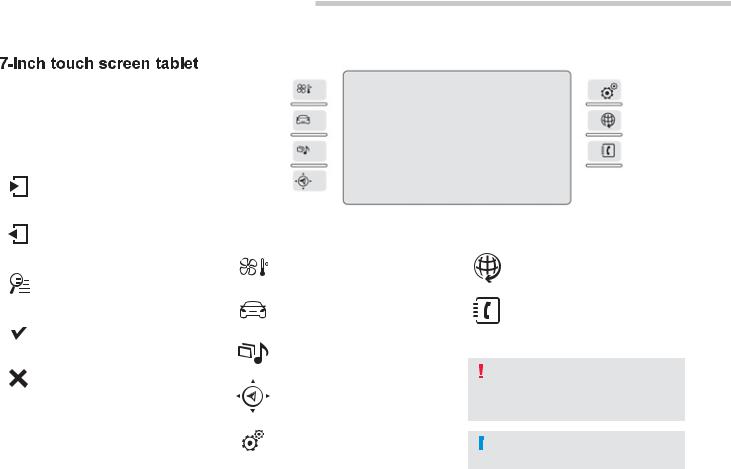
7-inch touch screen tablet
The 7-inch touch screen tablet gives access to:
-the heating/air conditioning controls,
-menus for adjusting settings for vehicle functions and systems,
-audio and display configuration menus,
-audio system and telephone controls and
the display of associated information, and, depending on equipment, allows:
-the display of alert messages and the visual parking sensors information,
-access to the controls for the navigation system and Internet services, and the display of associated information.
For reasons of safety, the driver should only carry out operations that require close attention, with the vehicle stationary.
Some functions are not accessible when driving.
General operation
Recommendations
It is necessary to press firmly, particularly for "flick" gestures (scrolling through lists, moving the map...).
A light wipe is not enough.
The tablet does not recognise pressing with more than one finger.
This technology allows use at all temperatures and when wearing gloves.
Do not use pointed objects on the touch screen tablet.
Do not touch the tablet screen with wet hands. Uses a soft clean cloth to clean the tablet touch
screen.
Principles
Use the buttons on either side of the screen for access to the menus, then press the virtual buttons in the touch screen.
Each menu is displayed over one or two pages (primary page and secondary page).
Use this button to go to the secondary page.
Use this button to return to the primary page.
After a few moments with no action on the secondary page, the primary page is displayed automatically.
Use this button for access to additional information and to the settings for certain functions.
Use this button to confirm.
Use this button to quit.
26

Monitoring
1
Touch screen tablet menus
State of indicator lamps
Some buttons contain an indicator lamp that gives the state of the corresponding function. Green indicator: you have switched on the corresponding function.
Orange indicator: you have switched off the corresponding function.
1. Access the the "Air conditioning" menu. Allows adjustment of the various settings for temperature, air flow... See the sections on "Heating", "Manual air conditioning" and "Digital air conditioning".
2. Access to the "Driving assistance" menu. Allows certain functions to be switched on and off and their settings adjusted.
3.Access to the "Media" menu.
See the Audio and telematics section.
4.Access to the "Navigation*" menu.
See the Audio and telematics section.
5. Access to the "Configuration" menu
Allows configuration of the display and the system.
6. Access to the "Connected services*"
menu.
See the Audio and telematics section.
7.Access to the "Telephone" menu. See the Audio and telematics section.
8.Adjustment of volume / mute.
See the Audio and telematics section.
*Depending on equipment.
27

Monitoring
"Driving assistance" menu
The functions with settings that can be adjusted are detailed in the table below.
|
|
|
|
|
|
|
|
|
|
Button |
|
Corresponding function |
Comments |
||||
|
|
|
|
|
|
|
|
|
|
|
|
Speed settings |
Memorisation of speeds for use with the speed limiter or cruise control. |
||||
|
|
|
|
|
|
|
|
|
|
|
|
Under-inflation initialisation |
Reinitialisation of the under-inflation system. |
||||
|
|
|
|
|
|
|
|
|
|
|
|
Park Assist |
Activation of the Park Assist function. |
||||
|
|
|
|
|
|
|
|
|
|
|
|
Stop & Start |
Deactivation of the function. |
||||
|
|
|
|
|
|
|
|
|
|
|
|
Blind spot sensors |
Activation of the function. |
||||
|
|
|
|
|
|
|
|
|
|
|
|
360 vision |
Activation of the function then choice of options. |
||||
|
|
|
|
|
|
|
|
|
28
 Loading...