


 Loading...
INSTRUCTION MANUAL

|
|
|
 (A)
(A)
|
|
|
|
||
|
|
|
(B) |
||
|
|
|

|
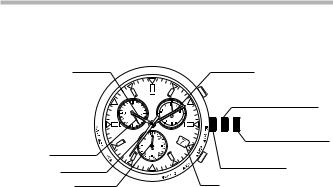
Name of |
Nom des pièces |
Nombre de los |
|
|
Components |
componentes |
||
|
|
|||
|
|
|
|
|
|
Hour hand |
Aiguille des heures |
Manecilla de hora |
|
|
|
|
|
|
|
24 hour hand |
Aiguille des 24 |
Manecilla de 24 |
|
heures |
horas |
|||
|
|
|||
|
|
|
|
|
|
Alarm ON/OFF |
Alarme ON/OFF |
Alarma ON/OFF |
|
(active/désactivée) |
(activación/desactvación) |
|||
|
|
|||
|
|
|
|
|
|
Second hand |
Trotteuse |
Manecilla de segundos |
|
|
|
|
|
|
|
Mode hand |
Aiguille de mode |
Manecilla de modo |
|
|
|
|
|
|
|
Button (B) |
Bouton (B) |
Botón (B) |
|
|
|
|
|
|
|
Date |
Date |
Fecha |
|
|
|
|
|
|
|
Crown |
Couronne |
Corona |
|
|
(Normal position) |
(Position normale) |
(Posición normal) |
|
|
Minute hand |
Aiguille des minutes |
Manecilla de minutos |
|
|
|
|
|
|
|
Button (A) |
Bouton (A) |
Botón (A) |
|
|
|
|
|
|
|
Function hand |
Aiguille de fonction |
Manecilla de función |
|
|
|
|
|

i

Model Indication
The caliber No. (Movement No.) of your watch is engraved on the back as shown in the figure below.
Check the back of your watch for the caliber number and be sure to use your watch according to the instruction manual.
caliber No.
ii

English
Instruction manual
Cal. E81*/E82*
1

 Table of Contents
About Eco-Drive Watches ..................................................................... |
3 |
E81* Operating Instructions............................................................... |
11 |
E82* Operating Instructions............................................................... |
37 |
Notes on Using Eco-Drive Watch........................................................ |
57 |
Specifications........................................................................................ |
58 |
Precautions........................................................................................... |
60 |
2

About Eco-Drive Watches
•This Eco-Drive watch features a solar panel under the dial and is powered by converting solar energy into electrical energy.
•This watch also features functions such as a perpetual calendar ( which automatically adjusts the date at month ends and leap years) a daily alarm (that can be set according to a 24-hour system), and a chronograph (capable of measuring up to 59 minutes, 59.95 seconds, in 1/20 second units).
English
3
Periodically expose the watch dial to daylight
This watch uses a rechargeable cell to store electrical energy. This is an environmentally clean cell that does not use any harmful substances such as mercury.
Once the rechargeable cell is fully charged, (and the power saving feature is operative) the watch will function for approximately 9 months (E81*)/24 months (E82*) without additional exposure to light.
Guide to Charging Time
Most users find that their watch receives more than enough light to keep it charged through their normal daily routine.
During normal operation, the charge necessary for the watch to operate for one day can be obtained in approximately 10 minutes per day when charged outdoors in direct sunlight, and in 4 hours per day when charged by indoor illumination.
If your watch is not exposed to light regularly and to prevent the watch from stopping due to an insufficient charge, we recommend that you charge the watch for 5 to 6 hours under direct sunlight once a month.
4

Ensuring optimal operation of the watch
Always store the watch in a bright location for best results.
•When you take your watch off, place it in a location so that the dial (face) can receive light, such as a window sill, where sunlight can directly strike the watch dial (face).
•Wearing clothes with long sleeves may inhibit sufficient light from reaching the watch dial (face), resulting in insufficient charging.
It is recommended that the watch is charged in direct sunlight once a month for 5 to 6 hours.
[Charging precautions]
•Avoid charging the watch on a car dashboard or under other high temperature conditions (60°C/140°F or more) as this may result in damage to your watch.
•Avoid charging the watch under potentially high temperature light sources such as incandescent or halogen lights as this may result in damage to your watch.
English
5
If the watch becomes insufficiently charged, the second hand will automatically move to the low charge warning, informing you of a “Charge warning” and “Time setting warning”.
Always take care to charge your watch so that the charge does not become insufficient.
[Normal time display]
If watch becomes insufficiently charged
As the watch recharges
If the second hand points to the SET position, it indicates that the time must be set. Set the correct time.
Note: Normal time display will not be restored unless the time is set. (Refer to “Setting the Time and Calendar”.)
6

[If the charge becomes insufficient during normal time display]
•If the charge becomes insufficient, quickly charge the watch to restore normal operations (normal time display).
[Insufficient charge warning] |
[Stopped status] |
[Time setting warning display] |
The second hand points to |
The second hand |
The second hand points to SET. |
CHARGE. |
points to STOP. |
|
When the |
When charging the |
watch is |
watch by subjecting it to |
left |
light, the second hand |
without |
will move from the STOP |
charging |
position to the SET |
|
position. |
|
Note: Continue to subject the watch to light until |
|
the second hand moves to the “SET” |
|
position (approximately 30 minutes or |
|
more). |
English
7
<Low Power Warning>
Regardless what mode the watch is in, if the power becomes very low, the watch will switch to the time display and the second hand will move to the ‘CHARGE’ position indicating that recharging is necessary.
After the second hand has moved to the ‘CHARGE’ position, the watch will switch to display the time in the following sequence, 24-hour hand, hour hand, minute hand, date (function hand).
Although the watch is functioning properly in this low charge state, it will stop within approximately 5 days (E81*)/11 days (E82*) (approximately 2 days if the display switches from charge warning operations to time change movement).
Restore the 1-second interval movement of the second hand by exposing the watch to light sufficient for charging.
If the watch stops due to insufficient charge, be sure to fully charge it, perform the all reset and 0-positioning procedure and then re-set the time as well as the calendar.
Note, during low power:
• The chronograph will stop, even during measurement, and reset.
• The time set for local time (time difference) is maintained.
• The alarm sound will not be emitted even if the alarm has been set.
• Crown (changing modes) and button operations will not function.
8

<Time setting warning function>
As the watch is exposed to light sufficient for charging and begins re-charging after it has stopped, the second hand will move to the SET position, informing you that the time is incorrect and must be set. Although movement of the 24-hour hand, hour hand, and minute hand will start after the second hand has moved to the SET position, the time and calendar must be set after the watch has fully charged. Note: When the time setting warning function is enabled
•Crown and button operations other than those used to set the time and calendar will not function.
•The time setting warning function is cancelled when the crown is pulled out to position 2 (time correction position) while in time/calendar mode. The second hand will stop at the SET position unless the time is set after pulling the crown out to position 2.
•If the watch has stopped due to an insufficient charge, expose the watch to light sufficient for charging
until the display switches to the time setting warning indication (SET position) (30 minutes or more).
<Overcharging prevention function>
Once the rechargeable cell is fully charged, an overcharging prevention function will activate so that it is not charged any further.
English
9
<Power saving function>
If the watch is not exposed to light sufficient for charging and in the time/calendar mode
(TME) or local time mode (L-TM), the second hand will move to the 0-position and stop, and the watch will enter power saving mode to reduce power consumption.
Even though the second hand stops, the 24-hour hand, hour hand, and minute hand will continue to keep the correct time. Also, the calendar will continue to update according to the movement of the 24-hour hand, hour hand, and minute hand.
•The Second Hand will start moving again once the watch is subjected to light sufficient for charging. However, if the watch is in insufficient charge warning mode, the second hand will stop at the CHARGE position. If the watch is in time setting warning mode, the second hand will stop at the SET position. If the watch is stopped, the second hand will stop at the STOP position.
10

English
Operating Instructions
E81*
11

 E81*/ Table of Contents
1. Switching the Mode (Display Function)......................................... |
13 |
2. Setting the Time and Calendar....................................................... |
14 |
[Setting the Time]........................................................................................... |
14 |
[Setting the Calendar]..................................................................................... |
16 |
[When the date position has shifted off center in the calendar window]........... |
20 |
3. Using the Chronograph................................................................... |
21 |
4. Setting the Local (Secondary) Time................................................ |
24 |
5. Using the Alarm................................................................................ |
27 |
6. Checking and Correcting the Reference or 0-Position of Each Hand...... 30 |
|
[Checking the Reference or 0-Position]............................................................. |
30 |
[Correcting the Reference or 0-Position]........................................................... |
32 |
7. All-Reset Operation.......................................................................... |
34 |
12

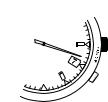
1. Switching the Mode (Display Function)
This watch has 4 modes: time/calendar, chronograph, local time, and alarm. The mode can be switched by rotating the crown. Check the current mode with the mode hand.
English
[Mode/display function]
|
|
|
|
|
|
|
ALM |
TME |
|
|
|
|
|
|
|
||
|
|
|
|
|
|
|
Alarm mode |
Time/calendar mode |
|
|
|
|
|
|
|
L-TM |
CHR |
|
|
|
|
|
|
|
||
|
|
|
|
|
|
|
||
|
|
|
|
|
|
|
||
|
|
|
|
|
|
|
Local time mode |
Chronograph/ |
|
|
|
|
|
|
|
|
reference or 0-position |
|
|
|
|
|
|
|
|
correction mode |
Mode hand
13
2. Setting the Time and Calendar
[Setting the Time]
1.Rotate the crown to align the mode hand with time/calendar [TME] mode as indicated on the mode sub dial.
Hour |
Minute hand |
(A) |
(1) Calendar adjustment |
|
|
|
position |
(2) Time setting position
24-hour hand |
(B) |
Closed position |
Second |
(Normal position) |
|
|
|
|
Mode |
|
|
14

2. Pull the crown out two ‘steps’ to position 2 (time setting position). The second hand |
English |
Note: |
|
will rapidly advance to the 0-second position and stop. |
|
• If the second hand does not stop at the 0-second position, be sure to perform reference or |
|
0-position correction in reference or 0-position correction mode. |
|
• If the crown is pulled out two ‘steps’ to position 2 while the date is advancing, the date and |
|
function hand will stop at that position, and after the second hand has rapidly advanced to the 0 |
|
second position, the date will advance by remaining amount. |
|
3. Rotate the crown to adjust the time. |
|
(1) Rotate the crown to the right (clockwise) by 1 ‘click’ to move the 24-hour hand, |
|
hour hand and minute hand clockwise. |
|
(2) Rotate the crown to the left (counterclockwise) by 1 ‘click’ to move the 24-hour |
|
hand, hour hand and minute hand counterclockwise. |
|
• Quickly rotate the crown 2 or more clicks consecutively to advance the hands |
|
rapidly. Rotate the crown to the left or right 1 click to stop rapid advance. |
|
If the rapid advance is not stopped, the hand will automatically stop after “12 hours” |
|
of rotation. |
|
4. Adjust the watch according to a reliable time source and then return the crown to the |
|
closed position (normal position). |
|
15
[Setting the Calendar]
Once the calendar is set, it will operate as a perpetual calendar that automatically changes the year, month, and date including leap years. Provided the watch does not stop due to an insufficient charge, once set no further setting is necessary.
Function hand: Indicates the number of number of years elapsed since leap year
 (A)
(A)
(1) Calendar adjustment position
Normal position
(B)
Date
Month
16

1. Rotate the crown to set time/calendar [TME] mode as indicated on the mode sub dial. |
English |
hand will advance rapidly to the month position set in memory and stop. The function |
|
2. Pull the crown out one ‘step’ to position 1 (calendar adjustment position). The second |
|
hand will move to the year position (number of years elapsed since leap year) set in |
|
memory and stop. |
|
Note: |
|
If the crown is pulled out one ‘step’ to position 1 when the date is advanced, the |
|
second hand will rapidly advance after the date is changed. |
|
3. Rotate the crown to the left (counterclockwise) to set the date. |
|
• Rotate the crown to the left (counterclockwise) by 1 click to rotate the function |
|
hand 4 times and advance the date by 1 day. |
|
• Quickly Rotate the crown 2 or more ‘clicks’ consecutively for continuous advance. |
|
Rotate the crown to the left or right by 1 ‘click’ to stop rapid advance. |
|
If the movement of the date is not stopped, the date will automatically stop after |
|
advancing 31 days. |
|
17
Loading...