

Citizen C320 User Manual

CITIZEN QUARTZ
PROMASTER NAVISURF
Model No.JN2XXX
Caliber No.C320
• Instruction Manual
CTZ-B6804
Thank you for purchasing a CITIZEN QUARTZ
Watch. To ensure correct use, please read these
instructions carefully. Please confirm that the
CITIZEN International Guarantee Card is included
for your possible claim.
1. PRODUCT FEATURES
This watch can easily retrieve Greenwich Mean
Time (UTC) and the time and calendar for 23 cities
around the world by simple button operation.
In addition, this combination watch also features a
racing timer useful in yacht racing and other
competitions, an alarm function and chronograph.
2. NAMES OF COMPONENTS
Verify the locations of components by comparing
with the illustration inside the front cover of this
manual.
3. SWITCHING FUNCTIONS (MODES)
The mode changes each time button M button is
pressed. The mode hand indicates the current mode.
4. GREENWICH MEAN TIME (UTC) AND TIME
DIFFERENCE
• Those cities (regions)
that use Daylight
Savings Time are
indicated with a circle,
while those (regions)
that do not are
indicated with an X.
• The time differences
and use of Daylight
Savings Time in each
country are subject to
change in accordance
with the regulations in that country.
5. SETTING THE TIME
<Digital Time Setting (TME)>
■ When the time is set for any city, the times in
other cities are set automatically.
When reading this instruction manual please
keep the watch diagram at left folded out and in
view. Symbols ( 嘷A, 嘷B , etc.) used in the
sections on operating instructions refer to the
symbols indicated in this diagram.

[Normal Time Display]
1. Press button 嘷
M and set
the watch to TME mode.
2. Press button 嘷
A or 嘷C ,
and display the name of
the city for which the
time is to be set.
3. Pull out button 嘷
M . The
hours, minutes and
seconds of the digital
display will start to flash.
* The time can be switched to Daylight Saving
Time as this time.
Press button 嘷
C to switch to Daylight Saving Time
for that city. When the Daylight Saving Time is
displayed the word “SUMMER” will be displayed.
4. Each time button 嘷
A is pressed, the display will
change in the order of SUMMER, seconds,
minutes, hours and 12H/24H (12 hour or 24 hour)
display. Since the flashing digit of the display
changes each time button 嘷
A is pressed, press
button 嘷
A until the digit of the display you want to
correct flashes
5. Press button 嘷
C to set the flashing digit of the
display (continuously pressing button 嘷
C will
cause the number displayed to advance rapidly).
• When setting to a 12 hour display, make sure
the display for AM/PM is correct.
6. Push button 嘷
A back into the normal position,
completing the digital time setting.
• Daylight Savings Time can be set independently
for each city.
<Analog Time Setting>
Analog cannot be set alone. However, analog time
can be set by switching the digital and analog
display. Refer to section 7 entitled, “Switching
Between Analog Time and Digital Time”. (Page 14)
6. SETTING THE CALENDAR
■ When the calendar is set for any city, the
calendar for the other cities are set automatically.
[Normal Calendar Display]
1. Press button 嘷
M and set
the watch to the CAL
mode.
2. Press button 嘷
A or button
嘷
C to display the city for
which you want to set the
calendar.
3. Pull out the 嘷
M button. The
“month” of the digital
display will start to flash.
4. Since the flashing digit of the display will change
each time button 嘷
A is pressed in the order of
month, date, day and year, press button 嘷
A until
the digit of the display you want to correct flashes.
5. Press button 嘷
C to correct the flashing digit of the
display (continuously pressing button 嘷
C
will
cause the number displayed to advance rapidly).
6. Push button 嘷
M
back into the normal position,
completing the calendar setting.
7. SWITCHING BETWEEN ANALOG TIME AND
DIGITAL TIME
This watch is
designed for
simple switching
between digital
and analog displays for cities and calendars.
1. Press button 嘷
M and set the watch to the TME or
CAL mode.
2. Press button 嘷
A (to advance the name of the
cities forward) or button 嘷
C (to advance the name
of the cities backward) to display the desired city.
3. Simultaneously press buttons 嘷
A and 嘷C . A
confirming beep will be produced indicating that
the times (calendar) of the cities designated for
digital have been interchanged.
8. DISPLAYING TIME AND CALENDAR OF
MAJOR CITIES OF THE WORLD
1. Press button 嘷
M and set
the watch to the TME or
CAL mode.
2. Press button 嘷
A (to advance
the name of the cities
forward) or button 嘷
C (to
advance the name of the
cities backward) to display
the desired city.
9. USE OF ZONE SETTING (SET)
■ In the zone setting function, only the cities selected
“SET” can be retrieved and displayed in each
mode easily.
[Zone Setting Mode]
<Zone Setting>
1. Press button 嘷
M and set the
watch to the SET mode.
2. Press button 嘷
A or button
嘷
C to display the city that
you want to set.
3. Pull out button 嘷
M. The
name of the city and the
word “SET” of the digital
3. display will begin to flash. At this time, select
“SET” or “OFF” for display of the city by pressing
button 嘷
B.
• When setting other cities, first press button 嘷
A
or
嘷
C to display the city desired to be corrected, and
then set for each city using button 嘷
B
.
4. After completing settings for each city, push button
嘷
M to the normal position to complete the setting
procedure.
• The year can be set from the years 1995 to 2099.
• Since this watch is equipped with an autocalendar function, there is no need to correct
the date at the end of the month.
• When the date has been set to a date that does
not exist (such as February 30), the watch will
automatically correct the date to the 1st of the
following month when return to the normal display.
10. USE OF RACING TIMER (R-1/R-2)
■ This watch has the following two kinds of race
timer, which are convenient for yacht races, etc.
1. Race Timer 1 (R-1)
: It has no auto-repeat function which repeats
timing from the set time to time up three times
automatically. This is convenient for repeating
the starting practices, etc.
■ 2. Race Timer 2 (R-2)
: It has an auto-chrono function which after time
up, chronograph timing starts automatically, and
you can measure the passed time since time up.
<Setting Procedure> (Same for R-1 and R-2)
• Race timer can be set from
60 minutes to 10 minutes
in 5 minute intervals, and
set to 6, 5, 3, 1 minute.
1. Press button 嘷
M and set
the watch to either R-1 or
R-2 mode.
2. Pull out button 嘷
M . The
minutes digit of the digital
2. display will start to flash. At this time, press button
嘷
C until the time you want to set is flashing on the
display (continuously pressing button 嘷
C will cause
the number displayed to advance rapidly).
3. Push in button 嘷
M to the normal position to
complete the setting procedure.
<Timer sound>
When the timer has finished, a time up sound rings
for about 5 seconds. Also an alarm sounds every
minute between 10-1 minute and 50, 40, 30, 20,
10, 5, 4, 3, 2, 1 second to indicate the remaining
time till time up.
<Use of Racing Timer 1 (R-1)>
• This race timer repeats
the timer from set time to
time up to three times
automatically. Then
returns to set time and
stops.
1. When button 嘷
A is pressed, the timer will start to
measure time from the set time.
2. The timer is stopped by pressing button 嘷
A
during timing.
• Press button 嘷
A again to restart timing.
3. When the timer is stopped, pressing button 嘷
C
returns the timer to the set time.
*1. Timer Fly Back (Restart) Function
When button 嘷
C
is pressed during timing, the timer will
return to the set time and restart timing automatically.
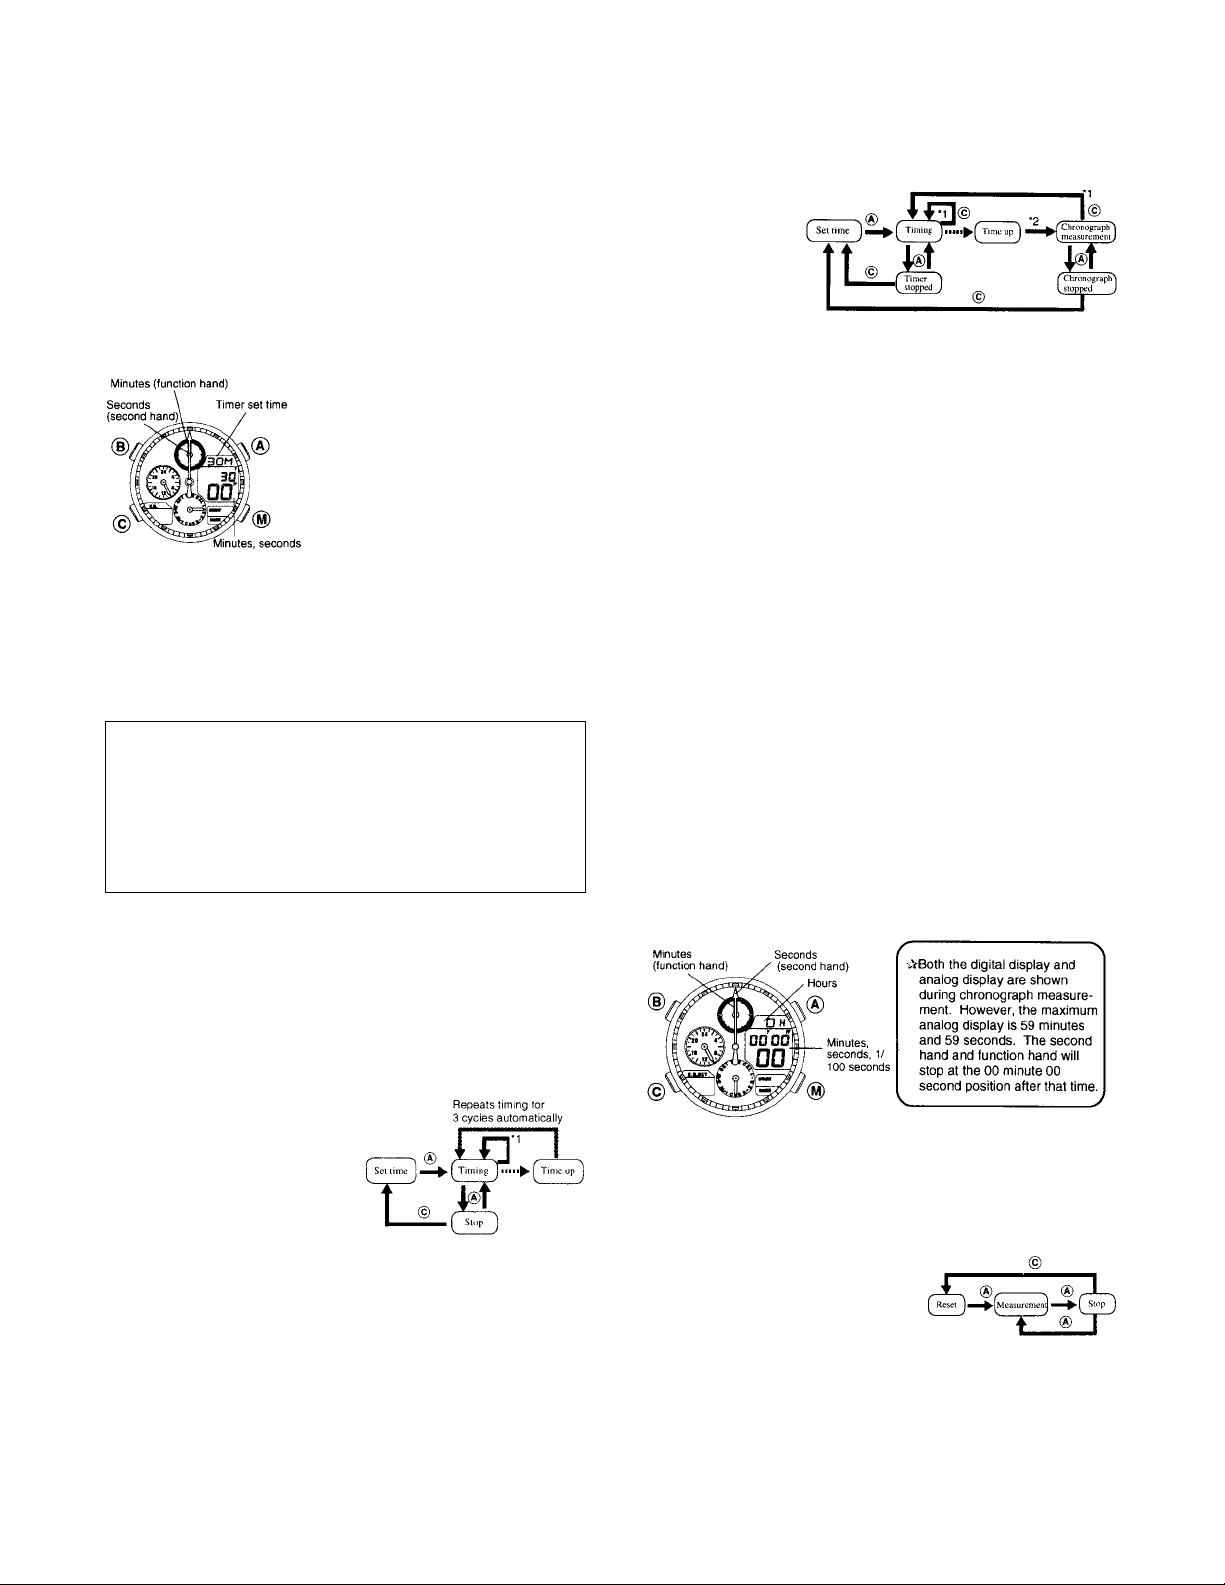
<Use of Racing Timer 2 (R-2)>
This racing timer is equipped with an auto-chronograph
function in which operation automatically switches
to chronograph measurement simultaneous to time
elapsing on the timer. The auto-chronograph
function measures time for 24 hours and following
completion of
chronograph
measurement,
the timer returns
to the set time
and stops.
1. When button 嘷
A is pressed, the timer will start to
measure time from the set time.
2. The timer timing or auto-chronograph measurement
is stopped by pressing button 嘷
A .
3. When the timer or auto-chronograph is stopped,
pressing button 嘷
C returns the timer to the set time.
*1. Timer Fly Back (Restart) Function:
When button 嘷
A is pressed during timing or time
measurement with the auto-chronograph function,
the timer will return to the set time and restart
timing automatically.
*2. Starting of Auto-Chronograph Measurement:
Time measurement with the auto-chronograph
will start automatically simultaneous to time
elapsing on the timer.
11. USE OF CHRONOGRAPH (CHR)
■ This chronograph can measure and display time
in 1/100 second units for a maximum of 23 hours
59 minutes 59 seconds. Following completion of
measurement for 24 hours, it returns to the reset
state and stops. In addition, it is also able to
measure split time.
[Chronograph Mode]
<Accumulative Time Measurement>
1. The chronograph is started and stopped with
button 嘷
A . (Measurement can be started and
stopped repeatedly as often as desired by
repeatedly pressing button 嘷
A during
measurement.)
2. The chronograph can be
reset by pressing button 嘷
A
when it is stopped.
• Both the digital display and analog display are
shown during timer timing and auto-chronograph
measurement. However, the maximum analog
display during auto-chronograph measurement
is 59 minutes and 59 seconds. The second hand
and function hand will stop at the 00 minute 00
second position after that time.
 Loading...