


Citizen CL-E300 Service Manual
LINE THERMAL PRINTER
MODEL CL-E300/CL-E303
User’s Manual

|
WEEE MARK |
|||||||||
En |
If you want to dispose of this product, do not mix it with general household waste. There is a |
|||||||||
separate collection systems for used electronics products in accordance with legislation under the |
||||||||||
|
WEEE Directive (Directive 2002/96/EC) and is effective only within European Union. |
|||||||||
Ge |
Wenn Sie dieses Produkt entsorgen wollen, dann tun Sie dies bitte nicht zusammen mit dem |
|||||||||
Haushaltsmüll. Es gibt im Rahmen der WEEE-Direktive innerhalb der Europäischen Union |
||||||||||
|
(Direktive 2002/96/EC) gesetzliche Bestimmungen für separate Sammelsysteme für gebrauchte |
|||||||||
|
elektronische Geräte und Produkte. |
|||||||||
Fr |
Si vous souhaitez vous débarrasser de cet appareil, ne le mettez pas à la poubelle avec vos |
|||||||||
ordures ménagères. Il existe un système de récupération distinct pour les vieux appareils élec- |
||||||||||
|
troniques conformément à la législation WEEE sur le recyclage des déchets des équipements |
|||||||||
|
électriques et électroniques (Directive 2002/96/EC) qui est uniquement valable dans les pays de |
|||||||||
|
l’Union européenne. |
|||||||||
|
Les appareils et les machines électriques et électroniques contiennent souvent des matières |
|||||||||
|
dangereuses pour l’homme et l’environnement si vous les utilisez et vous vous en débarrassez de |
|||||||||
|
façon inappropriée. |
|||||||||
Sp |
Si desea deshacerse de este producto, no lo mezcle con residuos domésticos de carácter general. |
|||||||||
Existe un sistema de recogida selectiva de aparatos electrónicos usados, según establece la leg- |
||||||||||
|
islación prevista por la Directiva 2002/96/CE sobre residuos de aparatos eléctricos y electrónicos |
|||||||||
|
(RAEE), vigente únicamente en la Unión Europea. |
|||||||||
It |
Se desiderate gettare via questo prodotto, non mescolatelo ai rifiuti generici di casa. Esiste un |
|||||||||
sistema di raccolta separato per i prodotti elettronici usati in conformità alla legislazione RAEE |
||||||||||
|
(Direttiva 2002/96/CE), valida solo all’interno dell’Unione Europea. |
|||||||||
Du |
Deponeer dit product niet bij het gewone huishoudelijk afval wanneer u het wilt verwijderen. Er |
|||||||||
bestaat ingevolge de WEEE-richtlijn (Richtlijn 2002/96/EG) een speciaal wettelijk voorgeschreven |
||||||||||
|
verzamelsysteem voor gebruikte elektronische producten, welk alleen geldt binnen de Europese |
|||||||||
|
Unie. |
|||||||||
Da |
Hvis du vil skille dig af med dette produkt, må du ikke smide det ud sammen med dit almindelige |
|||||||||
husholdningsaffald. Der findes et separat indsamlingssystem for udtjente elektroniske produkter |
||||||||||
|
i overensstemmelse med lovgivningen under WEEE-direktivet (direktiv 2002/96/EC), som kun er |
|||||||||
|
gældende i den Europæiske Union. |
|||||||||
Por |
Se quiser deitar fora este produto, não o misture com o lixo comum. De acordo com a legislação |
|||||||||
que decorre da Directiva REEE – Resíduos de Equipamentos Eléctricos e Electrónicos (2002/ 96/ |
||||||||||
|
CE), existe um sistema de recolha separado para os equipamentos electrónicos fora de uso, em |
|||||||||
|
vigor apenas na União Europeia. |
|||||||||
Pol |
Jeżeli zamierzasz pozbyć się tego produktu, nie wyrzucaj go razem ze zwykłymi domowymi od- |
|||||||||
padkami.Według dyrektywy WEEE (Dyrektywa 2002/96/EC) obowiązującej w Unii Europejskiej dla |
||||||||||
|
używanych produktów elektronicznych należy stosować oddzielne sposoby utylizacji. |
|||||||||
|
|
|
|
|
|
|
|
|
|
|
|
|
|
|
|
|
|
|
|
|
|
|
|
|
|
|
|
|
|
|
|
|
|
|
|
|
|
|
|
|
|
|
|
|
|
|
|
|
|
|
|
|
|
|
|
|
|
|
|
|
|
|
|
|
|
— 2 —

Compliance Statement for European Users
CE marking shows conformity to the following criteria and provisions:
Low Voltage Directive (2014/35/EU), EMC Directive (2014/30/EU), and RoHS directive (2011/65/EU)
Full text of the EU declaration of conformity is available at the following internet address: http://www.citizen-systems.co.jp/english/support/download/printer/others/eu_doc/
IMPORTANT: This equipment generates, uses, and can radiate radio frequencyenergy and if not installed and used in accordance with the instruction manual, maycause interference to radio communications. It has been tested and found to complywith the limits for a Class A computing device pursuant to Subpart J of Part 15 of FCCRules, which are designed to provide reasonable protection against such interferencewhen operated in a commercial environment. Operation of this equipment in aresidential area is likely to cause interference, in which case the user at his ownexpense will be required to take whatever measures may be necessary to correct theinterference.
CAUTION: Use shielded cable for this equipment.
Sicherheitshinweis
Die Steckdose zum Anschluß dieses Druckers muß nahe dem Gerät angebracht und leicht zugänglich sein.
For Uses in Canada
This Class A Information Technology Equipment (ITE) complies with Canadian CAN ICES-3(A)/NMB-3(A).
This Information Technology Equipment (ITE) does not exceed the Class A limits for radio noise emissions from digital apparatus set out in the Radio Interference Regulations of the Canadian Department of Communications.
Pour L’utilisateurs Canadiens
Cet Equipements informatiques (EI) de la classe A est conforme a la norme CAN ICES-3(A)/NMB-3(A) du Canada.
Le present Equipements informatiques (EI) n’emet pas de bruite radio electriques depassant les limites applicables aux appareils numeriques de la classe A prescrites dans le Reglement sur le brouillage radioelectrique edicte par le ministere des Communications du Canada.
— 3 —

Radio Wave Interference Self-Regulation
This is a class B device.
Although this device is designed for home use, use in close proximity to radios or television antennas could cause interference.
Use the device correctly in accordance with the instruction manuals.
VCCI-B
GENERAL PRECAUTIONS
Before using this product, be sure to read through this manual. After having read this manual, keep it in a safe, readily accessible place for future reference.
The information contained herein is subject to change without prior notice.
Reproduction or transfer of part or all of this document in any means is prohibited without permission from Citizen Systems.
Note that Citizen Systems is not responsible for any operation results regardless of omissions, errors, or misprints in this manual.
Note that Citizen Systems is not responsible for any trouble caused as a result of using options or consumables that are not specified in this manual.
Except explained elsewhere in this manual, do not attempt to service, disassemble, or repair this product.
Citizen Systems Japan Co., Ltd. shall not be liable for damages caused by improper or incorrect usage or by the usage environment.
Data is basically for temporary use and not stored for an extended period of time or permanently. Please note that Citizen Systems is not responsible for damage or lost profit resulting from the loss of data caused by accidents, repairs, tests or other occurrences.
If you find omissions, errors, or have questions, please contact your Citizen
Systems dealer.
— 4 —
CITIZEN is a registered trademark of Citizen Watch Co., Ltd.
QR Code is a registered trademark of DENSO WAVE INCORPORATED.
Datamax® is a registered trademark of Honeywell International Inc.
Maxi Code is a registered trademark of UPS.
Zebra®, ZPL2®, and EPL2TM are registered trademarks of Zebra Technologies, Inc. in the U.S.
PDF417 is a trademark or registered trademark of Motorola, Inc. in the U.S. and other countries.
TrueType™ is a trademark of Apple Inc.
All other trademarks are the property of their respective owners.
Citizen Systems use these trademarks in accordance with the license of relevant owners.
Copyright© CITIZEN SYSTEMS JAPAN CO., LTD. 2017
— 5 —

SAFETY PRECAUTIONS...WHICH SHOULD BE STRICTLY
OBSERVED
Before using this product for the first time, carefully read these SAFETY PRECAUTIONS. Improper handling may result in accidents (fire, electric shock or injury).
In order to prevent injury to operators, third parties, or damage to property, special warning symbols are used in the User’s Manual to indicate important items to be strictly observed.
After having read this Manual, keep it in a safe, readily accessible place for future reference.
Some of the descriptions contained in this manual may not be relevant to some printer models.
The following describes the degree of hazard and damage that could occur if the printer is improperly operated by ignoring the instructions indicated by the warning symbols. Be sure to read this information carefully.
 WARNING
Neglecting precautions indicated by this symbol may result in fatal or serious injury.
 CAUTION
Neglecting precautions indicated by this symbol may result in injury or damage to property.
This symbol is used to alert your attention to important items.
— 6 —

Warnings
 WARNING
Do not perform any of the following actions as they may result in damage or malfunction of the device, overheating, the generation of smoke, fire, or electric shock. If the device is damaged or defective, turn off the power, dis-
connect the power plug from the electrical outlet, and contact your retailer.
Do not step on, drop, hit, or otherwise subject the device to significant force or impact.
Do not use the device in environments of poor ventilation or in a manner that blocks device vents.
Do not use the device in environments, such as laboratories, where chemical reactions occur or environments exposed to air that contains salt or toxic gases.
Use the device in environments at specified power supply voltage and frequency
(100 - 240 V and 50/60 Hz).
Do not connect or disconnect the power cord or an interface cable by holding the cable itself. Do not pull or carry the device while cables are under load.
Do not drop or insert small objects such as clips or push-pins into the device.
Do not connect too many power cords to a single electrical outlet.
Do not spill tea, coffee, juice, or other beverages onto the device. Do not subject the device to insecticides. If liquid is spilled onto the device, turn off the power, disconnect the power plug from the electrical outlet, and contact your retailer.
Do not disassemble or modify the device.
Do not use non-specified AC adapters.
Use only the included power cord. Do not use the included power cord with other devices.
Do not use deformed or damaged power cords.
Do not unnecessary process power cords.
Exposed wire due to damaged power cords or melted sheaths may cause current leakage, malfunction, or electric shock. Contact your retailer if the
power cord becomes damaged.
Do not place objects around the power plug.
— 7 —

General Precautions
Observe these precautions to ensure proper use of the device. Make sure to read these precautions.
 CAUTION
Do not touch the area around the thermal head during or right after the printing process. This area will be hot and may cause burns.
Do not drop or insert small objects such as clips or pins into the printer. Doing so may result in failure.
Exercise caution when carrying or transporting the device. Dropping the device may damage other objects or cause injury.
Make sure to open the printer cover fully when it needs to be opened. Failure to do so may result in the printer closing unexpectedly, which may cause injury.
Exercise caution when the printer cover is open. Contact with edges may result in injury.
Do not open the printer cover while the printer is printing.
Do not use thinner, trichlene, benzene, ketone-based solvents, or cleaning cloths with chemicals to clean the case surface.
Do not use the device in environments exposed to significant levels of oil, metal shavings, waste, and dust.
Do not spill liquids onto the device or expose the device to spray chemicals.
Do not step on, drop, hit, or otherwise subject the device to significant force or impact.
Make sure to use the control panel correctly. Pressing buttons randomly may cause malfunction and even failure. Do not use sharp objects including tips of pens to operate the control panel.
If some abnormality occurs during use, immediately stop using the device and disconnect the power plug from the electrical outlet.
Do not disassemble the device for repairs in case of failure. Always contact the dealer for repairs.
The auto cutter has internal blades near the media discharge port. Never insert hands inside the media discharge port whether the printer is operating or not.
— 8 —

Installation Precautions
 CAUTION
Do not use or store the device in environments exposed to excessive heat, moisture, direct sunlight, near heaters, extremely high or low altitudes, excessive humidity, or excessive dust.
Do not use the device in environments, such as laboratories, where chemical reactions occur.
Do not use the device in environments exposed to air that contains salt or toxic gases.
Place printers on level, stable surfaces in environments with good ventilation. (Do not place the printer such that the vents are against walls.)
Do not place objects on top of the device.
Using the device near radios or televisions or plugging the power cord into the same electrical outlet as used by such devices may cause reception interference.
Use the device in environments at specified power supply voltage and frequency.
Use only the included power cord. Do not use the included power cord with other devices.
Do not place objects or step on power cords.
Do not pull or attempt to carry the device by the power cord or an interface cable.
Do not connect too many power cords to a single electrical outlet.
Do not bundle the power cord.
Hold the power cord by the power plug to connect and disconnect to/from electrical outlets.
Ensure connectors are properly connected. In particular, reversing the polarity may damage internal parts.
Turn the power switch off before connecting or disconnecting interface cables.
Do not run long signal lines or make connections with noisy devices to the extent possible. If necessary, use shielded twisted pair cables for signal lines and take any other necessary steps to ensure signal integrity.
Place the device near an electrical outlet and ensure that the power plug can be unplugged easily so that the power to the device can be cut quickly if necessary.
Use electrical outlets with ground terminal screws. Using electrical outlets without ground terminals may result in injury due to static electricity.
— 9 —

THE TABLE OF CONTENTS
1. GENERAL OUTLINE...................................................................... |
12 |
|
1.1 |
Features............................................................................................. |
12 |
1.2 |
Unpacking.......................................................................................... |
14 |
1.3 |
Model Classification........................................................................... |
15 |
2. Part Names and Function............................................................. |
17 |
|
2.1 |
Front of Printer................................................................................... |
17 |
2.2 |
Operation panel................................................................................. |
19 |
2.3 |
Rear of Printer.................................................................................... |
20 |
2.4 |
Inside of Printer.................................................................................. |
22 |
3. SETUP............................................................................................ |
24 |
|
3.1 |
Printing Preparation Process............................................................. |
24 |
3.2 |
Loading Paper.................................................................................... |
25 |
3.3 |
Adjusting Media Sensor Positions...................................................... |
31 |
3.4 |
Connecting the AC Adapter............................................................... |
32 |
3.5 |
Connecting the Printer to a Host Computer....................................... |
34 |
3.6 |
Install the Printer Driver..................................................................... |
35 |
4. |
Basic Operation............................................................................. |
36 |
|
|
4.1 |
FEED Key Operation.......................................................................... |
36 |
5. |
Configuring Printer Settings Using the Specialized Utility....... |
38 |
|
|
5.1 |
List of Settings................................................................................... |
39 |
|
5.2 |
Obtaining the LabelPrinterUtility........................................................ |
44 |
|
5.3 |
Using the LabelPrinterUtility............................................................... |
44 |
6. |
Configuring Ethernet Network Settings |
|
|
|
Using Network Seeker.................................................................. |
45 |
|
|
6.1 |
Starting Network Seeker.................................................................... |
45 |
|
6.2 |
Changing Settings.............................................................................. |
46 |
7. |
Configuring Printer Settings Using a Browser........................... |
47 |
|
|
7.1 |
LinkServer user roles......................................................................... |
47 |
|
7.2 |
LinkServer menu configuration.......................................................... |
48 |
|
7.3 |
LinkServer connection procedure...................................................... |
49 |
— 10 —
8. Configuring the Printer Using the Operation Panel................... |
51 |
||
8.1 |
Sensor Adjustment Mode................................................................... |
53 |
|
8.2 |
Test print mode................................................................................... |
55 |
|
8.3 |
|
Configuration Print Mode................................................................... |
57 |
8.4 |
|
Emulation switching mode................................................................. |
58 |
8.5 |
HEX Dump Mode............................................................................... |
59 |
|
8.6 |
|
Initialization Mode.............................................................................. |
60 |
9. Online Configuration Mode.......................................................... |
62 |
||
10. Clearing Jobs Stored in the Printer........................................... |
63 |
||
11. Maintenance................................................................................. |
64 |
||
11.1 |
Plastic Surface of Printer and Platen............................................... |
65 |
|
11.2 |
Thermal head................................................................................... |
65 |
|
12. Appendices.................................................................................. |
66 |
||
12.1 |
Troubleshooting................................................................................ |
66 |
|
12.2 |
Basic Specifications......................................................................... |
67 |
|
12.3 |
Usage Conditions............................................................................. |
75 |
|
12.4 |
Printer Storage Conditions............................................................... |
75 |
|
12.5 |
Interfaces......................................................................................... |
76 |
|
— 11 —

1. GENERAL OUTLINE
Thank you for purchasing the Citizen Systems Line Thermal Printer CL-E300/CL-E303. This printer is a line direct thermal printer developed for labels, tags, tickets, and many other applications.
1.1 Features
< Compact and Stylish Design >
Boasting the smallest footprint in the industry, this printer was designed to be compact to free users from placement restrictions.
The stylish design enables the device to be used in different environments. Exterior color options include black and pure white.
< High-speed, High-quality Printing >
This printer utilizes the direct thermal transfer method and a thermal print head and includes a 32-bit RISC CPU with a maximum operating frequency of 216 MHz and thermal history control to provide high-speed, high-quality performance up to 8 IPS with the CL-E300 model and up to 6 IPS with the CL-E303 model.
< Adjustable Sensors Provided as Standard >
Adjustable media/black line sensors are provided as standard so that the detection position can be adjustable horizontally. This enables sensors to be placed at detection positions suitable for different types of media.
< Interface >
Standard interfaces include a 9-pin, DSUB RS232C interface, full-speed USB 2.0 port, and an Ethernet port that supports 100BASE-TX and 10BASE-T. These interfaces enable high-speed connections to many peripheral devices.
< Excellent Usability >
Manual media cutters are installed at the top and bottom of the media discharge port to cut media after being printed for better usability in many different environments.
The operation panel has been designed to have a different color than the main exterior color for better visibility and stress-free operation.
Thermal heads and platen rollers can be easily replaced without the use of tools.
—12 —

< Easy to Use >
Use the LabelPrinterUtility developed by Citizen to configure printer settings from a host computer.
The built-in LinkServer™ printer tool can be used over Ethernet connections to change settings and perform other operations.
Printer includes functionality to enable users to quickly adjust head balance.
<Models equipped with cutters are optionally available>
Models equipped with an auto cutter are also available.
The types of auto cutter units available include the integrated fixed blade/adjustable blade type and the interchangeable fixed blade/adjustable blade type.
— 13 —
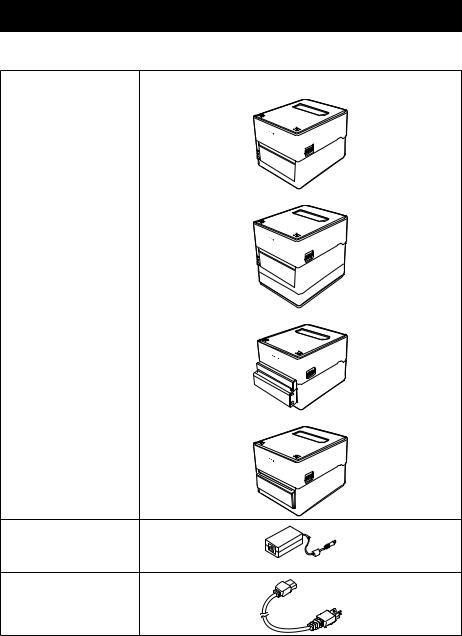
1.2 Unpacking
Make sure the following items are included with your printer.
NAME |
Exterior appearance |
Printer |
CL-E300X***NX (standard type) |
CL-E300X***NS (with AC adapter case)
CL-E300X***BC (with integrated cutter)
CL-E300X***PC (with interchangeable cutter)
AC adapter
*Standard type only.
AC cord
— 14 —

NAME |
Exterior appearance |
Head cleaner
Media shaft guide
Media shaft
USB cable
CD-ROM
Quick Start Guide
Safety Precautions
1.3 Model Classification
Model numbers indicate printer features according to the following system.
CL - E300 X J W N N T
1 2 3 4 5 6 7
1.Model name CL-E300: 200 DPI CL-E303: 300 DPI
2.Fixed value
3.Market E: Europe
U:North America
4.Body case color
B:Black
W:Pure white
5.Interface
N:USB port, Ethernet port, and RS-232C serial port
— 15 —
6.Cutter N: None
BC: Integrated
PC: Interchangeable
7. AC adapter
X: External type S: Internal type
Certain combinations may not be available. Please contact us for inquiries on desired configurations.
— 16 —
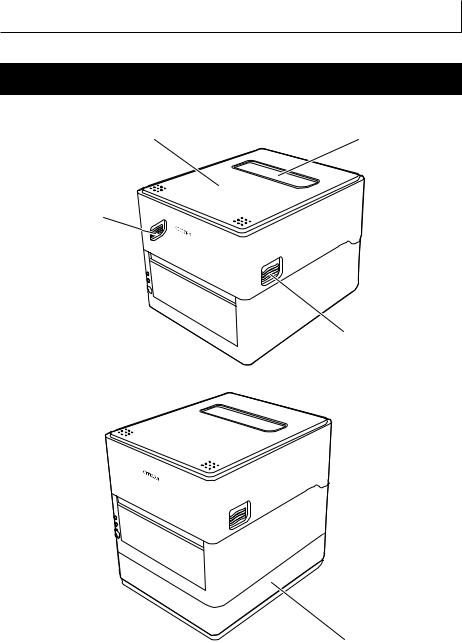
2.Part Names and Function
2.1Front of Printer
CL-E300X***N (standard type)
|
|

CL-E300X***NS (with AC adapter case)
— 17 —

CL-E300X***BC (with integrated cutter)
CL-E300X***PC (with interchangeable cutter)

1.Top cover window
Enables users to check the media level.
2.Top cover
Opens upward so users can replace or set media.
3.Operation panel
Includes 2 LEDs and 1 key.
Enables users to perform different printer operations and check printer status.
Refer to 2.2 Operation panel
— 18 —

4.Cover release buttons
The cover is opened by pressing the buttons on both the right and left sides.
5.Push marks
6.AC adapter case
7.Cutter
2.2Operation panel
The operation panel includes 2 LEDs and 1 key.
1.Power LED
Turns on when the power is turned on and turns off when the power is turned off.
2.Status LED
Turns on or flashes in green, red, and amber depending on the printer status.
Color |
Lights/ |
Status |
|
flashes |
|
Green |
On |
Printer is online |
|
Flashes |
Receiving data |
Amber |
On |
Startup |
Red to green to amber |
Flashes |
Error or alarm |
- |
Off |
Paused |
3.FEED key
Feeds media when pressed while the printer is waiting to receive data.
Pressing and holding this key for at least 3 seconds changes the operation mode to the online configuration mode.
 Refer to 9. Online Configuration Mode
— 19 —
Turning on the power to the printer while pressing and holding the FEED key with the closed changes starts the printer in the special function mode.
 Refer to 8. Configuring the Printer Using the Operation Panel Other key operation varies depending on the currently selected mode. Refer to “FEED Key Operation” for more information
Refer to 4.1 FEED Key Operation
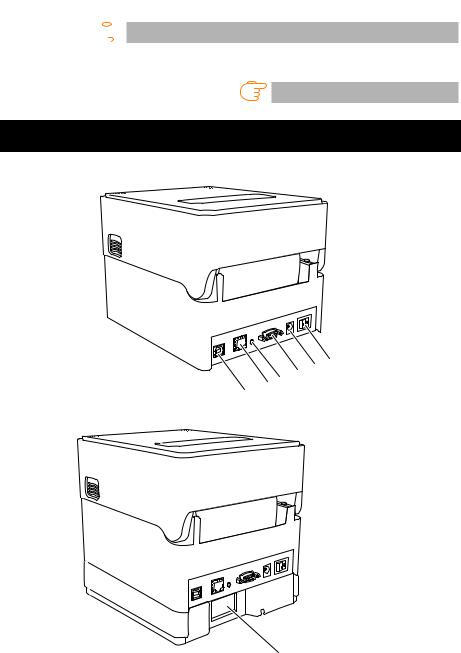
2.3 Rear of Printer
CL-E300X***N (standard type)
CL-E300X***NS (with AC adapter case)

— 20 —
CL-E300X***BC (with integrated cutter)
1.External media feed port
This port is used to feed media into the printer.
2.Power switch
Turns the printer power supply on and off.
3.DC jack
Connects to the included AC adapter.
4.D-SUB 9pin serial interface
5.USB interface
6.Ethernet Interface
7.AC port
8.Ethernet panel button
This button prints and initializes network settings.
 CAUTION
Do not connect a USB cable to the Ethernet interface. Doing so may damage connectors/interfaces.
— 21 —

2.4 Inside of Printer
CL-E300X***N (standard type)


|
|
|
|
|
|
— 22 —

CL-E300X***BC (with integrated cutter)
CL-E300X***PC (with interchangeable cutter)
|
|
1.Thermal head
Prints characters and graphic data on paper (paper rolls).
2.Upper sensor
This sensor detects the media position.
3.Media damper
When using roll media, absorbs tension generated by media feed operations to prevent print errors.
4.Bottom sensor
This sensor detects the media position.
5.Fixed left-side media guide
6.Adjustable right-side media guide
7.Platen roller
This roller transports media.
8.Media shaft
9.Media shaft guide
10.Head balance adjustment slider
11.Manual cutter (Upper/Bottom)
12.Cutter
13.Media discharge port
— 23 —

3.SETUP
3.1Printing Preparation Process
The printer must be set up according to the following process before printing can be performed.
Refer to the description of each section for detailed information on each step of the process.
1.Unpack and check the package contents
Refer to 1.2 Unpacking
2.Physical installation
3.Loading Media
Refer to 3.2 Loading Paper
4.Adjusting Media Sensor Positions
Refer to 3.3 Adjusting Media Sensor Positions
5.Connecting the AC Adapter
Refer to 3.4 Connecting the AC Adapter
6.Connecting the Printer to a Host Computer
Refer to 3.5 Connecting the Printer to a Host Computer
7.Installing the Printer Driver onto the Host Computer
Refer to 3.6 Install the Printer Driver
8.Installing the Configuration Application onto the Host Computer
Refer to 5.2 Obtaining the LabelPrinterUtility
9.Printing
Use the Configuration Application installed on the Host Computer to print.
— 24 —
 Loading...