


 Loading...
Step1
Laser Beam Printer
Step2
Getting Started Guide
Step3
Step4
Step5
Read This Manual First.
Taking the Printer out of the Package and Installing the Printer
Installing the Toner Cartridge
Connecting the Power Cord
Loading Paper
Connecting the Printer to a Computer and Installing the Software
p. 6
p. 10
p. 14
p. 15
p. 22
Thank you for purchasing the Canon LASER SHOT LBP2900.
Please read this manual thoroughly before operating the printer. After reading this manual, keep it in a safe place for future reference.
Introduction
About this manual
An electronic version (PDF) of the users manual is included on the CD-ROM that comes with this printer.
Before using this CD-ROM, refer to "About the CD-ROM," on p. 29 in this manual.
■Getting Started Guide (This Document) CD-ROM : Manual_1.pdf
Describes how to install the printer and the preparations needed before you can use the printer to print.
■User's Guide CD-ROM : Manual_2.pdf
Describes how to print, perform routine maintenance, resolve problems, etc. The PDF manuals are available from the CD-ROM Setup. (See "About CDROM Setup," on p. 29.) The file names written next to the CD-ROM marks (Manual_1.pdf, etc.) are the names of the PDF files of the manuals provided in the [Manuals] folder of the CD-ROM.
 IMPORTANT
Adobe Reader/Adobe Acrobat Reader is required to view the manuals in PDF format. If Adobe Reader/Adobe Acrobat Reader is not installed on your system, please download it from the Adobe Systems Incorporated website.
Conventions
The following symbols are used in this manual to explain procedures, restrictions, handling precautions, and instructions that should be observed for safety.
 WARNING
Indicates warnings that, if followed incorrectly, may lead to death or serious personal injury. To use the product safely, be sure to adhere to these warnings.
 CAUTION
Indicates cautions that, if followed incorrectly, may lead to personal injuries or damage to property. To use the product safely, be sure to adhere to these cautions.
 IMPORTANT
Indicates important points and limitations that need to be observed. Be sure to read these carefully to avoid running into problems operating the printer.
 NOTE
NOTE
Indicates additional information related to the operation of the printer. It is recommended that you read these points.
Copyright 2005 by Canon Inc. All rights reserved.
No part of this publication may be reproduced or transmitted in any form or by any means, electronic or mechanical, including photocopying and recording, or by any information storage or retrieval system without the prior written permission of Canon Inc.
Notice
Canon makes no guarantees of any kind with regard to this manual. Canon shall not be held liable for errors contained herein or for consequential or incidental damages incurred as a result of acting on information contained in the manual.
Abbreviations Used in this Manual
In this manual, product names and model names are abbreviated as follows:
Microsoft® Windows® 98 operating system: |
Windows 98 |
Microsoft® Windows® Millennium Edition operating system: |
Windows Me |
Microsoft® Windows® 2000 operating system: |
Windows 2000 |
Microsoft® Windows® XP operating system: |
Windows XP |
Microsoft® Windows ServerTM 2003 operating system: |
Windows Server 2003 |
Microsoft® Windows® operating system: |
Windows |
LASER SHOT LBP2900: |
LBP2900 |
2

Trademarks
Canon, the Canon logo, LASER SHOT, and LBP are trademarks of Canon Inc.
Adobe, Adobe Acrobat, and Adobe Reader are trademarks of Adobe Systems Incorporated.
IBM and PowerPC are trademarks of International Business Machines Corporation in the United States.
Microsoft and Windows are registered trademarks of Microsoft Corporation in the United States and/or other countries.
Other product and company names herein may be the trademarks of their respective owners.
Installation Site
Installation Environment
To use this printer safely and comfortably, install the printer in a location that meets the following requirements.
 IMPORTANT
Before installing the printer, be sure to read "Important Safety Instructions"
in the CD-ROM User's Guide.
●Use power supplies rated for voltages in the following ranges.
220 to 240 V (±10%) 50/60 Hz (±2 Hz)
●The maximum power consumption for the printer is 726W or below. Electrical noise or a dramatic drop in power voltage may result in a faulty operation or loss of data in the printer and computer.
●Use the printer where the temperature and humidity are in the following ranges.
Ambient temperature: 10 to 32.5°C (50 to 90.5°F)
Humidity: 20 to 80% RH (no condensation)
 IMPORTANT
Water droplets (condensation) may form inside the printer in the following situations: To allow the printer to adjust to the surrounding temperature and humidity, leave the printer in the installation area for at least one hour before use. If water droplets form inside the printer, problems may arise in the paper transport path, resulting in paper jams, printer malfunctions, and other operating problems.
-When the room where the printer is installed is heated suddenly
-When the printer is moved from a cool and dry area to a hot and humid area
 NOTE
NOTE
To customers using an ultrasonic humidifier
If you use tap water or well water when you are using an ultrasonic humidifier, impurities in the water may be dispersed through the air and become trapped inside the printer, causing poor image quality. When you are using these humidifiers, it is therefore recommended that you use purified water or other water that is free of impurities.
●Install the printer in the following environment
•A place where sufficient space can be secured
•A well-ventilated room
•A flat surface
•A sturdy platform that can easily tolerate the weight of the printer and optional equipment
 WARNING
Do not install the printer in a location near alcohol, thinners, or other flammable substances. If an inflammable substance comes into contact with the electrical unit inside the printer it may ignite or cause an electrical shock.
3
CAUTION
•Do not install the printer in any of the following locations. Doing so may cause fire or electrical shock.
-A damp or dusty location
-A location exposed to smoke and steam, such as next to a stove or humidifier.
-A location exposed to rain or snow
-A location near water faucets or water
-A location exposed to direct sunlight
-A location subject to high temperatures
-A location near open flames
•Do not install the printer on an unsteady platform, an uneven surface, or any other unstable location, or any location subject to vibrations. If the printer falls down or the platform tips over, someone may be injured.
 IMPORTANT
Do not install the printer in any of the following locations. Doing so may damage the printer.
-An environment where the temperature and/or humidity changes rapidly, or where condensation occurs
-A poorly ventilated room
-Near devices that generate magnetic or electromagnetic waves
-In rooms such as laboratories where chemical reactions occur
-In a room where corrosive or poisonous chemicals such as salt or ammonia are present in the air
-A platform that may warp from the weight of the printer and optional equipment, or where the printer is liable to sink (such as on a carpet or mat)
Installation Space
Choose an installation location where you can secure the following amount of free space around the printer, and on a surface that can support the weight of the printer. The dimensions of each of the printer components, the dimensions of the space needed around the components, and the positions of the feet are as follows.
•Printer Dimensions
1.281
382 |
|
|
.8 |
(mm) |
.5 |
|
|
||
|
|
|
369 |
|
•Peripheral Space |
|
|
|
|
Front View |
|
|
|
|
585 |
|
|
|
|
75 |
|
|
|
150 |
|
|
|
|
|
75 |
75 |
520 |
|
450 |
|
|
|
||
75 |
|
|
|
(mm) |
•Feet Positions |
32.8 |
171.3 |
46.5 |
|
Front View |
36.1 |
|
52.6 |
|
|
|
|
||
|
285.8 |
|
261.5 |
|
|
47.9 |
|
55.7 |
|
|
32.8 |
171.3 |
46.5 |
(mm) |
4

System Requirements
Operating System
•Microsoft Windows 98
•Microsoft Windows Me
•Microsoft Windows 2000 Server/Professional
•Microsoft Windows XP Professional/Home Edition
•Microsoft Windows Server 2003
(32-bit processor version only)
Operating Environment
|
Windows 98/Me |
Windows 2000/XP/Server 2003 |
|
|
|
|
|
CPU |
Pentium II |
Pentium II |
|
300MHz or higher |
300MHz or higher |
||
|
|||
|
|
|
|
Memory (RAM)* |
64MB or more |
128MB or more |
|
|
|
|
|
Hard Disk |
30MB or more |
Windows 2000: 60MB or more |
|
|
Windows XP/Server 2003: 70MB or more |
||
|
|
||
|
|
|
|
|
|
(PC/AT compatibles) |
*As the actual amount of memory that is available for use differs depending on the configuration of your computer system and the application you are using, printing cannot be guaranteed in all cases in the above environments.
Recommended Environment
|
Windows 98/Me |
Windows 2000/XP/Server 2003 |
|
|
|
|
|
CPU |
Pentium III |
Pentium III |
|
600MHz or higher |
600MHz or higher |
||
|
|||
|
|
|
|
Memory (RAM) |
128MB or more |
256MB or more |
|
|
|
|
Interface
•Windows 98/Me: USB Full-Speed (USB1.1 equivalent)
•Windows 2000/XP/Server 2003: USB 2.0 Hi-Speed/USB Full-Speed (USB1.1 equivalent)
 NOTE
NOTE
•If you want to use the sounds from the printer driver, a PC synthesizer (and the PCM synthesizer driver) needs to be installed in your computer. Do not use the PC speaker driver (speaker.drv).
•This printer uses bidirectional communication. Operation of the printer when connected via unidirectional communication equipment has not been tested. As a result, Canon cannot guarantee printer operation when the printer is connected using unidirectional print servers, USB hubs and switching devices.
5
Step
1
Taking the Printer out of the Package and
Step1
Installing the Printer
Confirming the Package Contents
Before installing the printer, check that all of the following components are included in the package. In the rare event that any components are missing or damaged, contact the store where you purchased the printer.
|
CD-ROM |
|
[LBP2900 User Software] |
Printer |
CAPT (Canon Advanced |
|
Printing Technology) software |
|
USB Class Driver |
|
Getting Started Guide (This Manual) |
|
User's Guide |
|
CAPT Windows Firewall Utility |
Power Cord |
USB cable |
Toner Cartridge |
(Only countries and regions of Asia)
 NOTE
NOTE
•Illustrations of the power cord used in this manual may not represent exact appearance and configuration of the actual power cord.
•The toner cartridge supplied with the printer is different from the replacement toner cartridge. Refer to Chapter 5 "Routine Maintenance" in the CD-ROM User's Guide when you purchase a replacement toner cartridge.
•A USB cable is supplied with this printer only within countries and regions of Asia. In other countries and regions, prepare according to the specifications of your computer.
Carrying the Printer to the Installation Site
Once you have chosen an installation site, take the printer out of the package
and carry it to the chosen location.
 IMPORTANT
• Install the printer on a platform such as a desk that can tolerate the weight of the printer sufficiently.
• Do not install the printer on a platform that could warp under the weight of the printer and optional equipment, or where the printer is liable to sink (such as on a carpet or mat)
1 Take the printer out of the package.
 IMPORTANT
Use a large area with plenty of space for taking the printer out of the package.
6
2 Carry the printer to the installation site. |
• Do not lift the printer by the multi-purpose tray, manual feed tray, |
paper output tray or any other part of the printer except as directed. |
|
Hold both sides of the printer in your hands as shown in the diagram, making sure |
Doing so may cause the printer to fall, resulting in personal injury. |
that you hold the printer firmly with both hands. |
|
CAUTION
• The printer weighs approximately 5.6 kg when the toner cartridge is
not installed. Take care to carry the printer without hurting your back.
3 Put the printer down carefully at the installation site.
 CAUTION
Put the printer down slowly and carefully. You may be injured if your hands, etc. are pinched by the printer.
 IMPORTANT
Make sure there is enough space set aside at the installation site for
attaching cables, etc.
Step
1
7
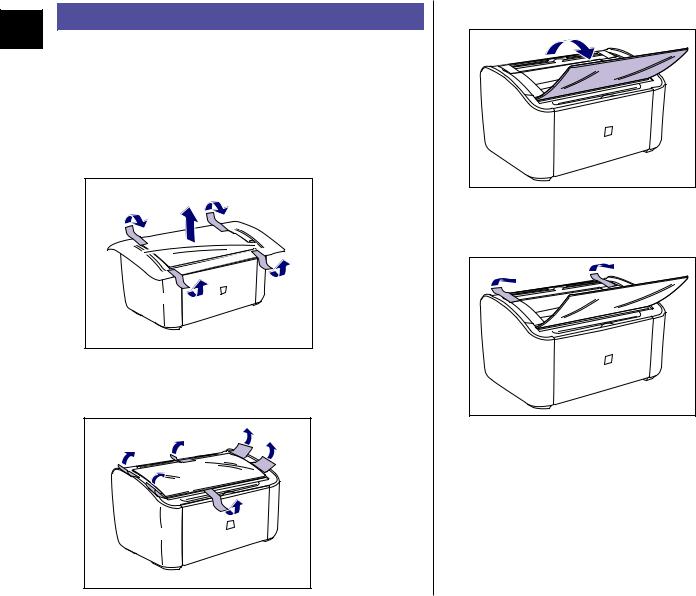
Removing the Packing Materials
Step
1
Cellophane tape and packing materials are attached to the printer to protect it from vibrations and shocks during transport. Remove these pieces of tape and packing material after you carry the printer to the installation site.
1 Remove the tape that is attached to the printer at four locations at the front and back of the printer a, then remove the protective sheet b.
b
a
2 Remove the following pieces of tape that are attached to the printer (6 locations).
3
4
Open the output tray.
Remove the following pieces of tape that are attached to the printer (2 locations).
8
5
6
Open the multi-purpose tray. Grasp the groove in the center |
7 Close the multi-purpose tray. |
of the printer to open the multi-purpose tray. |
Step |
|
1 |
Remove the tape that is securing the rear paper guide.
9

1
Installing the Toner
Cartridge
Step2
Step 2
For details on handling the toner cartridges, refer to Chapter 5 "Routine
Maintenance" in the CD-ROM User's Guide.
 WARNING
The toner cartridge produces a weak magnetic field. If someone who is using a pacemaker feels any unusual sensations, they should stay clear of the toner cartridge and seek medical attention immediately.
 CAUTION
2
Be careful to avoid staining your clothes or hands with toner. If you do get any toner on your clothes or hands, wash it off immediately with cold water. If you rinse using hot water the toner may become fixed, creating a stain that cannot be removed.
 IMPORTANT
Never touch any of the high voltage parts inside the top cover. Doing so
may damage the printer.
High Voltage Electrical |
Contacts |
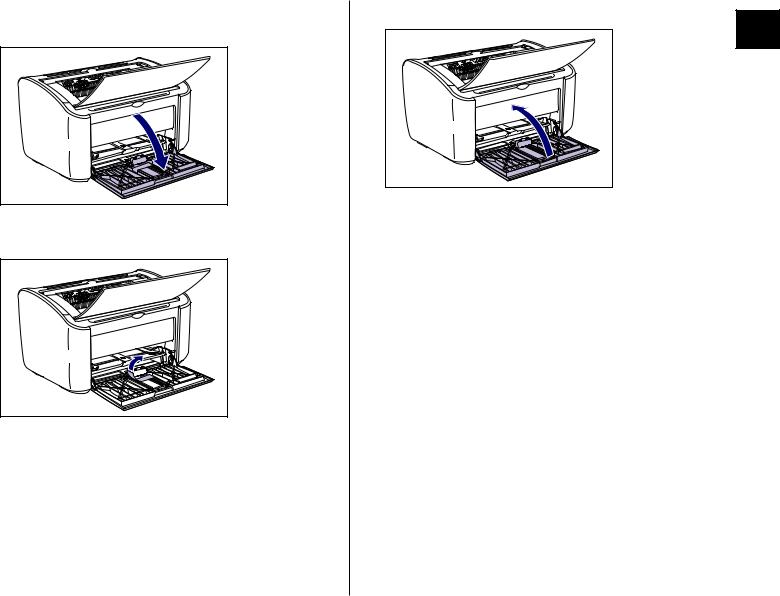
Open the output tray.
Open the top cover.
Grasp the groove on the right side of the top cover and open the cover until it
stops. |
10
Loading...