


PUB. DIE-317
Digital Video Camcorder
Quick Guide
PAL
Important Usage Instructions
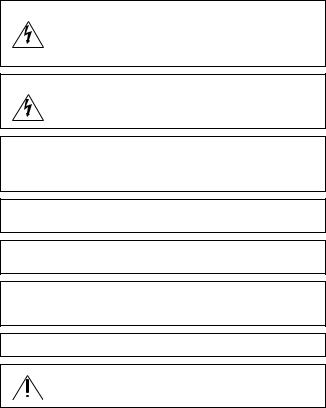
WARNING!
TO REDUCE THE RISK OF ELECTRIC SHOCK, DO NOT REMOVE COVER (OR BACK). NO USER SERVICEABLE PARTS INSIDE. REFER SERVICING TO QUALIFIED SERVICE PERSONNEL.
WARNING!
TO REDUCE THE RISK OF FIRE OR ELECTRIC SHOCK, DO NOT EXPOSE THIS PRODUCT TO RAIN OR MOISTURE.
CAUTION:
TO REDUCE THE RISK OF ELECTRIC SHOCK AND TO REDUCE ANNOYING INTERFERENCE, USE THE RECOMMENDED ACCESSORIES ONLY.
CAUTION:
DISCONNECT THE MAINS PLUG FROM THE SUPPLY SOCKET WHEN NOT IN USE.
The Mains plug is used as the disconnect device. The Mains plug shall remain readily operable to disconnect the plug in case of an accident.
While using the compact power adapter, do not wrap it or cover it with a piece of cloth, and do not place it in confined narrow spaces. Heat may build up, the plastic case may deform and it could result in electric shock or fire.
CA-570 identification plate is located on the bottom.
Using any device other than the Compact Power Adapter CA-570 may damage the camcorder.
2

European Union (and EEA) only.
These symbols indicate that this product is not to be disposed of with your household waste, according to the WEEE Directive (2002/
96/EC), the Battery Directive (2006/66/EC) and/or your national laws implementing those Directives.
This product should be handed over to a designated collection point, e.g., on an authorized one-for-one basis when you buy a new
similar product or to an authorized collection site for recycling waste electrical and electronic equipment (EEE) and batteries and accumulators. Improper handling of this type of waste could have a possible impact on the environment and human health due to potentially hazardous substances that are generally associated with EEE. Your cooperation in the correct disposal of this product will contribute to the effective usage of natural resources.
For more information about the recycling of this product, please contact your local city office, waste authority, approved scheme or your household waste disposal service or visit www.canon-europe.com/environment.
(EEA: Norway, Iceland and Liechtenstein)
3
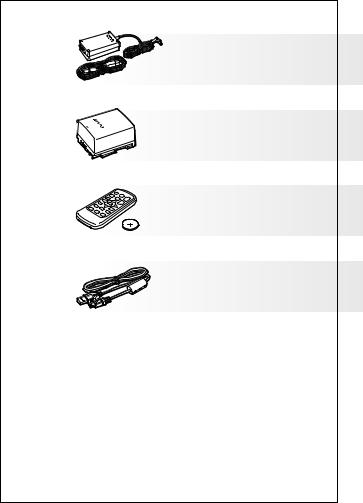
Package Contents
4
CA-570 Compact Power
Adapter (incl. power cord)
BP-808 Battery Pack
 only: WL-D88 Wireless
Controller (incl. Lithium Button
Battery CR2025)
IFC-400PCU USB Cable
•STV-250N Stereo Video Cable
•WS-30 Wrist Strap

Supplied CD-ROMs
The following CD-ROMs and software are supplied with the camcorder:
•PIXELA Application Disc Ver.1 Disc 1 CD-ROM* and ‘PIXELA ImageMixer 3 SE Installation Guide’
-ImageMixer 3 SE Ver.4 Transfer Utility - Software for saving and transferring movies.
-Music Transfer Utility Ver.1 - Software for transferring music for Video Snapshot playback to the camcorder.
•PIXELA Application Disc Ver.1 Disc 2 CD-ROM*
-ImageMixer 3 SE Ver.4 Video Tools - Software for managing, editing, and playing back movies.
•DIGITAL VIDEO Solution Disk CD-ROM* - Software for saving, managing, and printing photos.
• Instruction Manual/Music Data Disc CD-ROM - Contains the full-version Instruction Manual of the camcorder and music data for Video Snapshot and slideshow playback. This CD-ROM cannot be played back on a CD player. The music files on this CD-ROM are for exclusive use with the supplied PIXELA applications, Music Transfer Utility and ImageMixer 3 SE Video Tools. For more details, refer to the ‘Music Transfer Utility Software Guide’ and ‘ImageMixer 3 SE Software Guide’ on the PIXELA Application Disc Ver.1 Disc 1 CD-ROM.
* The CD-ROM includes the instruction manual of the software (electronic version on PDF file).
5

Package Contents
About the Camcorder’s PDF Instruction Manual
This guide will get you started and show you how to use the most basic functions of your camcorder to shoot video, take photos and play back your recordings (using the camcorder or connecting it to your TV). To learn more about the more advanced functions of your camcorder, to read important handling precautions and to consult the troubleshooting section if an error message is displayed, be sure to read the full instruction manual, included as a PDF file in the  Instruction Manual/Music Data CD-ROM*.
1 Turn on the computer.
2Insert the  Instruction Manual/Music Data CD-ROM into the computer’s disc drive.
3Open [My Computer].
Windows Vista users: Open [Computer] instead.
4Right-click the drive in which you inserted the CD-ROM and select [Open].
5Open the [MANUAL] folder and then the [ENGLISH] folder.
The PDF file is located in this folder. For easy access later, you can copy the PDF file to your computer’s desktop.
* Adobe® Reader® 6 or later is required to view the PDF Instruction Manual.
6

Table of Contents
04 Package Contents
08 Names of Parts and Onscreen Displays
16 Charging the Battery Pack
20 Operating Modes of the Camcorder
22 First Time Settings
24 Getting Ready to Start Recording
28 Basic Recording: Shooting Video and Taking Photos
37 Basic Playback: Playing Back Movies and Viewing Photos
43 Playback on a TV Screen
45Saving Your Recordings
46Abridged Specifications
Conventions Used in the Quick Guide
• IMPORTANT: Precautions related to the camcorder’s operation.
• NOTES: Additional topics that complement the basic operating procedures.
• POINTS TO CHECK: Restrictions or requirements regarding the function described.
• : Reference page number in this manual.
 : Reference page number in the camcorder’s full-version Instruction Manual (PDF file).
• : Text that applies only to the model shown in the icon.
•Brackets [ ] are used to refer to menu options as they are displayed on screen.
•Names of buttons and switches other than the joystick are indicated within a “button” frame.
•The  arrow is used to abbreviate menu selections. For a detailed explanation refer to Using the Menus (
 25).
25).
•The photos included in this manual are simulated pictures taken with a still
camera. Unless indicated otherwise, illustrations and menu icons refer to the  .
.
7
introduction
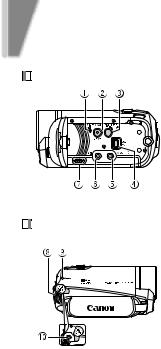
Names of Parts
Left side view
Right side view
1 RESET button: Reset all the camcorder’s settings. ( 93)
93)
2VIDEO SNAP (Video Snapshot) button: Shoot short videos (approx. 4 seconds) and arrange them into a video clip set to your favorite background music.
( 44)/
44)/
 (print/share) button: Print your photos or transfer them to a computer with the press of a single button.
( 67, 79)
3DISP. (on-screen display) button:
Change the camcorder’s onscreen displays. ( 51)/
51)/
BATT. INFO button: Press when the camcorder is off to check the battery pack’s charge status and its remaining recording time.
4 USB terminal: Connect the camcorder to a computer or printer ( 72)
72)
5 AV OUT/ H terminal ( 72)
72)
6 MIC terminal (red): Connect an external microphone. ( 52)
52)
7 Speaker (b41)
8 Strap mount: Attach an optional shoulder strap for convenience and portability. ( 20)
20)
9 ACCESS (memory access) indicator (b28)
qA DC IN terminal (b16)
8
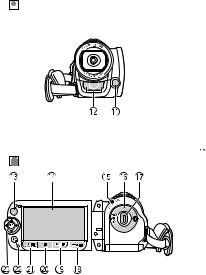
Front view
Back view
Names of Parts
Aa Mini video light: Turn on to shoot video or take photos in dark places. ( 43)
43)
As Stereo microphone
dA  Remote sensor (
 19)
19)
Af LCD screen (b27)
gA ON/OFF(CHG) (power/charge) indicator (b 16, 33)
Ah Camera mode dial (b21) Aj Start/Stop button (b28) Ak 

 (camera/play) button
(b20, 37)
Al PLAYLIST button: Edit the playlist to play back only your favorite scenes in the order of your choice. ( 53)/Zoom in T (telephoto) button (b 31)
qS  (stop) button (b37)/Zoom out W (wide-angle) button (b31)
Sa  /
/ (play/pause) button (b37)/START/STOP button (b28)
sS FUNC. button: In the flexible recording modes you can access the FUNC. menu and setup menus. ( 25, 81)
Sd Joystick (b20)
9
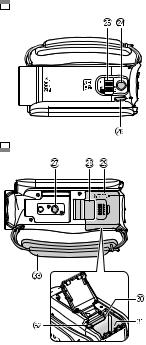
Names of Parts
Top view
Bottom view
Sf PHOTO button (b 29) Sg Zoom lever (b 31)
Sh POWER button
jS Tripod socket: Mount the camcorder on a tripod for steadier shots. ( 102)
102)
Sk Serial number
lS Battery compartment cover/ Memory card slot cover
Dq Memory card slot (b 24)
aD Battery compartment (b16) sD Battery release latch (b16) dD Grip belt: Adjust for a comfortable
and secure grip. ( 20)
20)
10
introduction
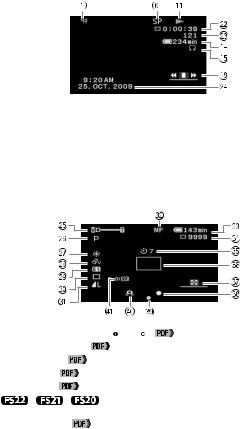
Onscreen Displays and Icons
Recording movies
1 Operating mode (b20)
2Recording program: Recording programs allow you to change various picture-related settings to your preference, or to use a Special Scene recording program to apply the camcorder settings most appropriate for a variety of situations ( 41, 42).
3White balance: Change the setting so different lighting conditions do not affect the colors in your recordings and white objects look truly white
( 48).
48).
4 Image effects: Try using various image effects to change the look of your recordings ( 49).
49).
5Digital effects: The camcorder offers various transition effects (faders) for movies and digital effects to add some flavor to your recordings
( 50).
50).
6 Recording mode (b 35).
7  Remote sensor off (
 87) 8 Manual focus (
 48)
48)
9Image stabilizer: The stabilizer is activated by default and will compensate for a normal degree of camcorder shake so you can get beautiful, steady
recordings ( 83).
83).  The image stabilizer may not be able to successfully eliminate all blur if the camcorder or the subject is moving too much.
Aq Pre-recording function: The camcorder will start recording video 3 seconds before you press START/STOP , so you do not miss important shooting opportunities. ( 46)
46)
aA Memory operation ( 16)
16)
11
Onscreen Displays and Icons
As Number of scenes recorded (record pause)/Time code (hours : minutes :
seconds, while recording) |
|
|
||||
dA Remaining recording time |
|
|
||||
On the memory card |
|
|
||||
/ |
/ |
|
|
In the built-in memory |
|
|
|
|
|
|
|||
When there is no more free space on the memory, [ |
|
END] (built-in |
||||
|
||||||
memory) or [ |
|
END] (memory card) will be displayed and the recording |
||||
will stop. |
|
|
|
|
|
|
Af Remaining battery time
-
 in red: Battery pack is almost empty. Replace with a fully charged battery pack.
When the camcorder is off, press BATT.INFO to display the charge
status of a battery pack. The Intelligent System will display the charge status (as a percentage) and the remaining recording time (in minutes) for 5 seconds. If the battery pack is exhausted, the battery information
may not be displayed. |
|
Ag Headphone output ( |
51) |
Ah Wind screen off: Wind screen removes the background sound of wind when recording outdoors. You may want to turn it off when recording indoors in
very quiet surroundings ( |
83). |
|
Aj Backlight correction ( |
|
47) |
Ak Joystick guide ( |
24) |
|
Al Mini video light ( |
43) |
|
Sq Level marker: Display onscreen markers to check your composition and make |
||
sure horizontal or vertical lines do not appear crooked in your recordings |
||
( |
85). |
|
Sa Audio level indicator ( |
85) |
|
12
Onscreen Displays and Icons
Playing movies (during playback)
Ss Playback time (hours : minutes : seconds) Sd Scene number
Sf Data code: In addition to the date and time of recording, you can choose to display information related to the camcorder settings like the shutter speed or aperture value used ( 85).
85).
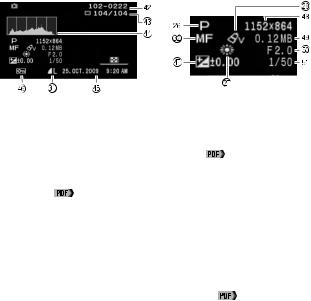
Recording photos
gS Zoom (s31), Exposure |
|
|
|
|
|
( |
47) |
|||
|
|
|
|
|
||||||
|
|
|||||||||
hS Recording program ( |
41, 42) |
|
||||||||
jS White balance ( |
48) |
|
|
|
|
|
|
|
||
kS Image effect ( |
|
49) |
|
|
|
|
|
|
|
|
lS Digital effect ( |
|
50) |
|
|
|
|
|
|
|
|
qD |
/ |
/ |
Drive mode: You can take a single photo or change |
|||||||
|
the drive mode to continuous shooting to take a series of photos of a |
|||||||||
|
moving subject ( |
63). |
|
|
|
|
|
|
|
|
13

Onscreen Displays and Icons
aD Photo quality/size (s 36)
Ds Manual focus ( |
|
48) |
|
|
|
Dd Remaining battery time |
|||||
Df Number of photos available |
|||||
|
On the memory card |
||||
|
/ |
/ |
|
|
In the built-in memory |
|
|
|
|||
- |
in red: Cannot record any more photos. |
||||
- |
in red: No memory card in the camcorder. |
||||
gD Self timer ( |
|
46) |
|
|
|
hD AF frame: You can change whether to let the camcorder detect the subject and select where to focus (9-point AiAF system) or have it focus only on
the frame at the center of the screen. ( |
84) |
|
jD Joystick guide ( |
24) |
|
kD Mini video light ( |
43) |
|
Dl Focus and exposure lock (s29)
Fq Camcorder shake warning: When this icon appears on-screen, you may need to stabilize the camcorder using a tripod or use a higher shutter speed ( 84).
84).
Fa  Remote sensor off (
 87)
87)
14
Onscreen Displays and Icons
Viewing photos
Fs Photo number ( 16, 88)
Fd Current photo / Total number of photos
fF Histogram: Gives you a graphic indication about a photo’s exposure so you
can confirm that it is not too dark or too bright ( |
64). |
gF Date and time of recording
hF Photo protection mark: Protect your favorite photos to prevent erasing them
by mistake ( |
64). |
Fj Manual exposure: Correct the exposure manually for a picture darker/ brighter than the one obtained using the automatic exposure set by the camcorder ( 47).
47).
kF Photo size (s36) lF File size
Gq Aperture value
aG Shutter speed: Control the shutter speed manually to change the
appearance of moving objects in your recordings ( |
42). |
15
 Loading...