


FAX-PHONE L90
Table of contents
 Loading...
TOP
Before Using the
Machine
Document and Paper
1
2
Sending and
Receiving
Copying
3
4
Printing
5
System Manager
Settings
Maintenance
6
7
Troubleshooting
Reference Guide
Back
Previous
Next
Appendix
Table of Contents
Index
8
9
Please read this guide before operating this product.
After you finish reading this guide, store it in a safe place
for future reference.
How to Use This Guide

TOP
Before Using the
Machine
Document and Paper
1
2
Sending and
Receiving
Copying
3
4
Printing
5
System Manager
Settings
Maintenance
6
7
Troubleshooting
Manuals for the Machine
Back
Previous
Next
Appendix
Table of Contents
Index
8
9
To view the manuals in PDF format, Adobe Reader/Acrobat Reader/Acrobat is required. If Adobe Reader/Acrobat
●
Reader/Acrobat is not installed on your system, please download it from the Adobe Systems Incorporated website
(http://www.adobe.com).
Considerable effort has been made to make sure that the manuals for the machine are free of inaccuracies and
●
omissions. However, as we are constantly improving our products, if you need an exact specification, please
contact Canon.
The machine illustration on the cover may differ slightly from your machine.
●
i
TOP
Before Using the
Machine
Document and Paper
1
2
Sending and
Receiving
Copying
3
4
Printing
5
System Manager
Settings
Maintenance
6
7
Troubleshooting
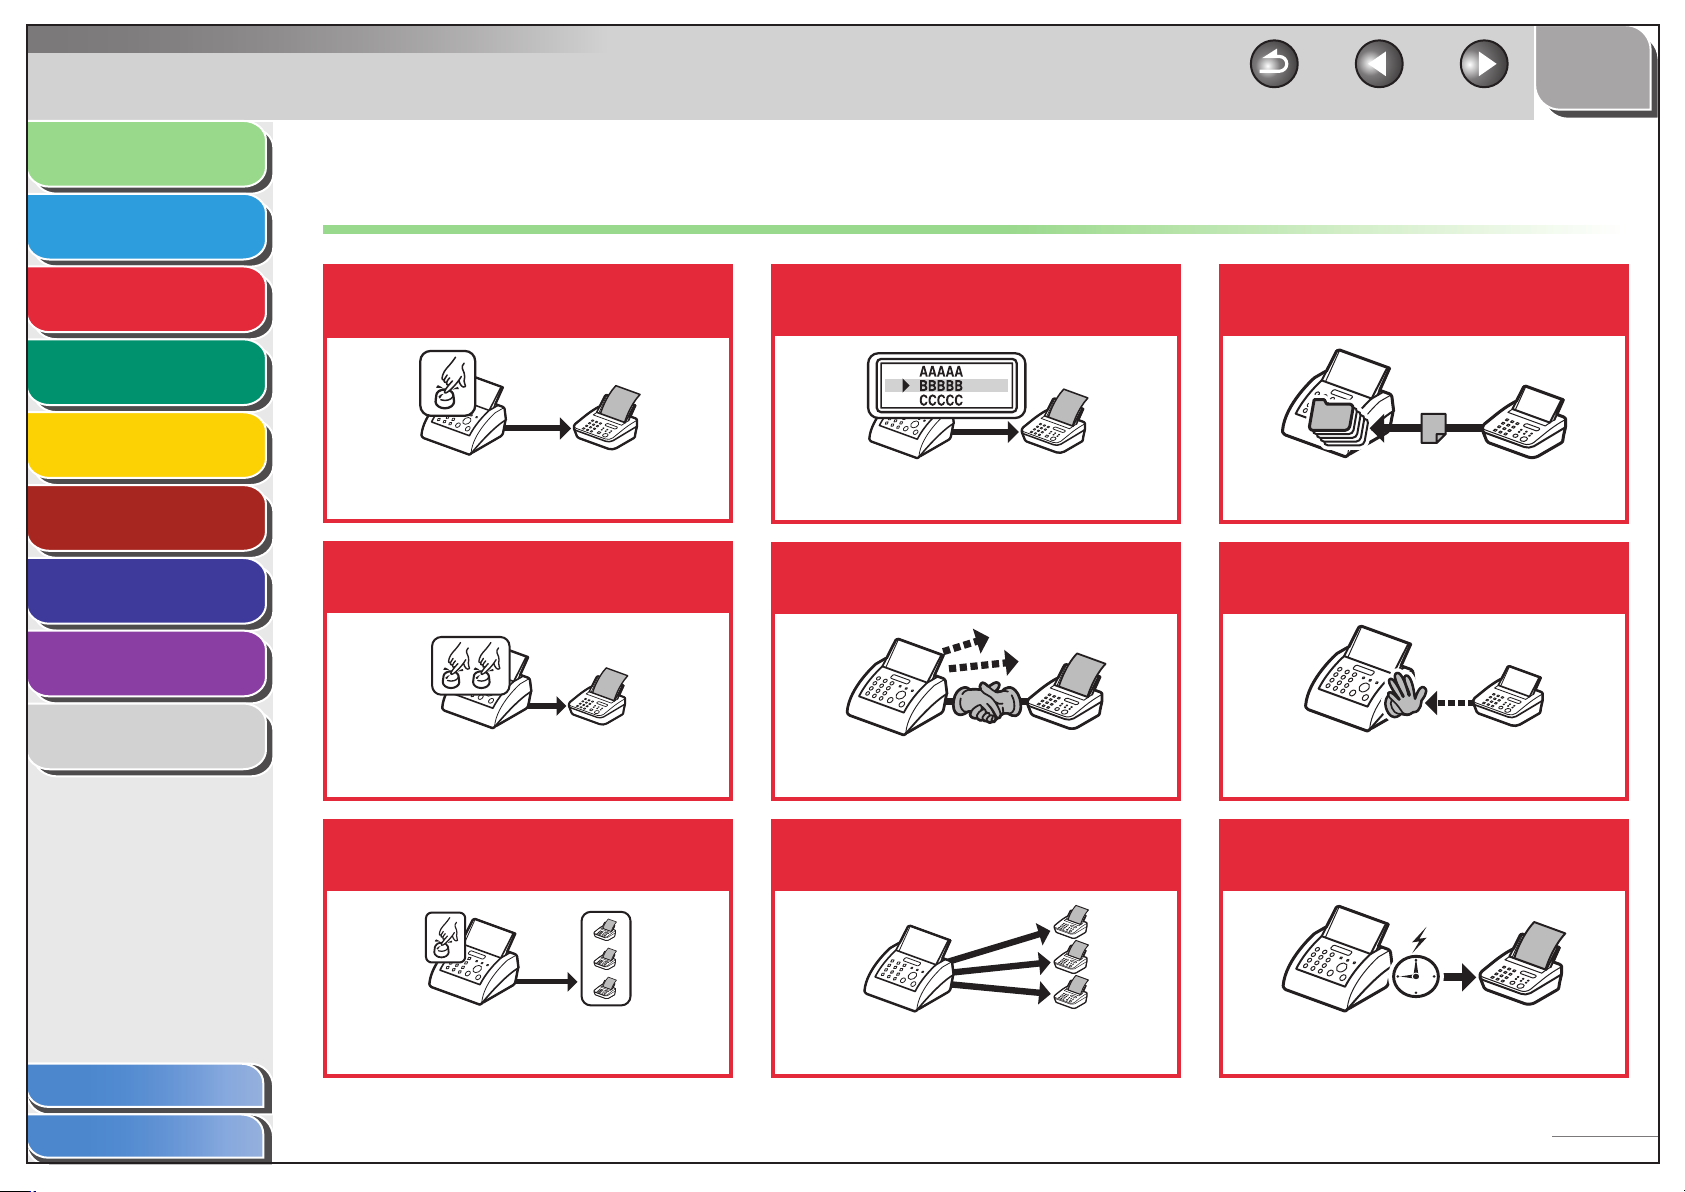
Things You Can Do
Specify a recipient with a single
key
One-Touch Speed Dialing Keys
p. 3-14
Specify a recipient with a two-digit
code
Look up a particular recipient
Address Book Search
p. 3-15
Redial when the line is busy
Back
Previous
Next
Receive faxes in memory without
printing out
Memory Lock Reception
p. 3-25
Reject faxes without their
numbers
Appendix
Table of Contents
Index
8
9
Coded Speed Dialing Codes
p. 3-14
Specify multiple recipients as a
group
Group Dialing
p. 3-15
Redialing
p. 3-19
Send documents to multiple
recipients
Broadcasting
p. 3-30
RX Restriction
p. 3-28
Send a fax at a specified time
Delayed Sending
p. 3-30
ii
TOP
Before Using the
Machine
Document and Paper
1
2
Sending and
Receiving
Copying
3
4
Printing
5
System Manager
Settings
Maintenance
6
7
Troubleshooting
8
Appendix
9
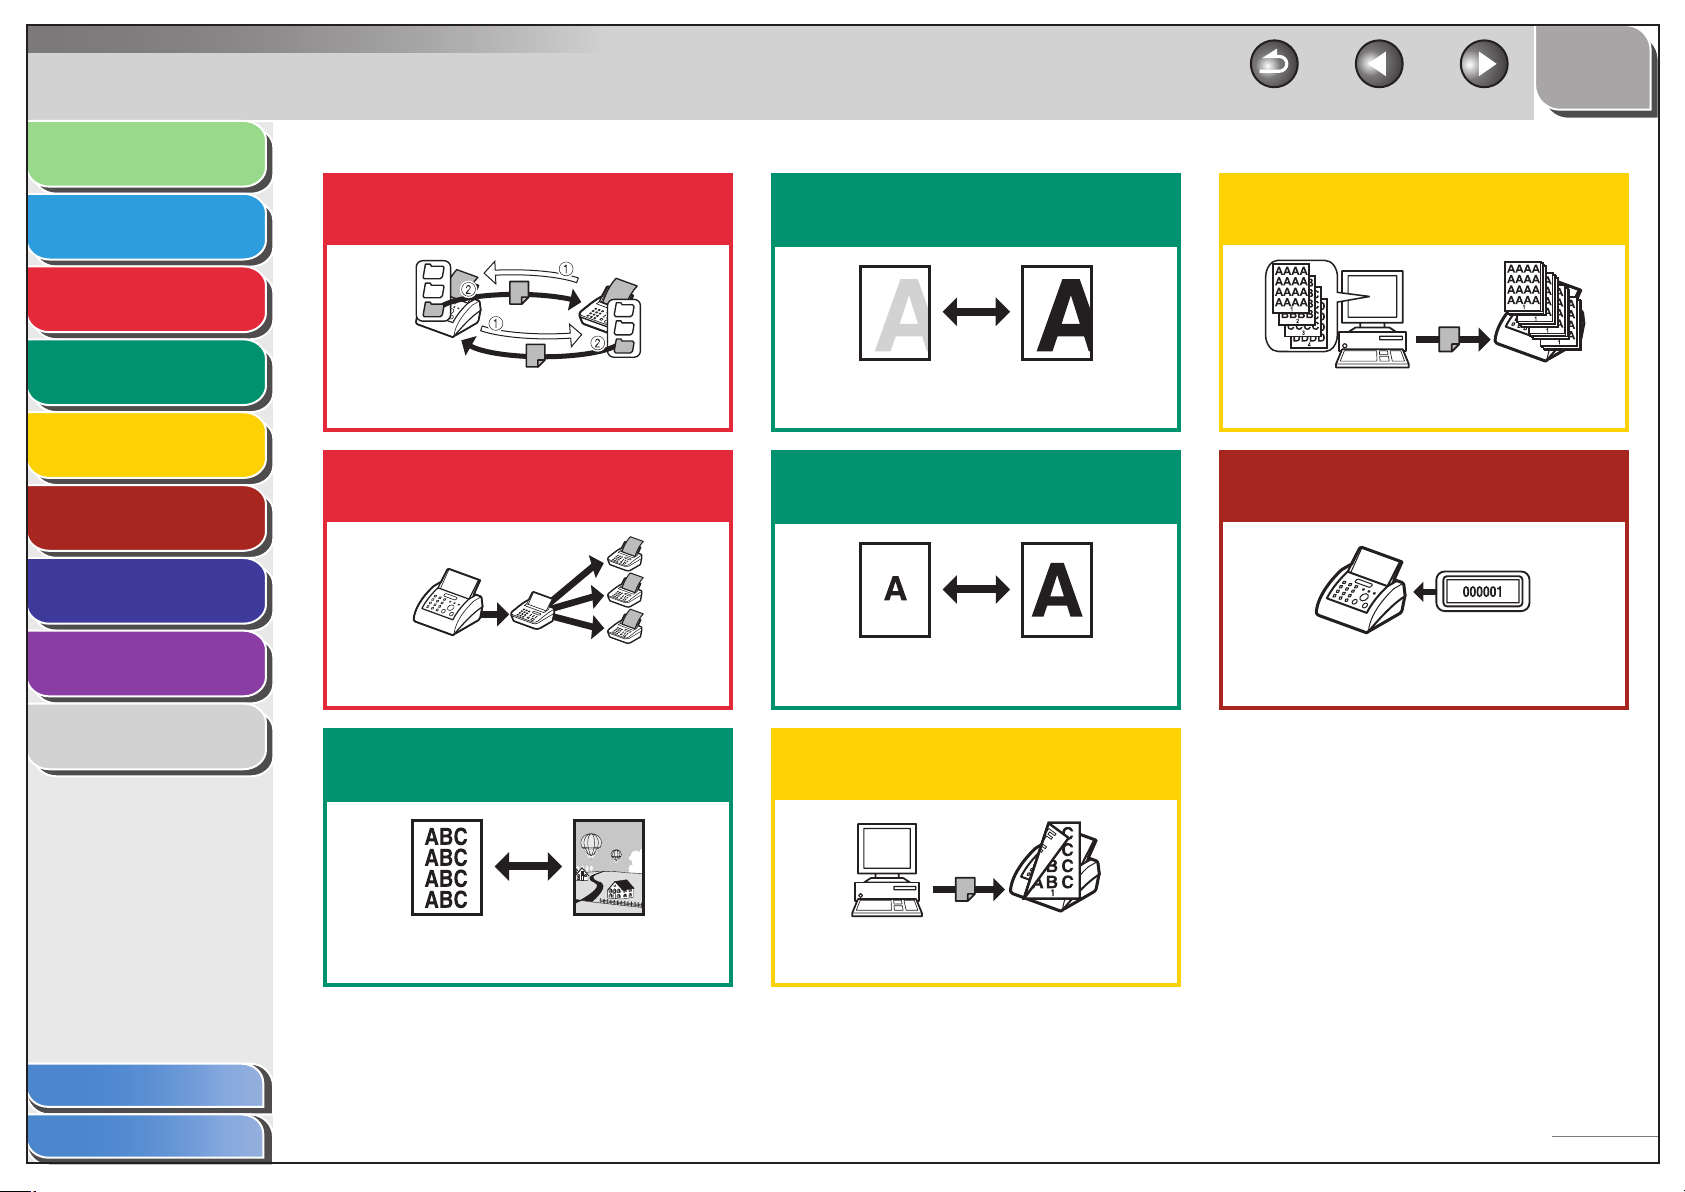
Send or receive a fax automatically
upon request
Polling
p. 3-31
Send a fax to be relayed to other
fax machines
Relay
p. 3-33
Select a scan mode depending on
the type of image
Adjust the density level of scanned
images
Density
p. 4-3
Enlarge or reduce copied images
Zoom Ratio
p. 4-4
Print a document from a PC
Back
Sort printouts by page order
Collate Printing
Restrict the use of the machine
with a password
System Manager Settings
Previous
p. 5-3
p. 6-2
Next
Table of Contents
Index
Image Quality
p. 4-3
Printing
p. 5-2
iii

TOP
Before Using the
Machine
Document and Paper
1
2
Sending and
Receiving
Copying
3
4
Printing
5
System Manager
Settings
Maintenance
6
7
Troubleshooting
Back
Previous
Next
Table of Contents
Manuals for the Machine ............................................................................................................... i
Things You Can Do ..........................................................................................................................ii
How to Use This Guide ................................................................................................................xv
Using the Top Page .............................................................................................................. xv
Using the Chapter Topic List ........................................................................................... xvi
Legal Notices .............................................................................................................................. xviii
1 Before Using the Machine ........................................................................................................1-1
Appendix
Table of Contents
Index
8
9
Machine Components ...............................................................................................................1-3
Operation Panel ...........................................................................................................................1-6
Operation Panel ...................................................................................................................1-6
iv

TOP
Before Using the
Machine
Document and Paper
1
2
Sending and
Receiving
Copying
3
4
Printing
5
System Manager
Settings
Maintenance
6
7
Troubleshooting
Back
Previous
Next
LCD (Standby Mode) ..................................................................................................................1-9
Fax Mode ................................................................................................................................1-9
Copy Mode ............................................................................................................................1-9
Handset ....................................................................................................................................... 1-10
Maintaining the Handset ..............................................................................................1-10
Toner Cartridge ......................................................................................................................... 1-11
Maintaining the Toner Cartridge ................................................................................ 1-12
Telephone Line Setting .......................................................................................................... 1-13
Setting the Telephone Line Type ................................................................................1-13
Timer Settings ........................................................................................................................... 1-14
Setting the Sleep Mode ................................................................................................. 1-14
Appendix
Table of Contents
Index
8
9
Setting Daylight Saving Time ......................................................................................1-15
2 Document and Paper ................................................................................................................2-1
Document Requirements ......................................................................................................... 2-2
v

TOP
Before Using the
Machine
Document and Paper
1
2
Sending and
Receiving
Copying
3
4
Printing
5
System Manager
Settings
Maintenance
6
7
Troubleshooting
8
Appendix
Back
Previous
Next
Scanning Area ..............................................................................................................................2-3
Loading Documents ..................................................................................................................2-4
Paper Requirements ...................................................................................................................2-5
Printable Area ...............................................................................................................................2-7
Loading Paper ..............................................................................................................................2-8
Loading Envelopes .............................................................................................................2-8
Setting Paper Size and Type ................................................................................................. 2-11
3 Sending and Receiving .............................................................................................................3-1
Basic Sending Method ..............................................................................................................3-5
Scan Settings ................................................................................................................................3-6
Table of Contents
Index
9
Image Quality .......................................................................................................................3-6
Density ....................................................................................................................................3-6
vi

TOP
Before Using the
Machine
Document and Paper
1
2
Sending and
Receiving
Copying
3
4
Printing
5
System Manager
Settings
Maintenance
6
7
Troubleshooting
8
Appendix
9
Back
Previous
Next
Storing/Editing Address Book ................................................................................................3-7
Storing/Editing One-Touch Speed Dialing Keys/Coded Speed Dialing
Codes .......................................................................................................................................3-7
Storing/Editing Group Dialing ....................................................................................3-10
Specifying Recipients ............................................................................................................. 3-14
Using One-Touch Speed Dialing Keys ......................................................................3-14
Using Coded Speed Dialing Codes ............................................................................ 3-14
Group Dialing .................................................................................................................... 3-15
Using Address Book Key ................................................................................................ 3-15
Manual Sending ....................................................................................................................... 3-17
Fax Dialing Features ................................................................................................................ 3-18
Switching Temporarily to Tone Dialing ....................................................................3-18
Redialing .............................................................................................................................3-19
Checking Dialing Line ....................................................................................................3-20
Dialing an Overseas Number (With Pauses) ........................................................... 3-20
Table of Contents
Index
Basic Receiving Method ......................................................................................................... 3-22
vii

TOP
Before Using the
Machine
Document and Paper
1
2
Sending and
Receiving
Copying
3
4
Printing
5
System Manager
Settings
Maintenance
6
7
Troubleshooting
8
Appendix
9
Back
Previous
Next
Receiving Features ................................................................................................................... 3-23
FAX/TEL: Optional Settings ...........................................................................................3-23
DRPD: Optional Settings ...............................................................................................3-24
Manual Reception ............................................................................................................ 3-24
Memory Reception .......................................................................................................... 3-25
Memory Lock Reception ...............................................................................................3-25
Remote Reception ...........................................................................................................3-27
Selecting the Receive Mode for Printing ................................................................. 3-28
Reception Restriction ..................................................................................................... 3-28
Printing Received Documents .....................................................................................3-29
Advanced Features .................................................................................................................. 3-30
Broadcasting ......................................................................................................................3-30
Delayed Sending .............................................................................................................. 3-30
Polling ..................................................................................................................................3-31
Relay .....................................................................................................................................3-33
Table of Contents
Index
Canceling TX/RX Jobs ............................................................................................................. 3-34
viii

TOP
Before Using the
Machine
Document and Paper
1
2
Sending and
Receiving
Copying
3
4
Printing
5
System Manager
Settings
Maintenance
6
7
Troubleshooting
Back
Previous
Next
Checking and Deleting TX/RX Jobs ................................................................................... 3-35
Checking Transmission/Reception Results ............................................................. 3-35
Checking and Deleting Fax Documents Stored in Memory ............................. 3-35
4 Copying .....................................................................................................................................4-1
Basic Copying Method ..............................................................................................................4-2
Scan Settings ................................................................................................................................4-3
Image Quality .......................................................................................................................4-3
Density ....................................................................................................................................4-3
Zoom Ratio ............................................................................................................................4-4
Canceling Copy Jobs ..................................................................................................................4-5
Appendix
Table of Contents
Index
8
5 Printing ......................................................................................................................................5-1
9
Printing Documents ...................................................................................................................5-2
ix

TOP
Before Using the
Machine
Document and Paper
1
2
Sending and
Receiving
Copying
3
4
Printing
5
System Manager
Settings
Maintenance
6
7
Troubleshooting
Back
Previous
Next
Advanced Printing Features ....................................................................................................5-3
Collate Printing ....................................................................................................................5-3
Checking and Deleting Jobs ...................................................................................................5-4
Checking and Deleting Print Jobs ................................................................................5-4
6 System Manager Settings ........................................................................................................6-1
Specifying the System Manager Settings...........................................................................6-2
Restricting Access to Destinations ........................................................................................6-3
Confirming Entered Fax Numbers ................................................................................6-3
Restricting Redial ................................................................................................................6-3
Appendix
Table of Contents
Index
8
9
7 Maintenance .............................................................................................................................7-1
Cleaning the Machine ...............................................................................................................7-2
Exterior ...................................................................................................................................7-2
Interior ....................................................................................................................................7-2
Fuser Roller ............................................................................................................................7-6
Scanning area .......................................................................................................................7-6
x

TOP
Before Using the
Machine
Document and Paper
1
2
Sending and
Receiving
Copying
3
4
Printing
5
System Manager
Settings
Maintenance
6
7
Troubleshooting
8
Appendix
Back
Previous
Next
Replacing the Toner Cartridge ...............................................................................................7-8
Redistributing Toner ..........................................................................................................7-8
Replacing the Toner Cartridge with a New One ...................................................7-12
Recycling Used Cartridges .................................................................................................... 7-17
The Clean Earth Campaign ...........................................................................................7-17
U.S.A. PROGRAM ...............................................................................................................7-18
CANADA PROGRAM-CANADA PROGRAMME ........................................................ 7-20
Transporting the Machine .................................................................................................... 7-23
8 Troubleshooting .......................................................................................................................8-1
Clearing Jams ...............................................................................................................................8-3
Document Jams ...................................................................................................................8-3
Paper Jams.............................................................................................................................8-5
Table of Contents
Index
9
LCD Messages ............................................................................................................................ 8-10
Error Codes ................................................................................................................................. 8-16
xi

TOP
Before Using the
Machine
Document and Paper
1
2
Sending and
Receiving
Copying
3
4
Printing
5
System Manager
Settings
Maintenance
6
7
Troubleshooting
Back
Previous
Next
If <LOAD CORRECT PAPER> is displayed ......................................................................... 8-18
Re-Loading the Paper ..................................................................................................... 8-18
Changing the Paper Size Setting ................................................................................8-18
General Problems ..................................................................................................................... 8-19
Paper Feeding Problems........................................................................................................ 8-20
Sending/Receiving Problems .............................................................................................. 8-21
Sending Problems ...........................................................................................................8-21
Receiving Problems .........................................................................................................8-24
Copying Problems ................................................................................................................... 8-30
Printing Problems .................................................................................................................... 8-32
Appendix
Table of Contents
Index
8
9
Telephone Problems ............................................................................................................... 8-35
If a Power Failure Occurs........................................................................................................ 8-36
If You Cannot Solve a Problem ............................................................................................ 8-37
Customer Support (U.S.A.) ............................................................................................ 8-37
Customer Support (Canada) ........................................................................................ 8-37
xii

TOP
Before Using the
Machine
Document and Paper
1
2
Sending and
Receiving
Copying
3
4
Printing
5
System Manager
Settings
Maintenance
6
7
Troubleshooting
Back
Previous
Next
9 Appendix ...................................................................................................................................9-1
Machine Settings ........................................................................................................................9-3
Printing USER DATA LIST ...................................................................................................9-3
Accessing the Setting Menu ...........................................................................................9-3
Setting Menu ................................................................................................................................9-5
PAPER SETTINGS ..................................................................................................................9-5
VOLUME CONTROL .............................................................................................................9-5
COMMON SETTINGS ..........................................................................................................9-6
COPY SETTINGS ...................................................................................................................9-6
FAX SETTINGS .......................................................................................................................9-7
ADDRESS BOOK SET. .......................................................................................................9-12
PRINTER SETTINGS ........................................................................................................... 9-13
Appendix
Table of Contents
Index
8
9
TIMER SETTINGS ...............................................................................................................9-14
ADJUST./CLEANING ......................................................................................................... 9-15
REPORT SETTINGS............................................................................................................9-15
SYSTEM SETTINGS ........................................................................................................... 9-17
xiii

TOP
Before Using the
Machine
Document and Paper
1
2
Sending and
Receiving
Copying
3
4
Printing
5
System Manager
Settings
Maintenance
6
7
Troubleshooting
Back
Previous
Next
Summary of Reports and Lists............................................................................................. 9-19
Printing Reports Automatically ........................................................................................... 9-20
TX REPORT .......................................................................................................................... 9-20
RX REPORT ..........................................................................................................................9-21
ACTIVITY REPORT ............................................................................................................. 9-22
Printing Reports and Lists Manually.................................................................................. 9-24
Checking Remaining Memory ............................................................................................. 9-25
Checking Print and Scan Counts ........................................................................................ 9-26
Glossary ....................................................................................................................................... 9-27
Index ............................................................................................................................................. 9-33
Appendix
Table of Contents
Index
8
9
xiv
TOP
Before Using the
Machine
1
Document and Paper
2
Sending and
Receiving
3
Copying
4
Printing
5
System Manager
Settings
6
Maintenance
7
Troubleshooting
8
Appendix
9
How to Use This Guide
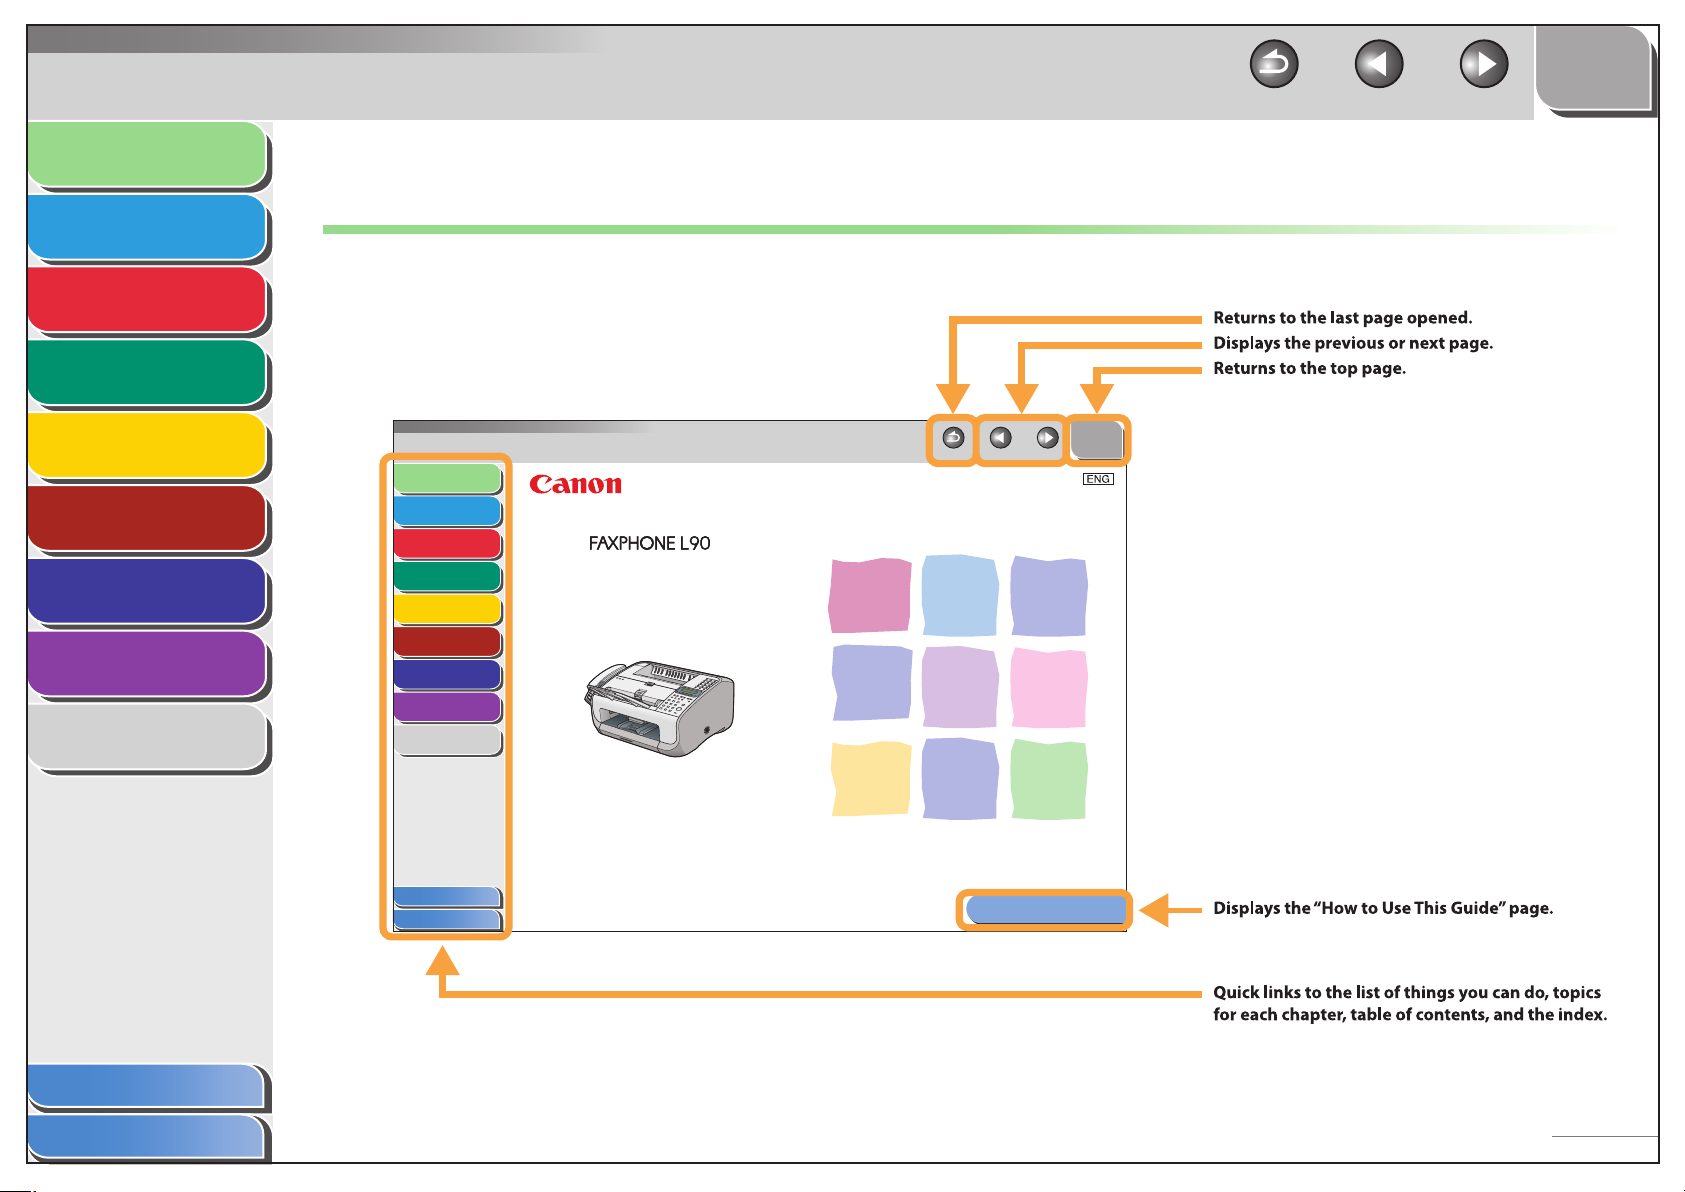
Using the Top Page
■
Before Using the
Machine
Document and Paper
Sending and
Receiving
Copying
Printing
System Manager
Settings
Maintenance
Troubleshooting
Appendix
1
2
Reference Guide
3
4
5
6
7
8
9
Back NextPrevious
TOP
Back
Returns to the last page opened.
Displays the previous or next page.
Returns to the top page.
Previous
Next
Table of Contents
Index
Table of Contents
Index
Please read this guide before operating this product.
After you nish reading this guide, store it in a safe place
for future reference.
How to Use This Guide
Displays the “How to Use This Guide” page.
Quick links to the list of things you can do, topics
for each chapter, table of contents, and the index.
xv

TOP
Before Using the
Machine
1
Document and Paper
2
Sending and
Receiving
3
Copying
4
Printing
5
System Manager
Settings
6
Maintenance
7
Troubleshooting
8
Appendix
Using the Chapter Topic List
■
Before Using the
Machine
Document and Paper
Sending and
Receiving
Copying
Printing
System Manager
Settings
Maintenance
Troubleshooting
Appendix
1
1 Before Using the Machine
2
3
4
5
6
7
8
9
Machine Components......................................................................................1-3
Operation Panel ...............................................................................................1-6
LCD (Standby Mode) ........................................................................................1-9
Handset...........................................................................................................1-10
Toner Cartridge ..............................................................................................1-11
TOP
Back Previous
Operation Panel............................................................................1-6
Fax Mode .........................................................................................1-9
Copy Mode.....................................................................................1-9
Maintaining the Handset ....................................................... 1-10
Maintaining the Toner Cartridge......................................... 1-12
Next
Back
Previous
Next
Table of Contents
Index
9
Table of Contents
Index
1-1
xvi
TOP
Before Using the
Machine
Document and Paper
1
2
Sending and
Receiving
Copying
3
4
Printing
5
System Manager
Settings
Maintenance
6
7
Troubleshooting
Back
The following symbols are used throughout the manuals for the machine and indicate the warnings, cautions and notes you should keep in
mind when using the machine.
Indicates a warning that may lead to death or serious injury if not observed.
Explains how to avoid actions that could injure you or damage your machine.
Explains operating restrictions and how to avoid minor difficulties.
In addition, this guide uses distinctive notations to identify keys and information in the LCD:
The keys you press appear in square brackets: [Stop/Reset].
–
Information in the LCD appears in angle brackets: <LOAD PAPER>.
–
The items appear on the PC (Menus, Menu commands, buttons etc.) in square brackets: [Save].
–
Previous
Next
Appendix
Table of Contents
Index
8
9
xvii

TOP
Before Using the
Machine
Document and Paper
1
2
Sending and
Receiving
Copying
3
4
Printing
5
System Manager
Settings
Maintenance
6
7
Troubleshooting
8
Appendix
9
Back
Previous
Next
Legal Notices
Trademarks
Canon, the Canon logo, and FAXPHONE are trademarks of Canon Inc.
Microsoft, Windows, Windows Server and Windows Vista are trademarks or registered trademarks of Microsoft Corporation in the U.S. and/or other
countries.
All other product and brand names are registered trademarks, trademarks or service marks of their respective owners.
Copyright
Copyright © 2007 by Canon Inc. All rights reserved. No part of this publication may be reproduced, transmitted, transcribed, stored in a retrieval system,
or translated into any language or computer language in any form or by any means, electronic, mechanical, magnetic, optical, chemical, manual, or
otherwise, without the prior written permission of Canon Inc.
Disclaimer
The information in this document is subject to change without notice.
CANON INC. MAKES NO WARRANTY OF ANY KIND WITH REGARD TO THIS MATERIAL, EITHER EXPRESS OR IMPLIED, EXCEPT AS PROVIDED HEREIN,
INCLUDING WITHOUT LIMITATION, THEREOF, WARRANTIES AS TO MARKETABILITY, MERCHANTABILITY, FITNESS FOR A PARTICULAR PURPOSE OF USE OR
NON-INFRINGEMENT. CANON INC. SHALL NOT BE LIABLE FOR ANY DIRECT, INCIDENTAL, OR CONSEQUENTIAL DAMAGES OF ANY NATURE, OR LOSSES OR
EXPENSES RESULTING FROM THE USE OF THIS MATERIAL.
Table of Contents
Index
xviii

TOP
Before Using the
Machine
Document and Paper
1
2
Sending and
Receiving
Copying
3
4
Printing
5
System Manager
Settings
Maintenance
6
7
Troubleshooting
8
Appendix
9
1 Before Using the Machine
Machine Components ......................................................................................1-3
Operation Panel ...............................................................................................1-6
Operation Panel ............................................................................1-6
LCD (Standby Mode) ........................................................................................1-9
Fax Mode .........................................................................................1-9
Copy Mode .....................................................................................1-9
Handset ...........................................................................................................1-10
Maintaining the Handset ....................................................... 1-10
Toner Cartridge ..............................................................................................1-11
Maintaining the Toner Cartridge ......................................... 1-12
Back
Previous
Next
Table of Contents
Index
1-1
TOP
Before Using the
Machine
Document and Paper
1
2
Sending and
Receiving
Copying
3
4
Printing
5
System Manager
Settings
Maintenance
6
7
Troubleshooting
Back
Previous
Next
Telephone Line Setting ..................................................................................1-13
Setting the Telephone Line Type ......................................... 1-13
Timer Settings ................................................................................................1-14
Setting the Sleep Mode .......................................................... 1-14
Setting Daylight Saving Time ............................................... 1-15
Appendix
Table of Contents
Index
8
9
1-2
TOP
Before Using the
Machine
Document and Paper
1
2
Sending and
Receiving
Copying
3
4
Printing
5
System Manager
Settings
Maintenance
6
7
Troubleshooting
8
Appendix
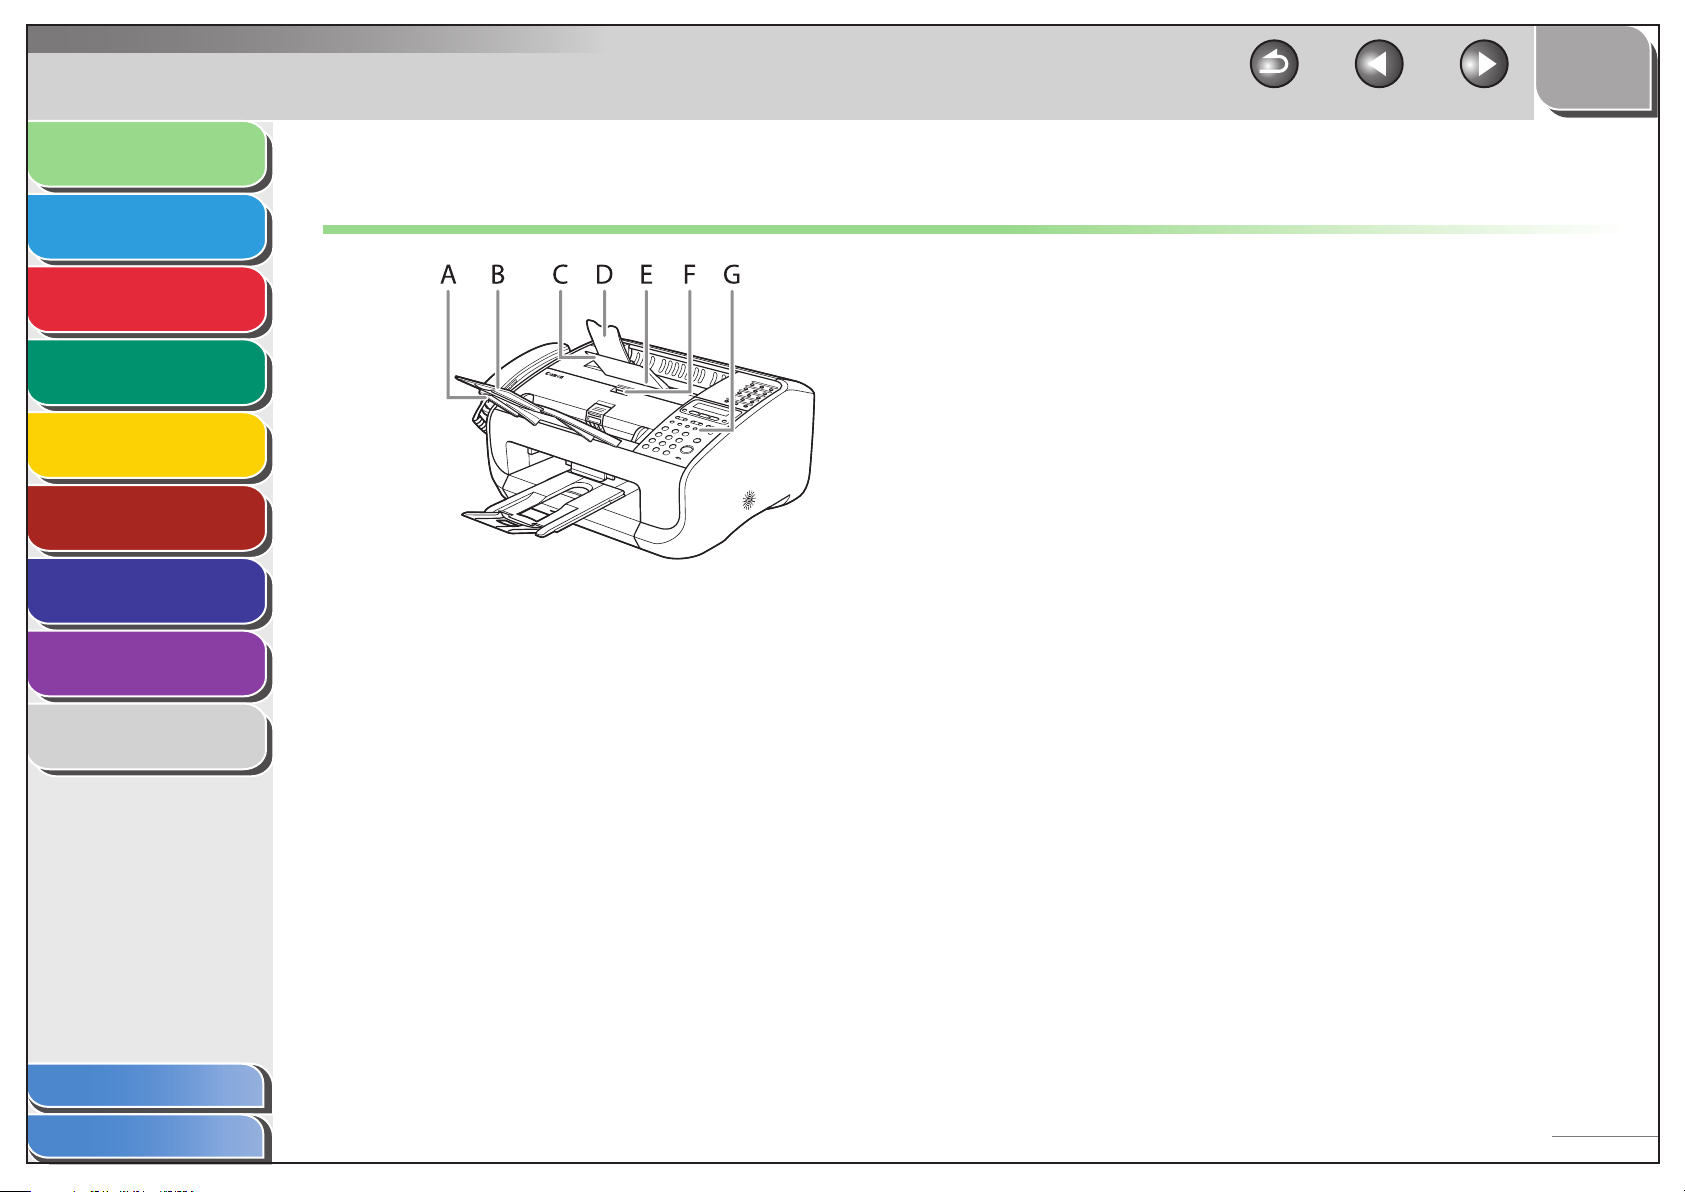
Machine Components
Back
A Document feeder tray
Holds documents.
B Document feeder tray extension
Extension for the document feeder tray.
C Paper delivery tray
Outputs printouts.
D Paper delivery tray extension
Extension for the paper output tray.
E Toner cover
Open it when replacing the toner cartridge or removing jammed
paper.
F Notch
Used to open the toner cover.
G Operation panel
Controls the machine.
Previous
Next
Table of Contents
Index
9
1-3
TOP
Before Using the
Machine
Document and Paper
1
2
Sending and
Receiving
Copying
3
4
Printing
5
System Manager
Settings
Maintenance
6
7
Troubleshooting
Back
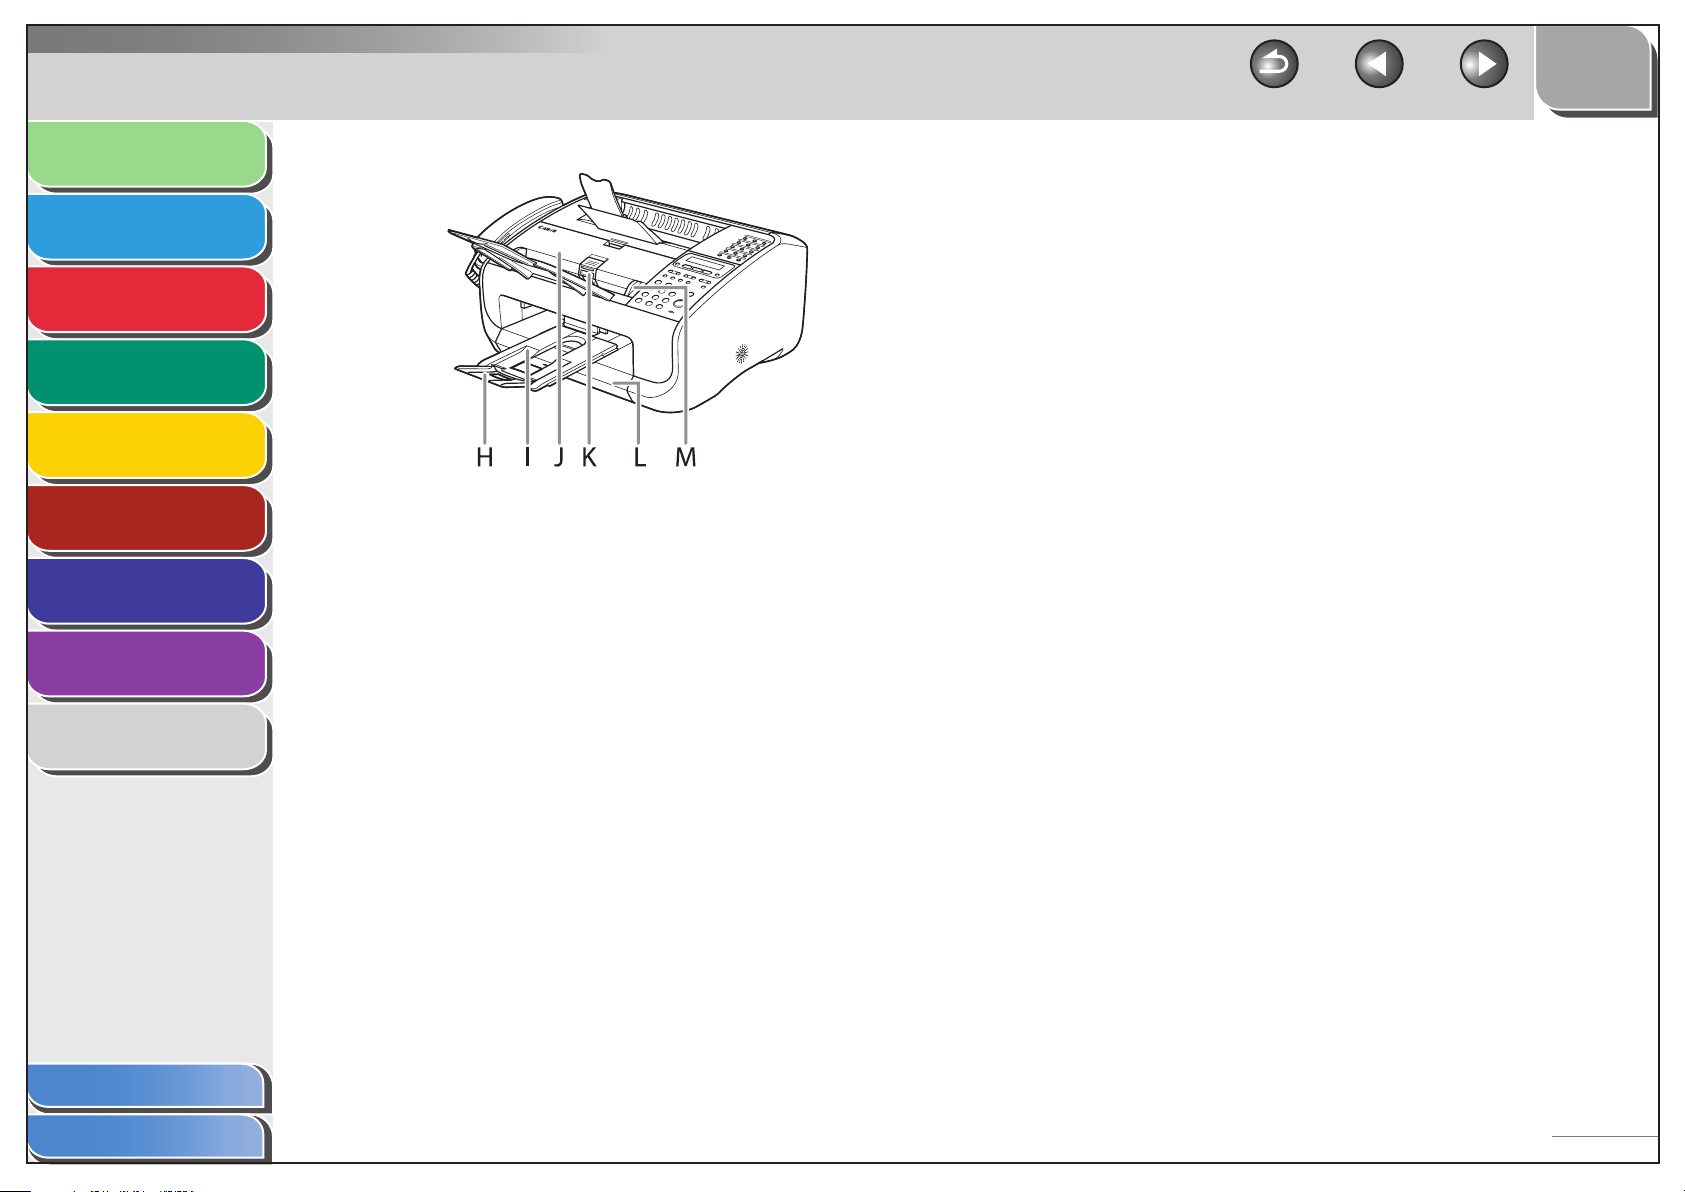
H Document delivery tray extension
Extension for the document delivery tray.
I Document delivery tray
Outputs scanned documents. Part of paper stack cover.
J ADF (Automatic Document Feeder)
Feeds documents automatically into the machine for scanning.
K Document release lever
Releases jammed document.
L Paper stack cover
Protects paper supply in the machine from dirt and dust.
M Document guides
Adjust to the width of documents.
Previous
Next
Appendix
Table of Contents
Index
8
9
1-4
TOP
Before Using the
Machine
Document and Paper
1
2
Sending and
Receiving
Copying
3
4
Printing
5
System Manager
Settings
Maintenance
6
7
Troubleshooting
Back
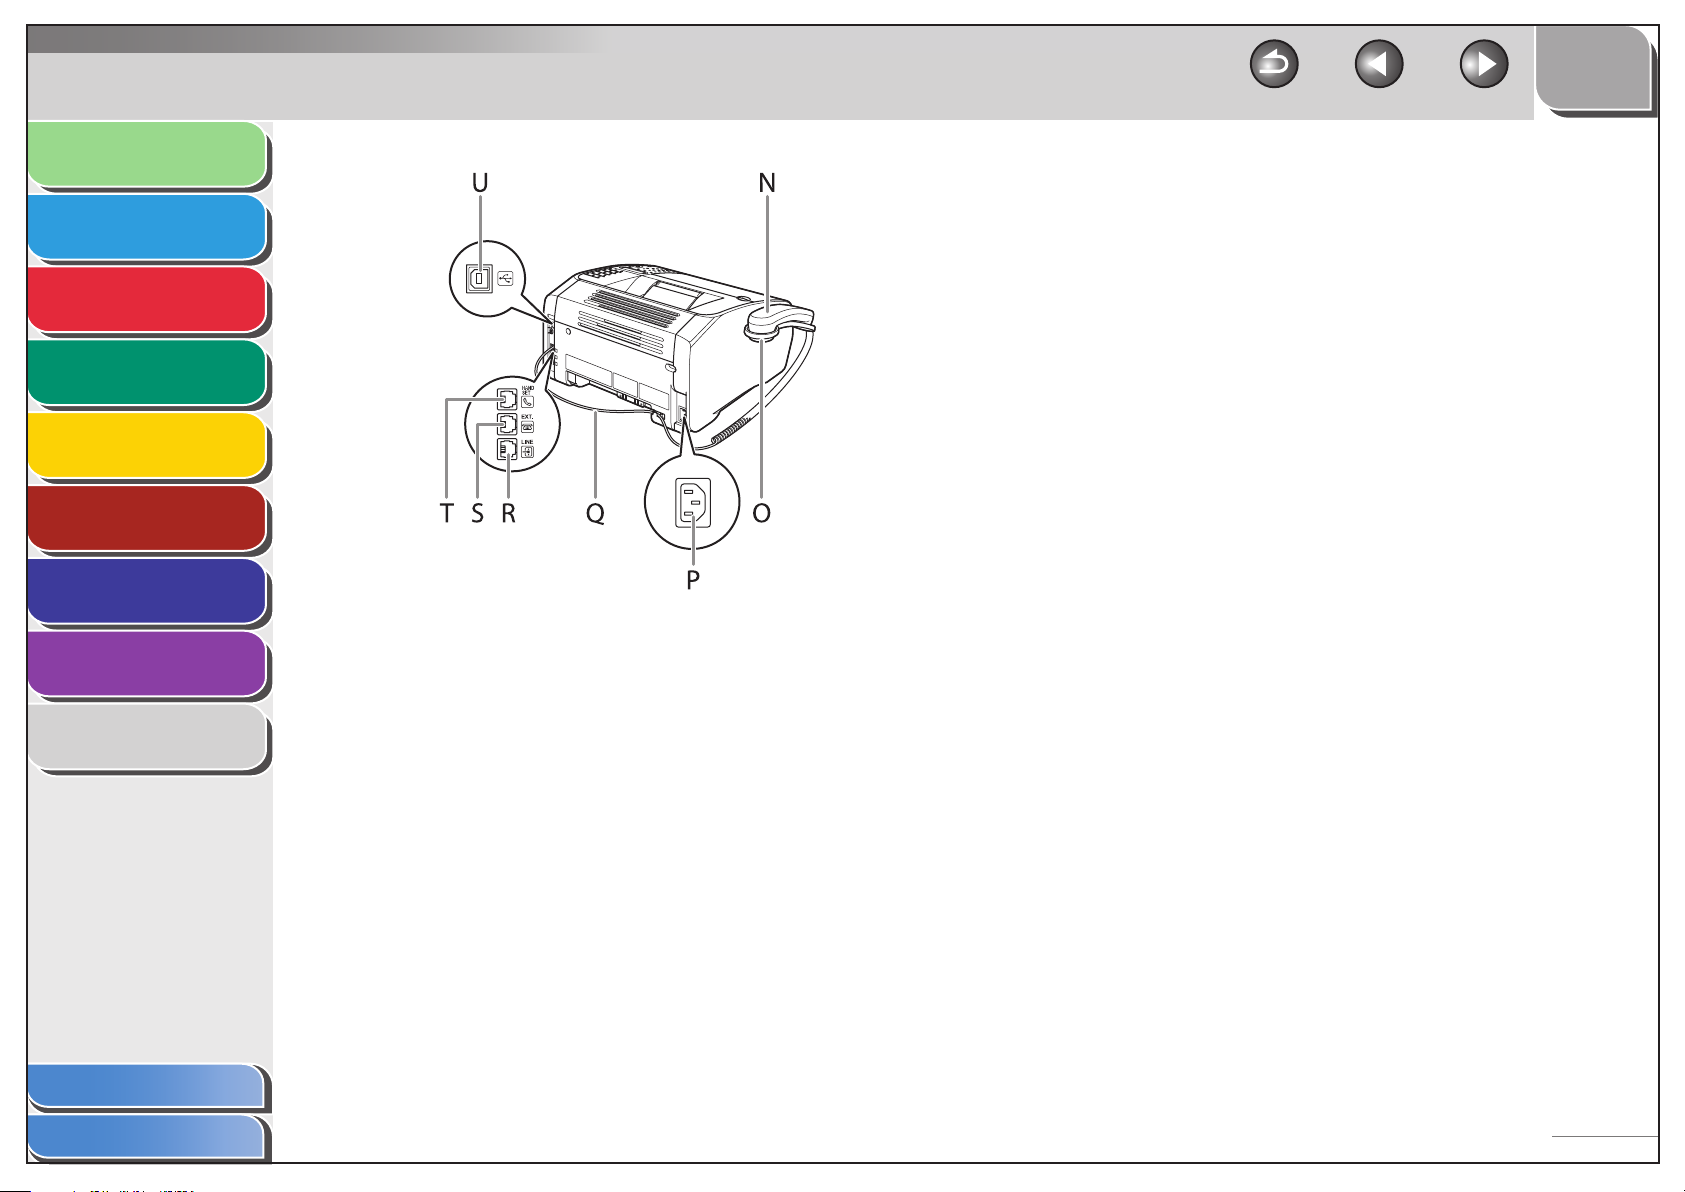
N Handset
For using the machine as a telephone or sending/receiving faxes
remotely.
O Handset cradle
Cradle for the handset.
P Power socket
Connect the power cord.
Q Handset cable retainer
Hook the handset cable to retain the slack.
R Line jack
Connect the telephone cable.
S External device jack
Connect an external device if necessary.
T Handset jack
Connect the handset.
U USB port
Connect the USB cable.
Previous
Next
Appendix
Table of Contents
Index
8
9
1-5

TOP
Before Using the
Machine
Document and Paper
1
2
Sending and
Receiving
Copying
3
4
Printing
5
System Manager
Settings
Maintenance
6
7
Troubleshooting
8
Appendix
9
Operation Panel
Operation Panel
■
Back
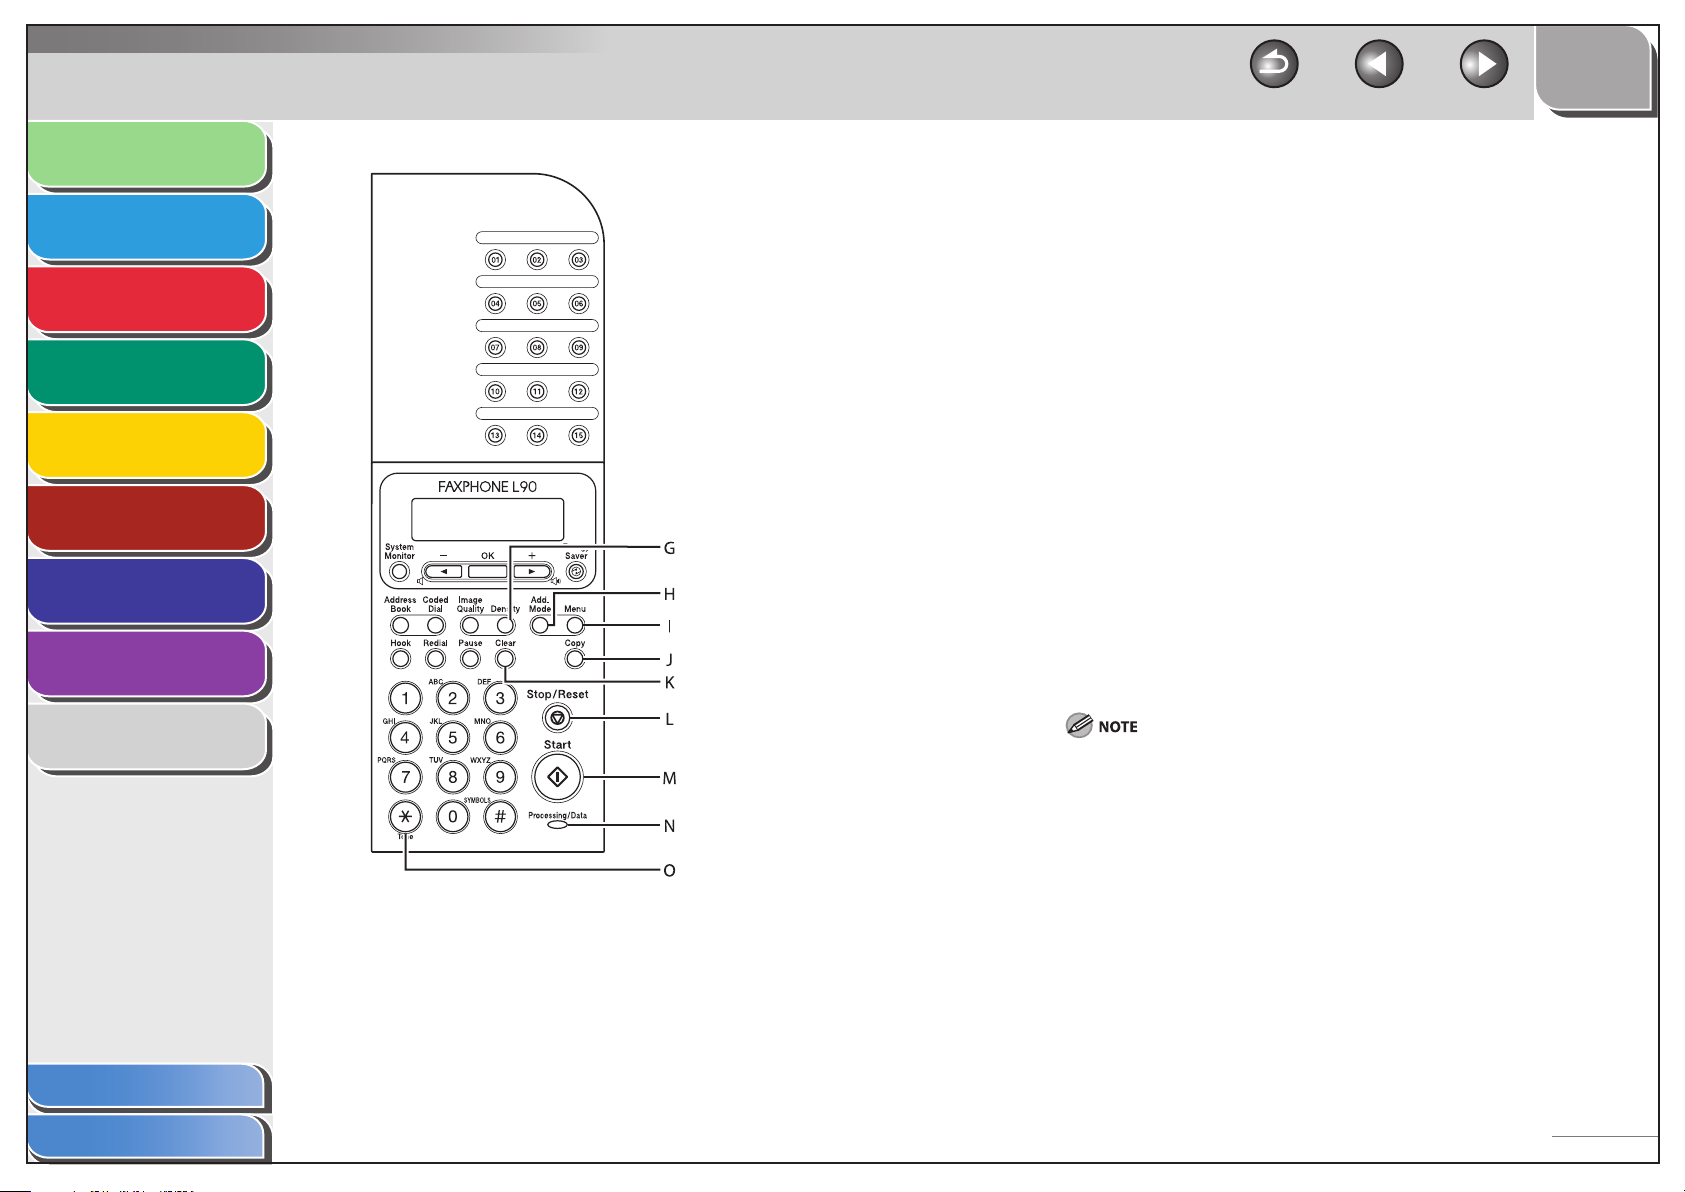
A One-Touch Speed Dialing keys
Press to enter destinations registered for one-touch speed
dialing or group dialing.
B LCD display
Displays messages and prompts during operation. Also
displays selections, text, and numbers when adjusting
settings.
C [ ] key
Press to decrease the value for various settings. Also press to
see the previous item in the menu.
D [ ] key
Press to increase the value for various settings. Also press to
see the next item in the menu.
E [Energy Saver] key
Press to set or cancel the Sleep mode manually. The key
lights green when the Sleep mode is set, and goes off when
the mode is canceled.
F [OK] key
Press to accept a set function or mode.
Previous
Next
Table of Contents
Index
1-6
TOP
Before Using the
Machine
Document and Paper
1
2
Sending and
Receiving
Copying
3
4
Printing
5
System Manager
Settings
Maintenance
6
7
Troubleshooting
8
Appendix
9
Back
G [Density] key
Press to adjust the density for copy or documents you send.
H [Add. Mode] key
Press to access additional fax modes.
I [Menu] key
Press to access the setting menu for customizing machine
operations.
J [Copy] key
Press to switch to the Copy mode.
K [Clear] key
Press to clear entered alphanumeric characters.
L [Stop/Reset] key
Press to stop a current job or to return the machine to the
standby mode. Also, press to switch to the Fax mode when
the machine is in the Copy mode.
M [Start] key
Press to start scanning documents for sending or copying.
N Processing/Data indicator
Flashes while sending or receiving faxes. Lights when the
machine has waiting jobs and stores the data in memory.
Any data stored in the memory, including received fax documents, will be
deleted if you disconnect the power cord of the machine.
O [Tone] key
Press to switch from rotary pulse to tone dialing.
Previous
Next
Table of Contents
Index
1-7
TOP
Before Using the
Machine
Document and Paper
1
2
Sending and
Receiving
Copying
3
4
Printing
5
System Manager
Settings
Maintenance
6
7
Troubleshooting
8
Appendix
Back
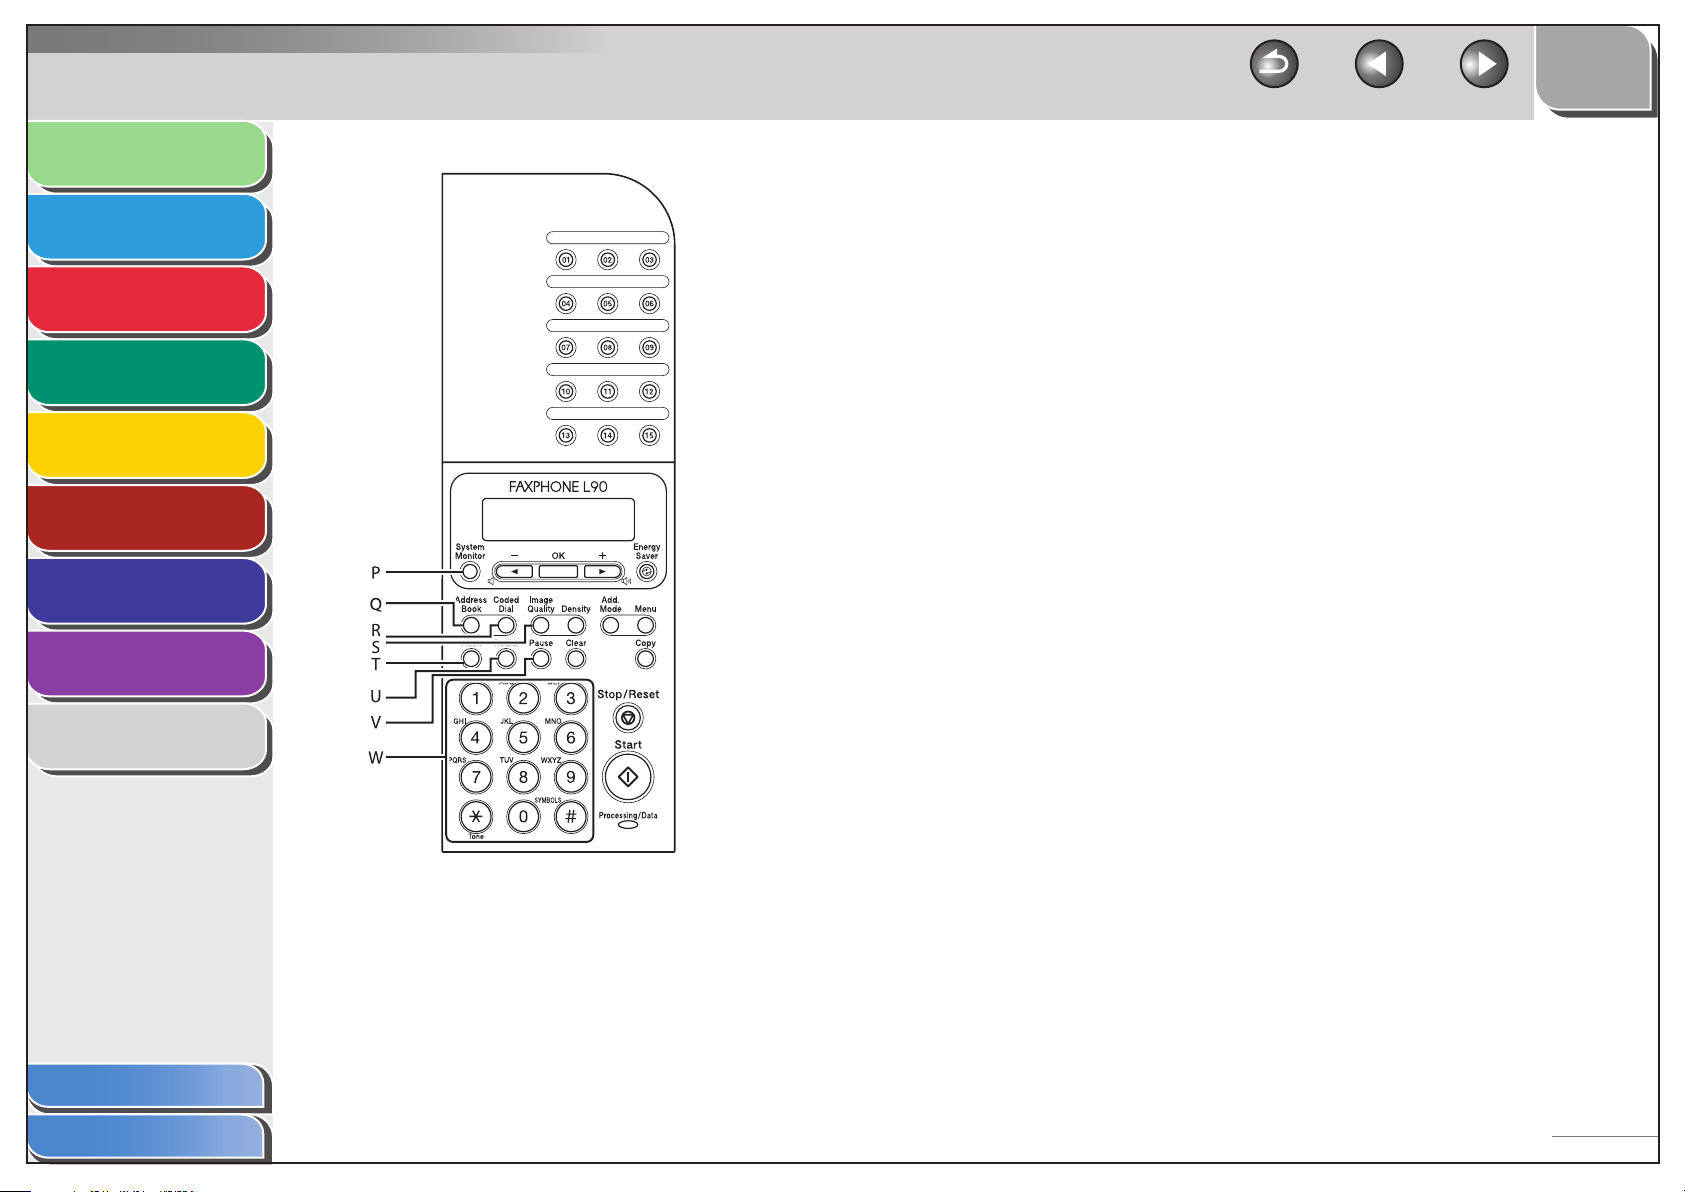
P [System Monitor] key
Press to check the sending status, print status, sending/
receiving log, available memory, or printing/scanning count.
Q [Address Book] key
Press to search pre-registered destinations under one-touch
speed dialing keys or coded speed dialing codes by name.
R [Coded Dial] key
Press to specify recipients registered under coded speed
dialing.
S [Image Quality] key
Press to select image quality for copy or fax.
T [Hook] key
Press when you want to dial without lifting up the handset or
the handset of the external telephone.
U [Redial] key
Press to redial the last dialed number.
V [Pause] key
Press to insert a pause when entering a fax number.
W Numeric keys
Use to enter letters and numbers.
Previous
Next
Table of Contents
Index
9
1-8
TOP
Before Using the
Machine
Document and Paper
1
2
Sending and
Receiving
Copying
3
4
Printing
5
System Manager
Settings
Maintenance
6
7
Troubleshooting
8
Appendix
LCD (Standby Mode)
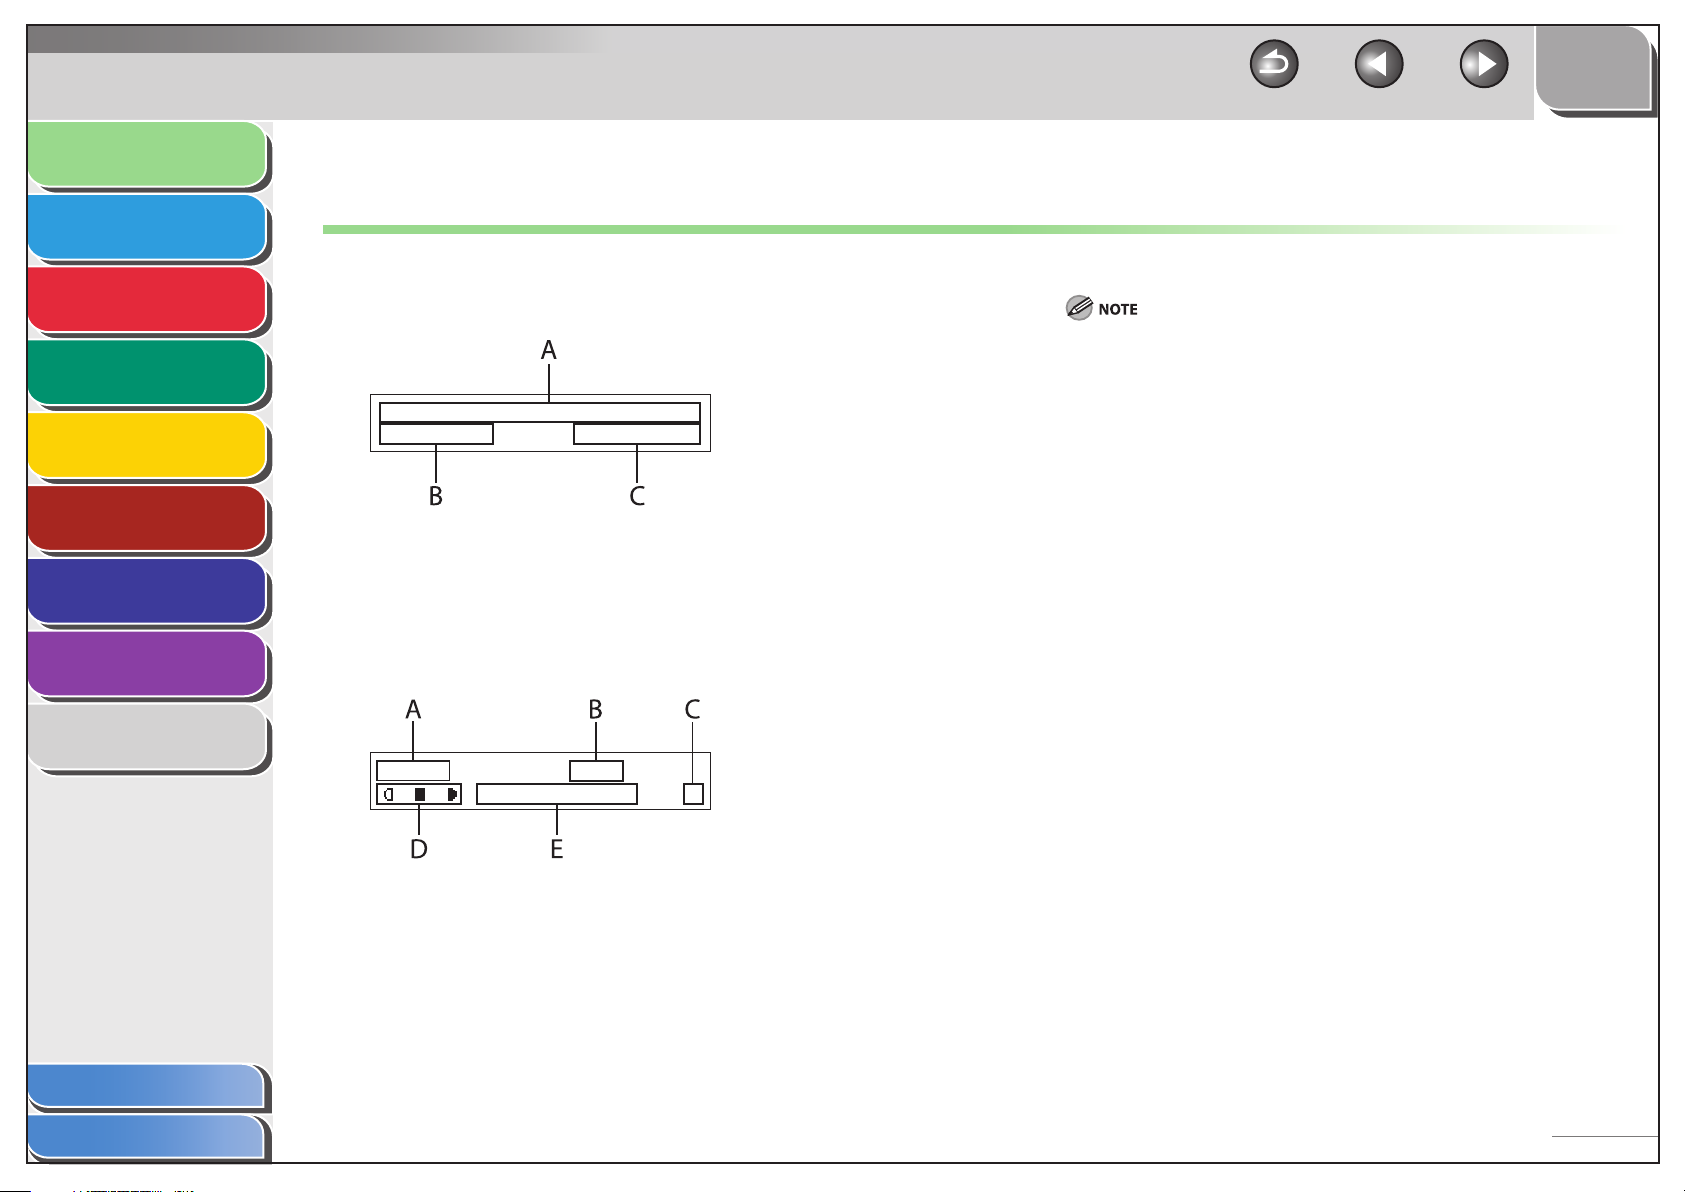
Fax Mode
■
12/31/2007 MON 15:50
FaxOnly STANDARD
A Date & Time
B Receive mode
C Image quality
■
Copy Mode
Back
–
When you connect the power cord, the LCD displays <PLEASE WAIT>
first, and then displays <INITIALIZING...> until the standby display
appears. It is also possible to see the standby display without having
<INITIALIZING...> shown.
If the machine remains idle for one minute, the display returns to the Fax
–
mode.
Previous
Next
Table of Contents
Index
9
TEXT/PHOTO 1
A Zoom ratio
B Paper size
C Quantity
D Density
E Image quality
LTR100%
1-9

TOP
Before Using the
Machine
Document and Paper
1
2
Sending and
Receiving
Copying
3
4
Printing
5
System Manager
Settings
Maintenance
6
7
Troubleshooting
8
Appendix
9
Handset
The handset is used to use the machine as a telephone and a fax
machine, and to receive faxes manually.
For how to install the handset, see “Before FAX Setting,” in the Starter Guide.
■
–
–
–
Maintaining the Handset
Do not leave the handset exposed to direct sunlight.
Do not install the handset in hot or humid conditions.
Do not spray aerosol polish on the handset as it may cause
damage.
Back
Previous
Next
Table of Contents
Index
Use a damp cloth to wipe clean the handset.
–
1-10
TOP
Before Using the
Machine
Document and Paper
1
2
Sending and
Receiving
Copying
3
4
Printing
5
System Manager
Settings
Maintenance
6
7
Troubleshooting
8
Appendix
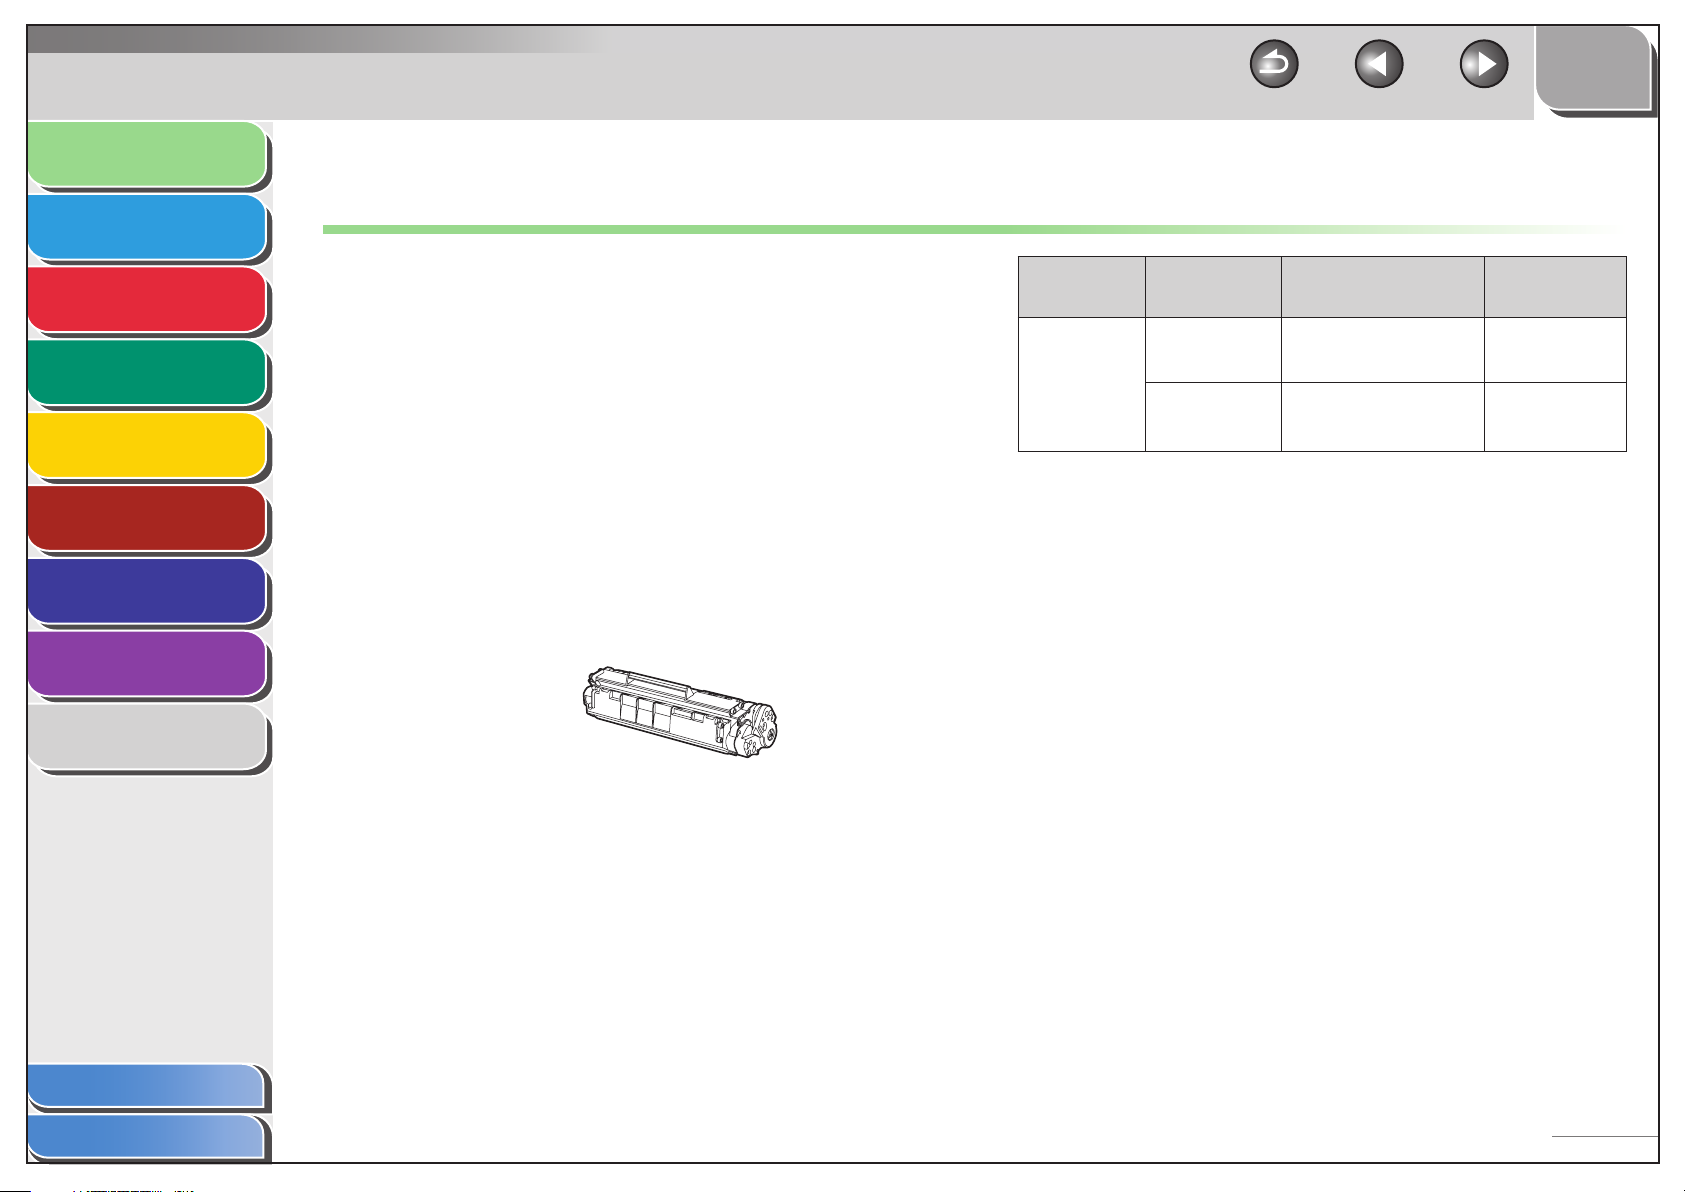
Toner Cartridge
The lifetime of the Canon genuine starter toner cartridge which
comes with the machine is approximately 1,000 pages, the
Canon genuine replacement toner cartridge is approximately
2,000 pages. The page counts are based on 5% coverage* when
printing A4 size paper with the default print density setting.
The level of toner consumption varies depending on the type
of documents printed. If your average document contains a lot
of graphics, tables, or charts, the life of the toner cartridge will
be shorter as they consume more toner. When you are replacing
a toner cartridge, be sure to use a toner cartridge designed for
this product. To purchase the Canon genuine replacement toner
cartridge, contact your local Canon dealer or Canon Customer
Care Center (U.S.A.:1-800-828-4040, Canada:1-800-652-2666).
* The term “5% coverage” denotes a document on which the area
covered with toner is 5% of the total area of a sheet.
Toner Cartridge name:
Canon Cartridge 104
L90
Model
Name
Back
Type
Bundled
Replacement Canon Cartridge 104
Previous
Supported Canon
Genuine Cartridge
Canon Cartridge 104
Starter
Next
Print Yield
Approx. 1,000
pages
Approx. 2,000
pages
Table of Contents
Index
9
1-11
Loading...