


 Loading...
PUB. DIM-863
Y |
|
|
P |
|
|
O |
|
|
C |
|
|
Digital Video amcorder |
|
|
Instruction Manual |
English |
|
Caméscope numérique |
|
|
Manuel d’instruction |
Français |
|
|
|
|
Videocámara digital |
|
|
Manual de Instrucciones |
Español |
|
|
|
|
NTSC

Important Usage Instructions
WARNING!
TO REDUCE THE RISK OF FIRE OR ELECTRIC SHOCK, DO NOT EXPOSE THIS PRODUCT TO RAIN OR MOISTURE.
WARNING!
TO REDUCE THE RISK OF ELECTRIC SHOCK AND TO REDUCE ANNOYING INTERFERENCE, USE THE RECOMMENDED ACCESSORIES ONLY.
COPYRIGHT WARNING:
Unauthorized recording of copyrighted materials may infringe on the rights of copyright
owners and be contrary to copyright laws. |
Y |
|
This device complies with Part 15 of the FCC Rules. Operation is subject to the following two conditions: (1) This device may not cause P
harmful interference, and (2) this device must accept any interference received, including interference that may cause undesired operation.
Note: This equipment has been tested and found to comply with the limits for class B digital device, pursuant to Part 15 of the FCC
Rules. These limits are designed to provide reasonable protection against harmful interference in a residential installation. This equipment generates, uses and can radiate radio frequency energy and, if not installed and use in accordance with the instructions, may cause harmful interference to radio communications. However, there is no guarantee that interference will not occur in a particular installation. If this equipment does cause harmful interference to radio or television reception, which can be determined by turning the equipment off and on, the user is encouraged to try to correct the interference by one or more of the following measures:
• |
Reorient or relocate the receiving antenna. |
• Increase the separation between the equipment and receiver. |
|
• |
Connect the equipment into an outlet on a circuit different from that to which the receiver is connected. |
• |
Consult the dealer or an experienced radio/TV technician for help. |
|
O |
The cable with the ferrite core provided with the digital video camcorder must be used with this equipment in order to comply with |
|
Class B limits in Subpart B of Part 15 of the F rules. |
|
Do not make any changes or modifications to the equipment unless otherwise specified in the manual. |
|
If such changes or modifications should be made, you could be required to stop operation of the equipment. |
|
|
C |
Canon U.S.A. Inc.
One Canon Plaza, Lake Success, NY 11042, U.S.A.
Tel No. (516)328-5600
CAUTION:
TO PREVENT ELECTRIC SHOCK, MATCH WIDE BLADE OF PLUG TO WIDE SLOT, FULLY INSERT.
Important Warning
CAUTION
RISK OF ELECTRIC SHOCK
DO NOT OPEN
CAUTION:
TO REDUCE THE RISK OF ELECTRIC SHOCK, DO NOT REMOVE COVER (OR BACK). NO USER-SERVICEABLE PARTS INSIDE. REFER SERVICING TO QUALIFIED SERVICE PERSONNEL.
The lightning flash with arrowhead symbol, within an equilateral triangle, is intended to alert the user to the presence of uninsulated “dangerous voltage” within the product’s enclosure, that may be of sufficient magnitude to constitute a risk of electric shock to persons.
The exclamation point, within an equilateral triangle, is intended to alert the user to the presence of important operating and maintenance (servicing) instructions in the literature accompanying the product.
2

IMPORTANT SAFETY INSTRUCTIONS
In these safety instructions the word |
|
magnetic radiation. They may cause |
|
|
“apparatus” or “product” refers to the Canon |
picture interference, or permanently |
|
||
Digital Video Camcorder FS11 A/FS10 A/ |
damage the camera. |
|
||
FS100 A and all its accessories. |
|
16 Water and Moisture — Hazard of electric |
|
|
1 |
Read these instructions. |
|
shock — Do not use this product near |
|
2 |
Keep these instructions. |
|
water or in rainy/moist situations. |
|
3 |
Heed all warnings. |
|
17 Placing or Moving — Do not place on an |
|
4 |
Follow all instructions. |
|
unstable cart, stand, tripod, bracket or |
|
|
table. The product may fall, causing |
|
||
5 |
|
|
|
|
Do not use this apparatus near water. |
serious injury to a child or adult, and |
|
||
6 |
Clean only with dry cloth. |
|
serious damage to the product. A |
|
7 |
Do not install near any heat sources such |
product and cart combination should be |
|
|
moved with care. Quick stops, excessive |
|
|||
|
as radiators, heat registers, stoves, or |
force, and uneven surfaces may cause |
|
|
|
other apparatus (including amplifiers) |
the product and cart combination to |
|
|
|
that produce heat. |
|
overturn. |
|
8 |
Protect the power cord from being |
18Yower Sources — The product should |
|
|
|
walked on or pinched particularly at |
be operated only from the type of power |
|
|
|
plugs, convenience receptacles, and the |
source indicated on the marking label. If |
|
|
|
point where they exit from the apparatus. |
|
||
|
you are not sure of the type of power |
|
||
9 |
|
P |
|
|
Unplug this apparatus during lightning |
supply to your home, consult your |
|
||
|
storms or when unused for long periods |
product dealer or local power company. |
|
|
|
of time. |
|
Regarding other power sources such as |
|
|
C |
|
battery power, refer to instructions in this |
|
10 |
Read instructionsO— All the safety and |
|
||
manual. |
|
|||
|
operating instructions should be read |
|
||
|
19 Overloading — Do not overload wall |
|
||
|
before the product is operated. |
|
|
|
11 |
Retain instructions — The safety and |
outlets and extension cords as this can |
|
|
|
||||
result in a risk of fire or electric shock. |
|
|||
|
operating instructions should be retained |
|
||
|
20 Objects and Liquid Entry — Never push |
|
||
|
for future reference. |
|
|
|
12 |
Heed Warnings — All warnings on the |
objects of any kind into this product |
|
|
through openings as they may touch |
|
|||
|
product and in the operating instructions |
|
||
|
dangerous voltage points or short out |
|
||
|
should be adhered to. |
|
|
|
13 |
|
parts that could result in a fire or electric |
|
|
Follow instructions — All operating and |
|
|||
shock. Be careful not to spill liquid of any |
|
|||
|
maintenance instructions should be |
kind onto the product. |
|
|
14 |
followed. |
|
21 Servicing — Do not attempt to service |
|
Cleaning — Unplug this product from the |
|
|||
this product yourself as opening or |
|
|||
|
wall outlet before cleaning. Do not use |
removing covers may expose you to |
|
|
|
liquid or aerosol cleaners. The product |
dangerous voltage or other hazards. |
|
|
|
should be cleaned only as |
|
Refer all servicing to qualified service |
|
15 |
recommended in this manual. |
|
personnel. |
|
Avoid magnetic or electric fields — Do |
22 Power Sources — The CA-590 Compact |
|
||
|
not use the camera close to TV |
|
Power Adapter should be operated only |
|
|
transmitters, portable communication |
from the type of power source indicated |
|
|
|
devices or other sources of electric or |
on the marking label. If you are not sure |
|
|
3
|
|
|
|
|
|
|
of the type of power supply to your |
|
|
d. If the product does not operate |
|
|
home, consult your product dealer or |
|
normally even if you follow the |
||
|
local power company. Regarding other |
|
operating instructions. Adjust only |
||
|
power sources such as battery power, |
|
those controls that are covered by the |
||
|
refer to instructions in this manual. |
|
|
operation instructions. Improper |
|
|
23 Lightning — For added protection of this |
|
adjustment of other controls may |
||
|
product during a lightning storm, or |
|
|
result in damage and will often require |
|
|
|
|
extensive work by a qualified |
||
|
when it is left unattended and unused for |
|
|||
|
|
technician to restore the product to its |
|||
|
long periods of time, disconnect it from |
|
|||
|
|
normal operation. |
|||
|
the wall outlet and disconnect the |
|
|
||
|
|
|
e. If the product has been dropped or |
||
|
antenna. This will prevent damage to the |
|
|||
|
|
the cabinet has been damaged. |
|||
|
product due to lightning and power-line |
|
|||
|
|
f. When the product exhibits a distinct |
|||
|
surges. |
|
|
|
|
|
|
|
|
change in performance. This indicates |
|
|
24 Overloading — Do not overload wall |
|
|||
|
|
a need for service. |
|||
|
outlets and extension cords as this can |
26 Replacement Parts — When |
|||
|
result in a risk of fire or electric shock. |
||||
|
|
replacement parts are required, be sure |
|||
|
25 Damage Requiring Service — |
|
|
||
|
|
|
the service technician has used |
||
|
Disconnect this product from the wall |
|
replacement parts that are specified by |
||
|
outlet and all power sources including |
|
Canon or that have the same |
||
|
battery, and refer servicing to qualified |
|
characteristics as the original part. |
||
|
service personnel under the following |
|
YUnauthorized substitutions may result in |
||
|
conditions: |
|
|
|
fire, electric shock or other hazards. |
|
a. When the plug is damaged. |
|
27 Safety Check — Upon completion of any |
||
|
b. If any liquid has been spilled onto, or |
||||
|
|
|
|||
|
|
|
Pservice or repairs to this product, ask the |
||
|
objects have fallen into, the product. |
|
service technician to perform safety |
||
|
c. If the product has been exposed to |
|
|||
|
|
checks to determine that the product is |
|||
|
rain or water. |
O |
|||
|
in safe operating order. |
||||
|
|
||||
|
|
|
|||
|
C |
|
|
|
|
When replacement of the power supply is required, please return it to the responsible nearest Canon Service enter and please replace it with the same type number CA-590.
This Class B digital apparatus complies with Canadian ICES-003.
The Mains plug is used as the disconnect device. The Mains plug shall remain readily operable to disconnect the plug in case of an accident.
The adapter can be used with a power supply between 100 and 240 V AC. For areas where 120 V AC power is not used, you will need a special plug adapter. Contact your nearest Canon Service Center for further information.
The adapter is not intended to be serviced. Should the product cease to function in its intended manner, it should be returned to the manufacturer or be discarded.
4
Getting to Know the Camcorder
What is so special about recording on flash memory?
Your videos and photos are recorded in the built-in memory ( and
and  only) or on a memory card (SD or SDHC card). Recording on flash memory means that there are no moving parts in the recorder unit of the camcorder. To you, it means a camcorder that is smaller, lighter and faster.
 Y
Y Other featuresOof this camcorderP
Whether you are using a camcorder for the first time or are very experienced, this camcorderCoffers many easy-to-use functions. The following are just but a few examples of the many functions that can enrich your shooting experience.
• Special Scene recording programs ( 42): You can simply activate a Special Scene recording program when shooting in a variety of situations, such as at a beach or sports tournament, in order to let the camcorder automatically select the optimal settings for that situation.
• Quick Start (  35): Using the Quick Start function, you can open the LCD panel and start recording within approximately one second!
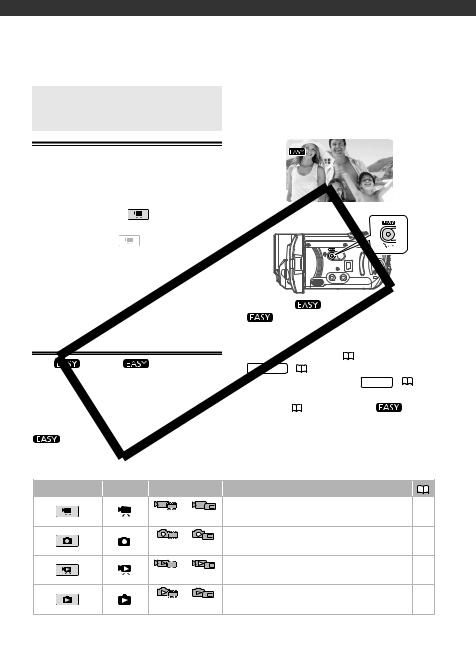
•  mode (
  24): With
  mode, recording is as simple as pressing a single button and using the zoom lever. The camcorder will take care of the rest!
5
Table of contents
Introduction ______________________________
5 Getting to Know the Camcorder
10 About this Manual
12 Overview
12Supplied Accessories
13Components Guide
16Screen Displays
|
|
|
|
Y |
Preparations |
P |
|||
_____________________________ |
||||
19 |
Operating |
|
||
Getting Started |
|
|
||
19 |
Charging the Battery |
ack |
|
|
20 |
Preparing the Wireless Controller and Accessories |
|||
22 |
Adjusting the Position and Brightness of the LCD Screen |
|||
C |
|
|
||
24 |
Basic |
peration of the Camcorder |
||
24 |
|
Modes |
|
|
24 |
The |
Button: |
Mode or Flexible Recording |
|
25 |
Joystick and Joystick Guide |
|||
25 |
Using the Menus |
|
|
|
27 First Time Settings
27Setting the Date and Time
28Changing the Language
28Changing the Time Zone
29Using a Memory Card
29 Recommended Memory Cards
29Inserting and Removing a Memory Card
30/ Selecting the Memory for the Recordings
30 |
Initializing the Built-In Memory ( |
/ |
only) or Memory |
Card
6

Table of contents
Video ____________________________________
32 Basic Recording
32 Shooting Video
33 Selecting the Video Quality (Recording Mode)
33 Zooming: Optical, Advanced and Digital Zoom
35 Quick Start Function
35 Reviewing and Deleting the Last Scene Recorded
36 |
Basic Playback |
|
|
36 |
Playing Back the Video |
||
38 |
|
Playback |
|
Special Playback Modes |
|||
39 |
Selecting Scenes by Recording Date |
||
40 |
Selecting the |
|
StartingYoint from the Movie Timeline |
41 |
O |
||
Deleting Scenes |
|
||
42 |
Advanced Functions |
|
|
42 |
Special Scene Recording Programs |
||
43 |
ontrolling Shutter Speed and Other Functions while Shooting |
||
44 |
Mini Video Light |
|
|
45 |
Self Timer |
|
|
45 |
Automatic Backlight Correction and Manual Exposure |
||
|
Adjustment |
|
|
C46 Manual Focus Adjustment |
|||
47White Balance
48Image Effects
48Digital Effects
49On-Screen Displays and Data Code
50Using an External Microphone
51Managing Scenes and the Memory
51Creating a Playlist
52Deleting Scenes from the Playlist
52Moving Scenes in the Playlist
53 /
/ Copying Scenes
7

Photos __________________________________
54 |
Basic Recording |
|
|||
54 |
Taking Photos |
|
|
|
|
54 |
Selecting Photo Size and Quality |
||||
56 |
Erasing a Photo Right After Recording It |
||||
56 |
Basic Playback |
Y |
|||
56 |
Viewing Photos |
||||
|
|||||
58 |
Magnifying Photos during Playback |
||||
58 |
Erasing Photos |
P |
|||
59 |
|
|
|||
Additional Functions |
|
||||
59 |
Drive Mode: Continuous Shooting and Exposure Bracketing |
||||
60 |
Other |
|
|||
Histogram Display |
|
||||
60 |
Protecting Photos |
|
|||
61 |
/ |
Copying hotos |
|||
62 |
Functions You Can Use when Taking Photos |
||||
C |
|
|
|
||
62 |
Printing Photos |
|
|||
62 |
Printing Photos |
|
|
||
63 |
Selecting the Print Settings |
|
|||
65 |
Print Orders |
|
|
|
|
External Connections _______________________
67Terminals on the Camcorder
67Connection Diagrams
68Playback on a TV Screen
68Saving and Backing Up Your Recordings
68Backing Up Your Recordings on a Computer
69Authoring DVD Discs and Photo DVDs
71Copying your Recordings to an External Video Recorder
72Transferring Photos to a Computer (Direct Transfer)
74 Transfer Orders
8

Table of contents
Additional Information ______________________
75Appendix: Menu Options Lists
75FUNC. Menu
76Setup Menus
76 |
Camera Setup (Digital Zoom, Image Stabilizer, etc.) |
|
|||
78 |
Memory Operations (Initialization, etc.) |
|
|||
79 |
Display Setup (LCD Brightness, Language, etc.) |
|
|||
80 |
System Setup (Speaker Volume, Beep, etc.) |
|
|||
81 |
Date/Time Setup |
|
|
||
82 |
Trouble? |
|
P |
|
|
82 |
Troubleshooting |
|
Y |
|
|
86 |
List of Messages |
|
|||
93 |
O |
|
|
||
Do’s and Don’ts |
|
|
|
||
93 |
Handling Precautions |
|
|
||
96 |
Maintenance/ thers |
|
|
||
C |
|
|
|
||
97 |
Using the |
amcorder Abroad |
|
||
98 |
General Information |
|
|
||
98 |
System Diagram |
|
|
|
|
99 |
Optional Accessories |
|
|
||
101 |
Product |
odes |
|
|
|
102 |
Specifications |
|
|
|
|
105 |
Index |
|
|
|
|
9
Introduction
About this Manual
Thank you for purchasing the Canon FS11/FS10/FS100. Please read this manual carefully before you use the camcorder and retain it for future reference. Should your camcorder fail to operate correctly, refer to Troubleshooting ( 82).
82).
Conventions Used in this Manual
•  IMPORTANT: Precautions related to the camcorder’s operation.
•  NOTES: Additional topics that complement the basic operating procedures.
•  POINTS TO CHECK: Restrictions or requirements regarding the function described.
•  : Reference page number in this manual.
|
P |
To complete some operations you will need to refer also to other instruction |
|
manuals. This will be indicated with the following icons and the name of the |
|
relevant chapter or section. |
|
Refer to the “Digital Video Software” Yinstruction manual, included as a |
|
O |
|
PDF file in the supplied DIGITAL VIDEO Solution Disk CD-ROM. Refer to the instruction manual of the optional DW-100 DVD Burner.
•: Text that applies only to the model shown in the icon.
•The following terms are used in this manual:
C |
|
|
When not specified as “memory card” or “built-in memory”, the term “memory” by |
||
itself refers to both ( |
/ |
only). |
“Scene” refers to one movie unit from the point you press the Start/Stop button to start recording until you press again to pause the recording.
“Photo” and “still image” are used interchangeably with the same meaning.
• The photos included in this manual are simulated pictures taken with a still camera. Unless indicated otherwise, illustrations and menu icons refer to the  .
.
Names of buttons and switches other than the joystick are indicated within a “button” frame. For example  .
.
Brackets [ ] and capital letters are used to refer to menu options as they are displayed on screen. In tables in this manual the default value is shown in boldface.
For example [ON], [OFF].
FUNC.
( 27)
27)
FUNC.
[ MENU]
MENU] 
[

 DISPLAY SETUP]
  [LANGUAGE
 ]
]  Desired language
FUNC.
Buttons and switches to be operated
10
Online product registration for U.S.A. Customers only.
Register your product online at www.registercanon.com
 Protect your product
We will keep the model number and date of purchase of your new Canon product on file to help you refer to this information in the event of an insurance claim such as loss or theft.
 Receive information on new products and promotions
Upon your request, we will send you information on Canon new products and promotions.
|
|
|
|
|
Date of Purchase: |
Y |
|
|
|
Model Name: FS11 A/FS10 A/FS100 A |
|
|
||
Purchased From: |
Serial No.: |
|
|
|
Dealer Address: |
P |
|
|
|
Dealer Phone No.: |
|
|
||
O |
|
|
||
C |
|
|
|
|
|
|
|
|
|
The serial number of this product can be found on the battery compartment cover of the camcorder. Write down the number and other information here and retain this book as a permanent record of your purchase to aid identification in case of theft.
11
Introduction
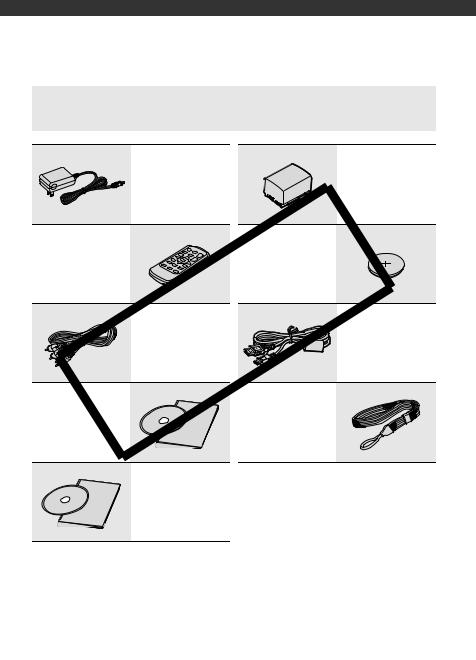
Supplied Accessories
|
CA-590 Compact Power |
|
BP-808 Battery Pack |
|
Adapter |
|
|
|
Y |
||
|
|
||
|
|
Lithium Button Battery |
|
WL-D88 Wireless Controller |
|
CR2025 for Wireless |
|
|
|
Controller |
|
|
O |
|
|
|
STV-250N |
|
|
|
Stereo Video Cable |
|
IFC-400PCU USB Cable |
|
Yellow • Red • WhitePplugs |
|
|
C |
|
|
|
Software D-ROM* |
|
|
|
and Installation Guide |
|
|
|
PIXELA ImageMixer 3 SE |
|
WS-30 Wrist Strap |
|
For saving, managing, |
|
|
|
|
|
|
|
editing and playing back |
|
|
|
movies. |
|
|
|
Software CD-ROM*
and Installation Guide
DIGITAL VIDEO
Solution Disk
For saving, managing, and printing photos.
*The CD-ROM includes the instruction manual of the software (electronic version on PDF file).
12

Components Guide
Left side view |
|
RESET button ( |
84) |
|
|
||
|
|
|
button ( |
24)/ |
|
|
|
|
|
|
(print/share) button ( |
63, 72) |
|||
|
|
DISP. (on-screen display) button |
|||||
|
|
( |
49, 60)/ |
|
|
|
|
|
|
BATT. INFO button ( |
18) |
|
|||
|
|
USB terminal ( |
67) |
|
|
||
|
|
AV OUT terminal (yellow) ( |
67) |
||||
|
|
MIC terminal (red) ( |
50) |
|
|||
|
|
Speaker ( |
38) |
|
|
|
|
|
|
Strap mount ( |
21) |
|
|
||
|
|
ACCESS (memory access) indicator |
|||||
|
|
( |
32, 54)/ |
|
|
|
|
Right side view |
|
CHG (charge) indicator ( |
19) |
||||
|
Y |
|
|||||
|
|
DC IN terminal ( |
19) |
|
|
||
|
|
Mini video light ( |
44) |
|
|||
C |
PStereo microphone |
|
|
||||
Names of buttons and switches other than the |
|||||||
|
|
joystick are indicated within a “button” frame |
|||||
|
O(for example FUNC. ). |
|
|
|
|||
Front view
13

Introduction
Back view |
|
|
Remote sensor ( |
21) |
|
|
|
||
|
|
|
LCD screen ( |
22) |
|
|
|
||
|
|
|
Mode dial ( |
24) |
|
|
|
|
|
|
|
|
Start/Stop button ( |
32) |
|
|
|||
|
|
|
(stop) button ( |
36)/ |
|
|
|
||
|
|
|
BLC (backlight correction) button ( |
45) |
|||||
|
|
|
|
(fast forward) button ( |
36)/ |
|
|||
|
|
|
Zoom in T (telephoto) button ( |
33) |
|
||||
|
|
|
|
(fast reverse) button ( |
36)/ |
|
|||
|
|
|
Zoom out W (wide-angle) button ( |
33) |
|||||
|
|
|
/ |
(play/pause) button ( |
36)/ |
|
|||
Top view |
|
|
START/STOP button ( |
32) |
|
|
|||
|
|
Y |
|
|
|||||
|
|
|
FUNC. button ( |
26, 75) |
|
|
|||
|
|
|
Joystick ( 25) |
|
|
|
|
||
|
|
|
Zoom lever ( |
33) |
|
|
|
||
|
|
|
HOTO button ( |
54) |
|
|
|
||
|
|
|
ON/OFF button |
|
|
|
|
||
|
O |
|
indicator |
|
|
|
|
||
|
Tripod socket ( |
93) |
|
|
|
||||
|
|
|
Serial number |
|
|
|
|
|
|
|
|
PBattery compartment cover/ |
|
|
|||||
|
|
|
Memory card slot cover |
|
|
|
|||
|
|
|
Memory card slot ( |
29) |
|
|
|||
Bottom view |
|
|
Battery compartment ( |
19) |
|
|
|||
C |
|
Battery release latch ( |
20) |
|
|
||||
|
Grip belt |
|
|
|
|
|
|||
Names of buttons and switches other than the |
|||||||||
|
|
joystick are indicated within a “button” frame (for |
|||||||
|
|
example |
FUNC. ). |
|
|
|
|
|
|
14

Wireless Controller WL-D88
START/STOP button ( |
32) |
|
|
FUNC. button ( |
26, 75) |
|
|
MENU button ( |
26, 76) |
|
|
PLAYLIST button ( |
|
51) |
|
Navigation buttons ( |
/ / |
/ ) |
|
(frame reverse) button ( |
38) |
||
(fast reverse) button ( |
38) |
||
(play) button ( |
36) |
|
|
Y |
|
||
(pause) button ( |
36) |
|
|
(stop) button ( |
36) |
|
|
HOTO button ( |
54) |
|
|
DISP |
33) |
|
|
Zoom buttons ( |
|
||
 SET button
O |
|
(frame advance) button ( |
38) |
|
(fast forward) button ( |
38) |
|
|
|
. (on-screen display) button |
|
C |
( |
49, 60) |
|
|
|
|
|
15
|
|
|
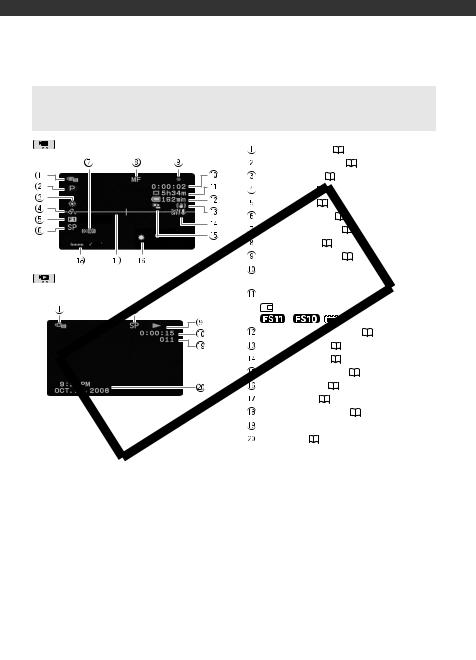
Operating mode ( |
24) |
|
||
|
|
|
Recording program ( |
42, 43) |
|||
|
|
|
White balance ( |
|
47) |
|
|
|
|
|
Image effect ( |
|
48) |
|
|
|
|
|
Digital effect ( |
|
48) |
|
|
|
|
|
Recording mode ( |
33) |
|
||
|
|
|
Remote sensor off ( |
80) |
|
||
|
|
|
Manual focus ( |
|
46) |
|
|
|
|
|
Memory operation ( |
18) |
|
||
Playing Movies |
|
|
Time code/Playback time |
|
|||
|
|
(hours : minutes : seconds) |
|
||||
(During Playback) |
|
|
|
||||
|
|
Remaining recording time |
|
||||
|
|
|
|
||||
|
|
|
On the memory card |
|
|||
|
|
|
Y |
||||
|
|
|
/ |
|
In the built-in memory |
||
|
|
|
Remaining battery time ( |
18) |
|||
|
|
|
Image stabilizer ( |
76) |
|
||
|
|
P |
|
76) |
|
||
|
O |
Wind screen off ( |
|
||||
|
Backlight correction ( |
45) |
|
||||
|
Mini video light ( |
44) |
|
||||
|
Level marker ( |
|
79) |
|
|
||
C |
|
|
|
|
|||
|
Audio level indicator ( |
79) |
|||||
|
Scene number |
|
|
|
|
||
|
Data code ( |
79) |
|
|
|||
|
|
|
|
|
|||
16
|
|
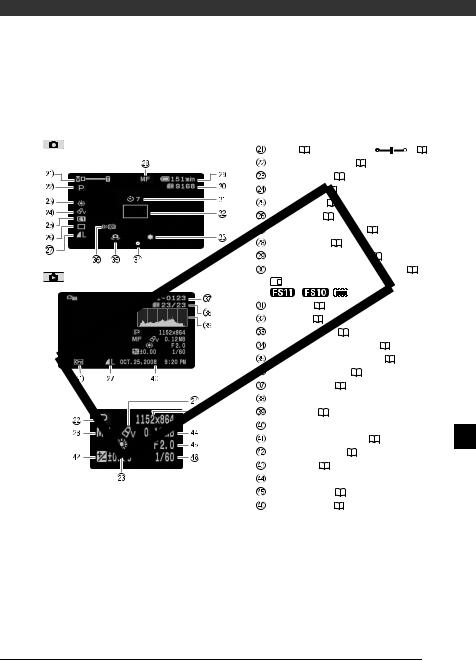
Zoom ( |
33), Exposure |
|
( |
45) |
||||
|
|
Recording program ( |
42, 43) |
|
|
|||||
|
|
White balance ( |
47) |
|
|
|
||||
|
|
Image effect ( |
|
48) |
|
|
|
|
||
|
|
Digital effect ( |
|
48) |
|
|
|
|
||
|
|
Drive mode ( |
|
59) |
|
|
|
|
||
|
|
Still image quality/size ( |
54) |
|
|
|||||
|
|
Manual focus ( |
46) |
|
|
|
|
|||
|
|
Remaining battery time ( |
18) |
|
|
|||||
Viewing Still Images |
|
Number of still images available ( |
18) |
|||||||
|
On the memory card |
|
|
|
||||||
|
|
|
|
|
||||||
|
|
/ |
|
|
In the built-in memory |
|||||
|
|
Self timer ( |
|
45) |
|
|
|
|
||
|
|
Y |
|
|
|
|||||
|
|
AF frame ( |
|
77) |
|
|
|
|
||
|
|
Mini video light ( |
44) |
|
|
|
||||
|
|
Focus and exposure lock ( |
54) |
|
||||||
|
P |
|
|
|
|
77) |
|
|||
O |
Camcorder shake warning ( |
|
||||||||
Remote sensor off ( |
80) |
|
|
|
||||||
Image number ( |
18, 81) |
|
|
|
||||||
Current image / Total number of images |
||||||||||
C |
|
|||||||||
|
Histogram ( |
60) |
|
|
|
|
||||
|
Date and time of recording |
|
|
|
||||||
|
Image protection mark ( |
60) |
|
|
||||||
|
|
|
|
|||||||
|
|
Manual exposure ( |
45) |
|
|
|
||||
|
|
Image size ( |
54) |
|
|
|
|
|||
|
|
File size |
|
|
|
|
|
|
|
|
|
|
Aperture value ( |
43) |
|
|
|
||||
|
|
Shutter speed ( |
43) |
|
|
|
|
|||
17
Introduction
|
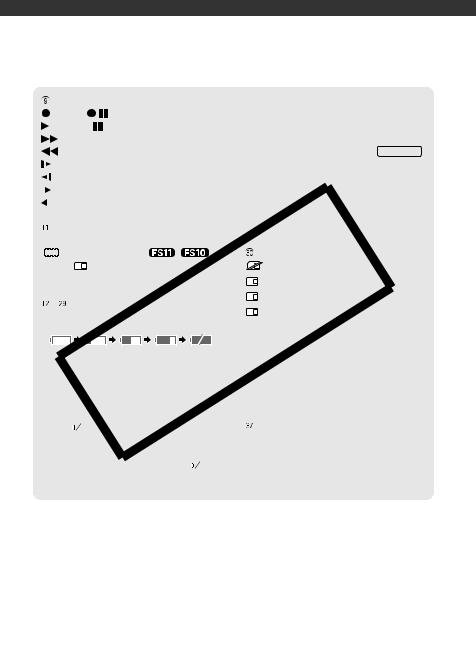
Memory operation |
|
|
|
|
|
|
• Depending on the conditions under which the |
|||||
|
Record, |
|
Record pause, |
|
|
|
|
camcorder and the battery pack are used, the |
|||||
|
Playback, |
Playback pause, |
|
|
|
|
actual battery charge may not be indicated |
||||||
|
Fast playback, |
|
|
|
|
|
|
accurately. |
|||||
|
Fast reverse playback, |
|
|
|
|
|
|
• When the camcorder is off, press BATT.INFO |
|||||
|
Slow playback, |
|
|
|
|
|
|
to display the charge status of a battery pack. |
|||||
|
Slow reverse playback, |
|
|
|
|
|
|
The Intelligent System will display the charge |
|||||
|
Frame advance, |
|
|
|
|
|
|
status (as a percentage) and the remaining |
|||||
|
|
|
|
|
|
|
|||||||
|
Frame reverse |
|
|
|
|
|
|
recording time (in minutes) for 5 seconds. If the |
|||||
|
|
|
|
|
|
|
|||||||
|
|
|
|
|
|
|
|
|
|
|
|
battery pack is exhausted, the battery |
|
|
Remaining recording time |
|
|
|
|
|
|
information may not be displayed. |
|||||
When there is no more free space on the memory, |
|
|
|||||||||||
[ |
END] (built-in memory, |
/ |
|
|
|
|
|
|
Number of still images available |
||||
|
|
|
|
|
|||||||||
only) or [ |
END] (memory card) will be |
|
|
|
|
|
in red: No card |
||||||
displayed and the recording will stop. |
|
|
|
|
|
in green: 6 or more images |
|||||||
, |
Remaining battery time |
|
|
|
|
|
in yellow: 1 to 5 images |
||||||
|
|
|
|
|
in red: No more images can be recorded |
||||||||
|
|
|
|
|
|
|
|
|
|
|
|
|
|
|
|
|
|
|
|
|
|
|
|
|
|
|
Y |
|
100% |
|
|
75% |
50% |
25% |
|
0% |
|
• When viewing the still images, the display will |
|||
|
|
|
|
|
|
|
|
|
|
|
|
always be in green. |
|
|
|
|
|
|
|
|
|
|
|
|
|
• Depending on the recording conditions, the |
|
|
|
|
|
|
|
|
|
|
|
|
|
||
|
|
|
|
|
|
|
|
P |
|||||
• The icon shows a rough estimate of the |
|
|
|
|
number of available still images displayed may |
||||||||
|
remaining charge as a percentage of the full |
not decrease even after a recording has been |
|||||||||||
|
charge of the battery pack. The remaining |
made, or may decrease by 2 still images at |
|||||||||||
|
|
|
|
|
O |
|
|||||||
|
recording/playback time of the battery pack is |
once. |
|||||||||||
|
displayed, in minutes, next to the icon. |
|
|
|
|
|
|
||||||
• When |
|
|
is displayed in red, replace the |
|
Image number |
||||||||
|
|
|
|
C |
|
|
|
|
The image number indicates the name and |
||||
|
battery pack with a fully charged one. |
|
|
|
|
||||||||
• When you attach an empty battery pack, the |
location of the file on the memory card. For |
||||||||||||
|
power may turn off without displaying |
|
|
|
. |
|
example, the file name of image 101-0107 is |
||||||
|
|
|
|
|
|
|
|
|
|
|
|
“IMG_0107.JPG”, stored under the folder |
|
|
|
|
|
|
|
|
|
|
|
|
|
“DCIM\101CANON”. |
|
18
Preparations
This chapter describes basic operations, such as navigating the menus, and first time settings to help you learn more about your camcorder.
3 Close the cover and slide it toward the lens until you hear a click.
CHG (charge)
indicator
DC IN terminal
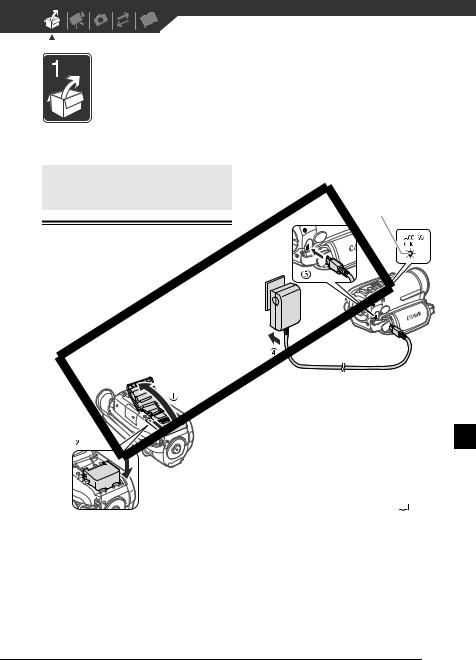
Charging the Battery Pack
The camcorder can be powered with a |
Y |
|||
battery pack or directly using the |
|
|||
compact power adapter. Charge the |
||||
battery pack before use. |
|
|||
For approximate charging times and |
||||
|
||||
recording/playback times with a full |
|
|||
battery pack, refer to the tables on |
|
|||
pages 99-100. |
|
P |
||
O |
|
|||
|
|
|||
C |
|
|
||
1Slide the battery compartment cover away from the lens and open it.
2Insert the battery pack all the way into the compartment and press gently until it clicks.
•The CHG (charge) indicator starts flashing. The indicator will stay on when the charging is completed.
•If the indicator flashes quickly, refer to Troubleshooting ( 82).
82).
 ONCE THE BATTERY PACK IS FULLY CHARGED
1Disconnect the compact power adapter from the camcorder.
2Unplug the power cord from the power outlet.
19
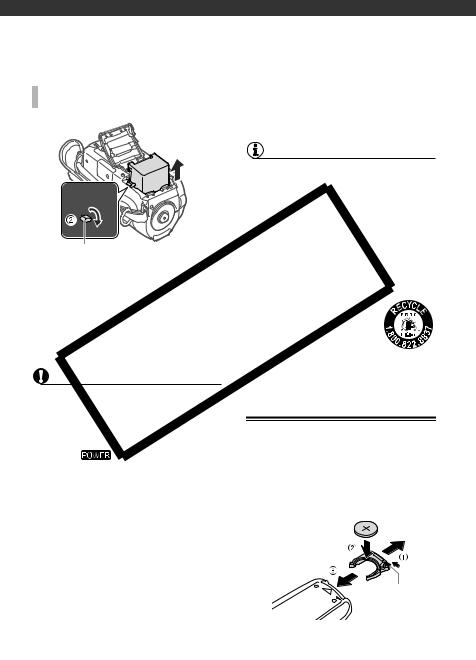
TO REMOVE THE BATTERY PACK |
|
|
voltage converters for overseas travels |
|
|
|
or special power sources such as those |
||
|
|
|
|
|
|
|
|
|
on aircraft and ships, DC-AC inverters, |
|
|
|
|
etc. |
|
|
|
|
NOTES |
|
|
|
• If remaining battery time is an issue, you |
|
|
|
|
|
can power the camcorder using the |
|
|
|
|
compact power adapter so the battery |
|
|
|
|
pack will not be consumed. |
|
|
|
• Charged battery packs continue to |
|
|
|
|
|
discharge naturally. Therefore, charge |
Battery release latch |
|
|
them on the day of use, or the day |
|
|
|
before, to ensure a full charge. |
||
|
|
|
|
|
1 Slide the battery compartment |
• We recommend that you prepare battery |
|||
cover away from the lens and |
|
|
packs to last 2 to 3 times longer than |
|
open it. |
|
|
|
you think you might need. |
|
|
|
• U.S.A. and Canada only: The |
|
2 Press the battery release latch and |
|
LithiumYion/polymer battery |
||
pull out the battery pack. |
|
|
that powers the product is |
|
3 Close the cover and slide it toward |
|
|||
|
recyclable. lease call |
|||
the lens until you hear a click. |
|
|
1-800-8-BATTERY for |
|
|
|
P |
||
|
O |
information on how to recycle |
||
IMPORTANT |
this battery. |
|||
|
|
|||
• Turn off the camcorder before |
|
|
|
|
connecting or disconnecting the |
|
|
|
|
compact power adapter. After turning |
Preparing the Wireless Controller and |
|||
off the camcorder, important data is |
||||
C |
|
Accessories |
||
updated in the memory. Be sure to wait |
||||
until the |
indicator turns off. |
|
|
|
• We recommend charging the battery pack in temperatures between 10 °C and 30 °C (50 °F and 86 °F). Outside the temperature range of 0 °C to 40 °C
(32 °F to 104 °F), the charging will not start.
•Do not connect to the camcorder’s DC IN terminal or to the compact power adapter any electrical equipment that is not expressly recommended for use
with this camcorder.
•To prevent equipment breakdowns and excessive heating, do not connect the supplied compact power adapter to
20
1 |
Press the tab in the direction of |
Accessories |
|
the arrow and pull out the battery |
|
|
holder. |
|
2 |
Place the lithium button battery |
|
|
with the + side facing up. |
|
3 |
Insert the battery holder. |
|
 TO USE THE WIRELESS CONTROLLER
|
|
Fasten the grip belt. |
|
|
P |
||
|
|
• Adjust the grip belt so that you can |
|
|
|
reach the zoom lever with your index |
|
O |
finger, and the Start/Stop button with |
||
Yyour thumb. |
|||
|
|
||
|
|
• You can remove the grip belt and |
|
|
|
replace it with the supplied wrist |
|
C |
|
strap. |
|
|
|
||
Point the wireless controller at the camcorder’s remote sensor when you press the buttons.
You can rotate the L D panel 180 degrees to use the wireless controller from the front of the camcorder.
 NOTES
NOTES
• The wireless controller may not work properly when the remote sensor is situated under strong light sources or direct sunlight.
• If the wireless controller does not work, check that [WL.REMOTE] is not set to [ OFF
OFF
 ] (
] ( 80). Otherwise, replace the battery.
21
Preparations
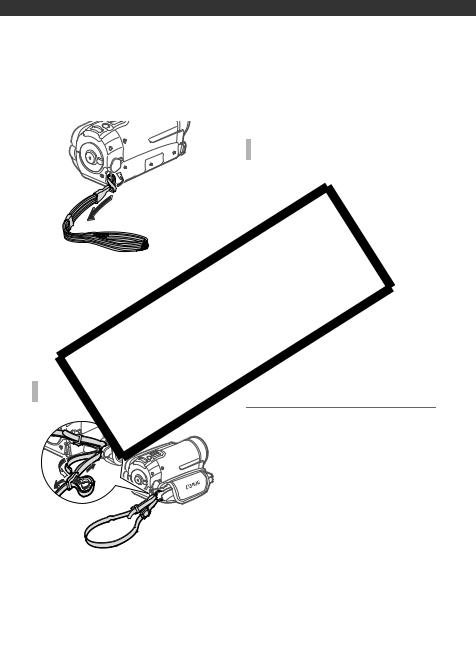
 TO ATTACH A WRIST STRAP
You can also remove the grip belt and attach the shoulder strap directly to the rear bracket on the camcorder.
TO REATTACH THE GRIP BELT
1Pass the end of the strap through the rear bracket on the camcorder.
|
|
|
2 Thread the strap through the |
|
|
|
|
padded handgrip and then pass it |
|
|
|
|
through the front bracket on the |
|
|
|
|
camcorder. |
|
Pass the attaching end of the wrist |
3 Fasten the grip belt as necessary, |
|||
strap through the back bracket on |
attach the strap to the Velcro pad |
|||
the camcorder, thread the wrist strap |
on the handgrip and close the flap. |
|||
through the loop and fasten. |
|
Y |
||
You can also attach the wrist strap to |
||||
|
||||
the strap mount on the grip belt to use |
|
|||
both for extra convenience and |
|
Adjusting the osition and Brightness |
||
|
|
|
||
protection. |
|
P |
||
|
|
of the LCD Screen |
||
|
|
|
||
TO ATTA H A SHOULDER STRAP |
|
|
||
|
O |
|||
C |
|
Rotating the LCD Panel |
||
|
Open the LCD panel 90 degrees. |
|||
|
• You can rotate the panel 90 degrees |
|||
|
downward. |
|||
|
|
|
||
|
|
|
• You can rotate the panel 180 degrees |
|
|
|
|
toward the lens. Rotating the LCD |
|
|
|
|
panel 180 degrees can be useful in |
|
|
|
|
the following cases: |
|
|
|
|
- When you wish to include yourself in |
|
|
|
|
the picture when recording with the |
|
|
|
|
self timer. |
|
Pass the ends of the shoulder strap through the strap mount on the grip belt and adjust the length of the strap.
22
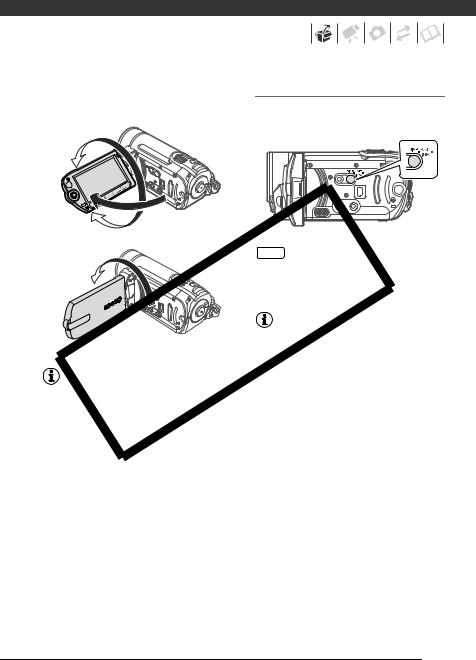
-To allow the camcorder to be operated with the wireless controller from the front.
180°
90°
LCD Backlight
You can set the brightness of the screen to normal or bright.
|
Y |
|
While the camcorder is on, hold |
|
DISP. pressed down for more than |
180° |
2 seconds. |
Repeat this action to toggle between the normal and bright settings.
|
O |
NOTES |
|
|
|
||
Subject can monitor the LCD screen |
• This setting does not affect the |
||
|
|||
|
Pbrightness of the recording. |
||
C |
• Using the bright setting will shorten the |
||
|
|
||
NOTES |
|
effective usage time of the battery pack. |
|
About the L |
D screen: The screen is |
• When the compact power adapter is |
|
connected while the brightness of the |
|||
|
|
||
produced using extremely high-precision |
screen is normal, the brightness will |
|
manufacturing techniques, with more than |
|
|
automatically change to bright. |
|
|
99.99% of the pixels operating to |
|
|
|
|
|
specification. Less than 0.01% of the |
|
|
pixels may occasionally misfire or appear |
|
|
as black, red, blue or green dots. This has |
|
|
no effect on the recorded image and does |
|
|
not constitute a malfunction. |
|
|
23
Preparations
Basic Operation of the
Camcorder
Operating Modes
camcorder settings, and flexible recording mode, which lets you change the camcorder's settings to your preference.
The camcorder's operating mode is |
|
|
|
|
|
||||
determined by the position of the mode |
|
|
|
|
|
||||
dial. In this manual, |
|
indicates that |
|
|
|
|
|
||
a function is available in the operating |
Y |
|
|||||||
mode shown and |
|
indicates that |
|
||||||
|
|
|
|
|
|
||||
the function is not available. When no |
|
|
|
|
|
||||
operating mode icons are given, the |
|
|
|
|
|
||||
|
|
|
|
P |
|
|
|
||
function is available in all operating |
|
|
|
|
|
||||
modes. See the following table for a |
|
|
|
|
|
||||
summary of the operating modes. |
|
ress the |
|
button to enter the |
|
||||
|
|
|
|
|
mode (the button's blue light will |
||||
|
|
|
|
|
be on). You do not need to worry about |
||||
|
|
|
|
|
any settings and can shoot video using |
||||
The |
C |
|
just the zoom lever ( |
34) and |
|
||||
|
|
|
|
|
|
||||
Button: |
|
Mode or |
|
Start/Stop ( |
32) or take photos using |
||||
Flexible Recording |
|
|
|
||||||
|
|
|
just the zoom lever and |
PHOTO ( 54). |
|||||
|
|
OYou can also use the Quick Start |
|
||||||
The camcorder offers two basic modes |
function ( 35). Press the |
|
|||||||
button again to return to the flexible |
|
||||||||
for recording video or still images: |
|
|
|||||||
|
recording mode (the button's light is |
|
|||||||
|
mode for beginners or if you just |
|
|||||||
|
off). You can access the menus and |
|
|||||||
prefer not to bother with detailed |
|
|
|||||||
|
|
|
|
|
|
||||
Operating mode Mode dial |
Icon display |
Operation |
|
|
|||||
|
|
|
* / |
|
Recording movies in the built-in memory* / |
32 |
|||
|
|
|
(green) |
|
on the memory card |
|
|
|
|
|
|
|
|
|
|
|
|
||
|
|
|
* / |
|
Recording still images in the built-in memory* / |
54 |
|||
|
|
|
(blue) |
|
on the memory card |
|
|
|
|
|
|
|
|
|
|
|
|
||
|
|
|
* / |
|
Playing movies from the built-in memory* / |
36 |
|||
|
|
|
(green) |
|
memory card |
|
|
|
|
|
|
|
|
|
|
|
|
||
|
|
|
* / |
|
Viewing still images from the built-in memory* / |
56 |
|||
|
|
|
(blue) |
|
memory card |
|
|
|
|
|
|
|
|
|
|
|
|
||
*  /
/ only.
only.
24
|
|
|
|
|
|
|
|
|
|
|
|
|
|
|
|
|
|
|
|
|
|
|
|
|
|
|
|
|
|
|
|
|
|
|
|
|
|
|
|
|
|
|
|
|
|
|
|
|
|
|
|
|
|
|
change settings to your preference. |
The joystick can also be used in |
|||||||||||||||
|
Even in flexible recording mode, the |
combination with the joystick guide to |
|||||||||||||||
|
camcorder can help you with the |
|
operate additional functions. Press |
||||||||||||||
|
settings. For example, you can use the |
to display/hide the joystick guide. |
|||||||||||||||
|
Special Scene recording programs |
The functions that appear on the |
|||||||||||||||
|
( |
|
42) to set at once all the optimal |
joystick guide will change depending |
|||||||||||||
|
|
||||||||||||||||
|
|
||||||||||||||||
|
settings to match special recording |
on the operating mode. In the |
|||||||||||||||
|
conditions. |
|
|
illustrations of this manual, positions |
|||||||||||||
|
|
|
|
|
|
|
other than those relevant to the function |
||||||||||
|
|
|
|
NOTES |
|
|
explained are marked with a striped |
||||||||||
|
|
|
|
|
|
|
pattern. |
||||||||||
|
In |
|
mode you cannot access the |
||||||||||||||
|
|
Depending on the operating mode, |
|||||||||||||||
|
menus but you can change the following |
||||||||||||||||
|
settings in advance, before setting the |
these positions may be empty or show a |
|||||||||||||||
|
different icon than the one on the |
||||||||||||||||
|
camcorder to |
mode. |
|
||||||||||||||
|
|
illustration. |
|
|
|
|
|
|
|
|
|
||||||
|
- Recording mode of movies |
|
|
|
|
|
|||||||||||
|
|
|
|
|
|
|
|
|
|
|
|
|
|||||
|
|
|
|
|
|
|
|
|
|
|
|
|
|||||
|
- Size/quality of still images |
|
|
|
|
|
|
|
|
|
|
|
|
||||
|
|
|
|
|
|
|
|
|
|
|
|
|
|||||
|
|
|
|
|
|
|
|
|
|
|
|
|
|||||
|
- Widescreen |
|
|
|
|
|
|
|
|
|
|
|
|
|
|||
|
|
|
Y |
|
|
|
|
||||||||||
|
- Auto slow shutter |
|
|
|
|
|
|
||||||||||
|
|
|
|
|
|
|
|
||||||||||
|
- All settings in the [ |
SYSTEM SETU ] |
|
|
NEXT |
|
|
||||||||||
|
|
menu |
|
|
|
|
|
|
|
|
|
|
|
|
|
||
|
|
|
|
|
|
|
When the guide contains multiple |
||||||||||
|
|
|
|
|
|
P“pages”, [NEXT] and the page number |
|||||||||||
|
|
|
|
|
|
|
icon ( ) will appear at the bottom |
||||||||||
|
|
|
|
|
|
|
position. Push the joystick ( ) toward |
||||||||||
|
|
|
|
|
|
|
|||||||||||
|
Joystick and Joystick Guide |
|
[NEXT] to display the next “page” of the |
||||||||||||||
|
|
|
|
|
|
|
|
|
|
|
|
|
|||||
|
|
|
|
|
Oguide. |
||||||||||||
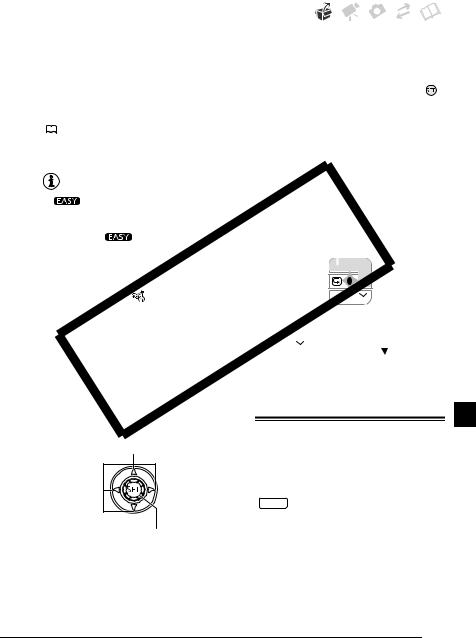
Use theCjoystick to operate the camcorder's menus.
Push the joystick up, down, left or right ( ,
,  ) to select an item or change settings.
Press the joystick itself (  ) to save the settings or confirm an action. On menu screens, this is indicated by the icon
(  ).
).
Using the Menus
Many of the camcorder’s functions can be adjusted from the menus that open after pressing the FUNC. button
( FUNC. ). To access the menus, set the camcorder to flexible recording mode. In  mode, except for a few exceptions, most menu settings will return to their default values (
 24). For details about the available menu options and settings, refer to the appendix Menu Options Lists (
  75).
75).
25
Preparations
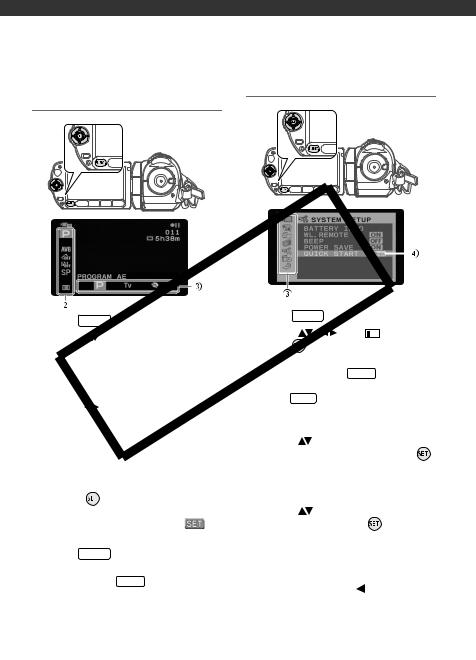
Selecting a FUNC. Menu Option in |
Selecting an Option from the Setup Menus |
Recording Mode |
|
1 Press FUNC. . |
|
1 |
Yress FUNC. . |
|
|
|
|||||||
|
|
|
|||||||||||
|
2 Select ( |
, |
) the |
|
|
|
icon and |
|
|||||
2 Select ( |
) the icon of the |
|
|
|
|
||||||||
|
|
|
|
||||||||||
|
|
|
|
||||||||||
|
|
|
|
||||||||||
|
press |
to open the setup |
|
||||||||||
|
|
|
|
|
|||||||||
function you want to change fromP |
|
|
|
|
|
|
|
||||||
the left side column. |
|
menus. |
|
|
|
|
|
|
|
|
|||
|
You can also hold FUNC. pressed |
|
|||||||||||
Menu items not available will appear |
|
|
|||||||||||
|
down for more than 1 second or |
|
|||||||||||
grayed out. |
|
O |
|
||||||||||
|
press MENU |
on the wireless |
|
||||||||||
3 Select ( |
|
|
|||||||||||
) the desired setting |
|
|
|||||||||||
|
controller to open directly the setup |
|
|||||||||||
from the available options at the |
|
menus screen. |
|
|
|
|
|
|
|||||
bottom bar. |
|
|
|
|
|
|
|
|
|||||
|
|
|
|
|
|
|
|
|
|
|
|||
C |
3 Select ( |
) the desired menu from |
|||||||||||
• The selected option will be |
|||||||||||||
|
the left side column and press |
. |
|||||||||||
highlighted in orange. |
|
||||||||||||
|
The title of the selected menu |
|
|||||||||||
• With some settings you will need |
|
|
|||||||||||
|
appears on top of the screen and |
|
|||||||||||
to make further selections and/or |
|
|
|||||||||||
|
under it the list of settings. |
|
|||||||||||
press |
. Follow the additional |
|
|
||||||||||
4 Select ( |
|
|
|
|
|
|
|
|
|||||
operation guides that will appear |
) the setting you want |
|
|||||||||||
on the screen (such as the |
|
to change and press |
. |
|
|
||||||||
icon, small arrows, etc.). |
|
• The orange selection bar indicates |
|||||||||||
4 Press FUNC. to save the settings |
|
the menu setting currently |
|
||||||||||
and close the menu. |
|
selected. Items not available |
|
||||||||||
You can press FUNC. to close the |
|
appear in black. |
|
|
|
|
|
|
|||||
|
• Push the joystick ( |
) to return to |
|
||||||||||
menu at any time. |
|
|
|
||||||||||
|
|
|
|
|
|
|
|
|
|
|
|||
the menu selection screen (step 3).
26

|
|
|
|
|
|
|
|
|
|
|
|
|
|
|
|
|
|
|
|
|
|
|
5 Select ( |
) the desired option and |
|
|
|
|
|
|
|
|
|
|
|
||||||||
|
|
|
|
|
|
|
|
|
|
|
|
||||||||||
|
|
|
|
|
|
|
|
|
|
|
|
||||||||||
|
First Time Settings |
|
|
|
|||||||||||||||||
|
press |
to save the setting. |
|
|
|
||||||||||||||||
|
6 Press FUNC. . |
|
|
|
|
|
|
|
|
|
|
|
|
|
|||||||
|
You can press FUNC. to close the |
|
|
|
|
|
|
|
|
|
|
|
|||||||||
|
|
|
|
|
|
|
|
|
|
|
|
||||||||||
|
menu at any time. |
|
|
|
|
|
|
|
|
|
|
|
|||||||||
|
|
|
|
|
|
|
|
|
|
|
|
||||||||||
|
Setting the Date and Time |
|
|
|
|||||||||||||||||
|
|
|
|
|
|
|
|
|
|
|
|
|
|
||||||||
|
Abbreviation of Menu Selections in this |
|
|
|
|
|
|
|
|
|
|
|
|||||||||
|
Manual |
|
|
|
|
|
|
You will need to set the date and time of |
|||||||||||||
|
|
|
|
|
|
|
|
|
|
|
|||||||||||
|
In this manual, the |
arrow is used to |
|||||||||||||||||||
|
the camcorder before you can start |
|
|
|
|||||||||||||||||
|
abbreviate menu selections. Below is |
using it. The [DATE/TIME] screen will |
|||||||||||||||||||
|
an example of changing a setting using |
appear automatically when the |
|
|
|
||||||||||||||||
|
the setup menus. |
|
|
camcorder’s clock is not set. |
|
|
|
||||||||||||||
|
FUNC. |
|
|
|
|
|
|
Y |
|
|
|
||||||||||
[ |
|
|
|
MENU] |
|
|
|
|
|
||||||||||||
|
|
|
|
|
|
|
|||||||||||||||
|
|
|
|
|
|
|
|||||||||||||||
[ |
|
|
|
DISPLAY SETUP] |
|
|
|
||||||||||||||
|
|
|
|
|
|
||||||||||||||||
|
[LANGUAGE |
|
|
] |
|
|
|
|
|||||||||||||
|
|
|
|
|
|
||||||||||||||||
|
Desired language |
|
|
|
|||||||||||||||||
|
FUNC. |
|
|
|
|
|
|
|
|
|
|||||||||||
|
|
|
|
|
|
|
|
|
|
|
|
|
|
|
|
|
|
||||
|
For selections in the FUNC. menu, the |
When the [DATE/TIME] screen appears, |
|||||||||||||||||||
|
|
|
|
|
|
|
|
|
|
|
|||||||||||
|
abbreviated form will always showPthe |
|
|
|
|||||||||||||||||
|
initial default value. In recording mode, |
the year will be displayed in orange and |
|||||||||||||||||||
|
its icon will appear on the left side |
indicated with up/down arrows. |
|
|
|
||||||||||||||||
|
column when you first open the menu. |
1 Change ( |
) the year and move |
||||||||||||||||||
|
|
|
|
|
|
|
|
|
O |
|
( ) to the month. |
|
|
|
|||||||
|
If the setting was changed, the icon of |
|
|
|
|
||||||||||||||||
|
the currently selected option will appear |
2 Change the rest of the fields |
|
|
|
||||||||||||||||
|
instead. |
|
|
|
|
|
|
(month, day, hour and minutes) in |
|
||||||||||||
|
|
|
|
|
|
|
|||||||||||||||
|
|
C |
|
|
|||||||||||||||||
|
|
|
the same way. |
|
|
|
|||||||||||||||
|
FUNC. |
|
|
|
|
|
|
|
|
|
|
||||||||||
[ |
|
|
|
IMAGE EFFECT OFF] |
3 Select ( |
) [OK] and press |
to |
||||||||||||||
|
Desired image effect |
|
start the clock and close the setup |
||||||||||||||||||
|
FUNC. |
|
|
|
|
|
|
|
|||||||||||||
|
|
|
|
|
|
|
|
screen. |
|
|
|
|
|
|
|
|
|||||
|
|
|
|
|
|
|
|
|
|
|
|
|
|
|
|
|
|
|
|
|
|
27
Preparations
•The date appears in a year-month-day format only in the first setup screen. In subsequent screen displays the date and time will appear as month-day-year (for example, [JAN. 1, 2008 12:00 AM]). You can change the date format ( 81).
81).
•You can also change the date and time later on (not during the initial setup). To open the [DATE/TIME] screen:
FUNC.  [
[ MENU]
MENU] 
[ DATE/TIME SETUP]
  [DATE/TIME]
 NOTES
NOTES
•If you changed the language by mistake,
follow the  mark next to the menu item to change the setting.
•The displays  and
and  that appear in some menu screens refer to the name of buttons on the camcorder and will not change, regardless of the language selected.
|
|
|
|
|
|
|
|
Changing the Time Zone |
||
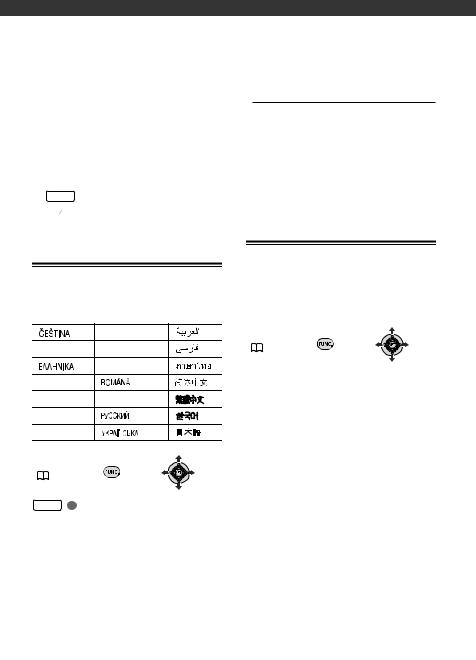
Changing the Language |
|
P |
||||||||
|
|
|
|
|
||||||
|
|
|
|
|
|
|
|
Change the time zone to match your |
||
Options |
|
|
|
|
|
|
location. The default setting is New |
|||
|
|
|
|
Default value |
York.Y |
|||||
[ |
] |
|
|
|
O |
|
|
|||
[MAGYAR] |
[ |
] |
FUNC. |
|||||||
[DEUTSCH] |
[MELAYU] |
[ |
] |
( |
|
26) |
||||
[ |
] |
[POLSKI] |
|
|
[ |
] |
|
|
|
|
[ENGLISH] |
[ |
|
] |
[ |
] |
|
TO SET THE HOME TIME ZONE |
|||
[ESPAÑOL] |
[TÜRKÇE] |
|
[ |
] |
FUNC. |
|||||
[FRANÇAIS] |
[ |
|
] |
|
[ |
] |
||||
|
|
|
[ |
MENU] |
||||||
[ITALIANO] |
[ |
|
|
] |
[ |
] |
|
|||
|
|
|
[ |
DATE/TIME SETUP] |
||||||
|
C |
|
|
|||||||
|
|
|
|
|
|
|
|
|
[T.ZONE/DST] |
|
FUNC. |
|
|
|
|
|
|
|
Your local time zone* |
||
( |
26) |
|
|
|
|
|
|
FUNC. |
||
FUNC. |
|
|
|
|
|
|
|
WHEN YOU TRAVEL |
||
[ |
MENU] |
|
|
|
|
|
|
|
|
|
[ |
DISPLAY SETUP] |
|
|
FUNC. |
||||||
[LANGUAGE |
] |
|
|
|
|
|
[ |
MENU] |
||
Desired language |
|
|
|
|
|
|||||
|
|
|
|
|
[ |
DATE/TIME SETUP] |
||||
FUNC. |
|
|
|
|
|
|
|
|||
|
|
|
|
|
|
|
[T.ZONE/DST] |
|||
|
|
|
|
|
|
|
|
|
||
|
|
|
|
|
|
|
|
|
Local time at your destination* |
|
|
|
|
|
|
|
|
|
FUNC. |
||
|
|
|
|
|
|
|
|
* To adjust for daylight saving time, select the |
||
|
|
|
|
|
|
|
|
|
area name marked with a . |
|
28
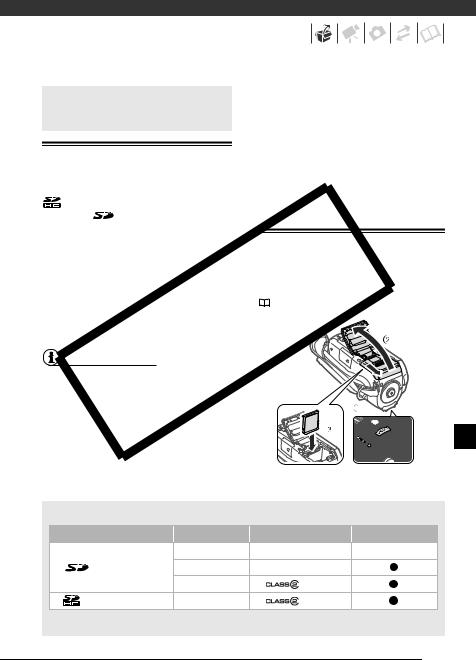
Using a Memory Card |
|
|
camcorder) are backward compatible |
||
|
|
and support regular SD memory cards. |
|||
|
|
|
|
• About the SD Speed Class: The SD Speed |
|
|
|
|
|
Class is a standard that indicates the |
|
|
|
|
|
minimum guaranteed data transfer |
|
Recommended Memory Cards |
|
speed of SD/SDHC memory cards. |
|||
|
When you buy a new memory card, look |
||||
|
|
|
|
||
|
|
|
|
for the Speed Class logo on the |
|
You can use commercially available |
package. |
|
|||
|
|
||||
SDHC (SD high capacity) memory |
|
|
|||
cards and |
SD memory cards with |
|
|
||
this camcorder to record movies and |
|
|
|||
still images. However, depending on the |
Inserting and Removing a Memory Card |
||||
memory card, you may not be able to |
|
|
|||
record movies on it. Refer to the |
|
Make sure to initialize all memory cards |
|||
following table. |
|
|
|||
As of January 2008, the movie |
|
before using them with this camcorder |
|||
recording function has been tested |
( 30). |
|
|||
using SD/SDHC memory cards made |
Y |
||||
|
|
||||
by Panasonic, SanDisk and Toshiba. |
|
|
|||
NOTES |
|
|
P |
|
|
|
|
|
|
|
|
• About SDHC Memory ards: SDHC is the |
|
|
|||
new type of SD memoryOcard with |
|
|
|||
capacities over 2 GB. Please note that |
|
|
|||
the specifications of |
memory |
|
|
||
cards are different from those of regular |
|
|
|||
SDHC |
|
|
|
||
SD memory cards and you will not be |
|
|
|||
able to use memory cards of over 2 GB |
|
|
|||
with devices that do not support SDHC. |
1 Turn off the camcorder. |
||||
However, SDHC devices (including this |
|||||
Memory cards usable for recording movies |
|
|
|||
Memory card |
|
Capacity |
SD Speed Class |
Recording movies |
|
|
|
64 MB or less |
– |
– |
|
|
SD memory cards |
128 MB to 2 GB |
– |
* |
|
|
|
512 MB to 2 GB |
or higher |
|
|
SDHC memory cards |
4 GB to 32 GB |
or higher |
|
||
* Depending on the card, it may not be possible to record movies.
29
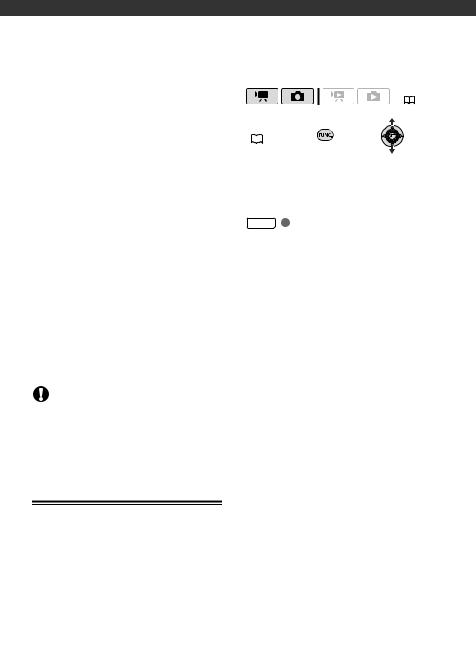
2 Slide the memory card slot cover |
( 24) |
away from the lens and open it. |
3 Insert the memory card straight, |
FUNC. |
|
with the label facing away from the |
||
lens, all the way into the memory |
( |
26) |
|
|
|
card slot until it clicks. |
|
|
4 |
Close the cover and slide it toward |
|
|
|
TO CHANGE THE MEDIA FOR RECORDING |
|
||||
|
|
the lens until you hear a click. |
|
|
|
|
||||
|
|
Do not force the cover closed if the |
|
|
|
MOVIES |
|
|||
|
|
|
|
|
|
|
|
|
||
|
|
memory card is not correctly |
|
FUNC. |
|
|
||||
|
|
inserted. |
|
|
|
|
||||
|
|
|
|
|
|
|
[ |
|
MENU] |
|
|
|
|
|
|
|
|
|
|
||
|
|
|
|
|
|
|
|
|
||
|
|
|
|
|
|
|
|
|
||
|
|
TO REMOVE THE MEMORY CARD |
|
|
|
[ |
|
OPER.] |
|
|
|
|
|
|
|
[MEDIA: MOVIES]* |
|
||||
|
|
|
|
|
|
|
|
|||
|
|
|
|
|
|
|
The memory you want to use** |
|
||
1 |
Slide the memory card slot cover |
|
|
|
|
|||||
|
|
|
ress |
|
||||||
|
|
away from the lens and open it. |
|
FUNC. |
|
|
||||
2 |
Push the memory card once to |
|
* Select [MEDIA: IMAGES] to change the |
|
||||||
|
|
release it. When the memory card |
|
|
|
MEMORY |
|
|||
|
|
|
|
|
media to be used for recording still images. |
|||||
|
|
springs out, pull it all the way out. |
|
** For each media, you can check the total, |
|
|||||
|
|
|
|
|
|
|
used, and available space. The available |
|
||
3 |
|
P |
|
|||||||
Close the cover and slide it toward |
|
|
|
space will depend on the recording mode |
|
|||||
|
|
the lens until you hear a click. |
|
|
|
(for movies) or size/quality (for still images). |
||||
|
|
IMPORTANT |
O |
|
|
|
|
|||
|
|
|
|
|
|
|
|
|||
|
|
|
|
|
|
|
||||
Memory cards have front and back sides |
|
Initializing the Built-In Memory ( |
/ |
|||||||
that are not interchangeable. Inserting a |
|
|
|
|
|
only) or Memory Card |
|
|||
|
|
C |
|
|
|
|
|
|
||
memory card facing the wrong direction can cause a malfunction of the camcorder.
 /
/  Selecting the Memory for the Recordings
You can select to record your movies and still images in the built-in memory or on the memory card. The built-in memory is the default media for recording both.
30
Loading...