


|
Starter Guide |
En |
|
Guide de démarrage |
Fr |
|
Handbuch für Starter |
De |
|
Guida all’avvio |
It |
|
Guía de inicio |
Es |
|
Manual Inicial |
Pt |
|
Οδηγός πρώτων βημάτων |
El |
|
Startvejledning |
Da |
|
Beknopte handleiding |
Nl |
|
Startveiledning |
No |
|
Starthandbok |
Sv |
|
Aloitusopas |
Fi |
|
Руководство по началу работы |
Ru |
|
Початок роботи |
Uk |
|
Darba sākšanas rokasgrāmata |
Lv |
|
Pradinė instrukcija |
Lt |
|
Alustusjuhend |
Et |
|
||
|
Przewodnik wprowadzający |
Pl |
|
Základní příručka |
Cs |
|
Úvodná príručka |
Sk |
|
Začetna navodila |
Sl |
|
Upute za početak korištenja |
Hr |
|
Telepítési kézikönyv |
Hu |
|
Ghid de punere rapidă în funcţiune |
Ro |
|
Кратко ръководство |
Bg |
|
Başlangıç Kılavuzu |
Tr |
|
|
Ar |
|
|
Fa |
FT5-4650 (010)

 X 1
X 1
=100 mm
|
904 mm |
|
|
|
672 mm |
|
|
|
|
|
|
|
706 mm |

X 7 |
X 2 |

1

 2
2


2
 1
1

Contents |
|
About the Supplied Manuals...................... |
10 |
Navigating the Menu and Text Input |
|
Method...................................................... |
10 |
Connecting the Power Cord andTurning |
|
ON the Power............................................ |
11 |
Specifying the Initial Settings..................... |
11 |
Specifying Initial Fax Settings and |
|
Connecting a Telephone Cable.................. |
11 |
Setting a Paper Size and Type................... |
12 |
Installing the Driver / Software................... |
12 |
Perform Useful Tasks................................. |
13 |
Clearing Paper Jams................................. |
14 |
Replacing Toner Cartridge......................... |
15 |
Table des matières |
|
A propos des manuels fournis................... |
18 |
Navigation dans le menu et méthode |
|
de saisie du texte....................................... |
18 |
Branchement du cordon d'alimentation |
|
et mise sous tension.................................. |
19 |
Configuration des réglages initiaux............ |
19 |
Configuration des réglages de fax initiaux |
|
et connexion d'un câble téléphonique....... |
19 |
Réglage du format et du type de papier..... |
20 |
Installation du pilote et/ou du logiciel......... |
20 |
Procédures utiles....................................... |
21 |
Résolution des bourrages papier............... |
22 |
Remplacement de la cartouche d'encre.... |
23 |
Inhalt |
|
Informationen zu den mitgelieferten |
|
Anleitungen............................................... |
26 |
Navigieren durch das Menü und |
|
Texteingabemethode................................. |
26 |
Anschließen des Netzkabels und |
|
Einschalten des Geräts über den |
|
Netzschalter.............................................. |
27 |
Festlegen der anfänglichen |
|
Einstellungen............................................. |
27 |
Festlegen der anfänglichen |
|
Faxeinstellungen und Anschließen eines |
|
Telefonkabels............................................ |
27 |
Einstellen von Papierformat |
|
und Papiertyp............................................ |
28 |
Installieren des Treibers/der Software........ |
28 |
Ausführen nützlicher Aufgaben.................. |
29 |
Beseitigen von Papierstaus....................... |
30 |
Austauschen derTonerpatrone.................. |
31 |
Περιεχόμενα |
|
Indhold |
|
Inhoudsopgave |
|
Πληροφορίες για τα παρεχόμενα |
60 |
Om de medfølgende vejledninger.............. |
68 |
Informatie over de meegeleverde |
76 |
εγχειρίδια.................................................. |
Navigation i menuen og |
68 |
handleidingen............................................ |
||
Περιήγηση στο μενού και τη μέθοδο |
60 |
tekstindlæsningsmetode........................... |
Navigeren in het menu en |
76 |
|
εισαγωγής κειμένου.................................. |
Tilslutning af netledningen |
69 |
tekstinvoermethode................................... |
||
Σύνδεση του καλωδίου ρεύματος και |
61 |
og AKTIVERING af maskinen.................... |
Het netsnoer aansluiten en |
77 |
|
ΕΝΕΡΓΟΠΟΙΗΣΗ της ισχύος.................... |
Angivelse af startindstillingerne................. |
69 |
het apparaat INSCHAKELEN.................... |
||
Καθορισμός αρχικών ρυθμίσεων.............. |
61 |
Angivelse af startindstillinger for fax |
69 |
De begininstellingen opgeven................... |
77 |
Καθορισμός των αρχικών ρυθμίσεων του |
61 |
og tilslutning af en telefonledning............... |
De beginfaxinstellingen opgeven en een |
77 |
|
φαξ και σύνδεση καλωδίου τηλεφώνου... |
Indstilling af papirformat og -type............... |
70 |
telefoonkabel aansluiten............................ |
||
Καθορισμός μεγέθους |
62 |
Installation af driveren/softwaren............... |
70 |
Papierformaat en type papier instellen....... |
78 |
και τύπου χαρτιού..................................... |
Udfør nyttige opgaver................................ |
71 |
Het stuurprogramma/de software |
78 |
|
Εγκατάσταση προγράμματος οδήγησης/ |
62 |
Udbedring af papirstop.............................. |
72 |
installeren.................................................. |
|
λογισμικού................................................. |
Udskiftning af tonerpatronen..................... |
73 |
Nuttige taken uitvoeren.............................. |
79 |
|
Εκτέλεση χρήσιμων εργασιών.................. |
63 |
|
|
Papierstoringen verhelpen......................... |
80 |
Αφαίρεση μπλοκαρισμένων χαρτιών........ |
64 |
|
|
Tonercartridge vervangen.......................... |
81 |
Αντικατάσταση κασέτας γραφίτη............. |
65 |
|
|
|
|
Содержание |
|
Сведения о входящих в комплект |
|
руководствах......................................... |
108 |
Поиск в меню и способ ввода |
|
текста..................................................... |
108 |
Подсоединение кабеля питания |
|
и включение аппарата........................... |
109 |
Указание начальных параметров......... |
109 |
Указание начальных параметров |
|
факса и подсоединение телефонного |
|
кабеля.................................................... |
109 |
Установка формата и типа бумаги........ |
110 |
Установка драйвера или |
|
программного обеспечения.................. |
110 |
Использование полезных функций...... |
111 |
Устранение замятия бумаги................. |
112 |
Замена картриджа с тонером............... |
113 |
Зміст |
|
Saturs |
|
|
Посібники з комплекту поставки.......... |
116 |
Par komplektācijā iekļautajām |
124 |
|
Переміщення між пунктами меню |
116 |
rokasgrāmatām....................................... |
||
та спосіб введення тексту..................... |
Naviģēšana izvēlnē un teksta ievades |
124 |
||
Підключення шнура живлення |
117 |
metode.................................................... |
||
та увімкнення живлення....................... |
Strāvas vada pievienošana un iekārtas |
125 |
||
Встановлення початкових |
117 |
IESLĒGŠANA.......................................... |
||
параметрів............................................. |
Sākotnējo iestatījumu norādīšana........... |
125 |
||
Зазначення початкових параметрів |
|
Sākotnējo faksa iestatījumu norādīšana |
125 |
|
факсу та підключення телефонного |
117 |
un tālruņa kabeļa pievienošana............... |
||
кабелю.................................................... |
Papīra formāta un tipa iestatīšana........... |
126 |
||
Установлення формату та типу |
118 |
Draiveru/programmatūras instalēšana..... |
126 |
|
паперу..................................................... |
Noderīgu uzdevumu veikšana................. |
127 |
||
Установлення драйвера |
118 |
Iestrēgušu lapu izņemšana...................... |
128 |
|
та програмного забезпечення.............. |
Tonera kasetnes nomaiņa |
129 |
||
Корисні функції |
119 |
|||
|
|
|||
Усунення зминання паперу................... |
120 |
|
|
|
Заміна картриджа з тонером................ |
121 |
|
|
6

Sommario |
|
Contenido |
|
Índice |
|
Informazioni sui manuali in dotazione........ |
36 |
Acerca de los manuales suministrados..... |
44 |
Acerca dos manuais fornecidos................ |
52 |
Esplorazione del menu e metodo |
36 |
Navegación por el menú y método de |
44 |
Navegar no menu e método |
52 |
d'immissione del testo............................... |
introducción de texto................................. |
de introdução de texto............................... |
|||
Collegamento del cavo di alimentazione |
37 |
Conexión del cable de alimentación |
|
Ligar o cabo de alimentação |
53 |
e accensione............................................. |
y encendido del interruptor |
45 |
e a ALIMENTAÇÃO................................... |
||
Selezione delle impostazioni iniziali........... |
37 |
de alimentación......................................... |
Especificar as definições iniciais............... |
53 |
|
Selezione delle impostazioni iniziali del |
37 |
Especificación de la configuración |
45 |
Especificar as definições iniciais |
53 |
fax e connessione di un cavo telefonico.... |
inicial......................................................... |
de fax e ligar um cabo telefónico............... |
|||
Impostazione del formato e del tipo |
38 |
Especificación de la configuración inicial |
45 |
Definir um tipo e tamanho de papel........... |
54 |
di carta...................................................... |
de fax y conexión del cable del teléfono.... |
Instalar o controlador/software.................. |
54 |
||
Installazione del Driver / Software.............. |
38 |
Ajuste del tamaño y el tipo del papel......... |
46 |
Executar tarefas úteis................................ |
55 |
Attività utili................................................. |
39 |
Instalación del controlador/el software...... |
46 |
Retirar papel encravado............................ |
56 |
Rimozione degli inceppamenti di carta...... |
40 |
Tareas útiles.............................................. |
47 |
Substituir uma cartridge de toner............... |
57 |
Sostituzione della cartuccia del toner........ |
41 |
Eliminación de atascos de papel............... |
48 |
|
|
|
|
Reemplazo del cartucho de tóner.............. |
49 |
|
|
|
|
|
|
|
|
Innhold |
|
Innehåll |
|
Sisällys |
|
Om de medfølgende håndbøkene............. |
84 |
Om de medföljande handböckerna........... |
92 |
Tietoja laitteen mukana toimitettavista |
100 |
Navigere i menyen og |
84 |
Navigering i menyn och |
92 |
oppaista................................................... |
|
tekstinnskrivingsmetode............................ |
textinmatningsmetod................................. |
Valikossa siirtyminen |
100 |
||
Koble til strømledningen og slå |
85 |
Ansluta nätkabeln och slå PÅ strömmen... |
93 |
ja tekstinsyöttötapa.................................. |
|
PÅ maskinen............................................. |
Ange de inledande inställningarna............ |
93 |
Virtajohdon liittäminen ja virran |
101 |
|
Angi oppstartsinnstillingene....................... |
85 |
Ange inledande faxinställningar |
93 |
KYTKEMINEN......................................... |
|
Angi oppstartsinnstillinger for faks |
85 |
och ansluta en telefonsladd....................... |
Perusasetusten määrittäminen................ |
101 |
|
og koble til en telefonkabel........................ |
Ange pappersformat och -typ.................... |
94 |
Perusfaksiasetusten määrittäminen |
101 |
|
Angi papirformat og -type.......................... |
86 |
Installera drivrutinen/programvaran........... |
94 |
ja puhelinjohdon kytkeminen................... |
|
Installere driveren/programvaren............... |
86 |
Använda praktiska funktioner.................... |
95 |
Paperikoon ja -tyypin määrittäminen........ |
102 |
Utføre nyttige oppgaver............................. |
87 |
Ta bort papper som fastnat........................ |
96 |
Ajurin/ohjelmiston asentaminen............... |
102 |
Fjerne fastkjørt papir.................................. |
88 |
Byta tonerpatron........................................ |
97 |
Päätoimintojen käyttäminen.................... |
103 |
Bytte tonerkassett...................................... |
89 |
|
|
Paperitukosten poistaminen.................... |
104 |
|
|
|
|
Väriainekasetin vaihtaminen.................... |
105 |
Turinys |
|
Sisukord |
|
Apie pateikiamas instrukcijas.................. |
132 |
Komplekti kuuluvad juhendid................... |
140 |
Meniu naršymas ir teksto įvesties |
132 |
Menüüs liikumine ja tekstisisestusviis...... |
140 |
būdas...................................................... |
Toitejuhtme ühendamine ja toite |
141 |
|
Maitinimo laido prijungimas ir aparato |
133 |
SISSELÜLITAMINE................................. |
|
ĮJUNGIMAS............................................. |
Algsätete määramine............................... |
141 |
|
Pradinių parametrų nustatymas............... |
133 |
Faksi algsätete määramine |
141 |
Pradinių fakso parametrų nustatymas |
133 |
ja telefonijuhtme ühendamine.................. |
|
ir telefono kabelio prijungimas................. |
Paberiformaadi ja -tüübi määramine........ |
142 |
|
Popieriaus formato ir tipo nustatymas...... |
134 |
Draiveri/tarkvara installimine.................... |
142 |
Tvarkyklės / programinės įrangos |
134 |
Kasulike toimingute tegemine.................. |
143 |
diegimas.................................................. |
Paberiummistuste kõrvaldamine.............. |
144 |
|
Naudingų užduočių vykdymas................. |
135 |
Toonerikasseti vahetamine...................... |
145 |
Įstrigusio popieriaus išėmimas................ |
136 |
|
|
Dažomųjų miltelių kasetės keitimas......... |
137 |
|
|
Spis treści |
|
Informacje o dostarczonych |
|
podręcznikach......................................... |
148 |
Poruszanie się po menu i sposób |
|
wpisywania tekstu.................................... |
148 |
Podłączanie przewodu zasilania |
|
i WŁĄCZANIE urządzenia....................... |
149 |
Konfigurowanie ustawień |
|
początkowych.......................................... |
149 |
Konfigurowanie ustawień początkowych |
|
faksu i podłączanie kabla |
|
telefonicznego......................................... |
149 |
Ustawianie formatu i rodzaju papieru....... |
150 |
Instalowanie |
|
sterownika/oprogramowania.................... |
150 |
Wykonywanie przydatnych zadań............ |
151 |
Usuwanie zaciętego papieru.................... |
152 |
Wymiana zasobnika z tonerem................ |
153 |
7

Obsah |
|
Obsah |
|
Obsah |
|
Dodané příručky...................................... |
156 |
Informácie o dodaných príručkách........... |
164 |
O priloženih navodilih.............................. |
172 |
Navigace v nabídce a metoda |
156 |
Navigácia v ponuke a spôsob |
164 |
Krmarjenje po meniju in način vnosa |
172 |
zadávání textu......................................... |
zadávania textu........................................ |
besedila................................................... |
|||
Připojení napájecího kabelu a ZAPNUTÍ |
157 |
Pripojenie napájacieho kábla |
165 |
Priključitev napajalnega kabla |
173 |
přístroje................................................... |
a ZAPNUTIE zariadenia.......................... |
in VKLOP................................................. |
|||
Zadání počátečního nastavení................. |
157 |
Zadanie počiatočného nastavenia........... |
165 |
Določanje začetnih nastavitev................. |
173 |
Určení počátečního nastavení faxu |
157 |
Zadanie počiatočného nastavenia faxu |
165 |
Določanje začetnih nastavitev faksa in |
173 |
a připojení telefonního kabelu.................. |
a pripojenie telefónneho kábla................. |
priključitev telefonskega kabla................. |
|||
Nastavení velikosti a typu papíru............. |
158 |
Nastavenie formátu a typu papiera.......... |
166 |
Nastavitev velikosti in vrste papirja.......... |
174 |
Instalace ovladače/softwaru.................... |
158 |
Inštalácia ovládača a softvéru................. |
166 |
Namestitev gonilnika/programske |
174 |
Provádění užitečných úkolů..................... |
159 |
Vykonávanie užitočných úloh.................. |
167 |
opreme.................................................... |
|
Odstraňování zachyceného papíru.......... |
160 |
Odstraňovanie zachyteného papiera....... |
168 |
Izvajanje uporabnih opravil...................... |
175 |
Výměna tonerové kazety......................... |
161 |
Výmena kazety s tonerom....................... |
169 |
Odpravljanje zastojev papirja................... |
176 |
|
|
|
|
Zamenjava kartuše s tonerjem................. |
177 |
|
|
|
|
|
|
Съдържание |
|
İçindekiler |
|
|
|
|
Информация за предоставените |
204 |
Makineyle Birlikte Gelen Kılavuzlar |
212 |
220 |
.................... صنلا لاخدإ ةقيرطو ةمئاقلا برع لقنتلا |
|
ръководства........................................... |
Hakkında................................................. |
220 |
...........................................ةقفرلما ةلدلأا لوح |
|||
Придвижване в менюто и метод на |
204 |
Menüde Gezinme ve Metin Giriş |
212 |
221.............................. |
ليغشتلاو ةقاطلا كلس ليصوت |
|
въвеждане на текст............................... |
Yöntemi................................................... |
221...................................... |
ةيلولأا تادادعلإا ديدحت |
|||
Свързване на захранващия кабел |
205 |
Güç Kablosunu Bağlama ve Makineyi |
213 |
221........ |
فتاه لبك ليصوتو ةيلولأا سكافلا تادادعإ ديدحت |
|
и ВКЛЮЧВАНЕ на захранването......... |
AÇIK Konuma Getirme............................ |
222 |
قرولا عونو ساقم طبض |
|||
Указване на първоначалните |
|
Başlangıç Ayarlarını Belirleme |
213 |
|||
|
222 |
جمابرلا/ليغشتلا جمانرب تيبثت |
||||
настройки |
205 |
Başlangıç Faks Ayarlarını Belirleme |
|
|||
|
223 |
ةديفم ماهم ذيفنت |
||||
Указване на първоначалните настройки |
ve Telefon Kablosunu Bağlama |
213 |
||||
224 |
قرولا راشحنا نم صلختلا |
|||||
на факса и свързване на телефонен |
205 |
Kağıt Boyutu ve Türü Ayarlama................ |
214 |
|||
кабел...................................................... |
Sürücü/Yazılım Kurulumu......................... |
214 |
225..................................... |
برحلا ةشوطرخ لادبتسا |
||
Задаване на формата и типа |
206 |
Kullanışlı Görevler Gerçekleştirme........... |
215 |
|
|
|
на хартията............................................ |
Kağıt Sıkışmalarını Giderme |
216 |
|
|
||
Инсталиране на драйвера/софтуера |
206 |
|
|
|||
Toner Kartuşunu Değiştirme |
217 |
|
|
|||
Изпълнение на полезни задачи |
207 |
|
|
|||
|
|
|
|
|||
Отстраняване на заседналата |
208 |
|
|
|
|
|
хартия..................................................... |
|
|
|
|
||
Подмяна на тонер касета...................... |
209 |
|
|
|
|
|
8

Sadržaj |
|
Tartalom |
|
Cuprins |
|
O priloženim priručnicima........................ |
180 |
A mellékelt kézikönyvek........................... |
188 |
Despre manualele furnizate..................... |
196 |
Kretanje po izborniku i način unosa |
180 |
Navigálás a menüben és |
188 |
Navigarea prin meniu şi metoda de |
196 |
teksta....................................................... |
a szövegbeviteli mód megadása............. |
introducere a textului............................... |
|||
Povezivanje kabela za napajanje |
181 |
A tápkábel csatlakoztatása és a készülék |
Conectarea cablului de alimentare şi |
197 |
|
i uključivanje napajanja............................ |
BEKAPCSOLÁSA................................... |
189 |
PORNIREA alimentării............................ |
||
Određivanje početnih postavki................ |
181 |
A kezdeti beállítások megadása.............. |
189 |
Specificarea setărilor iniţiale.................... |
197 |
Određivanje početnih postavki faksa |
181 |
Kezdeti faxbeállítások megadása |
189 |
Specificarea setărilor iniţiale de fax |
197 |
i priključivanje telefonskog kabela............ |
és a telefonkábel csatlakoztatása............ |
şi conectarea unui cablu de telefon......... |
|||
Postavljanje vrste i veličine papira........... |
182 |
A papírméret és a papírtípus beállítása.... |
190 |
Setarea dimensiunii şi a tipului |
198 |
Instalacija upravljačkog programa |
182 |
Az illesztőprogram és a szoftver |
190 |
de hârtie.................................................. |
|
ili softvera................................................ |
telepítése................................................. |
Instalarea driverului/software-ului............ |
198 |
||
Provođenje korisnih zadataka.................. |
183 |
Hasznos feladatok végrehajtása.............. |
191 |
Efectuaţi activităţi utile............................. |
199 |
Otklanjanje zaglavljenog papira............... |
184 |
A papírelakadások megszüntetése.......... |
192 |
Soluţionarea blocajelor de hârtie............. |
200 |
Zamjena spremnika za toner................... |
185 |
A festékkazetta cseréje............................ |
193 |
Înlocuirea cartuşului de toner................... |
201 |
|
|
|
|
|
|
228 |
..................نتم ندرک دراو شور و ونم ندرک رورم |
228................. |
هدش هضرع یامنهار یاه هچترفد هرابرد |
229............ |
هاگتسد ندرک نشور و قرب لباک ندرک لصو |
229........................................ |
هیلوا تامیظنت نییعت |
229........... |
نفلت لباک لاصتا و سکاف هیلوا تامیظنت نییعت |
230.................................... |
ذغاک عون و هزادنا میظنت |
230..................................... |
رازفا مرن/رویارد بصن |
231.......................................... |
دیفم یاهراک ماجنا |
232..................................... |
ذغاک ریگ ندرک فرطرب |
233................................. |
نوت یاه جیرتراک ضیوعت |
9

En |
|
|
|
|
|
About the Supplied Manuals |
Navigating the Menu and Text Input Method |
||
|
|
|
|
|
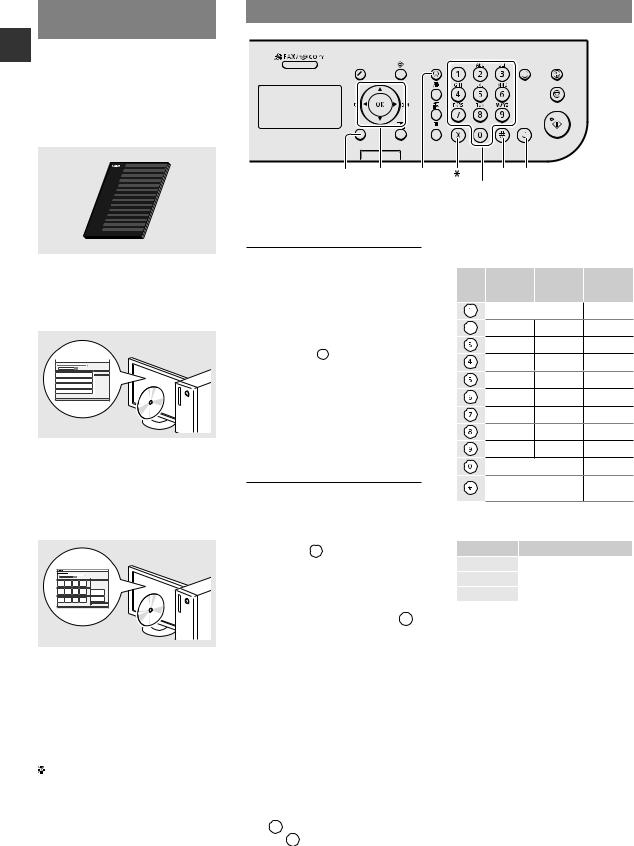
Starter Guide (This manual):
Read this manual first.This manual describes the installation of the machine, the settings, and a caution. Be sure to read this manual before using the machine.
Back |
OK |
Menu |
# C |
|
▲▼ |
|
Numeric keys |
FAX L Driver Installation Guide
(User Software CD-ROM):
Read this manual next.This manual describes software installation.
Navigating the Menu
Item selection or moving the cursor among the menu items
Select an item with [▲] or [▼]. Proceed to the next hierarchy with [OK] or [ ].Return to the previous hierarchy with [  ] (Back) or [ ].

 Setting confirmation
e-Manual
(Multi-lingual User Manual CD):
Read the desired chapter to suit your needs.The e-Manual is categorized by subject to fi nd desired information easily.
Press [OK].However, when <Apply> appears on the display, select <Apply>, and then press [OK].
Text Input Method
Changing entry mode
Press [▼] to select <Entry Mode>, and then press [OK].You can also press [  ] (Tone) to change the entry mode.
Entering text, symbols, and numbers
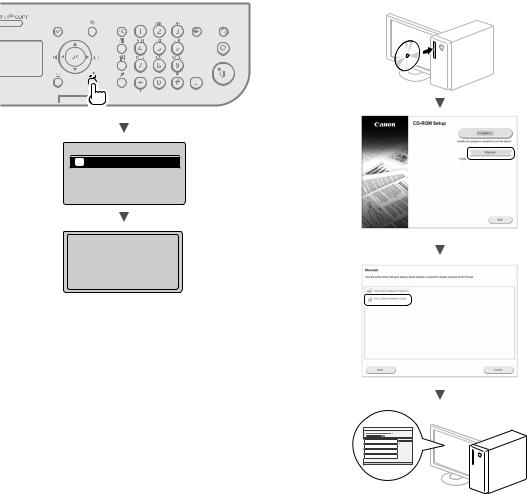
Viewing the e-Manual from the CD-ROM
1Insert the Multi-lingual User Manual CD in your computer.
2 Select your language.
3 Click [Display Manuals].
Depending on the operating system you are using, a security protection message appears.
Enter with the numeric keys or [  ] (SYMBOLS).
For details on the switchable mode or the available text, see the right side of this page.
Moving the cursor (Entering a space)
Move with [ ] or [ ].Move the cursor to the end of the text and press [ ] to enter a space.
Deleting characters
Delete with [  ] (Clear).Pressing and holding [
  ] (Clear) key deletes all characters.
Entering text, symbols, and numbers
|
Entry mode:<aA> |
Entry mode: <12> |
|
@ .- _ / |
1 |
2 |
ABCabc |
2 |
|
||
|
DEFdef |
3 |
|
GHIghi |
4 |
|
JKLjkl |
5 |
|
MNOmno |
6 |
|
PQRSpqrs |
7 |
|
TUVtuv |
8 |
|
WXYZwxyz |
9 |
|
(Not available) |
0 |
|
@ ./ - _ ! ? & $ % |
(Not available) |
|
# ( ) [ ] { } < > * + |
|
|
= “ , ;:‘ ^ ` | \ |
|
Changing entry mode
Entry mode |
Available text |
|
<aA> |
Alphabet (capital and small |
|
letters) and symbols |
||
|
||
<12> |
Numbers |
10
Connecting the Power Cord and Turning
ON the Power
OFF
ON
Do not connect the USB cable at this time.Connect it when installing software.
Specifying the Initial Settings
Follow the instructions on the screen, set the language and time.For details on navigating the menu and how to input the numbers, see “Navigating the Menu and Text Input Method” ( P.10).
Language |
|
Current Time |
Set. |
Czech |
|
Must rechg. battery |
|
Danish |
|
for 24 hrs. to save |
|
Dutch |
|
time settings. |
|
English |
|
After turning main |
|
|
|
|
|
En |
Specifying Initial Fax Settings and |
||||
Connecting a Telephone Cable |
|
|
||
|
||||
1 Specify the initial fax settings. |
|
|||
|
Perform fax setup? |
Set the RX Mode. |
|
|
|
|
Answer the following |
|
|
|
Set up Now |
questions to select |
|
|
|
|
|||
|
Set up Later |
the appropriate mode. |
|
|
|
|
*Next Screen: Press OK |
|
|
Follow the “Fax Setup Guide” to specify a fax number, a unit name, and a receive mode.For more details on the receive mode, see the e-Manual.
 e-Manual “Fax” “Using the Fax Functions” “Receiving Faxes” “RX Mode”
How to use a username
When you send a document, the sender information that you registered is printed on the recipient’s paper.
2 Connect a telephone cable.
Telephone line connector
Telephone
When <Connect phone line> appears on the display, connect the telephone cable by referring to the illustration.
When installing the handset
For more details, see the supplied manual with the handset.
3Exit the Fax Setup Guide, and then restart the machine.
End Fax Setup |
|
Setting is complete. |
Guide? |
|
Turn the main power |
|
|
OFF and ON. |
Yes |
No |
OK |
Turn OFF the machine and wait for at least 10 seconds before turning it ON again.The telephone line types are not detected automatically.See the e-Manual and set a telephone line manually.
 e-Manual “Fax” “Using the Fax Functions” “Changing Fax Settings (Settings that Can Be Specified Using the [Menu] Button)” “Configuring Send Settings” “Select Line Type”
11
En |
|
|
|
|
|
Setting a Paper Size and Type |
Installing the Driver / Software |
||
|
|
|
|
|
Follow the instructions on the screen, set the paper size and type.
Install the driver and software using the User Software CD-ROM.For details on the installation procedures, see the FAX L Driver Installation Guide.
Paper Settings
1 Drawer 1
Applying settings...
Wait a moment.
•We ask for the user’s cooperation for the Product Extended Survey Program.For details, see the descriptions on the screen.
12

Perform Useful Tasks
You can use various functions in this machine.Following functions are the overview of the main functions that you can use routinely.
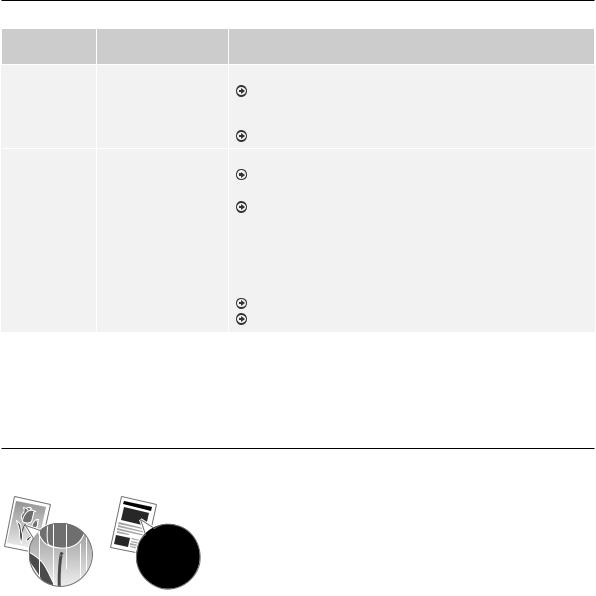
Copy
Enlarged/Reduced Copies
You can enlarge or reduce standard size documents to copy on standard size paper or specify the copy ratio in percentage.
2-Sided Copying
You can copy 1-sided documents on both sides of paper.
Collating
You can sort copies into sets arranged in page order.
Reduced Layout
You can reduce multiple documents to copy them onto one sheet.
2 on 1 |
4 on 1 |
Copying ID Card
You can make a copy of a 2-sided card onto one side of paper.
Fax
Sending a Document Directly from a Computer (PC Fax)
In addition to the normal sending and receiving faxes, you can use the PC fax.
Sending
You can register fax destinations in the address book. You can specify the destinations using various methods, enabling you to send documents quickly and easily.
•Destination search
•One-touch keys
•Coded dialing
•Destination Group
•Specifying from the sending history
•Sequential broadcast
•Delayed sending
Receiving |
En |
||||||||||||||||
Receiving in the memory.You can store the received |
|
||||||||||||||||
documents in the memory.You can print the stored |
|
||||||||||||||||
documents at any time or if you do not need them, you can |
|
||||||||||||||||
delete them. |
|
||||||||||||||||
|
|
|
|
|
|
|
|
|
|
|
|
|
|
|
|
|
|
|
|
|
|
|
|
|
|
|
|
|
|
|
|
|
|
|
|
|
|
|
|
|
|
|
|
|
|
|
|
|
|
|
|
|
|
|
|
|
|
|
|
|
|
|
|
|
|
|
|
|
|
|
|
|
|
|
|
|
|
|
|
|
|
|
|
|
|
|
|
|
|
|
|
|
|
|
|
|
|
|
|
|
|
|
|
|
|
|
|
Remote Receiving
If an external telephone is connected, you can switch to the fax receiving mode immediately by dialing the ID number for fax receiving using the dial buttons of the telephone during a phone call.
Polling Receiving
You can retrieve pre-loaded documents from a sender’s fax machine when you want to receive the fax.
Enlarged/Reduced Printing 2-Sided Printing
Reduced Layout
You can reduce multiple documents to print them onto one sheet.
2 on 1 |
4 on 1 |
Booklet Printing
Poster Printing
Watermark Printing
Displaying a Preview before Printing
Selecting a “Profile”
13
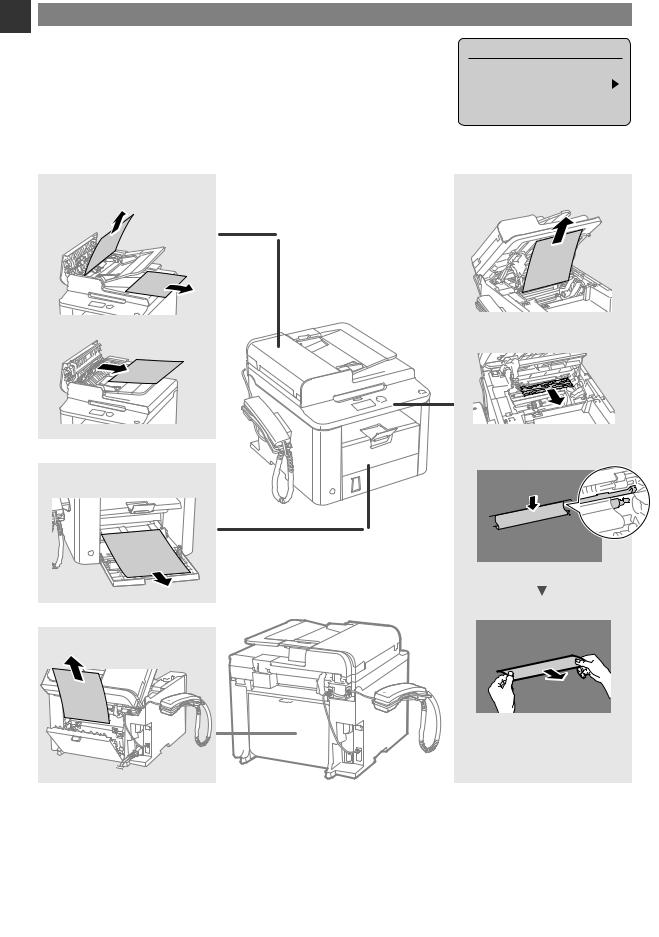
En Clearing Paper Jams
If the following screen appears, a paper jam has occurred in the feeder or inside the machine.Following the procedure displayed on the screen, remove the jammed document or paper.This manual indicates only areas where paper jams occur.For details on each function, see the e-Manual.
Feeder
Paper Cassette
Back Cover
 Paper jam.
Press [ ] to display steps.
Inside the machine
14
|
|
En |
Replacing Toner Cartridge |
||
|
|
|
Toner cartridges are consumables.When the toner becomes nearly empty or has run out completely in the middle of a job run, a message appears on the screen, or the following problems may occur.Take the appropriate action accordingly.
When a Message Appears
When the toner becomes nearly empty in the middle of a job run, a message appears on the screen.
Message |
When the message is |
Description and Solutions |
|
displayed on the screen |
|||
|
|
||
<Prepare toner |
When the toner cartridge |
Shake the toner cartridge to evenly distribute the toner inside the cartridge. |
|
cartridge.> |
needs a replacement |
e-Manual “Before Replacing the Toner Cartridge” |
|
|
soon. |
We recommend that the toner cartridge be replaced before printing high- |
|
|
|
volume documents. |
|
|
|
e-Manual “Replacing the Toner Cartridge” |
|
<Toner is nearly |
When the toner cartridge |
Shake the toner cartridge to evenly distribute the toner inside the cartridge. |
|
out.> |
has reached the end of |
e-Manual “Before Replacing the Toner Cartridge” |
|
|
its life. |
If this message does not disappear, replace the toner cartridge. |
|
|
|
||
|
|
e-Manual “Replacing the Toner Cartridge” |
|
|
|
If this message is displayed, the incoming fax will be stored in the memory |
|
|
|
without being printed.Also, reports may not be printed, even if they are set |
|
|
|
to be printed automatically. |
|
|
|
If <Continue Print.When Toner Is Nearly Out> in <RX Print Settings> is set |
|
|
|
to <On>, however, printing will be continued, but white streaks or smudges |
|
|
|
may appear on printouts. |
|
|
|
e-Manual “Printing the Report Automatically” |
|
|
|
e-Manual “Continue Print.When Toner Is Nearly Out” |
When white streaks appear on the output, or the output is partially faded
When white streaks appear on the output or the output is partially faded, the toner cartridge has almost reached the end of its life, even if no message appears on the screen.When the print quality becomes unacceptable, see the following to fix the problem.
When White Streaks Appear on the Output or the Output Is Partially Faded
When the toner nearly runs out, white streaks appear on the output, or the output is partially faded.
No message appears on the screen, if the toner nearly runs out. Replace the toner cartridge when white streaks appear on the output, or the output is partially faded.
When this problem occurs
Follow the steps in the procedure below before replacing the toner cartridge.The machine continues printing until the toner runs out completely.
 e-Manual “Before Replacing the Toner Cartridge”
When the print quality is still unacceptable
If the problem persists after you have followed the steps in the procedure below, replace the toner cartridge.  e-Manual “Replacing the Toner Cartridge”
15

En Symbols Used in This Manual
 WARNING
Indicates a warning concerning operations that may lead to death or injury to persons if not performed correctly.To use the machine safely, always pay attention to these warnings.
 CAUTION
Indicates a caution concerning operations that may lead to injury to persons if not performed correctly.To use the machine safely, always pay attention to these cautions.
Keys and Buttons Used in This Manual
The following symbols and key names are a few examples of how keys to be pressed are expressed in this manual.
• Operation panel keys: [Key icon] + (Key name)
• |
Example: [ |
] (Stop) |
Display: <Specify destination.> |
||
• |
Buttons and items on the computer display: [Preferences] |
|
 WARNING
To avoid the risk of personal injury or damage to the equipment and for legal information, read the Legal Notice and Important Safety Information in Multi-lingual User Manual CD that is included with the product.
Important Safety Instructions
Please read the “Important Safety Instructions” in this manual and in the e-Manual thoroughly before operating the machine.
As these instructions are intended to prevent injury to the user and other persons or to prevent destruction of property, always pay attention to these instructions and operational requirements.
Please note that you are responsible for all damages caused by failure to follow the directions provided herein, using the device for any purpose for which it was not intended, or repairs or alterations made by anyone other than a Canon-approved technician.
Installation
 WARNING
•Do not install the machine near flammable substances such as alcohol-based products or paint thinners.If these substances come in contact to the electrical parts inside the machine could ignite these substances and cause a fire or increase your risk of electric shock.
•Do not place necklaces and other metal objects or containers filled with liquid on the machine.If foreign substances come into contact with electrical parts inside the machine, this may result in a fire or electrical shock.If any of these substances falls into the machine, turn off the power to the machine immediately and contact your local Canon dealer.
 CAUTION
•Do not install the machine in the following locations.Doing so may result in personal injury, fire or electrical shock.
−−Unstable location
−−A location subject to excessive vibrations
−−A location where block the ventilation slots (too close to walls, bed, shaggy rug, and other similar objects)
−−A damp or dusty location
−−A location exposed to direct sunlight or an outside place
−−A location subject to high temperatures
−−A location near open flames
−−A location with poor ventilation system
•Although ozone is generated from the machine during operation, it does not have any affect on the human body.However, if you intend to use the machine for long periods of time, ensure that the installation location is well ventilated.
•Do not connect unapproved cables to this machine.Doing so may result in a fire or an electric shock.
•Machines with a hard disk may not operate properly when used at high altitudes of about 3,000 meters above sea level, or higher.
Power Supply
 WARNING
•Do not use power cords other than the one provided, as this can result in a fire or electrical shock.
•Do not modify or bend the power cord and do not pull on it with great force.Do not place heavy objects on the power cord. Damaging the power cord may result in a fire or an electric shock.
•Do not plug or unplug the power plug with wet hands, as this can result in electrical shock.
•Do not use extension cords or multi-plug power strips with this machine.Doing so may result in a fire or electric shock.
•Do not bundle up or tie up the power cord in a knot, as this can result in a fire or electrical shock.
•Insert the power plug completely into the AC power outlet.Failure to do so can result in a fire or electrical shock.
•Remove the power plug completely from the power outlet during a thunder storm.Failure to do may result in a fire, electric shock, or malfunction.
 CAUTION
•Use only a power supply that meets the voltage requirements listed herein.Failure to do so may result in a fire or electric shock.
•Do not obstruct the power outlet where this machine is connected, so that you can unplug the power cord easily in an emergency.
Handling
 WARNING
•Do not disassemble or modify the machine.There are hightemperature and high-voltage components inside the machine which may result in a fire or electrical shock.
•Do not allow children to touch or play with the power cord and cables or internal or electrical parts.Doing so may result in serious personal injury.
•Please contact an authorized Canon dealer if the machine makes an unusual noise, emits an unusual smell, or emits smoke or excessive heat.Continued use may result in a fire or electric shock.
•Do not use flammable sprays near the machine.If flammable substances come into contact with electrical parts inside the machine, this may result in a fire or electric shock.
16

 CAUTION
•For your safety, please unplug the power cord if the machine will not be used for a long period of time.
•Use caution when opening and closing covers to avoid injury to your hands.
•Keep hands and clothing away from the rollers in the output area.If the rollers catch your hands or clothing, this may result in personal injury.
•The inside of the machine and the output slot is very hot during and immediately after use.Avoid contact with these areas to prevent burns.Also, printed paper may be hot immediately after being output, so use caution when handling it.Failure to do so may result in burns.
Maintenance and Inspections
 WARNING
•Turn off the machine and unplug the power cord from the outlet before cleaning.Failure to do so may result in a fire or an electric shock.
•Unplug the power plug from the power outlet periodically and clean the area around the base of the power plug’s metal pins and the power outlet with a dry cloth to remove dust and grime.When damp, accumulated dust may cause short circuiting or fires.
•Use a damp, well wrung-out cloth to clean the machine.Dampen cleaning cloths with water only.Do not use alcohol, benzenes, paint thinners, or other flammable substances.If these substances come into contact with electrical parts inside the machine, this may result in a fire or electric shock.
•Check the power cord and plug regularly for damage.Check the machine for rust, dents, scratches, cracks, or excessive heat generation.Use of poorly-maintained equipment may result in a fire or electric shock.
Consumables
 WARNING
•Do not dispose of used toner cartridges in open flames.This may cause an ignition, and result in burns or fire.
•If you accidentally spill or scatter toner, carefully wipe up the loose toner with a damp, soft cloth and avoid inhaling any toner dust. Never use a vacuum cleaner to clean up loose toner.Doing so may cause a malfunction in the vacuum cleaner or result in a dust explosion due to static discharge.
 CAUTION
•Keep the toner cartridges and other consumables out of the reach of small children.If toner is ingested, consult a physician or poison control center immediately.
•Do not attempt to disassemble the toner cartridge.The toner may scatter and get into your eyes or mouth.If toner gets into your eyes or mouth, wash them immediately with cold water and consult a physician.
•If toner spills from the toner cartridge, avoid inhaling it or allowing it to come into contact with your skin.If the toner comes into contact with your skin, wash immediately with soap.If you inhale the toner or your skin becomes irritated due to contact with the toner, consult a physician or poison control center immediately.
Others
 WARNING
•If you are using a cardiac pacemaker:
This machine generates a low level magnetic field.If you feel any abnormalities in your body while using this machine, please move away from the machine and consult your physician immediately.
|
|
|
Legal Notices |
|
En |
|
|
|
Legal Limitations on Usage ofYour Product and the Use of Images
Using your product to scan, print or otherwise reproduce certain documents, and the use of such images as scanned, printed or otherwise reproduced by your product, may be prohibited by law and may result in criminal and/or civil liability.A non-exhaustive list of these documents is set forth below.This list is intended to be a guide only.If you are uncertain about the legality of using your product to scan, print or otherwise reproduce any particular document, and/or of the use of the images scanned, printed or otherwise reproduced, you should consult in advance with your legal advisor for guidance.
−−Paper Money
−−Traveler’s Checks
−−Money Orders
−−Food Stamps
−−Certificates of Deposit
−−Passports
−−Postage Stamps (canceled or uncanceled)
−−Immigration Papers
−−Identifying Badges or Insignias
−−Internal Revenue Stamps (canceled or uncanceled)
−−Selective Service or Draft Papers
−−Bonds or Other Certificates of Indebtedness
−−Checks or Drafts Issued by Governmental Agencies
−−Stock Certificates
−−Motor Vehicle Licenses and Certificates of Title
−−Copyrighted Works/Works of Art without Permission of Copyright Owner
Considerable effort has been made to make sure that the manuals for the machine are free of inaccuracies and omissions.However, as we are constantly improving our products if you need an exact specification, please contact Canon.
17
A propos des manuels fournis
Fr
Guide de démarrage
(ce manuel) :
Commencez par lire ce manuel. Il explique comment installer et
configurer la machine, et indique les précautions à suivre.Veillez à bien lire ce manuel avant d'utiliser la machine.
Guide d’installation du pilote de fax L (User Software CD-ROM) :
Vous devez ensuite lire ce manuel.Il explique comment installer le logiciel.
Manuel électronique
(Multi-lingual User Manual CD) :
Lisez le chapitre de votre choix.Le manuel électronique est divisé en rubriques afin de faciliter la recherche d'informations.
Affichage du manuel électronique depuis le CD-ROM
1Insérez le CD-ROM “Multi-lingual User Manual CD” dans le lecteur de
l'ordinateur.
2 Sélectionnez votre langue.
3 Cliquez sur [Afficher manuel].
En fonction de votre système d'exploitation, un message d'avertissement de sécurité apparaît parfois.
Navigation dans le menu et méthode de saisie du texte
Précédent |
OK |
Menu |
# C |
|
▲▼ |
|
Clavier numérique |
Navigation dans le menu
Sélection des options ou déplacement du curseur dans les options de menu
Sélectionnez une option en appuyant sur [▲] ou [▼].Accédez au niveau suivant en appuyant sur [OK] ou [ ].Revenez au niveau suivant en appuyant sur [ ] (Précédent) ou [ ].
Validation des réglages
Appuyez sur [OK].Toutefois, lorsque <Appliquer> s'affiche, sélectionnez <Appliquer>, puis appuyez sur [OK].
Méthode de saisie du texte
Modification du mode de saisie
Appuyez sur [▼] pour sélectionner <Mode de saisie>, puis appuyez sur [OK].Vous pouvez également appuyer sur [  ] (Tonalité) pour modifier le mode de saisie.
Saisie de texte, de symboles et de chiffres
Utilisez le clavier numérique ou [  ] (SYMBOLES).
Pour en savoir plus sur le changement de mode ou le texte disponible, reportez-vous à droite de cette page.
Déplacement du curseur (ajout d'un espace)
Déplacez le curseur en appuyant sur [ ] ou [ ].Déplacez le curseur à la fin du texte, puis appuyez sur [ ] pour ajouter un espace.
Suppression de caractères
Supprimez un caractère en appuyant sur [  ] (Effacer).Maintenez la touche [
  ] (Effacer) enfoncée pour effacer tous les caractères.
Saisie de texte, de symboles et de chiffres
|
Mode de |
Mode de |
Mode de |
|
saisie : |
saisie : |
saisie : |
|
<A> |
<a> |
<12> |
|
@ .- _ / |
1 |
|
2 |
AÀÂBCÇ |
aàâbcç |
2 |
|
|
|
|
|
DEËÉÈÊF |
deëéèêf |
3 |
|
GHIÏÎ |
ghiïî |
4 |
|
JKL |
jkl |
5 |
|
MNOÔ |
mnoô |
6 |
|
PQRS |
pqrs |
7 |
|
TUÜÙÛV |
tuüùûv |
8 |
|
WXYZ |
wxyz |
9 |
|
(Non disponible) |
0 |
|
|
@ ./ - _ ! ? & $ % # ( ) [ ] { |
(Non |
|
|
} < > * + = “ , ;:‘ ^ ` | \ |
disponible) |
|
Modification du mode de saisie
Mode de saisie |
Texte disponible |
<A> |
Majuscules et symboles |
<a> |
Minuscules et symboles |
<12> |
Chiffres |
18

Branchement du cordon d'alimentation et mise sous tension
OFF
ON
Ne connectez pas le câble USB pour l'instant. Connectez-le au moment de l'installation du logiciel.
Configuration des réglages initiaux
Suivez les instructions à l'écran, et définissez la langue et l'heure.Pour en savoir plus sur la navigation dans le menu et la saisie des chiffres, reportez-vous à la section “Navigation dans le menu et méthode de saisie du texte” ( P.18).

Language |
|
Régl. heure actuelle |
|
English |
|
La batterie doit |
|
Estonian |
|
être rechargée pdt |
|
Finnish |
|
24h pr enreg. les |
|
French |
|
régl. heure. Après |
Configuration des réglages de fax initiaux et connexion d'un câble
téléphonique |
Fr |
|
1 Définissez les réglages initiaux du fax. |
||
|
Configurer le fax ? |
Définir le mode RX. |
|
|
Répondre aux questions |
|
Maintenant |
suivantes pour choisir |
|
||
|
Plus tard |
le mode approprié. |
|
|
*Ecran suiv. : app OK |
Procédez comme indiqué dans le “Guide de configuration du fax” pour définir le numéro de fax, le nom de la machine et le mode de réception.Pour en savoir plus sur le mode de réception, consultez le manuel électronique.
 Manuel électronique “Fax” “Utilisation des fonctions de fax” “Réception de fax” “Mode RX”
Comment utiliser un nom d’utilisateur
Lorsque vous envoyez un document, les informations concernant l’expéditeur que vous avez mémorisées sont imprimées sur la page reçue par le destinataire.
2 Raccordez le câble téléphonique.
Prise pour ligne téléphonique
Téléphone
Lorsque le message <Connecter ligne tél.> s’affiche, connectez le câble téléphonique en vous référant à l’illustration.
Au moment de l’installation du combiné
Pour en savoir plus, reportez-vous au manuel fourni avec le combiné.
3Quittez le Guide de configuration du fax, puis redémarrez la machine.
Terminer guide |
Réglage terminé. |
|
d’installation fax ? |
Mettre machine hors |
|
|
|
puis sous tension. |
Oui |
Non |
OK |

Mettez la machine hors tension et attendez au moins 10 secondes avant de la remettre sous tension.Les types de lignes téléphoniques ne sont pas détectés automatiquement.Reportez-vous au Manuel électronique pour configurer manuellement la ligne téléphonique.
 Manuel électronique “Fax” “Utilisation des fonctions de fax” “Modification des réglages de fax (Eléments pouvant être spécifiés avec le bouton [Menu])” “Configuration des réglages d’envoi” “Sélection du type de ligne”
19

Réglage du format et du type de papier |
|
Installation du pilote et/ou du logiciel |
Fr |
Suivez les instructions à l’écran pour définir le format et le |
|
type de papier. |
Installez le pilote et le logiciel à l'aide du CD-ROM “User Software CD-ROM”.Pour en savoir plus sur les procédures d'installation, consultez le Guide d'installation du pilote de fax L.
Réglages du papier
1 Cassette 1
Application réglages...
Merci de patienter.
•Nous souhaitons obtenir la pleine coopération de l’utilisateur à travers le programme de questionnaire étendu sur le produit (Product Extended Survey Program). Pour en savoir plus, voir les descriptions reprises à l’écran.
20
Procédures utiles
Cette machine vous permet d'effectuer différentes opérations.Vous trouverez ci-dessous une description des fonctions les plus courantes.
Copie
Agrandissement/Réduction de copie
Vous pouvez agrandir ou réduire les documents de taille standard afin de les copier sur du papier de format standard, ou définir un taux de reproduction en pourcentage.
Copie recto-verso
Vous pouvez copier des documents recto-verso sur les deux faces d'une feuille de papier.
Tri séquentiel
Vous pouvez trier les copies en jeux organisés dans l'ordre des pages.
Disposition réduite
Il est possible de réduire plusieurs documents pour les copier sur une seule feuille de papier.
2 sur 1 |
4 sur 1 |
Copie carte d'identité
Vous pouvez copier une carte recto verso sur une même face d'une feuille.
Fax
Envoi d'un document directement depuis un ordinateur (Fax PC)
En plus de l'envoi et de la réception classiques de fax, vous pouvez utiliser la fonction d'envoi de fax depuis un ordinateur.
Envoi
Vous pouvez mémoriser les destinataires de fax dans le carnet d'adresses.Vous pouvez spécifier les destinataires de différentes façons, afin de faciliter et d'accélérer l'envoi de documents.
•Recherche de destinataires
•Boutons de composition 1 touche
•Composition codée
•Groupe de destinataires
•Historique d'envoi
•Multidiffusion
•Envoi retardé
Réception
Vous pouvez stocker les documents reçus en mémoire.
Vous pourrez ensuite les imprimer à tout moment ou les Fr supprimer s'ils ne vous sont d'aucune utilité.
Réception distante
Si un téléphone externe est connecté, vous pouvez passer immédiatement en mode de réception de fax pendant un appel téléphonique, en entrant le numéro d'ID de réception de fax à l'aide des touches de numérotation du téléphone.
Réception sondée
Vous pouvez récupérer à partir du télécopieur d'un expéditeur des documents préchargés lorsque vous souhaitez recevoir le fax.
Impression
Agrandissement/Réduction d'impression Impression recto-verso
Disposition réduite
Il est possible de réduire plusieurs documents pour les imprimer sur une seule feuille de papier.
2 sur 1 |
4 sur 1 |
Impression d'une brochure
Impression d'un poster
Impression d'un filigrane
Affichage d'un aperçu avant impression
Sélection d'un “profil”
21

|
Résolution des bourrages papier |
|
|
Lorsque le message ci-contre apparaît, cela signifie qu'un bourrage papier s'est |
|
Fr |
||
produit dans le chargeur ou la machine.Suivez les indications affichées à l'écran |
||
|
afin de retirer le papier ou le document coincé.Seules les zones où un bourrage |
|
|
papier risque de se produire sont indiquées dans ce manuel.Pour en savoir plus sur |
|
|
chacune des fonctions, reportez-vous au manuel électronique. |
Chargeur
Cassette à papier
Capot arrière
 Bourrage papier.
Appuyer sur [  ] pour afficher la procédure.
Intérieur de la machine
22
Remplacement de la cartouche d'encre
Les cartouches d'encre sont des consommables.Lorsque l'encre est presque ou entièrement épuisée au cours d'une tâche, un |
Fr |
message s'affiche à l'écran ou les problèmes suivants surviennent.Prenez les mesures appropriées. |
|
Lorsqu'un message apparaît
Lorsque l'encre est pratiquement épuisée au milieu de l'exécution d'une tâche, un message apparaît à l'écran.
Message |
Moment où le message |
Description et solutions |
|
s'affiche à l'écran |
|||
|
|
||
<Préparer |
Lorsque la cartouche |
Secouez légèrement la cartouche d'encre pour répartir à l'intérieur l'encre |
|
cartouche de |
d'encre est presque vide |
de façon homogène. |
|
toner.> |
et doit être remplacée. |
Manuel électronique “Avant de remplacer la cartouche d'encre” |
|
|
|
Nous recommandons de remplacer la cartouche d'encre avant d'effectuer |
|
|
|
une grande quantité d'impressions. |
|
|
|
Manuel électronique “Remplacement de la cartouche d'encre” |
|
<Toner presque |
Lorsque la cartouche |
Secouez légèrement la cartouche d'encre pour répartir à l'intérieur l'encre |
|
vide.> |
d'encre est épuisée. |
de façon homogène. |
|
|
|
Manuel électronique “Avant de remplacer la cartouche d'encre” |
|
|
|
Si le message ne disparaît pas, changez la cartouche d'encre. |
|
|
|
Manuel électronique “Remplacement de la cartouche d'encre” |
|
|
|
Si le message s'affiche, le fax entrant est stocké en mémoire sans être |
|
|
|
imprimé.De plus, il se peut que les rapports ne s'impriment pas, même s'ils |
|
|
|
sont configurés sur impression automatique. |
|
|
|
Toutefois, si l'option <Continuer l’impr.si toner presque vide> sous |
|
|
|
<Réglages impression RX> est réglée sur <Oui>, l'impression peut |
|
|
|
continuer, mais des traînées blanches ou des taches peuvent apparaître |
|
|
|
sur l'impression. |
|
|
|
Manuel électronique “Impression automatique du rapport” |
|
|
|
Manuel électronique “Continuer l’impr.si toner presque vide” |
Si des traînées blanches ou des zones trop pâles apparaissent sur l'impression
Si des traînées blanches ou des zones trop pâles apparaissent sur l'impression, la cartouche d'encre est alors pratiquement épuisée même si aucun message ne s'affiche à l'écran.Lorsque la qualité d'impression devient inacceptable, reportez-vous aux points suivants pour résoudre le problème.
Si des traînées blanches ou des zones trop pâles apparaissent sur l'impression
Lorsque l'encre est presque épuisée, des traînées blanches ou des zones pâles apparaissent sur l'impression.
Aucun message n'apparaît sur l'afficheur, même si l'encre est presque épuisée.Remplacez la cartouche d'encre si des traînées blanches ou des zones trop pâles apparaissent sur l'impression.
Lorsque ce problème survient
Suivez la procédure suivante avant de changer la cartouche d'encre.La machine continue à imprimer, jusqu'à ce que l'encre soit totalement épuisée.
 Manuel électronique “Avant de remplacer la cartouche d'encre”
Si la qualité d'impression reste inacceptable
Si le problème persiste après application de la procédure citée, changez la cartouche d'encre.
 Manuel électronique “Remplacement de la cartouche d'encre”
23

Symboles employés dans ce manuel
Fr  AVERTISSEMENT
Avertissement concernant les opérations susceptibles de représenter un danger de mort ou de provoquer des blessures si les instructions ne sont pas respectées.Ces recommandations sont à respecter rigoureusement.
 ATTENTION
Point important concernant les opérations susceptibles de provoquer des blessures si les instructions ne sont pas respectées.Ces recommandations sont à respecter rigoureusement.
Touches et boutons utilisés dans ce manuel
Vous trouverez ci-dessous les conventions de notation des symboles et des noms de touches.
•Touches du panneau de commandes : [icône de touche] + (nom de touche)Exemple : [  ] (Stop)
•Afficheur :<Spécifier destinataire>
•Boutons et options à l'écran de l'ordinateur : [Préférences]
 AVERTISSEMENT
Pour éviter tout risque de blessure corporelle ou de dommage matériel de l'équipement ainsi que pour des raisons légales, lisez les Avertissements juridiques et les Consignes de sécurité importantes dans le CD-ROM “Multi-lingual User Manual CD” fourni avec ce produit.
Consignes de sécurité importantes
Lisez attentivement les “Consignes de sécurité importantes” de ce manuel et du manuel électronique avant d'utiliser la machine.
Comme ces instructions permettent d'éviter les blessures de l'utilisateur et d'autres personnes, ou la destruction du matériel, lisez-les toujours très soigneusement, ainsi que les détails sur la configuration requise.
Notez que vous serez tenu responsable de tout dommage causé par le non-respect des présentes consignes, l'utilisation de cet équipement à des fins pour lesquelles il n'était pas prévu, ou des réparations ou des modifications effectuées par des techniciens non homologués Canon.
Installation
 AVERTISSEMENT
•N'installez jamais la machine à proximité de substances inflammables, comme des produits à base d'alcool ou des diluants.Si de telles substances entrent en contact avec les composants électriques internes de la machine, cela peut provoquer un incendie ou augmenter les risques d'électrocution.
•Ne laissez aucun collier et autre objet métallique, ou récipient contenant un liquide, à proximité de la machine.Si des objets étrangers entrent en contact avec les composants électriques internes de la machine, cela peut provoquer un incendie ou une électrocution.En cas de chute de l'un de ces objets dans la machine, mettez immédiatement la machine hors tension et contactez votre revendeur agréé Canon.
 ATTENTION
•N'installez pas la machine dans les lieux suivants, car cela peut provoquer des blessures, des incendies ou des électrocutions.
−−Surface instable
−−Emplacement soumis à de fortes vibrations
−−Endroit où les fentes de ventilation pourraient être obturées (à proximité de murs, de lits, de tapis et autres objets similaires)
−−Lieu humide ou poussiéreux
−−Lieu exposé à la lumière directe du soleil ou en extérieur
−−Lieu exposé à des températures élevées
−−Lieu à proximité d'une flamme nue
−−Endroit insuffisamment ventilé
•Bien que cette machine produise de l’ozone lors de son fonctionnement, cela n’a aucun effet sur la santé humaine. Cependant, si vous prévoyez d'utiliser cette machine pendant une durée prolongée, assurez-vous que la pièce dans laquelle elle est installée est bien aérée.
•Ne connectez pas des câbles non homologués à cette machine. Vous risquez de provoquer un incendie ou une électrocution.
•Il est possible que les appareils dotés d’un disque dur ne fonctionnent pas correctement s’ils sont utilisés à haute altitude, à savoir à partir d’environ 3 000 mètres au-dessus du niveau de la mer.
Alimentation électrique
 AVERTISSEMENT
•Utilisez uniquement le cordon d'alimentation fourni, pour éviter tout risque d'incendie ou d'électrocution.
•N'altérez pas le cordon d'alimentation, ne le tordez pas et ne le tirez pas avec une force excessive.Ne posez pas d'objets lourds dessus.Tout dommage du cordon électrique peut entraîner un incendie ou une électrocution.
•Ne branchez pas, ni ne débranchez le cordon d'alimentation avec les mains mouillées, car vous risquez de vous électrocuter.
•N'utilisez jamais de rallonge ou de multiprise avec cette machine. Vous risquez de provoquer un incendie ou une électrocution.
•N'enroulez pas le cordon d'alimentation ou ne le retenez pas par un nœud, cela peut provoquer un incendie ou une électrocution.
•Insérez complètement la fiche d'alimentation dans la prise secteur.Le non-respect de cette consigne peut entraîner un risque d'incendie ou d'électrocution.
•En cas d'orage, débranchez la fiche d'alimentation de la prise secteur.Le non-respect de cette consigne peut entraîner un incendie, une électrocution ou un dysfonctionnement.
 ATTENTION
•Utilisez uniquement une alimentation électrique conforme aux exigences de tension indiquées dans le présent document.Le non-respect de cette consigne peut entraîner un incendie ou une électrocution.
•Laissez un espace suffisant autour de la prise électrique sur laquelle la machine est connectée de façon à pouvoir la débrancher facilement en cas d'urgence.
24

Manipulation
 AVERTISSEMENT
•Ne démontez ou ne modifiez jamais la machine.Elle comporte des composants haute tension et haute température qui risquent de provoquer un incendie ou une électrocution.
•Tenez les enfants à l'écart du cordon d'alimentation, des câbles, des mécanismes internes ou des composants électriques de cette machine.Le non-respect de cette consigne peut provoquer des blessures graves.
•Si la machine émet des bruits anormaux, de la fumée, de la chaleur ou une odeur inhabituelle, contactez votre revendeur agréé Canon.Si vous continuez à utiliser la machine, cela peut entraîner un risque d'incendie ou d'électrocution.
•Ne vaporisez pas de produits inflammables près de la machine. Si de telles substances entrent en contact avec les composants électriques internes de la machine, cela peut provoquer un incendie ou une électrocution.
 ATTENTION
•Pour des raisons de sécurité, veillez à débrancher le cordon d'alimentation de la machine si celle-ci doit rester inutilisée pendant une période prolongée.
•Ouvrez et fermez les capots avec précaution afin d'éviter de vous blesser aux mains.
•Eloignez les mains ou vos vêtements du rouleau dans la zone de sortie.Le rouleau pourrait happer vos mains ou vêtements et provoquer des blessures graves.
•Les composants internes de la machine et la fente de sortie sont extrêmement chauds pendant et immédiatement après le fonctionnement de la machine.Eviter de toucher ces zones pour ne pas vous brûler.Le papier imprimé pouvant également être chaud à sa sortie de l'imprimante, manipulez-le avec précaution. Le non-respect de ces consignes peut entraîner des brûlures.
Entretien et vérifications
 AVERTISSEMENT
•Avant tout nettoyage, mettez la machine hors tension et débranchez le cordon d'alimentation du secteur.Le non-respect de ces consignes peut entraîner un incendie ou une électrocution.
•Débranchez régulièrement le cordon d'alimentation de la prise secteur, et nettoyez le pourtour des broches métalliques du cordon d'alimentation et la prise elle-même avec un chiffon sec pour retirer la poussière et la saleté.Avec l'humidité, les dépôts de poussière peuvent provoquer des courts-circuits ou des incendies.
•Nettoyez la machine avec un chiffon humide bien essoré. N'utilisez aucune substance inflammable telle que de l'alcool, du benzène ou du diluant à peinture.Si de telles substances entrent en contact avec les composants électriques internes de la machine, cela peut provoquer un incendie ou une électrocution.
•Vérifiez régulièrement que le cordon d'alimentation et sa fiche ne sont pas endommagés.Assurez-vous que la machine ne comporte pas des traces de rouille ou de coups, des rayures, des craquelures, ou ne génère pas de chaleur excessive.Un équipement insuffisamment entretenu peut entraîner un incendie ou une électrocution.
Consommables
 AVERTISSEMENT
•Ne jetez pas les cartouches d'encre usagées au feu.L'encre risque de s'enflammer, et de provoquer des brulures ou un incendie.
•En cas de renversement accidentel de toner, rassembler avec précaution les particules de toner ou les enlever à l’aide d’un chiffon doux humide de façon à en éviter l’inhalation. Ne jamais utiliser un aspirateur non équipé d’un dispositif de
protection contre les explosions de poussières pour nettoyer le toner renversé.Cela peut entraîner un dysfonctionnement de l’aspirateur ou une explosion de poussières due à une décharge électrostatique.
 ATTENTION
• Conservez les cartouches d'encre et autres produits consommables hors de la portée des jeunes enfants.En cas
d'ingestion d'encre, consultez immédiatement un médecin ou un Fr centre anti-poison.
•N'essayez pas de démonter la cartouche d'encre.Vous risquez de recevoir des éclaboussures d'encre dans les yeux ou la bouche. En cas de contact de l'encre avec les yeux ou la bouche, rincez immédiatement à l'eau froide et consultez un médecin.
•Si de l'encre s'échappe de la cartouche d'encre, faites attention
à ne pas l'inhaler et prenez soin d'éviter tout contact direct avec la peau.Si de l'encre entre en contact avec la peau, lavez immédiatement la zone affectée avec du savon.En cas
d'inhalation d'encre ou d'irritation due à un contact avec la peau, consultez immédiatement un médecin ou un centre anti-poison.
Autres
 AVERTISSEMENT
•Si vous portez un stimulateur cardiaque :
cette machine émet un faible champ magnétique.Si vous constatez une anomalie, éloignez-vous de la machine et consultez immédiatement votre médecin.
Informations légales
Limitations légales d’utilisation de votre produit et des images
L’utilisation de votre produit pour scanner, imprimer ou reproduire de toute autre manière certains documents, et l’utilisation des images ainsi scannées, imprimées ou reproduites par votre produit peuvent être interdites par la loi, et constituer un délit de responsabilité pénale et/ou civile.Nous donnons ci-après une liste non exhaustive de tels documents.Elle est donnée uniquement à titre indicatif.Si vous n’êtes pas certain de pouvoir utiliser votre imprimante pour scanner, imprimer ou reproduire de toute autre manière un document particulier et/ou de pouvoir utiliser les images scannées, imprimées ou reproduites, vous devez demander l’avis préalable d’un conseiller juridique.
−−Billets de banque
−−Chèques de voyage
−−Mandats
−−Coupons alimentaires
−−Certificats de dépôt
−−Passeports
−−Timbres poste (oblitérés ou non)
−−Papiers d’immigration
−−Badges d’identification ou insignes
−−Timbres fiscaux (oblitérés ou non)
−−Papiers de service militaire ou ordre d’incorporation
−−Obligations ou autres certificats d’endettement
−−Chèques ou ordres issus par les agences gouvernementales
−−Certificats d’actions
−−Permis de conduire et certificat de titre d’un véhicule
−−Œuvre protégée par les droits d’auteur/Œuvres d’art sans l’autorisation du détenteur des droits d’auteur
Des efforts considérables ont été mis en œuvre pour s’assurer que les manuels relatifs à la machine ne contiennent ni imprécision, ni omission.Néanmoins, comme nous améliorons constamment nos produits, n’hésitez pas à contacter Canon pour obtenir des spécifications précises.
25

|
|
Informationen zu den |
|
|
mitgelieferten Anleitungen |
|
|
Handbuch für Starter |
De |
|
(diese Anleitung): |
|
Lesen Sie zuerst diese |
|
|
|
Anleitung.In dieser Anleitung |
|
|
werden die Installation des |
|
|
Geräts, die Einstellungen sowie |
|
|
Vorsichtshinweise beschrieben. |
|
|
Lesen Sie diese Anleitung, bevor Sie |
|
|
das Gerät in Betrieb nehmen. |
|
|
|
Fax L-Treiber
Installationshandbuch (User Software CD-ROM):
Lesen Sie als nächstes diese Anleitung.In dieser Anleitung wird die Installation der Software beschrieben.
e-Anleitung (Multi-lingual User
Manual CD):
Lesen Sie nach Bedarf die gewünschten Kapitel.Die e-Anleitung ist nach Themen geordnet, sodass Sie die benötigten Informationen einfach finden können.
Anzeigen der e-Anleitung von der CD-ROM
1Legen Sie die Multi-lingual User Manual CD in den Computer ein.
2 Wählen Sie Ihre Sprache aus.
3Klicken Sie auf [Handbücher anzeigen].
Abhängig von dem von Ihnen verwendeten Betriebssystem wird eine Sicherheitswarnung angezeigt.
Navigieren durch das Menü und Texteingabemethode
Zurück |
|
|
|
|
|
|
|
|
|
|
|
|
|
|
|
|
|
|
|
|
|
|
|
|
|
|
OK |
Menü |
|
|
# C |
||||
|
▲▼ |
|
Numerische |
Tasten |
||||
Navigieren durch das Menü
Auswählen von Elementen oder Versetzen des Cursors in den Menüelementen
Wählen Sie mit [▲] oder [▼] ein Element aus.Wechseln Sie mit [OK] oder [ ] zur nächsten
Hierarchiestufe.Kehren Sie mit [ ] (Zurück) oder [ ] zur vorherigen Hierarchiestufe zurück.
Bestätigen einer Einstellung
Drücken Sie [OK].Wenn auf dem Display <Anwenden> angezeigt wird, wählen Sie <Anwenden> aus, und drücken Sie dann [OK].
Texteingabemethode
Ändern des Eingabemodus
Eingeben von Text, Symbolen und Zahlen
|
Eingabe |
Eingabe |
Eingabe |
|
modus: |
modus: |
modus: |
|
<A> |
<a> |
<12> |
|
@ .- _ / |
1 |
|
2 |
AÄBC |
aäbc |
2 |
|
|
|
|
|
DEF |
def |
3 |
|
GHI |
ghi |
4 |
|
JKL |
jkl |
5 |
|
MNOÖ |
mnoö |
6 |
|
PQRSß |
pqrs |
7 |
|
TUÜV |
tuüv |
8 |
|
WXYZ |
wxyz |
9 |
|
(nicht verfügbar) |
0 |
|
|
@ ./ - _ ! ? & $ % # ( ) [ ] |
(nicht |
|
|
{ } < > * + = “ , ;:‘ ^ ` | \ |
verfügbar) |
|
Drücken Sie [▼], um den <Eingabemodus> auszuwählen, und drücken Sie dann [OK].Sie können auch durch Drücken von [  ] (Ton) den Eingabemodus ändern.
Eingeben von Text, Symbolen und Zahlen
Nehmen Sie die Eingabe mit den numerischen Tasten oder mit [  ] (SYMBOLE) vor.
Nähere Informationen zum umschaltbaren Modus oder dem verfügbaren Text finden Sie rechts auf dieser Seite.
Versetzen des Cursors (Eingeben eines Leerzeichens)
Versetzen Sie den Cursor mit [ ] oder [ ].Bewegen Sie den Cursor an das Textende, und drücken Sie [ ], um ein Leerzeichen einzugeben.
Löschen von Zeichen
Löschen Sie Zeichen mit [  ] (Löschen).Durch Gedrückthalten der Taste [
  ] (Löschen) werden alle Zeichen gelöscht.
Ändern des Eingabemodus
Eingabemodus |
VerfügbarerText |
|
<A> |
Großbuchstaben und |
|
Symbole |
||
|
||
<a> |
Kleinbuchstaben und |
|
Symbole |
||
|
||
<12> |
Zahlen |
26

Anschließen des Netzkabels und Einschalten des Geräts über den Netzschalter
OFF
ON
Schließen Sie in diesem Fall nicht das USB-Kabel an. Stecken Sie es bei der Softwareinstallation ein.
Festlegen der anfänglichen
Einstellungen
Folgen Sie den Anweisungen auf dem Bildschirm, um Sprache und Uhrzeit einzustellen.Nähere Informationen zum Navigieren durch das Menü und zur Eingabe von Zahlen finden Sie unter “Navigieren durch das Menü und Texteingabemethode“ ( S.26).
Language |
|
Einst. aktuelle Zeit |
|
Estonian |
|
Batterie muss 24h |
|
Finnish |
|
aufgeladen werden, |
|
French |
|
um die Zeiteinst.zu |
|
German |
|
sichern. Nach AUS/ |
Festlegen der anfänglichen Faxeinstellungen und Anschließen eines Telefonkabels
1 Geben Sie die anfänglichen Faxeinstellungen an. De
Fax Setup durchführen? |
EM-Modus einstellen. |
|
|
Beantwortung folgender |
|
Jetzt einrichten |
Fragen helfen den ent- |
|
Später einrichten |
spr. Modus zu wählen. |
|
|
*Näch. Anz.: OK betät. |
Folgen Sie den Anweisungen im “Fax Setup Guide“, um eine Faxnummer, einen Gerätenamen und einen Empfangsmodus einzugeben.Nähere Informationen zum Empfangsmodus finden Sie in der e-Anleitung.
 e-Anleitung “Fax” “Verwenden der Faxfunktionen” “Empfangen von Faxen” “Empfangsmodus”
Verwendung eines Anwendernamens
Wenn Sie ein Dokument senden, werden die von Ihnen gespeicherten Absenderinformationen auf dem Papier des Empfängers ausgedruckt.
2 Schließen Sie ein Telefonkabel an.
Telefonleitungsanschluss
Telefon
Wenn auf dem Bildschirm <Telefonleitung anschl.> angezeigt wird, schließen Sie das Telefonkabel entsprechend der Abbildung an.
Wenn der Hörer installiert wird
Nähere Informationen finden Sie in der mit dem Hörer mitgelieferten Anleitung.
3Beenden Sie den Fax Setup Guide, und starten Sie dann das Gerät neu.
Fax Setup |
|
Einstellung abge- |
Handbuch beenden? |
schlossen. System |
|
|
|
AUS u. EINschalten. |
Ja |
Nein |
OK |
Schalten Sie das Gerät aus, und warten Sie mindestens 10 Sekunden, bevor Sie es wieder einschalten.Der Telefonleitungstyp wird nicht automatisch erkannt.Lesen Sie in der e-Anleitung nach, und legen Sie die Telefonleitung manuell fest.
 e-Anleitung “Fax” “Verwenden der Faxfunktionen” “Ändern der Faxeinstellungen (Einstellungen, die über die Schaltfläche [Menü] angegeben werden können)” “Konfigurieren von Sendeeinstellungen” “Leitungstyp wählen”
27
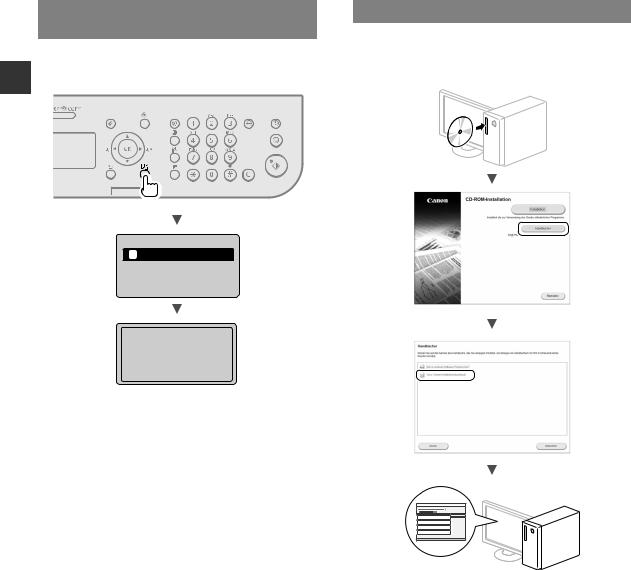
Einstellen von Papierformat und
Papiertyp
Folgen Sie den Anweisungen auf dem Bildschirm, um das De Papierformat und den Papiertyp einzustellen.
Einstellungen Papier
1 Kassette 1
Einstellungen anwenden...
Einen Moment warten.
Installieren des Treibers/der Software
Installieren Sie den Treiber und die Software mithilfe der User Software CD-ROM.Nähere Informationen zur Installation finden Sie im Fax L-Treiber Installationshandbuch.
•Wir bitten die Benutzer um die Teilnahme am Product Extended Survey Program.Detaillierte Informationen werden auf dem Bildschirm angezeigt.
28

Ausführen nützlicher Aufgaben
Sie können mit diesem Gerät verschiedene Funktionen verwenden.Folgende Funktionen stellen die Übersicht der Hauptfunktionen dar, die Sie routinemäßig verwenden können.
Kopieren
Vergrößern und Verkleinern von Kopien
Sie können Dokumente mit Standardformat für die Kopie auf Papier mit Standardformat vergrößern oder verkleinern oder den Zoomfaktor in Prozent angeben.
Doppelseitiges Kopieren
Sie können ein einseitiges Dokument auf beide Seiten eines Papiers kopieren.
Sortieren
Sie können Kopien automatisch in Sätzen in
Seitenreihenfolge sortieren.
Verkleinertes Layout
Sie können mehrere Dokumente verkleinern, um sie auf ein Blatt zu kopieren.
2 auf 1 |
4 auf 1 |
Kopieren einer ID-Karte
Sie können eine doppelseitige Karte auf ein einseitiges Papier kopieren.
Fax
Senden eines Dokuments direkt von einem Computer (PC-Fax)
Zusätzlich zum normalen Senden und Empfangen von Faxdokumenten können Sie das PC-Fax verwenden.
Senden
Sie können Faxempfänger im Adressbuch speichern. Sie können die Empfänger über verschiedene Methoden angeben, sodass Sie schnell und einfach Dokumente senden können.
•Empfängersuche
•Zielwahltasten
•Kodierte Wahl
•Empfängergruppe
•Angeben aus dem Sendelog
•Rundsendung
•Verzögertes Senden
Empfangen
Empfangen im Speicher.Sie können die empfangenen Dokumente im Speicher speichern.Sie können die gespeicherten Dokumente jederzeit drucken oder löschen, wenn Sie sie nicht benötigen.
De
Remote-Empfang
Wenn ein externes Telefon angeschlossen ist, können Sie während des Telefonanrufs sofort in den
Faxempfangsmodus wechseln, indem Sie die ID-Nummer für den Faxempfang über die Wähltasten des Telefons wählen.
Abruf-Empfang
Sie können zuvor eingelegte Dokumente von einem sendenden Faxgerät abrufen, wenn Sie ein Fax empfangen möchten.
Vergrößern und Verkleinern des Drucks Doppelseitiger Druck
Verkleinertes Layout
Sie können mehrere Dokumente verkleinern, um sie auf ein Blatt zu drucken.
2 auf 1 |
4 auf 1 |
Broschürendruck
Posterdruck
Wasserzeichendruck
Anzeigen einer Druckvorschau
Auswählen eines "Profils"
29
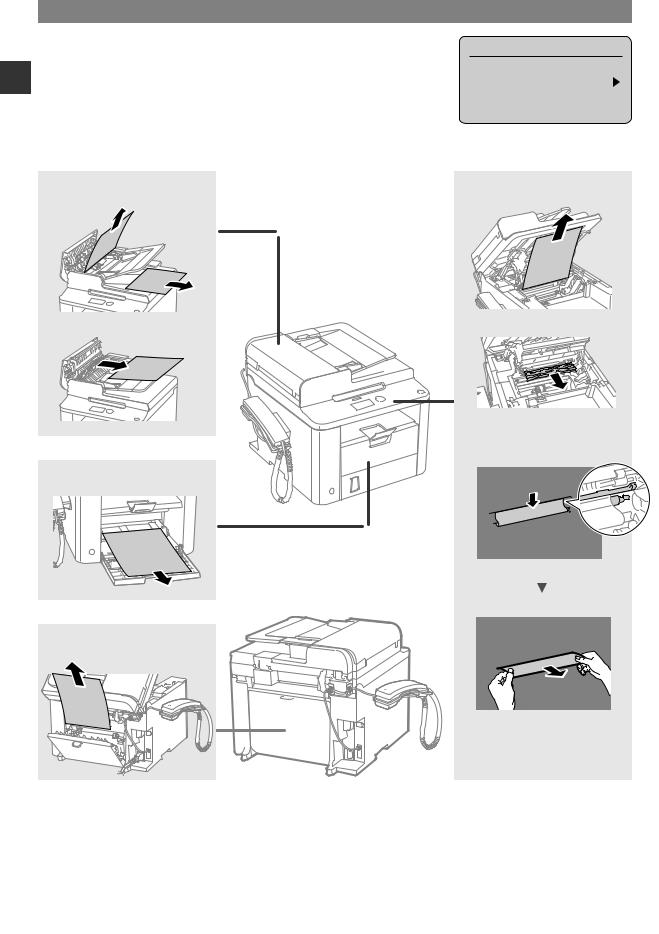
Beseitigen von Papierstaus
Wird folgender Bildschirm angezeigt, ist in der Zufuhr oder im Geräteinneren ein Papierstau aufgetreten.Entfernen Sie das gestaute Dokument oder Papier der Anleitung auf dem Bildschirm entsprechend.In diesen Anweisungen wird
De nur auf Bereiche hingewiesen, in denen ein Papierstau auftreten kann.Nähere Informationen zu den einzelnen Funktionen finden Sie in der e-Anleitung.
Zufuhr
Papierkassette
Rückabdeckung
 Papierstau.
[  ] betätigen, um Schritte anzuzeigen.
Geräteinneres
30
 Loading...