


Getting Started Guía de inicio Para Começar Démarrage
Руководство по началу работы
Посібник для початку роботи
ءدبلا ليلد
Read Safety and Important Information
\addendum\ first.
Lea primero Información de seguridad e información importante \apéndice\.
Leia Informações Importantes e Sobre Segurança \adendo\ primeiro.
Commencez par lire Sécurité et informations importantes \addendum\.
В первую очередь прочтите документ Информация о безопасности и важные сведения \приложение\.
Спершу прочитайте документ Інформація щодо безпеки й важливі відомості \додаток\.
.ًلاوأ)قحلملاب( ةماهلاتامولعملاوناملأاتامولعمأرقا
|
|
|
...................................................................................................................Installing the Printer |
page 1 |
|
|
|
Instalación de la impresora................................................................................................ |
página 1 |
|
|
|
Instalando a impressora....................................................................................................... |
página 1 |
|
|
|
Installation de l'imprimante.................................................................................................. |
page 1 |
|
|
|
Установка принтера.................................................................................................................... |
стр. 1 |
|
|
|
Установлення принтера........................................................................................................ |
стор. 1 |
|
|
|
1 ةحفص....................................................................................................................................... |
ةعباطلا بيكرت |
|
|
|
||
|
|
|
||
|
|
|
|
|
|
|
|
|
................................................Connecting to a Computer, Smartphone or Tablet |
page 4 |
|
|
|
|
|
Conexión con un ordenador, teléfono inteligente o tableta........................ |
página 4 |
|
|
|
|
|
Conectando a um computador, smartphone ou tablet................................. |
página 4 |
|
|
|
|
|
Connexion à un ordinateur, un smartphone ou une tablette......................... |
page 4 |
|
|
|
|
|
Подключение к компьютеру, смартфону или планшету................................... |
стр. 4 |
|
|
|
|
|
................................Підключення до комп’ютера, смартфона або планшета |
стор. 4 |
|
|
|
|
|
4 ةحفص............................................................... |
يحوللا زاهجلا وأ يكذلا فتاهلا وأ رتويبمكلاب ليصوتلا |
|
|
|
|
|
|
|
|
|
|
|
|
|
|
|
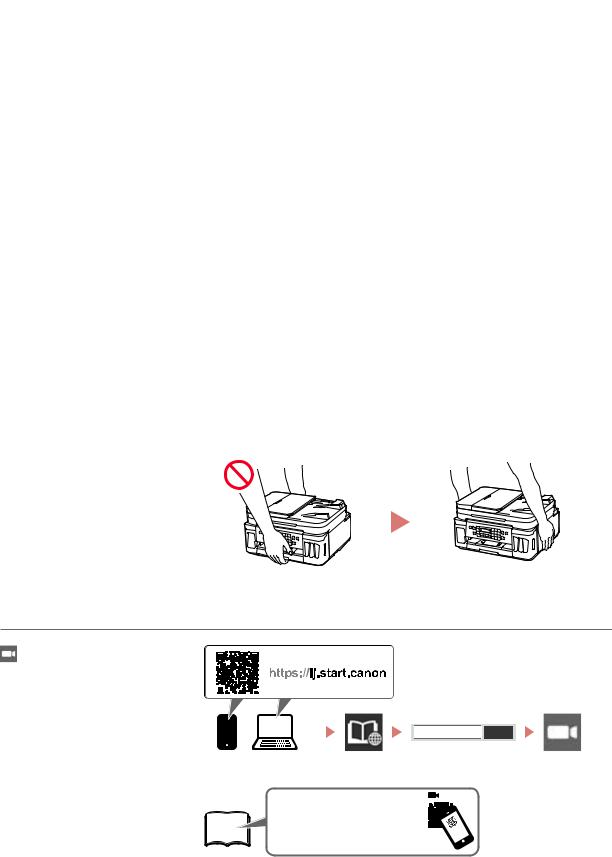
Holding the Printer Cómo sujetar la impresora Segurando a impressora
Manipulation de l'imprimante Удерживание принтера
Як тримати принтер
ةعباطلا لمح
|
|
|
|
|
|
|
|
|
|
|
|
|
|
|
|
|
|
|
|
|
|
|
|
|
|
|
Instructional Videos |
|
|
|
|
|
|
|
|
|
|
|
|
|
|
|
|
|
|
|
|
|
|
|
|||
|
|
|
|
|
|
|
|
|
|
|
|
|
|
|
|
|
|
|
|
|
|
|
||||
Vídeos instructivos |
|
|
|
|
|
|
|
|
|
|
|
|
|
|
|
|
|
|
|
|
|
|
|
|
|
|
|
|
|
|
|
|
|
|
|
|
|
|
|
|
|
|
|
|
|
|
|
|
|
|
|||
Vídeos instrucionais |
|
|
|
|
|
|
|
|
|
|
|
|
|
|
|
|
|
|
|
|
|
|
|
|||
Instructions vidéo |
|
|
|
|
|
|
|
|
|
|
|
|
|
|
|
|
|
|
|
|
|
|
|
|||
|
|
|
|
|
|
|
|
|
|
|
|
|
|
|
|
|
|
|
|
|
Go |
|
||||
Видеоинструкции |
|
|
|
|
|
|
|
|
|
|
|
|
|
|
|
|
|
|
|
|
|
|
||||
|
|
|
|
|
|
|
|
|
|
|
|
|
|
|
|
|
|
|
|
|
|
|
||||
|
|
|
|
|
|
|
|
|
|
|
|
|
|
|
|
|
|
|
|
|
|
|
||||
Відеоінструкції |
|
|
|
|
|
|
|
|
|
|
|
|
|
|
|
|
|
|
|
|
|
|
|
|||
ةيداشرإ ويديف عطاقم |
|
|
|
|
|
|
|
|
|
|
|
|
|
|
|
|
|
|
|
|
|
|
|
|
|
|
|
|
|
|
|
|
|
|
|
|
|
|
|
|
|
|
|
|
|
|
|
|
|
|
|
|
|
|
|
|
|
|
|
|
|
|
|
|
|
|
|
|
|
|
|
|
|
|
|
|
|
|
|
|
|
|
|
|
|
|
|
|
|
|
|
|
|
|
|
|
|
|
|
|
|
|
|
|
|
|
|
|
|
|
|
|
|
|
|
|
|
|
|
|
|
|
|
|
|
|
|
|
|
|
|
|
|
|
|
|
|
|
|
|
|
|
|
|
|
|
|
|
|
|
|
|
|
|
|
|
|
|
|
|
|
|
|
|
|
|
|
|
|
|
|
|
|
|
|
|
|
|
|
|
|
|
|
|
|
|
|
|
|
|
|
|
|
|
|
|
|
|
|
|
|
|
|
|
|
|
|
|
|
|
|
|
|
|
|
|
|
|
|
|
|
|
|
|
|
|
|
|
|
|
|
|
|
|
|
|
|
|
|
|
|
|

Setting Up the Printer
1. Box Contents
•Print heads |
•Ink bottles |
|
•Power cord |
|
•Modular cable |
|
•Setup CD-ROM for Windows |
|
•Safety and Important Information |
|
•Getting Started (this manual) |
2. Removing Packing Materials
1 |
|
|
|
|
|
|
|
|
|
|
|
|
|
|
|
|
|
|
|
|
|
|
|
|
|
|
|
Remove and dispose of any packing materials |
|
||||||||||||
|
and orange tape. |
|
|||||||||||
2 |
Open the scanning unit / cover, remove and |
|
|||||||||||
dispose of the orange tape and protective material inside.
b 
 a
a


3. Installing the Print Heads
1 Open the print head locking cover.
2 Take out each print head from the package and remove the label.
Online Setup
3 Remove the protective tape.
<![if ! IE]><![endif]>ENGLISH
4 Insert the C \color\ print head on the left and the B \black\ print head on the right.
5 Close the print head locking cover and press down until it clicks.
6 Press down both joint buttons completely until they click.
Check!
1

6 Replace the tank cap securely, and then close the ink tank cover.
7 Repeat steps 1 through 6 to pour all ink into the corresponding ink tanks on the right.
Check!
C M Y
8 Close the scanning unit / cover.
 Caution
Watch your fingers.
5. Turning on the Printer
1 Connect the power cord.
Back

 Important
At this time, do not connect any other cables.
2 Open the operation panel and press the ON button.
2
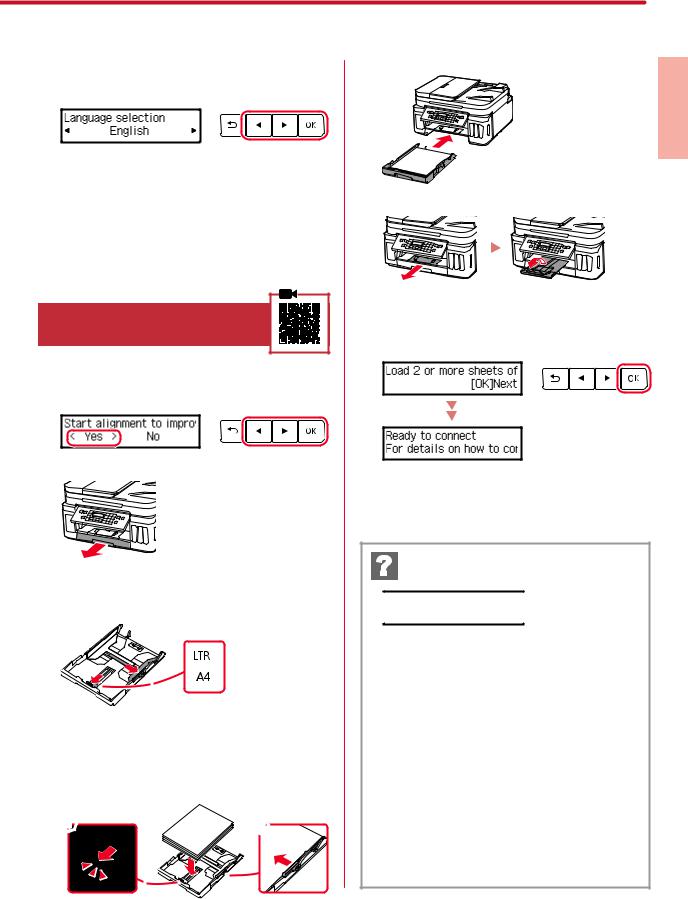
3 When the following screen appears, use the [ and ]buttons to select a language, and then press the OK button.

 Important
If an error appears on the screen, see "If an error message (support code) appears on the screen" on page 3 and follow the instructions.
4 If the country or region selection screen appears, use the [and ]buttons to select your country or region, and then press the OK button.
6. Loading Paper
1 |
When the following screen appears, use the [ |
|
and ]buttons to select Yes, and then press the |
|
OK button. |
2 |
Remove the cassette from the printer. |
5
6
7
Replace the cassette.
Pull out the paper output tray.
Follow the on-screen instructions, and then press the OK button.
•Check that Ready to connect appears on the printer's screen.
<![endif]>ENGLISH
3 |
Slide apart the paper guides. |
|||
• |
Slide the right paper guide to the right edge. Align |
|||
|
|
the front paper guide with the Letter or A4 mark. |
||
|
|
|
|
|
|
|
|
|
|
4 Load paper.
•Load 2 or more sheets of Letter or A4 sized plain paper with the print side facing down.
•Place the paper against the front paper guide, and align the right paper guide to the width of the paper.
a |
b |
If an error message (support code) appears on the screen

 Support code
Check the support code, and then follow the instructions if the displayed code is written below.
•The protective materials are not removed.
 "2. Removing Packing Materials" on page 1
•1470The print heads are not installed correctly.
 "3. Installing the Print Heads" on page 1
•1471No print heads are installed.
 "3. Installing the Print Heads" on page 1
•1642There may be insufficient ink.

 "4. Pouring Ink" on page 21890
For all other cases, refer to the Online Manual.
3

Setting Up the Printer
What device are you connecting?
Computer |
Computer and |
Smartphone |
|
smartphone |
|||
|
|
||
|
|
Not connecting to any other devices 7-c |
7-a |
Connecting to a Computer |
|
|
|
|
|
|
|
|
|
|
|
|
||
|
|
|
|
|
|
||
|
If you are using multiple computers, perform these steps on each computer. |
|
|
|
|
|
|
|
|
|
|
|
|
|
|
|
|
|
|
|
|
|
|
|
|
|
|
|
|
|
|
|
|
|
|
|
|
|
|
|
|
|
|
|
|
|
|
|
|
|
|
|
|
|
|
1 |
Access the Canon website from a |
6 |
Click Download. |
|||||
|
computer. |
7 |
Run the downloaded file. |
|||||
|
|
|
|
|
||||
|
|
|
|
|
||||
2 |
|
|
|
|
8 |
Click Start Setup. |
||
Select |
Set Up. |
|
|
|
|
|||
3 |
Enter your printer's model name and |
|
|
|
|
|||
|
click Go. |
|
|
|
|
|
|
|
4 |
Click Start. |
|
|
|
|
|||
5 |
Click If you have already prepared |
9 |
Follow the on-screen instructions. |
|||||
|
your printer, go to Connect. |
• These operations may take some time. |
||||||
|
Note |
|
|
|
|
• To connect to a smartphone as well, see "7-b. |
||
|
The following steps are for Windows (except |
|
||||||
|
|
|
Connecting to a Smartphone" on page 5. |
|||||
|
Windows 10 in S mode) and macOS users. For other |
|
|
|
|
|||
|
operating systems, continue setup by following the |
|
|
|
|
|||
|
on-screen instructions instead. |
|
|
|
|
|||
Using the Setup CD-ROM for Windows
Double click EasySetup.exe in the CD-ROM, and then continue from step 3. If you do not have an internet connection, open the win folder in the CD-ROM and double click SETUP.exe. This will install the printer driver.
4

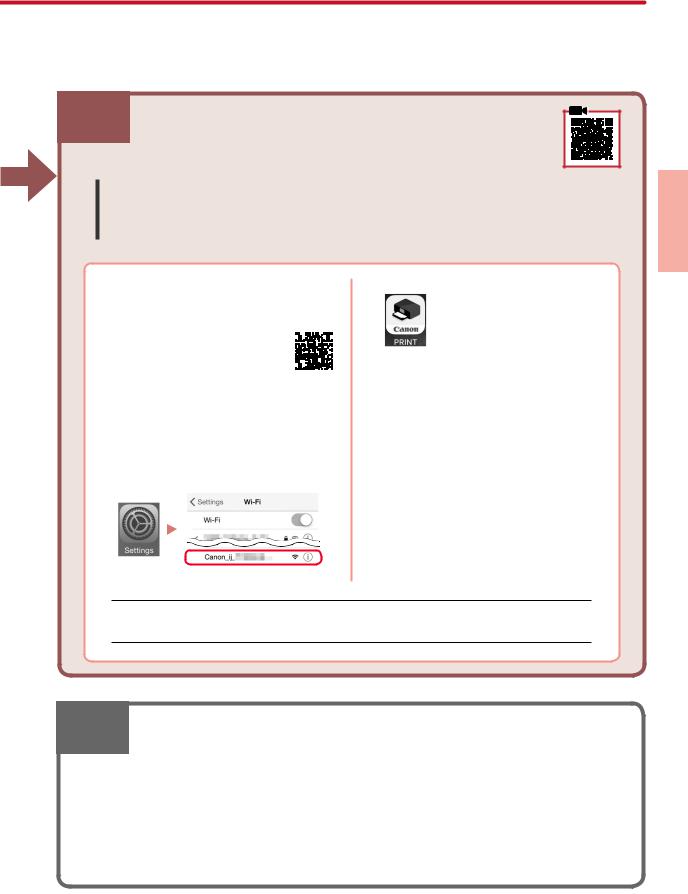
7-b Connecting to a Smartphone
If you are using multiple smartphones, perform these steps on each smartphone.
Prepare the following before starting.
aEnable the Wi-Fi setting on your smartphone.
bConnect your smartphone to the wireless router (if you have a wireless router). Refer to your smartphone and wireless router manuals for more details.
1 |
Install the "Canon PRINT Inkjet/SELPHY" |
3 |
Open the installed app. |
||||||||||||||
|
app on your smartphone. |
|
|
||||||||||||||
|
• Scan the QR code shown on |
|
|
|
|
|
|
|
|
|
|
|
|
|
|
|
|
|
|
|
|
|
|
|
|
|
|
|
|
|
|
|
|
||
|
the right to access the Canon |
|
|
|
|
|
|
|
|
|
|
|
|
|
|
|
|
|
|
|
|
|
|
|
|
|
|
|
|
|
|
|
|
||
|
website, and then download |
|
|
|
|
|
|
|
|
|
|
|
|
|
|
|
|
|
|
|
|
|
|
|
|
|
|
|
|
|
|
|
|
||
|
the app. |
|
|
|
|
|
|
|
|
|
|
|
|
|
|
|
|
2 |
|
|
|
|
|
|
|
|
|
|
|
|
|
4 |
Follow the on-screen instructions in the |
||
Open your smartphone's Wi-Fi settings. |
|||||||||||||||||
|
app to add your printer. |
||||||||||||||||
|
Tap the network name \SSID\ that starts |
|
|
||||||||||||||
|
with "Canon_ij_". |
|
|
||||||||||||||
|
If "Canon_ij_" does not appear, proceed |
|
|
||||||||||||||
|
to step 3. |
|
|
||||||||||||||
|
(Example of iOS screen) |
|
|
||||||||||||||
<![endif]>ENGLISH
Once you have added your printer, you can print from your smartphone. To print photos, see "Loading Photo Paper" on page 6.
7-c Do Not Connect To A Device
1 |
Press the Stop button. |
2 |
Select Do not connect, and then press the OK button. |
3 |
Select Yes, and then press the OK button. |
5
Loading Photo Paper
Photo paper can only be loaded in the rear tray.
1 Open the rear tray cover and extend the paper support.
a
 b
b
3 Load several sheets of photo paper with the print side facing up.
4 Align the paper guide to the paper, and then close the feed slot cover.
•Follow the on-screen instructions to set information for the loaded paper.
2 Open the feed slot cover and slide the righthand side paper guide to the far right.
|
5 |
When Save the rear tray paper information |
|
|
appears on the printer's screen, press the OK |
|
|
button. |
|
6 |
Select the paper size and type, and press the OK |
|
||
|
|
button. |
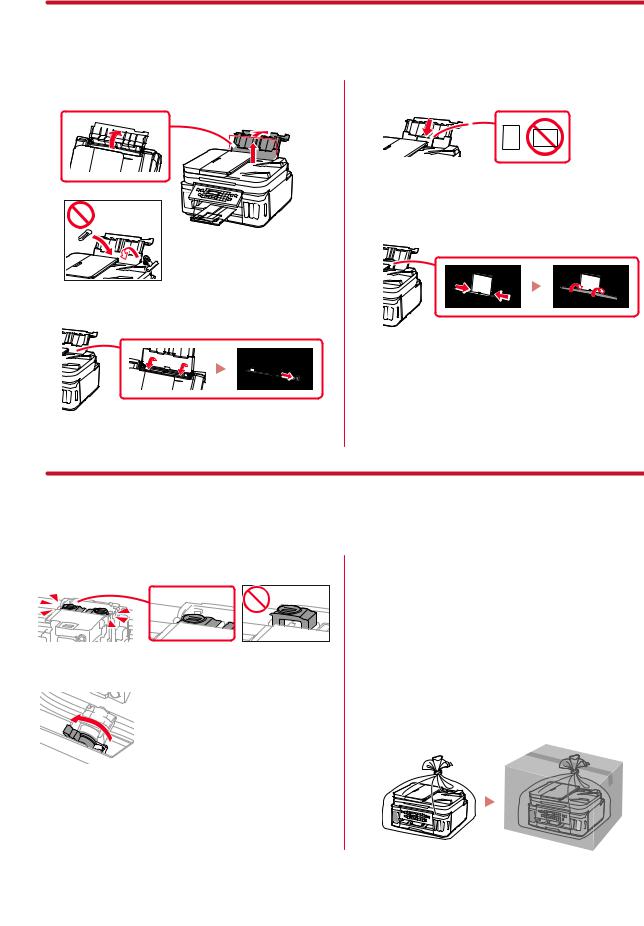
Transporting Your Printer
When relocating the printer, make sure of the following. Refer to the Online Manual for details.
Check that both joint buttons are pressed down completely to avoid ink leaks.
Check that the position of the ink valve lever is closed.
Pack the printer in a plastic bag in case ink leaks.
•Pack the printer in a sturdy box so that it is placed with its bottom facing down, using sufficient protective material to ensure safe transport.
•Do not tilt the printer. Ink may leak.
•Please handle with care and ensure the box remains flat and NOT turned upside down or on its side, as the printer may be damaged and ink in the printer may leak.
•When a shipping agent is handling transport of the printer, have its box marked "THIS SIDE UP" to keep the printer with its bottom facing down. Mark also with "FRAGILE" or "HANDLE WITH CARE".
6

Instalación de la impresora
1. Contenido de la caja
•Cabezales de impresión |
•Frascos de tinta |
|
•Cable de alimentación |
|
•Cable modular |
|
CD-ROM de instalación para |
|
•Windows |
|
Información de seguridad e |
|
•información importante |
|
•Guía de inicio (este manual) |
2. Retirar los materiales de protección
1 |
|
|
|
|
Retire y tire los materiales de protección y la |
||||
|
cinta naranja. |
|||
2 |
Abra la cubierta/unidad de escaneado, retire |
|||
y tire la cinta naranja y el material de protección que hay dentro.
b 
 a
a


3. Instalar los cabezales de impresión
1 Abra la cubierta de bloqueo del cabezal de impresión.
2 Saque cada cabezal de impresión del paquete y retire la etiqueta.
Con guración en línea |
3 Retire la cinta protectora.
4 Inserte el cabezal de impresión C \color\ a la izquierda y el cabezal de impresión B \negro\ a la derecha.
5 Cierra la cubierta de bloqueo del cabezal de impresión y presione hacia abajo hasta que haga clic.
6 Presione hacia abajo los dos botones de unión completamente hasta que hagan clic.
¡Comprobar!
<![endif]>ESPAÑOL
1

Instalación de la impresora
4. Verter la tinta

 Importante
Este producto un tratamiento cuidadoso de la tinta, ya que puede salpicar cuando se rellenan de tinta los depósitos de tinta. Es posible que las manchas de tinta no salgan de la ropa u otras pertenencias.
1 Abra el cubierta del depósito de tinta y la tapa del depósito a la izquierda de la impresora.
2 |
Sujete el frasco de tinta hacia arriba y gire |
|
suavemente la tapa del frasco para retirarla. |
|
¡Comprobar! |
|
PGBK |
3 |
Alinee la boquilla del frasco de tinta con la |
|
entrada. |
6 Reemplace la tapa del depósito de manera segura y, a continuación, cierre la cubierta del depósito de tinta.
7 Repita los pasos del 1 al 6 para verter toda la tinta en los depósitos de tinta correspondientes de la derecha.
¡Comprobar!
C M Y
8 Cierre la cubierta/unidad de escaneado.
 Precaución
Tenga cuidado con los dedos.
4 Coloque el frasco de tinta boca abajo despacio y empuje hacia abajo para verter la tinta.
• Si la tinta no se vierte, retire suavemente el frasco de tinta e inténtelo de nuevo.
a 


 b
b

5 Retire suavemente el frasco de tinta de la
entrada.
•

 a
a b
b


5. Encender la impresora
1 Conecte el cable de alimentación.
Atrás

 Importante
En este momento, no conecte ningún otro cable.
2 Abra el panel de control y pulse el botón
ACTIVADO (ON).
2
3 Si aparece la siguiente pantalla, use los botones [y ]para seleccionar el idioma y pulse el botón OK.

 Importante
Si aparece un error en la pantalla, consulte "Si un mensaje de error (código de asistencia) se muestra en la pantalla" en la página 3 y siga las instrucciones.
4 Si aparece la pantalla de selección de país o región, utilice los botones [y ]para seleccionar su país o región y, a continuación, pulse el botón OK.
6. Carga del papel
1 |
Si aparece la siguiente pantalla, use los botones |
|
[y ]para seleccionar Sí (Yes) y pulse el botón |
|
OK. |
2 |
Retire el cassette de la impresora. |
5
6
7
<![endif]>ESPAÑOL
3 |
Separe las guías del papel deslizándolas. |
|
• |
Deslice la guía del papel derecha hacia el borde |
|
|
|
derecho. Alinee la guía del papel frontal con la marca |
Carta o A4.
4 Cargue el papel.
•Cargue 2 o más hojas de papel normal de tamaño Carta o A4 con el lado de impresión hacia abajo.
•Coloque el papel delante de la guía del papel frontal y alinee la guía del papel derecha con el ancho del papel.
a |
b |
Compruebe el código de asistencia y después siga las instrucciones si el código que se muestra está escrito a continuación.
•1890No se han retirado los materiales de protección.

 "2. Retirar los materiales de protección" en la página 1
•1470Los cabezales de impresión no están instalados correctamente.
 "3. Instalar los cabezales de impresión" en la página 1
•1471Los cabezales de impresión no están instalados.

 "3. Instalar los cabezales de impresión" en la página 1
•1642Es posible que la tinta sea insuficiente.

 "4. Verter la tinta" en la página 2
Para los demás casos, consulte el Manual en línea.
3

Instalación de la impresora
¿Qué dispositivo va a conectar?
Ordenador |
Ordenador y |
|
Teléfono inteligente |
|
|||
|
|
||||||
teléfono inteligente |
|
||||||
|
|
|
|
|
|
||
|
|
|
Sin conectar con ningún otro dispositivo |
|
7-c |
||
|
|
|
|
||||
|
|
|
|
||||
|
|
|
|
|
|
|
|
7-a |
Conectar al ordenador |
|
|
|
|
|
|
|
|
|
|
|
|
||
|
|
|
|
|
|
||
|
Si utiliza varios ordenadores, realice estos pasos en cada ordenador. |
|
|
|
|
|
|
|
|
|
|
|
|
|
|
|
|
|
|
|
|
|
|
|
|
|
|
|
|
|
|
|
|
|
|
|
|
|
|
|
|
|
|
|
|
|
|
|
|
|
|
|
|
|
|
1 |
Acceda al sitio web de Canon desde un |
6 |
Haga clic en Descargar. |
|||||
|
ordenador. |
|
|
|
7 |
Ejecute el archivo descargado. |
||
|
|
|
|
|
||||
|
|
|
|
|
||||
|
|
|
|
|
8 |
Haga clic en Iniciar configuración |
||
2 |
Seleccione |
Configurar. |
|
(Start Setup). |
||||
|
|
|
|
|||||
3 |
Escriba el nombre del modelo de su |
|
|
|
|
|||
|
impresora y haga clic en Ir. |
|
|
|
|
|||
4 |
Haga clic en Iniciar. |
|
|
|
|
|||
5 |
Haga clic en Si ya ha preparado la |
9 |
|
|
|
|||
|
|
|
||||||
|
impresora, vaya a Conectar. |
Siga las instrucciones que aparezcan en |
||||||
|
Nota |
|
|
|
|
pantalla. |
||
|
Los siguientes pasos son para usuarios de Windows |
|
• Estas operaciones pueden llevar algún |
|||||
|
(excepto Windows 10 in S mode) y macOS. |
|
||||||
|
Para otros sistemas operativos, continúe con la |
|
|
tiempo. |
||||
|
|
• Para conectar con un teléfono inteligente |
||||||
|
configuración siguiendo las instrucciones en |
|
||||||
|
pantalla. |
|
|
|
|
|
también, consulte "7-b. Conexión con un |
|
|
|
|
|
|
|
|
teléfono inteligente" en la página 5. |
|
Uso del CD-ROM de instalación para Windows
Haga doble clic en EasySetup.exe en el CD-ROM y después continúe desde el paso 3. Si no tiene una conexión a Internet, abra la carpeta win en el CD-ROM y haga doble clic en SETUP.exe. Esto instalará el controlador de la impresora.
4
7-b Conexión con un teléfono inteligente
Si utiliza varios teléfonos inteligentes, realice estos pasos en cada teléfono inteligente.
Prepare lo siguiente antes de empezar.
aActive la configuración de Wi-Fi en su teléfono inteligente.
bConecte su teléfono inteligente al router inalámbrico (si tiene un router inalámbrico).
Consulte los manuales de su teléfono inteligente y del router inalámbrico para obtener más detalles.
1 |
Instale la aplicación "Canon PRINT |
3 |
Abra la aplicación instalada. |
|||||||||||||
|
Inkjet/SELPHY" en su teléfono |
|
|
|||||||||||||
|
inteligente. |
|
|
|||||||||||||
|
• Escanee el código QR que |
|
|
|
|
|
|
|
|
|
|
|
|
|
|
|
|
|
|
|
|
|
|
|
|
|
|
|
|
|
|
|
|
|
se muestra a la derecha para |
|
|
|
|
|
|
|
|
|
|
|
|
|
|
|
|
|
|
|
|
|
|
|
|
|
|
|
|
|
|
|
|
|
acceder al sitio web de Canon |
|
|
|
|
|
|
|
|
|
|
|
|
|
4 |
Siga las instrucciones en pantalla de la |
|
|
|
|
|
|
|
|
|
|
|
|
|
|
|||
|
y, a continuación, descargue la |
|
|
|
|
|
|
|
|
|
|
|
|
|
||
|
|
|
|
|
|
|
|
|
|
|
|
|
|
aplicación para agregar su impresora. |
||
|
aplicación. |
|
||||||||||||||
|
|
|
||||||||||||||
2 |
Abra la configuración de Wi-Fi de su |
|
|
|||||||||||||
|
teléfono inteligente. Toque el nombre de |
|
|
|||||||||||||
|
red \SSID\ que empieza con "Canon_ij_". |
|
|
|||||||||||||
|
Si no aparece "Canon_ij_", vaya al paso 3. |
|
|
|||||||||||||
|
(Ejemplo de la pantalla de iOS) |
|
|
|||||||||||||
Cuando haya agregado la impresora, podrá imprimir desde su teléfono inteligente.
Para imprimir fotos, consulte "Carga de papel fotográfico" en la página 6.
7-c No conectar con un dispositivo
1 |
Pulse el botón Parar (Stop). |
2 |
Seleccione No conectar (Do not connect) y, a continuación, pulse el botón OK. |
3 |
Seleccione Sí (Yes) y, a continuación, pulse el botón OK. |
<![endif]>ESPAÑOL
5

Carga de papel fotográfico
El papel fotográfico solo se puede cargar en la bandeja posterior.
1 Abra la cubierta de la bandeja posterior y extienda el soporte del papel.
a
 b
b
3 Cargue varias hojas de papel fotográfico con el lado de impresión hacia arriba.
4 Alinee la guía del papel con el papel y,
a continuación, cierre la cubierta de la ranura de alimentación.
•Siga las instrucciones en pantalla para definir la información para el papel cargado.
2 Abra la cubierta de la ranura de alimentación y deslice la guía del papel del lado derecho totalmente hacia la derecha.
5
6
Cuando Registre la información de papel de la bandeja posterior (Save the rear tray paper information) se muestre en la pantalla de la impresora, pulse el botón OK.
Seleccione el tipo y tamaño de papel y pulse el botón OK.
Transporte de la impresora
Cuando vaya a transportar la impresora, asegúrese de lo siguiente. Consulte el Manual en línea para obtener más información.
Compruebe que ambos botones de unión se hayan presionado hacia abajo completamente para evitar derrames de tinta.
Compruebe que la posición de la palanca de la válvula de tinta esté cerrado.
Embale la impresora en una bolsa de plástico por si hay derrames de tinta.
•Embale la impresora en una caja resistente y de modo que no quede boca abajo. Utilice suficiente material de protección para garantizar un transporte seguro.
•No incline la impresora. De lo contrario, es posible que la tinta se derrame.
•Manipule con cuidado y asegúrese de que la caja permanece en una superficie plana y que NO se coloca boca abajo o de lado, ya que la impresora podría dañarse y la tinta de la impresora, derramarse.
•Cuando se ocupe del transporte de la impresora una empresa de mensajería, marque la caja con "ESTE LADO ARRIBA" para mantener la impresora con la parte inferior abajo. Márquela también con "FRÁGIL" o "MANEJAR CON CUIDADO".
6
 Loading...