


Getting Started Handbuch Erste Schritte Guide de mise en route Guía de inicio Guida introduttiva
Introductiehandleiding Guia de Iniciação Startvejledning Starthandbok Aloitusopas Příručka Začínáme Kezdeti lépések Pierwsze kroki Úvodná príručka Alustamine Darba uzsākšana
Parengimo darbui instrukcija
Βασικές Οδηγίες Χρήσης
EN DE
FR ES IT NL
PT DA SV FI
CS HU PL SK ET
LV
LT
EL
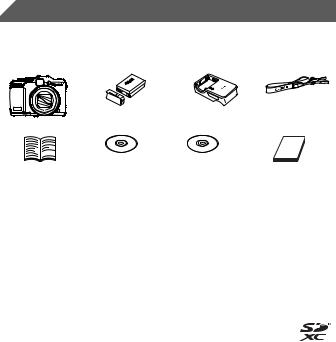
 Package Contents
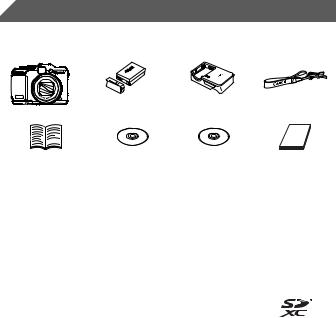
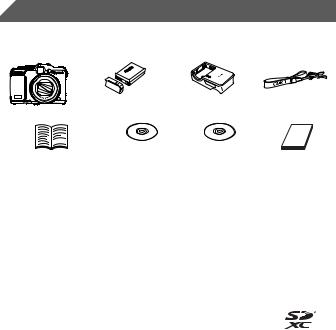
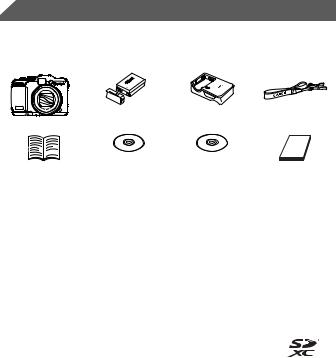
Before use, make sure the following items are included in the package. If anything is missing, contact your camera dealer.
Camera |
Battery Pack NB-10L |
Battery Charger |
Neck Strap |
(with terminal cover) |
CB-2LC/CB-2LCE |
NS-DC11*1 |
|
Getting Started |
DIGITAL CAMERA |
DIGITAL CAMERA |
Warranty System |
(this guide) |
Manuals Disk*2 |
Solution Disk*3 |
Booklet |
*1 For attachment instructions, refer to the Camera User Guide on the DIGITAL CAMERA Manuals Disk.
*2 Contains manuals (=3).
*3 Contains software. For installation instructions, refer to the Camera User Guide, and for instructions on use, refer to the Software Guide.
 Compatible Memory Cards
No memory card is included. Purchase one of the following kinds of card as needed. These memory cards can be used, regardless of capacity. For details on the number of shots and recording time per memory card, refer to “Specifications” in the Camera User Guide.
• |
SD memory cards* |
• |
SDXC memory cards* |
• |
SDHC memory cards* |
• |
Eye-Fi cards |
*Conforms to SD specifications. However, not all memory cards have been verified to work with the camera.
 About Eye-Fi Cards
This product is not guaranteed to support Eye-Fi card functions (including wireless transfer). In case of an issue with an Eye-Fi card, please check with the card manufacturer.
Also note that an approval is required to use Eye-Fi cards in many countries or regions. Without approval, use of the card is not permitted. If it is unclear whether the card has been approved for use in the area, please check with the card manufacturer.
2
 Viewing the Manuals
The following manuals are provided on the included DIGITAL CAMERA Manuals Disk. Adobe Reader is required to view the PDF manuals.
Camera User Guide
This guide covers the following topics.
Camera basics, from getting ready to shooting, playback, installing the included software, and importing images
Other instructions, about all camera features
Software Guide
This guide describes how to use the included software.
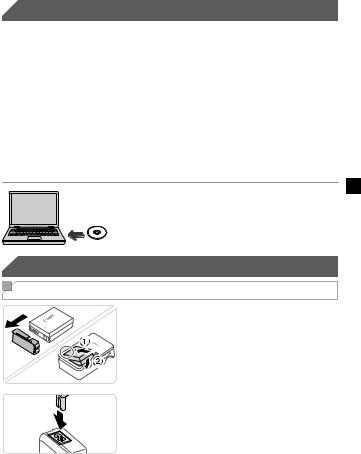
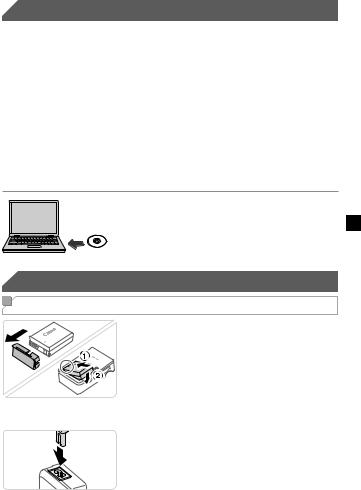
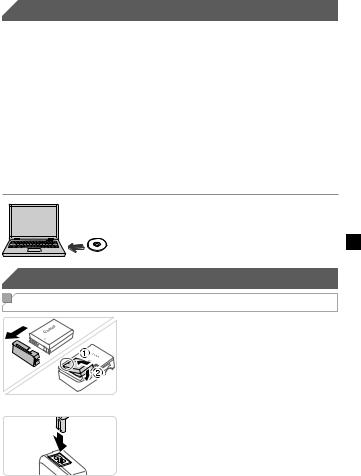
Insert the DIGITAL CAMERA Manuals Disk in the computer’s DVD-ROM drive.
Follow the instructions displayed to view the manual.
 Initial Preparations
Charging the Battery
1 Remove the battery cover and insert the battery in the charger.
Remove the cover from the battery, align
the marks on the battery and charger,
and insert the battery by pushing it in ( ) and down (
 ).
).
2 Charge the battery.
Once you connect the power cord to the charger and plug the cord into a power
outlet, the lamp will light up orange. When charging is finished, the lamp turns
green. Remove the battery.
3
Initial Preparations
For details on charging time and the number of shots or recording time available with a fully charged battery, refer to “Specifications” in the Camera User Guide.
 Inserting the Battery and Memory Card
|
|
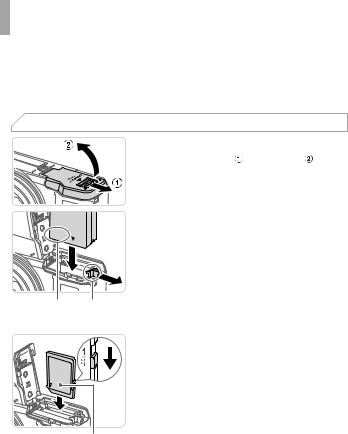
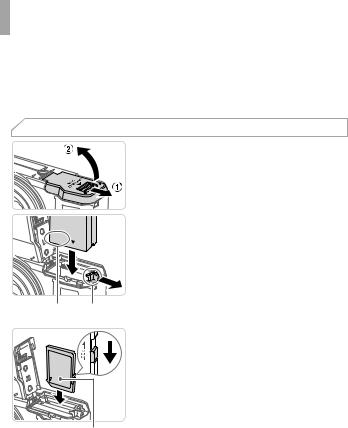
1 Open the cover. |
|
|
Slide the cover ( ) and open it ( ). |
|
|
2 Insert the battery. |
|
|
While pressing the battery lock in the |
|
|
direction of the arrow, insert the battery |
|
|
as shown and push it in until it clicks into |
|
|
the locked position. |
|
|
To remove the battery, press the battery |
Terminals |
Battery |
lock in the direction of the arrow. |
|
||
|
Lock |
|
|
|
3 Check the card’s write-protect |
|
|
tab and insert the memory card. |
|
|
Recording is not possible on memory |
|
|
cards with a write-protect tab when the |
|
|
tab is in the locked (downward) position. |
|
|
Slide the tab up until it clicks into the |
|
|
unlocked position. |
|
Label |
Insert the memory card facing as shown |
|
until it clicks into the locked position. |
|
|
|
|
|
|
To remove the memory card, push it in |
|
|
until you feel a click, and then slowly |
|
|
release it. |
4
Initial Preparations
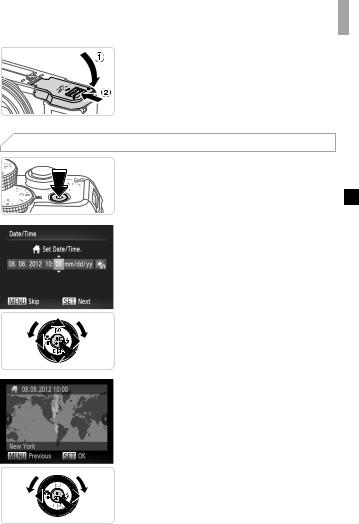
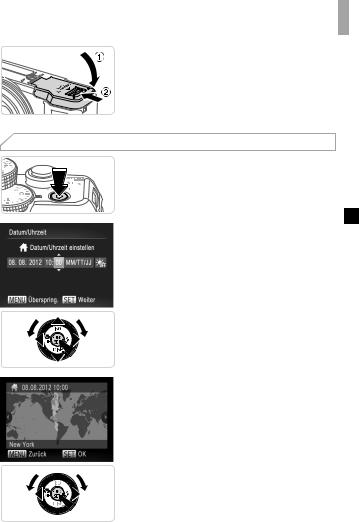
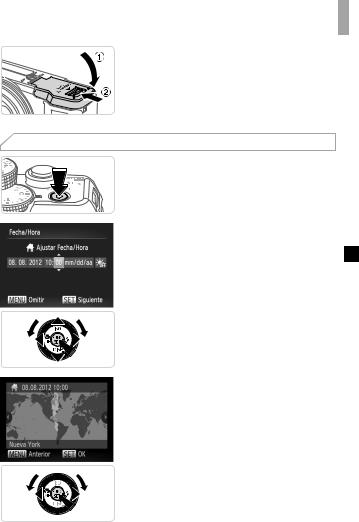
4 Close the cover.
Lower the cover ( ) and hold it down as you slide it, until it clicks into the closed position (
 ).
).
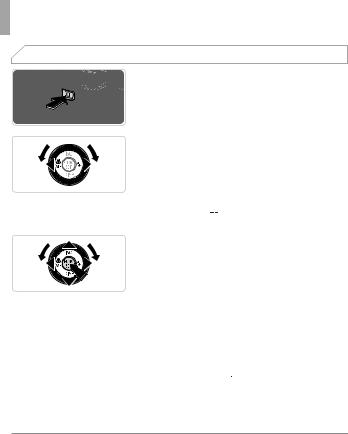
 Setting the Date and Time
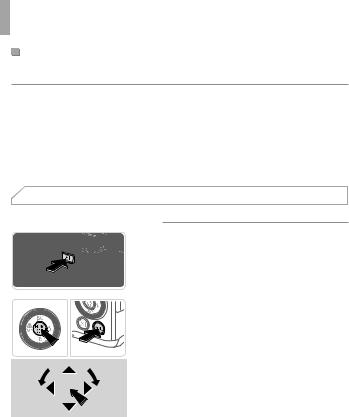
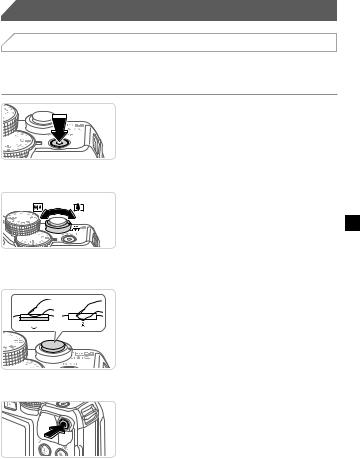
1 Turn the camera on.
Press the ON/OFF button.
The [Date/Time] screen is displayed.
2 Set the date and time.
Press the <q><r> buttons to choose an option.
Press the <o><p> buttons or turn the <7> dial to specify the date and time.
When finished, press the <m> button.
3 Set the home time zone.
Press the <q><r> buttons or turn the <7> dial to choose your home time zone.
Press the <m> button when finished. After a confirmation message, the setting screen is no longer displayed.
To turn off the camera, press the ON/OFF button.
5
Initial Preparations
Changing the Date and Time
To adjust the date and time once you have set it, do the following.
1Press the <n> button.
2Move the zoom lever to choose the [3] tab.
3Press the <o><p> buttons or turn the <7> dial to choose [Date/Time], and then press the <m> button.
4Follow step 2 in “Setting the Date and Time” to adjust the settings.
5Press the <n> button.
 Display Language
The display language can be changed as needed.
1 Enter Playback mode.
Press the <1> button.
2 Access the setting screen.
Press and hold the <m> button, and then immediately press the <n> button.
Press the <o><p><q><r> buttons or turn the <7> dial to choose a language, and then press the <m> button.
6
 Trying the Camera Out
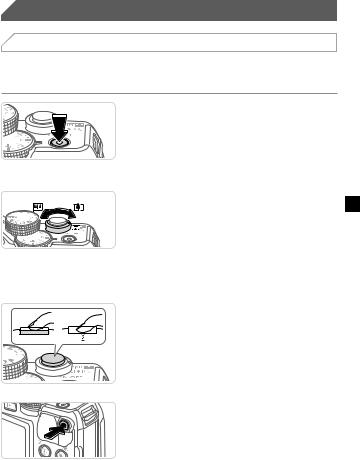
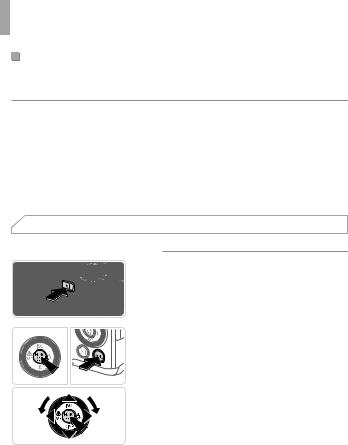
 Shooting
For fully automatic selection of the optimal settings for specific scenes, simply let the camera determine the subject and shooting conditions.
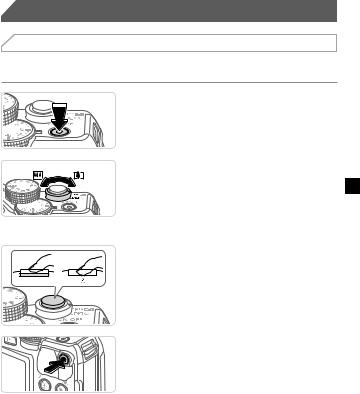
1 Turn the camera on and enter <A> mode.
Press the ON/OFF button. Set the mode dial to <A>.
2 Compose the shot.
To zoom in and enlarge the subject, move the zoom lever toward <i> (telephoto) as you watch the screen, and to zoom away from the subject, move it toward <j> (wide angle).
3 Shoot still images.
Press the shutter button lightly ( ). The camera beeps twice after focusing,
and AF frames are displayed to indicate image areas in focus. Press the shutter button all the way down ( ).
).
Shoot movies.
Press the movie button to start shooting, and press it again to stop.
7
Trying the Camera Out
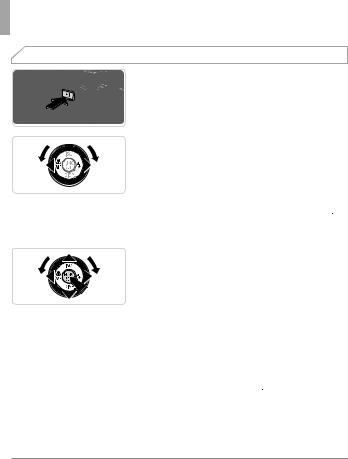
 Viewing
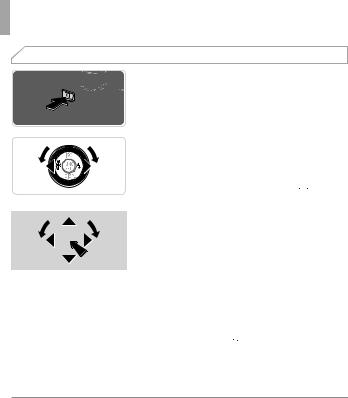
1 Enter Playback mode.
Press the <1> button.
2 Browse through your images.
To view the previous or next image, press the <q><r> buttons or turn the <7> dial.
Movies are identified by a [
 ] icon. To play movies, go to step 3.
3 Play movies.
Press the <m> button to access the movie control panel, choose [  ] (either press the <q><r> buttons or turn the <7> dial), and then press the <m> button again.
To adjust the volume, press the <o><p> buttons.
Playback now begins, and after the movie is finished, [
 ] is displayed.
 Erasing the Images
To erase the image you chose in step 2, do the following. Note that erased images cannot be recovered.
1Press the <a> button.
2After [Erase?] is displayed, press the <q><r> buttons or turn the <7> dial to choose [Erase], and then press the <m> button.
8

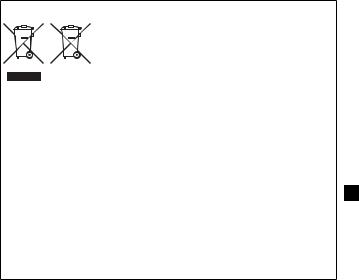
European Union (and EEA) only.
These symbols indicate that this product is not to be disposed of with your household waste, according to the WEEE Directive (2002/96/EC), the Battery Directive (2006/66/EC)
and/or your national laws implementing those Directives. If a chemical symbol is printed beneath the symbol shown
above, in accordance with the Battery Directive, this indicates that a heavy metal (Hg = Mercury, Cd = Cadmium, Pb =
Lead) is present in this battery or accumulator at a concentration above an applicable threshold specified in the Battery Directive.
This product should be handed over to a designated collection point, e.g., on an authorized one-for-one basis when you buy a new similar product or to an authorized collection site for recycling waste electrical and electronic equipment (EEE) and batteries and accumulators. Improper handling of this type of waste could have a possible impact on the environment and human health due to potentially hazardous substances that are generally associated with EEE.
Your cooperation in the correct disposal of this product will contribute to the effective usage of natural resources.
For more information about the recycling of this product, please contact your local city office, waste authority, approved scheme or your household waste disposal service or visit www.canon-europe.com/environment.
(EEA: Norway, Iceland and Liechtenstein)
CAUTION
RISK OF EXPLOSION IF BATTERY IS REPLACED BY AN INCORRECT TYPE.
DISPOSE OF USED BATTERIES ACCORDING TO LOCAL REGULATION.
CANON INC.
30-2, Shimomaruko 3-chome, Ohta-ku, Tokyo 146-8501, Japan
CANON EUROPA N.V.
Bovenkerkerweg 59-61, 1185 XB Amstelveen, The Netherlands
© CANON INC. 2012 |
PRINTED IN THE EU |
9
 Lieferumfang
Überprüfen Sie, ob die folgenden Teile im Lieferumfang enthalten sind. Wenden Sie sich an den Kamera-Händler, falls etwas fehlen sollte.
Kamera |
|
Akku NB-10L |
Akkuladegerät |
Trageriemen |
(mit Kontaktabdeckung) |
CB-2LC/CB-2LCE |
NS-DC11*1 |
||
Handbuch Erste Schritte |
DVD-ROM |
CD-ROM |
Canon- |
|
DIGITAL CAMERA DIGITAL CAMERA |
||||
(Dieses Handbuch) |
Manuals Disk*2 |
Solution Disk*3 |
Garantiebroschüre |
|
*1 Anweisungen zur Befestigung finden Sie im Kamera-Benutzerhandbuch auf der DVD-ROM DIGITAL CAMERA Manuals Disk.
*2 Enthält Handbücher (=3).
*3 Enthält Software. Anweisungen zur Installation finden Sie im KameraBenutzerhandbuch und Anweisungen zur Verwendung im Software-Handbuch.
 Kompatible Speicherkarten
Eine Speicherkarte ist im Lieferumfang nicht enthalten. Erwerben Sie je nach Bedarf einen der folgenden Kartentypen. Diese Speicherkarten
können unabhängig von der Kapazität verwendet werden. Einzelheiten zur Anzahl der Aufnahmen und zur Aufnahmedauer pro Speicherkarte finden Sie unter „Technische Daten“ im Kamera-Benutzerhandbuch.
• |
SD-Speicherkarten* |
• |
SDXC-Speicherkarten* |
• |
SDHC-Speicherkarten* |
• |
Eye-Fi-Karten |
*Entspricht den SD-Spezifikationen. Die Kompatibilität aller Speicherkarten mit der Kamera kann jedoch nicht garantiert werden.
 Informationen zu Eye-Fi-Karten
Zu diesem Produkt wird nicht garantiert, dass die Funktionen der Eye-Fi- Karte (einschließlich drahtloser Übertragung) unterstützt werden. Wenn Sie ein Problem mit der Eye-Fi-Karte haben, wenden Sie sich bitte an
den Kartenhersteller.
Bitte beachten Sie auch, dass zur Verwendung einer Eye-Fi-Karte in bestimmten Ländern oder Regionen eventuell eine Zulassung notwendig ist. Ohne Zulassung ist die Verwendung nicht gestattet. Bei Unklarheiten, ob die Karte zur Verwendung in bestimmten Ländern/Regionen zugelassen ist, informieren Sie sich bitte beim Kartenhersteller.
2
 Anzeigen der Handbücher
Folgende Handbücher befinden sich auf der mitgelieferten DVD-ROM DIGITAL CAMERA Manuals Disk. Zur Anzeige der Handbücher im PDF-Format ist Adobe Reader erforderlich.
Kamera-Benutzerhandbuch
Dieses Handbuch behandelt die folgenden Themen.
Grundlagen der Kamera, Vorbereiten der Aufnahme, Wiedergabe, Installieren der im Lieferumfang enthaltenen Software und Importieren von Bildern
Weitere Anleitungen zu allen Kamerafunktionen
Software-Handbuch
Dieses Handbuch enthält Anweisungen zur Verwendung der im Lieferumfang enthaltenen Software.
Legen Sie die DVD-ROM DIGITAL CAMERA Manuals Disk in das DVD-ROM-Laufwerk des Computers ein.
Befolgen Sie die Anweisungen auf dem Bildschirm zur Anzeige des Handbuchs.
 Erste Vorbereitungen
Aufladen des Akkus
1 Öffnen Sie die
Akkufachabdeckung, und
setzen Sie den Akku in das
Ladegerät ein.
Entfernen Sie die Abdeckung des Akkus, richten Sie die Markierungen am Akku und am Ladegerät aneinander aus, und setzen Sie dann den Akku ein, indem Sie ihn hineinschieben ( ) und nach unten drücken (
 ).
).
2 Laden Sie den Akku auf.
Wenn Sie das Netzkabel an das Ladegerät und das Kabel dann an
eine Steckdose angeschlossen haben,
leuchtet die Lampe orange.
Wenn der Akku vollständig aufgeladen wurde, leuchtet die Lampe grün. Entfernen Sie den Akku.
3

Erste Vorbereitungen
Einzelheiten zur Ladezeit, zur Anzahl der Aufnahmen und zur Aufnahmezeit bei vollständig aufgeladenem Akku finden Sie unter „Technische Daten“ im KameraBenutzerhandbuch.
 Einsetzen von Akku und Speicherkarte
1 Öffnen Sie die Abdeckung.
Schieben Sie die Abdeckung in Pfeilrichtung ( ), und öffnen Sie sie (
 ).
).
|
2 Setzen Sie den Akku ein. |
|
|
Drücken Sie die Akkuverriegelung in |
|
|
Richtung des Pfeils, setzen Sie den Akku |
|
|
wie dargestellt ein, und schieben Sie ihn |
|
|
hinein, bis er hörbar einrastet. |
|
|
Um den Akku zu entfernen, drücken Sie die |
|
|
Akkuverriegelung in Richtung des Pfeils. |
|
Anschlüsse Akkuverriegelung |
|
|
|
3 Überprüfen Sie den |
|
|
Schreibschutzschieber der |
|
|
Karte, und setzen Sie die |
|
|
Speicherkarte ein. |
|
|
Wenn die Speicherkarte über einen |
|
|
Schreibschutzschieber verfügt und dieser |
|
|
sich in der Position für den Schreibschutz |
|
Beschriftung |
(unten) befindet, können Sie keine Bilder |
|
aufnehmen. Schieben Sie den Schieber |
||
|
nach oben, bis er in die Position ohne Schreibschutz einrastet.
Setzen Sie die Speicherkarte wie dargestellt ein, bis sie hörbar einrastet.
Um die Speicherkarte herauszunehmen, drücken Sie sie hinein, bis Sie ein Klicken hören. Lassen Sie sie dann langsam los.
4
Erste Vorbereitungen
4 Schließen Sie die Abdeckung.
Klappen Sie die Abdeckung nach unten
( ), und halten Sie sie gedrückt, während Sie sie in Pfeilrichtung schieben, bis sie hörbar einrastet (
 ).
).
 Einstellen von Datum und Uhrzeit
1 Schalten Sie die Kamera ein.
Drücken Sie die Taste ON/OFF. Der Bildschirm [Datum/Uhrzeit]
wird angezeigt.
2Stellen Sie das Datum und die Uhrzeit ein.
Drücken Sie die Tasten <q><r>, um eine Option auszuwählen.
Drücken Sie die Tasten <o><p>, oder drehen Sie das Wahlrad <7>, um das Datum und die Uhrzeit anzugeben.
Drücken Sie anschließend die Taste <m>.
3Legen Sie die Standardzeitzone fest.
Drücken Sie die Tasten <q><r>, oder drehen Sie das Wahlrad <7>, um die Standardzeitzone auszuwählen.
Drücken Sie anschließend die Taste <m>. Nach der Anzeige einer Bestätigungsmeldung wird der Einstellungsbildschirm nicht mehr angezeigt.
Drücken Sie die Taste ON/OFF, um die Kamera auszuschalten.
5

Erste Vorbereitungen
Ändern von Datum und Uhrzeit
Gehen Sie wie folgt vor, wenn Sie das Datum und die Uhrzeit anpassen möchten, nachdem Sie sie eingestellt haben.
1Drücken Sie die Taste <n>.
2Bewegen Sie den Zoom-Regler, um die Registerkarte [3] auszuwählen.
3Wählen Sie mit den Tasten <o><p> oder durch Drehen des Wahlrads <7>, [Datum/Uhrzeit] aus, und drücken Sie anschließend die
Taste <m>.
4Befolgen Sie Schritt 2 in „Einstellen von Datum und Uhrzeit“, um die Einstellungen zu ändern.
5Drücken Sie die Taste <n>.
 Spracheinstellung
Die Anzeigesprache kann nach Wunsch geändert werden.
1 Wechseln Sie in den Wiedergabemodus.
Drücken Sie die Taste <1>.
2 Greifen Sie auf den Einstellungsbildschirm zu.
Halten Sie die Taste <m> gedrückt, und drücken Sie dann sofort die Taste <n>.
Drücken Sie die Tasten <o><p><q><r>, oder drehen Sie das Wahlrad <7>, um eine Sprache auszuwählen. Drücken Sie anschließend die Taste <m>.
6
 Ausprobieren der Kamera
 Aufnahme
Für die vollautomatische Auswahl der optimalen Einstellungen für spezielle Szenen können Sie das Motiv und die Aufnahmebedingungen einfach von der Kamera ermitteln lassen.
1 Schalten Sie die Kamera ein, und stellen Sie den Modus <A> ein.
Drücken Sie die Taste ON/OFF. Drehen Sie das Modus-Wahlrad auf die
Position <A>.
2 Richten Sie die Kamera auf den gewünschten Bildausschnitt.
Zum Heranzoomen und Vergrößern des Motivs bewegen Sie während der Betrachtung des Bildschirms den ZoomRegler in Richtung <i> (Tele). Um aus dem Motiv herauszuzoomen, bewegen Sie ihn in Richtung <j> (Weitwinkel).
3 Nehmen Sie Fotos auf.
Drücken Sie leicht auf den Auslöser ( ). Nach der Fokussierung ertönen zwei
Signaltöne, und um die fokussierten Bildbereiche werden AF-Rahmen eingeblendet. Drücken Sie den Auslöser vollständig herunter ( ).
).
Nehmen Sie Filme auf.
Drücken Sie die Movie-Taste, um die Aufnahme zu beginnen, und drücken Sie sie erneut, um die Aufnahme anzuhalten.
7
Ausprobieren der Kamera
 Anzeigen
1 Wechseln Sie in den
Wiedergabemodus.
Drücken Sie die Taste <1>.
2 Durchsuchen Sie Ihre Bilder.
Um das vorherige bzw. nächste Bild anzuzeigen, drücken Sie die Tasten <q><r>, oder drehen Sie das Wahlrad <7>.
Filme werden durch das Symbol [
 ] gekennzeichnet. Um Filme wiederzugeben, gehen Sie zu Schritt 3.
3 Spielen Sie Filme ab.
Drücken Sie die Taste <m>, um auf die Filmsteuerung zuzugreifen, wählen Sie [  ] aus (drücken Sie die Tasten <q><r>, oder drehen Sie das Wahlrad <7>), und drücken Sie dann die
Taste <m> erneut.
Um die Lautstärke einzustellen, drücken Sie die Tasten <o><p>.
Die Wiedergabe beginnt. Wenn der Film beendet ist, wird [
 ] angezeigt.
 Löschen von Bildern
Gehen Sie wie folgt vor, um das in Schritt 2 ausgewählte Bild zu löschen. Beachten Sie, dass einmal gelöschte Bilder nicht wiederhergestellt werden können.
1Drücken Sie die Taste <a>.
2Wenn [Löschen?] angezeigt wird, drücken Sie die Tasten <q><r>, oder drehen Sie das Wahlrad <7>, um [Löschen] auszuwählen, und drücken Sie dann die Taste <m>.
8
Nur Europäische Union (und EWR)
Diese Symbole weisen darauf hin, dass dieses Produkt gemäß WEEE-Richtlinie 2002/96/EG (Richtlinie über Elektround Elektronik-Altgeräte), Batterien-Richtlinie (2006/66/EG)
und/oder nationalen Gesetzen zur Umsetzung dieser Richtlinien nicht über den Hausmüll entsorgt werden darf. Falls sich unter dem oben abgebildeten Symbol ein chemisches Symbol befindet, bedeutet dies gemäß der Batterien-Richtlinie,
dass in dieser Batterie oder diesem Akkumulator ein Schwermetall (Hg = Quecksilber, Cd = Cadmium, Pb = Blei) in einer Konzentration vorhanden ist, die über einem in der Batterien-Richtlinie angegebenen geltenden Schwellenwert liegt.
Dieses Produkt muss bei einer dafür vorgesehenen Sammelstelle abgegeben werden. Dies kann z. B. durch Rückgabe beim Kauf eines neuen ähnlichen Produkts oder durch Abgabe bei einer autorisierten Sammelstelle für die Wiederaufbereitung von Elektround Elektronik-Altgeräten sowie Batterien und Akkumulatoren geschehen. Der unsachgemäße Umgang mit Altgeräten kann aufgrund potenziell gefährlicher Stoffe, die häufig in Elektround Elektronik-Altgeräten enthalten sind, negative Auswirkungen auf die Umwelt und die menschliche Gesundheit haben.
Durch Ihre Mitarbeit bei der sachgemäßen Entsorgung dieses Produkts tragen Sie zu einer effektiven Nutzung natürlicher Ressourcen bei.
Um weitere Informationen über die Wiederverwertung dieses Produkts zu erhalten, wenden Sie sich an Ihre Stadtverwaltung, den öffentlich-rechtlichen Entsorgungsträger, eine autorisierte Stelle für die Entsorgung von Elektround Elektronik-Altgeräten oder Ihre Müllabfuhr oder besuchen Sie www.canon-europe.com/environment.
(EWR: Norwegen, Island und Liechtenstein)
VORSICHT
ES BESTEHT DIE GEFAHR EINER EXPLOSION, WENN EIN FALSCHER AKKUTYP VERWENDET WIRD.
VERBRAUCHTE AKKUS SIND ENTSPRECHEND DEN ÖRTLICHEN BESTIMMUNGEN ZU ENTSORGEN.
CANON INC.
30-2, Shimomaruko 3-chome, Ohta-ku, Tokyo 146-8501, Japan
CANON EUROPA N.V.
Bovenkerkerweg 59-61, 1185 XB Amstelveen, The Netherlands
© CANON INC. 2012 |
GEDRUCKT IN DER EU |
9
 Contenu du coffret
Vérifiez que les éléments suivants sont inclus dans le coffret avant d’utiliser l’appareil photo.
Si un élément venait à manquer, contactez le revendeur de l’appareil photo.
Appareil photo |
Batterie NB-10L |
Chargeur de batterie |
Courroie |
(avec couvre-bornes) |
CB-2LC/CB-2LCE |
NS-DC11*1 |
|
Guide de mise |
DVD-ROM |
CD-ROM |
Brochure sur le |
DIGITAL CAMERA |
DIGITAL CAMERA |
||
en route |
Manuals Disk*2 |
Solution Disk*3 système de garantie |
|
(ce guide) |
|
|
de Canon |
*1 Pour obtenir des instructions pour la fixation, reportez-vous au Guide d’utilisation de l’appareil photo sur le DVD-ROM DIGITAL CAMERA Manuals Disk.
*2 Contient les manuels (=3).
*3 Contient les logiciels. Pour obtenir des instructions sur l’installation, reportez-vous au Guide d’utilisation de l’appareil photo et pour des instructions concernant l’utilisation, consultez le Guide d’utilisation des logiciels.
 Cartes mémoire compatibles
Aucune carte mémoire n’est fournie. Achetez un des types de carte suivants, selon les besoins. Vous pouvez utiliser ces cartes mémoire, quelle que soit leur capacité. Pour en savoir plus sur le nombre de prises de vue et la durée d’enregistrement par carte mémoire, reportez-vous à la section « Caractéristiques » du Guide d’utilisation de l’appareil photo.
• |
Cartes mémoire SD* |
• |
Cartes mémoire SDXC* |
• |
Cartes mémoire SDHC* |
• |
Cartes Eye-Fi |
*Conformes aux spécifications SD. Le fonctionnement de toutes les cartes mémoire avec l’appareil photo n’a cependant pas été vérifié.
 À propos des cartes Eye-Fi
La compatibilité de ce produit avec les fonctions des cartes Eye-Fi
(y compris le transfert sans fil) n’est pas garantie. En cas de problème avec une carte Eye-Fi, veuillez consulter le fabricant de la carte. Veuillez noter également que dans de nombreux pays ou régions,
l’utilisation de cartes Eye-Fi requiert un agrément. Sans agrément, l’usage de ces cartes n’est pas autorisé. En cas d’incertitude quant à l’agrément des cartes dans un lieu donné, veuillez consulter le fabricant de la carte.
2
 Visualisation des manuels
Vous pouvez trouver les manuels suivants sur le DVD-ROM DIGITAL CAMERA Manuals Disk fourni. Adobe Reader est nécessaire pour visualiser les manuels.
Guide d’utilisation de l’appareil photo
Ce guide couvre les sujets suivants :
Principes de base de l’appareil photo, depuis la mise en route à la prise de photo, la lecture, l’installation des logiciels fournis et l’importation de photos
Autres instructions à propos de toutes les fonctions de l’appareil photo
Guide d’utilisation des logiciels
Ce guide explique comment utiliser les logiciels fournis.
Insérez le DVD-ROM DIGITAL CAMERA Manuals Disk dans le lecteur de DVD-ROM de l’ordinateur.
Suivez les instructions qui s’affichent pour visualiser le manuel.
 Préparatifs initiaux
Chargement de la batterie
1 Retirez le couvercle du logement de la batterie et insérez la
batterie dans le chargeur.
Retirez le couvercle du logement de
la batterie, alignez les symboles de la batterie et du chargeur et insérez la batterie en l’enfonçant ( ), puis en l’abaissant (
 ).
).
2 Chargez la batterie.
Une fois que vous connectez le cordon d’alimentation au chargeur et branchez
l’autre extrémité sur la prise secteur,
le témoin s’allume en orange.
Une fois la charge terminée, le témoin devient vert. Retirez la batterie.
3
Préparatifs initiaux
Pour en savoir plus sur la durée de charge et le nombre de prises ou la durée d’enregistrement en cas de charge complète de la batterie, reportez-vous
à la section « Caractéristiques » du
Guide d’utilisation de l’appareil photo.
 Insertion de la batterie et de la carte mémoire
Bornes Verrou de la batterie
1 Ouvrez le couvercle.
Faites glisser le couvercle ( ) et ouvrez-le (
 ).
).
2 Insérez la batterie.
Tout en appuyant sur le verrou de la batterie dans le sens de la flèche, insérez la batterie comme illustré et enfoncez-la jusqu’à ce qu’un déclic indique qu’elle est en position verrouillée.
Pour retirer la batterie, appuyez sur le verrou de la batterie dans le sens de la flèche.
3 Vérifiez la position de la
|
languette de protection contre |
|
l’écriture de la carte mémoire et |
|
insérez cette dernière. |
|
L’enregistrement n’est pas possible sur |
|
les cartes mémoire dont la languette de |
|
protection contre l’écriture est en position |
|
verrouillée (abaissée). Faites glisser la |
Étiquette |
languette vers le haut jusqu’à ce qu’un |
|
déclic indique qu’elle est en position |
|
déverrouillée. |
|
Insérez la carte mémoire dans le sens |
|
illustré jusqu’à ce qu’un déclic indique |
|
qu’elle est en position verrouillée. |
|
Pour retirer la carte mémoire, appuyez |
|
dessus jusqu’à ce que vous sentiez un |
|
déclic, puis relâchez-la lentement. |
4
Préparatifs initiaux
4 Fermez le couvercle.
Abaissez le couvercle ( ) et maintenez-le enfoncé pendant que vous le faites glisser jusqu’à ce qu’un déclic indique qu’il est en position fermée (
 ).
).
 Réglage de la date et de l’heure
1 Mettez l’appareil photo
sous tension.
Appuyez sur la touche ON/OFF. L’écran [Date/Heure] s’affiche.
2 Réglez la date et l’heure.
Appuyez sur les touches <q><r> pour choisir une option.
Appuyez sur les touches <o><p> ou tournez la molette <7> pour spécifier la date et l’heure.
Une fois que vous avez terminé, appuyez sur la touche <m>.
3Définissez le fuseau horaire local.
Appuyez sur les touches <q><r> ou tournez la molette <7> pour choisir le fuseau horaire local.
Appuyez sur la touche <m> une fois que vous avez terminé. Après l’affichage d’un message de confirmation, l’écran de réglage disparaît.
Pour mettre l’appareil photo hors tension, appuyez sur la touche ON/OFF.
5

Préparatifs initiaux
Modification de la date et de l’heure
Pour modifier la date et l’heure une fois qu’elles ont été réglées, procédez comme suit.
1Appuyez sur la touche <n>.
2Déplacez la commande de zoom pour choisir l’onglet [3].
3Appuyez sur les touches <o><p> ou tournez la molette <7> pour choisir [Date/Heure], puis appuyez sur la touche <m>.
4Exécutez l’étape 2 de la section « Réglage de la date et de l’heure » pour effectuer les réglages.
5Appuyez sur la touche <n>.
 Langue d’affichage
Vous pouvez modifier la langue d’affichage selon vos besoins.
1 Activez le mode de lecture.
Appuyez sur la touche <1>.
2 Accédez à l’écran de réglage.
Appuyez sur la touche <m> et maintenez-la enfoncée, puis appuyez immédiatement sur la touche <n>.
Appuyez sur les touches <o><p><q><r> ou tournez la molette <7> pour choisir une langue, puis appuyez sur la touche <m>.
6
 Test de l’appareil photo
 Prise de vue
Pour une sélection entièrement automatique des réglages optima pour des scènes spécifiques, laissez l’appareil photo déterminer les conditions du sujet et de prise de vue.
1 Mettez l’appareil photo sous tension et passez en mode <A>.
Appuyez sur la touche ON/OFF. Positionnez la molette modes
sur <A>.
2 Composez la vue.
Pour faire un zoom avant et agrandir le sujet, déplacez la commande de zoom vers <i> (téléobjectif) tandis que vous regardez l’écran et, pour faire un zoom arrière, déplacez-la vers <j> (grand angle).
3 Prenez des photos.
Appuyez légèrement sur le déclencheur ( ).
).
L’appareil photo émet deux bips après la mise au point et des zones AF s’affichent pour indiquer les zones de l’image mises au point. Appuyez sur le déclencheur
à fond ( ).
).
Réalisez des vidéos.
Appuyez sur la touche vidéo pour démarrer l’enregistrement et appuyez à nouveau dessus pour l’arrêter.
7
Test de l’appareil photo
 Affichage
1 Activez le mode de lecture.
Appuyez sur la touche <1>.
2 Parcourez vos photos.
Pour afficher la photo précédente ou suivante, appuyez sur les touches <q><r> ou tournez la molette <7>.
Les vidéos sont identifiées par une icône [
 ]. Pour lire des vidéos, allez à l’étape 3.
3 Lisez les vidéos.
Appuyez sur la touche <m> pour accéder au panneau de commande des vidéos, choisissez [  ] (appuyez sur les touches <q><r> ou tournez la molette <7>), puis appuyez à nouveau sur
la touche <m>.
Pour régler le volume, appuyez sur les touches <o><p>.
La lecture commence et, une fois la vidéo terminée, [
 ] s’affiche.
 Effacement des photos
Pour effacer la photo choisie à l’étape 2, procédez comme suit. Veuillez noter qu’il est impossible de récupérer les photos effacées.
1Appuyez sur la touche <a>.
2Lorsque [Effacer?] s’affiche, appuyez sur les touches <q><r> ou tournez la molette <7> pour choisir [Effacer], puis appuyez sur la touche <m>.
8
Union européenne (et Espace économique européen) uniquement.
Ces symboles indiquent que ce produit ne doit pas être mis au rebut avec les ordures ménagères, comme le spécifient la Directive européenne DEEE (2002/96/CE), la Directive
européenne relative à l'élimination des piles et des accumulateurs usagés (2006/66/CE) et les lois en vigueur dans votre pays, appliquant ces directives.
Si un symbole de toxicité chimique est imprimé sous le symbole illustré ci-dessus conformément à la Directive relative aux piles et aux accumulateurs, il indique la présence d'un métal lourd (Hg = mercure, Cd = cadmium, Pb = plomb) dans la pile ou l'accumulateur à une concentration supérieure au seuil applicable spécifié par la Directive.
Ce produit doit être confié à un point de collecte désigné, par exemple, chaque fois que vous achetez un produit similaire neuf, ou à un point de collecte agréé pour
le recyclage des équipements électriques ou électroniques (EEE) et des piles et accumulateurs. Le traitement inapproprié de ce type de déchet risque d'avoir des répercussions sur l'environnement et la santé humaine, du fait de la présence de substances potentiellement dangereuses généralement associées aux équipements électriques ou électroniques.
Votre coopération envers la mise au rebut correcte de ce produit contribuera à l'utilisation efficace des ressources naturelles.
Pour de plus amples informations sur le recyclage de ce produit, veuillez contacter vos services municipaux, votre éco-organisme ou les autorités locales. Vous pouvez également vous rendre sur le site www.canon-europe.com/environment.
(Espace économique européen : Norvège, Islande et Liechtenstein)
ATTENTION
RISQUE D’EXPLOSION EN CAS D’UTILISATION DES BATTERIES NON CONFORMES.
REPORTEZ-VOUS AUX RÉGLEMENTATIONS LOCALES POUR L’ABANDON DES BATTERIES USAGÉES.
CANON INC.
30-2, Shimomaruko 3-chome, Ohta-ku, Tokyo 146-8501, Japan
CANON EUROPA N.V.
Bovenkerkerweg 59-61, 1185 XB Amstelveen, The Netherlands
© CANON INC. 2012 |
IMPRIMÉ EN UE |
9
 Contenido del paquete
Antes de utilizarlo, asegúrese de que el paquete contiene los siguientes artículos.
Si faltara alguno, póngase en contacto con el distribuidor de la cámara.
|
Batería NB-10L |
Cargador de batería |
Correa para |
|
Cámara |
el cuello |
|||
(con tapa de terminales) CB-2LC/CB-2LCE |
NS-DC11*1 |
|||
|
Disco |
Disco |
|
|
Guía de inicio |
DIGITAL CAMERA |
DIGITAL CAMERA Folleto sobre el sistema |
||
(esta guía) |
Manuals Disk*2 |
Solution Disk*3 |
de garantía de Canon |
|
*1 Para obtener instrucciones sobre el material incluido, consulte la Guía del usuario de la cámara del disco DIGITAL CAMERA Manuals Disk.
*2 Contiene manuales (=3).
*3 Contiene software. Para obtener instrucciones de instalación, consulte la Guía del usuario de la cámara y, para instrucciones de uso, consulte la Guía del software.
 Tarjetas de memoria compatibles
No incluye tarjeta de memoria. Es necesario adquirir uno de los siguientes tipos de tarjeta. Se pueden utilizar estas tarjetas, independientemente de la capacidad. Para obtener más información sobre el número de disparos y el tiempo de grabación por tarjeta de memoria, consulte las “Especificaciones” de la Guía del usuario de la cámara.
• |
Tarjetas de memoria SD* |
• |
Tarjetas de memoria SDXC* |
• |
Tarjetas de memoria SDHC* |
• |
Tarjetas Eye-Fi |
*Conforme con las especificaciones SD. No obstante, no se ha comprobado si todas las tarjetas de memoria funcionan con la cámara.
 Acerca de las tarjetas Eye-Fi
No se garantiza la compatibilidad de este producto con las funciones de las tarjetas Eye-Fi (inclusive la transferencia inalámbrica). En caso de experimentar problemas cuando utilice una tarjeta Eye-Fi, póngase en contacto directo con el fabricante de las tarjetas.
También deberá tener en cuenta que en muchos países se requiere una aprobación específica para poder usar las tarjetas Eye-Fi. Sin dicha aprobación, no se pueden usar dichas tarjetas. Si no está seguro de que dichas tarjetas puedan usarse en el lugar donde se encuentre, solicite información al respecto al fabricante de las tarjetas.
2
 Visualización de los manuales
En el disco DIGITAL CAMERA Manuals Disk se incluyen los manuales siguientes. Para ver los manuales en PDF, se necesita Adobe Reader.
Guía del usuario de la cámara
En esta guía se tratan los temas siguientes.
Conceptos básicos de la cámara, desde la introducción, hasta fotografiar, reproducir, instalar el software que se incluye e importar imágenes
Otras instrucciones, información sobre todas las prestaciones de la cámara
Guía del software
En esta guía se describe cómo utilizar el software incluido.
Inserte el disco DIGITAL CAMERA Manuals Disk en la unidad de DVD-ROM.
Siga las instrucciones que se muestran para ver el manual.
 Preparativos iniciales
Carga de la batería
1 Quite la tapa de la batería e inserte la batería en el cargador.
Quite la tapa de la batería, alinee las
marcas de la batería y el cargador
y, a continuación, introduzca la batería empujándola hacia dentro ( ) y hacia abajo (
 ).
).
2 Cargue la batería.
Una vez que haya conectado el cable de alimentación al cargador y lo enchufe en una toma de corriente, la luz se iluminará
en naranja.
Cuando finalice la carga, la luz se vuelve verde. Retire la batería.
3

Preparativos iniciales
Para obtener información sobre el tiempo de carga y el número de disparos o sobre el tiempo de grabación disponible con una batería totalmente cargada, consulte las “Especificaciones” de la Guía del usuario de la cámara.
 Introducción de la batería y la tarjeta de memoria
1 Abra la tapa.
Deslice la tapa ( ) y ábrala (
 ).
).
2 Introduzca la batería.
Mientras presiona el cierre de la batería en
el sentido de la flecha, inserte la batería
tal como se muestra y empújela hasta que
encaje en la posición de bloqueo.
Para quitar la batería, presione el bloqueo
de la batería en el sentido de la flecha.
Terminales Cierre de la batería
3 Compruebe la pestaña de
protección contra escritura
de la tarjeta e inserte la tarjeta de memoria.
|
No es posible grabar en las tarjetas de |
|
memoria que tengan una pestaña de |
|
protección con escritura y que la tengan |
Etiqueta |
en la posición de bloqueo (hacia abajo). |
Deslice la pestaña hacia arriba hasta que |
|
|
encaje en la posición desbloqueada. |
|
Introduzca la tarjeta de memoria tal |
|
como se muestra hasta que encaje en |
|
la posición bloqueada. |
|
Para quitar la tarjeta de memoria, |
|
empújela hasta que note un “clic” y |
|
entonces suéltela suavemente. |
4
Preparativos iniciales
4 Cierre la tapa.
Baje la tapa ( ) y manténgala así mientras la desliza, hasta que encaje en la posición de cierre (
 ).
).
 Ajuste de la fecha y la hora
1 Encienda la cámara.
Pulse el botón ON/OFF. Aparece la pantalla [Fecha/Hora].
2 Establezca la fecha y la hora.
Pulse los botones <q><r> para elegir una opción.
Pulse los botones <o><p> o gire el dial <7> para especificar la fecha y la hora.
Cuando finalice, pulse el botón <m>.
3 Ajuste la zona horaria local.
Pulse los botones <q><r> o gire el dial <7> para elegir la zona horaria local.
Cuando haya finalizado, pulse el botón <m>. Después de recibir un mensaje de confirmación, la pantalla de configuración deja de aparecer.
Para apagar la cámara, pulse el botón ON/OFF.
5
Preparativos iniciales
Cambio de la fecha y la hora
Para ajustar la fecha y la hora una vez la haya establecido, lleve a cabo lo siguiente.
1Pulse el botón <n>.
2Mueva la palanca del zoom para elegir la ficha [3].
3Pulse los botones <o><p> o gire el dial <7> para elegir [Fecha/Hora] y, a continuación, pulse el botón <m>.
4Siga el paso 2 de “Ajuste de la fecha y la hora” para ajustar la configuración.
5Pulse el botón <n>.
 Idioma de la pantalla
El idioma se puede cambiar según sea necesario.
1 Acceda al modo Reproducción.
Pulse el botón <1>.
2 Acceda a la pantalla de configuración.
Mantenga pulsado el botón <m> y, a continuación, pulse inmediatamente el botón <n>.
Pulse los botones <o><p><q><r>
o gire el dial <7> para elegir un idioma y, a continuación, pulse el botón <m>.
6
 Loading...