


F1 Flexible Array Loudspeaker System
F1 Model 812 and F1 Subwoofer
Owner’s Guide
Brugervejledning
Bedienungsanleitung
Guía del usuario
Notice d’utilisation
Manuale d’uso
Gebruikershandleiding
Bruksanvisning
Important Safety Instructions
Please read this owner’s guide carefully and save it for future reference.
WARNINGS:
•To reduce the risk of fire or electrical shock, do not expose the product to rain or moisture.
•Do not expose this apparatus to dripping or splashing, and do not place objects filled with liquids, such as vases, on or near the apparatus. As with any electronic products, use care not to spill liquids into any part of the system. Liquids can cause a failure and/or a fire hazard.
•Do not place any naked flame sources, such as lighted candles, on or near the apparatus .
The lightning flash with arrowhead symbol within an equilateral triangle alerts the user to the presence of uninsulated dangerous voltage within the system enclosure that may be of sufficient magnitude to constitute a risk of electrical shock.
The exclamation point within an equilateral triangle, as marked on the system, is intended to alert the user to the presence of important operating and maintenance instructions in this owner’s guide.
This product contains magnetic material. Please contact your physician if you have any questions on whether this might affect the operation of your implantable medical device.
Contains small parts which may be a choking hazard. Not suitable for children under age 3.
CAUTIONS:
•This product shall be connected to a mains socket outlet with a protective earthing connection.
•Do not make unauthorized alterations to the product; doing so may compromise safety, regulatory compliance, system performance, and may void the warranty.
Notes:
•Where the mains plug or appliance coupler is used as the disconnect device, such disconnect device shall remain readily operable.
•The product must be used indoors. It is neither designed nor tested for use outdoors, in recreational vehicles, or on boats.
This product conforms to all applicable EU directive requirements.
The complete Declaration of Conformity can be found at
www.Bose.com/compliance.
This symbol means the product must not be discarded as household waste, and should be delivered to an appropriate collection facility for recycling. Proper disposal and recycling helps protect natural resources, human health and the environment. For more information on disposal and
recycling of this product, Contact your local municipality, disposal service, or the shop where you bought this product.
NOTE: This equipment has been tested and found to comply with the limits for a Class A digital device, pursuant to part 15 of the FCC Rules. These limits are designed to provide reasonable protection against harmful interference when the equipment is operated in a commercial environment. This equipment generates, uses, and can radiate radio frequency energy and, if not installed and used in accordance with the instruction manual, may cause harmful interference to radio communications. Operation of this equipment in a residential area is likely to cause harmful interference in which case the user will be required to correct the interference at their own expense.
This Class A digital apparatus complies with Canadian ICES-003.
Changes or modifications not expressly approved by Bose Corporation could void the user’s authority to operate this equipment.
1.Read these instructions.
2.Keep these instructions.
3.Heed all warnings.
4.Follow all instructions.
5.Do not use this apparatus near water.
6.Clean only with a dry cloth.
7.Do not block any ventilation openings. Install in accordance with the manufacturer’s instructions.
8.Do not install near any heat sources, such as radiators, heat registers, stoves or other apparatus (including amplifiers) that produce heat.
9.Do not defeat the safety purpose of the polarized or grounding-type plug. A polarized plug has two blades with one wider than the other. A grounding type plug has two blades and a third grounding prong. The wide blade or the third prong are provided for your safety. If the provided plug does not fit into your outlet, consult an electrician for replacement of the obsolete outlet.
10.Protect the power cord from being walked on or pinched, particularly at plugs, convenience receptacles, and the point where they exit from the apparatus.
11.Only use attachments/accessories specified by the manufacturer.
12.Use only with the cart, stand, tripod, bracket, or table specified by the manufacturer, or sold with the apparatus. When a cart is used, use caution when
moving the cart/apparatus combination to avoid injury from tip-over.
13. Unplug this apparatus during lightning storms or when unused for long periods of time.
14.Refer all servicing to qualified service personnel. Servicing is required
when the apparatus has been damaged in any way: such as power supply cord or plug is damaged; liquid has been spilled or objects have fallen into the apparatus; the apparatus has been exposed to rain or moisture, does not operate normally, or has been dropped.
For Japan only:
Provide an earth connection before the main plug is connected to the mains.
For Finland, Norway, and Sweden:
•In Finnish: “Laite on liitettävä suojamaadoituskoskettimilla varustettuun pistorasiaan”
•In Norwegian: “Apparatet må tilkoples jordet stikkontakt”
•In Svenska: “Apparaten skall anslutas till jordat uttag”
For China only:
CAUTION: Only suitable for use at areas with altitude less than 2000m.
Please complete and retain for your records
Now is a good time to record the serial numbers of your product. Serial numbers can be found on the rear panel. You can register your product online at www.Bose.com/ register or by calling 877-335-2673. Failure to do so will
not affect your warranty rights.
F1 Model 812 Loudspeaker_____________________________
F1 Subwoofer_________________________________________
2 - English

Contents |
|
Introduction |
|
Product Description....................................................................................................................................................... |
4 |
Features and Benefits.................................................................................................................................................... |
4 |
Carton Contents............................................................................................................................................................. |
4 |
F1 Model 812 Flexible Array Loudspeaker.................................................................................................................... |
5 |
F1 Subwoofer................................................................................................................................................................. |
5 |
Using the Flexible Array................................................................................................................................................. |
6 |
Adjusting the array.................................................................................................................................................. |
6 |
Four coverage patterns........................................................................................................................................... |
6 |
Applications............................................................................................................................................................. |
7 |
Setting Up the System |
|
Using the F1 Model 812 with the F1 Subwoofer........................................................................................................... |
8 |
Using the F1 Model 812 on a Tripod Stand................................................................................................................... |
9 |
Operation |
|
F1 Model 812 Control Panel.......................................................................................................................................... |
10 |
F1 Subwoofer Control Panel.......................................................................................................................................... |
11 |
Power On/Off Sequence................................................................................................................................................ |
12 |
Setting EQ selector switches......................................................................................................................................... |
12 |
Connecting Sources...................................................................................................................................................... |
12 |
Setting Up INPUT 1 with a Microphone.................................................................................................................. |
12 |
Setting Up INPUT 1 with a Source.......................................................................................................................... |
12 |
Setting Up INPUT 2 with a Source.......................................................................................................................... |
12 |
Connection Scenarios.................................................................................................................................................... |
13 |
Full band, mixing console stereo output to L/R F1 Model 812 Loudspeakers....................................................... |
13 |
Full band with mixing console, one F1 Subwoofer and two F1 Model 812 Loudspeakers.................................... |
13 |
Mixing console stereo output to F1 Subwoofer and left/right F1 Model 812 Loudspeakers.................................. |
14 |
Full band with mixing console stereo output to two F1 Subwoofers and two F1 Model 812 Loudspeakers......... |
15 |
Stereo input to Left/right F1 Subwoofers and F1 Model 812 Loudspeakers.......................................................... |
15 |
Mic to F1 Model 812 Loudspeaker INPUT 1........................................................................................................... |
16 |
Mobile device to single F1 Model 812 Loudspeaker............................................................................................... |
16 |
Mobile device to F1 Model 812 Loudspeaker and F1 Subwoofer.......................................................................... |
17 |
DJ Console to two F1 Subwoofers and two F1 Model 812 Loudspeakers............................................................. |
17 |
Care and Maintenance |
|
Caring for Your Product................................................................................................................................................. |
18 |
Cleaning................................................................................................................................................................... |
18 |
Getting Service........................................................................................................................................................ |
18 |
Troubleshooting............................................................................................................................................................. |
18 |
LED Indicators............................................................................................................................................................... |
19 |
Limited Warranty and Registration................................................................................................................................. |
19 |
Accessories.................................................................................................................................................................... |
19 |
Technical Information..................................................................................................................................................... |
20 |
Physical................................................................................................................................................................... |
20 |
Electrical.................................................................................................................................................................. |
20 |
Input/Output Connector Wiring Reference.............................................................................................................. |
20 |
English - 3
Introduction
Product Description
The Bose® F1 Model 812 Flexible Array Loudspeaker is the first powered portable loudspeaker that lets you control its vertical coverage pattern. Simply push or pull the array into position to create “Straight,” “C,” “J” or “Reverse J” coverage patterns. And once set, the system automatically changes the EQ to maintain optimum tonal balance for
each coverage pattern. So whether you’re playing at floor level, on a stage, or facing raked seats or bleachers, you can now adapt your PA to match the room.
Engineered with an array of eight high-output mid/high drivers, a high-powered 12" woofer and a lower crossover point, the loudspeaker delivers high SPL performance while maintaining vocal and midrange clarity that’s dramatically better than conventional loudspeakers.
For extended bass response, the Bose F1 Subwoofer packs all the power of a larger bass box into a more compact design that’s easier to carry and fits in a car. A mounting stand for the loudspeaker is integrated right into the body of the subwoofer, so you always know where it is, making setup fast and easy. The stand even includes cable channels to neatly hide the wires.
The loudspeaker and subwoofer each have 1,000 watts of power, so you can fill nearly any venue with sound.
And now getting there is easier, too. The loudspeaker and subwoofer feature light weight, high impact composite materials and strategically placed handles for easy transport.
For the first time, the F1 Model 812 Loudspeaker allows you to focus sound where it’s needed. So no matter where you perform, your PA has you covered.
Features and Benefits
•The flexible, eight-loudspeaker array of the F1 Model 812 allows you to select one of four coverage patterns to direct sound to where the audience is located resulting in better overall clarity throughout the venue.
•The vertical orientation of the eight-driver loudspeaker array helps deliver wide, consistent sound coverage, providing better clarity and tonal balance for speech, music, and instruments.
•F1 Subwoofer provides a unique built-in speaker stand for the F1 Model 812, eliminating the need for a conventional pole mount.
•Attractive design creates a unique system with a rugged but professional look.
•The bi-amplified design includes powerful, lightweight amplifiers that provide consistent output over long durations with extended dynamic range and lower operating temperatures.
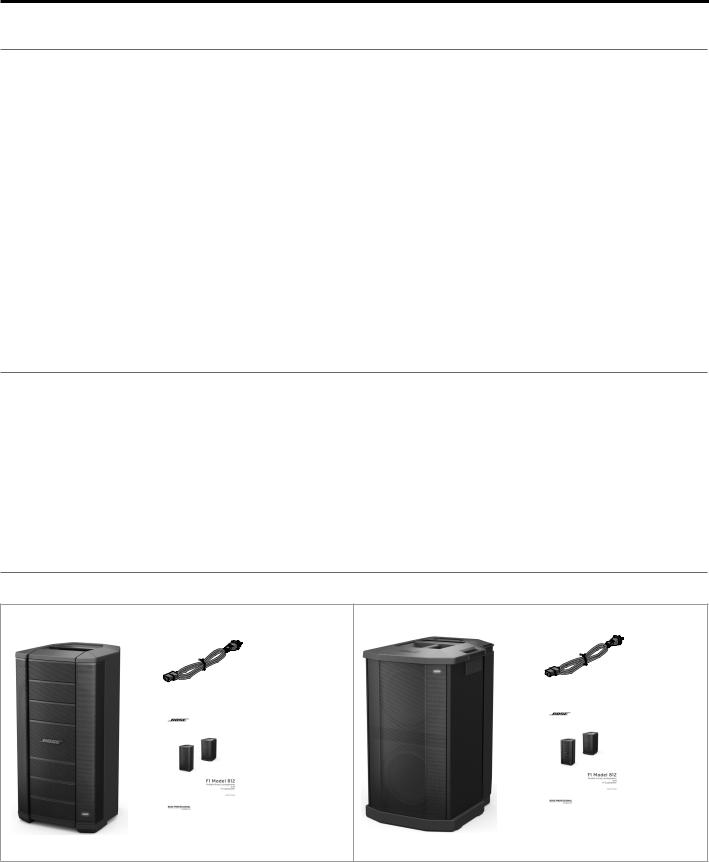
Carton Contents
Each loudspeaker is packaged separately with the items indicated below.
F1 Model 812 Flexible Array Loudspeaker |
F1 Subwoofer |
AC power cord* |
AC power cord* |
|
|
|
|
|
|
|
|
|
|
|
|
|
|
|
Owner’s Guide |
|
Owner’s Guide |
|||
|
|
|
||
F1 Model 812 Loudspeaker |
|
|
F1 Subwoofer with built-in stand |
|
*The appropriate power cord(s) for your region is included.
4 - English
Introduction
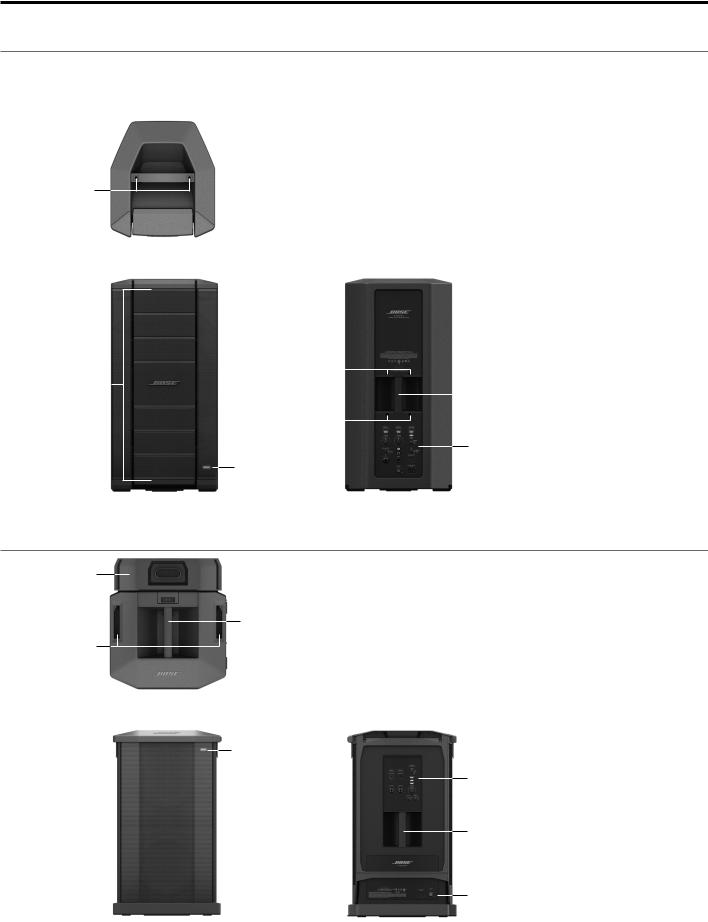
F1 Model 812 Flexible Array Loudspeaker
Note: The F1 Model 812 comes with threaded M8 inserts for rigging or attaching accessory brackets.
CAUTION: Only professional installers with the knowledge of proper hardware and safe mounting techniques should attempt to install any loudspeaker overhead.
 Carry handle
Threaded M8 inserts
TOP
Flexible array |
|
|
|
|
|
|
|
Threaded |
|
|
Carry handle |
||
|
|
|
||||
|
|
|
|
|||
|
|
M8 inserts |
|
|
||
|
|
|
|
|
||
|
|
|
|
|
|
|
|
|
|
|
|
|
|
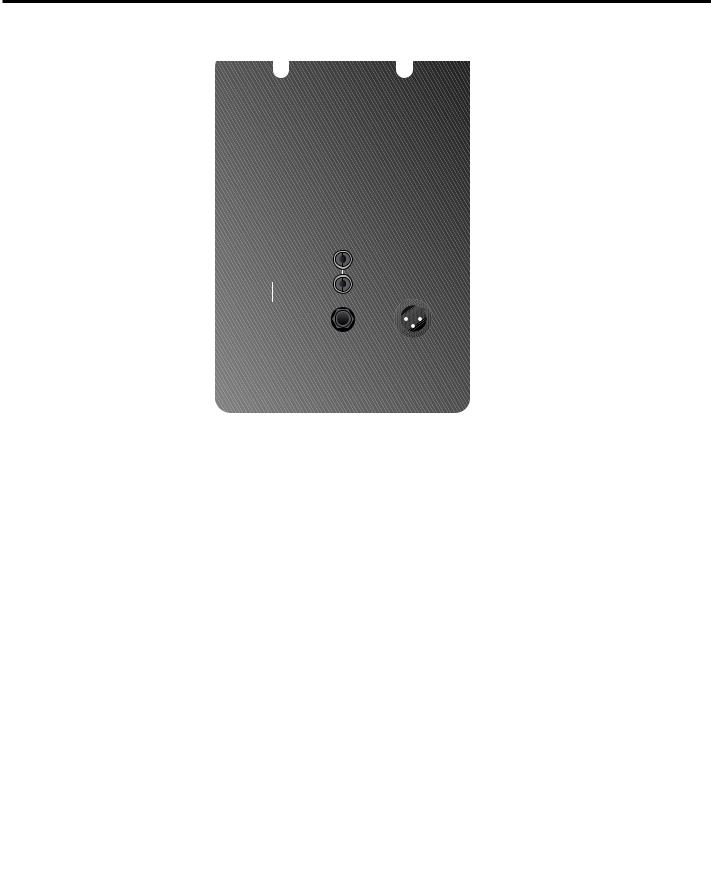
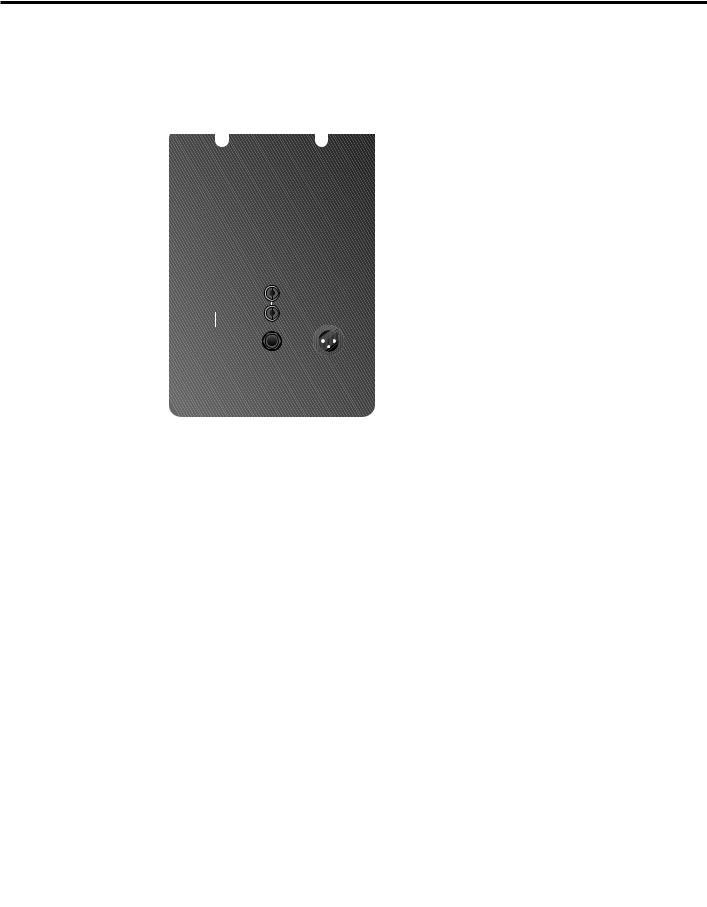
Connections and controls panel
Front LED
FRONT |
REAR |
F1 Subwoofer
Built-in speaker stand
Carry handle
Speaker stand slots
TOP
Front LED
Connections and controls panel
Carry handle
AC input connector and power switch
FRONT |
REAR |
English - 5
Introduction
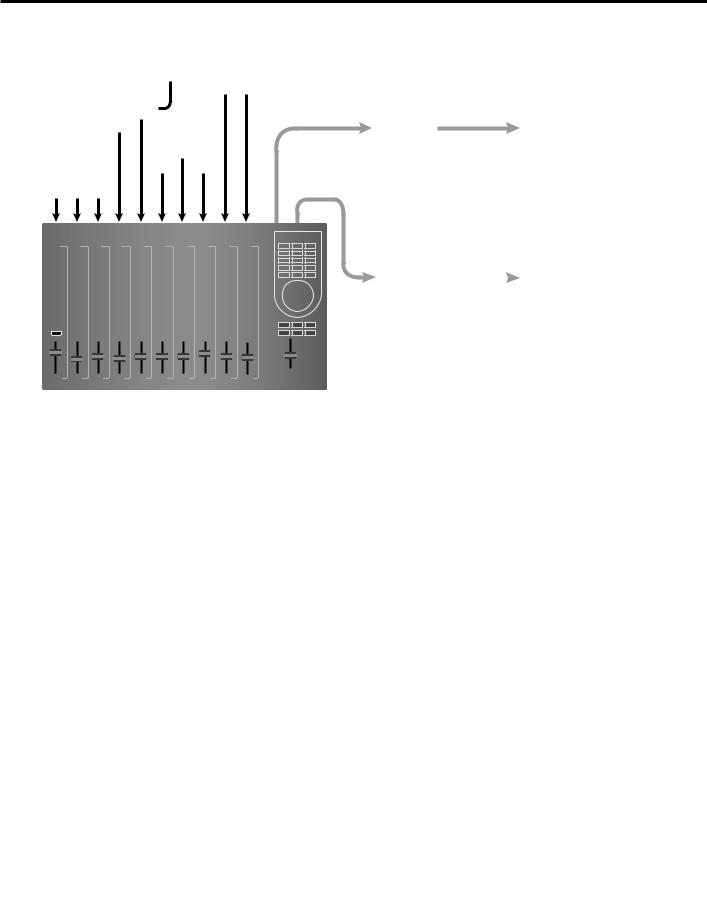
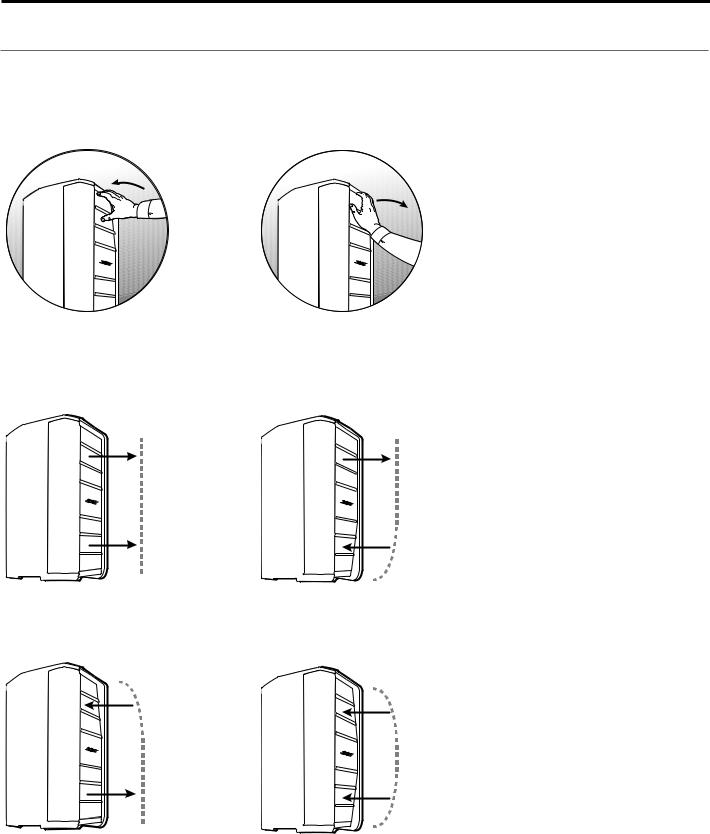
Using the Flexible Array
You can shape the coverage pattern by moving the position of the top and bottom array. The array position is held in place by magnets that trigger internal sensors that adjust EQ according to array shape.
Adjusting the array
Pushing the array in |
Pulling the array out |
Four coverage patterns
Straight pattern |
J pattern |
||||||
Pull top and bottom array out |
Pull top array out, push bottom array in. |
||||||
|
|
|
|
|
|
|
|
|
|
|
|
|
|
|
|
Reverse-J pattern |
C pattern |
||||||
Push top array in, pull bottom array out. |
Push top and bottom array in. |
||||||
|
|
|
|
|
|
|
|
|
|
|
|
|
|
|
|
6 - English

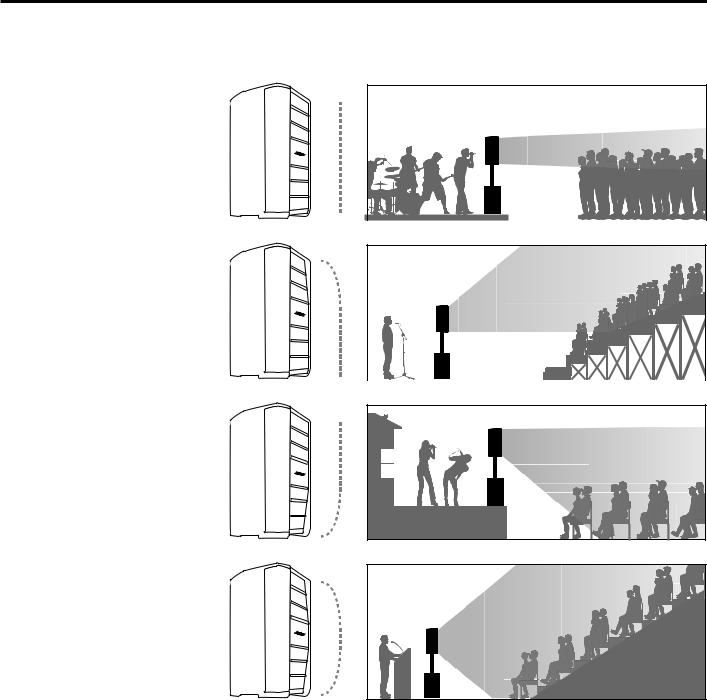
Applications
Straight pattern
Use the straight pattern when the audience is standing and their heads are approximately at the same height as the loudspeaker.
Reverse-J pattern
The reverse-J pattern is good for an audience in raked seating that starts at loudspeaker height and extends above the top of the loudspeaker.
J pattern
The J pattern works well when the loudspeaker is up on a raised stage and the audience is seated below on the floor.
C pattern
Use the C pattern for raked seating in an auditorium when the first row is on the floor with the loudspeaker.
Introduction
English - 7
Setting Up the System
Using the F1 Model 812 with the F1 Subwoofer
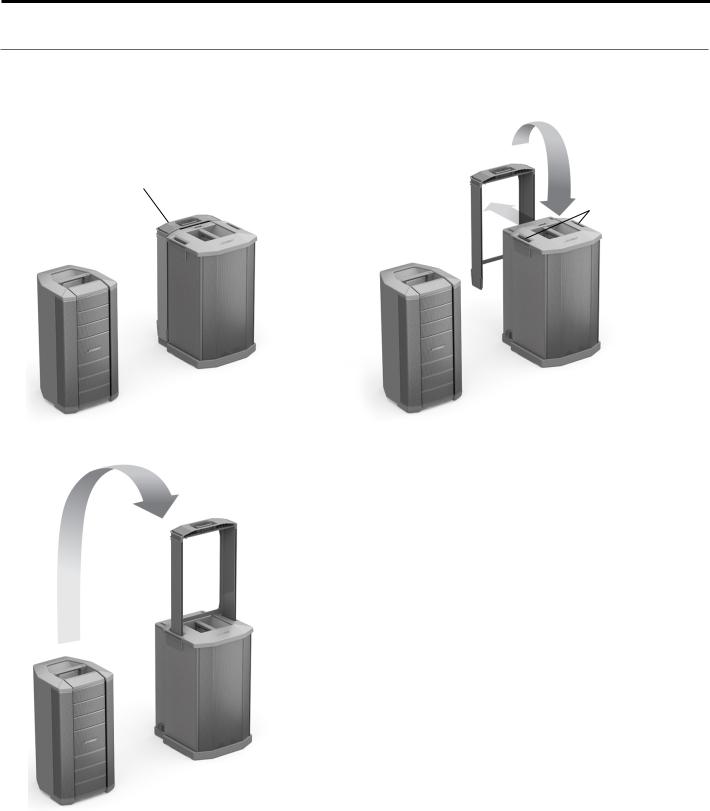
The built-in loudspeaker stand is stored in the rear of the subwoofer. Setting up the F1 Model 812 Loudspeaker with the F1 Subwoofer is easy:
1. Remove the built-in speaker stand from the back of the F1 Subwoofer and insert it into the stand slots.
Built-in speaker stand
Stand slots
2. Lift the F1 Model 812 Loudspeaker and place it on the stand.
8 - English
Setting Up the System
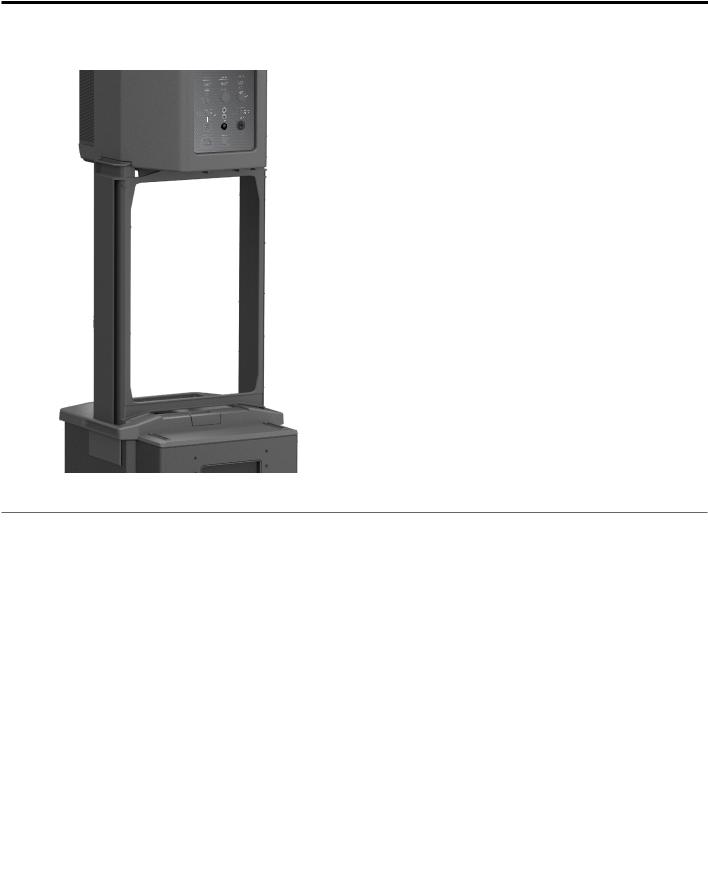
3.Plug in your audio cables. Feed the cables from the F1 Model 812 through the channels in the speaker stand to help keep them organized.
Cable channel (both sides)
Using the F1 Model 812 on a Tripod Stand
The bottom of the F1 Model 812 Loudspeaker includes pole cup for mounting the loudspeaker on a tripod speaker stand. The pole cup fits a standard 35 mm post.
WARNING: Do not use the F1 Model 812 Loudspeaker with a tripod stand that is unstable. The loudspeaker is only designed for use on a 35 mm pole, and the tripod stand must be capable of supporting a loudspeaker with a minimum weight of 44.5 lb (20.2 Kg) lbs and an overall size of 26.1" H x 13.1" W x 14.6" D (665 mm H x 334 mm W x 373 mm D) inches (mm). Using a tripod stand that is not designed to support the size and mass of the F1 Model 812 Loudspeaker may lead to an unstable and hazardous condition that could result in injury.
Pole cup fits a standard 35 mm tripod stand
English - 9

Operation
F1 Model 812 Control Panel
Note: For a complete list of LED indications and behaviors, see “LED Indicators” on page 19.
POWER: AC |
|
|
|
|
|
AC power |
|
|
|
|
|
||
power on/off |
|
|
|
|
|
input |
SIGNAL/CLIP: Displays the input signal status in color.
•Green = signal present.
•Red = signal clipping, input signal too high VOLUME: Adjusts channel volume.
SIGNAL INPUT: Selector switch sets input sensitivity for input type. Combo connector accepts XLR mic connector or ¼" phone plug (TRS balanced or TS unbalanced cables).
•MIC selects sensitivity for microphone inputs (dynamic or self-powered mics only) – use only when a mic is connected directly to the input.
•LINE selects sensitivity for line-level inputs, for example, from a mixing console or DJ controller.
POWER/FAULT:
• Blue = power on.
• Red = fault condition.
SIGNAL/CLIP: Displays the input signal status in color.
• Green = signal present.
• Red = signal clipping, input signal too high.  VOLUME: Adjusts channel volume.
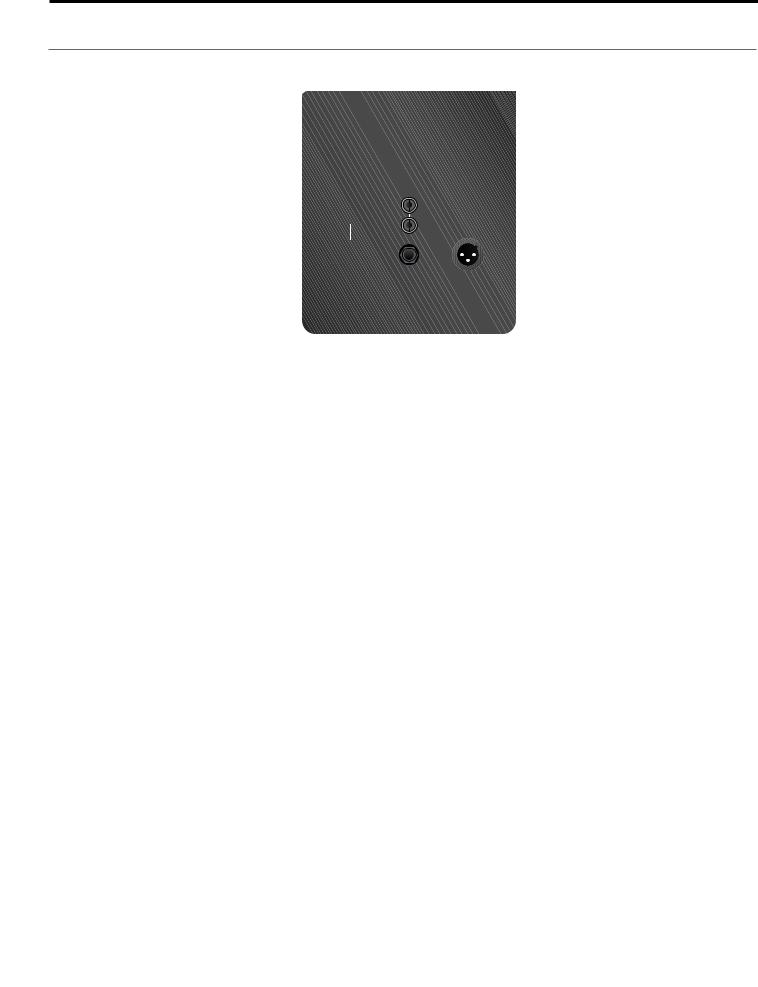
RCA connectors: Analog stereo input for audio sources such as DJ controllers and other line-level sources. Left and right are summed, producing a mono audio output and mono signal to LINE OUTPUT (XLR).
• Left (White)
• Right (Red)
 ¼" phone connector: Provides analog input for guitars and other instruments. Accepts TRS balanced or TS unbalanced cables.
 LIMIT:
• Amber = system limiting (protection mode).


 FRONT LED:
• POWER enables front LED to indicate power status.
• LIMIT engages a limiting display on the front LED. • OFF turns off the front LED.
EQ: (See “Setting EQ selector switches” on page 12.)
• FULL RANGE allows the loudspeaker to function without high-pass filtering.
• WITH SUB engages a high-pass filter (100 Hz) when using the loudspeaker with the F1
subwoofer. Recommended when using with F1 Subwoofer.
LINE OUTPUT:
•Balanced XLR line output provides a mix of input 1 and 2, post input volume control. Can be used to daisy chain speakers together.
10 - English
Operation
F1 Subwoofer Control Panel
Note: For a complete list of LED indications and behaviors, see “LED Indicators” on page 19.
LINE OUTPUT 1 & 2:
Individual outputs that provide balanced line output signals (pre-volume control) that can be sent to powered loudspeakers
or additional subwoofers.
Note: When the LINE OUTPUT EQ selector switch is set to THRU, the LINE OUTPUT signal will be full range.
LINE INPUT 1 & 2:
Combination XLR – ¼" phone connector inputs that accept
line level signals.
POLARITY:
•NORM is used when when the F1 Model 812 loudspeaker is mounted on the supplied stand.
•REV may be used to better align the bass when the subwoofer is located further away from the F1 Model 812 loudspeaker.
FRONT LED selector switch:
•POWER enables LED to indicate power status.
•LIMIT enables LED to indicate limiting .
• OFF turns off LED.
POWER/FAULT: indicates power/fault
status
• Blue = power on.
• Red = fault condition.


 LIMIT: Amber = system limiting.

 SIGNAL/CLIP: Displays the input signal
status in color.
• Green = signal present.
• Red = signal clipping - input signal too high.
VOLUME – Adjusts subwoofer volume. Middle detent position is 0dB – nominal position when the F1 Model 812 and F1
Subwoofer are connected to a mixing console . Use 0dB position for a line-level signal input.
LINE OUTPUT EQ: (See “Setting EQ selector switches” on page 12.)
• THRU passes input signal to the output with no filtering. Recommended when using with F1 Model 812.
•HPF passes input through a high -pass (100 Hz) filter. Affects LINE OUTPUT signals only.
AC input connector. |
POWER on/off switch. |
English - 11

Operation
Power On/Off Sequence
When turning the system on, turn on input sources and mixing consoles first and then turn on the F1 Model 812 Loudspeaker and the F1 Subwoofer. When turning the system off, turn off the F1 Model 812 and F1 Subwoofer first followed by input sources and mixing consoles.
Setting EQ selector switches
Recommended settings for the EQ selector switches on the F1 Model 812 Loudspeaker and the F1 Subwoofer are describe in the following table.
|
|
F1 Model 812 |
F1 Subwoofer |
|
System Setup |
|
EQ Switch |
LINE OUTPUT EQ Switch |
|
|
|
|
|
|
F1 Model 812 Loudspeaker used without F1 Subwoofer |
FULL RANGE |
Not applicable |
|
|
|
|
|
|
|
Signal input to F1 |
Subwoofer, F1 Subwoofer output to F1 Model 812 Loudspeaker |
WITH SUB |
THRU |
|
|
|
|
|
|
Signal input to F1 |
Model 812 Loudspeaker, F1 Model 812 output to F1 Subwoofer |
FULL RANGE |
No affect |
|
|
|
or WITH SUB* |
|
|
|
|
|
|
|
*Provides more bass extension. |
|
|
|
|
Connecting Sources |
|
|
|
|
Before plugging in a sound source, turn the VOLUME control of the channel fully counter-clockwise.
The two independent inputs provide a combination of input connectors that can accomodate microphone and line-level sources.
Note: Only dynamic or self-powered microphones can be used for INPUT 1.
Setting Up INPUT 1 with a Microphone
1.Turn the INPUT 1 VOLUME fully counter-clockwise.
2.Set the SIGNAL INPUT switch to MIC.
3.Plug the mic cable into the INPUT 1 connector.
4.Adjust the VOLUME to your desired level.
 0 dB (detent)
Setting Up INPUT 1 with a Source
1.Turn the INPUT 1 VOLUME fully counter-clockwise.
2.Set the SIGNAL INPUT switch to LINE LEVEL.
3.Plug the source cable into the INPUT 1 connector.
4.Adjust the VOLUME to your desired level.
Setting Up INPUT 2 with a Source
1.Turn the INPUT 2 VOLUME fully counter-clockwise.
2.Plug the source cable into an INPUT 2 connector.
3.Adjust the VOLUME to your desired level.
 0 dB (detent)
12 - English
Operation
Connection Scenarios
Full band, mixing console stereo output to L/R F1 Model 812 Loudspeakers
L
Set F1 Model 812
EQ to FULL RANGE.
R
F1 Model 812
If using INPUT 1, set
F1 Model 812 SIGNAL
INPUT to LINE LEVEL.
F1 Model 812
Full band with mixing console, one F1 Subwoofer and two F1 Model 812 Loudspeakers
Set LINE
OUTPUT EQ
to THRU
(full range).
L  R
R 
|
|
|
|
|
|
F1 Subwoofer |
F1 Model 812 |
|
|
|
|
|
|
||
|
|
|
|
|
|
||
|
|
|
|
|
|
|
|
Set F1
Model 812
EQ to WITH
SUB.
F1 Model 812
English - 13
Operation
Mixing console stereo output to F1 Subwoofer and left/right F1 Model 812 Loudspeakers
Note: The recommend EQ settings are provided under the heading, “Setting EQ selector switches” on page 12. However, for maximum bass response, set the EQ selector switch on both F1 Model 812 Loudspeakers to FULL RANGE and set the EQ selector switch on the F1 Subwoofer to THRU.
F1 Subwoofer
L
R
|
If using INPUT 1, |
F1 Model 812 |
|
|
set F1 Model 812 |
Set F1 Model 812 |
|
|
|
||
|
SIGNAL INPUT to |
|
EQ to WITH SUB. |
|
LINE LEVEL. |
|
|
Set LINE OUTPUT EQ to THRU (full range).
F1 Model 812
14 - English
Operation
Full band with mixing console stereo output to two F1 Subwoofers and two F1 Model 812 Loudspeakers
 Set LINE OUTPUT EQ
to THRU (full range).
L
R
|
|
|
|
|
F1 Subwoofer |
F1 Model 812 |
|
|
|
|
|
|
|
|
|
|
|
|
|
|
|
|
|
|
|
|
|
|
|
|
|
|
|
|
|
|
|
|
|
|
|
|
|
|
|
|
|
|
|
|
|
|
|
|
|
|
|
|
|
|
|
|
|
|
|
|
|
|
|
|
|
|
|
|
|
|
|
|
|
Set LINE OUTPUT EQ to THRU (full range).
Set F1 Model 812 EQ to WITH SUB.
Set F1 Model 812 EQ to WITH SUB.
F1 Subwoofer |
F1 Model 812 |
Stereo input to Left/right F1 Subwoofers and F1 Model 812 Loudspeakers
L
|
|
|
|
If using INPUT 1, |
F1 Model 812 |
Set F1 Model 812 |
|
|
|
|
|||
|
|
|
|
set F1 Model 812 |
||
|
|
|
|
SIGNAL INPUT to |
|
EQ to WITH SUB. |
F1 Subwoofer |
|
|
|
LINE LEVEL. |
|
|
|
|
|
|
|
|
Set LINE OUTPUT EQ to THRU (full range).
R
F1 Subwoofer |
F1 Model 812 |
English - 15
Operation
Mic to F1 Model 812 Loudspeaker INPUT 1
Set F1 Model 812 

 SIGNAL INPUT to


 MIC.
MIC.


 Set F1 Model 812
EQ to FULL RANGE.
Mobile device to single F1 Model 812 Loudspeaker


 Set F1 Model 812 EQ
to FULL RANGE.
Mobile device headphone output to F1 Model 812 INPUT 2 RCA connectors.
16 - English
Operation
Mobile device to F1 Model 812 Loudspeaker and F1 Subwoofer
F1 Model 812
F1 Subwoofer
Set F1
Model 812
EQ to FULL
RANGE.
Mobile device headphone output to F1 Model 812 INPUT 2 RCA connectors.
DJ Console to two F1 Subwoofers and two F1 Model 812 Loudspeakers
|
|
|
|
|
|
|
|
|
|
|
|
|
|
|
|
|
|
|
|
|
|
|
|
F1 Subwoofer |
|
|
F1 Model 812 |
|
|||
|
|
Set LINE |
|
|
Set F1 |
||
|
|
OUTPUT EQ |
|
Model |
|||
|
|
to THRU |
|
812 EQ to |
|||
|
|
(full range). |
|
WITH SUB |
|||
|
|
|
|
|
|
|
|
|
|
|
|
|
|
|
|
F1 Subwoofer |
F1 Model 812 |
English - 17

Care and Maintenance
Caring for Your Product
Cleaning
•Clean the product enclosures using only a soft, dry cloth.
•Do not use any solvents, chemicals, or cleaning solutions containing alcohol, ammonia, or abrasives.
•Do not use any sprays near the product or allow liquids to spill into any openings.
•If necessary, you may carefully vacuum the grille of the loudspeaker array.
Getting Service
For additional help in solving problems, contact the Bose Professional Sound Division at (877) 335-2673 or visit our support area online at www.Bose.com/livesound.
Troubleshooting
If you experience problems while using this product, try the following solutions. The recommended troubleshooting tools include a spare AC power cord and extra XLR and 1/4” phone plug cables.
Problem |
What to do |
|
|
|
|
Loudspeaker is plugged in, |
• Make sure the power cord is fully engaged into both the F1 Model 812 Loudspeaker and the AC |
|
power switch is on, but power |
outlet. |
|
LED is off. |
• Make sure you have power at the AC outlet. Try operating a lamp or other equipment from the |
|
|
same AC outlet. |
|
|
• Try a different power cord. |
|
|
|
|
Power LED is on (green),but |
• Make sure the VOLUME control is turned up. |
|
no sound. |
• Make sure volume control is turned up on your instrument. |
|
|
• Make sure your instrument or audio source is plugged into the appropriate input connector. |
|
|
• If the F1 Model 812 Loudspeaker is receiving input from the F1 Subwoofer, make sure the |
|
|
subwoofer |
is turned on. |
|
|
|
Instrument or audio source |
• Lower the volume of the connected audio source. |
|
sounds distorted. |
• If you are connected to an external mixing console, make sure input gain to the mixing console |
|
|
input channel is not clipping. |
|
|
• Reduce the output of the mixing console. |
|
|
|
|
Microphone is encountering |
• Reduce the input gain on the mixing console. |
|
feedback. |
• Try positioning the microphone so it nearly touches your lips. |
|
|
• Try a different microphone. |
|
|
• Use the tone controls on the mixing console to reduce the offending frequencies. |
|
|
• Increase the distance from the loudspeaker to the microphone. |
|
|
• If using a vocal effects processor, make sure it is not contributing to the feedback. |
|
|
|
|
Poor Bass Response |
• If using the F1 Model 812 Loudspeaker without the F1 Subwoofer, make sure the EQ switch is |
|
|
set to FULL RANGE. |
|
|
• If using the F1 Model 812 Loudspeaker with the F1 Subwoofer, check to see if the POLARITY |
|
|
switch is in NORMAL mode. If there is a fair amount distance between the F1 Subwoofer and |
|
|
the F1 Model 812 Loudspeaker, setting the POLARITY switch to REV may improve bass. |
|
|
• If using two F1 Subwoofers, make sure that the POLARITY switch is in the same position on |
|
|
each subwoofer. |
|
|
|
|
18 - English

|
|
Care and Maintenance |
|
|
|
Problem |
What to do |
|
|
|
|
Excessive Noise or System |
• When connecting a microphone to the F1 Model 812 Loudspeaker, make sure the INPUT 1, |
|
Hum |
SIGNAL INPUT switch is set to MIC. |
|
|
• Check to make sure that all system connections are secure. Lines that are not completely |
|
|
connected |
could create noise. |
|
• If using a mixing console, external source or receiving input from the F1 Subwoofer, make sure |
|
|
the INPUT 1 SIGNAL INPUT switch on the F1 Model 812 Loudspeaker is set to LINE. |
|
|
• For best results, use balanced (XLR) connections on the system inputs. |
|
|
• Keep all signal-carrying cables away from AC power cords. |
|
|
• Light dimmers can cause hum in loudspeaker systems. To avoid this, plug the system into a |
|
|
circuit that is not controlling lights or dimmer packs. |
|
|
• Plug the audio system components into power outlets that share a common ground. |
|
|
• Check cables at mixing console inputs by muting channels. If the hum goes away, replace the |
|
|
cable at that mixing console channel. |
|
|
|
|
LED Indicators
The following table describes LED behavior on both the F1 Model 812 Loudspeaker and F1 Subwoofer.
Type |
Location |
Color |
Behavior |
Indication |
Required Action |
|
|
|
|
|
|
Front LED (Power) |
Front Grille |
Blue |
Steady state |
Loudspeaker is on |
None |
|
|
|
|
|
|
|
|
Blue |
Pulsing |
Limiter is active, amplifier |
Reduce volume or |
|
|
|
|
protection engaged |
source input level |
|
|
|
|
|
|
SIGNAL/CLIP |
INPUT 1/2 |
Green (nominal) |
Flicker/Steady state |
Input signal present |
Adjust to desired level |
|
|
|
|
|
|
|
|
Red |
Flicker/Steady state |
Input signal too high |
Reduce volume or |
|
|
|
|
|
source input level |
|
|
|
|
|
|
POWER/FAULT |
Rear panel |
Blue |
Steady state |
Loudspeaker is on |
None |
|
|
|
|
|
|
|
|
Red |
Steady state |
Amplifier thermal shutdown |
Turn loudspeaker off |
|
|
|
|
active |
|
|
|
|
|
|
|
LIMIT |
Rear panel |
Amber |
Pulsing/Steady state |
Limiter is active, amplifier |
Reduce volume or |
|
|
|
|
protection engaged |
source input level |
|
|
|
|
|
|
Limited Warranty and Registration
Your product is covered by a limited warranty. Visit pro.Bose.com for warranty details.
Register your products online at www.Bose.com/register or call (877) 335-2673. Failure to do so will not affect your warranty rights.
Accessories
A variety of wall/ceiling brackets, carry bags and covers are available for these products. Contact Bose to place an order. See the contact information inside the rear cover of this guide.
English - 19
Care and Maintenance
Technical Information
Physical
|
|
Dimensions |
Weight |
|
|
|
|
F1 |
Model 812 Loudspeaker |
26.1" H x 13.1" W x 14.6" D (665 mm H x 334 mm W x 373 mm D) |
44.5 lb (20.18 Kg) |
|
|
|
|
F1 |
Subwoofer |
27.0" H x 16.1" W x 17.6" D (688 mm H x 410 mm W x 449 mm D) |
55.0 lb (24.95 Kg) |
|
|
|
|
F1 system stack |
73.5" H x 16.1" W x 17.6" D (1868 mm H x 410 mm W x 449 mm D) |
99.5 lb (45.13 Kg) |
|
|
|
|
|
Electrical
|
|
AC power rating |
|
Peak inrush current |
|
|
|
|
|
|
|
|
|
F1 |
Model 812 Loudspeaker |
100–240V |
2.3–1.2A 50/60Hz |
|
120 V RMS: 6.3A RMS |
|
|
|
|
|
|
230 V RMS: 4.6A RMS |
|
|
|
|
|
|
|
|
F1 |
Subwoofer |
100–240V |
2.3–1.2A 50/60Hz |
|
120 V RMS: 6.3A RMS |
|
|
|
|
|
|
230 V RMS: 4.6A RMS |
|
|
|
|
|
|
||
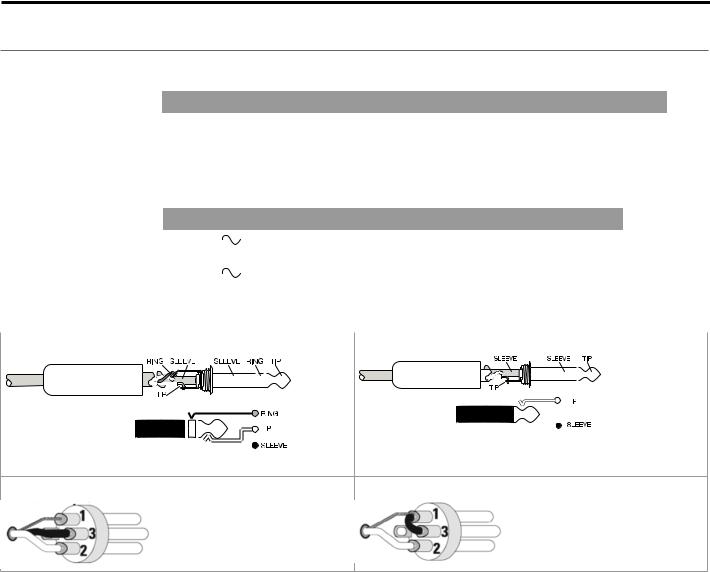
Input/Output Connector Wiring Reference |
|
|
|
|||
|
|
|
|
|
||
TRS balanced |
|
|
TS unbalanced |
|
||
|
|
|
|
|
|
|
|
|
|
|
|
|
|
|
|
|
|
|
|
|
|
|
|
|
|
|
|
|
|
|
|
|
|
|
|
|
|
|
|
|
|
|
|
|
|
|
|
|
|
|
|
|
|
|
|
|
|
|
|
|
|
|
|
|
|
|
|
|
|
|
|
|
|
|
|
|
|
|
|
|
|
|
|
|
|
|
|
|
|
|
|
|
|
|
|
|
|
|
|
|
|
|
|
|
|
|
|
|
|
|
|
|
|
|
|
|
|
|
|
|
|
|
|
|
|
|
|
|
|
|
|
|
|
|
|
|
|
|
|
|
|
|
|
|
|
|
|
|
|
|
|
|
|
XLR balanced |
|
|
|
|
|
|
|
|
|
XLR unbalanced |
|
|
|
|
|||||||
|
|
|
|
|
|
|
|
|
|
|
|
|
|||||||||
|
|
|
|
|
|
|
|
|
|
|
|
|
|||||||||
|
|
|
|
|
|
|
|
|
|
|
|
|
|||||||||
1 |
– Shield (ground) |
1 |
– Shield (ground) |
||||||||||||||||||
3 |
– Minus (–) |
3 |
– Minus (–) |
||||||||||||||||||
2 |
– Plus (+) |
2 |
– Plus (+) |
||||||||||||||||||
20 - English
English - 21
Vigtige sikkerhedsinstruktioner
Læs venligst denne brugervejledning omhyggeligt, og gem den, så du har adgang til den senere.
ADVARSLER:
•Produktet må ikke udsættes for regn eller fugtighed af hensyn til risikoen for brand eller elektrisk stød.
•Udsæt ikke dette apparat for dryp eller stænk, og anbring ikke genstande, der er fyldt med væske, som f.eks. vaser, på eller i nærheden af apparatet. Som ved alle elektroniske produkter skal der udvises forsigtighed, så der ikke spildes væske på nogen dele af systemet. Væsker kan forårsage fejl i systemet og/eller medføre fare for brand.
•Placer ikke nogen form for åben ild (f.eks. stearinlys) på eller tæt ved apparatet.
En ligebenet trekant med et lyn med pilehoved gør brugeren opmærksom på, at der i systemets kabinet kan være uisoleret farlig spænding, der kan være så kraftig, at der er risiko for elektrisk stød.
Mærket med et udråbstegn i en ligesidet trekant skal gøre brugeren opmærksom på vigtige betjeningsog vedligeholdelsesinstruktioner i denne brugervejledning.
Dette produkt indeholder magnetisk materiale. Kontakt din læge, hvis du er i tvivl om, hvorvidt dette kan påvirke din implanterbare medicinske enheds funktion.
Indeholder små dele, som kan udgøre en kvælningsfare. Egner sig ikke til børn under 3 år.
FORSIGTIG:
•Dette produkt skal tilsluttes en stikkontakt med en beskyttende jordforbindelse.
•Foretag ikke uautoriserede ændringer af produktet. Dette kan kompromittere sikkerheden, regeloverholdelsen og systemets ydeevne og kan medføre, at garantien bortfalder.
Bemærkninger:
•Hvis netstikket eller stikdåsen anvendes som afbryder, skal denne afbryder være let at komme til.
•Produktet skal anvendes inden døre. Det er hverken designet eller testet til udendørs brug i fritidskøretøjer eller i lystbåde.
Dette produkt lever op til alle relevante krav i EU-direktiverne.
Den fulde overensstemmelseserklæring finder du på
www.Bose.com/compliance.
Dette symbol betyder, at produktet ikke må smides ud som husholdningsaffald og bør indleveres til en passende indsamlingsordning med henblik på genanvendelse. Korrekt bortskaffelse og genanvendelse bidrager til beskyttelse af naturressourcer, menneskets sundhed og miljøet. Hvis du
ønsker flere oplysninger om bortskaffelse og genanvendelse af dette produkt, kan du kontakte din kommune, dit renovationsselskab eller den butik, hvor du har købt dette produkt.
BEMÆRK: Dette udstyr er blevet testet og overholder grænserne for en digital enhed i klasse A i henhold til del 15 af FCC-reglerne. Disse grænser er udviklet til at yde rimelig beskyttelse mod skadelig interferens, når udstyret anvendes i en professionel installation. Dette udstyr genererer, bruger og kan udstråle radiofrekvensenergi, og kan – hvis det ikke installeres og bruges i overensstemmelse med brugervejledningen – forårsage skadelig interferens i forbindelse med radiokommunikation. Brug af dette udstyr i en privat installation kan forårsage skadelig interferens, og i så fald må brugeren få udbedret interferensen for egen regning.
Dette produkt overholder den canadiske ICES-003 Klasse A-specifikation.
Ændringer eller modifikationer, der ikke udtrykkeligt er godkendt af Bose Corporation, kan ophæve brugerens ret til at betjene dette udstyr.
1.Læs disse instruktioner.
2.Gem disse instruktioner.
3.Ret dig efter alle advarsler.
4.Følg alle instruktioner.
5.Anvend ikke dette apparat i nærheden af vand.
6.Rengør kun med en tør klud.
7.Blokér ikke nogen ventilationsåbninger. Installer i overensstemmelse med producentens anvisninger.
8.Installer ikke i nærheden af varmekilder, såsom radiatorer, varmeovne, komfurer eller andre apparater (herunder forstærkere), der frembringer varme.
9.Forkast ikke sikkerhedsformålet med det polariserede stik eller jordstikket. Et polariseret stik har to ben, hvoraf det ene er bredere end det andet. Et jordforbundet stik har to stikben og et tredje jordben. Det brede stikben eller det tredje ben er der af sikkerhedshensyn. Hvis det medfølgende stik ikke passer i stikkontakten, skal du kontakte en elektriker for at få stikkontakten udskiftet.
10.Beskyt netledningen mod at blive trådt på eller klemt, især ved stikkene, stikkontakter og på det sted, hvor den kommer ud af apparatet.
11.Brug kun tilslutningsudstyr/tilbehør, der er angivet af producenten.
12.Brug kun apparatet sammen med en vogn, et stativ, et beslag eller et bord, der er
angivet af producenten eller solgt sammen med apparatet. Når der anvendes en vogn, skal der udvises forsigtighed ved kørsel med vognen/apparatet, så det ikke vælter.
13. Afbryd strømmen til apparatet under tordenvejr, eller når det står ubrugt i lang tid.
14.Al reparation skal udføres af kvalificerede fagfolk. Et serviceeftersyn er påkrævet, når apparatet på nogen måde er beskadiget, hvis f.eks. netledningen eller stikket er beskadiget, der er blevet spildt væske, eller der er kommet objekter ind i apparatet, hvis apparatet er blevet udsat for regn eller fugt, ikke virker normalt eller er blevet tabt.
Kun for Japan:
Sørg for at etablere en jordforbindelse, før netstikket tilsluttes en stikkontakt.
For Finland, Norge og Sverige:
•På finsk: “Laite on liitettävä suojamaadoituskoskettimilla varustettuun pistorasiaan”
•På norsk: “Apparatet må tilkoples jordet stikkontakt”
•På svensk: “Apparaten skall anslutas till jordat uttag”
Kun for Kina:
FORSIGTIG! Kun velegnet til brug i områder beliggende i maks. 2.000 meters højde.
Bedes udfyldt og opbevaret, så du har det til rådighed
På nuværende tidspunkt er det en god idé at nedskrive serienummeret for dit produkt. Serienummeret kan findes på bagpanelet. Du kan registrere dit produkt online på www.Bose.com/register eller ved at ringe på 877-335- 2673. Hvis ikke du gør det, har det ingen betydning for din garanti.
F1 Model 812 højttaler_ ________________________________
F1 subwoofer_________________________________________
2 - Dansk

|
Indhold |
Indledning |
|
Produktbeskrivelse......................................................................................................................................................... |
4 |
Funktioner og Fordele ................................................................................................................................................... |
4 |
Pakkens indhold............................................................................................................................................................ |
4 |
F1 Model 812 Flexible Array højttaler............................................................................................................................ |
5 |
F1 subwoofer................................................................................................................................................................. |
5 |
Brug af Flexible Array..................................................................................................................................................... |
6 |
Justering af array-enhederne.................................................................................................................................. |
6 |
Fire dækningsmønstre............................................................................................................................................. |
6 |
Anvendelsesområder............................................................................................................................................... |
7 |
Opsætning af systemet |
|
Brug af F1 Model 812 sammen med F1 subwooferen.................................................................................................. |
8 |
Brug af F1 Model 812 på et trebenet stativ................................................................................................................... |
9 |
Betjening |
|
Betjeningspanelet på F1 Model 812.............................................................................................................................. |
10 |
Betjeningspanelet på F1 subwooferen.......................................................................................................................... |
11 |
Tænd/sluk-sekvens........................................................................................................................................................ |
12 |
Indstilling af kontakter til valg af EQ............................................................................................................................... |
12 |
Tilslutning af kilder......................................................................................................................................................... |
12 |
Tilslutning af en mikrofon til INPUT 1...................................................................................................................... |
12 |
Tilslutning af en kilde til INPUT 1............................................................................................................................. |
12 |
Tilslutning af en kilde til INPUT 2............................................................................................................................. |
12 |
Tilslutningsscenarier...................................................................................................................................................... |
13 |
Fuldt orkester, stereoudgang fra mixerkonsol til højre og venstre F1 Model 812 højttaler..................................... |
13 |
Fuldt orkester med mixerkonsol, én F1 subwoofer og to F1 Model 812 højttalere................................................. |
13 |
Stereoudgang fra mixerkonsol til F1 subwoofer og højre og venstre F1 Model 812 højttaler................................. |
14 |
Fuldt orkester med stereoudgang fra mixerkonsol til to F1 subwoofere og to F1 Model 812 højttalere................ |
15 |
Stereoindgang til højre og venstre F1 subwoofer og F1 Model 812 højttaler......................................................... |
15 |
Mikrofon til F1 Model 812 højttalerens INPUT 1...................................................................................................... |
16 |
Mobilenhed til en enkelt F1 Model 812 højttaler..................................................................................................... |
16 |
Mobilenhed til F1 Model 812 højttaler og F1 subwoofer......................................................................................... |
17 |
DJ-pult til to F1 subwoofere og to F1 Model 812 højttalere.................................................................................... |
17 |
Pleje og vedligeholdelse |
|
Vedligeholdelse af produktet.......................................................................................................................................... |
18 |
Rengøring................................................................................................................................................................ |
18 |
Supportmuligheder.................................................................................................................................................. |
18 |
Fejlfinding....................................................................................................................................................................... |
18 |
LED-indikatorer.............................................................................................................................................................. |
19 |
Begrænset garanti og registrering................................................................................................................................. |
19 |
Tilbehør.......................................................................................................................................................................... |
19 |
Tekniske oplysninger...................................................................................................................................................... |
20 |
Fysiske specifikationer............................................................................................................................................ |
20 |
Elektrisk................................................................................................................................................................... |
20 |
Ledningsforbindelser for input-/outputstik.............................................................................................................. |
20 |
Dansk - 3

Indledning
Produktbeskrivelse
Bose® F1 Model 812 Flexible Array højttaleren er den første aktive bærbare højttaler, der lader dig styre dens lodrette dækningsmønster. Du skal blot skubbe eller trække array-enhederne i stilling for at skabe dækningsmønstrene “Lige”, “C”, “J” eller “Omvendt J”. Når dækningsmønstret er indstillet, ændrer systemet automatisk EQ'en, så den optimale tonebalance for hvert enkelt dækningsmønster opretholdes. Så uanset om du spiller på gulvniveau, på en scene eller vendt mod hældende sæderækker eller tribuner, kan du tilpasse dit PA-anlæg, så det matcher rummet.
Højttaleren, der er designet med en række bestående af otte mellemtone/diskant-drivere med høj effekt, en højeffekts-woofer på 12" og et lavere overgangspunkt, leverer høj SPL-ydeevne, mens der bevares en vokalog mellemtoneklarhed, der er markant bedre end fra almindelige højttalere.
Bose F1 subwooferen har forøget basrespons og har samme kraft som en større basenhed, men i et mere kompakt design, der er nemt at tage med sig, og som passer i en bil. Et højttalerstativ er integreret direkte i subwooferens kabinet, så opsætningen er hurtig og nem, og du ved altid, hvor det er. Stativet omfatter endda kabelgange til nemt at skjule kablerne.
Højttaleren og subwooferen har hver en effekt på 1.000 watt, så du kan fylde næsten ethvert spillested med lyd.
Og nu er det også nemmere at komme frem. Højttaleren og subwooferen består af sammensatte letvægtsmaterialer af kraftig kvalitet og strategisk placerede håndtag til nem transport.
Med F1 Model 812 højttaleren kan du for første gang fokusere lyden, hvor der er behov for den. Så uanset hvor du optræder, er du dækket ind med dit PA-anlæg.
Funktioner og Fordele
•Med den fleksible F1 Model 812 højttaler bestående af otte enheder kan du vælge blandt fire dækningsmønstre til at retningsbestemme lyden mod publikums placering og derved opnå en bedre overordnet klarhed fordelt over hele spillestedet.
•Den lodrette placering af højttalerens otte enheder sikrer en bred, konsistent lyddækning, der giver bedre klarhed og tonebalance til tale, musik og instrumenter.
•F1 subwooferen har et unikt, indbygget højttalerstativ til F1 Model 812 højttaleren, der overflødiggør behovet for almindelig stativmontering.
•Det attraktive design giver et unikt system med et robust, men professionelt udseende.
•Det dobbeltforstærkede design omfatter kraftfulde letvægtsforstærkere, der leverer et konsistent output ved lang tids brug og med udvidet dynamisk rækkevidde og lavere driftstemperaturer.
Pakkens indhold
Hver højttaler leveres separat med de herunder anførte elementer.
F1 Model 812 Flexible Array højttaler |
F1 subwoofer |
Netledning* |
Netledning* |
|
|
|
|
|
|
|
|
|
|
|
|
|
|
|
|
|
Brugervejledning |
|
|
Brugervejledning |
||||
|
|
|
|
||
F1 Model 812 højttaler |
|
|
F1 subwoofer med indbygget stativ |
||
*Netledning(er), der passer til din region, følger med.
4 - Dansk

Indledning
F1 Model 812 Flexible Array højttaler
Bemærk! F1 Model 812 leveres med M8-indsatser med gevind til yderligere udstyr og montering af beslag.
FORSIGTIG! Kun professionelle installatører med viden om den korrekte hardware og sikre monteringsteknikker bør forsøge at installere højttalere over hovedhøjde.
 Bærehåndtag
M8-indsatser med gevind
TOP
Fleksibel |
|
|
|
|
|
|
|
||
|
|
|
|
|
|
|
|||
array-enhed |
|
|
|
M8-indsatser |
|
|
|
Bærehåndtag |
|
|
|
|
|
|
|||||
|
|
|
|
|
|
|
|||
|
|
|
|
med gevind |
|
|
|
||
|
|
|
|
|
|
|
|
||
|
|
|
|
|
|
|
|
|
Tilslutninger og |
|
|
|
|
|
|
|
|
|
|
|
|
|
|
|
|
|
|
|
|
|
|
|
|
|
|
|
|
|
|
|
|
|
|
Forside-LED |
|
|
|
betjeningspanel |
|
|
|
|
|
|
|
|
|
||
|
|
|
|
|
|
|
|
||
|
|
|
|
FORSIDE |
|
|
BAGSIDE |
|||
F1 subwoofer |
|
|
|
|
|
|||||
Indbygget højt- |
|
|
|
|
|
|
|
|
||
|
|
|
|
|
|
|||||
talerstativ |
|
|
|
|
|
|||||
Huller til højt- |
|
|
|
|
|
|
Bærehåndtag |
|||
|
|
|
|
|
|
|||||
|
|
|
|
|
|
|
|
|
||
|
|
|
|
|
|
|||||
talerstativ |
|
|
|
|
|
|||||
|
|
|
|
TOP |
|
|
|
|
|
|
|
|
|
|
|
|
|
Forside-LED |
|||
|
|
|
|
|
|
|
||||
|
|
|
|
|
|
|
|
|
|
Tilslutninger og |
|
|
|
|
|
|
|
|
|
|
|
|
|
|
|
|
|
|
|
|
|
betjeningspanel |
|
|
|
|
|
|
|
|
|
|
Bærehåndtag |
|
|
|
|
|
|
|
|
|
|
|
Netstik og afbryderknap
FORSIDE |
BAGSIDE |
Dansk - 5
Indledning
Brug af Flexible Array
Du kan forme dækningsmønstret ved at flytte placeringen af øverste og nederste array-enhed. Array-placeringen fastholdes af magneter, der udløser interne sensorer, som justerer EQ'en i henhold til array-formen.
Justering af array-enhederne
Array-enheden skubbes ind |
Array-enheden trækkes ud |
Fire dækningsmønstre
Lige mønster
Træk øverste og nederste array-enhed ud
J-mønster
Træk øverste array-enhed ud, skub nederste array-enhed ind.
Omvendt J-mønster |
C-mønster |
Skub øverste array-enhed ind, træk nederste array-enhed ud.
Skub øverste og nederste array-enhed ind.
6 - Dansk
Anvendelsesområder
Lige mønster
Brug det lige mønster, når publikum står placeret med højttaleren omtrent i hovedhøjde.
Omvendt J-mønster
Det omvendte J-mønster er velegnet til et publikum, der sidder på hældende sæderækker, som starter i højde med højttaleren
og strækker sig over højttalernes højde.
J-mønster
J-mønstret er velegnet, når højttaleren er placeret på en hævet scene, og publikum befinder sig på gulvet under højttaleren.
C-mønster
Brug C-mønstret til hældende sæderækker i et auditorium, hvor første række er på gulvniveau med højttaleren.
Indledning
Dansk - 7

Opsætning af systemet
Brug af F1 Model 812 sammen med F1 subwooferen
Det indbyggede højttalerstativ opbevares bag på subwooferen. Opsætning af F1 Model 812 sammen med F1 subwooferen er nemt:
1. Fjern det indbyggede højttalerstativ fra bagsiden af F1 subwooferen, og placer det i stativhullerne.
Indbygget højttalerstativ
Huller til stativ
2. Løft F1 Model 812 højttaleren op, og placer den på stativet.
8 - Dansk

Opsætning af systemet
3.Sæt lydkablerne i. Før kablerne fra F1 Model 812 gennem kabelgangene i højttalerstativet for at holde dem organiserede.
Kabelgang (begge sider)
Brug af F1 Model 812 på et trebenet stativ
F1 Model 812 højttaleren har et hul under bunden til montering af højttaleren på et trebenet højttalerstativ. Hullet passer til et standardstativ med en rørdiameter på 35 mm.
ADVARSEL: Brug ikke F1 Model 812 højttaleren sammen med et ustabilt højttalerstativ. Højttaleren er kun designet
til brug på stativer med en rørdiameter på 35 mm, og det trebenede stativ skal kunne bære en højttaler med en minimumvægt på 20,2 kg og en samlet størrelse på 665 mm H x 334 mm B x 373 mm. Ved brug af et trebenet stativ, der ikke er designet til at kunne bære størrelsen og vægten af F1 Model 812 højttaleren, kan der opstå ustabile og farlige forhold, der kan medføre personskade.
Hul, der passer til et standardstativ med en rørdiameter på 35 mm
Dansk - 9
Betjening
Betjeningspanelet på F1 Model 812
Bemærk! Du kan se en komplet liste over LED-indikationer og -tilstande ved at gå til ”LED-indikatorer” på side 19.
POWER:
Tænd/sluk
SIGNAL/CLIP: Viser status for inputsignalet i farver.
• Grøn = inputsignal til stede.
• Rød = signalet overstyrer, inputsignalet er  for højt
VOLUME: Justerer lydstyrken for kanalen.
SIGNAL INPUT: Vælgeren indstiller inputfølsomheden for inputtypen. Kombinationsstik, der passer til XLR-mikrofonstik og 1/4"-audiokabler (balancerede TRS-kabler eller ubalancerede TS-kabler).
• MIC vælger følsomheden for mikrofoninputs (kun dynamiske eller aktive mikrofoner) – bruges kun når der er sluttet en mikrofon direkte til inputtet.
• LINE vælger følsomheden for line-inputs, for eksempel fra en mixerkonsol eller en DJ-pult.
POWER/FAULT:
• Blå = tændt.
• Rød = fejltilstand.
Indgang for netledning
SIGNAL/CLIP: Viser status for inputsignalet i farver.
• Grøn = inputsignal til stede.
• Rød = signalet overstyrer, inputsignalet er  for højt.
RCA-stik: Analog stereoindgang til lydkilder såsom DJ-pulte og andre line-input- kilder. Højre og venstre kanal samles, så der produceres et lydoutput i mono og et monosignal til LINE OUTPUT (XLR).
• Venstre (hvid)
• Højre (rød)
 ¼"-audiokabel: Analogt input til guitarer og andre instrumenter. Passer til balancerede TRSeller ubalancerede TS-kabler.
 LIMIT:
• Gul = systemet bruger limiteren (sikker tilstand).


 FRONT LED:
• POWER indstiller forside-LED'en til at vise tænd/sluk-status.
• LIMIT aktiverer forside-LED'ens visning af brug af limiting. • OFF slukker for forside-LED'en.
EQ: (Se ”Indstilling af kontakter til valg af EQ” på side 12.)
• FULL RANGE indstiller højttaleren til at fungere uden high-pass-filtrering.
• WITH SUB aktiverer et high-pass-filter (100 Hz), når højttaleren bruges sammen med F1
subwooferen. Anbefales ved brug sammen med F1 subwooferen.
LINE OUTPUT:
•Et balanceret XLR-line-output giver et mix af input 1 og 2 efter inputlydstyrkereguleringen. Kan bruges til seriel forbindelse af højttalere.
10 - Dansk
 Loading...