


Acoustic Wave® II CD Changer
!"#$%&'()*+,$ -$,+$#*#.'/#0$+1*#. 231+4$(,&*1+0+1'/1+3# 5/#*/0$(,+(+'1%*6+3#+ )$7%*+8'//#"+96+#.
English |
Español
Français
Safety Information
Please read this owner’s guide
Please take the time to follow the instructions in this owner’s guide carefully. It will help you set up and operate your system properly and enjoy all of its advanced features. Please save this owner’s guide for future reference.
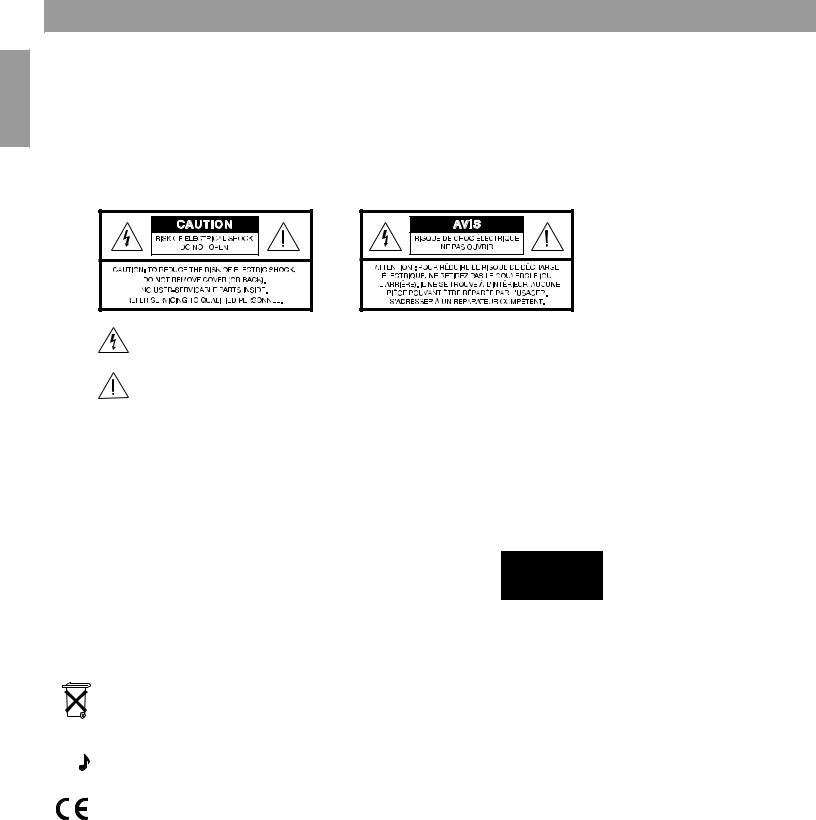
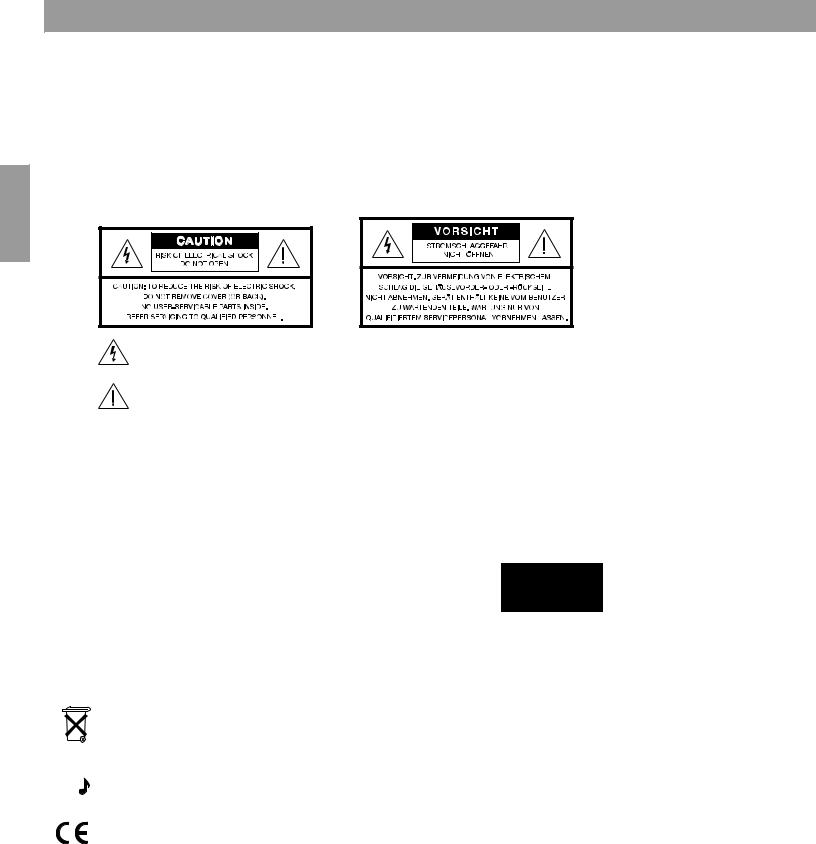
 WARNING: To reduce the risk of fire or electrical shock, do not expose the product to rain or moisture.
 WARNING: The apparatus shall not be exposed to dripping or splashing, and objects filled with liquids, such as vases, shall not be placed on the apparatus. As with any electronic products, use care not to spill liquids into any part of the system. Liquids can cause a failure and/or a fire hazard.
 CAUTION: To reduce the risk of electric shock, do not disassemble this product unless you are qualified. Refer servicing to qualified service personnel.
The lightning flash with arrowhead symbol within an equilateral triangle alerts the user to the presence of uninsulated, dangerous voltage within the system enclosure that may be of sufficient magnitude to constitute a risk of electrical shock.
The exclamation point within an equilateral triangle, as marked on the system, is intended to alert the user to the presence of important operating and maintenance instructions in this owner’s guide.
Class B emissions
This Class B digital apparatus meets all requirements of the Canadian Interference-Causing Equipment Regulations (Canada only).
 CAUTION: To prevent electric shock, match the wide blade of the line cord plug to the wide slot of the AC (mains) receptacle. Insert fully.
 CAUTION: Use of controls or adjustments or performance of procedures other than those specified herein may result in hazardous radiation exposure. The compact disc player should not be adjusted or repaired by anyone except properly qualified service personnel.
 CAUTION: Make no modifications to the system or accessories. Unauthorized alterations may compromise safety, regulatory compliance, and system performance.
Class 1 laser product
This CD player is classified as a CLASS 1 LASER PRODUCT according to |
CLASS 1 |
LASER PRODUCT |
KLASSE 1 |
LASER PRODUKT |
|
EN 60825-1:1994+A1+A2, IEC 60825-1:1993+A1+A2. |
LUOKAN 1 |
LASER LAITE |
KLASS 1 |
LASER APPARAT |
 WARNING: Keep the remote control battery away from children. It may cause a fire or chemical burn if mishandled. Do not recharge, disassemble, heat above 100ºC (212ºF), or incinerate. Dispose of used batteries promptly. Replace only with a battery of the correct type and model number.
 WARNING: Danger of explosion if battery is incorrectly replaced. Replace only with Duracell, Eveready, Energizer, Maxell, Toshiba, or Shun Wo CR2032 or DL2032 3-volt lithium battery.
Please dispose of used batteries properly, following any local regulations. Do not incinerate.
 WARNING: No naked flame sources, such as lighted candles, should be placed on the apparatus.
Note: Where the mains plug or appliance coupler is used as the disconnect device, such disconnect device shall remain readily operable.
This product conforms to the EMC Directive 89/336/EEC and to the Low Voltage Directive 73/23/EEC. The complete Declaration of Conformity can be found at www.bose.com/static/compliance/index.html.
©2006 Bose Corporation. No part of this work may be reproduced, modified, distributed, or otherwise used without prior written permission. All trademarks referenced herein are property of Bose Corporation. The Acoustic Wave® music system II design is a registered trademark of Bose Corporation.
2
Important Safety Instructions
1.Read these instructions – for all components before using this product.
2.Keep these instructions – for future reference.
3.Heed all warnings – on the product and in the owner’s guide.
4.Follow all instructions.
5.Do not use this apparatus near water or moisture – Do not use this product near a bathtub, washbowl, kitchen sink, laundry tub, in a wet basement, near a swimming pool, or anywhere else that water or moisture are present.
6.Clean only with a dry cloth – and as directed by Bose Corporation. Unplug this product from the wall outlet before cleaning.
7.Do not block any ventilation openings. Install in accordance with the manufacturer’s instructions – To ensure reliable operation of the product and to protect it from overheating, put the product in a position and location that will not interfere with its proper ventilation. For example, do not place the product on a bed, sofa, or similar surface that may block the ventilation openings. Do not put it in a builtin system, such as a bookcase or a cabinet that may keep air from flowing through its ventilation openings.
8.Do not install near any heat sources, such as radiators, heat registers, stoves or other apparatus (including amplifiers) that produce heat.
9.Do not defeat the safety purpose of the polarized or grounding-type plug. A polarized plug has two blades with one wider than the other. A grounding-type plug has two blades and a third grounding prong. The wider blade or third prong are provided for your safety. If the provided plug does not fit in your outlet, consult an electrician for replacement of the obsolete outlet.
10.Protect the power cord from being walked on or pinched, particularly at plugs, convenience receptacles, and the point where they exit from the apparatus.
11.Only use attachments/accessories specified by the manufacturer.
12.Use only with the cart, stand, tripod,
bracket or table specified by the 
 manufacturer or sold with the appa-
  ratus. When a cart is used, use cau-

 tion when moving the cart/apparatus combination to avoid injury from tip-over.
13.Unplug this apparatus during lightning storms or when unused for long periods of time – to prevent damage to this product.
14.Refer all servicing to qualified service personnel. Servicing is required when the apparatus has been damaged in any way: such as powersupply cord or plug is damaged; liquid has been spilled or objects have fallen into the apparatus; the apparatus has been exposed to rain or moisture, does not operate normally, or has been dropped – Do not attempt to service this product yourself. Opening or removing covers may expose you to dangerous voltages or other hazards. Please call Bose to be referred to an authorized service center near you.
15.To prevent risk of fire or electric shock, avoid overloading wall outlets, extension cords, or integral convenience receptacles.
16.Do not let objects or liquids enter the product – as they may touch dangerous voltage points or shortout parts that could result in a fire or electric shock.
17.See product enclosure bottom for safety related markings.
Information about products that generate electrical noise
If applicable, this equipment has been tested and found to comply with the limits for a Class B digital device, pursuant to Part 15 of the FCC rules. These limits are designed to provide reasonable protection against harmful interference in a residential installation. This equipment generates, uses, and can radiate radio frequency energy and, if not installed and used in accordance with the instructions, may cause harmful interference to radio communications. However, this is no guarantee that interference will not occur in a particular installation. If this equipment does cause harmful interference to radio or television reception, which can be determined by turning the equipment off and on, you are encouraged to try to correct the interference by one or more of the following measures:
•Reorient or relocate the receiving antenna.
•Increase the separation between the equipment and receiver.
•Connect the equipment to an outlet on a different circuit than the one to which the receiver is connected.
•Consult the dealer or an experienced radio/TV technician for help.
Note: Unauthorized modification of the receiver or radio remote control could void the user’s authority to operate this equipment.
This product complies with the Canadian ICES-003 Class B specifications.
English |
Español
Français
English |
Español
Français
Important Safety Instructions
18.Use Proper Power Sources – Plug the product into a proper power source, as described in the operating instructions or as marked on the product.
19.Avoid Power Lines – Use extreme care when installing an outside antenna system to keep from touching power lines or circuits, as contact with them may be fatal. Do not install external antennas near overhead power lines or other electric light or power circuits, nor where an antenna can fall into such circuits or power lines.
20.Ground All Outdoor Antennas – If an external antenna or cable system is connected to this product, be sure the antenna or cable system is grounded. This will provide some protection against voltage surges and built-up static charges.
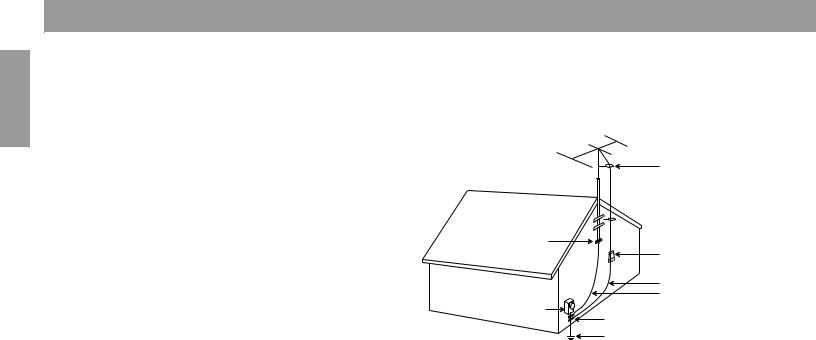
Section 810 of the National Electrical Code ANSI/ NFPA No. 70 provides information with respect to proper grounding of the mast and supporting structure, grounding of the lead-in wire to an antenna discharge unit, size of grounding conductors, location of antenna-discharge unit, connection to grounding electrodes, and requirements for the ground electrode. Refer to the antenna grounding illustration on this page.
Antenna grounding
Example of antenna grounding as per National Electrical Code, ANSI/NFPA 70.
Antenna lead-in wire
Ground clamp
Antenna discharge unit (NEC Section 810-20)
Grounding conductors (NEC Section 810-21)
Electric service |
|
equipment |
Ground clamps |
|
Power service grounding electrode system (NEC ART 250, Part H)
Note to CATV system installer
This reminder is provided to call the CATV system installer’s attention to Article 820-40 of the NEC (of USA) that provides guidelines for proper grounding. In particular, it specifies that the cable ground shall be connected to the grounding system of the building, as close to the point of cable entry as is practical.

|
Contents |
|
|
Setting Up Your Acoustic Wave® II CD Changer . . . . . . . . . . . . . . . . . . . . . . |
. . . . . . . . 4 |
|
|
Features and benefits of the Acoustic Wave® II CD changer . . . . . . . . . . . . . . . . . |
. . . . . . . . . 4 |
English |
|
Seating your Acoustic Wave® music system II on the CD changer . . . . . . . . . . . . |
. . . . . . . . . 5 |
||
Unpacking the carton . . . . . . . . . . . . . . . . . . . . . . . . . . . . . . . . . . . . . . . . . . . . . . . |
. . . . . . . . . 4 |
|
|
Selecting a location for your music system and changer . . . . . . . . . . . . . . . . . . . |
. . . . . . . . . 5 |
|
|
Making the connections . . . . . . . . . . . . . . . . . . . . . . . . . . . . . . . . . . . . . . . . . . . . . |
. . . . . . . . . 6 |
|
|
Operating Your System . . . . . . . . . . . . . . . . . . . . . . . . . . . . . . . . . . . . . . . . . |
. . . . . . . . 7 |
|
|
Using the remote control . . . . . . . . . . . . . . . . . . . . . . . . . . . . . . . . . . . . . . . . . . . . |
. . . . . . . . . 7 |
|
|
Using the Acoustic Wave® II CD changer control panel . . . . . . . . . . . . . . . . . . . . . |
. . . . . . . . . 8 |
Deutsch |
|
Turning your system on or off |
8 |
||
|
|||
Loading/unloading discs into the CD changer . . . . . . . . . . . . . . . . . . . . . . . . . . . . |
. . . . . . . . . 9 |
|
|
Selecting the CD player or CD changer . . . . . . . . . . . . . . . . . . . . . . . . . . . . . . . . . |
. . . . . . . . . 9 |
|
|
Playing CDs in the CD changer . . . . . . . . . . . . . . . . . . . . . . . . . . . . . . . . . . . . . . . |
. . . . . . . . . 10 |
|
|
Listening to an External Audio Source . . . . . . . . . . . . . . . . . . . . . . . . . . . . . |
. . . . . . . . 11 |
|
|
Connecting an external audio source . . . . . . . . . . . . . . . . . . . . . . . . . . . . . . . . . . . |
. . . . . . . . . 11 |
|
|
Playing a connected audio source . . . . . . . . . . . . . . . . . . . . . . . . . . . . . . . . . . . . . |
. . . . . . . . . 12 |
Français |
|
Troubleshooting . . . . . . . . . . . . . . . . . . . . . . . . . . . . . . . . . . . . . . . . . . . . . . . . . . . |
. . . . . . . . . 14 |
||
Care and Maintenance . . . . . . . . . . . . . . . . . . . . . . . . . . . . . . . . . . . . . . . . . |
. . . . . . . . 13 |
|
|
Replacing the remote control battery . . . . . . . . . . . . . . . . . . . . . . . . . . . . . . . . . . . |
. . . . . . . . . 13 |
|
|
Customer Service . . . . . . . . . . . . . . . . . . . . . . . . . . . . . . . . . . . . . . . . . . . . . . . . . . |
. . . . . . . . . 14 |
|
|
Limited warranty . . . . . . . . . . . . . . . . . . . . . . . . . . . . . . . . . . . . . . . . . . . . . . . . . . . |
. . . . . . . . . 15 |
|
|
Technical Information . . . . . . . . . . . . . . . . . . . . . . . . . . . . . . . . . . . . . . . . . . . . . . . |
. . . . . . . . . 15 |
|
|
|
|
Italiano |
Nederlands |
3
English |
Español
Français
Setting Up Your Acoustic Wave® II CD Changer
Features and benefits of the Acoustic Wave® II CD changer
Thank you for selecting the Bose® Acoustic Wave® II CD changer accessory. Combining this product with your Acoustic Wave® music system II provides you with some valuable benefits:
•A six-disc music system – One disc player in the Acoustic Wave® music system II plus five additional disc slots in the Acoustic Wave® II CD changer allows you to load and play up to six audio CDs, providing hours of uninterrupted CD music.
•Elegant integrated pedestal design – Using the same table-top space as the Acoustic Wave® music system II, the CD changer complements the elegance and simplicity of the system.
•One integrated remote control – Provides the simplicity of using one remote control and one-touch selection of all built-in sources.
•Multiple source switching – Using the rear-panel auxiliary (AUX) input jacks, you can enjoy listening to one or two other audio sources in your home through the Acoustic Wave® music system II.
Unpacking the carton
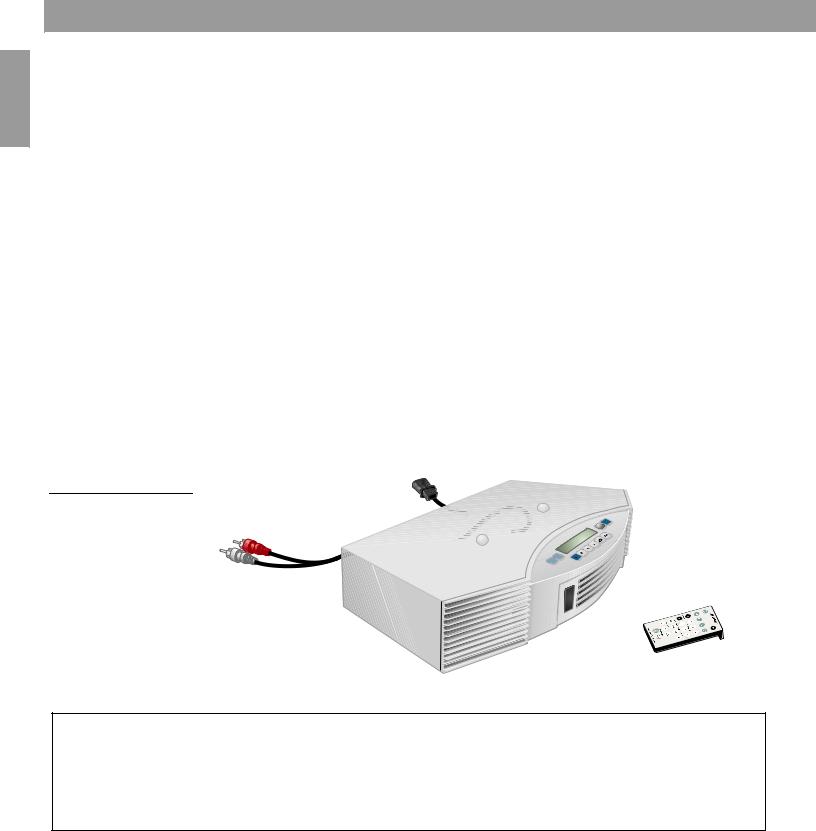
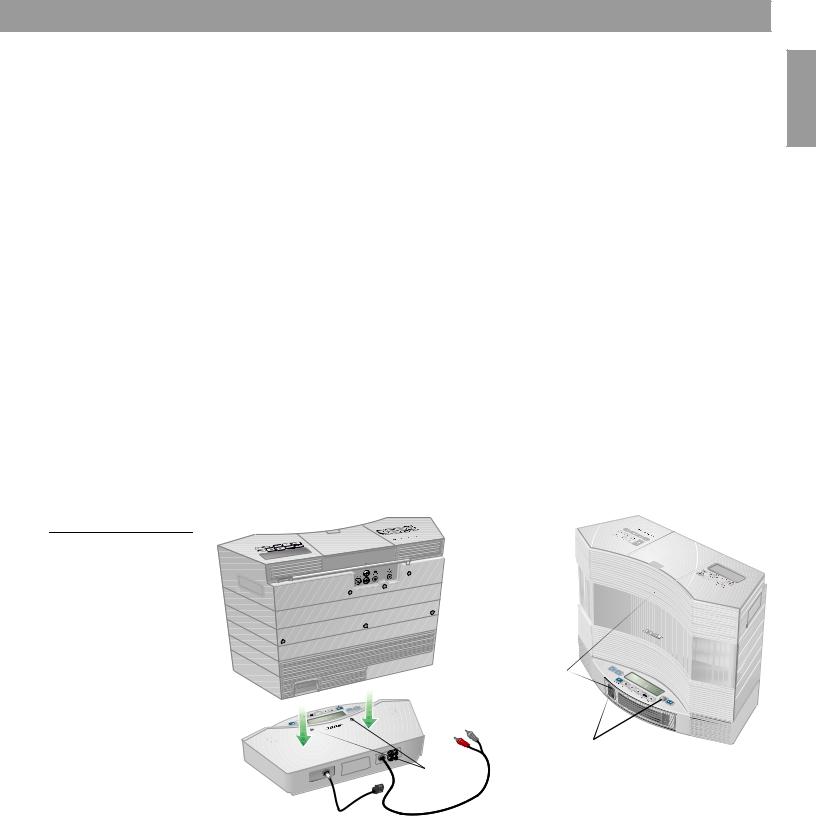
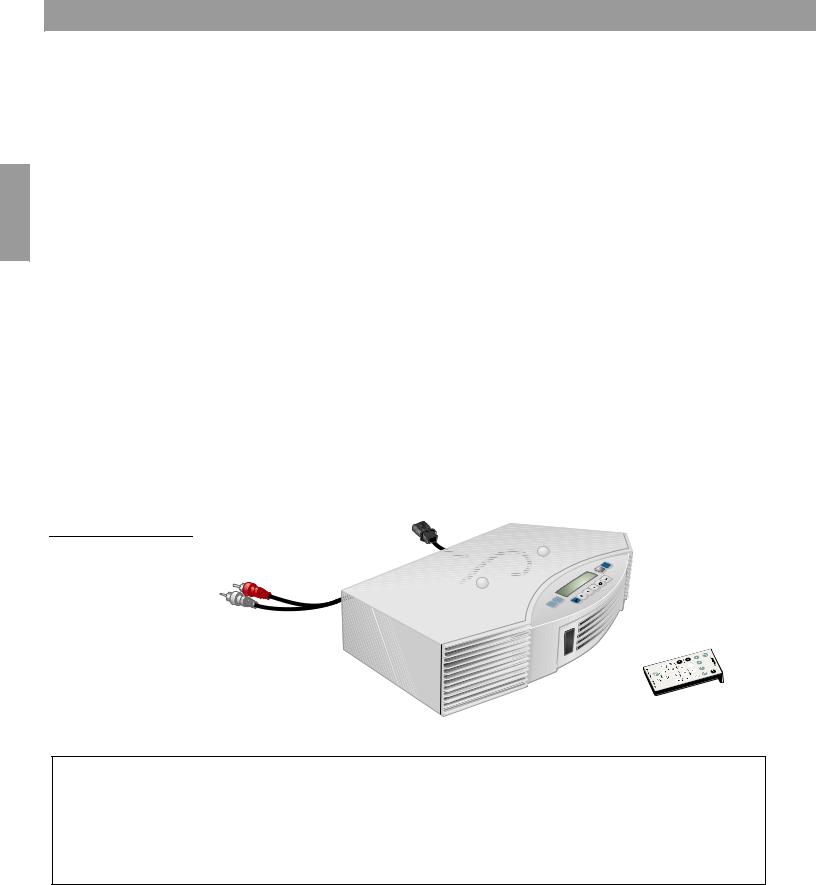
Carefully unpack your Acoustic Wave® II CD changer. Save all packing materials for possible future use. The original packing materials provide the safest way to transport your new multidisc changer.
Check to be sure you received both parts identified in Figure 1. If either part appears to be damaged, do not attempt to use it. Notify Bose Customer Service immediately (see phone numbers on the inside back cover).
 WARNING: To avoid danger of suffocation, keep the plastic bags out of the reach of children.
Figure 1
Carton contents
Acoustic Wave® II |
|
CD changer |
Remote control |
|
For your records
Now is a good time to record the serial number of your Acoustic Wave® II CD changer here and on your product registration card. The serial number is located on the back panel.
Serial number: _____________________________ |
Purchase date: _________________________________________ |
We suggest you keep your sales receipt and a copy of your product registration card together with this owner’s guide.
4
Setting Up Your Acoustic Wave® II CD Changer
Selecting a location for your music system and changer
The Acoustic Wave® II CD changer is designed to fit under your Acoustic Wave® music system II. Before you connect the two, however, select a good location for the stacked units.
When choosing the location, remember that the tonal quality of your Acoustic Wave® music system II, as with any high-performance sound system, will vary with room placement.
Feel free to try different locations, but keep the following guidelines in mind:
•The Acoustic Wave® music system II is designed to sound best when placed on a shelf, counter, desk, or table top, 30 to 48 inches (75 to 120 cm) from the floor.
•The CD player in the Acoustic Wave® music system II needs an allowance of several inches for the CD cover on top of the music system to open.
•The Acoustic Wave® music system II should be near the center of a wall and 6 inches (15 cm), or less, away from the wall.
•To increase the bass response, move the unit toward any corner of the room; to decrease bass response, move it away from the corner.
Seating your Acoustic Wave® music system II on the CD changer
Figure 2
Seating the Acoustic Wave® music system on the CD changer
With the CD changer in your chosen location, carefully set your Acoustic Wave® music system II on top of the CD changer (Figure 2a).
•Make sure the Acoustic Wave® music system II fits onto the raised guides on top of the CD changer.
•Make sure the Acoustic Wave® music system II sits flat and the side edges of both units are aligned.
•Make sure there is a clear optical path in front of the unit to allow the infrared emitters and receivers to communicate (Figure 2b).
(a) |
(b) |
|
TM |
TM
IR signal receivers
IR signal emitters
Raised guides
English |
Español
Français
5
English |
Español
Français
Setting Up Your Acoustic Wave® II CD Changer
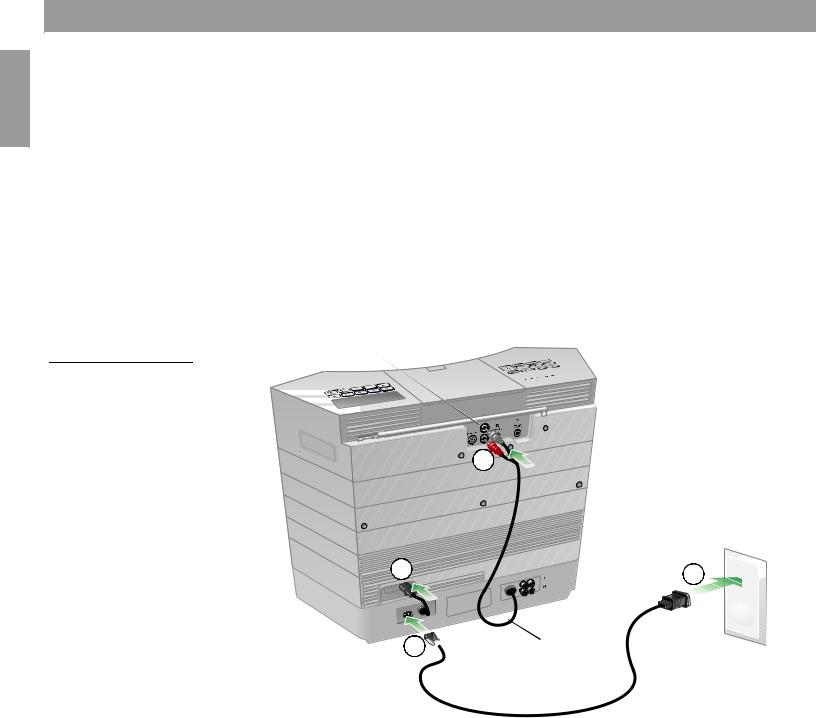
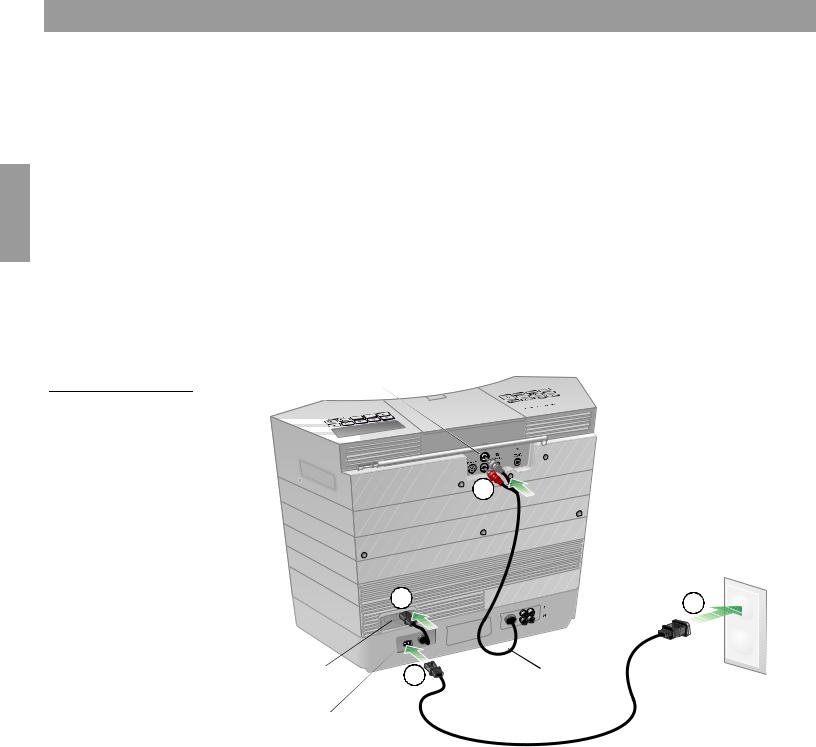
Making the connections
Before you start this setup procedure, disconnect the AC power cord on your
Acoustic Wave® music system II and set it aside. You will need to use it again in
Step 3.
On the back of the CD changer there are two cables that connect to your Acoustic Wave® music system II.
1.Insert the two connectors of the AUX input cable into AUX IN jacks on the back of the music system (Figure 3). Be sure to match the colors of the connectors and jacks: red to red, and white to white.
2.Plug the attached CD changer power cord into the AC power jack on the back of the music system.
3.Plug the small end of the power cord into the power jack on the back of the CD changer.
4.Plug the other end of the power cord into an AC (mains) wall outlet.
After applying power, “PLEASE WAIT” appears on the display for about 30 seconds while the system prepares itself for operation. DO NOT insert any discs until this message disappears.
Figure 3 |
AUX IN jacks |
Connecting cables and |
TM |
|
|
power cords |
|
Acoustic Wave® music system II power jack
CD changer power jack
1
2 
3 

AUX input cable
4
 Acoustic Wave® music system II AC power cable
6
Operating Your System
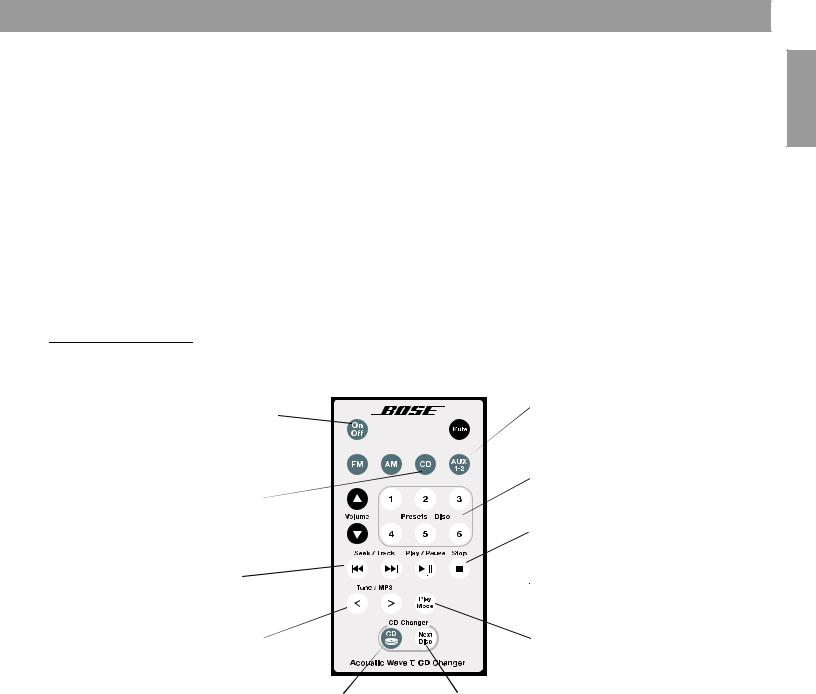
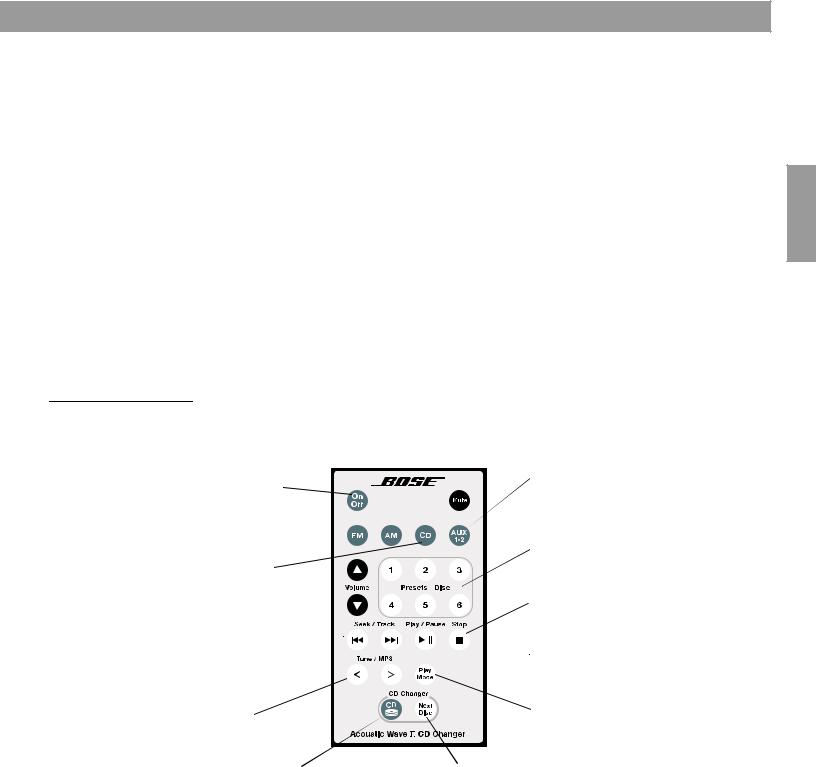
Using the remote control
The remote control included with your Acoustic Wave® II CD changer allows you to control functions of both the CD changer and your Acoustic Wave® music system II. Therefore, you only need this remote to control your system. Just aim the remote at the system and press the buttons. The remote normally works within 20 feet of the front panel.
If the remote stops operating or its range seems reduced, it may be time to replace the battery. For instructions, refer to “Replacing the remote control battery” on page 13.
The information in Figure 4 describes the buttons used for playing CDs and selecting auxiliary inputs. For controlling other functions of the Acoustic Wave® music system II, see the owner’s guide that came with it.
 Notes:
•Press-and-hold operations require holding the button down for at least one second.
•Pressing FM, AM, CD, or AUX automatically turns on the system to the source selected.
•The remote can select an external audio source that is connected to the changer, but cannot turn the source on or off or change its settings.
Figure 4
Acoustic Wave® II CD changer remote control
On/Off
Turns the system on or off (page 8).
CD
Selects the CD source in the Acoustic
Wave® music system II (page 9).
Seek/Track
Skips to next/previous CD track (page 10).
Tune/MP3
Scans forward/backward through a CD track (page 10).
CD Changer
Selects the CD changer and turns it on if it is off (page 9).
AUX 1-2
Selects the AUX 1 or AUX 2 input jack on the rear panel of the CD changer (page 12).
Presets/Discs
Selects CD changer slots 1-5 (page 10).
Stop
Stops a playing CD (page 10).
 Play/Pause
Plays a CD or pauses a playing
CD (page 10).
Play Mode
Selects repeat and random CD play modes (page 10).
Next Disc
Moves to next CD in the changer (page 10).
Throughout this owner’s guide, you will see button icons to the left of the operating instructions. These icons refer to buttons located on the remote control.
English |
Español
Français
7

English |
Español
Français
Operating Your System
Using the Acoustic Wave® II CD changer control panel
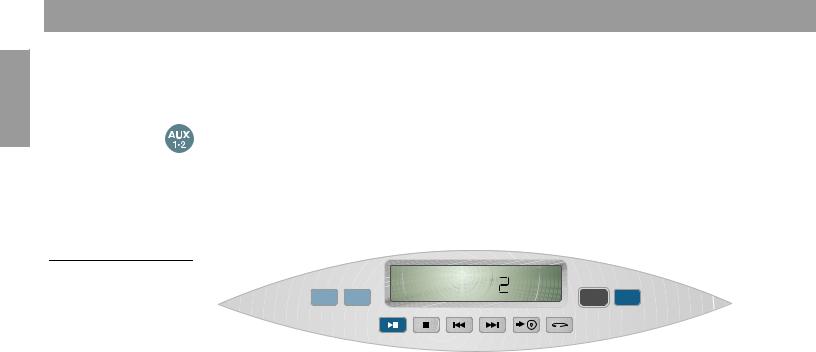
The Acoustic Wave® II CD changer control panel provides playback control buttons and a display for operating the changer only. It cannot control any functions of the Acoustic Wave® music system II. Figure 5 describes the control buttons and display window.
Figure 5
CD changer control buttons and display functions
|
|
Track number |
Play/pause indicator |
|
|
Selected disc slot |
|
|
|
|
|
|
DISC |
TRACK |
|
|
|
|
CHANGER |
|
AUX 1 |
AUX 2 |
|
|
AUX 1/AUX 2 |
|
|
|
|
Selects the AUX 1/2 source, |
|
|
|
|
and automatically turns on |
|
|
Play/Pause Stop |
Next Disc CD Mode |
the system if it is off. |
|
|
|
|
Play/Pause |
Stop |
|
Seek/Track |
|
Plays or pauses the |
Stops the currently |
• Press: Skips to next/previous CD track. |
||
selected CD. |
playing CD. |
|
• Press and hold: Scans forward/backward |
|
through a CD track.
Elapsed time |
On/Off |
|
Turns CD changer on or off.
ON/OFF
CD Mode
Selects repeat and random CD play modes.
Next Disc
Moves to the next CD in the changer.
Turning your system on or off
Figure 6
Power on/off controls of the complete system
To turn on the complete system, press On/Off on the CD changer control panel or press the changer select button CD on the remote. For other power on/off controls, see Figure 6.
|
• |
Turns on only the Acoustic |
|
Turns only the Acoustic |
|
||||
|
|
|||
|
|
Wave® music system II. |
|
Wave® music system II |
|
• |
Turns off the complete system. |
|
on or off. |
|
|
|||
|
|
|
|
|
TM
• Selects and turns on the CD changer.
• Turns on the Acoustic Wave® music system II if it is off.
Turns on the complete system and plays a CD in the changer.
•Turns on the complete system and switches the Acoustic Wave® music system II to the AUX source.
•Only turns off the CD changer.
8
Operating Your System
Loading/unloading discs into the CD changer
The Acoustic Wave® II CD changer holds up to five CDs. When a CD is inserted into a slot in the changer and it is on, the changer’s display window indicates the number of the CD slot selected, the track number playing, and the elapsed time (see Figure 5).
To load a CD into the changer, insert one edge of the disc into an empty slot and push the disc all the way in (Figure 7). The LED indicator to the right of each slot indicates the status.
Figure 7
Loading discs
TM
Disc slot status indicators
• Off ........... Empty disc slot.
• Amber.... The slot contains a CD, but it is not currently selected. The amber light flashes while a slot is ejecting a disc.
• Green..... The current disc slot. The green light flashes while the changer switches to this slot.
Disc slot eject buttons
To remove a CD from a changer slot, press the Eject button to the right of the status indicator for that slot. Allow a few seconds for the mechanism to respond.
 CAUTION:
•DO NOT INSERT mini CDs or non-circular CDs into any disc slot. The CD changer may not properly play or eject them.
•DO NOT INSERT more than one disc at a time into any disc slot.
•Doing either of the above can cause damage to the disc and/or the CD changer.
Selecting the CD player or CD changer
Using the Acoustic Wave® II CD changer provides access to up to six CDs, one in the
Acoustic Wave® music system II and five in the CD changer.
To use the Acoustic Wave® music system II CD player:
Press CD on the remote control or on the Acoustic Wave® music system II control panel to turn on (if off) the Acoustic Wave® music system II and select the CD player.
For complete instructions on operating the CD player, refer to your Acoustic Wave® Music
System II Owner’s Guide.
English
Español
Français
9
Operating Your System
English |
TRACK
CHANGER
ON/OFF
To use the Acoustic Wave® II CD changer:
Press CD changer on the remote control, or press On/Off on the CD changer control panel to turn on (if off) the complete system and select the CD changer.
Stop |
Next Disc |
CD Mode |
Español
Français
Playing CDs in the CD changer
• Press Play/Pause to start playing the selected CD. Press again to pause it. While a CD is playing, the display tells you the disc slot number, track number, and elapsed time.
• Press Seek/Track 
 once to skip to the beginning of the current track. Press again within three seconds to skip to the beginning of the previous track.
•Press Seek/Track 
 once to skip to the next track.
•Press and hold Tune/MP3 < or Tune/MP3 > to quickly scan backward or forward through a track.
• Press Stop to stop the currently playing CD.
• Press Next Disc to move to the next disc slot. The disc slot number on the display tells you which slot is currently selected.
OR
• Press Preset/Disc 1-5 to move to a specific disc slot.
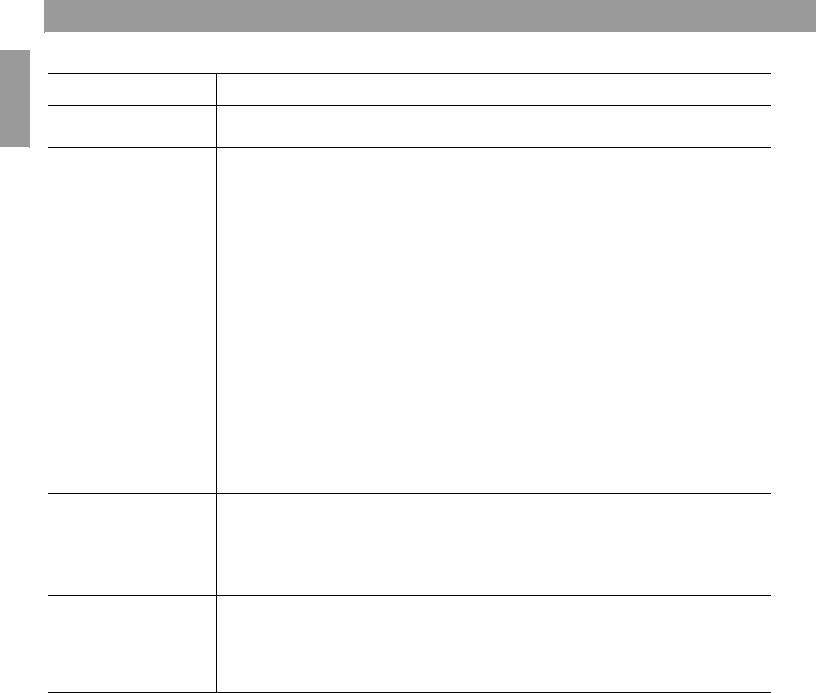
Press Play Mode repeatedly until the play mode you want is displayed.
Displayed mode |
Description |
|
|
REPEAT ALL |
Repeats all tracks and discs in numerical order. |
|
|
REPEAT ALL RANDOM |
Repeats all tracks and discs in random order. |
|
|
REPEAT DISC |
Repeats all tracks on selected disc in numerical order. |
|
|
REPEAT DISC RANDOM |
Repeats all tracks on selected disc in random order. |
|
|
10

Listening to an External Audio Source
Connecting an external audio source
The Acoustic Wave® II CD changer provides two rear-panel inputs (AUX 1 and AUX 2) for connecting external audio devices such as a TV, VCR, DVD player, cassette player, or MP3 player. This gives you the advantage of hearing Acoustic Wave® music system II sound from a range of sources.
To make the connection, use an appropriate stereo cable (not included).
1.Connect one end of the cable to the audio output jacks of the device and the other end to one set of AUX input jacks on the changer (Figure 8). Be sure to match the red and white plugs on the cable to the red (R) and white (L) AUX jacks on the changer.
2.Repeat Step 1 to connect another device.
3.Plug the device into an AC outlet.
Figure 8
External audio device connections
Audio device
AUX 1 INPUT
AUX 2 INPUT
English |
Español
Français
11
English |
Español
Français
Listening to an External Audio Source
Playing a connected audio source
To listen to a connected source:
1.Turn on the external audio device.
2.Press AUX 1-2 on the Acoustic Wave® II CD changer remote control. Press AUX 1-2
again to switch between the AUX 1 and AUX 2 inputs. AUX 1 or AUX 2 appears on the display to confirm your selection (Figure 9).
3.Adjust the volume using the remote control.
 Note: The Acoustic Wave® II CD changer remote control cannot turn a connected AUX device on or off, or change its settings or selections.
Figure 9
Acoustic Wave® II CD |
|
AUX |
changer sample AUX |
|
|
display |
AUX 1 AUX 2 |
ON/OFF |
|
Play/Pause Stop |
Next Disc Random |
12
Care and Maintenance
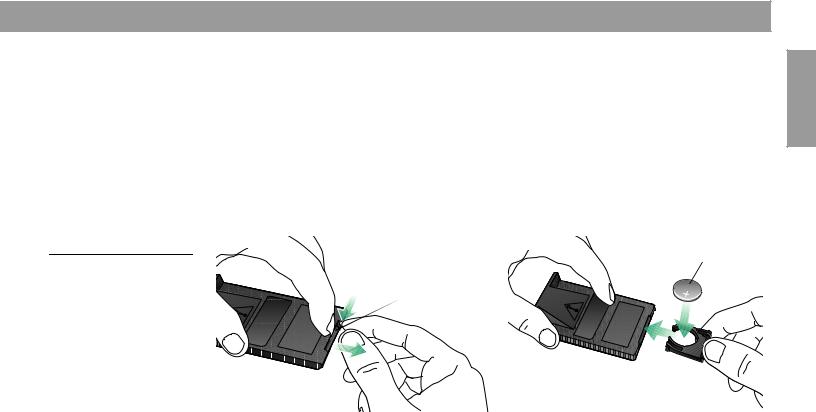
Replacing the remote control battery
If your remote control does not work properly, or its range of operation is reduced, it is time to replace the battery. Follow the instructions below:
1.Place the remote control face down on a flat surface.
2.Using your finger, push the tab lock to the side as shown and hold (Figure 10a). Slide the battery compartment open.
3.Keeping the remote control face down, insert the new battery into the compartment with the + symbol facing up (Figure 10b).
4.Gently slide the battery compartment closed. It locks automatically.
Figure 10 |
(a) |
(b) |
Positive |
Remote control battery |
|
|
symbol |
|
|
|
replacement
Tab
 WARNING: Danger of explosion if battery is incorrectly replaced. Replace only with the same or equivalent type. Replace only with a lithium CR2032 or DL2032 3-volt battery by Duracell, Eveready, Energizer, Maxell, New Sun, or Toshiba (available from most electronics stores).
 WARNING: Mishandling the remote control battery may cause a fire or chemical burn. Keep the battery away from children. Do not recharge, disassemble, heat above 212 °F (100 °C), or incinerate the battery. Dispose of the used battery promptly and responsibly.
For more information, call Bose® Customer Service. Refer to the phone numbers on the inside back cover of this guide.
English |
Español
Français
13
|
Care and Maintenance |
|
English |
Troubleshooting |
|
No system operation |
• Make sure the power cord for the Acoustic Wave® II CD changer is completely plugged in |
|
|
Problem |
What to do |
|
|
both at the changer jack and at the wall outlet. |
|
No sound or |
• If the Acoustic Wave® II CD changer or an audio device connected to it is playing, make |
|
|
sound is muffled |
sure that the “AUX” source indicator appears on the Acoustic Wave® music system II dis- |
|
Español |
play. |
||
• If the source is AUX 1 or AUX 2, make sure that the connected audio device is plugged in |
|||
|
|
||
|
|
and turned on, and make sure the stereo cable is properly connected between the two |
|
|
|
units. |
|
|
|
• Make sure that both the Acoustic Wave® II CD changer and the Acoustic Wave® music |
|
|
|
system II are plugged into functioning power outlets, and are turned on. |
|
Français |
• Check the connection of the Acoustic Wave® music system II to the changer. Make sure |
||
the two RCA connectors are firmly inserted, red to red, and white to white, into the AUX IN |
|||
|
|
||
|
|
jacks on the Acoustic Wave® music system II. Refer to “Making the connections” on |
|
|
|
page 6. |
|
|
|
• Make sure nothing is blocking or preventing the IR signals emitted by the CD changer |
|
|
|
from reaching the receiver on the front of the Acoustic Wave® music system II. Refer to |
|
|
|
“Selecting a location for your music system and changer” on page 5. |
|
|
|
|
|
|
CD skips |
• Make sure the system is in a location where it cannot get bumped. If so, move it to a more |
|
|
|
protected location. |
|
•Check the CD for smudges or dirt. Wipe the CD (NOT in a circular pattern, but straight out from the center) to it clean off.
CD does not play |
• Make sure you have selected the CD changer. |
•If you have selected the CD changer, make sure the AUX indicator appears on the Acoustic Wave® music system II display. If not, press the AUX button on the music system console.
•Make sure there is a CD in the selected CD changer slot.
A CD is playing, but none |
• Check to see if the CD player in the Acoustic Wave® music system II is on and playing, |
of the CD changer LEDs is |
instead of the CD changer. |
lit |
|
|
|
CD changer does not |
• Disconnect the system power cord from the AC outlet, wait a few seconds, and plug it in |
eject a disc |
again. |
Customer Service
For additional help in solving problems, contact Bose® Customer Service. Refer to the address list on the inside back cover of this guide.
14

Care and Maintenance
Limited warranty
What is covered:
All parts defective in material or workmanship.
For how long:
Two years (one year, Europe) from the purchase date.
What we will do:
We will, at our sole option, repair or replace any defective parts free of charge.
What you must do:
A.Call Bose® Customer Service and ask for shipping instructions.
B.Properly pack the unit, if possible, in the original carton for shipping.
Other conditions:
This limited warranty is fully transferable for the one-year period following purchase.
THE PROVISIONS OF THIS LIMITED WARRANTY ARE IN LIEU OF ANY OTHER WARRANTY, WHETHER EXPRESS OR IMPLIED, WRITTEN OR ORAL, INCLUDING ANY WARRANTY OF MERCHANTABILITY OR FITNESS FOR A PARTICULAR PURPOSE. BOSE CORPORATION’S MAXIMUM LIABILITY SHALL NOT EXCEED THE ACTUAL PURCHASE PRICE PAID BY YOU FOR THE PRODUCT. IN NO EVENT SHALL BOSE BE LIABLE FOR SPECIAL, INCIDENTAL, CONSEQUENTIAL, OR INDIRECT DAMAGES.
This limited warranty does not cover a defect that has resulted from improper or unreasonable use or maintenance, accident, improper packing, or unauthorized tampering, alteration, or modification as determined solely by us. This limited warranty is void if the label bearing the serial number has been removed or defaced.
Other Legal Rights:
This limited warranty gives you specific legal rights, and you also may have other rights that vary from state to state or country to country. Some places do not allow limitations on implied warranties or the exclusion or limitation of incidental or consequential damages, so the above limitations or exclusions may not apply to you.
Technical Information
Multi-disc changer power rating
222V-240V~ 50/60 Hz 80W (80W max., combined with the Acoustic Wave® music system II)
Dimensions
31/4"H x 18"W x 83/8"D (8.7 cm x 45.7 cm x 21.1 cm)
Weight
6.7 lb (3.1 kg)
Color
Graphite Gray or Platinum White
English |
Español
Français
15
English
Deutsch |
Sicherheitshinweise
Lesen Sie diese Bedienungsanleitung aufmerksam durch.
Beachten Sie alle Hinweise sorgfältig. Die Anleitung unterstützt Sie beim Aufbau und ordnungsgemäßen Betrieb des Systems und seiner modernen Funktionen. Bewahren Sie diese Bedienungsanleitung zum späteren Nachschlagen auf.
 WARNUNG: Um Brände und Stromschläge zu vermeiden, darf dieses Produkt weder Regen noch Feuchtigkeit ausgesetzt werden.
 WARNUNG: Schützen Sie das Gerät vor tropfenden oder spritzenden Flüssigkeiten, und stellen Sie keine mit Flüssigkeiten gefüllten Gefäße (z. B. Vasen) auf das Gerät. Wie bei allen elektronischen Geräten dürfen niemals Flüssigkeiten ins Innere gelangen. Dadurch kann es zu Fehlfunktionen oder Bränden kommen.
 ACHTUNG: Um Stromschläge zu vermeiden, darf dieses Produkt nur von qualifiziertem Personal zerlegt werden. Wenden Sie sich bei allen Reparaturund Wartungsarbeiten nur an qualifiziertes Kundendienstpersonal.
Français
Das Blitzsymbol mit Pfeilspitze in einem gleichseitigen Dreieck weist den Benutzer auf nicht isolierte, gefährliche elektrische Spannung innerhalb des Systemgehäuses hin. Es besteht die Gefahr von Stromschlägen!
Das Ausrufezeichen in einem gleichseitigen Dreieck, wie es auf dem System angebracht ist, soll den Benutzer auf wichtige Bedienungsund Wartungsanweisungen in dieser Bedienungsanleitung aufmerksam machen.
Class B Emissions
Dieses Gerät der Klasse B entspricht den Anforderungen der Canadian Interference-Causing Equipment Regulations (nur Kanada).
 ACHTUNG: Stecken Sie zur Vermeidung von Stromschlägen den breiten Kontakt des Netzkabelsteckers vollständig in den breiten Schlitz. Überzeugen Sie sich vom korrekten Sitz des Steckers.
 ACHTUNG: Bei unsachgemäßem Gebrauch besteht die Gefahr, dass aus dem Gerät Strahlung austritt. Reparaturund Wartungsarbeiten müssen von qualifiziertem Kundendienstpersonal durchgeführt werden.
 ACHTUNG: Nehmen Sie keine Veränderungen am System oder am Zubehör vor. Nicht autorisierte Veränderungen können die Sicherheit, die Erfüllung von Richtlinien und die Systemleistung beeinträchtigen.
Klasse 1 Laser-Produkt
Dieser CD-Player ist ein LASER-PRODUKT DER KLASSE 1 gemäß |
CLASS 1 |
LASER PRODUCT |
KLASSE 1 |
LASER PRODUKT |
|
EN 60825-1:1994+A1+A2, IEC 60825-1:1993+A1+A2. |
LUOKAN 1 |
LASER LAITE |
KLASS 1 |
LASER APPARAT |
 WARNUNG: Halten Sie die Batterien der Fernbedienung außerhalb der Reichweite von Kindern. Die falsche Behandlung der Fernbedienungsbatterie kann Brände oder Verätzungen verursachen. Versuchen Sie nicht, die Batterie wiederaufzuladen, auseinander zu nehmen, auf eine Temperatur von über 100 ºC zu erhitzen oder zu verbrennen. Entsorgen Sie verbrauchte Batterien sofort. Ersetzen Sie Batterien nur durch Batterien des richtigen Typs und der richtigen Modellnummer.
 WARNUNG: Bei falsch eingelegter Batterie besteht Explosionsgefahr. Verwenden Sie nur 3-Volt-Lithium-Batterien CR2032 oder DL2032 von Duracell, Eveready, Energizer, Maxell, Toshiba oder Shun Wo.
Leere Batterien müssen getrennt entsorgt werden und gehören nicht in den Hausmüll. Verbrennen Sie keine Batterien.
 WARNUNG: Stellen Sie keine brennenden Kerzen und kein offenes Licht auf das Gerät.
Hinweis: Falls Sie den Netzstecker oder eine Mehrfachsteckdose verwenden, um das Gerät von der Stromversorgung zu trennen, sollten Sie sicherstellen, dass Sie jederzeit auf den Stecker zugreifen können.
Dieses Produkt entspricht den Bestimmungen der EMV-Richtlinie 89/336/EWG und der Niederspannungs-Richtlinie 73/23/EWG. Die vollständige Konformitätserklärung ist einsehbar unter www.bose.com/static/compliance/index.html.
©2006 Bose Corporation. Dieses Dokument darf ohne vorherige schriftliche Genehmigung weder ganz noch teilweise reproduziert, verändert, vertrieben oder in anderer Weise verwendet werden. Alle hier genannten Warenzeichen sind Eigentum der Bose Corporation. Das Design des Acoustic Wave® Music System II ist ein eingetragenes Warenzeichen der Bose Corporation.
2

|
Inhalt |
Aufbau des Acoustic Wave® II CD-Wechslers . . . . . . . . . . . . . . . . . . . . . . . . . . . . |
. . . . 4 |
Merkmale und Vorteile des Acoustic Wave® II CD-Wechslers . . . . . . . . . . . . . . . . . . . . |
. . . . . 4 |
Auspacken des Kartons . . . . . . . . . . . . . . . . . . . . . . . . . . . . . . . . . . . . . . . . . . . . . . . . . |
. . . . . 4 |
Auswählen eines Standorts für das Music System und den CD-Wechsler . . . . . . . . . . |
. . . . . 5 |
Aufsetzen des Acoustic Wave® Music System II auf den CD-Wechsler . . . . . . . . . . . . |
. . . . . 5 |
Anschließen der Kabel . . . . . . . . . . . . . . . . . . . . . . . . . . . . . . . . . . . . . . . . . . . . . . . . . . |
. . . . . 6 |
Betrieb des Systems . . . . . . . . . . . . . . . . . . . . . . . . . . . . . . . . . . . . . . . . . . . . . . . . . . . |
7 |
|
|
Verwendung der Fernbedienung . . . . . . . . . . . . . . . . . . . . . . . . . . . . . . . . . . . . . . . . . . . . . . . |
7 |
|
|
Verwendung des Kontrollfelds des Acoustic Wave® II CD-Wechslers . . . . . . . . . . . . . . . . . . . |
8 |
Deutsch |
|
Einund Ausschalten des Systems |
8 |
||
|
|||
CDs in den CD-Wechsler einlegen und daraus entnehmen . . . . . . . . . . . . . . . . . . . . . . . . . . . |
9 |
|
|
CD-Player oder CD-Wechsler auswählen . . . . . . . . . . . . . . . . . . . . . . . . . . . . . . . . . . . . . . . . |
9 |
|
|
CDs im CD-Wechsler abspielen . . . . . . . . . . . . . . . . . . . . . . . . . . . . . . . . . . . . . . . . . . . . . . . . |
10 |
|
|
Externe Audioquellen . . . . . . . . . . . . . . . . . . . . . . . . . . . . . . . . . . . . . . . . . . . . . . . . . . |
11 |
|
|
Anschließen einer externen Audioquelle . . . . . . . . . . . . . . . . . . . . . . . . . . . . . . . . . . . . . . . . . |
11 |
|
|
Wiedergabe von einer angeschlossenen Audioquelle . . . . . . . . . . . . . . . . . . . . . . . . . . . . . . . |
12 |
|
|
Pflege und Wartung . . . . . . . . . . . . . . . . . . . . . . . . . . . . . . . . . . . . . . . . . . . . . . . . . . . |
13 |
|
|
Austausch der Batterie der Fernbedienung . . . . . . . . . . . . . . . . . . . . . . . . . . . . . . . . . . . . . . . |
13 |
|
|
Fehlersuche . . . . . . . . . . . . . . . . . . . . . . . . . . . . . . . . . . . . . . . . . . . . . . . . . . . . . . . . . . . . . . . |
14 |
|
|
Kundendienst . . . . . . . . . . . . . . . . . . . . . . . . . . . . . . . . . . . . . . . . . . . . . . . . . . . . . . . . . . . . . . |
14 |
|
|
Eingeschränkte Garantie . . . . . . . . . . . . . . . . . . . . . . . . . . . . . . . . . . . . . . . . . . . . . . . . . . . . . |
15 |
|
|
Technische Daten . . . . . . . . . . . . . . . . . . . . . . . . . . . . . . . . . . . . . . . . . . . . . . . . . . . . . . . . . . . |
15 |
|
3
English
Deutsch |
Français
Aufbau des Acoustic Wave® II CD-Wechslers
Merkmale und Vorteile des Acoustic Wave® II CD-Wechslers
Vielen Dank, dass Sie sich für den Acoustic Wave® II CD-Wechsler von Bose® entschieden haben. Die Kombination dieses Produkts mit Ihrem Acoustic Wave® Music System II bringt Ihnen einige wertvolle Vorteile:
•Ein Musiksystem für sechs Discs – Wenn Sie den Disc-Player im Acoustic Wave® Music System II und die fünf zusätzlichen CD-Fächer im Acoustic Wave® II CD-Wechsler nutzen, können Sie bis zu sechs Musik-CDs einlegen und so mehrere Stunden lang ohne Unterbrechung Musik hören.
•Elegantes Sockeldesign – Der CD-Wechsler hat dieselbe Grundfläche wie das Acoustic Wave® Music System II und fügt sich nahtlos in die schlichte Eleganz des Systems ein.
•Integrierte Fernbedienung – Mit einer Fernbedienung lassen sich alle integrierten Quellen auswählen und steuern.
•Wechsel zwischen mehreren Quellen – Indem Sie die AUX-Eingänge auf der Rückseite nutzen, können Sie über das Acoustic Wave® Music System II eine oder zwei weitere Audioquellen hören.
Auspacken des Kartons
Packen Sie den Acoustic Wave® II CD-Wechsler vorsichtig aus. Bewahren Sie das Verpackungsmaterial zur späteren Verwendung auf. In der Originalverpackung können Sie das System zu einem späteren Zeitpunkt sicher transportieren.
Überprüfen Sie, ob Sie beide in Abbildung 1 angegebenen Teile erhalten haben. Sollte eines der Teile beschädigt aussehen, verwenden Sie es nicht. Wenden Sie sich in diesem Fall unverzüglich an den Bose-Kundendienst (die Telefonnummer finden Sie auf der hinteren Umschlagseite innen).
 WARNUNG: Bewahren Sie Plastikbeutel außerhalb der Reichweite von Kindern auf, um Erstickungsgefahr zu vermeiden.
Abbildung 1
Kartoninhalt
Acoustic Wave® II |
|
CD-Wechsler |
Fernbedienung |
|
Für Ihre Unterlagen
Es wird empfohlen, dass Sie nun die Seriennummer des Acoustic Wave® II CD-Wechslers hier und auf der Produktregistrierungskarte notieren. Die Seriennummer befindet sich auf der Rückseite des Systems.
Seriennummer: _____________________________ |
Kaufdatum: ____________________________________________ |
Bewahren Sie die Kaufquittung und eine Kopie der Produktregistrierungskarte zusammen mit dieser Bedienungsanleitung auf.
4
Aufbau des Acoustic Wave® II CD-Wechslers
Auswählen eines Standorts für das Music System und den CD-Wechsler
Der Acoustic Wave® II CD-Wechsler passt genau unter das Acoustic Wave® Music System II. Bevor Sie beide verbinden, sollten Sie jedoch einen geeigneten Standort für die aufeinander gestellten Geräte auswählen.
Beachten Sie bei der Auswahl des Standorts, dass die Klangqualität des Acoustic Wave® Music System II wie bei allen hochwertigen Soundsystemen von der Platzierung im Raum abhängig ist.
Probieren Sie ggf. verschiedene Standorte aus, beachten Sie dabei aber die folgenden
Richtlinien.
•Das Acoustic Wave® Music System II klingt am besten, wenn es auf einem Regal, einer Anrichte, einem Tisch oder Schreibtisch in Höhe von 75 bis 120 cm über dem Fußboden aufgestellt wird.
•Der CD-Player des Acoustic Wave® Music System II benötigt einen Freiraum von mehreren Zentimetern, damit das CD-Fach oben auf dem Music System geöffnet werden kann.
•Das Acoustic Wave® Music System II sollte mit einem Abstand von höchstens 15 cm mittig vor einer Wand stehen.
•Zum Verstärken der Basswiedergabe bewegen Sie das Gerät näher an eine Ecke des Raums, für eine schwächere Basswiedergabe bewegen Sie es von der Ecke weg.
Aufsetzen des Acoustic Wave® Music System II auf den CD-Wechsler
Abbildung 2
Acoustic Wave® Music System II auf den CDWechsler setzen
Nachdem Sie den CD-Wechsler an einem geeigneten Platz aufgestellt haben, setzen Sie das Wave® Music System vorsichtig auf den CD-Wechsler (Abbildung 2a).
•Achten Sie darauf, das Acoustic Wave® Music System II in die Führungen oben auf dem CD-Wechsler einzupassen.
•Vergewissern Sie sich, dass das Acoustic Wave® Music System II flach aufliegt und die Seitenflächen der beiden Module direkt übereinander ausgerichtet sind.
•Achten Sie darauf, dass vor dem System keine Hindernisse die Kommunikation zwischen Infrarotsender und -empfänger stören (Abbildung 2b).
(a) |
(b) |
|
TM |
TM
Infrarot-
Signalempfänger 


Infrarot-
Signalsender
Erhöhte
Führungen
English
Deutsch |
Français
5
English
Deutsch |
Français
Aufbau des Acoustic Wave® II CD-Wechslers
Anschließen der Kabel
Abbildung 3
Verbindungsund Stromkabel
Bevor Sie mit der Einrichtung beginnen, trennen Sie das Netzkabel vom Acoustic Wave® Music System II ab und legen Sie es zur Seite. Sie brauchen es wieder in Schritt 3.
Auf der Rückseite des CD-Wechslers befinden sich zwei Kabel für den Anschluss an das Acoustic Wave® Music System II.
1.Stecken Sie die beiden Stecker des AUX-Eingangskabels in die AUX IN-Buchsen auf der Rückseite des Musiksystems (Abbildung 3). Die Farben der Stecker müssen mit den Farben der Buchsen übereinstimmen: rot an rot und weiß an weiß.
2.Stecken Sie das fest angebrachte Stromkabel des CD-Wechslers in den Netzanschluss auf der Rückseite des Musiksystems.
3.Stecken Sie das kleinere Ende des Netzkabels in den Netzanschluss auf der Rückseite des CD-Wechslers.
4.Stecken Sie den anderen Stecker des Netzkabels in eine Netzsteckdose.
Nachdem Sie die Stromversorgung hergestellt haben, erscheint auf dem Display für etwa 30 Sekunden die Meldung PLEASE WAIT (Bitte warten), während sich das System vorbereitet. Legen Sie KEINE Disc ein, solange diese Meldung angezeigt wird.
AUX IN-Buchsen
TM
Netzanschluss des Acoustic Wave® Music System II
Netzanschluss des CD-Wechslers
1
2 |
4 |
|
|
3 |
AUX-Eingangskabel |
 Netzkabel des
Acoustic Wave®
Music System II
6
Betrieb des Systems
Verwendung der Fernbedienung
Mit der im Lieferumfang des Acoustic Wave® II CD-Wechslers enthaltenen Fernbedienung können Sie die Funktionen des CD-Wechslers und des Acoustic Wave® Music System II steuern. Sie benötigen also nur diese eine Fernbedienung für Ihr System. Halten Sie die Fernbedienung in Richtung des Systems und drücken Sie auf die Tasten. Im Allgemeinen kann die Fernbedienung in einem Abstand bis zu 6 m vom System verwendet werden.
Wenn die Fernbedienung nicht mehr funktioniert oder die Reichweite sich zu verringern scheint, müssen Sie möglicherweise die Batterie ersetzen. Anweisungen dazu finden Sie unter „Austausch der Batterie der Fernbedienung“ auf Seite 13.
In Abbildung 4 sehen Sie die Tasten, die für das Abspielen von CDs und das Auswählen von Auxiliary-Eingängen verwendet werden. Informationen zu den anderen Funktionen des Acoustic Wave® Music System II finden Sie in der dazugehörigen Bedienungsanleitung.
 Hinweise:
•Beim Gedrückthalten müssen Sie die Taste mindestens eine Sekunde lang drücken.
•Wenn Sie FM, AM, CD oder AUX drücken, wird das System automatisch mit der gewählten Quelle eingeschaltet.
•Mit der Fernbedienung können Sie zwar eine externe Audioquelle, die an den Wechsler angeschlossen ist, auswählen, Sie können dieses Gerät damit jedoch nicht einoder ausschalten oder die Einstellungen ändern.
Abbildung 4
Fernbedienung des
Acoustic Wave® II
CD-Wechslers
On/Off
Schaltet das System ein oder aus (Seite 8).
CD
Wählt die CD-Quelle im Acoustic Wave®
Music System II (Seite 9).
Seek/Track (Suchen/Track)
Springt zum nächsten/vorherigen CD-  Track (Seite 10).
Tune/MP3
Geht durch einen CD-Track (vor oder zurück) (Seite 10).
AUX 1-2
Wählt die Eingangsbuchse AUX 1 oder AUX 2 auf der Rückseite des CD-Wechslers aus (Seite 12).
Presets/Discs
Wählt die Fächer 1-5 des CD-Wechslers (Seite 10).
Stopp
Beendet die Wiedergabe der zurzeit gespielten CD (Seite 10).
 Play/Pause
Spielt eine CD ab bzw. unterbricht die Wiedergabe einer CD (Seite 10).
Play Mode
Wählt die CD-Wiedergabemodi „Repeat“ (Wiederholen) und „Shuffle“ (zufällige Wiedergabe) aus (Seite 10).
CD-Wechsler |
Nächste Disc |
Wählt den CD-Wechsler und schaltet ihn |
Geht zur nächsten Disc im Wechsler |
ein, falls er ausgeschaltet ist (Seite 9). |
(Seite 10). |
In diesem Handbuch sehen Sie links neben Bedienungshinweisen stets Tastensymbole. Diese Symbole beziehen sich auf die Tasten der Fernbedienung.
English
Deutsch |
Français
7

English
Deutsch |
Français
Betrieb des Systems
Verwendung des Kontrollfelds des Acoustic Wave® II CD-Wechslers
Das Kontrollfeld des Acoustic Wave® II CD-Wechslers besteht aus Steuerungstasten für die Wiedergabe und einem Display. Beides gilt nur für den CD-Wechsler. Mit diesem Kontrollfeld können Sie keine anderen Funktionen des Acoustic Wave® Music System II steuern. In Abbildung 5 sind die Steuerungstasten und das Display dargestellt.
Abbildung 5
Tasten und Display des
CD-Wechslers
|
Tracknummer |
|
Wiedergabe/Pause-Anzeige |
Ausgewähltes CD-Fach |
|
Vergangene Zeit On/Off |
|
|
DISC |
TRACK |
Schaltet das System |
|
ein bzw. aus. |
||
|
|
|
|
|
|
|
CHANGER |
AUX 1 |
AUX 2 |
|
ON/OFF |
AUX 1/AUX 2 
Wählt die Quelle AUX 1/2 und schaltet das System automatisch ein, falls es ausgeschaltet ist.
Play/Pause |
Stopp |
Spielt die ausgewählt CD |
Beendet die |
ab oder unterbricht die |
Wiedergabe der |
Wiedergabe. |
zurzeit |
|
abgespielten CD. |
|
|
|
CD Mode |
Play/Pause Stop |
Next Disc |
CD Mode |
Wählt die CD- |
|
|
|
|
|
|
|
Wiedergabemodi |
|
|
|
„Repeat“ (Wiederholen) |
Seek/Track (Suchen/Track) |
Nächste Disc |
und „Shuffle“ (zufällige |
|
• Drücken: Springt zum nächsten/ |
Geht zur nächsten |
Wiedergabe) aus. |
|
vorherigen CD-Track. |
|
CD im Wechsler. |
|
•Gedrückt halten: Geht durch einen CD-Track (vor oder zurück).
Einund Ausschalten des Systems
Abbildung 6
Ein-/Aus-Tasten des gesamten Systems
Um das gesamte System einzuschalten, drücken Sie On/Off auf dem Kontrollfeld des CD-Wechslers oder die Auswahltaste CD für den Wechsler auf der Fernbedienung. Weitere Tasten zum Ein-/Ausschalten sehen Sie in Abbildung 6.
|
• Schaltet nur das Acoustic Wave® Music System II ein. |
|
Schaltet nur das Acoustic |
|
|||
|
|
||
|
• Schaltet das gesamte System aus. |
|
Wave® Music System II |
|
|
|
ein oder aus. |
|
|
|
|
|
|
|
|
TM
• Wählt den CD-Wechsler aus und schaltet diesen ein.
• Schaltet das Acoustic Wave® Music System II ein, falls es ausgeschaltet ist.
Schaltet das gesamte System ein und spielt eine CD im Wechsler ab.
•Schaltet das gesamte System ein und wechselt das Acoustic Wave® Music System II zur AUX-Quelle.
•Schaltet nur den CD-Wechsler aus.
8
 Loading...