


CINEMATE™
D I G I T A L H O M E T H E A T E R S P E A K E R S Y S T E M
2ZQHU¶V *XLGH

Français |
Español |
English |
SAFETY INFORMATION
Please read this guide
Please take the time to follow the instructions in this guide carefully. It will help you set up and operate your system properly and enjoy all of its advanced features. Please save this guide for future reference.
The Interface module is to be used only with the Acoustimass® module in the Bose® CineMate™ speaker system.
 WARNING: To reduce the risk of fire or electrical shock, do not expose the product to rain or moisture.
 WARNING: The apparatus shall not be exposed to dripping or splashing, and objects filled with liquids, such as vases, shall not be placed on the apparatus. As with any electronic products, use care not to spill liquids into any part of the system. Liquids can cause a failure and/or a fire hazard.
The lightning flash with arrowhead symbol within an equilateral triangle alerts the user to the presence of uninsulated dangerous voltage within the system enclosure that may be of sufficient magnitude to constitute a risk of electrical shock.
The exclamation point within an equilateral triangle, as marked on the system, is intended to alert the user to the presence of important operating and maintenance instructions in this owner’s guide.
CAUTION: To prevent electric shock, match the wide blade of the line cord plug to the wide slot of the AC (mains) receptacle. Insert fully.
Note: Where the mains plug is used as the disconnect device, such disconnect device shall remain readily operable.
 WARNING: No naked flame sources, such as lighted candles, should be placed on the apparatus.
Class B emissions limits
This Class B digital apparatus meets all requirements of the Canadian Interference-Causing Equipment Regulations (Canada only).
Please dispose of used batteries properly, following any local regulations. Do not incinerate.
Note: This product must be used indoors. It is neither designed or tested for use outdoors, in recreation vehicles, or on boats.
This product conforms to the EMC Directive 89/336/EEC and to the Low Voltage Directive 73/23/EEC. The remote control conforms to the RTTE Directive 99/5/EC (R+TTED).The complete Declaration of Conformity can be found on <www.bose.com>.
Additional safety information
See the additional instructions on the Important Safety Information sheet enclosed in the shipping carton.
%RVH &RUSRUDWLRQ 1R SDUW RI WKLV ZRUN PD\ EH UHSURGXFHG PRGLILHG GLVWULEXWHG RU RWKHUZLVH XVHG ZLWKRXW SULRU ZULWWHQ SHUPLVVLRQ
2

English |
Español |
Français |
CONTENTS
INTRODUCTION
SYSTEM SETUP
OPERATION
CARE AND MAINTENANCE
4
5
16
22
INTRODUCTION . . . . . . . . . . . . . . . . . . . . . . . . . . . . . . . . . . . . . . . . . . . . . . . . . . . . . . . . . . . . |
4 |
Before you begin . . . . . . . . . . . . . . . . . . . . . . . . . . . . . . . . . . . . . . . . . . . . . . . . . . . . . . . . . . . . . . . . . . . . . . . . . . . . . |
4 |
For your records . . . . . . . . . . . . . . . . . . . . . . . . . . . . . . . . . . . . . . . . . . . . . . . . . . . . . . . . . . . . . . . . . . . . . . . . . . . . . . |
4 |
SYSTEM SETUP . . . . . . . . . . . . . . . . . . . . . . . . . . . . . . . . . . . . . . . . . . . . . . . . . . . . . . . . . . . |
5 |
Unpacking . . . . . . . . . . . . . . . . . . . . . . . . . . . . . . . . . . . . . . . . . . . . . . . . . . . . . . . . . . . . . . . . . . . . . . . . . . . . . . . . . . |
5 |
Selecting a location for your CineMateTM speaker system . . . . . . . . . . . . . . . . . . . . . . . . . . . . . . . . . . . . . . . . . . . . . . |
6 |
Positioning the Interface module . . . . . . . . . . . . . . . . . . . . . . . . . . . . . . . . . . . . . . . . . . . . . . . . . . . . . . . . . . . . |
6 |
Positioning the speakers . . . . . . . . . . . . . . . . . . . . . . . . . . . . . . . . . . . . . . . . . . . . . . . . . . . . . . . . . . . . . . . . . . |
7 |
Positioning the Acoustimass® module . . . . . . . . . . . . . . . . . . . . . . . . . . . . . . . . . . . . . . . . . . . . . . . . . . . . . . . . |
8 |
Making system connections . . . . . . . . . . . . . . . . . . . . . . . . . . . . . . . . . . . . . . . . . . . . . . . . . . . . . . . . . . . . . . . . . . . . |
9 |
Connecting the speakers to the Acoustimass module . . . . . . . . . . . . . . . . . . . . . . . . . . . . . . . . . . . . . . . . . . . |
9 |
Connecting the Interface module to the Acoustimass module . . . . . . . . . . . . . . . . . . . . . . . . . . . . . . . . . . . . . |
10 |
Connecting your TV to the Interface module . . . . . . . . . . . . . . . . . . . . . . . . . . . . . . . . . . . . . . . . . . . . . . . . . . . |
11 |
Using TV audio output jacks . . . . . . . . . . . . . . . . . . . . . . . . . . . . . . . . . . . . . . . . . . . . . . . . . . . . . . . . . . . . . . . |
11 |
Connecting the power cord . . . . . . . . . . . . . . . . . . . . . . . . . . . . . . . . . . . . . . . . . . . . . . . . . . . . . . . . . . . . . . . . |
11 |
Standby and Power LED indicators . . . . . . . . . . . . . . . . . . . . . . . . . . . . . . . . . . . . . . . . . . . . . . . . . . . . . . . . . . |
12 |
Setting up your TV for the CineMateTM speaker system . . . . . . . . . . . . . . . . . . . . . . . . . . . . . . . . . . . . . . . . . . . . . . . . |
13 |
Selecting the FIXED audio output option on your TV . . . . . . . . . . . . . . . . . . . . . . . . . . . . . . . . . . . . . . . . . . . . . |
13 |
Turning the TV internal speakers off . . . . . . . . . . . . . . . . . . . . . . . . . . . . . . . . . . . . . . . . . . . . . . . . . . . . . . . . . . |
13 |
Installing or replacing the remote batteries . . . . . . . . . . . . . . . . . . . . . . . . . . . . . . . . . . . . . . . . . . . . . . . . . . . . . . . . . |
14 |
Setting up the remote to control other sources . . . . . . . . . . . . . . . . . . . . . . . . . . . . . . . . . . . . . . . . . . . . . . . . . . . . . . |
14 |
Finding device codes . . . . . . . . . . . . . . . . . . . . . . . . . . . . . . . . . . . . . . . . . . . . . . . . . . . . . . . . . . . . . . . . . . . . . |
14 |
To control your TV . . . . . . . . . . . . . . . . . . . . . . . . . . . . . . . . . . . . . . . . . . . . . . . . . . . . . . . . . . . . . . . . . . . . . . . |
14 |
To control a combination device . . . . . . . . . . . . . . . . . . . . . . . . . . . . . . . . . . . . . . . . . . . . . . . . . . . . . . . . . . . . |
15 |
OPERATION . . . . . . . . . . . . . . . . . . . . . . . . . . . . . . . . . . . . . . . . . . . . . . . . . . . . . . . . . . . . . . |
16 |
Using the remote to control other sources . . . . . . . . . . . . . . . . . . . . . . . . . . . . . . . . . . . . . . . . . . . . . . . . . . . . . . . . . |
16 |
Using the remote to watch TV . . . . . . . . . . . . . . . . . . . . . . . . . . . . . . . . . . . . . . . . . . . . . . . . . . . . . . . . . . . . . . |
16 |
Using the remote to watch a DVD . . . . . . . . . . . . . . . . . . . . . . . . . . . . . . . . . . . . . . . . . . . . . . . . . . . . . . . . . . . |
16 |
Selecting the TV input . . . . . . . . . . . . . . . . . . . . . . . . . . . . . . . . . . . . . . . . . . . . . . . . . . . . . . . . . . . . . . . . . . . . |
16 |
Switching control from one device to another . . . . . . . . . . . . . . . . . . . . . . . . . . . . . . . . . . . . . . . . . . . . . . . . . . |
16 |
Remote control operating guide . . . . . . . . . . . . . . . . . . . . . . . . . . . . . . . . . . . . . . . . . . . . . . . . . . . . . . . . . . . . . . . . . |
17 |
Verifying a device code . . . . . . . . . . . . . . . . . . . . . . . . . . . . . . . . . . . . . . . . . . . . . . . . . . . . . . . . . . . . . . . . . . . . . . . . |
21 |
CARE AND MAINTENANCE . . . . . . . . . . . . . . . . . . . . . . . . . . . . . . . . . . . . . . . . . . . . . . . . . . . . |
22 |
Cleaning your speaker system . . . . . . . . . . . . . . . . . . . . . . . . . . . . . . . . . . . . . . . . . . . . . . . . . . . . . . . . . . . . . . . . . . . |
22 |
Limited warranty . . . . . . . . . . . . . . . . . . . . . . . . . . . . . . . . . . . . . . . . . . . . . . . . . . . . . . . . . . . . . . . . . . . . . . . . . . . . . . |
22 |
Accessories . . . . . . . . . . . . . . . . . . . . . . . . . . . . . . . . . . . . . . . . . . . . . . . . . . . . . . . . . . . . . . . . . . . . . . . . . . . . . . . . . |
22 |
Troubleshooting . . . . . . . . . . . . . . . . . . . . . . . . . . . . . . . . . . . . . . . . . . . . . . . . . . . . . . . . . . . . . . . . . . . . . . . . . . . . . . |
22 |
Customer service . . . . . . . . . . . . . . . . . . . . . . . . . . . . . . . . . . . . . . . . . . . . . . . . . . . . . . . . . . . . . . . . . . . . . . . . . . . . . |
23 |
Technical information . . . . . . . . . . . . . . . . . . . . . . . . . . . . . . . . . . . . . . . . . . . . . . . . . . . . . . . . . . . . . . . . . . . . . . . . . . |
23 |
3

INTRODUCTION
Français |
Español |
English |
INTRODUCTION
Before you begin
Thank you for purchasing a Bose® CineMateTM digital home theater speaker system, which delivers the superb acoustic performance needed to enjoy the full audio impact of DVDs and other exciting home entertainment.
Using our TrueSpaceTM signal processing technology, CineMate speakers provide improved spaciousness for bold 3-D effects and movie-like realism from surround encoded DVDs and other entertainment sources. In fact, they provide much of the performance of premium five-speaker systems, yet from a modest array of equipment.
Your system includes:
•Small, easy-to-place shelf speakers
•An attractive floor-standing Acoustimass® module
•An easy-to-use, universal infrared (IR) remote control
•An Interface module that provides simple audio connections to your TV and receives IR remote control signals
Setup help
The CineMate digital home theater speaker system easily connects to your TV and other home theater equipment. To help you set up your CineMate system, the following items are provided:
•Quick Setup Guide
•Setup DVD
•Detailed instructions in the Setup section of this owner’s guide
For your records
The serial number is located on the rear of the Acoustimass module.
Serial number: ____________________________________________________________________
Dealer name: _____________________________________________________________________
Dealer phone: __________________________ Purchase date: ____________________________
We suggest you keep your sales receipt and product registration card together with this owner’s guide.
4

English |
Español |
Français |
SYSTEM SETUP
Unpacking
Carefully unpack your system. Save all packing materials, which provide the safest way to transport your system. If any part of the system appears damaged, do not attempt to use it. Notify Bose or your authorized Bose® dealer immediately. For Bose contact information, refer to the address sheet included in the carton.
 WARNING: To avoid danger of suffocation, keep plastic bags out of the reach of children.
Check to be sure your system includes the parts shown in Figure 1.
Note: Now is a good time to find the serial number on the rear of the Acoustimass® module.
Copy that number onto your product registration card and in the space provided on page 4.
Figure 1
Carton contents
Speakers
Small rubber feet
Interface module
Acoustimass
 module
  Batteries Large rubber
feet
Universal
remote control
8-foot power cord*
Setup disc
15-foot speaker cable
6-foot stereo cable
* The appropriate power cord for your region is provided.
ETUPS YSTEMS
5
SYSTEM SETUP
Français |
Español |
English |
SYSTEM SETUP
Selecting a location for your CineMateTM speaker system
Figure 2
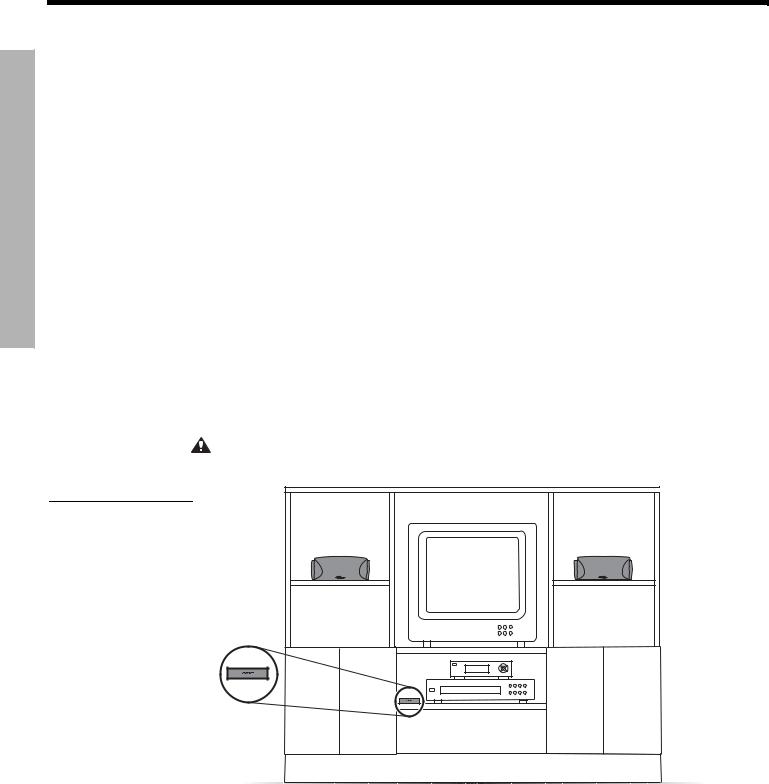
Example location for the Interface module
Use the following guidelines to choose locations and positions for the speakers and the Interface module. While these guidelines are offered to ensure the best system performance, you may find other placement variations that are more convenient and provide the sound you enjoy.
 Note: Keep in mind that the Acoustimass® module is the only part of this system that connects to a power outlet.
Positioning the Interface module
The Interface module receives commands from the universal remote control and provides audio input connections for the CineMateTM speaker system. The remote control commands allow you to turn the speakers on, change the volume, and mute or turn off the speaker system.
•Position the Interface module on a flat surface near the TV and other home theater equipment (Figure 2). The remote should have a clear line of sight to the Interface module, the TV, and any other equipment it will control.
•Keep the Interface module within 15 feet (4.6 meters) of the Acoustimass module, to which it connects.
•If you position the Interface module on a shelf, make sure the front edge of the module is flush with the front edge of the shelf. If on a high shelf, make sure the front edge of the module extends slightly past the front of the shelf, so the shelf does not block signals from the remote control.
•Do not position the Interface module in direct sunlight.
•Peel the protective film off the lens on the front of the Interface module.
CAUTION: When positioning the Interface module, avoid blocking any ventilation openings on the TV or other electronic equipment.
Left |
Right |
Interface |
|
module |
|
6
English |
Español |
Français |
SYSTEM SETUP
Positioning the speakers
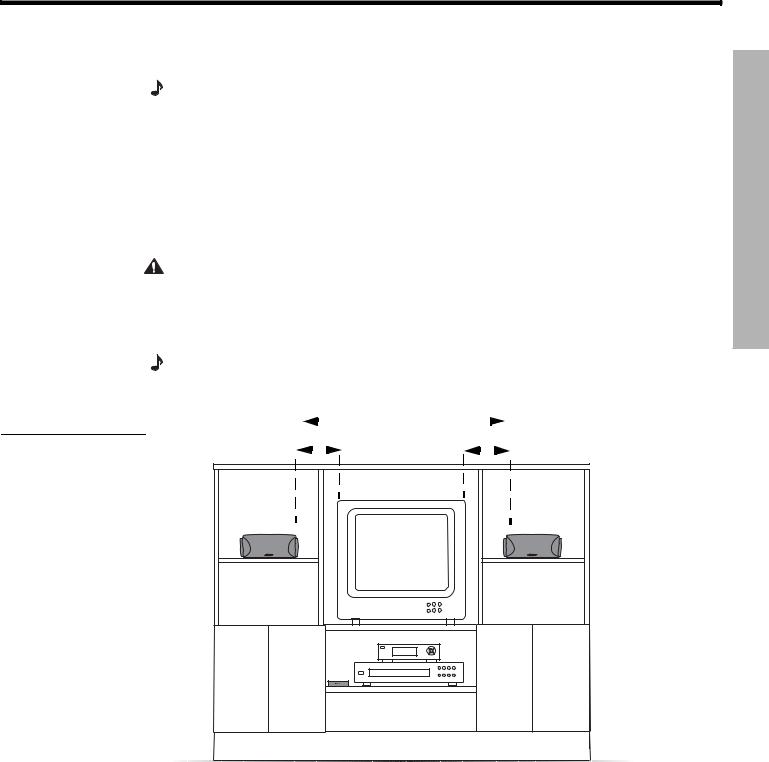
Figure 3
Recommended positioning of left and right speakers
Choosing a good location for the speakers will allow you to experience the audio surround effects that your CineMateTM home theater speaker system is designed to deliver.
Note: The left and right speakers are identical. Place one speaker to the left of your TV and the other one to the right.
•Place the left and right speakers at least 3 feet (1 meter) apart from each other to optimize the surround sound experience (Figure 3).
•Place each speaker within 3 feet (1 meter) of the edge of the TV screen. Placing the speakers more than 3 feet away from the TV may cause the sound to seem separated from the TV picture (Figure 3).
•If you are using a bookshelf or a home entertainment unit, place each speaker at the front edge of its shelf Positioning the speakers too far back in an enclosed space can change the overall quality of sound and alter the program’s sound effects.
CAUTION: Choose a stable and level surface for both speakers. Vibration can cause the speakers to move, particularly on smooth surfaces like marble, glass, or highly polished wood. If you are placing the speakers on a smooth surface, be sure to attach one set of the small rubber feet to the bottom surface of each speaker. You can obtain additional rubber feet (PN 178321) from Bose® Customer Service. For Bose contact information, refer to the address sheet included in the carton.
Note: The speakers can be mounted on Bose brackets, table stands, or floor stands. For ordering information, refer to “Accessories” on page 22. Additional or longer cables may also be ordered.
|
|
|
|
|
|
3 ft (1 m) |
|
|
|
|
|
|
3 ft (1 m) |
|
|
|
|
|
minimum |
3 ft (1 m) |
|||||
maximum |
|
|
|
|
|
|
|
|
|
|
|
maximum |
|
|
|
|
|
|
|
|
|
|
|
||
|
|
|
|
|
|
|
|
|
|
|
||
Left |
Right |
ETUPS YSTEMS
7

SYSTEM SETUP
Français |
Español |
English |
SYSTEM SETUP
• Set the speakers on their bottom surfaces, only, with the Bose® logo right-side up.
Figure 4
Recommended speaker orientation
•Aim the speakers straight ahead into the listening area (Figure 5). Do not place the speakers at an angle. Angling one or both speakers into or away from the listening area significantly alters system performance.
Figure 5
Recommended speaker position
Positioning the Acoustimass® module
•Place the module at the same end of the room as the TV and the speakers (Figure 6).
•Keep the module at least 3 feet (1 meter) away from the TV to prevent the module from interfering with the TV screen.
•Place the module within reach of the cable from the Interface module and an AC (mains) power outlet.
•Choose a convenient location such as under a table, behind a sofa or chair, or behind drapes but DO NOT BLOCK the port opening.
Figure 6
Recommended Acoustimass module position
Acoustimass module
|
|
|
|
|
|
|
|
|
|
|
|
|
|
|
|
|
|
|
|
|
|
|
|
|
|
|
|
|
|
|
|
|
|
|
|
|
|
|
|
|
|
|
|
|
|
|
|
|
|
|
|
|
|
|
|
|
|
|
|
|
|
|
|
|
|
|
|
|
|
|
|
|
|
|
|
|
|
|
|
|
|
|
|
|
|
|
|
|
|
|
|
|
|
|
|
|
|
|
|
|
|
|
|
|
|
|
|
|
|
|
|
|
|
|
|
|
|
|
|
|
|
|
|
|
|
|
|
|
|
|
|
|
|
|
|
|
|
|
|
|
|
|
|
|
|
|
|
|
|
|
|
|
|
|
|
|
|
|
|
|
|
|
|
|
|
|
|
|
|
|
|
|
|
|
|
|
|
|
|
|
|
|
|
|
|
|
|
|
|
|
|
|
|
|
|
|
|
|
|
|
|
|
|
|
|
|
|
|
|
|
3 ft (1 m) |
|
|
|
|
Port opening |
||||
|
|
|
|
|
|
|
|
|
|
|||||||
|
|
|
|
|
|
|||||||||||
|
|
|
|
|
|
|
|
|
|
|
|
|||||
minimum |
DO NOT BLOCK |
|
8
 Loading...