


Use |
and Care |
Manual |
3Y34 |
Guide |
d'utilisation |
et d'entretien |
35Y70 |
Microwave oven
Model:
HMV 3051 C
Table of Contents
Safety . . . . . . . . . . . . . . . . . . . . . 5. . .
Important Safety Instructions. . . . . . . . . . . . . . . . . . . . 5. . . .
Microwave utensil guide. . . . . . . . . . . . . . . . . . . . . . . . 11. . . . .
XGetting started . . . . . . . . . . . . . . . . .12. . .
Microwave overview . |
. . . . |
. |
. . . . |
. . . |
. . |
. . . . |
. |
. |
. . .12. . . . |
Oven specifications. . . |
. . . |
. . |
. . . . |
. . . |
. . |
. . . . |
. |
. |
. . . 12. . . . . |
Control Panel. . . . . |
. . . |
. . |
. . . |
. . . |
. . |
. . . . |
. |
. |
.. .. .. 13. . . . . |
XOperation . . . . . . . . . . . . . . . . . . . 14. . . .
Manual operation. . . . . . . . . . . . . . . . . . . . . . . . . 14. . . . .
Setting the clock. . . . . . . . . . . . . . . . . . . . . . . . . . . 14. . . . .
Setting the timer. . . . . . . . . . . . . . . . . . . . . . . . . . . 14. . . . .
Exhaust High / Low / . Off. . . . . . . . . . . . . . . . . . . . . . .14. . . .
Surface Light / On /. Off. . . . . . . . . . . . . . . . . . . . . . . .14. . . .
Control Lock . . . . . . . . . . . . . . . . . . . . . . . . . .. .. .. 14. . . . .
Using EasySet. . . . . . . . . . . . . . . . . . . . . . . . . .. .. . 15. . . . .
Heating with multiple cooking stages. . . . . . . . . . . . . . . . . . .15. . . .
Heating with high power level. . . . . . . . . . . . . . . . . . . . . .15. . . .
Heating with lower power levels. . . . . . . . . . . . . . . . . . . . .16. . . .
Using the Pause key. . . . . . . . . . . . . . . . . . . . . . . . . .16. . . .
Adding cook time (Plus 30 sec. ..) . . . . . . . . . . . . . . . . . . .16. . . .
Setting Defrost (by Weight). . . . . . . . . . . . . . . . . . . . . . . 16. . . . .
Setting Defrost (by Time). . . . . . . . . . . . . . . . . . . . . . . .17. . . .
Special notes for defrosting by .time. . . . . . . . . . . . . . . . . . 17. . . . .
Defrosting tips. . . . . . . . . . . . . . . . . . . . . . . . . .. .. . 17. . . . .
Defrosting suggestions for meat. . . . . . . . . . . . . . . . . . . . .18. . . .
Reheat . . . . . . . . . . . . . . . . . . . . . . . . . .. .. .. .. .. ..18.. .. . . .
Reheat cooking suggestions. . . . . . . . . . . . . . . . . . . . . . 19. . . . .
Suggested power levels for cooking. . . . . . . . . . . . . . . . . . . 19. . . . .
Suggestions for getting the best results. . . . . . . . . . . . . . . . . .19. . . .
Convenience operation. . . . . . . . . . . . . . . . . . . . . . .21. . . .
Popcorn . . . . . . . . . . . . . . . . . . . . . . . . . .. .. .. .. .. 21.. .. . . .
Potato . . . . . . . . . . . . . . . . . . . . . . . . . .. .. .. .. .. .. 21.. .. .. . .
Beverage . . . . . . . . . . . . . . . . . . . . . . . . . .. .. .. .. ..22.. . . . .
Convenience cooking suggestions. . . . . . . . . . . . . . . . . . . .22. . . .
Cooking meat in your microwave. . . . . . . . . . . . . . . . . . . . 22. . . . .
Cooking poultry in your microwave. . . . . . . . . . . . . . . . . . . .23. . . .
Cooking eggs in your microwave. . . . . . . . . . . . . . . . . . . . .23. . . .
Cooking vegetables in your microwave. . . . . . . . . . . . . . . . . .24. . . .
Cooking seafood in your microwave. . . . . . . . . . . . . . . . . . . 24. . . . .
3
XCleaning and Maintenance. . . . . . . . . . . . .25. .
Cleaning . . . . . . . . . . . . . . . . . . . . . . . . .. .. .. .. .. 25.. .. . .
Cleaning suggestions. . . . . . . . . . . . . . . . . . . . . . . . . 25. . . . .
Cleaning the exhaust filters. . . . . . . . . . . . . . . . . . . . . . .26. . . .
Maintenance . . . . . . . . . . . . . . . . . . . . . . . . .. .. .. 27. . . . .
Surface light replacement. . . . . . . . . . . . . . . . . . . . . . . 27. . . . .
Oven light replacement. . . . . . . . . . . . . . . . . . . . . . . . .28. . . .
Charcoal filter replacement. . . . . . . . . . . . . . . . . . . . . . .30. . . .
XService . . . . . . . . . . . . . . . . . . . . 31. . . .
Troubleshooting . . . . . . . . . . . . . . . . . . . . . . . . . .31. . . .
Customer service. . . . . . . . . . . . . . . . . . . . . . . . . 32. . . . .
STATEMENT OF LIMITED PRODUCT WARRANTY. . . . . . . . . . . . .32. .
4

Safety
Important Safety Instructions
READ AND SAVE THESE INSTRUCTIONS
State of California Proposition 65 Warnings
State of California to cause cancer.
WARNING:gThis product contains one or more chemicals known to the
State of California to cause birth defects or other reproductive harm.WARNING:gThis product contains one or more chemicals known to the
WARNING:gIf the |
information in this manual is not followed exactly, fire |
shock may result |
causing property damage or personal injury. |
When using electrical appliances basic safety precautions should be followed, including the following:
WARNING:gTo reduce |
the risk of |
burns, electric shock, fire, injury to |
persons, or exposure |
to excessive |
microwave energy: |
Read all instructions before using the appliance.
Read and follow |
the specificPRECAUTIONS TO AVOID POSSIBLE EXPOSURE |
|
TO |
EXCESSIVE |
MICROWAVE ENERGY |
This |
appliance must be grounded. Connect only to properly grounded outlet |
|
(See GROUNDING |
INSTRUCTIONS). |
|
Install or locate this appliance only in accordance with the provided installation instructions.
Some |
products such as whole eggs with or without shell, narrow neck bottles |
sealed |
containers - for example, closed glass jars - may explode and should |
heated |
in this oven. |
Use this appliance only for its intended use as described in this manual. Do corrosive chemicals, vapors, or nonhfood products in this appliance, they will damage the appliance and may result in radiation leaks. This type of oven is specifically designed to heat, or cook food. It is not designed for industrial or laboratory use.
As with any appliance, close supervision |
is necessary when used by children. |
(See CHILD SAFETY) |
|
Do not operate this appliance if it has |
a damaged cord or plug, if it is not |
properly, or if it has been damaged or |
dropped. |
This appliance should be serviced only by qualified service personnel. Contact nearest authorized service facility for examination, repair, or adjustment.
Do not cover or block any vents or openings on the appliance.
5
Important Safety Instructions
READ AND SAVE THESE INSTRUCTIONS
Do not store this appliance outdoors. Do not use this product near water - f example, near a kitchen sink, in a wet basement, near a swimming pool, or locations.
Do not immerse cord or plug in water. Keep cord away from heated surfaces.
Do not let cord hang over edge of table or counter.
Either: |
|
|
|
D When cleaning surfaces of the door and |
oven that come together |
on |
closin |
door, use only mild, nonhabrasive soaps |
or detergents applied with |
a |
sponge |
soft cloth |
|
|
|
To reduce the risk of fire in the oven |
cavity: |
|
|
PRECAUTIONS TO AVOID EXPOSURE TO EXCESSIVE MICROWAVE ENERGY
D Do not overcook food. Carefully attend appliance when paper, plastic, or oth
|
combustible materials are placed inside the oven to facilitate cooking |
||||||
D |
Remove wire twisthties |
from |
paper or plastic bags before placing bag in ove |
||||
D If materials |
inside the |
oven |
ignite, keep |
oven door closed, turn oven off, an |
|||
|
disconnect |
the power |
cord, |
or shut |
off |
power at the fuse or |
circuit breaker |
POSSIBLEDo |
not attempt to operate this oven |
with |
the door open since |
openhdoor oper |
|||
can result in harmful exposure |
to microwave energy. It is important not to def |
||||||
tamper with the safety interlocks. |
|
|
|
||||
Do |
not place any object between the oven front face and the |
door or allow |
|||||
cleaner residue to accumulate |
on sealing |
surfaces. |
|
||||
Do |
not operate the oven if it |
is damaged. It is particularly important that the |
|||||
door close properly and |
that |
there is |
no |
damage to the: |
|
||
D |
door (bent) |
|
|
|
|
|
|
D |
hinges and |
latches (broken |
or loosened) |
|
|||
|
D door seals and sealing surfaces |
|
|
|
|
|
|
|||||
|
D The oven should not be adjusted |
or repaired by anyone except properly qu |
||||||||||
|
service personnel. |
Improper installation, service |
or maintenance |
can |
cause |
inju |
||||||
|
or property damage. Refer to this |
manual |
for |
guidance. Refer |
all |
servicing |
to |
|||||
|
factory authorized |
service center. |
|
|
|
|
|
|
||||
Grounding Instructions |
This |
appliance must |
be grounded. Grounding |
reduces risk of electric shock by |
||||||||
|
providing an escape |
wire for the electric current |
if an electrical |
short occurs. T |
||||||||
|
oven is equipped with a cord having |
a grounding wire with a |
grounding plug. |
|||||||||
|
plug must be plugged into an |
outlet |
that is |
properly installed and grounded. |
||||||||
|
See INSTALLATION |
INSTRUCTIONS. |
|
|
|
|
|
|
||||
|
Consult a qualified electrician or servicer if grounding instructions are not compl |
|||||||||||
|
understood, or if |
doubt exists as to |
whether |
the oven is properly grounded. |
|
|||||||
|
Do not use an extension cord. |
If the product power cord is too short, have |
||||||||||
|
qualified electrician install a threehslot |
receptacle. This oven should be plugged |
||||||||||
|
a separate 60 Hertz circuit with the |
electrical rating as shown in specifications |
||||||||||
|
When |
the oven |
is |
on |
a circuit |
with |
other equipment, an increase in cooking t |
|||||
|
may |
be required |
and |
fuses can |
be |
blown. |
|
|
|
|
|
|
6
Important Safety Instructions
READ AND SAVE THESE INSTRUCTIONS
|
Microwave |
operates |
on standard household current, 110h120 V. |
|
TV / Radio Interference |
This appliance generates |
and uses ISM frequency energy. If not installed and u |
||
|
properly, in strict accordance with the manufacturer's instructions, it may cause |
|||
|
interference |
to radio |
and |
television reception. It has been type tested and foun |
|
comply with limits for ISM equipment persuant to Part 18 of FCC rules, which |
|||
|
designed to provide reasonable protection against such interference in a residen |
|||
|
installation. However, there is no guarantee that interference will not occur in a |
|||
|
particular installation. Turn the appliance on and off if it causes interference. Tr |
|||
|
following to |
correct |
the |
interference: |
D Clean door and sealing surface of the oven
D Reorient the receiving antenna of the radio or television
D Relocate the microwave oven with respect to the receiver
D Move the microwave oven away from the receiver
|
D Plug the microwave into |
a different outlet so that the microwave oven and |
|||||||
|
receiver |
are |
on different |
branch circuits |
|||||
|
The |
manufacturer |
is |
not |
responsible |
for any radio or television interference caus |
|||
|
by |
unauthorized |
|
modification |
to this |
microwave oven. It is the responsibility of t |
|||
|
user to correct such interference. |
|
|||||||
Intended Use |
This |
appliance |
is |
intended |
for normal family household use only. It is not appr |
||||
|
for |
outdoor, mobile |
vehicle, |
marine, or commercial use. See the warranty. If yo |
|||||
|
have any |
questions, |
contact the manufacturer. |
||||||
|
Do not use the cavity for |
storage purposes. Do not leave paper products, coo |
|||||||
|
utensils, or |
food |
in |
the |
cavity when |
not in use. |
|||
Do not operate oven when room humidity is excessive.
|
This oven is suitable for use |
above both |
gas |
and electric |
|
cooking |
equipment |
|
||||||||||||
|
(914 mm) |
or |
less |
wide. |
|
|
|
|
|
|
|
|
|
|
|
|
||||
Child Safety |
Do |
not |
allow |
children to use this appliance unless closely supervised by an ad |
||||||||||||||||
|
Children and pets should not be left alone or |
unattended in the area where t |
||||||||||||||||||
|
appliance |
|
is |
in |
use. They should never be |
allowed to play |
in |
its |
vicinity, |
whet |
||||||||||
|
not the appliance is in use. |
|
|
|
|
|
|
|
|
|
|
|
||||||||
|
When |
children |
become |
old enough |
to |
use |
the |
appliance, |
it |
is |
the |
legal |
respon |
|||||||
|
of |
the |
parents |
or |
legal |
guardians |
to |
ensure that they are |
instructed in safe |
pr |
||||||||||
|
by |
qualified |
persons |
|
|
|
|
|
|
|
|
|
|
|
|
|||||
|
Do |
not |
allow |
anyone to climb, stand, lean, sit |
or hang on any part of |
an |
ap |
|||||||||||||
|
This can damage the appliance, potentially causing severe injury. |
|
|
|
||||||||||||||||
Cleaning Safety |
Clean |
exhaust |
filters frequently - Do not allow |
grease to |
accumulate on |
the |
h |
|||||||||||||
|
filters. |
Fire |
could |
result. |
|
|
|
|
|
|
|
|
|
|
|
|
||||
|
Use care when cleaning the exhaust filters. Corrosive cleaning agents, such as |
|||||||||||||||||||
|
lyehbased |
oven |
cleaners |
may |
damage |
the |
filter |
(ReferCLEANINGto the |
section in |
|
|
|||||||||
|
this |
manual). |
|
|
|
|
|
|
|
|
|
|
|
|
|
|
|
|||
|
Clean |
turntable |
roller rest and |
oven floor frequently to prevent |
excessive |
noise. |
||||||||||||||
7
Important Safety Instructions
READ AND SAVE THESE INSTRUCTIONS
Cooking |
Safety |
|
|
CAUTION:gTo avoid personal injury or property damage, observe the |
||||||||||
|
|
following: |
|
|
|
|
|
|
|
|
||||
|
|
Do |
not |
leave oven unattended while in use. |
|
|
|
|||||||
|
|
Do |
not |
store flammable materials next to or in the |
oven. |
|
|
|||||||
|
|
When flaming |
foods |
under the microwave, always turn the fan |
on. |
|
||||||||
|
|
Do |
not |
operate |
the |
oven while empty. This could damage the |
oven and |
result |
||||||
|
|
risk of |
fire. |
|
|
|
|
|
|
|
|
|
|
|
|
|
Do |
not |
store |
or |
use |
|
corrosive chemicals, vapors, flammables or |
nonfood |
produc |
||||
|
|
or |
near |
this appliance. It is specificallly designed for |
use when |
heating or coo |
||||||||
|
|
food. The use of corrosive chemicals in heating or cleaning will damage the |
||||||||||||
|
|
appliance and could |
result in injury. |
|
|
|
||||||||
|
|
Do not dry clothes, newspapers or other materials in the oven. Do not use |
||||||||||||
|
|
newspapers |
or paper |
|
bags for cooking. Fire could result. |
|
|
|||||||
|
|
Do |
not |
use |
|
recycled |
|
paper |
products unless labeled |
safe for microwave use. Th |
||||
|
|
may contain |
|
impurities |
which |
may |
cause sparks and |
result in fires when |
used. |
|||||
In Case |
of Fire |
If |
materials |
inside the |
oven |
should |
ignite: |
|
|
|
||||
1.Keep door closed
2.Turn appliance off
3.Unplug the appliance or shut off at fuse or circuit breaker
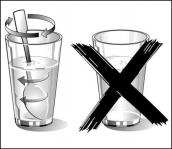
Liquids |
Liquids, |
such as water, |
coffee, or tea could |
be overheated. They can be heat |
||||||
|
beyond |
the boiling point without appearing to |
boil. For example, visible bubbling |
|||||||
|
boiling |
when the container is removed from the microwave oven is not always |
||||||||
|
present. THIS COULD RESULT IN VERY HOT LIQUIDS SUDDENLY BOILING |
|
||||||||
|
OVER |
WHEN THE CONTAINER IS DISTURBED OR A UTENSIL IS INSERTED I |
||||||||
|
THE LIQUID. |
|
|
|
|
|
||||
|
To |
reduce |
the risk of |
injury to persons: |
|
|
|
|
||
|
D |
Do |
not |
overheat the |
liquid |
|
|
|
|
|
|
D |
Stir |
the liquid both before and halfway through heating |
|
|
|||||
|
D |
Use |
extreme care when inserting a spoon |
or other utensil into the container |
||||||
|
D |
Do |
not |
use straight sided containers with narrow necks |
|
|
||||
|
D |
After |
|
heating, allow the container to stand |
in the |
microwave oven for |
a |
sho |
||
|
|
before |
removing |
|
|
|
|
|
||
Eggs |
Do |
not |
cook or reheat |
whole eggs, with or |
without |
shell. Steam buildup |
in |
w |
||
eggs may cause them to explode, and possibly damage the oven or cause in Reheating sliced hardhboiled eggs and cookingscrambled eggs is safe.
8
Important Safety Instructions
READ AND SAVE THESE INSTRUCTIONS
Popcorn |
Use only |
popcorn |
in packages designed and labeled for microwave use, |
or |
po |
|
|
a |
microwave oven corn popper. Follow popcorn manufacturers' directions |
and |
u |
||
|
a |
brand |
suitable |
for the wattage of your oven. Do not continue to heat |
after |
|
|
|
|
|
|
has stopped. |
Popcorn will scorch or burn. Do not leave oven unattended. |
|
|||||||||||||
|
|
|
|
|
|
|
CAUTION:gWhen using prehpackaged microwave popcorn, check |
|
|
|||||||||||
|
|
|
|
|
package weight before |
using the |
popcorn pad. Set the oven |
for |
the |
w |
||||||||||
|
|
|
|
|
|
|
of the popcorn package. If these |
instructions are not |
followed, popcorn |
|||||||||||
|
|
|
|
|
|
|
may not pop adequately or may ignite and cause fire. |
|
|
|
|
|||||||||
Foods |
with nonporous |
skins |
Potatoes, tomatoes, |
apples, whole squash and sausages are examples |
of |
foods |
||||||||||||||
|
|
|
|
|
with nonporous skins. These types of foods must be pierced before |
cooking |
to |
|||||||||||||
|
|
|
|
|
prevent |
them |
from |
exploding. |
|
|
|
|
|
|
|
|
|
|||
Baby |
formula |
/ Baby |
food |
Do not |
heat |
baby |
bottles |
or |
food in microwave oven. The glass jar |
or |
the |
su |
||||||||
|
|
|
|
|
food may appear warm while the interior can burn the infant's mouth and |
|
||||||||||||||
|
|
|
|
|
esophagus. |
|
|
|
|
|
|
|
|
|
|
|
|
|
||
Deep |
fat |
frying |
|
Do not |
deep |
fat fry |
in oven. |
Oil can be heated beyond ideal temperatures |
ve |
|||||||||||
|
|
|
|
|
quickly in a microwave oven. |
Temperatures can climb high enough for the coo |
||||||||||||||
|
|
|
|
|
oils to |
reach |
their |
respective flash points and burst into flames. The heated oil |
||||||||||||
|
|
|
|
|
bubble |
and spatter |
causing possible damage to the oven and perhaps result |
in |
||||||||||||
|
|
|
|
|
burns. Additionally, microwavehsafe utensils may not be able to withstand the |
|
||||||||||||||
|
|
|
|
|
temperature of the |
hot oil, |
and could result in the utensil shattering, |
if it cont |
||||||||||||
|
|
|
|
|
slight imperfection, scratch or chip. |
|
|
|
|
|
|
|
|
|||||||
Home Canning / Drying foods / DoSmallnot use microwave oven |
for home canning or heating of any closed |
jar. |
P |
|||||||||||||||||
quantities |
of |
foods |
|
will build up |
and the jar may explode. |
In |
addition, the oven |
cannot |
maintain t |
|||||||||||
|
|
|
|
|
at the proper canning temperature. Improperly canned food may spoil and be |
|||||||||||||||
|
|
|
|
|
dangerous to |
consume. |
|
|
|
|
|
|
|
|
|
|
||||
|
|
|
|
|
Small |
quantities of |
food or |
foods with low |
moisture content |
can |
dry |
out, burn |
||||||||
|
|
|
|
|
catch |
on fire. |
|
|
|
|
|
|
|
|
|
|
|
|
||
|
|
|
|
|
Do not |
dry meats, |
herbs, fruits or vegetables in your oven. |
|
|
|
|
|
||||||||
|
|
|
|
|
Proper cooking depends on time set and |
weight |
of food. If |
you |
use |
a |
smaller |
|||||||||
|
|
|
|
|
than |
recommended |
and cook |
at the time |
for the |
recommended |
portion, |
fire |
co |
|||||||
|
|
|
|
|
result. |
|
|
|
|
|
|
|
|
|
|
|
|
|
|
|
Cooking |
Utensils |
|
See alsoMicrowave |
utensil |
guide. |
|
|
|
|
|
|
|
|
|||||||
|
|
|
|
|
Cooking utensils and the glass tray get hot during microwaving. Always use |
|
||||||||||||||
|
|
|
|
|
potholders when removing items from the oven. Allow to cool the glass tray b |
|||||||||||||||
|
|
|
|
|
handling. |
|
|
|
|
|
|
|
|
|
|
|
|
|
||
|
|
|
|
|
Do not |
use |
metal |
utensils, |
or |
dishes with |
metallic |
trim in the oven. |
|
|
|
|||||
|
|
|
|
|
When |
using |
aluminum |
foil |
in |
the oven, allow at least 1" (25,4 mm) |
of space |
|||||||||
|
|
|
|
|
foil and |
intirior oven |
walls |
or |
door. |
|
|
|
|
|
|
|
|
|||
9
Important Safety Instructions
READ AND SAVE THESE INSTRUCTIONS
|
The glass |
tray will get hot during |
cooking. |
cooking |
container and |
the glass tra |
|||||||
|
be hot even if the oven is cool. |
|
|
|
|
|
|
|
|
||||
|
Never use paper, plastic, or other combustible materials that are not intended |
||||||||||||
|
cooking. |
|
|
|
|
|
|
|
|
|
|
|
|
|
When cooking with paper, plastic, or other combustible materials, follow |
|
|
||||||||||
|
manufacturer's |
recommendations |
on |
product |
use. |
|
|
|
|
|
|||
|
Do not use paper towels which contain |
nylon or synthetic fibers. |
Heated synth |
||||||||||
|
could melt |
and cause paper to |
ignite. |
|
|
|
|
|
|
|
|||
|
Do not heat sealed containers or plastic |
bags in oven. Food or liquid |
could e |
||||||||||
|
quickly and cause container or bag to break. Pierce or open container or bag |
||||||||||||
|
cooking. |
|
|
|
|
|
|
|
|
|
|
|
|
Browning dishes / Oven Cooking Microwave |
browning dishes or grills |
are |
designed for microwave cooking |
only. |
|||||||||
Bags |
Preheating |
times vary depending |
on |
the |
size of the browning dish and |
food b |
|||||||
|
cooked. Always follow instructions provided by the browning dish or grill |
|
|
||||||||||
|
manufacturer. |
Do not preheat browning dishes more |
than |
6 minutes. |
|
|
|||||||
|
If an oven bag is used for microwave cooking, prepare according to package |
||||||||||||
|
directions. Do not use wire twisthties to |
close bags, instead use nylon |
ties, co |
||||||||||
|
string or a strip cut from the open end |
of the bag. Make six ½" (12,7 mm) |
|||||||||||
|
closure. |
Place oven cooking bag in a dish slightly |
larger |
than the |
food |
being |
|||||||
Glass Tray / Turntable Ring |
Do not |
operate the oven without the turntable ring |
and |
the glass |
tray |
in |
place |
||||||
|
Do not operate the oven without the glass tray in place. Improper cooking |
or |
|||||||||||
|
damage to the oven could result. Verify |
that the glass tray is properly |
position |
||||||||||
|
turning when |
the oven is in use. |
|
|
|
|
|
|
|
|
|||
Note:gThe glass tray can turn in either direction.
Only use the glass tray designed for this oven. Do not substitute any other tr
Allow the glass tray to cool before cleaning or placing in water.
|
Do not place food directly on the |
glass |
tray. Always |
place food in |
a microwa |
|
dish. |
|
|
|
|
|
Always replace the turntable ring |
and the glass tray |
in their proper |
positions. |
|
|
The turntable ring must always be |
used |
for cooking along with the glass tray. |
||
Fan Motor Operation |
After using the oven the fan motor can |
rotate to cool the electric components |
|||
is perfectly normal, and |
you |
can take |
out |
the |
food from |
the oven while the f |
operates. |
|
|
|
|
|
|
Room Venting with Carbon Filter The charcoal filter,which |
was |
enclosed |
with |
your |
microwave |
oven, binds the |
odorous substances. |
|
|
|
|
|
|
Note:gIf no charcoal filter is installed, it is not possible to bind the odorous substances in the cooking vapours.
10
Important Safety Instructions
READ AND SAVE THESE INSTRUCTIONS
Exhaust |
Mode |
Operation |
|
|
When |
the |
microwave |
is |
operated |
in exhaust |
mode |
simultaneously |
with |
a |
differe |
|||||||||||||||||||||
|
|
|
|
|
|
|
|
|
|
burner, care must be taken to ensure |
that |
there is an |
adequate |
supply |
of |
fre |
||||||||||||||||||||
|
|
|
|
|
|
|
|
|
|
which will be needed by the burner for combustion. |
|
|
|
|
|
|
|
|
|
|
|
|
||||||||||||||
|
|
|
|
|
|
|
|
|
|
|
CAUTION:gAvoid carbon monoxide poisoning - Provide adequate air |
|
|
|||||||||||||||||||||||
|
|
|
|
|
|
|
|
|
|
intake so combustion gases |
are |
not |
drawn |
back |
into |
the |
room. |
|
|
|
|
|
||||||||||||||
Thermometers |
|
|
|
|
|
|
Do not use regular cooking thermometers in oven. Most cooking thermometers |
|||||||||||||||||||||||||||||
|
|
|
|
|
|
|
|
|
|
contain |
mercury and |
may cause electrical arc, malfunction, or damage to the o |
||||||||||||||||||||||||
Pacemakers |
|
|
|
|
|
|
|
To avoid pacemaker |
malfunction, consult physician or pacemaker manufacturer |
|
||||||||||||||||||||||||||
|
|
|
|
|
|
|
|
|
|
about |
effects of microwave energy on pacemaker. |
|
|
|
|
|
|
|
|
|
|
|
|
|
||||||||||||
Microwave |
utensil |
guide |
|
|
|
|
|
|
|
|
|
|
|
|
|
|
|
|
|
|
|
|
|
|
|
|
|
|
|
|||||||
|
|
|
|
|
|
|
|
|
|
|
|
|
|
|
|
|
|
|
|
|
|
|
|
|
|
|
|
|
|
|
|
|
|
|
||
Use |
|
|
|
|
|
|
|
|
|
|
|
Do |
not use |
|
|
|
|
|
|
|
|
|
|
|
|
|
|
|
|
|
|
|
|
|
||
|
|
|
|
|
|
|
|
|
|
|
|
|
|
|
|
|
|
|
|
|
|
|||||||||||||||
Oven proof glass (specifically treated for |
Metalhigh utensils: |
|
|
|
|
|
|
|
|
|
|
|
|
|
|
|
|
|
|
|
|
|||||||||||||||
intensity heat): |
|
|
|
|
|
|
|
|
Metal shields the food from microwave energy and produces uneven |
|
|
|||||||||||||||||||||||||
|
|
|
|
|
|
|
|
|
|
|
|
|
|
|||||||||||||||||||||||
Utility dishes, loaf dishes, pie plates, |
cake |
plates,cooking. Also, |
avoid |
metal |
skewers, thermometers |
or |
foil |
trays. |
Metal |
|
|
|||||||||||||||||||||||||
liquid |
measuring |
cups, |
casseroles and bowls |
utensils can |
cause |
arcing, |
which can |
damage your |
|
microwave |
oven. |
|
|
|||||||||||||||||||||||
without |
metallic |
trim. |
|
|
|
|
|
Metal |
decoration: |
|
|
|
|
|
|
|
|
|
|
|
|
|
|
|
|
|
|
|
||||||||
|
|
|
|
|
|
|
|
|
|
|
|
|
|
|
|
|
|
|
|
|
|
|
|
|
|
|
|
|
|
|
||||||
China: |
|
|
|
|
|
|
|
|
|
|
Bowls, cups, serving plates and platters without metallic trim. |
|
|
|
|
|
|
|||||||||||||||||||
|
|
|
|
|
|
|
|
|
|
|
|
|
|
|
|
|
|
|||||||||||||||||||
Bowls, cups, serving plates and platters without |
|
Aluminum foil: |
|
|
|
|
|
|
|
|
|
|
|
|
|
|
|
|
|
|
|
|
|
|||||||||||||
metallic |
trim. |
|
|
|
|
|
|
|
|
|
|
|
|
|
|
|
|
|
|
|
|
|
|
|
|
|
|
|
|
|
|
|||||
|
|
|
|
|
|
|
|
|
Avoid |
large |
sheets of |
aluminum |
foil because |
they |
hinder |
cooking |
|
and |
m |
|||||||||||||||||
Plastic: |
|
|
|
|
|
|
|
|
|
|
|
|||||||||||||||||||||||||
|
|
|
|
|
|
|
|
|
|
cause |
harmful |
arcing. |
Use |
small |
pieces of foil to |
shield |
poultry |
legs |
and |
|||||||||||||||||
|
|
|
|
|
|
|
|
|
|
|
|
|||||||||||||||||||||||||
Plastic |
wrap |
(as |
a cover) - lay the plastic wrapwings. Keep |
ALL |
aluminum |
foil |
at least 1 inch from the |
side |
walls of |
t |
||||||||||||||||||||||||||
loosely |
over |
the |
dish and press it to the sidesoven.Ventcavity |
and |
door |
of |
the microwave. |
|
|
|
|
|
|
|
|
|
|
|
|
|
||||||||||||||||
plastic |
wrap |
by turning |
back one edge slightly |
to |
|
|
|
|
|
|
|
|
|
|
|
|
|
|
|
|
|
|
|
|
|
|
|
|||||||||
allow |
excess |
steam |
to |
escape. The |
dish |
|
Wood: |
|
|
|
|
|
|
|
|
|
|
|
|
|
|
|
|
|
|
|
|
|
|
|
||||||
should |
|
|
|
|
|
|
|
|
|
|
|
|
|
|
|
|
|
|
|
|
|
|
|
|||||||||||||
|
|
|
|
|
|
|
|
|
|
|
|
Wooden bowls and boards will |
dry out and |
may |
split |
or |
crack |
when |
yo |
|||||||||||||||||
be deep enough so that the plastic wrap will not |
|
|
|
|
|
|
|
|
|
|
|
|
|
|
|
|
|
|
|
|
|
|
|
|||||||||||||
touch |
the food. |
Use plastic dishes, cups, |
|
them in the |
microwave oven. Baskets made |
of wood |
will |
react |
in |
the |
s |
|||||||||||||||||||||||||
semi-rigid freezer containers and plastic bagswayfor. |
|
|
|
|
|
|
|
|
|
|
|
|
|
|
|
|
|
|
|
|
|
|
|
|||||||||||||
short |
cooking times. Use |
these |
with |
care |
because |
covered |
utensils: |
|
|
|
|
|
|
|
|
|
|
|
|
|
|
|
|
|||||||||||||
the plastic may |
soften |
from the |
heat of the |
Tightly |
|
|
|
|
|
|
|
|
|
|
|
|
|
|
|
|
||||||||||||||||
food. |
to toleave |
|
ings for |
|
to toescapeescapefrom |
|
|
cocookware. |
|
|
|
|
|
|
||||||||||||||||||||||
|
|
|
|
|
|
|
|
|
|
|
|
Be |
|
|
|
covered |
|
|
|
|
|
|
||||||||||||||
Paper: |
|
|
|
|
|
|
|
|
|
|
|
sure |
|
open |
|
steam |
|
|
|
|
|
|
|
|
|
|
|
|
|
|||||||
|
|
|
|
|
|
|
|
|
|
Pierce plastic pouches of vegetables or other food items before cooking. |
||||||||||||||||||||||||||
|
|
|
|
|
|
|
|
|
|
|
|
|||||||||||||||||||||||||
|
|
|
|
|
|
|
|
|
|
|
|
Tightly closed pouches may explode. |
|
|
|
|
|
|
|
|
|
|
|
|
|
|
||||||||||
Paper towls, waxed paper, paper napkins and |
|
|
|
|
|
|
|
|
|
|
|
|
|
|
|
|
|
|
|
|
|
|
|
|
||||||||||||
paper |
plates |
with no metallic trim or |
design. |
Look |
paper: |
|
|
|
|
|
|
|
|
|
|
|
|
|
|
|
|
|
|
|
|
|
||||||||||
for the manufacturer |
s |
|
|
spec |
|
|
Brown |
|
|
|
|
|
|
|
|
|
|
|
|
|
|
|
|
|
|
|
|
|
||||||||
|
slabel for any special |
|
|
Avoid |
using |
brown paper bags. They absorb heat and can burn. |
|
|
|
|||||||||||||||||||||||||||
instructions for use |
in |
the |
microwave |
oven. |
|
|
|
|||||||||||||||||||||||||||||
|
|
|
|
|
|
|
|
|
|
|
|
Flawed or chipped cooking utensils: |
|
|
|
|
|
|
|
|
|
|
|
|
|
|||||||||||
|
|
|
|
|
|
|
|
|
|
|
|
Any utensil that is cracked, flawed or chipped may break |
in the oven. |
|||||||||||||||||||||||
|
|
|
|
|
|
|
|
|
|
|
|
Metal |
twist |
ties: |
|
|
|
|
|
|
|
|
|
|
|
|
|
|
|
|
|
|
|
|||
|
|
|
|
|
|
|
|
|
|
|
|
Remove metal twist ties from plastic or paper bags. They |
become |
hot |
a |
|||||||||||||||||||||
|
|
|
|
|
|
|
|
|
|
|
|
could |
cause |
a fire. |
|
|
|
|
|
|
|
|
|
|
|
|
|
|
|
|
|
|
|
|||
11
XGetting started
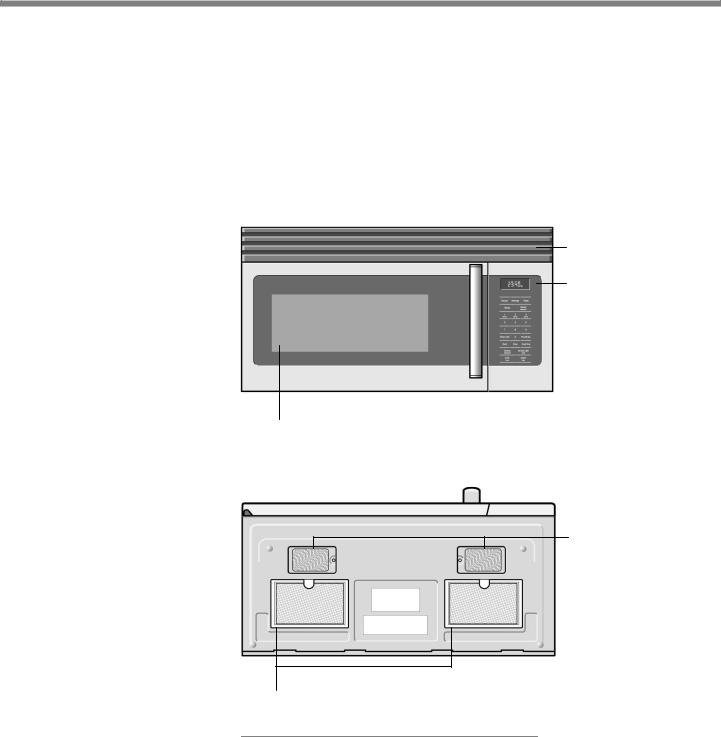
Microwave overview
Front view
Front vent grill
Control panel
Window |
Door handle |
Bottom view
Surface lights
Ventilation filters
Oven specifications
Power |
Supply |
|
120 V AC, 60 Hz |
|
|
|
|
|
|
Input |
Power |
1.550 |
W |
|
|
|
|
|
|
Cooking Power |
1.000 |
W |
||
|
|
|
|
|
Frequency |
2.450 |
MHz |
||
|
|
|
|
|
Cavity |
Volume |
|
1.6 cubic ft. (45 L) |
|
|
|
|
|
|
Net Weight |
56.2 |
lbs. (25,5 kg) |
||
12

Control Panel
Display
Program pads
Numeric pads (0 through 9)
13

XOperation
Manual operation
Setting the clock
Example: setting clock display for 9:00:
1. Touch Clock pad once or twice to select AM or PM. 2. Enter time using number pads.
3. Touch Clock pad again.
Setting the timer
Example: setting timer for 5 minutes:
|
|
|
|
1. Touch Timer pad |
once. |
|
|
|
|
|
|
|
|
|
|
|
|
||||
|
|
|
|
2. Enter |
desired time |
using number pads. |
|
|
|
|
|
|
|
|
|
|
|||||
|
|
|
|
3. Touch Timer pad. |
|
|
|
|
|
|
|
|
|
|
|
|
|
||||
|
|
|
|
When the |
timer has |
reached the |
end of |
Œset |
time,appears in |
the |
display |
and |
you |
||||||||
|
|
|
|
will hear |
permanent |
beep alerts indicating |
the |
timer has |
run out. |
|
|
|
|
||||||||
|
|
|
|
To stop the beep, touchTimer pad. |
|
|
|
|
|
|
|
|
|
|
|
|
|||||
Exhaust |
High |
/ |
Low |
/ Off |
|
|
|
|
|
|
|
|
|
|
|
|
|
|
|
|
|
|
|
|
|
The exhaust ventilation moves steam and other cooking vapors from |
the cookin |
||||||||||||||||
|
|
|
|
surface |
of |
the range |
below the microwave |
oven. |
|
|
|
|
|
|
|
||||||
|
|
|
|
To operate the exhaust vent, TouchExhaustthe |
High/Low/Off pad |
once |
for |
the |
|
||||||||||||
|
|
|
|
highest |
speed setting. Touch the pad again |
to choose the |
Low |
speed |
setting |
||||||||||||
|
|
|
|
3rd time to turn the exhaust ventilation off. |
|
|
|
|
|
|
|
|
|
||||||||
|
|
|
|
Note:gIf the temperature gets too hot around the microwave oven, the fan |
in |
||||||||||||||||
|
|
|
|
exhaust |
vent |
hood |
will automatically turn |
on |
at the LOW setting to cool the o |
||||||||||||
|
|
|
|
The fan |
will |
automatically turn off |
when |
the |
internal parts are |
cool. |
When |
this |
|||||||||
|
|
|
|
the vent cannot be turned off. |
|
|
|
|
|
|
|
|
|
|
|
|
|||||
Surface Light |
/ |
On / |
Off |
|
|
|
|
|
|
|
|
|
|
|
|
|
|
|
|
|
|
|
|
|
|
Touch theSurface |
Light/On/Off pad |
once |
for |
a |
cooking surface |
light. |
Press |
the |
|||||||||
|
|
|
|
pad again to turn the light off. |
|
|
|
|
|
|
|
|
|
|
|
|
|||||
Control |
Lock |
|
|
|
|
|
|
|
|
|
|
|
|
|
|
|
|
|
|
|
|
|
|
|
|
You may lock the control panel to prevent |
the microwave |
from being |
accidenta |
||||||||||||||
|
|
|
|
started or used by children. |
|
|
|
|
|
|
|
|
|
|
|
|
|||||
|
|
|
|
The control lock feature is very useful when |
|
cleaning the control panel. The lo |
|||||||||||||||
|
|
|
|
prevent |
accidental |
programming when wiping |
the control |
panel |
clean. |
|
|
|
|||||||||
Example: to set the control lock ON:
Touch |
and |
hold theStop/Cancel pad for |
more than 3 |
seconds. The Lock icon wil |
appear |
in |
the display window along |
with 2 beeps. |
|
14
Example: to change the control lock from ON to OFF:
Touch and hold the Stop/Cancel pad for more than 3 seconds. The Lock ico disappear in the display window.
Using EasySet
Microwave heating or cooking may be quickly |
set at 100% power level for 1, |
||
minutes. Use the number keys |
1, 2 or 3 to |
choose the |
desired minutes of c |
(this option will only work using |
the 1, 2 or |
3 numeric |
pads): |
Example: to quickly heat for 2 minutes at 100% power:
Touch number pads 1, 2 or 3 for desired minutes of cook time.
Note:gThe EasySet function cannot be set when using the Defrost (by weight) feature.
Heating with multiple cooking stages
For best results, some microwave |
recipes call for different power levels or diffe |
||||||||||||||||
lengths |
of |
time |
for |
cooking. |
Your |
|
microwave |
may |
be set |
to change |
from |
one |
|||||
to another automatically (2 stages maximum). |
|
|
|
|
|
||||||||||||
Example: |
to |
cook |
food |
for |
3 |
minutes |
at |
80% |
power |
and then |
50% |
pow |
|||||
6 |
minutes |
30 |
seconds: |
|
|
|
|
|
|
|
|
|
|
|
|||
1. |
Press Cook |
Time. |
|
|
|
|
|
|
|
|
|
|
|
|
|||
2. |
Use |
the |
number |
pads |
to |
enter |
heating time for the 1st stage (cook time m |
||||||||||
|
set |
up |
to |
99 minutes |
and |
99 |
|
seconds). |
|
|
|
|
|
||||
3. |
Press Power |
Level pad |
once. |
|
|
|
|
|
|
|
|
||||||
4. |
Use |
the |
number |
keys |
to |
enter |
|
power |
level |
for |
the PL81st |
appearsstage. in |
the |
|
|||
|
display (80 |
% power). |
|
|
|
|
|
|
|
|
|
|
|
||||
5. |
Press Cook |
Time pad for |
2nd |
stage. |
|
|
|
|
|
|
|||||||
6. |
Use |
the |
number |
pads |
to |
enter |
heating time for the 2nd stage (cook time |
||||||||||
|
set |
up |
to |
99 minutes |
and |
99 |
|
seconds). |
|
|
|
|
|
||||
7. Press Power Levelpad for 2nd stage.
8. Use the number key to enter power level for the PL52ndappearsstage. in the display (50 % power).
9. Press START pad.
When heating has finished you will hear 5 beeps and "Good" will display. Touch STOP pad or open door.
Heating with high power level
Example: to heat for 5 minutes at 100% power:
1. |
Press Cook |
Time pad. |
||
2. |
Use |
the number |
pads to enter desired heating time (cook time may be set |
|
|
99 |
minutes |
and |
99 seconds). |
3. Touch START pad.
When heating has finished you will hear 5 beeps and "Good" will display. Touch STOP pad or open door.
15
Heating with lower power levels
Using |
the highest |
power level to heat foods with does |
not always give the be |
||
results |
when |
some |
types of food need slower cooking, |
such |
as roasts, baked |
or custards. |
Your |
oven has nine other power levels you |
may |
choose. |
|
Example: to heat for 4 minutes at 70% power:
1. |
Press Cook |
|
Time. |
|
|
|
|
|
|
|
|
|
||
2. |
Use |
the number |
pads |
to enter |
desired heating time (cook time |
may be |
set |
|||||||
|
99 |
minutes |
and |
99 seconds). |
|
|
|
|
|
|
|
|||
3. |
Press Power |
Levelpad |
once for |
power level 10 (100% power). |
|
|
|
|
||||||
4. |
Use |
the number |
key |
to change |
the power levelPL7 toappears7. |
in the |
display |
|
||||||
|
(70 |
% power). |
|
|
|
|
|
|
|
|
|
|||
5. |
Press START |
pad. |
|
|
|
|
|
|
|
|
||||
When |
heating |
|
has |
finished you will hear 5 beeps and "Good" will display. |
|
|||||||||
Touch STOP |
pad or open door. |
|
|
|
|
|
|
|
||||||
Using the Pause key |
|
|
|
|
|
|
|
|
|
|
|
|
|
|
If |
at |
anytime |
your |
microwave recipe would require that the |
food |
be |
turned |
or |
||||||
you |
to stop |
the microwave during |
the |
cooking process you |
may |
do |
so after s |
|||||||
the |
microwave |
with |
the |
START/Pause |
pad. |
|
|
|
|
|
||||
Example: To pause the microwave during cooking:
1.Touch START/Pause pad once.
2.Touch START/Pause pad again to resume cooking.
Adding |
cook time (Plus 30 sec.) |
|
|
|
|
|
|
|
|
This time-saving feature will let you quickly add |
30 |
seconds |
to |
any |
cook |
time |
|
|
already set when cooking at a 100% power level. This feature |
may |
only |
be |
u |
|||
|
while cooking and with cook time remaining. Each press of this pad will |
add |
|
|||||
|
seconds to the cook time. |
|
|
|
|
|
|
|
|
Example: to add 1 minute of cook time at |
the |
default |
power |
level |
of |
1 |
|
|
Press Plus 30 sec. pad twice. |
|
|
|
|
|
|
|
Setting |
Defrost (by Weight) |
|
|
|
|
|
|
|
|
Example: to defrost 1lb. (454g) of food with |
the |
default |
power |
level |
and |
||
|
time determined automatically: |
|
|
|
|
|
|
|
1. Press Defrost pad once. 0.0 will appear in the display.
2. Use |
the numeric pads to input |
weight of food to defrost in pounds (10 = |
may |
enter any weight from 0.1 |
to 6.0lbs. |
3. Press START pad.
When defrosting has finished you will hear 5 beeps and "Good" will display.
Touch STOP |
pad |
or |
open |
door. |
Note:gThe weight |
amount |
must be a valid entry for this feature to start. A val |
||
weight entry |
is 0.1 |
to 6.0 pounds. |
||
16
Setting Defrost (by Time) |
|
|
|
|
|
|
|
Example: |
to defrost |
food |
with |
the default 30% power level for |
5 |
minute |
|
1. |
Press |
Defrost pad |
twice. |
0:00 |
will appear in the display. |
|
|
2. |
Use the number pads to |
enter |
desired defrost time (defrost time |
may |
be se |
||
|
99 minutes and 99 seconds). |
|
|
|
|||
3. |
Press START pad. |
|
|
|
|
||
When heating has finished you will |
hear 5 beeps and |
"Good" will |
display. |
||||
Touch STOP |
pad or open door. |
|
|
|
|
||
Note:gPower |
levels cannot be changed for both defrost |
(by weight) |
or defrost ( |
||||
time) because the defrost performance will be adversely affected. |
|
|
|||||
Special notes for defrosting by |
time |
|
|
|
|
||
D |
After |
pressing START/Pause key, |
the display will count down remaining |
defro |
|||
|
time. |
The |
oven will beep twice |
during the defrost cycle. At this |
time |
open |
|
|
and |
turn |
the food if needed and remove any portions that have |
already tha |
|||
|
Touch the START/Pause key to |
resume the defrost |
cycle. |
|
|
||
D When heating has finished you will hear 5 beeps.
Defrosting tips
D When |
using |
the defrost |
weight |
feature, |
the |
weight entered should always be |
pounds |
(valid |
entries are |
from |
0.1 to |
6.0 |
pounds). |
D Use both defrost weight and defrost time features for raw food items only.
Defrosting gives best results |
when |
food to be thawed is a |
minimum |
of 0ºF |
||||||
directly from a true freezer). |
If the |
food has been stored in a |
refrigerator-fre |
|||||||
that |
does not |
maintain a temperature of 5° F or below, always |
program a l |
|||||||
food |
weight |
or |
lower cook |
time to prevent cooking the food. |
|
|
|
|||
D If the frozen food is stored |
outside the freezer for up to 20 minutes, enter |
|||||||||
reduced cook |
time or weight. |
|
|
|
|
|
||||
D The shape of the package |
will alter the defrosting time. Shallow rectangular |
|||||||||
packets defrost |
more quickly |
than |
a deep frozen block of |
food. |
|
|
|
|||
D Separate pieces as they begin to defrost. Separated frozen |
pieces |
of |
food d |
|||||||
better. |
|
|
|
|
|
|
|
|
|
|
D Shield |
warm |
areas of food |
with small pieces of foil if they |
start |
to |
become |
||||
D You may use small pieces |
of aluminum foil to shield food items like chicke |
|||||||||
wings, |
leg tips |
and fish tails, but |
do not allow the foil to |
touch |
the |
oven |
||||
walls |
|
when |
defrosting. |
|
|
|
|
|
|
|
17

Defrosting |
suggestions |
for |
meat |
|
|
|
|
|
|
|
For best results, please read these suggestions when defrosting meat. |
||||
|
|
|
|
|
|
|
|
Meat |
|
Normal |
amount |
Suggestions |
|
|
|
|
|
|
|
|
|
|
|
Roast beef or |
pork |
2.5 to 6 |
lbs. |
(40 to 96 |
oz.Start) with the |
food placed fat side down. After each stage, turn t |
|
|
|
|
|
|
food over and shield any warm portions with narrow strips of |
||
|
|
|
|
|
aluminum foil. |
Let stand, covered for 15h30 minutes. |
|
Steaks, chops or fish
Ground meat
Whole chicken
0.5 |
to |
3 |
lbs. (8 |
to |
48 |
oz.) After |
each stage, rearrange the food. |
If there are any warm or |
|||
|
|
|
|
|
|
|
|
thawed portions of food, shield them with narrow flat pieces of |
|||
|
|
|
|
|
|
|
|
aluminum foil. Remove any pieces of |
food that are nearly defroste |
||
|
|
|
|
|
|
|
|
Let |
stand, covered for about 5 to 10 minutes. |
||
|
|
|
|
|
|
|
|
|
|
|
|
0.5 |
to |
3 |
lbs. (8 |
to |
48 |
oz.) After |
each stage, remove any pieces |
of food that are nearly |
|||
|
|
|
|
|
|
|
|
defrosted. Let stand, covered with foil |
for 5 to 10 minutes. |
||
|
|
|
|
|
|
|
|
|
|
||
2.5 |
to |
6 |
lbs. (40 to |
96 |
oz.Remove) giblets before freezing poultry. |
Start defrsoting with the |
|||||
|
|
|
|
|
|
|
|
breast side down. After the 1st stage, turn the chicken over and |
|||
|
|
|
|
|
|
|
|
shield any warm portions with narrow |
strips of aluminum foil. After |
||
|
|
|
|
|
|
|
|
the |
2nd stage, again shield any warm portions with narrow strips |
||
aluminum foil. Let stand, covered, for 30 to 60 minutes in the refrigerator.
Chicken pieces |
0.5 to 3 lbs. (8 to 48 oz.) After |
each stage, rearrange or remove any pieces of food that are |
|
nearly |
defrosted. Let stand for 10h20 minutes. |
Reheat
The reheat feature provides 3 quick |
preset |
settings |
based on serving size to r |
||||||||||||
food for your cooking convenience. |
|
|
|
|
|
||||||||||
Example: |
to reheat |
24 |
ounces |
of |
food. |
|
|
|
|||||||
1. Press Reheat pad 3 times to reheat |
24oz. of food. |
||||||||||||||
24oz will |
appear |
in |
the |
display |
(see |
reheat |
category |
table). |
|||||||
2. Press |
START |
pad. |
|
|
|
|
|
|
|
|
|
|
|||
|
|
|
|
|
|
|
|
|
|
||||||
Reheat |
Category |
|
Press |
|
|
Display |
|
||||||||
|
|
|
|
|
|
|
|
|
|
|
|
|
|
|
|
8 |
oz. of |
|
food |
|
|
|
once |
|
|
8 |
oz |
|
|
|
|
|
|
|
|
|
|
|
|
|
|
|
|
|
|
||
16 |
oz. of |
food |
|
|
|
twice |
|
|
16 |
oz |
|
|
|
||
|
|
|
|
|
|
|
|
|
|
|
|
|
|
|
|
24 |
oz. of |
food |
|
|
3 |
times |
|
|
24 |
oz |
|
|
|
||
18

Reheat |
cooking |
suggestions |
|
|
|
|
|
|
|
|
|
|
|
Reheat |
Directions |
|
|
|
Amount |
|
|
|
|
|
|||
Dinner plate Use only |
prehcooked, refrigerated foods. Cover plate |
with vented plastic wrap or 1waxedserving (1 plate) |
||||
|
paper, tucked under plate. If food is not as hot as you prefer afterReheatheating, with |
|||||
|
continue heating using manual time and power level settings. |
|||||
|
Contents: |
D 3-4 oz. met, |
poultry or |
fish (up to |
6 oz. with bone) |
|
|
|
D ½ cup starch |
(potatoes, |
pasta, rice, |
etc.) |
|
D ½ cup of vegetables (about 3-4 oz.)
Casserole |
Cover plate with lid or |
vented plastic wrap. |
If food |
is not |
as hot |
as you prefer1afterto 4heatingservings |
|
with Reheat, continue heating using manual |
time and |
power |
level |
settings. |
|
|
|
|
|
|
|
|
Pasta |
Stir foods once before |
serving. |
|
|
|
|
Contents: D Casserolehrefrigerated foods (for example beef stew or lasagna)
D PastahCanned spaghetti and ravioli, refrigerated foods.
Suggested power levels for cooking
The 10 power levels available with this microwave will help you to adjust to t power output best suited for the food type you are preparing. As with any fo
prepartion |
in the |
microwave, it is best to follow the microwave instructions that |
||
printed |
on |
food |
packaging. |
|
The |
table |
below |
provides suggested power levels for various types of food that |
|
can |
be |
prepare |
in the microwave. |
|
Suggestions for getting the best results
To help you achieve the best possible results from your microwave oven, read following suggestions below:
D |
Storage |
temperature |
|
|
|
|
|
|
|
|
|
|
|||||
|
Foods |
taken |
from the |
freezer or |
refrigerator |
take |
longer |
to |
cook |
than the sa |
|||||||
|
foods |
would |
at |
room |
temperature. |
|
|
|
|
|
|
|
|
|
|||
D |
Size |
|
|
|
|
|
|
|
|
|
|
|
|
|
|
|
|
|
Small |
pieces |
of |
food |
cook faster |
than large |
ones. Pieces |
similar |
in |
size |
and |
||||||
|
will cook more evenly when cooked together. For more |
even results, |
reduce |
||||||||||||||
|
power |
levels |
when cooking large |
pieces of |
food. |
|
|
|
|
|
|
|
|||||
D |
Natural |
moisture |
|
|
|
|
|
|
|
|
|
|
|||||
|
Very moist foods cook more evenly because microwave energy heats water |
||||||||||||||||
|
molecules |
very |
efficiently. |
|
|
|
|
|
|
|
|
|
|||||
D |
Stirring |
|
|
|
|
|
|
|
|
|
|
|
|
|
|
||
|
Stir foods such as casseroles and vegetable from the outside to the center |
||||||||||||||||
|
distribute |
the |
heat more evenly. This will allow the food to cook faster. Con |
||||||||||||||
|
stirring |
is |
not |
necessary. |
|
|
|
|
|
|
|
|
|
||||
D |
Turn |
|
over |
items |
|
|
|
|
|
|
|
|
|
|
|||
|
Turn |
over |
foods such |
as pork chops, roasts or |
whole |
cauliflower |
halfway thr |
||||||||||
|
the |
cook |
time. |
This will help to |
expose all |
sides |
equally to |
microwave |
energ |
||||||||
D |
Food |
placement |
|
|
|
|
|
|
|
|
|
|
|||||
|
Place |
delicate |
areas of food items, such as |
asparagus |
tips, |
toward |
the |
cent |
|||||||||
|
the |
turntable |
tray. |
|
|
|
|
|
|
|
|
|
|
||||
D |
Food |
arrangement |
|
|
|
|
|
|
|
|
|
|
|||||
|
Arrange unevenly shaped foods, such as chicken pieces |
or |
|
salmon, |
with |
the |
|||||||||||
|
thicker |
or |
meatier parts toward the outside |
of the turntable |
tray. |
|
|
|
|||||||||
19
D Let the food |
stand |
|
|
|
|
|
|
|
|
After removing |
the food from the microwave, cover the food |
with |
foil or |
a |
|||||
casserole lid and let it stand to finish |
cooking. This will |
help |
the |
food |
finish |
||||
center |
and avoids overcooking the |
out |
edges, |
The length |
of |
stand |
time |
dep |
|
on the |
density and surface area of |
the |
food |
items. |
|
|
|
|
|
D Wrapping in paper towels or waxed paper
Sandwiches and many other food types containing pre-baked bread should b
wrapped prior to |
placing |
in the microwave |
to help prevent the food items fr |
|||
drying out |
while |
heating. |
|
|
|
|
|
|
|
|
|
|
|
Power level |
Microwave |
Use to |
prepare |
when: |
||
|
output |
|
|
|
|
|
|
|
|
|
|
|
|
10 |
100% |
|
Boiling |
water |
|
|
High |
|
|
|
Cooking |
ground |
beef |
|
|
|
|||
|
|
|
|
|
|
|
||||||
|
|
|
|
Making candy |
|
|
|
|
|
|
||
|
|
|
|
Cooking fresh fruits & vegetables |
||||||||
|
|
|
|
Cooking |
fish & |
poultry |
|
|
|
|||
|
|
|
|
Preheating |
browning |
dish |
|
|
||||
|
|
|
|
Reheating |
beverages |
|
|
|
|
|||
|
|
|
|
Cooking |
bacon |
slices |
|
|
|
|||
|
|
|
|
|
|
|
|
|
||||
9 |
90% |
|
Reheating |
meat |
slices |
quickly |
||||||
|
|
|
|
Saute onions, |
celery |
& |
green peppers |
|||||
|
|
|
|
|
|
|
|
|
|
|
||
8 |
80% |
|
All reheating |
|
|
|
|
|
|
|||
|
|
|
|
Cooking |
scrambled |
eggs. |
|
|
||||
|
|
|
|
|
|
|
|
|
||||
7 |
70% |
|
Cooking |
breads |
& cereal |
products |
||||||
|
|
|
|
Cooking cheese dishes & veal |
||||||||
|
|
|
|
Cakes, muffins, brownies & cupcakes |
||||||||
|
|
|
|
Cooking |
whole |
poultry |
|
|
|
|||
|
|
|
|
|
|
|
|
|
|
|
|
|
6 |
60% |
|
Cooking |
pasta |
|
|
|
|
|
|
||
|
|
|
|
|
|
|
|
|
|
|
|
|
5 |
50% |
|
Cooking |
meat |
|
|
|
|
|
|
||
|
|
|
|
Cooking |
custard |
|
|
|
|
|||
|
|
|
|
Cooking |
spare |
|
ribs, rib roast & sirloin roast |
|||||
|
|
|
|
|
|
|
||||||
4 |
40% |
|
Cooking |
less tender cuts of meat |
||||||||
|
|
|
|
Reheating |
frozen packaged foods |
|||||||
|
|
|
|
|
|
|
|
|
|
|||
3 |
30% |
|
Thawing |
meat, |
poultry |
& |
seafood |
|||||
|
|
|
|
Cooking small quantities of food |
||||||||
|
|
|
|
Finish cooking |
casseroles, |
stew & some sauces |
||||||
|
|
|
|
|
|
|
|
|
|
|||
2 |
20% |
|
Softening |
|
butter |
& cream |
cheese |
|||||
|
|
|
|
Heating small |
amounts |
of |
food |
|||||
|
|
|
|
|
|
|
|
|
|
|
|
|
1 |
10% |
|
Softening |
|
ice |
cream |
|
|
|
|
||
|
|
|
|
Raise yeast dough |
|
|
|
|
||||
20
Convenience operation
Popcorn
CAUTION:gDo |
not leave microwave oven unattended while popping corn. |
|||
The popcorn feature lets you pop 3 different commercially packaged microwave |
||||
popcorn sized bags. Use the table below to determine the setting to use. |
||||
|
|
|
|
|
Amount |
|
Press popcorn pad |
||
|
|
|
|
|
1.75 |
oz. (default setting)once |
|||
|
|
|
|
|
3.0 |
oz. |
|
twice |
|
|
|
|
|
|
3.5 |
oz. |
|
3 times |
|
Example: |
to |
pop |
a |
3.0 |
oz. |
bag |
of |
popcorn |
automatically: |
|
|
|||
1. |
Press |
Popcorn |
pad |
(1, |
2 or |
3 |
times |
- |
refer |
to |
table above |
to |
change for |
|
2. |
Press |
START pad. |
|
|
|
|
|
|
|
|
|
|
||
When heating |
has |
finished |
you |
will |
hear |
5 |
beeps |
and "Good" |
will |
display. |
||||
Touch STOP |
pad |
or open |
door. |
|
|
|
|
|
|
|
||||
Potato
The potato feature cooks 1, 2 or 3 (cooking times based on 8 to 24 oz.) po automatically. Use the table below to determine the setting to use.
Amount |
|
|
Press potato pad |
|
|
|
|
|
|
1 |
potato (default |
setting)once |
||
|
|
|
|
|
2 |
potatoes |
|
|
twice |
|
|
|
|
|
3 |
potatoes |
|
|
3 times |
Example: |
to |
cook |
1 potato |
automatically: |
||||
1. |
Press |
Potato |
pad |
(1, 2 |
or |
3 times - refer to table above to change quant |
||
2. |
Press |
START |
pad. |
|
|
|||
When heating |
has |
finished |
you |
will hear 5 beeps and "Good" will display. |
||||
Touch STOP |
pad |
or |
open |
door. |
||||
Note:g |
|
|
|
|
|
|
|
|
D Before cooking, pierce potatoes with fork several times
D After cookings, let potatoes stand for 5 minutes
21

Beverage
The beverage feature heats 1, 2 or 3 cups of beverage. Use the table below determine the setting to use.
|
|
|
|
|
|
Amount |
|
|
|
|
|
|
Press |
beverage pad |
|
|
|
|
|
|||||
|
|
|
|
|
|
|
|
|
|
|
|
|
|
|
|
|
|
|
|
|
|
|||
|
|
|
|
|
|
1 |
cup |
(about |
8 oz.) |
|
|
once |
|
|
|
|
|
|
|
|
||||
|
|
|
|
|
|
|
|
|
|
|
|
|
|
|
|
|
|
|
|
|
|
|||
|
|
|
|
|
|
2 |
cups |
(about |
16 |
oz.) twice |
|
|
|
|
|
|
|
|
||||||
|
|
|
|
|
|
|
|
|
|
|
|
|
|
|
|
|
|
|||||||
|
|
|
|
|
|
3 cups (about 24 oz.) 3 times |
|
|
|
|
|
|
|
|||||||||||
|
|
|
|
|
|
Example: |
to |
heat |
1 |
|
cup |
of |
a |
beverage: |
|
|
|
|
|
|||||
|
|
|
|
|
|
1. Press Beverage pad (1, |
2 |
or 3 times -refer to |
table above |
to |
change num |
|||||||||||||
|
|
|
|
|
|
|
servings). |
|
|
|
|
|
|
|
|
|
|
|
|
|
|
|||
|
|
|
|
|
|
2. Press |
START pad. |
|
|
|
|
|
|
|
|
|
|
|
|
|||||
|
|
|
|
|
|
When heating |
has |
finished |
you will hear 5 beeps |
and "Good" |
will |
display. |
|
|||||||||||
|
|
|
|
|
|
Touch STOP pad or |
open |
door. |
|
|
|
|
|
|
|
|||||||||
Convenience cooking |
suggestions |
|
|
|
|
|
|
|
|
|
|
|
|
|
|
|||||||||
|
|
|
|
|
|
|
|
|
|
|
|
|
|
|
|
|
|
|
|
|||||
Convenience |
category Amount |
|
|
|
|
|
|
Suggestions |
|
|
|
|
|
|
|
|
|
|||||||
|
|
|
|
|
|
|
|
|
|
|
|
|||||||||||||
Popcorn |
1.75,3.0, |
3.5 |
oz. |
|
|
|
Cook a single •microwavehonly" bag of popcorn at a time. Use |
|
||||||||||||||||
|
1 |
pkg. |
|
|
|
|
|
|
caution when removing and opening the hot popcorn bag from th |
|||||||||||||||
|
|
|
|
|
|
|
|
|
|
|
oven. Let microwave oven cool down at least 5 minutes before |
|
||||||||||||
|
|
|
|
|
|
|
|
|
|
|
using |
again. |
|
|
|
|
|
|
|
|
|
|||
|
|
|
|
|
|
|
|
|
|
|
||||||||||||||
Potato |
|
|
1,2,3 potatoes |
|
|
|
|
Pierce each potato several times using a fork. Place on turntable |
|
|||||||||||||||
|
8,16,24 |
oz. |
|
|
|
|
|
spoke-like fashion. After cooking, let stand for 3h5 minutes. Let |
|
|||||||||||||||
|
|
|
|
|
|
|
|
|
|
|
oven cool for at least 5 minutes before using again. Use the |
|
||||||||||||
|
|
|
|
|
|
|
|
|
|
|
start/+30sec |
pad to increase cook time for larger potatoes. |
|
|||||||||||
|
|
|
|
|
|
|
|
|
|
|
|
|||||||||||||
Beverage |
|
|
1,2,3 cups |
|
|
|
|
|
Use a microwavehsafe measuring cup |
or mug; do not cover. Place |
||||||||||||||
|
(8 |
oz,16 |
oz, |
24 |
oz.) |
|
|
|
the beverage |
in |
the |
microwave. After |
heating, stir well. Let oven |
c |
||||||||||
|
|
|
|
|
|
|
|
|
|
|
for at least 5 minutes before using again. Beverages heated with |
|
||||||||||||
|
|
|
|
|
|
|
|
|
|
|
beverage category may be very hot. Remove the container with |
|
||||||||||||
|
|
|
|
|
|
|
|
|
|
|
care. |
|
|
|
|
|
|
|
|
|
|
|
|
|
Cooking |
meat in |
your microwave |
|
|
|
|
|
|
|
|
|
|
|
|
|
|
||||||||
|
|
|
|
|
|
Be sure to place prepared meats on a microwavehsafe roasting rack in a |
|
|||||||||||||||||
|
|
|
|
|
|
microwavehsafe |
dish. |
Start |
cooking |
the meat fat side down and |
if |
necessary, |
u |
|||||||||||
|
|
|
|
|
|
narrow |
strips |
of aluminum foil to shield any bone tips or thin meat areas. Afte |
||||||||||||||||
|
|
|
|
|
|
cooking, check the temperature in several places before letting the meat stand |
||||||||||||||||||
|
|
|
|
|
|
recommended time. Please note that the temperatures in the following charts a |
||||||||||||||||||
|
|
|
|
|
|
temperatures at removal time; |
the |
temperature will |
rise during the |
standing peri |
||||||||||||||
22
 Loading...