


HMB5060/01

Built-in Microwave Oven
Oven Model:
HMB50..
Trim Kit Models:
HMT57.., HMT50..
i!!!!!!!,!_!!i!i!iiiiiiiii
_i_;_i_i_!__:_ii_ii:ii!i!i!i!i!i!_i!i!i!i!i!i!i!i!_i!i!i!i!i!i!i!i!_i!_i!_iiii!ii!_i!_i!_ii_iii_;ii!!i!!i!!i!!i!_ii!i!_
Table of Contents
Safety ...................................... 1
ImportantSafety Instructions ....................................... 1
ImportantSafety Instructions ....................................... 2
Installation .................................. 3
Before you Begin ................................................. 3
Trim Kits ................................................................... 3
Combination with Wall Ovens .................................................. 3
Tools and Parts Needed ...................................................... 3
Parts Included .............................................................. 4
Power Requirements ......................................................... 4
Cabinet Cutout Dimensions .................................................... 5
Outlet Area ................................................................. 5
Installation Procedure ............................................. 6
Prepare the Appliance ........................................................ 6
Prepare Cabinet Cutout ....................................................... 8
Connect to Electricity ......................................................... 9
Install the Appliance ......................................................... 10
Service .................................... 11
Before Calling Service ....................................................... 11
Data Plate ................................................................ 11
This Bosch Appliance is made by
BSH Home Appliances Corporation
5551 McFadden Ave.
Huntington Beach, CA 92649
Questions?
1-800-944-2904
www.boschappliances.com
We look forward to hearing from you!
Safety
Important Safety Instructions
READ AND SAVE THESE INSTRUCTIONS
APPLIANCE HANDLING SAFETY
SAFETY CODES AND
STANDARDS
ELECTRIC SAFETY
WARNING:
When properly cared for, your new appliance has been designed to
be safe and reliable. Read all instructions carefully before use.
These precautions will reduce the risk of burns, electric shock, fire
and injury to persons. When using kitchen appliances, basic safety
precautions must be followed, including those in the following pages.
WARNING:
Do not repair or replace any part of the appliance unless specifically
recommended in the manuals. Improper installation, service or
maintenance can cause injury or property damage. Refer to this
manual for guidance. All other servicing should be done by a
qualified technician.
Hidden surfaces may have sharp edges. Use caution when reaching behind or
under appliance.
This appliance complies with one or more of the following Standards:
UL 858, The Standard for the Safety of Household Electric Ranges
UL 923, The Standard for the Safety of Microwave Cooking Appliances
UL 507, The Standard for the Safety of Electric Fans
ANSI Z21.1, The American National Standard for Household Cooking Gas
Appliances
CAN/CSA-C22.2 No. 113-M1984 Fans and Ventilators
CAN/CSA-C22.2 No. 61-M89 Household Cooking Ranges
It is the responsibility of the owner and the installer to determine if additional
requirements and/or standards apply to specific installations.
Before you plug in an electrical cord, be sure all controls are in the OFF position.
Do not plug the microwave into the wall until after the installation is complete. This
is to prevent accidentally turning the microwave on during the installation.
For appliances equipped with a cord and plug, do not cut or remove the ground
prong. It must be plugged into a matching grounding type receptacle to avoid
electrical shock. If there is any doubt as to whether the wall receptacle is properly
grounded, the customer should have it checked by a qualified electrician.
If required by the National Electrical Code (or Canadian Electrical Code), this
appliance must be installed on a separate branch circuit.
Installer - show the owner the location of the circuit breaker or fuse. Mark it for
easy reference.
English 1
Important Safety Instructions
READ AND SAVE THESE INSTRUCTIONS
RELATED EQUIPMENT SAFETY
MICROWAVE SAFETY
GROUNDING INSTRUCTIONS
Be sure your appliance is properly installed and grounded by a qualified technician.
Installation, electrical connections and grounding must comply with all applicable
codes.
Remove all tape and packaging before using the appliance. Destroy the packaging
after unpacking the appliance. Never allow children to play with packaging material.
Never modify or alter the construction of the appliance. For example, do not remove
leveling legs, panels, wire covers or anti-tip brackets/screws.
PRECAUTIONS TO BE OBSERVED BEFORE AND DURING SERVICING TO
AVOID POSSIBLE EXPOSURE TO EXCESSIVE MICROWAVE ENERGY
(a) Do not operate or allow the oven to be operated with the door open.
(b) Make the following safety checks on all ovens to be serviced before activating
the magnetron or other microwave source, and make repairs as necessary:
(1) interlock operation,
(2) proper door closing,
(3) seal and sealing surfaces (arcing, wear, and other damage),
(4) damage to or loosening of hinges and latches,
(5) evidence of dropping or abuse.
(c) Before turning on microwave power for any service test or inspection within the
microwave generating compartments, check the magnetron, wave guide or
transmission line, and cavity for proper alignment, integrity, and connection.
(d) Any defective or misadjusted components in the interlock, monitor, door seal,
and microwave generation and transmission systems shall be repaired, replaced, or
adjusted by procedures described in this manual before the oven is released to the
owner.
(e) A microwave leakage check to verify compliance with the Federal Performance
Standard should be performed on each oven prior to release to the owner.
This appliance must be grounded. In the event of an electrical short circuit,
grounding reduces the risk of electric shock by providing an escape wire for the
electric current. This appliance is equipped with a cord having a grounding wire with
a grounding plug. The plug must be plugged into an outlet that is properly installed
and grounded.
WARNING:
Improper use of the grounding can result in a risk of electric shock.
Consult a qualified electrician or serviceman if the grounding instructions are not
completely understood, or if doubt exists as to whether the appliance is properly
grounded, and:
• Do not use an extension cord. If the power supply cord is too short, have a
qualified electrician or serviceman install an outlet near the appliance.
English 2
Installation
Before you Begin
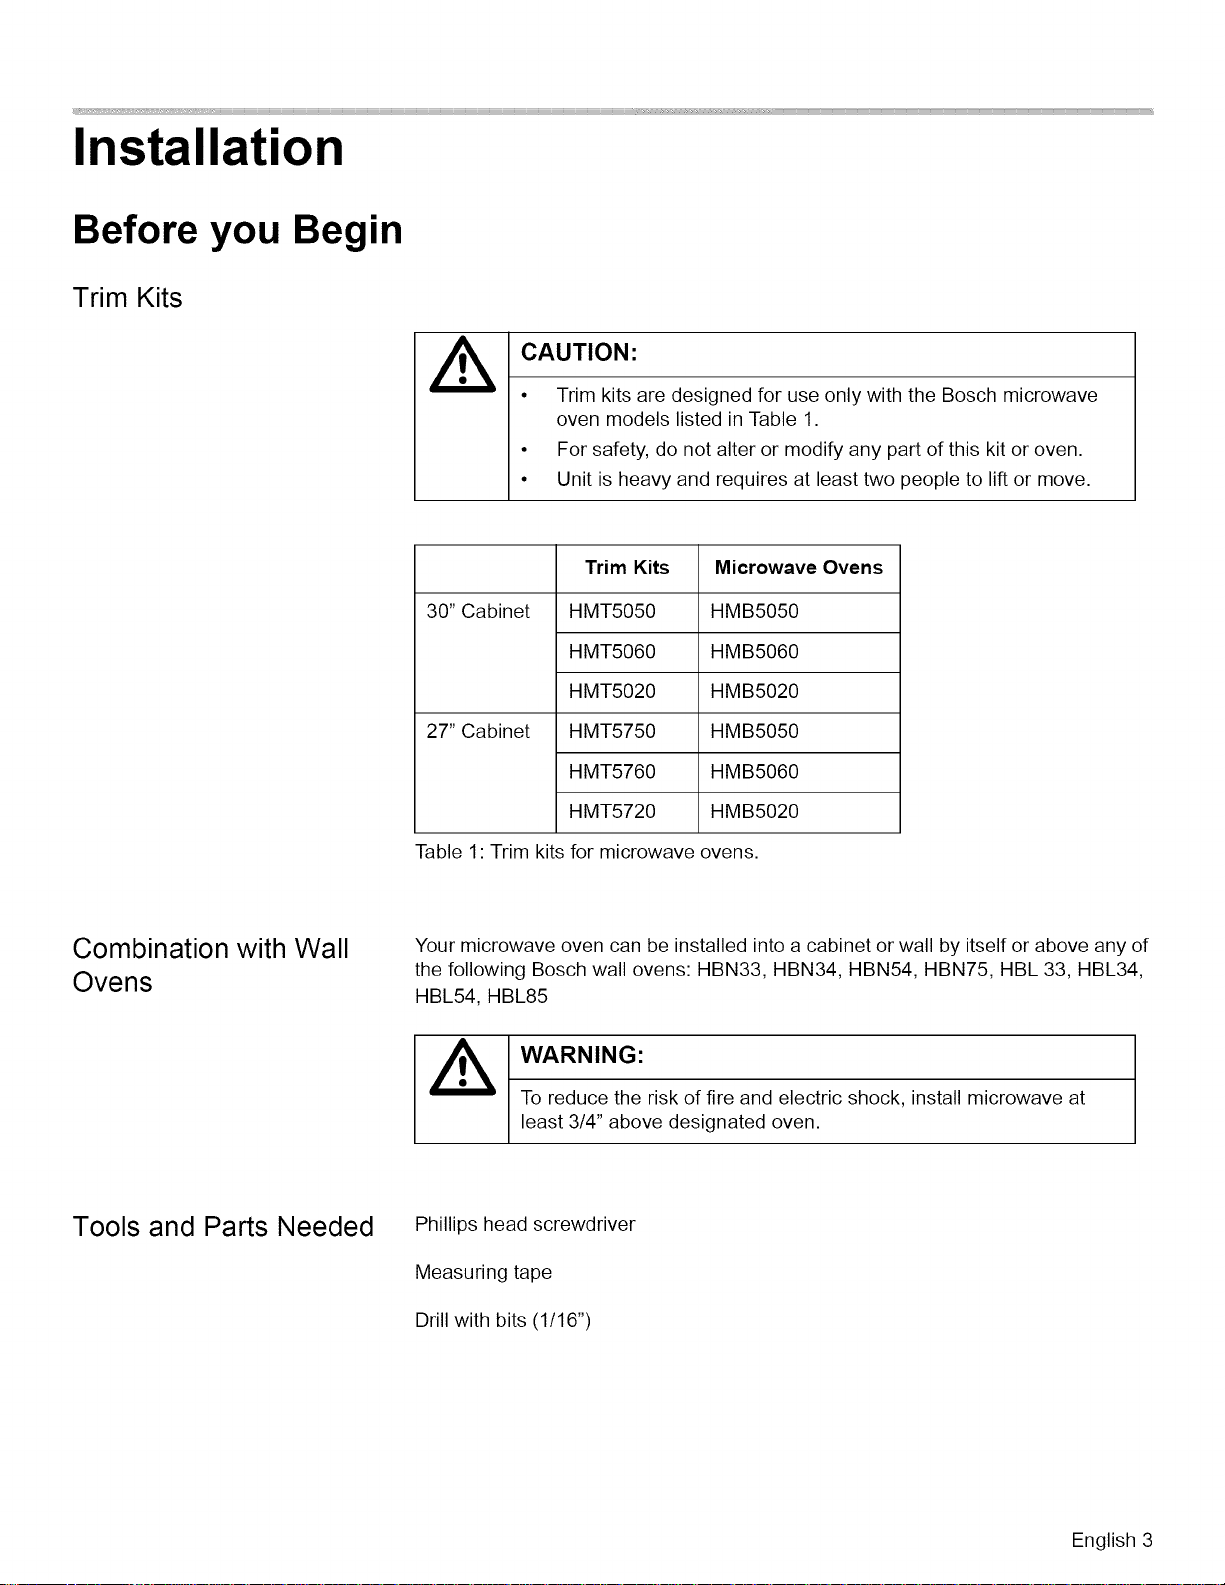
Trim Kits
CAUTION:
• Trim kits are designed for use only with the Bosch microwave
oven models listed in Table 1.
• For safety, do not alter or modify any part of this kit or oven.
• Unit is heavy and requires at least two people to lift or move.
30" Cabinet
27" Cabinet
Trim Kits
HMT5050
HMT5060
HMT5020
HMT5750
HMT5760
HMT5720
Microwave Ovens
HMB5050
HMB5060
HMB5020
HMB5050
HMB5060
HMB5020
Table 1 Trim kits for microwave ovens.
Combination with Wall
Ovens
Your microwave oven can be installed into a cabinet or wall by itself or above any of
the following Bosch wall ovens: HBN33, HBN34, HBN54, HBN75, HBL 33, HBL34,
HBL54, HBL85
,_ WARNING:
To reduce the risk of fire and electric shock, install microwave at
least 314"above designated oven.
Tools and Parts Needed
Phillips head screwdriver
Measuring tape
Drill with bits (1/16")
English 3
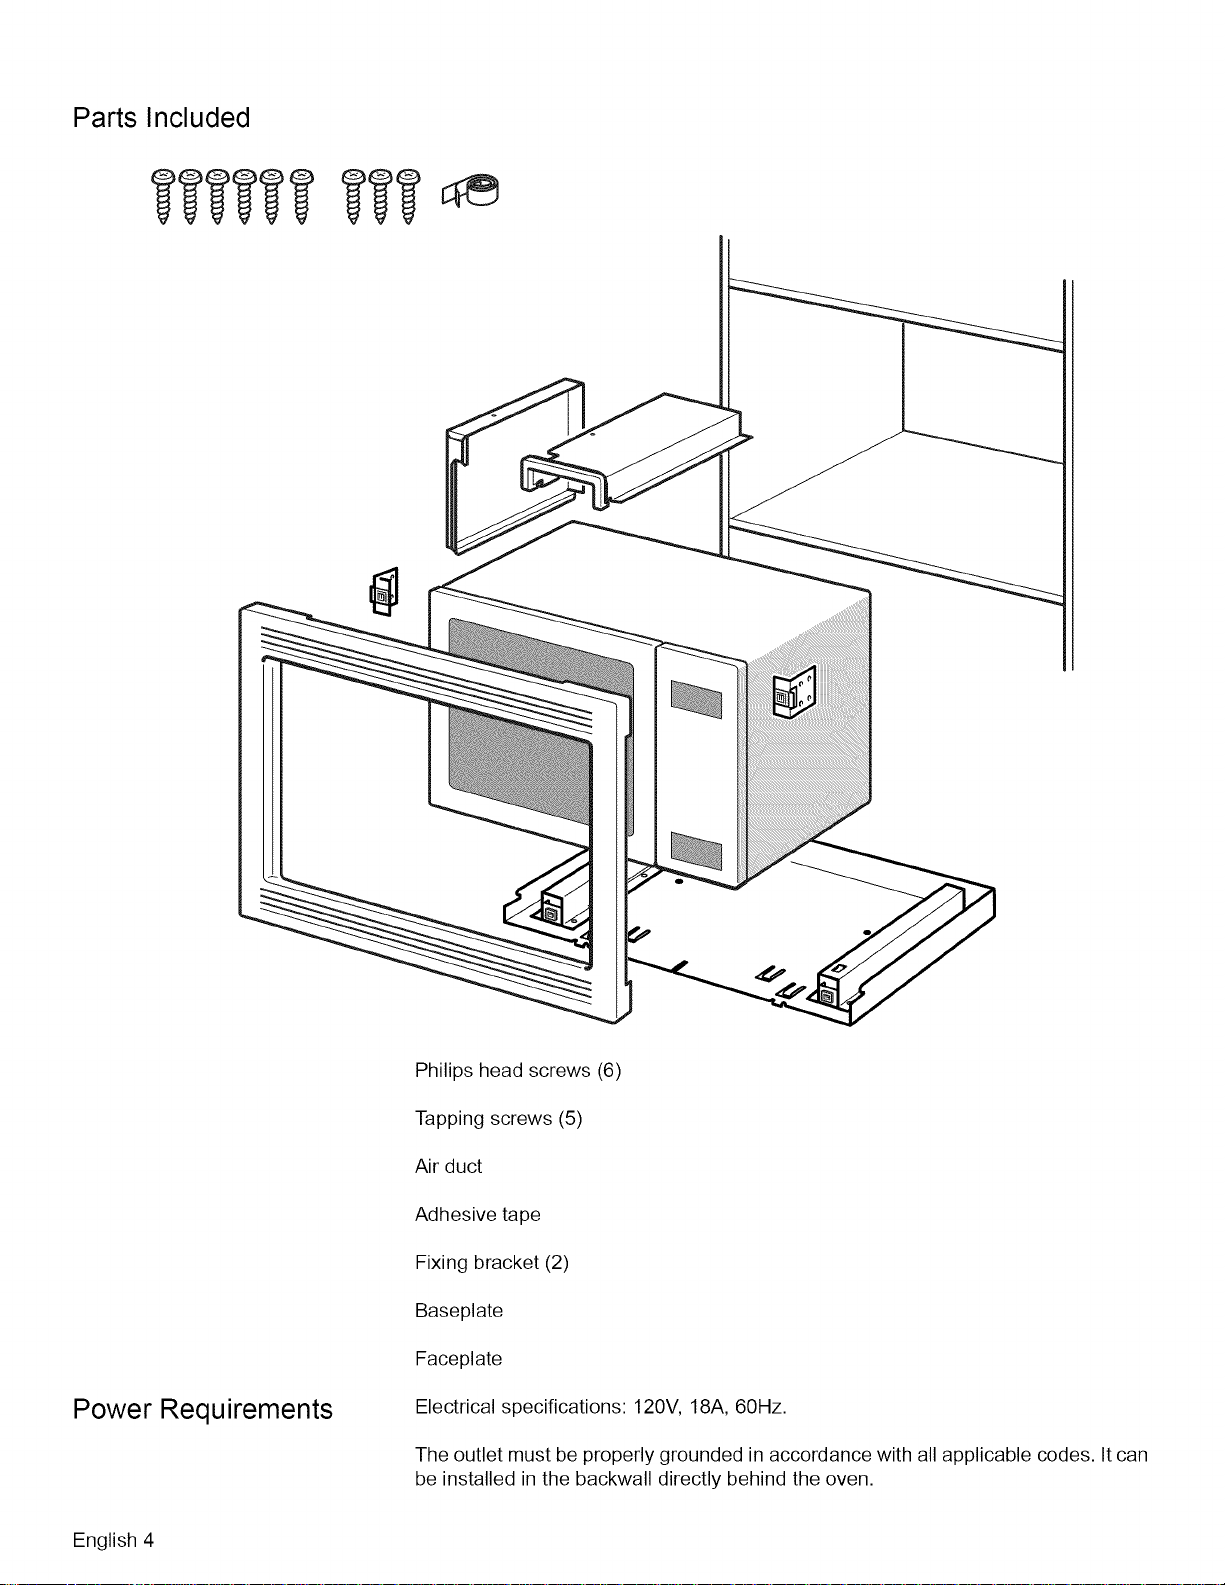
Parts Included
Power Requirements
Philips head screws (6)
Tapping screws (5)
Air duct
Adhesive tape
Fixing bracket (2)
Baseplate
Faceplate
Electrical specifications: 120V, 18A, 60Hz.
The outlet must be properly grounded in accordance with all applicable codes. It can
be installed in the backwall directly behind the oven.
English 4
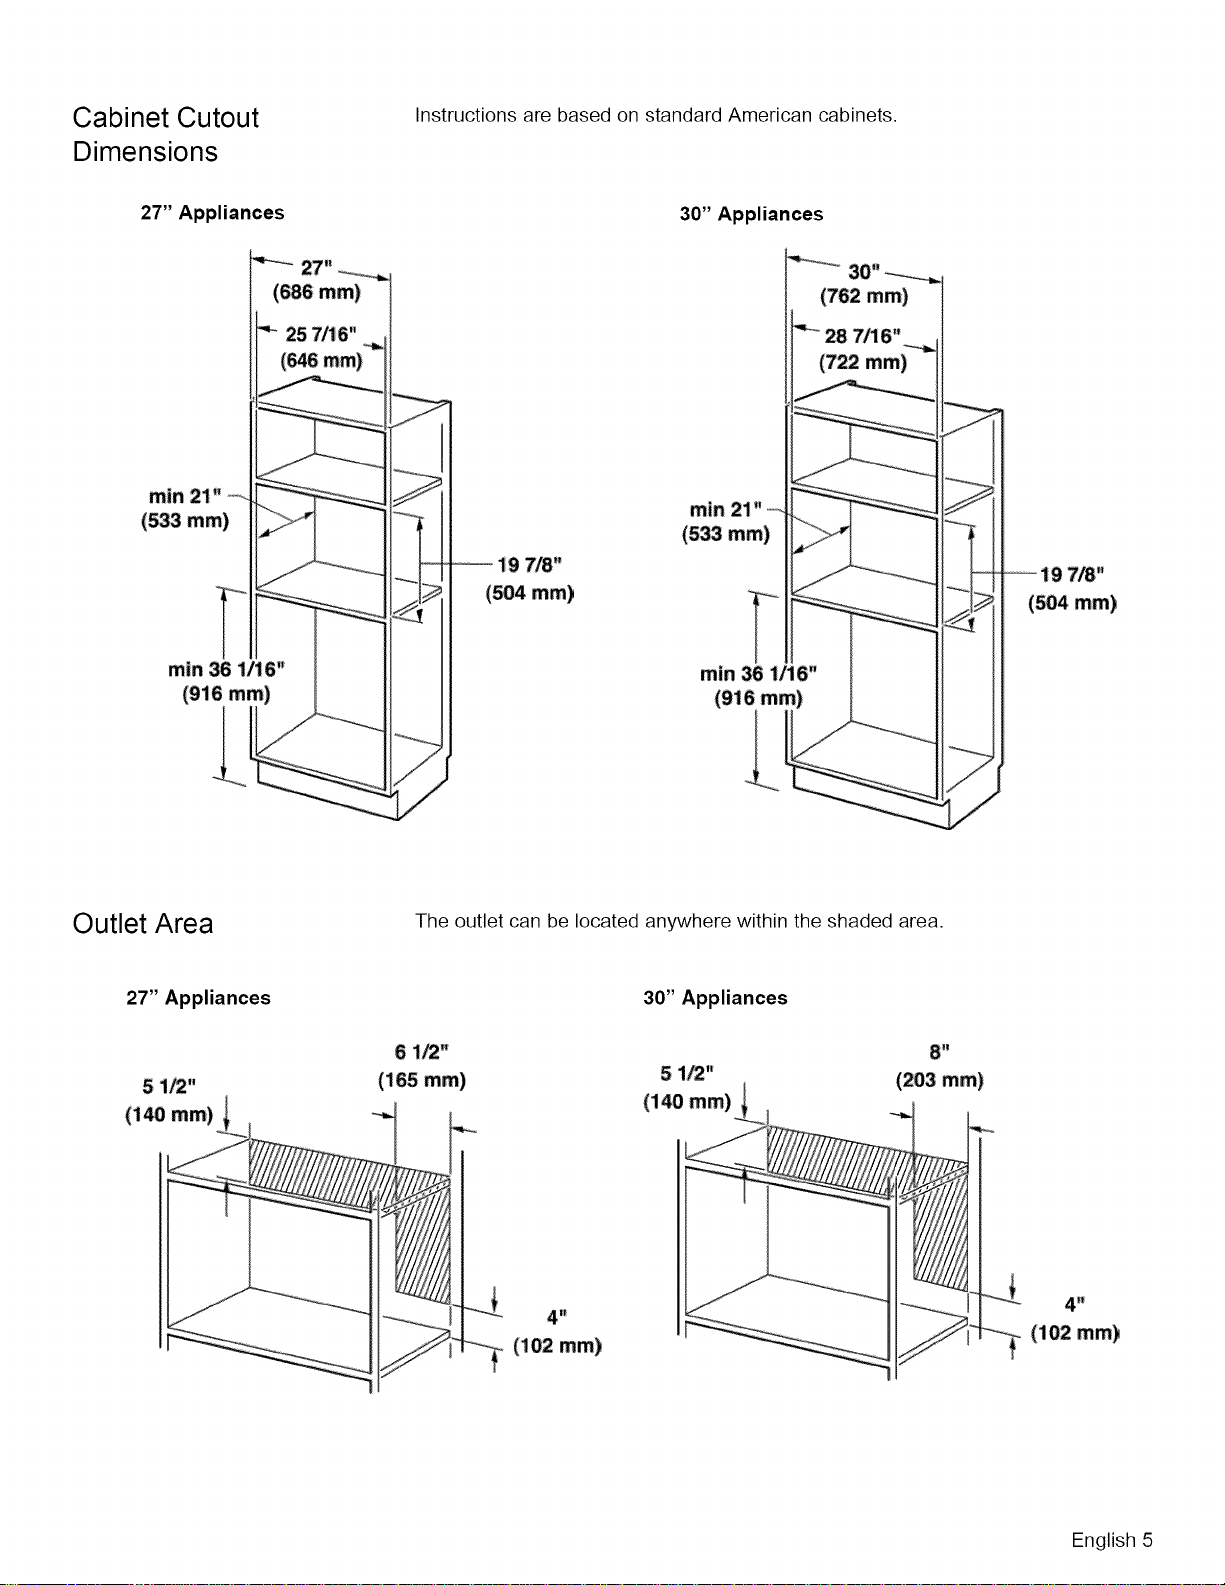
Cabinet Cutout
Dimensions
Instructions are based on standard American cabinets.
27" Appliances 30" Appliances
27"
(686 ram)
25 7/16"
(_6 ram)
min 21"
(533 mm)
min 36 1t16"
(916 mm)
7/8"
(504 ram)
30"
(762 ram)
(722 ram)
rain
(533 ram)
rain 36 1/16"
19 7/8"
(504 ram)
Outlet Area The outlet can be located anywhere within the shaded area.
27" Appliances 30" Appliances
5 1/2"
(140 mm)
6 1/2"
(165 mm)
5 1/2"
(140 mm)
.
(203 mm)
English 5
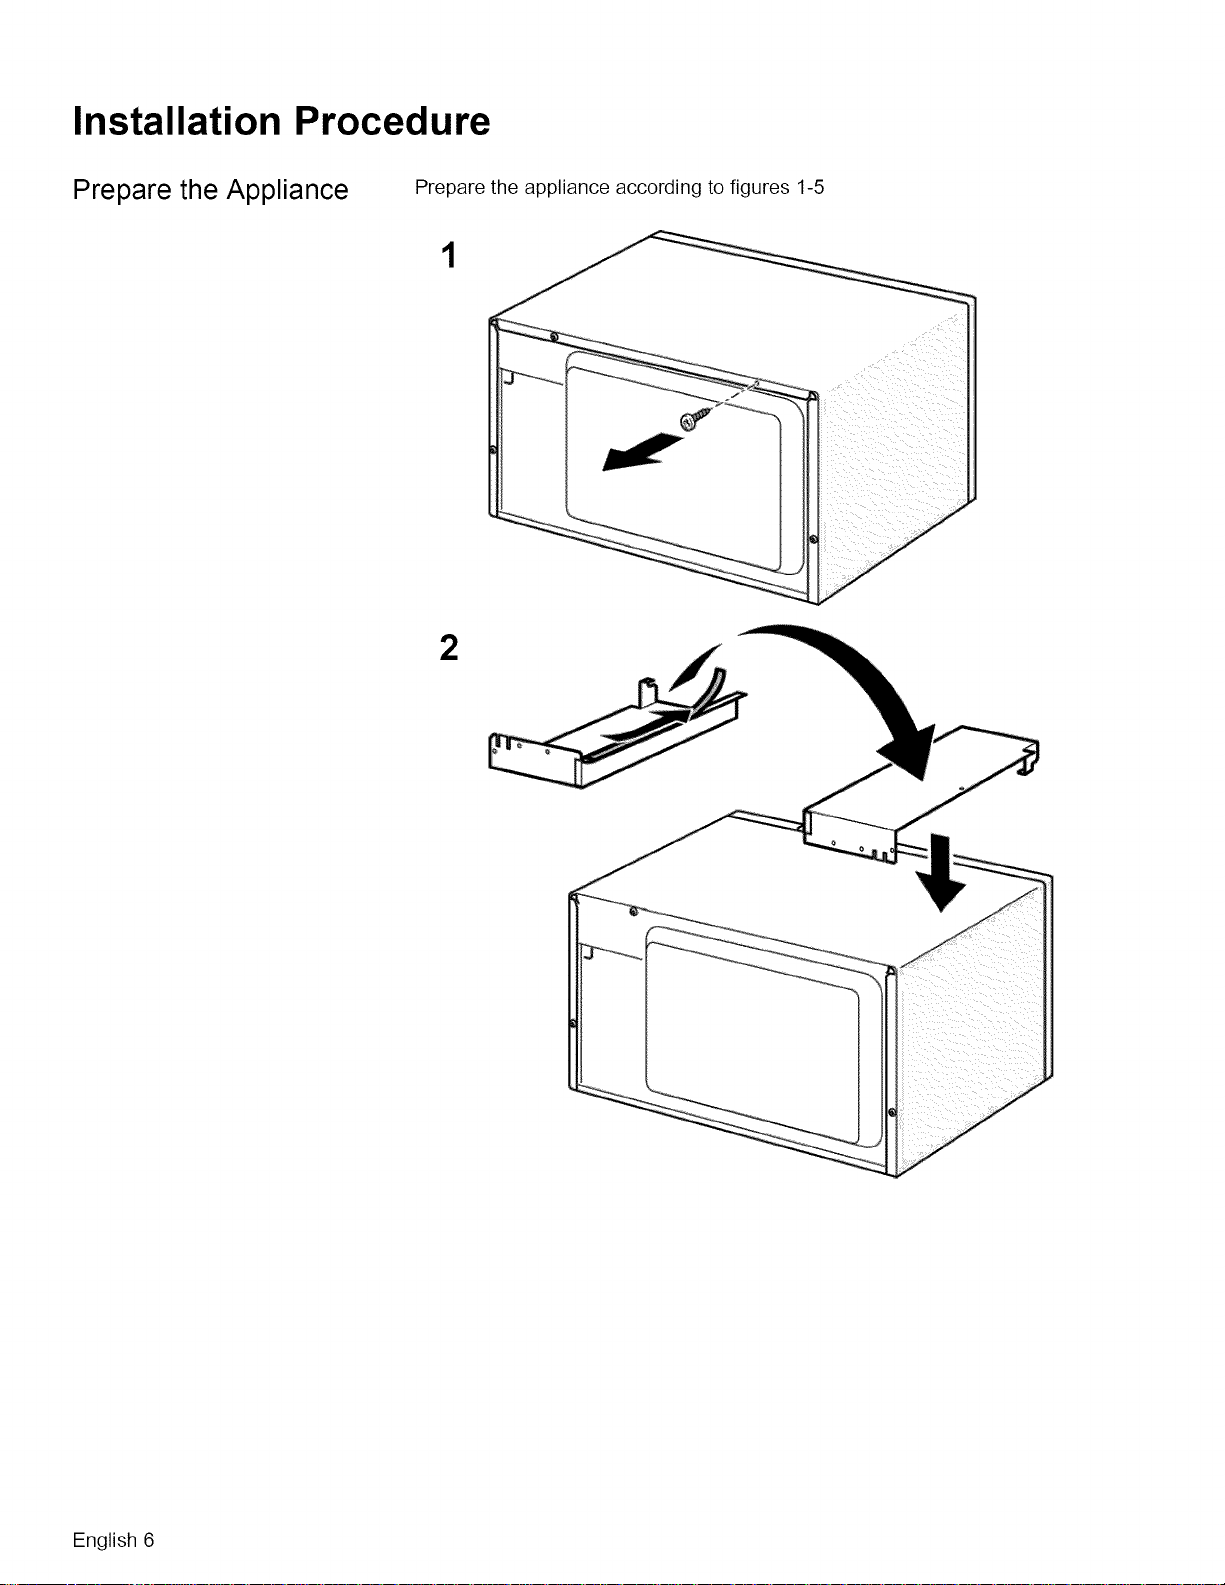
Installation Procedure
Prepare the Appliance
Prepare the appliance according to figures 1-5
2
English 6
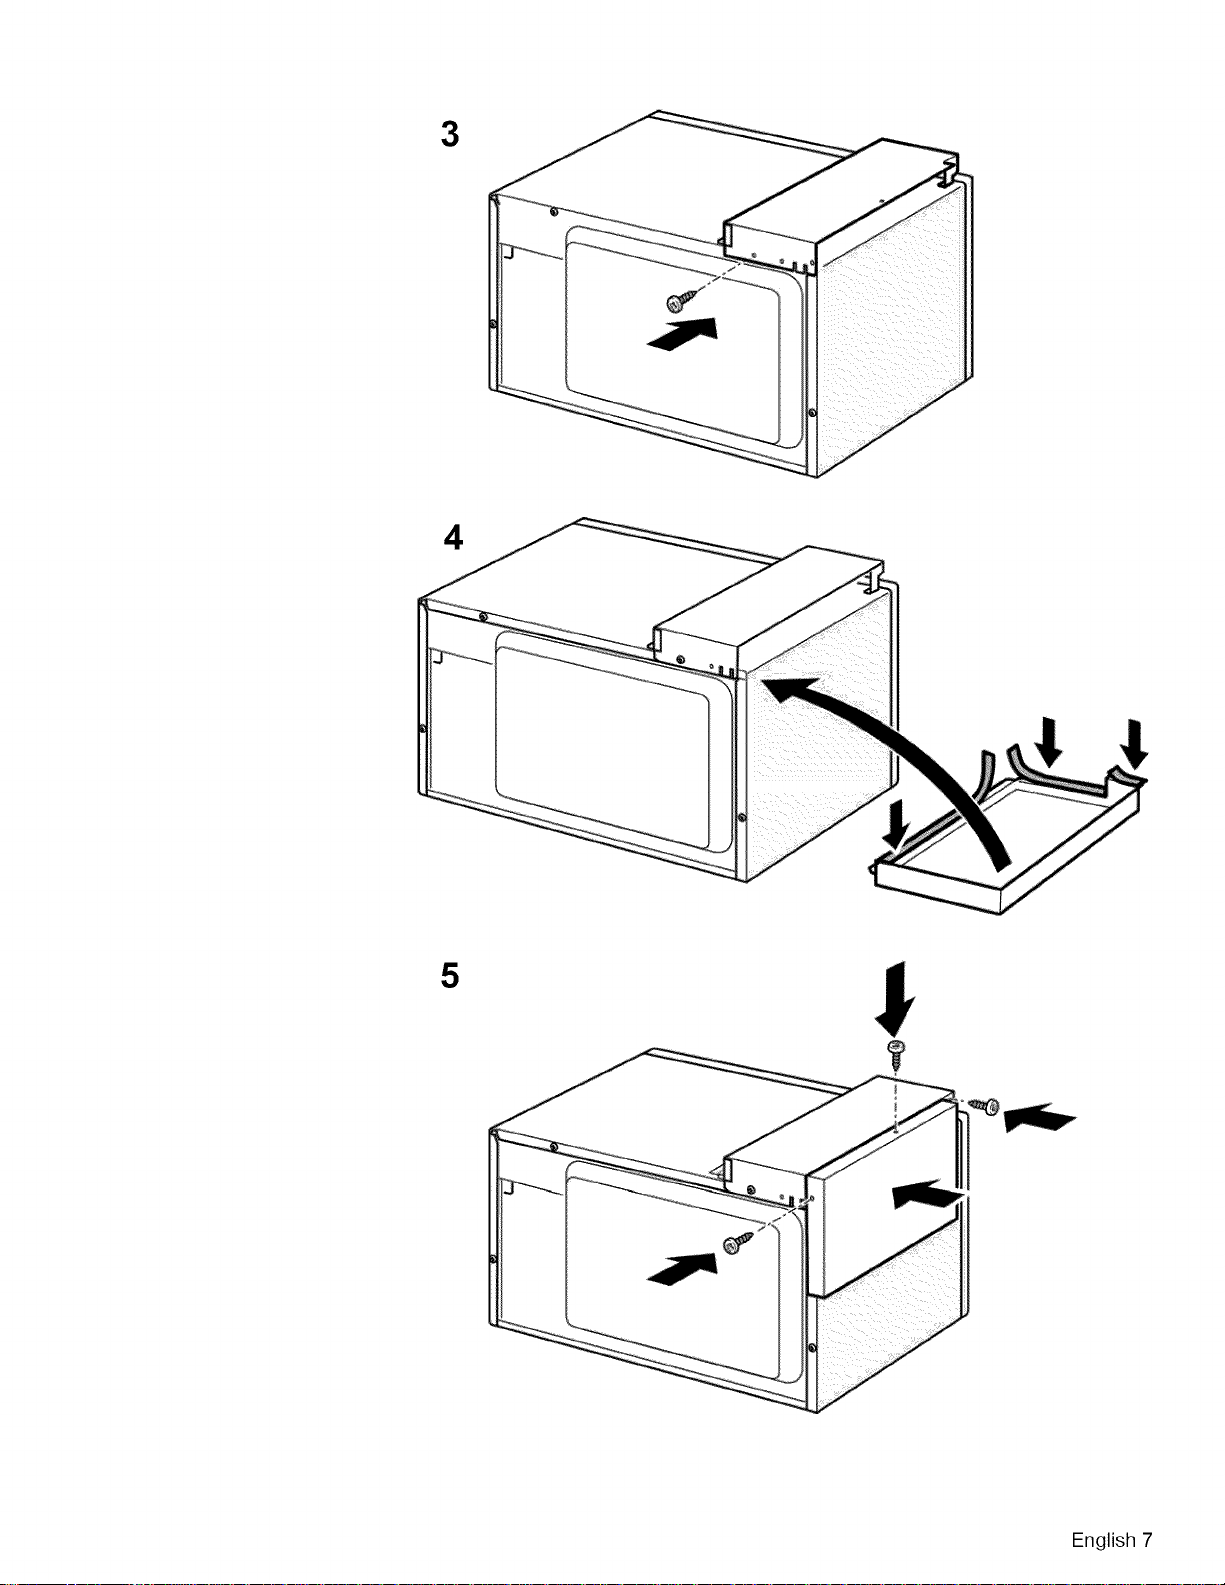
3
4
English 7
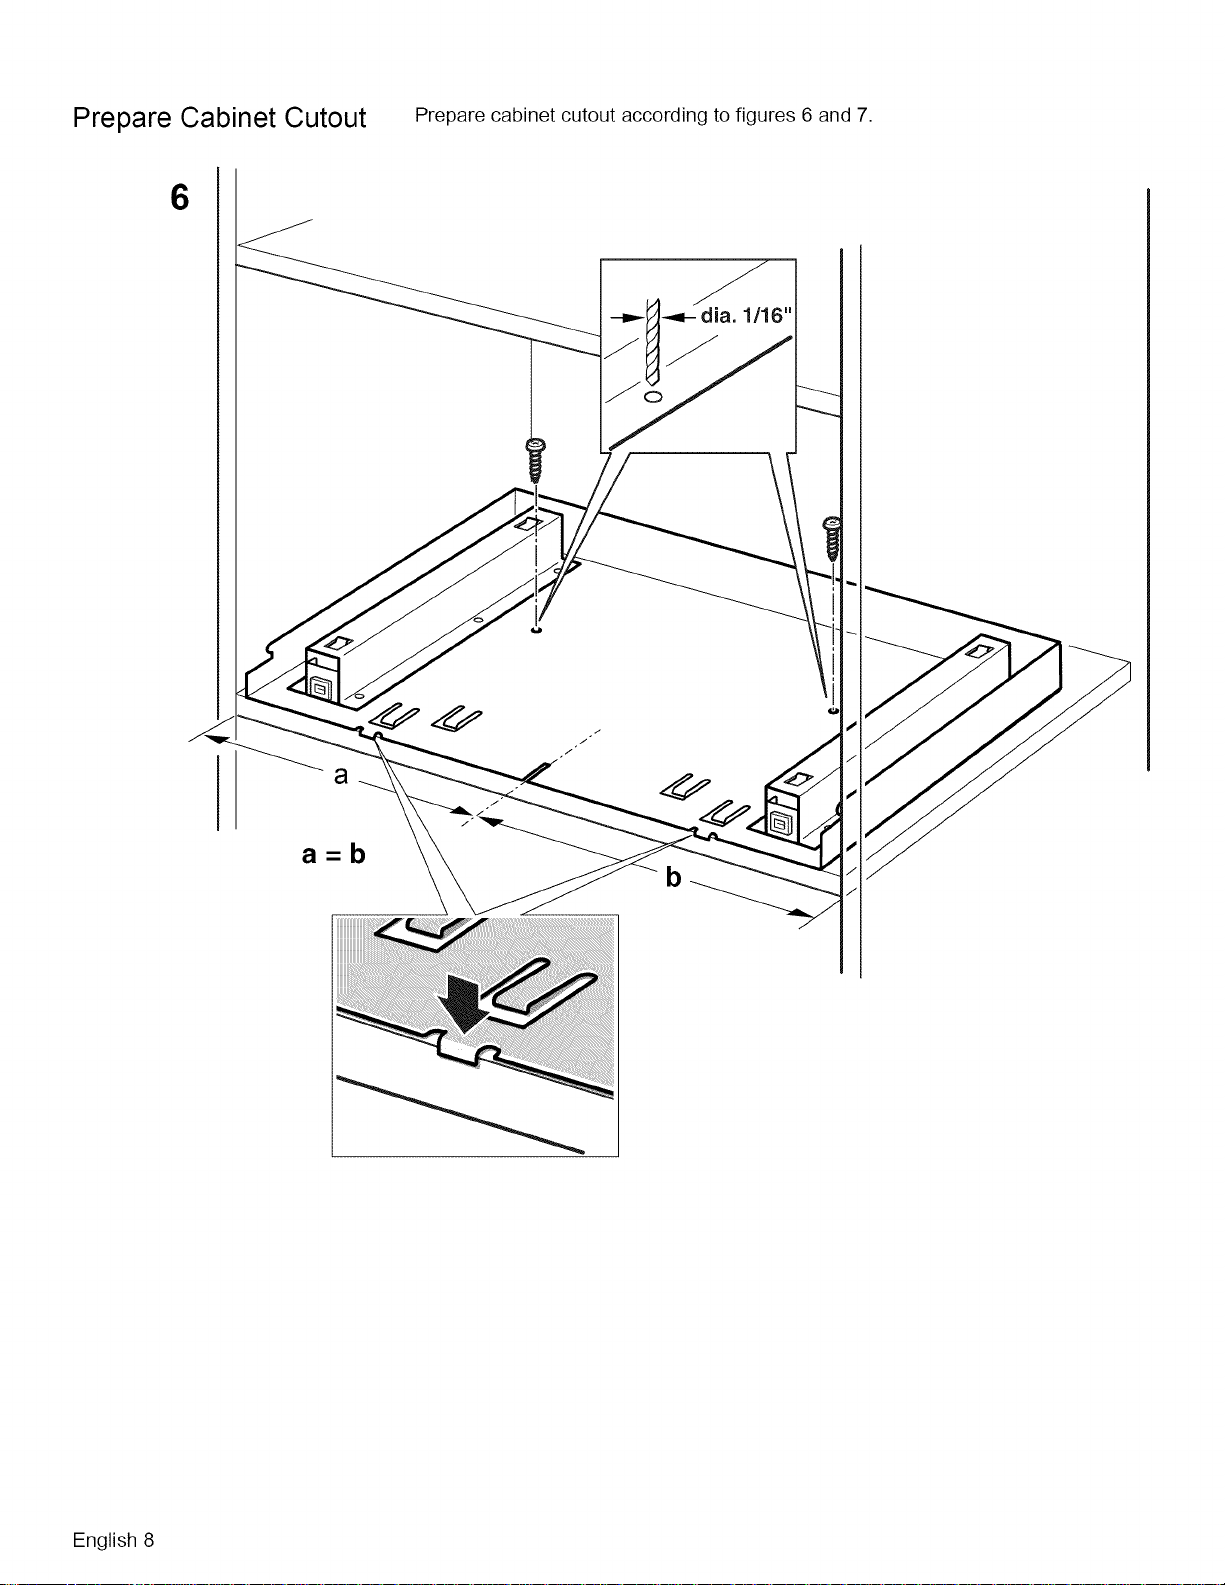
Prepare Cabinet Cutout Prepare cabinet cutout according to figures 6 and 7.
6
a=b
b
English 8
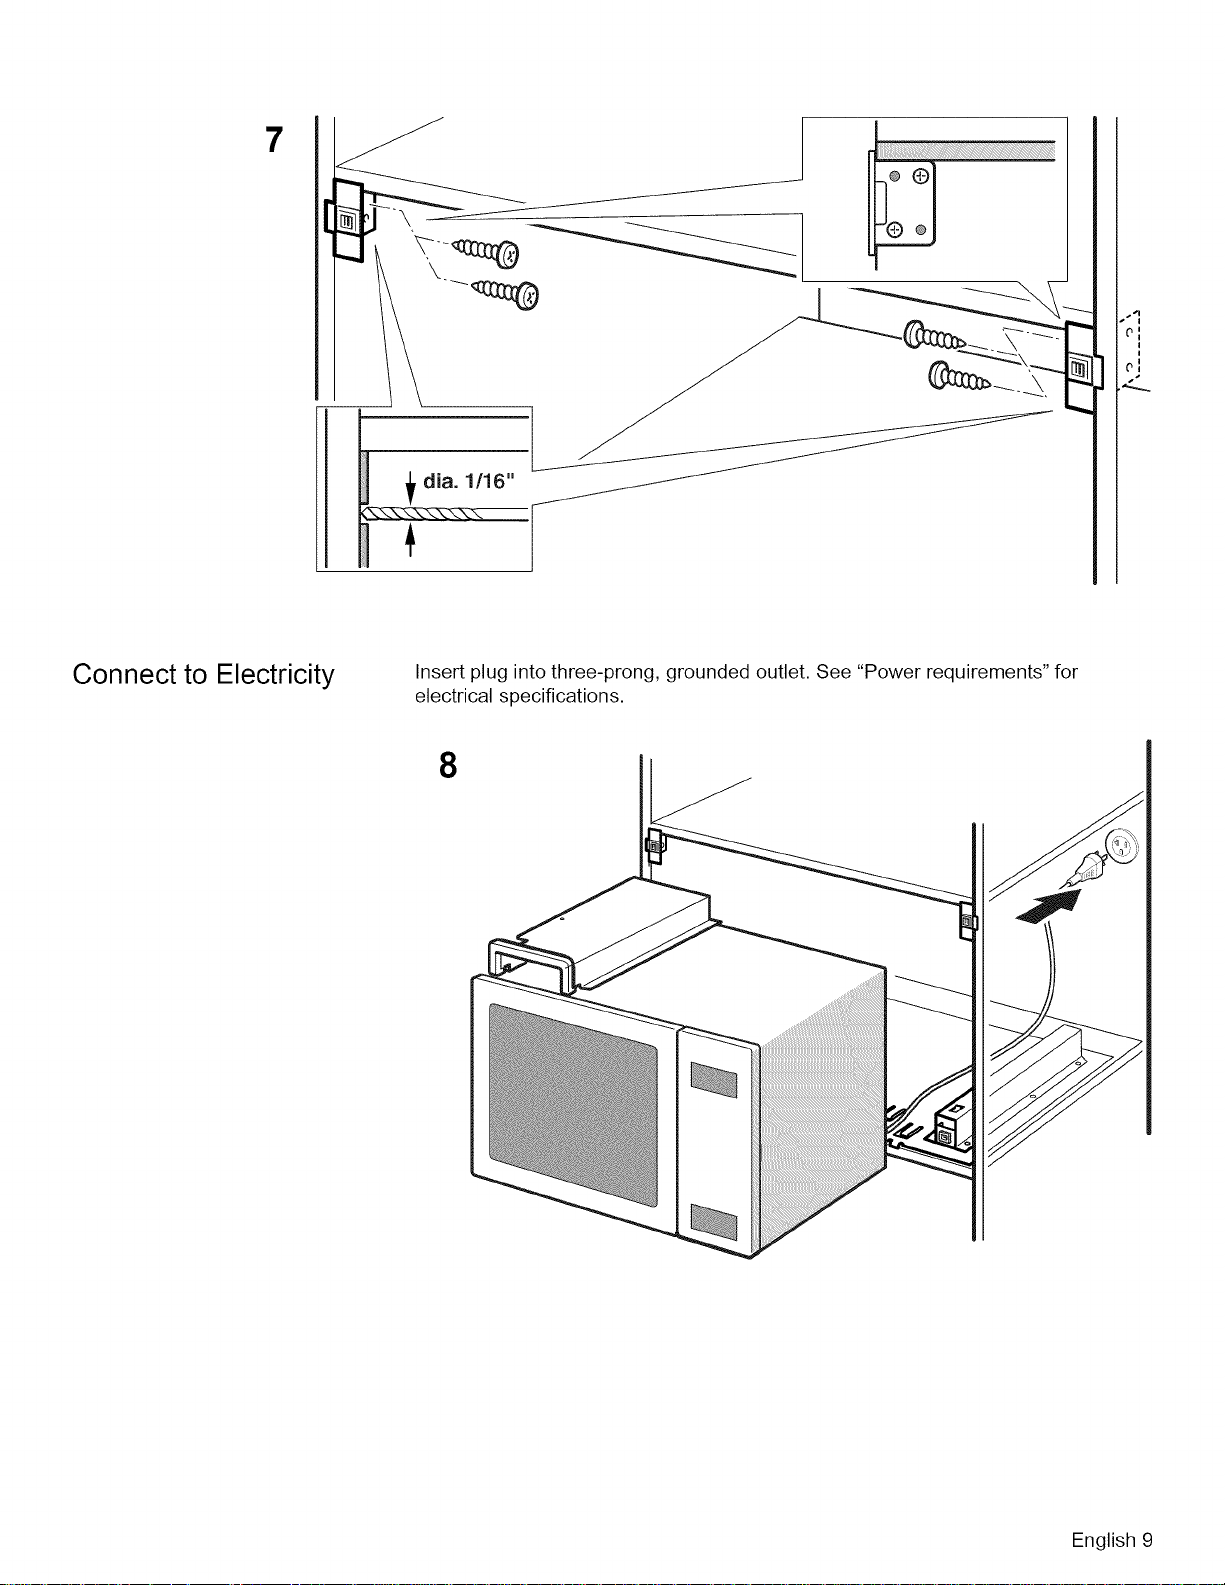
7
/1
I
!
Connect to Electricity
Insert plug into three-prong, grounded outlet. See "Power requirements" for
electrical specifications.
8
English 9
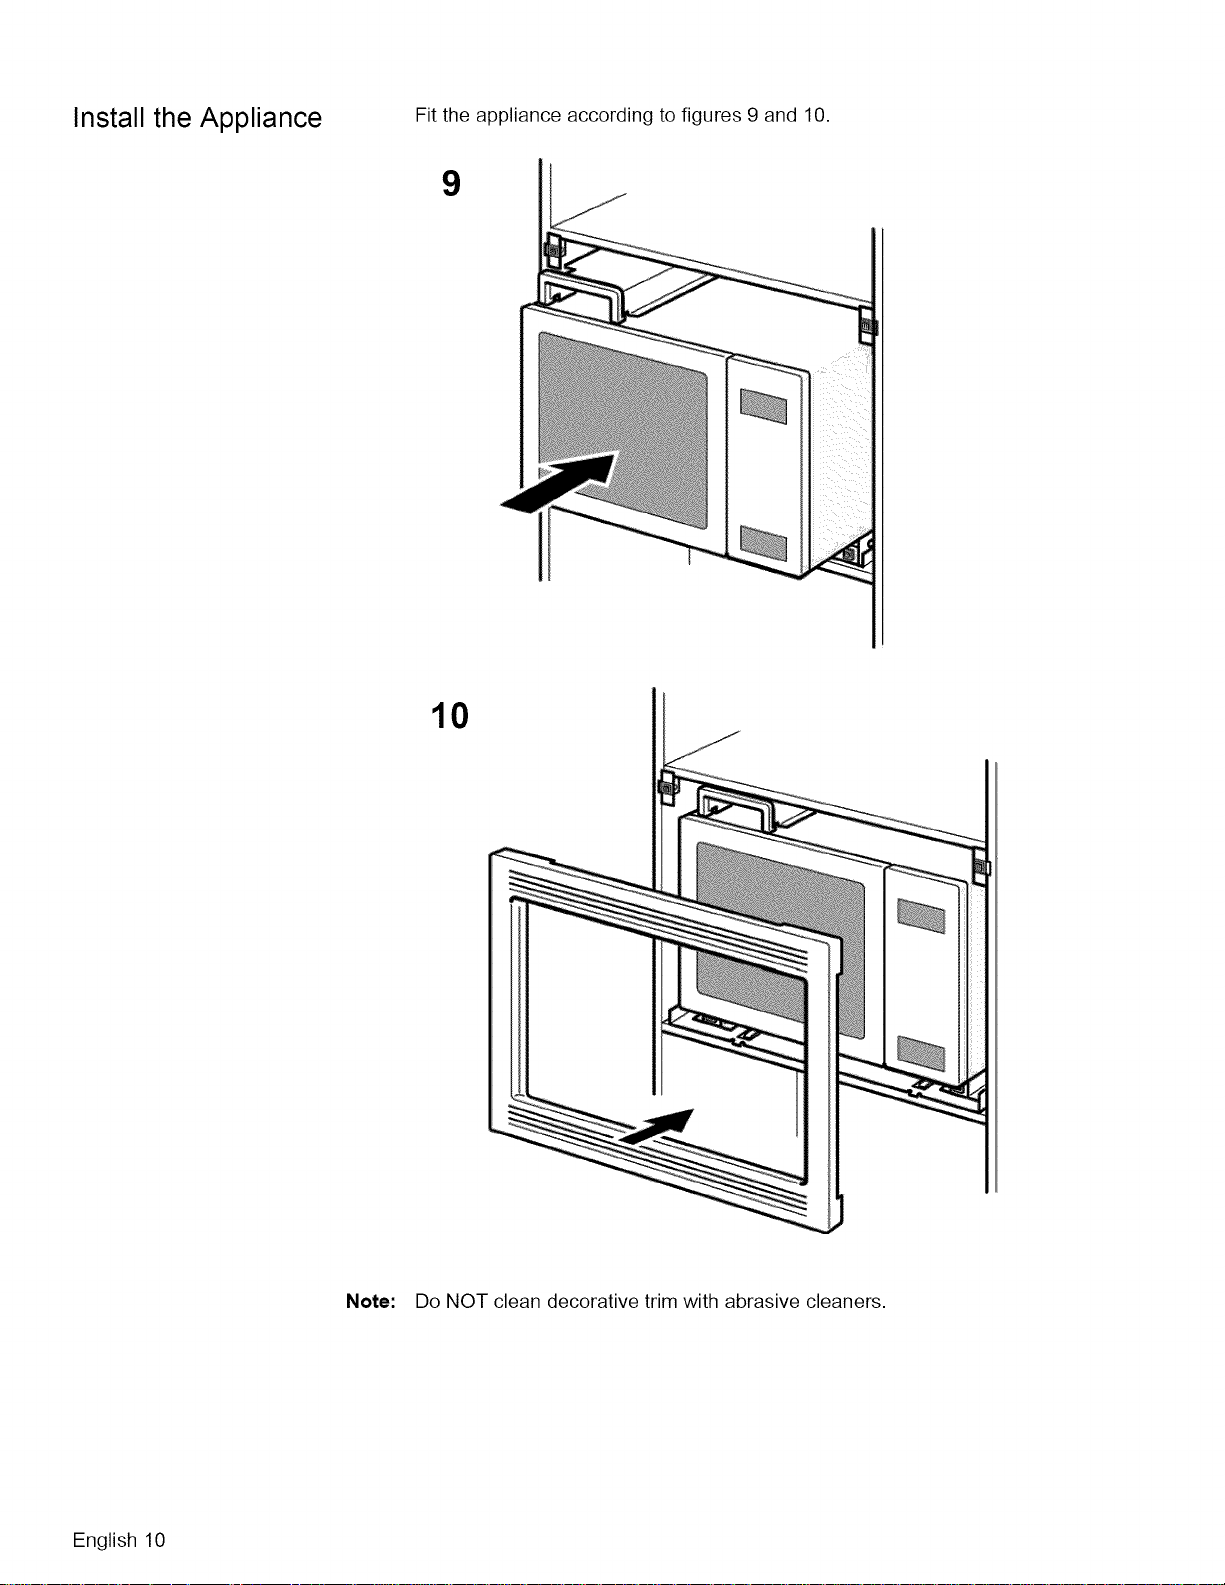
Install the Appliance Fit the appliance according to figures 9 and 10.
9
10
Note: Do NOT clean decorative trim with abrasive cleaners.
English 10
Service
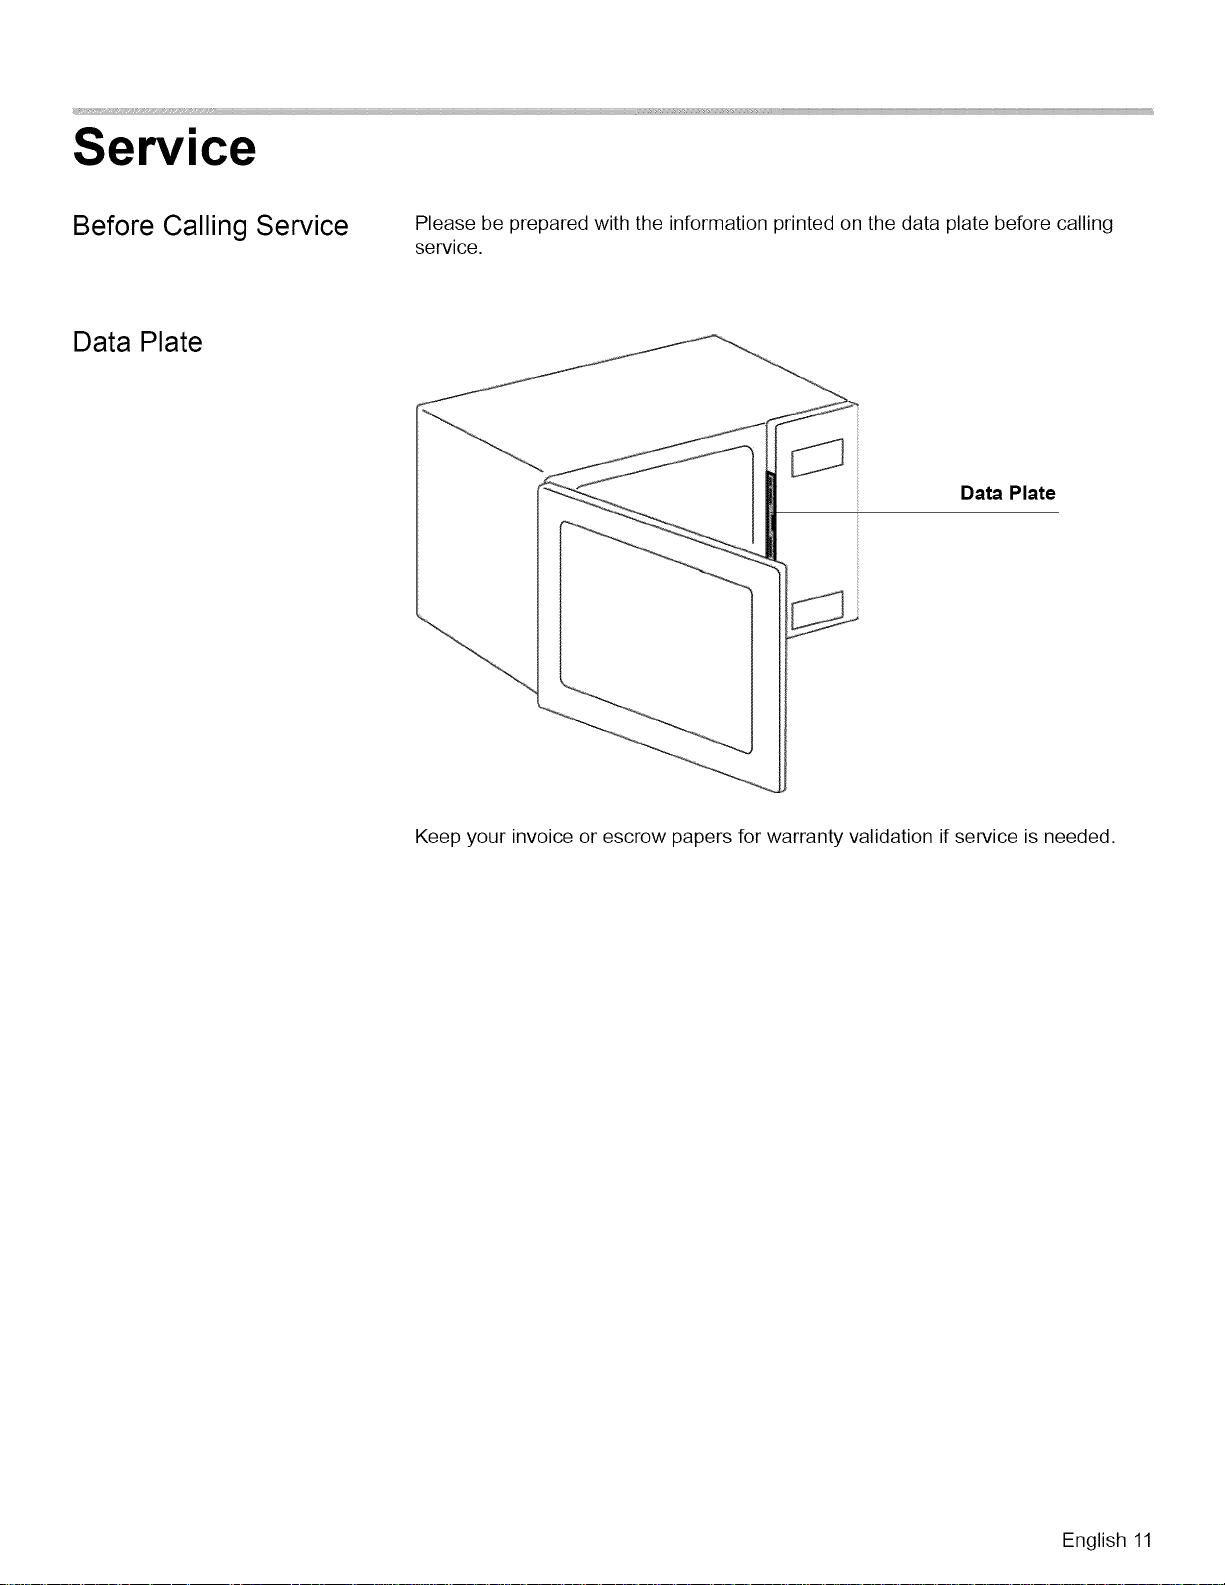
Before Calling Service
Please be prepared with the information printed on the data plate before calling
service.
Data Plate
Data Plate
Keep your invoice or escrow papers for warranty validation if service is needed.
English 11
 Loading...