


HDS7052U-01
Bosch HDS7052U-01, HDS7062U-01, HDI7052U-01, HDI7282U-01, HDI7152U-01 Use And Care Manual
...
Use and Care Manual
Bosh Dual Fuel Range
Table of Contents
About This Manual ................................................ 1
How This Manual Is Organized .......................................................... 1
Safety .......................................................... 1
Important Safety Instructions ............................................................ 1
Getting Started ................................................... 5
Parts and Accessories ................................................................. 6
Control (Panel) ..................................................................... 12
Before Using the Appliance for the First Time .............................................. 17
Operation - Cooktop .............................................. 17
About the Cooktop ................................................................... 17
Operation .......................................................................... 17
Operation - Oven ................................................ 18
About the Oven ..................................................................... 18
Operation .......................................................................... 18
Operation - Warming Drawer (some models) .......................... 22
About the Warming Drawer ............................................................ 22
Operation .......................................................................... 23
Getting the Most Out of Your Appliance ............................... 24
Getting the Most Out of Your Cooktop ................................................... 24
Getting the Most Out of Your Oven ...................................................... 25
Getting the Most Out of Your Warming Drawer ............................................. 33
Cleaning and Maintenance ........................................ 33
Cleaning - Cooktop .................................................................. 34
Cleaning - Oven ..................................................................... 37
Cleaning - Drawers (Storage or Warming) ................................................ 40
Maintenance ....................................................................... 40
Service ........................................................ 42
Before Calling Service ................................................................ 42
Questions?
1-800-944-2904
...............................................................................................We Ioo k forw ard toh ea ring from y ou!....................................................................................................
www.boschappliances.com
5551 McFadden Ave.
Huntington Beach, CA 92649
About This Manual
How This Manual Is Organized
This manual contains several sections:
• The Getting Started section describes the features and functionality of the
range, including a description of how to set up the range and operate the
control panel.
• The Operation sections describe how to operate each range component.
• The Getting the Most out of Your Appfiance section includes information
about the modes, cooking charts and tips for improving performance.
• The Cleaning and Maintenance section describes how to clean and main-
tain your appliance.
• The Service section includes troubleshooting tips and your Warranty.
Before using your range, be sure to read this manual. Pay special attention to
the Safety Sections located at the beginning of the manual.
Safety
Important Safety Instructions
READ AND SAVE THESE INSTRUCTIONS
Important Safety Instruc-
tions
Fire Safety • Do not use aluminum foil or protective liners to line any part of an appliance,
especially surface unit drip bowls or oven bottom. Installation of these liners
may result in a risk of electric shock or fire.
• Set the burner control so that the flame does not extend beyond the bottom
of the pan.
• If materials inside an oven or warming drawer should ignite, keep door
closed. Turn off the appliance and disconnect the circuit at the circuit
breaker box.
• Do not allow aluminum foil, plastic, paper or cloth to come in contact with a
hot burner or grate. Do not allow pans to boil dry.
• If the cooktop is near a window, forced air vent, or fan, be certain that flam-
mable materials such as window coverings do not blow over or near the
burners or elements. They could catch on fire.
• Always have a working smoke detector near the kitchen.
• Never leave the cooktop unattended when in use. Boilovers cause smoking
and greasy spillovers may ignite.
• WARNING - TO REDUCE THE RISK OF A RANGE TOP GREASE FIRE:
English 1

Safety
a) Never leave surface units unattended at high settings. Boilovers cause
smoking and greasy spillovers that may ignite. Heat oils slowly on low or
medium settings.
b) Always turn hood ON when cooking at high heat orwhen flambeing food
(i.e. Crepes Suzette, Cherries Jubilee, Peppercorn Beef Flambe').
c) Clean ventilating fans frequently. Grease should not be allowed to accu-
mulate on fan or filter.
d) d) Use proper pan size. Always use cookware appropriate for the size of
the surface element."
• In the event that personal clothing or hair catches fire, drop and roll immedi-
ately to extinguish flames.
• Smother flames from food fires other than grease fires with baking soda.
Never use water on cooking fires.
• Take care that drafts like those from fans or forced air vents do not push the
flames so that they extend beyond the edges of the pan.
• WARNING - TO REDUCE THE RISK OF INJURY TO PERSONS IN THE
EVENT OF A RANGE TOP GREASE FIRE, OBSERVE THE FOLLOWING:
a) SMOTHER FLAMES with a close-fitting lid, cookie sheet, or metal tray,
then turn off the burner. BE CAREFUL TO PREVENT BURNS. If the
flames do not go out immediately, EVACUATE AND CALL THE FIRE
DEPARTMENT.
b) NEVER PICK UP A FLAMING PAN - You may be burned.
c) DO NOT USE WATER, including wet dishcloths or towels - a violent
steam explosion will result.
d) Use an extinguisher ONLY if:
1) You know you have a Class ABC extinguisher, and you already
know how to operate it.
2) The fire is small and contained in the area where it started.
3) The fire department is being called.
4) You can fight the fire with your back to an exit.
5) Have an appropriate fire extinguisher available, nearby, highly visi-
ble and easily accessible near the oven. "
• Whenever possible, do not operate the ventilation system during a cooktop
fire. However, do not reach through fire to turn it off.
Gas Safety
• To prevent carbon monoxide build-up, do not block appliance air vents.
Do not store or use combustible materials, gasoline or other flamma-
ble vapors and liquids in the vicinity of this or any other appliance.
• WHAT TO DO IF YOU SMELL GAS:
• Do not try to light any appliance.
• Do not touch any electrical switch.
• Do not use any phone in your building.
• Immediately call your gas supplier from a neighbor's phone.
Follow the gas supplier's instructions.
• If you cannot reach your gas supplier, call fire department.
Installation and service must be performed by a qualified installer,
authorized service agency or the gas supplier.
• Have the installer show you where the gas shut-off valve is located.
English 2
Safety
• If a burner goes out and gas escapes, open windows and doors. Wait until
gas dissipates before using the appliance.
• If you smell gas, your installer has not done a proper job of checking for
leaks. If the connections are not perfectly tight, you can have a small leak
and, therefore, a faint smell. Finding a gas leak is not a "do-it-yourself" pro-
cedure. Some leaks can only be found with the burner control in the ON
• position and this must be done by a qualified service technician. See warn-
ing in "Gas Safety" on page 2.
Burn Prevention
• DO NOT TOUCH SURFACE UNITS OR AREAS NEAR UNITS - Surface
units may be hot even though they are dark in color. Areas near surface
units may become hot enough to cause burns. During and after use, do not
touch, or let clothing, potholders, or other flammable materials contact sur-
face units or areas near units until they have had sufficient time to cool.
Among these areas are the cooktop and areas facing the cooktop.
• DO NOT TOUCH HEATING ELEMENTS OR INTERIOR SURFACES OF
OVEN - Heating elements may be hot even though they are dark in color.
Interior surfaces of an oven become hot enough to cause burns. During and
after use, do not touch, or let clothing, potholders, or other flammable mate-
rials contact heating elements or interior surfaces of oven until they have
had sufficient time to cool. Other surfaces of the appliance may become hot
enough to cause burns. Among these surfaces are oven vent openings, sur-
faces near these openings and oven doors.
• Exercise caution when opening the appliance. Standing to the side, open
the door (or drawer) slowly and slightly to let hot air and/or steam escape.
Keep your face clear of the opening and make sure there are no children or
pets near the unit. After the release of hot air and/or steam, proceed with
your cooking. Keep doors shut unless necessary for cooking or cleaning
purposes. Do not leave open doors unattended.
• Do not heat or warm unopened food containers. Build-up of pressure may
cause the container to burst and cause injury.
• Always place oven racks in desired location while oven is cool. If a rack
must be moved while oven is hot, do not let potholder contact the heating
elements.
• Always turn hood ON when cooking at high heat or when flambeing food
(i.e. Crepes Suzette, Cherries Jubilee, Peppercorn Beef Flambe').
• Use high heat settings on the cooktop only when necessary. To avoid bub-
bling and splattering, heat oil slowly on no more than a low-medium setting.
Hot oil is capable of causing extreme burns and injury.
Never move a pan of hot oil, especially a deep fat fryer. Wait until it is cool.
Child Safety
Cleaning Safety
When children become old enough to use the appliance, it is the legal
responsibility of the parents or legal guardians to ensure that they are
instructed in safe practices by qualified persons.
• Do not allow anyone to climb, stand, lean, sit, or hang on any part of an
appliance, especially a door, warming drawer, or storage drawer. This can
damage the appliance, and the unit may tip over, potentially causing severe
injury.
• Do not allow children to use this appliance unless closely supervised by an
adult. Children and pets should not be left alone or unattended in the area
where the appliance is in use. They should never be allowed to play in its
vicinity, whether or not the appliance is in use.
• CAUTION - Items of interest to children should not be stored in an appli-
ance, in cabinets above an appliance or on the backsplash. Children climb-
ing on an appliance to reach items could be seriously injured.
"IMPORTANT SAFETY NOTICE: The California Safe Drinking and Toxic
Enforcement Act requires the Governor of California to publish a list of sub-
stances known to the state to cause cancer, birth defects or other reproduc-
English 3

Safety
tive harm, and requires businesses to warn customers of potential exposure
to such substances.
1) The burning of gas cooking fuel and the elimination of soil during self-
cleaning can generate small amounts of Carbon Monoxide.
2) The fiberglass insulation in self-clean ovens gives off very small
amounts of formaldehyde during the first several cleaning cycles.
3) California lists formaldehyde as a potential cause of cancer. Carbon
Monoxide is a potential cause of reproductive toxicity.
4) Exposure to these substances can be minimized by:
1) Providing good ventilation when cooking with gas.
2) Providing good ventilation during and immediately after self clean-
ing the oven.
3) Operating the unit according to the instructions in this manual."
Do not clean the appliance while it is still hot. Some cleaners produce nox-
ious fumes when applied to a hot surface. Wet cloths or sponges can cause
burns from steam.
When self-cleaning, confirm that the door locks and will not open. If the door
does not lock, do not run Self-Clean. Contact service.
Birds have very sensitive respiratory systems. Keep pet birds out of the
kitchen or other rooms where kitchen fumes could reach them. During self
clean, fumes are released that may be harmful to birds. Other kitchen fumes
such as overheating margarines and cooking oils may also be harmful.
Keep oven free from grease build up.
CookwareSafety
Proper Installation and Maintenance
• Do not place food directly on oven bottom.
• Follow the manufacturer's directions when using cooking or roasting bags.
• Hold the handle of the pan when stirring or turning food. This helps prevent
spills and movement of the pan.
• Use Proper Pan Size. The use of undersized cookware will expose a portion
of the heating element or burner to direct contact and may result in ignition
of clothing. Select cookware having flat bottoms large enough to cover the
surface heating unit. This appliance is equipped with one or more surface
units of different size. Proper relationship of cookware to heating element or
burner will also improve efficiency.
• Always position handles of utensils inward so they do not extend over adja-
cent work areas, burners, or the edge of the cooktop. This reduces the risk
of fires, spills and burns.
• Adjust burner flame size so that it does not extend beyond the edge of the
cookware. Proper relationship of cookware to burner flame reduces safety
risks.
• WARNING: When properly cared for, your new appliance has been
designed to be safe and reliable. Read all instructions carefully before use.
These precautions will reduce the risk of burns, electric shock, fire, and
injury to persons. When using kitchen appliances, basic safety precautions
must be followed, including those in the following pages.
• Have the installer show you the location of the circuit breaker or fuse. Mark it
for easy reference.
• This appliance must be properly installed and grounded by a qualified tech-
nician. Connect only to properly grounded outlet. Refer to Installation
Instructions for details.
English 4

Allrangescantip.Injurytopersonscouldresult.Installanti-tipdevicepack-
agedwithrange.Verifythattheanti-tipdevicesareengaged.Seeinstalla-
tioninstructions.
Figure 1: Tipping Precautions
• This appliance is intended for normal family household use only. It is not
approved for outdoor use. See the Warranty. tf you have any questions,
contact the manufacturer.
• Do not store or use corrosive chemicals, vapors, flammables or nonfood
products in or near this appliance. It is specifically designed for use when
heating or cooking food. The use of corrosive chemicals in heating or clean-
ing will damage the appliance and could result in injury.
• Do not operate this appliance if it is not working properly, or if it has been
damaged. Contact an authorized servicer.
• Do not obstruct oven vents.
• Do not repair or replace any part of the appliance unless specifically recom-
mended in this manual. Refer all servicing to a factory authorized service
center.
• In the event of an error the display flashes and beeps continuously. If this
happens during self-clean, disconnect appliance from the power supply and
call a qualified technician.
• In the event of an error the display flashes and beeps continuously. Discon-
nect appliance from the power supply and call a qualified technician.
Food Safety
Getting Started
CAUTION: To maintain food safety, follow these guidelines:
1) DO NOT use the warming drawer to heat cold food (exception: it is safe
to use the drawer to crisp crackers, chips or dry cereal and to warm
plates.
2) Be sure to maintain proper food temperature. The USDA recommends
holding hot food at 140°F or warmer.
3) DO NOT warm food for longer than one hour
English 5

GettingStarted
Parts and Accessories
Free-Standing Models Slide-In Models
1
2
11 /
9or10
(model dependent)
Table 1 Parts and Accessories Key
Oven Control Panel and Knob
Burner Caps (4)
3
4
5
6
7
8
Burner Grates (2 or 4; varies by model)
Cooktop Control Knob
Probe Receptacle
Rack Positions/Rack Guides
Oven Racks, Flat (2 or 3; varies by model)
Oven Door Gasket
13
14
15
16
17
18
19
2O
9or10
(model dependent)
Figure 2: Parts and Accessories
Cooktop Scraper (glass ceramic models only) (not
shown)
Weiman Cook Top@ glass ceramic cooktop cleaner
(glass ceramic models only) (not shown)
Anti-Tip Bracket (not shown)
Broiler Pan (not shown)
Oven Rack, Half (some models) (not shown)
Oven Rack, Full Extension (some models) (not shown
Literature Package (not shown)
Oven Lights (2) (oven back wall) (not shown)
9
10
11
12
Storage Drawer (some models) a
Warming Drawer (some models) a
Model # and Serial # Plate
Oven Vent
a. Depending on the model, your appliance has either a storage drawer or a warming drawer.
English 6
21
22
23
Convection Fan and Element (oven back wall; not
shown)
Broil Element (top of oven interior) (not shown)
Oven Door Lock (not visible) (not shown)
Sealed Gas Burners
Getting Started
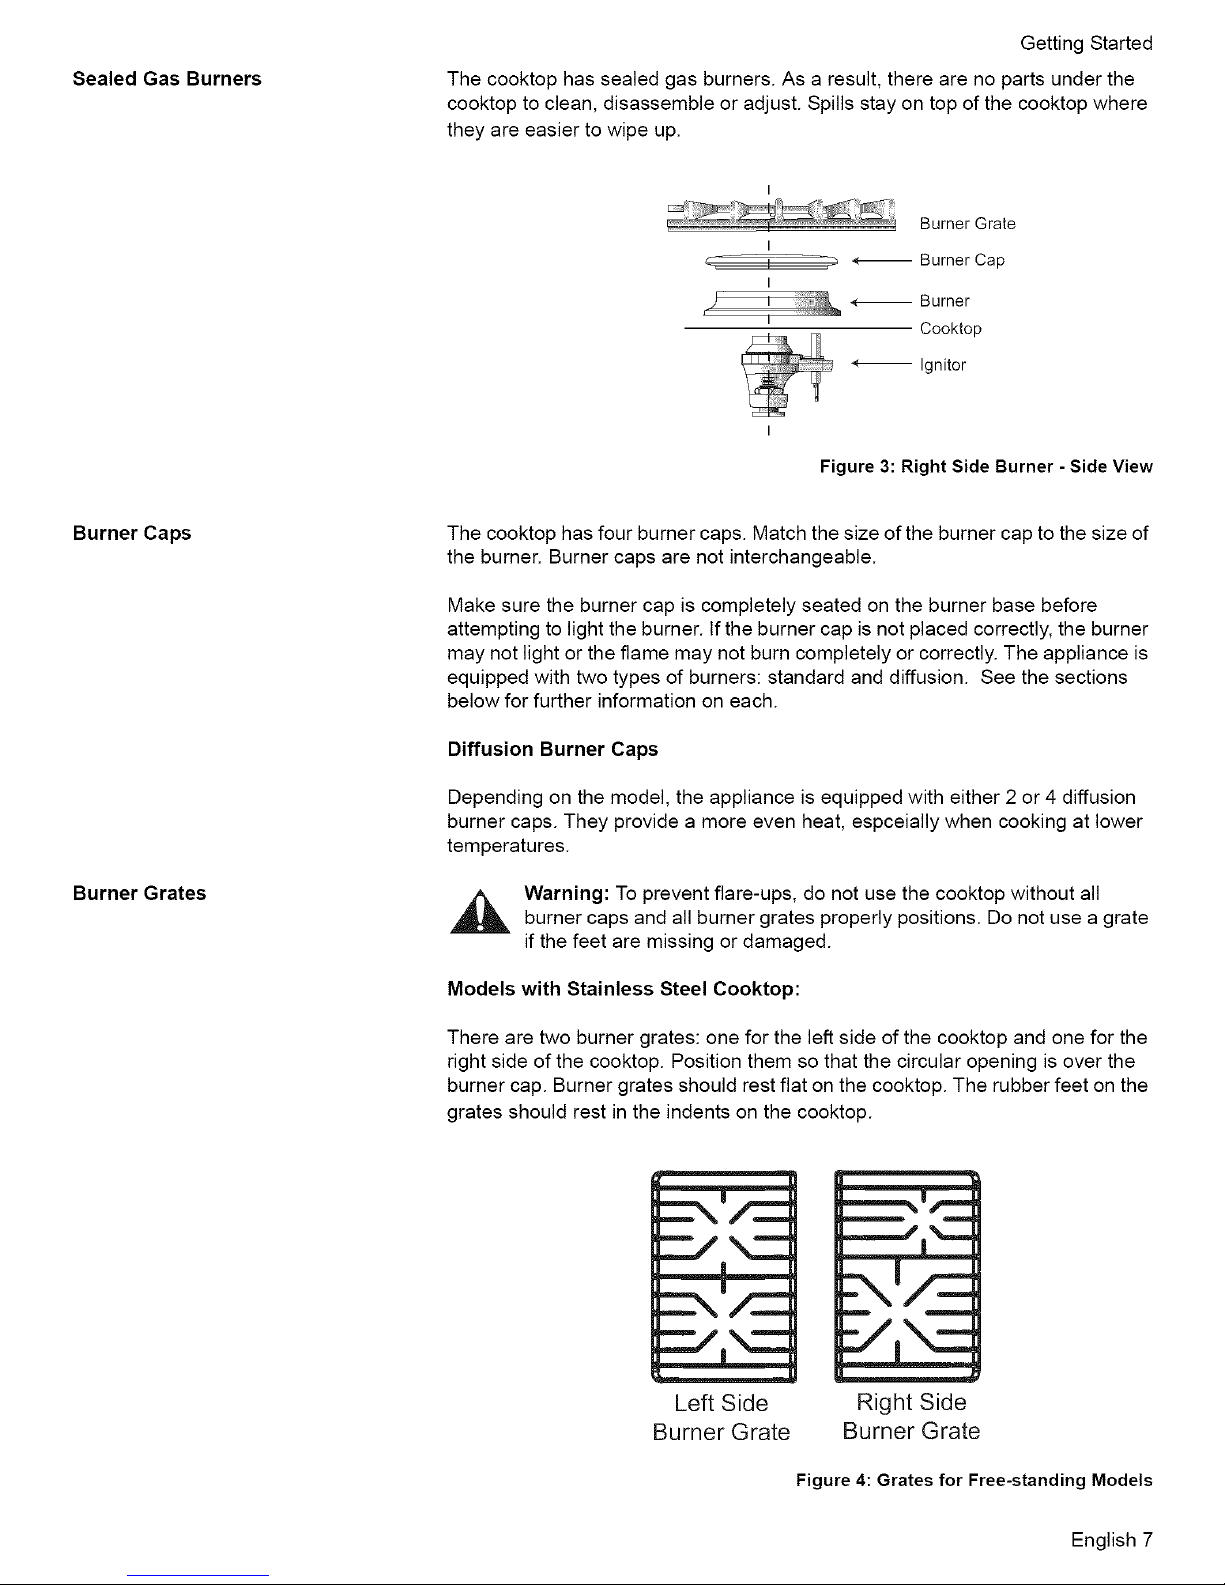
The cooktop has sealed gas burners. As a result, there are no parts under the
cooktop to clean, disassemble or adjust. Spills stay on top of the cooktop where
they are easier to wipe up.
Burner Grate
_- , _ 4-_ Burner Cap
r ,,
I
r
I
i *-- Burner
Cooktop
4_ Ignitor
Figure 3: Right Side Burner - Side View
Burner Caps
Burner Grates
The cooktop has four burner caps. Match the size of the burner cap to the size of
the burner. Burner caps are not interchangeable.
Make sure the burner cap is completely seated on the burner base before
attempting to light the burner. If the burner cap is not placed correctly, the burner
may not light or the flame may not burn completely or correctly. The appliance is
equipped with two types of burners: standard and diffusion. See the sections
below for further information on each.
Diffusion Burner Caps
Depending on the model, the appliance is equipped with either 2 or 4 diffusion
burner caps. They provide a more even heat, espceially when cooking at lower
temperatures.
Warning: To prevent flare-ups, do not use the cooktop without all
burner caps and all burner grates properly positions. Do not use a grate
if the feet are missing or damaged.
Models with Stainless Steel Cooktop:
There are two burner grates: one for the left side of the cooktop and one for the
right side of the cooktop. Position them so that the circular opening is over the
burner cap. Burner grates should rest flat on the cooktop. The rubber feet on the
grates should rest in the indents on the cooktop.
Left Side
Burner Grate
_-NI/=_
m m
Right Side
Burner Grate
Figure 4: Grates for Free-standing Models
English 7
GettingStarted
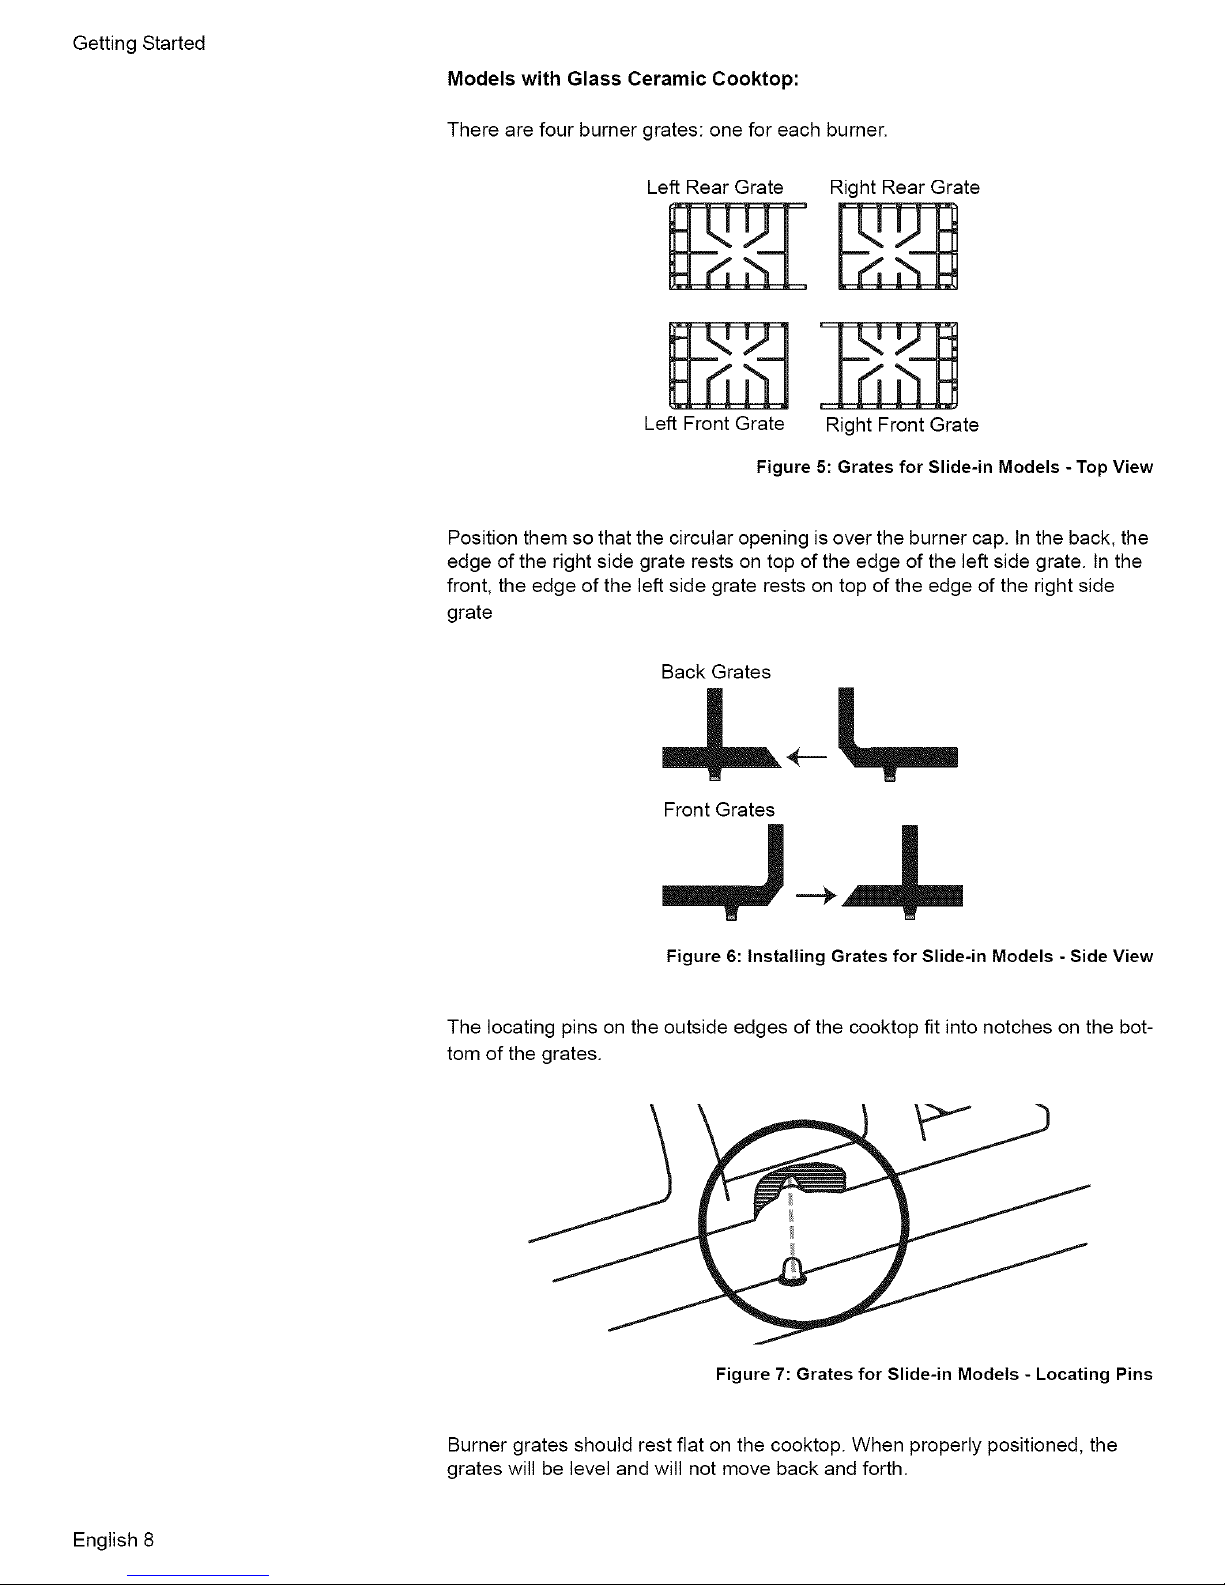
ModelswithGlassCeramicCooktop:
Therearefourburnergrates:oneforeachburner.
LeftRearGrate
LeftFrontGrate
Figure 5: Grates for Slide-in Models - Top View
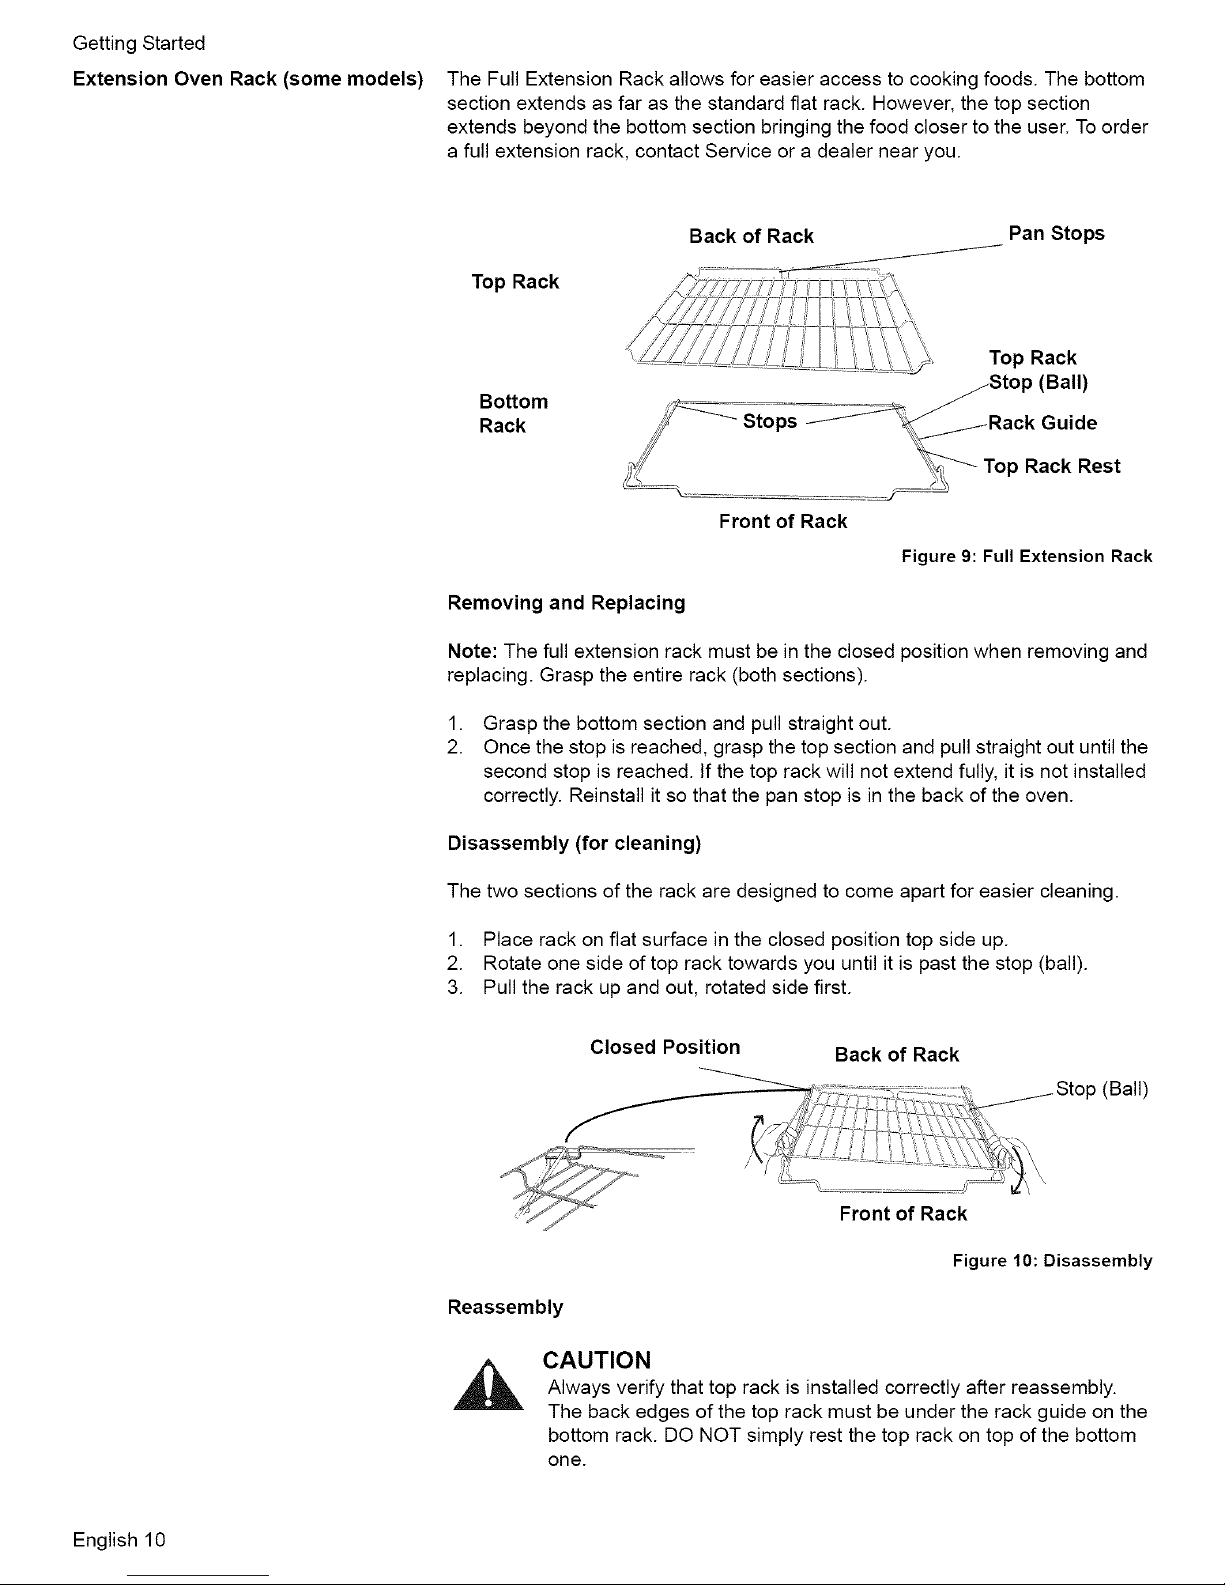
Position them so that the circular opening is over the burner cap. In the back, the
edge of the right side grate rests on top of the edge of the left side grate. In the
front, the edge of the left side grate rests on top of the edge of the right side
grate
Back Grates
RightRearGrate
RightFrontGrate
Front Grates
W N
Figure 6: Installing Grates for Slide-in Models - Side View
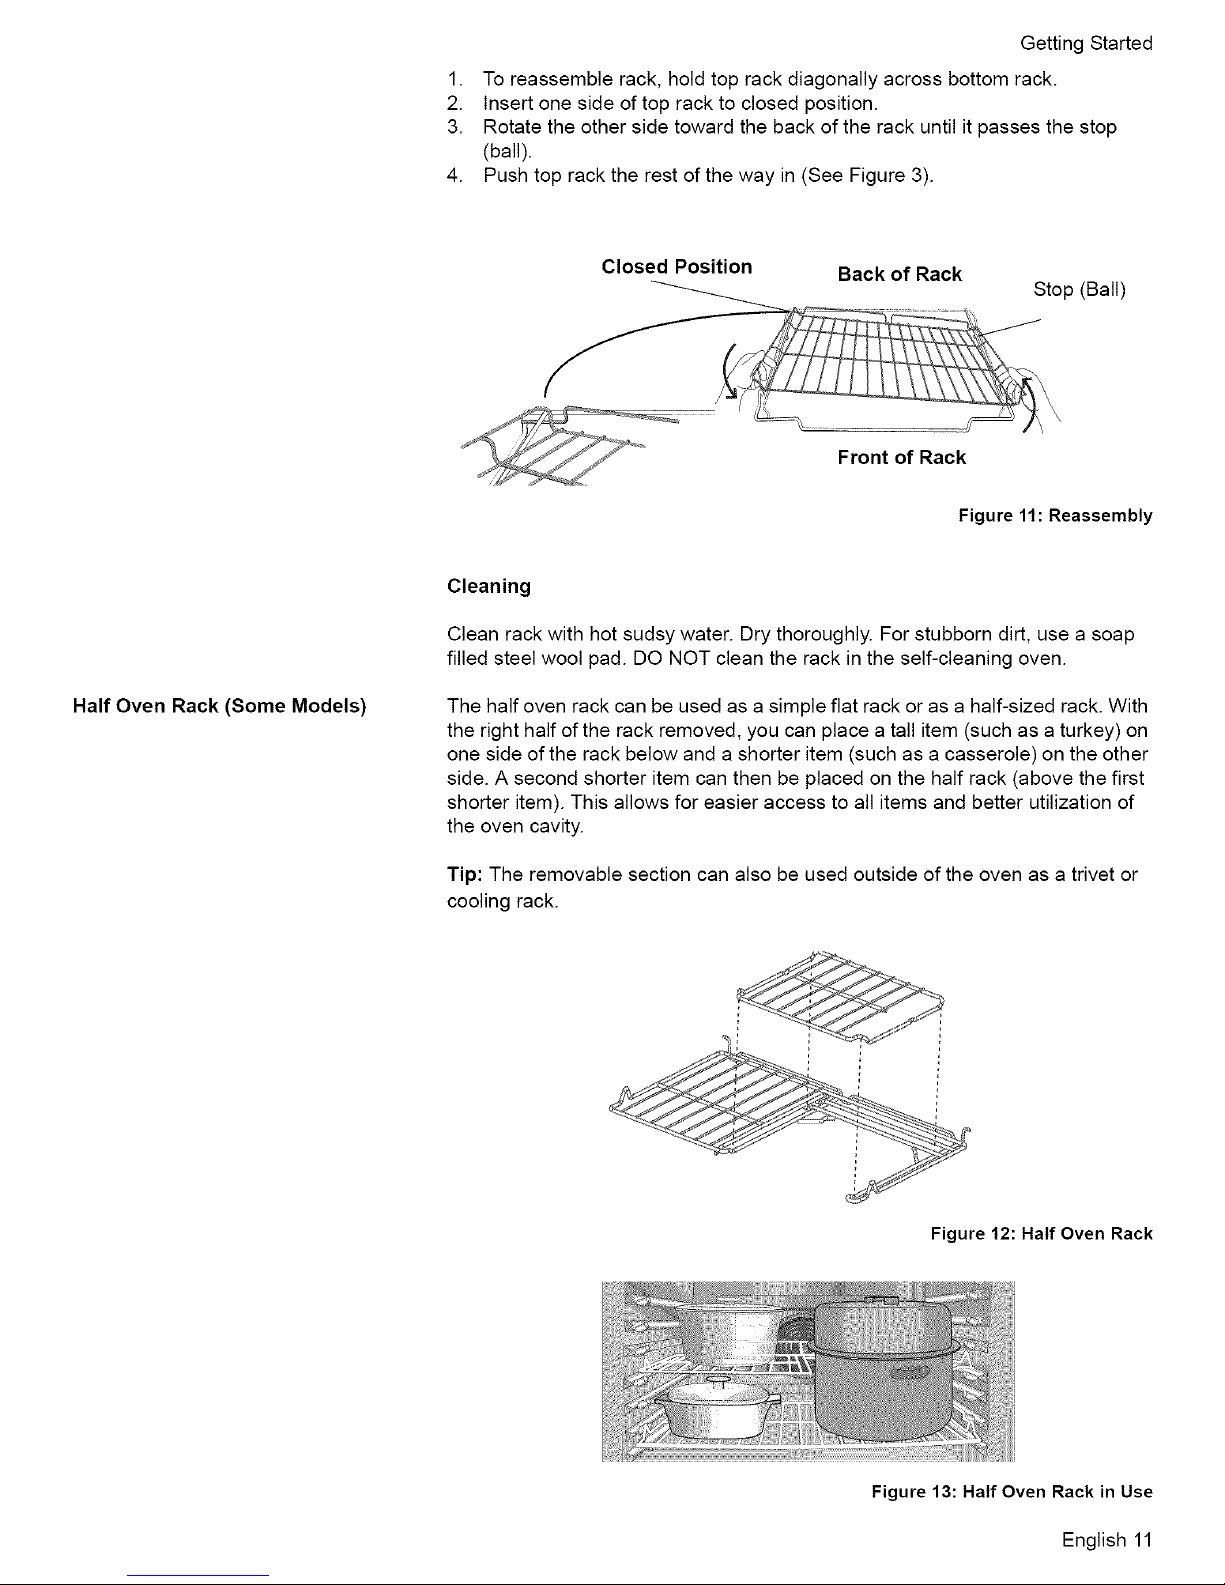
The locating pins on the outside edges of the cooktop fit into notches on the bot-
tom of the grates.
Figure 7: Grates for Slide-in Models - Locating Pins
English 8
Burner grates should rest flat on the cooktop. When properly positioned, the
grates will be level and will not move back and forth.

Getting Started
Electronic Ignitor
High Power Burner
Precision Burner
Oven Racks
The cooktop uses electronic ignitors to light the burners, There is no pilot light.
Each burner has its own ignitor. For proper operation, keep the ignitor clean and
dry. It is necessary to clean these when there is a boilover or when the burner
does not light even though the ignitor clicks.
Caution: All ignitors spark when any single burner is turned on. Do not touch
any of the burners when the cooktop is in use.
The high power burner is the largest burner. It is the most powerful burner on the
cooktop. It retains heat longer than normal burner caps and, at low settings, pro-
hibits the flame from touching the cookware. This results in a gentle, more pre-
dictable heat. Use the low settings on this burner to simmer large amounts of
sauces or soups. Use the high settings to quickly bring large amounts of water to
a boil.
The precision burner is the smallest burner on the cooktop. It is well suited for
gentle cooking of small amounts of food. Use the burner to melt butter or choco-
late or to prepare delicate sauces.
Depending on model, the range is equipped with one of the following combina-
tions:
• Three flat racks
• Two flat racks and one full extension rack
• Two flat racks and one half rack
Flat Oven Racks
The racks are designed with a stop so they will stop before coming completely
out of the oven and not tilt.
CAUTION
To avoid burns, place oven racks in desired positions before turning
oven on. Always use oven mitts when the oven is warm.If a rack
must be moved while the oven is hot, do not let oven mitts contact
hot burners.
Inserting Racks Into Oven
1. Grasp rack firmly on both sides.
2. Tilt rack up to allow stop into rack guide.
3. Bring rack to a horizontal position and press the rest of the way in. Rack
should be straight and flat, not crooked.
Back of rack
Insert rack with the back of the rack
toward the back wall of the rancle.
Figure 8: Inserting a Rack
Removing Flat Racks From Oven
1. Grasp rack firmly on both sides and pull rack toward you.
2. When the stop is reached, tilt rack up and pull the rest of the way out.
English 9
GettingStarted
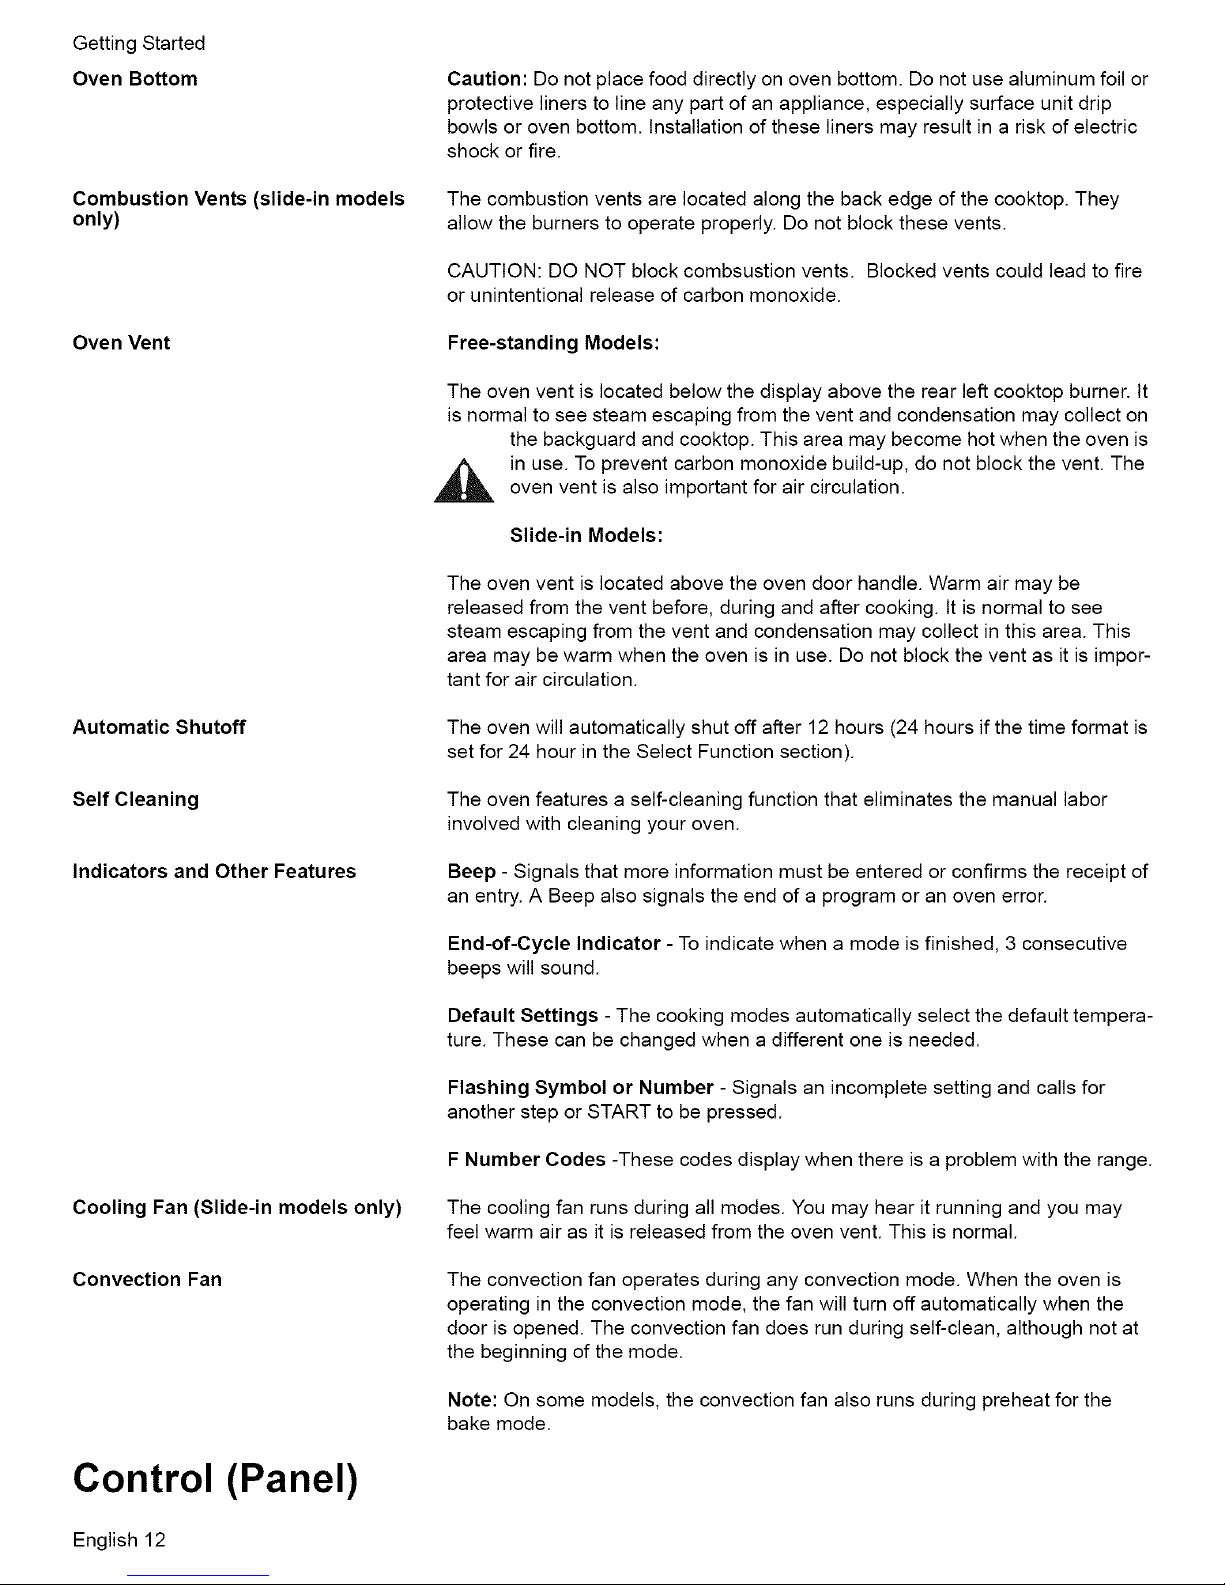
Extension Oven Rack (some models) The Full Extension Rack allows for easier access to cooking foods The bottom
section extends as far as the standard fiat rack However, the top section
extends beyond the bottom section bringing the food closer to the user To order
a full extension rack, contact Service or a dealer near you
Back of Rack Pan Stops
Top Rack
Top Rack
Bottom
Rack
Front of Rack
Figure 9: Full Extension Rack
Removing and Replacing
(Ball)
Top Rack Rest
Note: The full extension rack must be in the closed position when removing and
replacing Grasp the entire rack (both sections)
.
Grasp the bottom section and pull straight out
2
Once the stop is reached, grasp the top section and pull straight out until the
second stop is reached If the top rack will not extend fully, it is not installed
correctly Reinstall it so that the pan stop is in the back of the oven
Disassembly (for cleaning)
The two sections of the rack are designed to come apart for easier cleaning
1. Place rack on flat surface in the closed position top side up.
2. Rotate one side of top rack towards you until it is past the stop (ball).
3. Pull the rack up and out, rotated side first.
Closed Position Back of Rack
_fi " _1.Stop (Ball)
,",&=;...........................
' Front of Rack
English 10
Figure 10: Disassembly
Reassembly
CAUTION
Always verify that top rack is installed correctly after reassembly.
The back edges of the top rack must be under the rack guide on the
bottom rack. DO NOT simply rest the top rack on top of the bottom
one.
GettingStarted
1. Toreassemblerack,holdtoprackdiagonallyacrossbottomrack.
2. Insertonesideoftopracktoclosedposition.
3. Rotatetheothersidetowardthebackoftherackuntilitpassesthestop
(ball).
4. Pushtopracktherestofthewayin(SeeFigure3).
Closed Position
Cleaning
Clean rack with hot sudsy water. Dry thoroughly. For stubborn dirt, use a soap
filled steel wool pad. DO NOT clean the rack in the self-cleaning oven.
Half Oven Rack (Some Models) The half oven rack can be used as a simple flat rack or as a half-sized rack. With
the right half of the rack removed, you can place a tall item (such as a turkey) on
one side of the rack below and a shorter item (such as a casserole) on the other
side. A second shorter item can then be placed on the half rack (above the first
shorter item). This allows for easier access to all items and better utilization of
the oven cavity.
Back of Rack
Stop (Ball)
Front of Rack
Figure 11: Reassembly
Tip: The removable section can also be used outside of the oven as a trivet or
cooling rack.
Figure 12: Half Oven Rack
Figure 13: Half Oven Rack in Use
English 11
GettingStarted
OvenBottom
Caution:Donotplacefooddirectlyonovenbottom.Donotusealuminumfoilor
protectivelinerstolineanypartofanappliance,especiallysurfaceunitdrip
bowlsorovenbottom.Installationoftheselinersmayresultina riskofelectric
shockorfire.
Combustion Vents (slide-in models
only)
Oven Vent
Automatic Shutoff
The combustion vents are located along the back edge of the cooktop. They
allow the burners to operate properly. Do not block these vents.
CAUTION: DO NOT block combsustion vents. Blocked vents could lead to fire
or unintentional release of carbon monoxide.
Free-standing Models:
The oven vent is located below the display above the rear left cooktop burner. It
is normal to see steam escaping from the vent and condensation may collect on
the backguard and cooktop. This area may become hot when the oven is
in use. To prevent carbon monoxide build-up, do not block the vent. The
oven vent is also important for air circulation.
Slide-in Models:
The oven vent is located above the oven door handle. Warm air may be
released from the vent before, during and after cooking. It is normal to see
steam escaping from the vent and condensation may collect in this area. This
area may be warm when the oven is in use. Do not block the vent as it is impor-
tant for air circulation.
The oven will automatically shut off after 12 hours (24 hours if the time format is
set for 24 hour in the Select Function section).
Self Cleaning The oven features a self-cleaning function that eliminates the manual labor
involved with cleaning your oven.
Indicators and Other Features
Cooling Fan (Slide-in models only) The cooling fan runs during all modes. You may hear it running and you may
Convection Fan
Beep - Signals that more information must be entered or confirms the receipt of
an entry. A Beep also signals the end of a program or an oven error.
End-of-Cycle Indicator - To indicate when a mode is finished, 3 consecutive
beeps will sound.
Default Settings - The cooking modes automatically select the default tempera-
ture. These can be changed when a different one is needed.
Flashing Symbol or Number - Signals an incomplete setting and calls for
another step or START to be pressed.
F Number Codes -These codes display when there is a problem with the range.
feel warm air as it is released from the oven vent. This is normal.
The convection fan operates during any convection mode. When the oven is
operating in the convection mode, the fan will turn off automatically when the
door is opened. The convection fan does run during self-clean, although not at
the beginning of the mode.
Control (Panel)
English 12
Note: On some models, the convection fan also runs during preheat for the
bake mode.
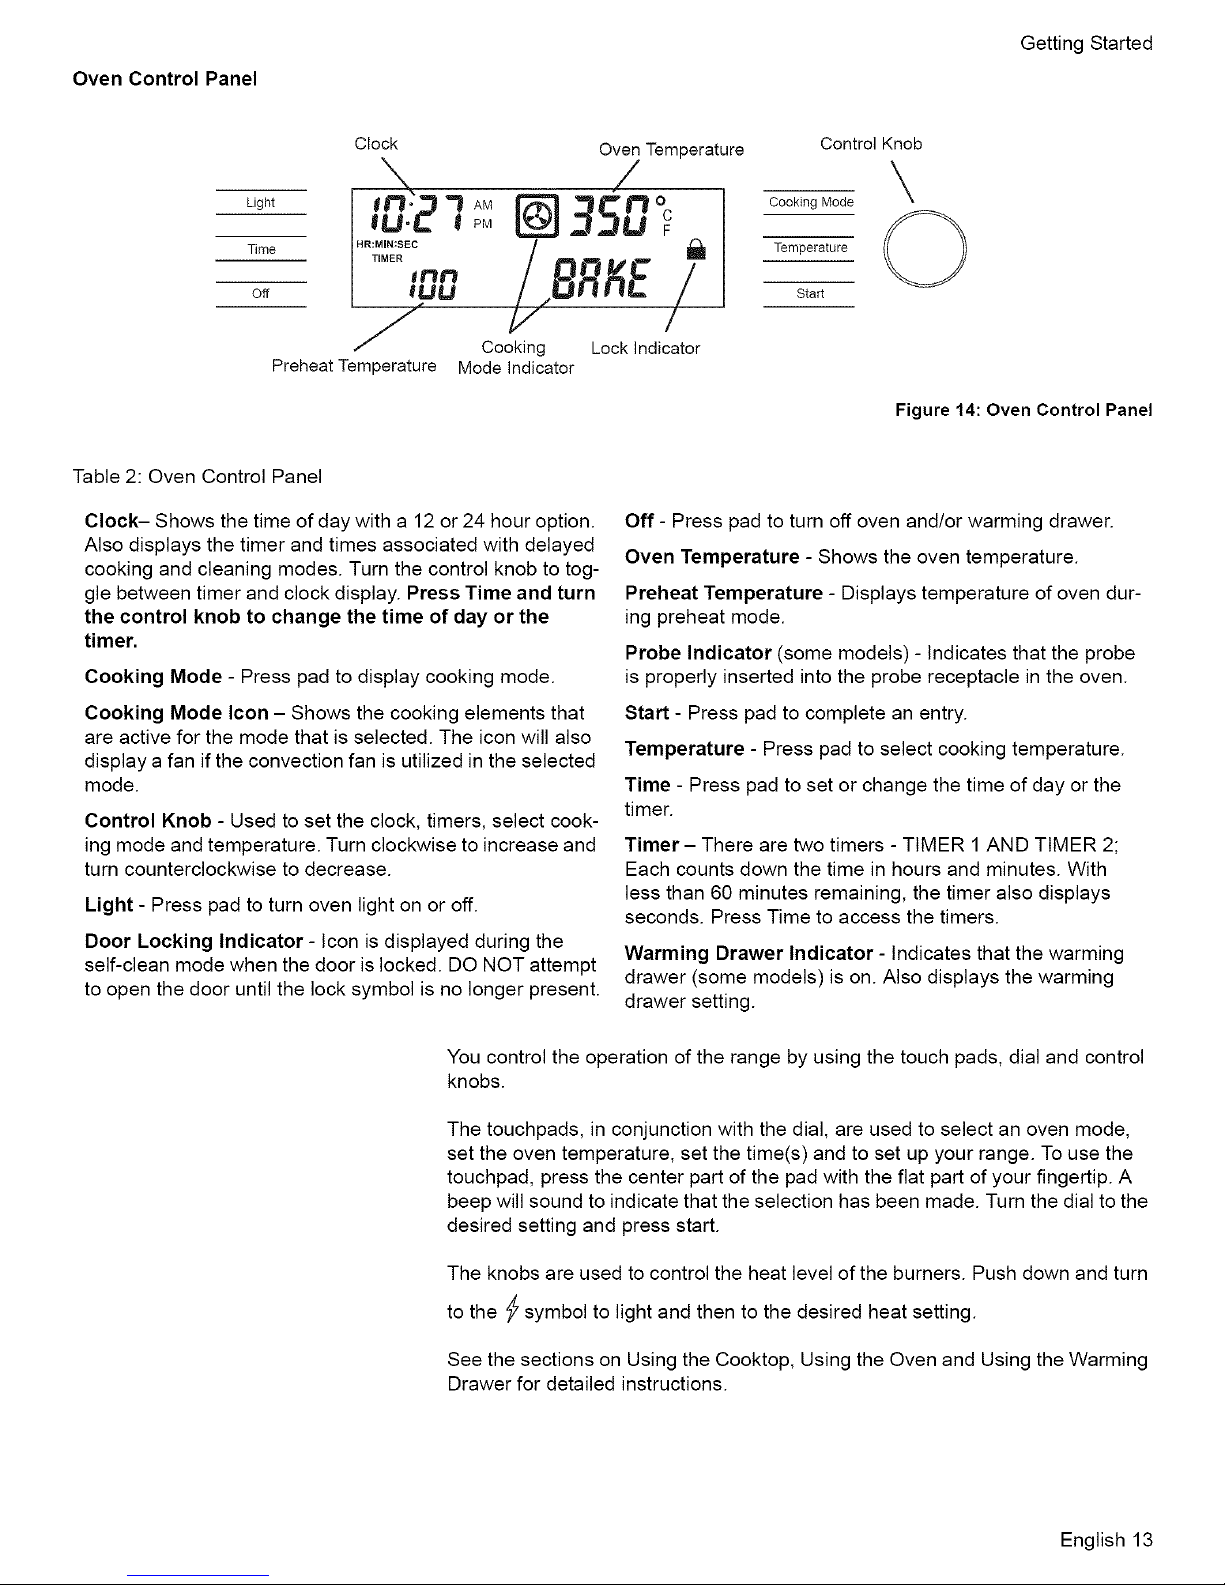
Oven Control Panel
Getting Started
Clock Oven Temperature
Light
_° _ AM " _O
,u.2 @35uc
Time
Off
Preheat Temperature
Table 2: Oven Control Panel
Clock- Shows the time of day with a 12 or 24 hour option.
Also displays the timer and times associated with delayed
cooking and cleaning modes. Turn the control knob to tog-
gle between timer and clock display. Press Time and turn
the control knob to change the time of day or the
timer.
Cooking Mode - Press pad to display cooking mode.
Cooking Mode Icon - Shows the cooking elements that
are active for the mode that is selected. The icon will also
display a fan if the convection fan is utilized in the selected
mode.
Control Knob - Used to set the clock, timers, select cook-
ing mode and temperature. Turn clockwise to increase and
turn counterclockwise to decrease.
Light - Press pad to turn oven light on or off.
Door Locking Indicator - Icon is displayed during the
self-clean mode when the door is locked. DO NOT attempt
to open the door until the lock symbol is no longer present.
.R:M,R:see /
H TIMER ,'_ _ Dql_ *_ _lw
Mode Indicator
Control Knob
CookingMode
Temperature O
Start
'ocklnd/tor
Figure 14: Oven Control Panel
Off - Press pad to turn off oven and/or warming drawer.
Oven Temperature - Shows the oven temperature.
Preheat Temperature - Displays temperature of oven dur-
ing preheat mode.
Probe Indicator (some models) - Indicates that the probe
is properly inserted into the probe receptacle in the oven.
Start - Press pad to complete an entry.
Temperature - Press pad to select cooking temperature.
Time - Press pad to set or change the time of day or the
timer.
Timer - There are two timers - TIMER 1 AND TIMER 2;
Each counts down the time in hours and minutes. With
less than 60 minutes remaining, the timer also displays
seconds. Press Time to access the timers.
Warming Drawer Indicator - Indicates that the warming
drawer (some models) is on. Also displays the warming
drawer setting.
You control the operation of the range by using the touch pads, dial and control
knobs.
The touchpads, in conjunction with the dial, are used to select an oven mode,
set the oven temperature, set the time(s) and to set up your range. To use the
touchpad, press the center part of the pad with the flat part of your fingertip. A
beep will sound to indicate that the selection has been made. Turn the dial to the
desired setting and press start.
The knobs are used to control the heat level of the burners. Push down and turn
to the _ symbol to light and then to the desired heat setting.
See the sections on Using the Cooktop, Using the Oven and Using the Warming
Drawer for detailed instructions.
English 13
 Loading...