


Einbaubackofen HBX33R51 |
Ankastre fırın HBX33R51 |
Built-in oven HBX33R51 |
Εντοιχιζόμενος φούρνος HBX33R51 |
Forno da incasso HBX33R51 |
Inbyggnadsugn HBX33R51 |
Horno empotrado HBX33R51 |
Innebygd stekeovn HBX33R51 |
Forno de encastrar HBX33R51 |
Kalusteisiin sijoitettava uuni |
Inbouwoven HBX33R51 |
HBX33R51 |
Four encastrable HBX33R51 |
Indbygningsovn HBX33R51 |
[de] |
Gebrauchsanleitung ................................... |
2 |
[en] |
Instruction manual ................................... |
13 |
[it] |
Istruzioni per l’uso ................................... |
23 |
[es] |
Instrucciones de uso ................................ |
33 |
[pt] |
Instruções de serviço ............................... |
44 |
[nl] |
Gebruiksaanwijzing .................................. |
54 |
[fr] |
Notice d’utilisation ................................... |
64 |
[tr] |
Kullanma kιlavuzu |
.................................... 75 |
[el] |
Οδηγíες χρήσεως ..................................... |
87 |
[sv] |
Bruksanvisning ........................................ |
98 |
[no] |
Bruksveiledning ..................................... |
107 |
[fi] |
Käyttöohje ............................................. |
117 |
[da] |
Brugsanvisning ...................................... |
127 |

Ø Inhaltsverzeichnis |
|
Wichtige Sicherheitshinweise .................................................. |
3 |
Ursachen für Schäden....................................................................... |
4 |
Ihr neues Gerät .......................................................................... |
5 |
Funktionswähler .................................................................................. |
5 |
Temperaturwähler ............................................................................... |
5 |
Die Elektronikuhr................................................................................. |
5 |
Zubehör ................................................................................................ |
6 |
Vor dem ersten Benutzen.......................................................... |
6 |
Uhrzeit einstellen................................................................................. |
6 |
Backofen ausheizen........................................................................... |
6 |
Zubehör reinigen................................................................................. |
6 |
So bedienen Sie Ihren Backofen .............................................. |
6 |
Heizart und Temperatur..................................................................... |
6 |
So bedienen Sie Ihre Elektronikuhr ......................................... |
7 |
Einstellungen ändern.......................................................................... |
7 |
Einstellungen löschen........................................................................ |
7 |
Signalton einstellen ............................................................................ |
7 |
Elektronikuhr einstellen...................................................................... |
7 |
Kurzzeitwecker einstellen .................................................................. |
7 |
Zeitschaltautomatik einstellen .......................................................... |
7 |
Pflege und Reinigung................................................................ |
8 |
Reinigungsmittel.................................................................................. |
8 |
Katalytische Garraumverkleidung.................................................... |
8 |
Deckenplatte herausnehmen............................................................ |
8 |
Gerätetür ausund einhängen.......................................................... |
9 |
Einhängegitter reinigen...................................................................... |
9 |
Eine Störung, was tun?............................................................. |
9 |
Backofenlampe auswechseln........................................................ |
10 |
Kundendienst........................................................................... |
10 |
E-Nummer und FD-Nummer .......................................................... |
10 |
Energieund Umwelttipps....................................................... |
10 |
Energiesparen .................................................................................. |
10 |
Umweltgerecht entsorgen .............................................................. |
10 |
Acrylamid in Lebensmitteln.................................................... |
11 |
Anwendungstipps.................................................................... |
11 |
Backen............................................................................................... |
11 |
Braten und Grillen............................................................................ |
12 |
Weitere Informationen zu Produkten, Zubehör, Ersatzteilen und Services finden Sie im Internet: www.bosch-home.com und Online-Shop: www.bosch-eshop.com
Für Produktinformationen sowie Anwendungsund Bedienungsfragen berät Sie unser Bosch-Infoteam unter
Tel.: 01805 304050 (Mo-Fr: 8.00-18.00 Uhr erreichbar,
0,14 EUR/Min aus dem Festnetz der T-Com, Mobil ggf. abweichend. Nur für Deutschland gültig.)
2

:Wichtige Sicherheitshinweise
Diese Anleitung sorgfältig lesen. Nur dann können Sie Ihr Gerät sicher und richtig bedienen. Die Gebrauchsund Montageanleitung für einen späteren Gebrauch oder für Nachbesitzer aufbewahren.
Dieses Gerät ist nur für den Einbau bestimmt. Spezielle Montageanleitung beachten.
Das Gerät nach dem Auspacken prüfen. Bei einem Transportschaden nicht anschließen.
Nur ein konzessionierter Fachmann darf Geräte ohne Stecker anschließen. Bei Schäden durch falschen Anschluss besteht kein Anspruch auf Garantie.
Dieses Gerät ist nur für den privaten Haushalt und das häusliche Umfeld bestimmt. Das Gerät nur zum Zubereiten von Speisen und Getränken benutzen. Das Gerät während des Betriebes beaufsichtigen. Das Gerät nur in geschlossenen Räumen verwenden.
Dieses Gerät kann von Kindern ab 8 Jahren und Personen mit reduzierten physischen, sensorischen oder mentalen Fähigkeiten oder Mangel an Erfahrung oder Wissen benutzt werden, wenn sie von einer Person, die für ihre Sicherheit verantwortlich ist, beaufsichtigt oder von ihr bezüglich des sicheren Gebrauchs des Gerätes unterwiesen wurden und sie die daraus resultierenden Gefahren verstanden haben.
Kinder dürfen nicht mit dem Gerät spielen. Reinigung und Benutzer-Wartung dürfen nicht durch Kinder durchgeführt werden, es sei denn, sie sind 8 Jahre und älter und werden beaufsichtigt.
Kinder jünger als 8 Jahre vom Gerät und der Anschlussleitung fernhalten.
Zubehör immer richtig herum in den Garraum schieben. Siehe Beschreibung Zubehör in der Gebrauchsanleitung.
Brandgefahr!
■Im Garraum gelagerte, brennbare Gegenstände können sich entzünden. Nie brennbare Gegenstände im Garraum aufbewahren. Nie die Gerätetür öffnen, wenn Rauch im Gerät auftritt. Das Gerät ausschalten und Netzstecker ziehen oder Sicherung im Sicherungskasten ausschalten.
■Beim Öffnen der Gerätetür entsteht ein Luftzug. Backpapier kann die Heizelemente berühren und sich entzünden. Nie Backpapier beim Vorheizen unbefestigt auf das Zubehör legen. Backpapier immer mit einem Geschirr oder einer Backform beschweren. Nur die benötigte Fläche mit Backpapier auslegen. Backpapier darf nicht über das Zubehör hinausstehen.
Verbrennungsgefahr!
■Das Gerät wird sehr heiß. Nie die heißen Garraum-Innenflächen oder Heizelemente berühren. Das Gerät immer abkühlen lassen. Kinder fernhalten.
■Zubehör oder Geschirr wird sehr heiß. Heißes Zubehör oder Geschirr immer mit Topflappen aus dem Garraum nehmen.
■Alkoholdämpfe können sich im heißen Garraum entzünden. Nie Speisen mit großen Mengen an hochprozentigen alkoholischen Getränken zubereiten. Nur kleine Mengen hochprozentiger Getränke verwenden. Gerätetür vorsichtig öffnen.
Verbrühungsgefahr!
■Die zugänglichen Teile werden im Betrieb heiß. Nie die heißen Teile berühren. Kinder fernhalten.
■Beim Öffnen der Gerätetür kann heißer Dampf entweichen. Gerätetür vorsichtig öffnen. Kinder fernhalten.
■Durch Wasser im heißen Garraum kann heißer Wasserdampf entstehen. Nie Wasser in den heißen Garraum gießen.
Verletzungsgefahr!
Zerkratztes Glas der Gerätetür kann springen. Keinen Glasschaber, scharfe oder scheuernde Reinigungsmittel benutzen.
Stromschlaggefahr!
■Unsachgemäße Reparaturen sind gefährlich. Nur ein von uns geschulter Kunden- dienst-Techniker darf Reparaturen durchführen. Ist das Gerät defekt, Netzstecker ziehen oder Sicherung im Sicherungskasten ausschalten. Kundendienst rufen.
■An heißen Geräteteilen kann die Kabelisolierung von Elektrogeräten schmelzen. Nie Anschlusskabel von Elektrogeräten mit heißen Geräteteilen in Kontakt bringen.
3
■Eindringende Feuchtigkeit kann einen Stromschlag verursachen. Keinen Hochdruckreiniger oder Dampfreiniger verwenden.
■Beim Auswechseln der Garraumlampe stehen die Kontakte der Lampenfassung unter Strom. Vor dem Auswechseln den Netzstecker ziehen oder Sicherung im Sicherungskasten ausschalten.
■Ein defektes Gerät kann einen Stromschlag verursachen. Nie ein defektes Gerät einschalten. Netzstecker ziehen oder Sicherung im Sicherungskasten ausschalten. Kundendienst rufen.
Brandgefahr!
■Lose Speisereste, Fett und Bratensaft können sich während der Selbstreinigung entzünden. Vor jeder Selbstreinigung grobe Verschmutzungen aus dem Garraum und vom Zubehör entfernen.
■Das Gerät wird während der Selbstreinigung außen sehr heiß. Nie brennbare Gegenstände, wie z. B. Geschirrtücher, an den Türgriff hängen. Vorderseite des Gerätes freihalten. Kinder fernhalten.
Verbrennungsgefahr!
■Der Garraum wird während der Selbstreinigung sehr heiß. Nie die Gerätetür öffnen oder den Verriegelungshaken mit der Hand verschieben. Das Gerät abkühlen lassen. Kinder fernhalten.
■; Das Gerät wird während der Selbstreinigung außen sehr heiß. Nie die Gerätetür berühren. Das Gerät abkühlen lassen. Kinder fernhalten.
Gefahr schwerer Gesundheitsschäden!
Das Gerät wird während der Selbstreinigung sehr heiß. Die Antihaftbeschichtung von Blechen und Formen wird zerstört und es entstehen giftige Gase. Nie antihaftbeschichtete Bleche und Formen bei der Selbstreinigung mitreinigen. Nur emailiertes Zubehör mitreinigen.
Ursachen für Schäden
Achtung!
■Zubehör, Folie, Backpapier oder Geschirr auf dem Garraumboden: Kein Zubehör auf den Garraumboden legen. Den Garraumboden nicht mit Folie, egal welcher Art, oder Backpapier auslegen. Kein Geschirr auf den Garraumboden stellen, wenn eine Temperatur über 50 °C eingestellt ist. Es entsteht ein Wärmestau. Die Backund Bratzeiten stimmen nicht mehr und das Email wird beschädigt.
■Wasser im heißen Garraum: Nie Wasser in den heißen Garraum gießen. Es entsteht Wasserdampf. Durch den Temperaturwechsel können Emailschäden entstehen.
■Feuchte Lebensmittel: Keine feuchten Lebensmittel längere Zeit im geschlossenen Garraum aufbewahren. Das Email wird beschädigt.
■Obstsaft: Das Backblech bei sehr saftigem Obstkuchen nicht zu üppig belegen. Obstsaft, der vom Backblech tropft hinterlässt Flecken, die nicht mehr entfernt werden können. Wenn möglich, die tiefere Universalpfanne verwenden.
■Auskühlen mit offener Gerätetür: Den Garraum nur geschlossen auskühlen lassen. Auch wenn die Gerätetür nur einen Spalt breit offen ist, können benachbarte Möbelfronten mit der Zeit beschädigt werden.
■Stark verschmutzte Türdichtung: Wenn die Türdichtung stark verschmutzt ist, schließt die Gerätetür bei Betrieb nicht mehr richtig. Die angrenzenden Möbelfronten können beschädigt werden. Türdichtung immer sauber halten.
■Gerätetür als Sitzoder Ablagefläche: Nicht auf die Gerätetür stellen, setzen oder daran hängen. Kein Geschirr oder Zubehör auf der Gerätetür abstellen.
■Zubehör einschieben: Je nach Gerätetyp kann Zubehör die Türscheibe beim Schließen der Gerätetür zerkratzen. Zubehör immer bis zum Anschlag in den Garraum schieben.
■Gerät transportieren: Gerät nicht am Türgriff tragen oder halten. Der Türgriff hält das Gewicht des Gerätes nicht aus und kann abbrechen.
4

Ihr neues Gerät
Hier lernen Sie Ihr neues Gerät kennen. Sie erhalten Informationen zur Bedienblende, zum Backofen, den Heizarten und zum
Zubehör. |
|
|
|
|
|
|
|
|
Erläuterung
1 |
Funktionswähler |
|
|
2 |
Temperaturwähler |
|
|
3 |
Anzeigelampe |
|
|
4 |
Anzeigefeld und Bedientasten |
|
|
Funktionswähler
Mit dem Funktionswähler stellen Sie die Heizart ein.
Stellung |
Verwendung |
|
|
Û Nullstellung |
Der Backofen ist ausgeschaltet. |
|
|
% Ober-/Unterhitze |
Für Kuchen, Aufläufe und magere |
|
Bratenstücke. Die Hitze kommt |
|
gleichmäßig von oben und unten. |
|
|
( Grill, große Fläche |
Grillen von Steaks, Würstchen, Toast |
|
und Fischstücken. Die ganze Fläche |
|
unter dem Grillheizkörper wird heiß. |
|
|
* Grill, kleine Fläche |
Grillen von kleinen Mengen Steaks, |
|
Würstchen, Toast und Fischstücken. |
|
Der mittlere Teil des Grillheizkör- |
|
pers wird heiß. |
|
|
7 Umluftgrillen |
Braten von Fleisch, Geflügel und |
|
ganzem Fisch. Der Grillheizkörper |
|
und der Ventilator schalten sich |
|
abwechselnd ein und aus. Der Venti- |
|
lator wirbelt die heiße Luft um das |
|
Gericht. |
|
|
; Pizzastufe |
Schnelle Zubereitung von Tiefkühl- |
|
produkten ohne Vorheizen, z. B. |
|
Pizza, Pommes frites oder Strudel. |
|
Der untere Heizkörper und der Ring- |
|
heizkörper in der Rückwand heizen. |
|
|
< Heißluft* |
Für Kuchen und Gebäck auf ein bis |
|
zwei Ebenen. Der Ventilator verteilt |
|
die Wärme des Ringheizkörpers in |
|
der Rückwand gleichmäßig im Gar- |
|
raum. |
NOber-/Unterhitze & Für Kuchen und Gebäck auf ein bis
Heißluft |
zwei Ebenen. Der Ventilator verteilt |
|
die Hitze der Heizelemente gleich- |
|
mäßig im Garraum. |
*Heizart, mit der die Energie-Effizienzklasse nach EN50304 bestimmt wurde.
Stellung |
Verwendung |
6Unterhitze & HeißFür saftig belegte Kuchen. Der Venti-
luft |
lator verteilt die Hitze des unteren |
|
Heizelementes gleichmäßig im Gar- |
|
raum. |
*Heizart, mit der die Energie-Effizienzklasse nach EN50304 bestimmt wurde.
Wenn Sie die Heizart einstellen, schaltet sich die Backofenlampe im Garraum ein.
Temperaturwähler
Mit dem Temperaturwähler stellen Sie die Temperatur oder Grillstufe ein.
Stellung |
|
Bedeutung |
|
|
|
Ú |
Nullstellung |
Der Backofen heizt nicht. |
|
|
|
50-250 Temperatur- |
Die Temperatur im Garraum in °C. |
|
|
bereich |
|
|
|
|
( |
Grillstufe |
Die Grillstufe für den Grill. |
|
|
|
Wenn der Backofen heizt, leuchtet die Anzeigelampe. In den Heizpausen erlischt sie.
Die Elektronikuhr
Mit der Elektronikuhr können Sie Ihren Backofen steuern. So können Sie z. B. den Zeitpunkt vorwählen, zu dem sich der Backofen einschalten bzw. die Zeitschaltautomatik den Backoder Garprozess beenden soll. Die Elektronikuhr kann auch als Kurzzeitwecker genutzt werden.
Funktionstasten
Durch Drücken der jeweiligen Funktionstaste wählen Sie die Funktion aus. Mit den Tasten + und - stellen Sie die Dauer oder Zeit ein. Die eingestellten Werte können Sie im Anzeigefeld ablesen.
Symbol |
Bedeutung |
Verwendung |
|
|
|
U |
Kurzzeitwecker |
Dauer einstellen |
|
|
|
r |
Betriebszeit-Ende |
Zeitpunkt für das automati- |
|
|
sches Ausschalten einstel- |
|
|
len |
|
|
|
q |
Betriebszeit-Dauer |
Dauer für automatisches |
|
|
Ausschalten einstellen |
|
|
|
- |
Minus |
Dauer bzw. Zeit vermin- |
|
|
dern |
|
|
|
+ |
Plus |
Dauer bzw. Zeit erhöhen |
|
|
|
5

Zubehör
Das Zubehör kann in 4 verschiedenen Höhen in den Garraum geschoben werden. Immer bis zum Anschlag einschieben, damit das Zubehör die Türscheibe nicht berührt. Achten Sie darauf, dass Sie das Zubehör immer richtig herum in den Garraum schieben.
|
|
|
|
Sie können das Zubehör zu zwei Drittel herausziehen, ohne dass es kippt. So lassen sich die Gerichte leicht entnehmen.
Wenn das Zubehör heiß wird, kann es sich verformen. Sobald es wieder abgekühlt ist, verschwindet die Verformung und hat keinen Einfluss auf die Funktion.
Zubehör können Sie beim Kundendienst, im Fachhandel oder im Internet nachkaufen.
Zubehör |
Beschreibung |
|
Backund Bratrost |
|
Für Geschirr, Kuchenformen, Bra- |
|
ten, Grillstücke, Tiefkühlgerichte. |
|
Emailliertes Backblech |
|
Für saftige Kuchen, Gebäck, Tief- |
|
kühlgerichte und große Braten. |
|
Unter dem Rost oder Drehspieß ein- |
|
geschoben auch als Fettauffang- |
|
Gefäß verwendbar. |
Vor dem ersten Benutzen
Hier erfahren Sie was Sie tun müssen, bevor Sie mit Ihrem Gerät zum ersten Mal Speisen zubereiten. Lesen Sie vorher das Kapitel Sicherheitshinweise.
Entfernen Sie die Verpackung des Gerätes und entsorgen Sie diese sachgemäß.
Uhrzeit einstellen
1.Drücken Sie die Funktionstaste r und q gleichzeitig.
2.Stellen Sie mit den Funktionstasten + und - die aktuelle Uhrzeit ein.
Nach einigen Sekunden wird die Uhrzeit übernommen.
Backofen ausheizen
Backofen vorreinigen
1.Entnehmen Sie das Zubehör und die Einhängegitter aus dem Garraum.
2.Entfernen Sie Verpackungsrückstände z.B. Styroporteilchen vollständig aus dem Garraum.
3.Einige Teile sind mit einer Kratzschutzfolie überzogen. Entfernen Sie diese Kratzschutzfolie.
4.Reinigen Sie das Gerät außen mit einem weichen, feuchten Tuch.
5.Reinigen Sie den Garraum mit heißer Spüllauge.
Backofen aufheizen
Um den Neugeruch zu beseitigen, heizen Sie den leeren, geschlossenen Backofen auf.
1.Drehen Sie den Funktionswähler auf die Betriebsart Ober-/ Unterhitze.
2.Drehen Sie den Temperaturwähler auf die maximale Temperatur.
3.Schalten Sie nach 40 Minuten den Backofen aus.
Backofen nachreinigen
1.Reinigen Sie den Garraum mit heißer Spüllauge.
2.Montieren Sie die Einhängegitter.
Zubehör reinigen
Bevor Sie das Zubehör benutzen, reinigen Sie es gründlich mit warmer Spüllauge und einem Spültuch.
So bedienen Sie Ihren Backofen
Sie haben die Möglichkeit, verschiedene Einstellungen Ihres Backofens vorzunehmen. Sie können den Backofen über die Elektronikuhr steuern.
Heizart und Temperatur
1.Mit dem Funktionswähler die Heizart einstellen.
2.Mit dem Temperaturwähler die Temperatur oder Grillstufe einstellen.
Der Backofen beginnt zu heizen.
Backofen ausschalten
Funktionswähler auf die Nullstellung drehen.
Einstellungen ändern
Sie können Heizart und Temperatur oder Grillstufe jederzeit mit dem jeweiligen Wähler ändern.
6

So bedienen Sie Ihre Elektronikuhr
Sie können die Elektronikuhr mit einer Hand bedienen. Nach dem Drücken der jeweiligen Funktionstaste die Zeit bzw. Dauer mit den Tasten + und - einstellen. Der eingestellte Wert wird übernommen.
Sie können Ihre Einstellungen auch während des Betriebs ändern oder löschen und den Vorgang so abbrechen.
Einstellungen ändern
1.Drücken Sie die jeweilige Funktionstaste. Das jeweilige Symbol leuchtet.
2.Verändern Sie mit den Tasten + und - Ihre Einstellungen.
Einstellungen löschen
1.Drücken Sie die jeweilige Funktionstaste. Das jeweilige Symbol leuchtet.
2.Drücken Sie die Taste - , bis 0 00 im Anzeigefeld erscheint.
3.Wenn die Zeitschaltautomatik in Betrieb war: Schalten Sie den Backofen aus.
Signalton einstellen
Sie können zwischen drei Tönen wählen, wenn gerade kein Programm läuft.
Drücken Sie die Taste - mehrmals, bis zum gewünschten Ton. Der Ton wird übernommen.
Elektronikuhr einstellen
Nach dem elektrischen Anschluss des Gerätes oder nach einem Stromausfall erscheinen in der Anzeige drei Nullen.
Uhrzeit einstellen
Sie können die Uhrzeit nur einstellen, wenn keine andere Funktion in Betrieb ist.
1.Drücken Sie die Funktionstaste r und q gleichzeitig.
2.Stellen Sie mit den Funktionstasten + und - die aktuelle Uhrzeit ein.
Kurzzeitwecker einstellen
Der Kurzzeitwecker ist ein rückwärts gehender Wecker, der nach Ablauf der eingestellten Dauer ein akustisches Signal gibt. Der Kurzzeitwecker hat keinen Einfluss auf die Funktionen des Backofens.
Dauer einstellen
1.Drücken Sie die Taste U.
2.Stellen Sie mit den Funktionstasten + und - die Dauer ein. Das Symbol U wird im Display angezeigt.
3.Um die restliche Dauer im Display anzuzeigen, drücken Sie die Taste U.
Nach Ablauf der Zeit ertönt ein akustisches Signal.
Zeitschaltautomatik einstellen
Über die Elektronikuhr können Sie den Backofen automatisch ausbzw. einund ausschalten.
Automatisches Ausschalten
Betriebszeit-Dauer einstellen
1.Drehen Sie den Funktionswähler auf die gewünschte Betriebsart.
2.Drehen Sie den Temperaturwähler auf die gewünschte Temperatur.
Der Backofen schaltet ein.
3.Drücken Sie die Funktionstaste r.
4.Stellen Sie mit den Tasten + und - die Betriebszeit-Dauer ein.
Der Backofen startet und im Anzeigefeld erscheint das Symbol A und die aktuelle Uhrzeit.
Betriebszeit-Dauer ist abgelaufen
Ein Signal ertönt und im Anzeigefeld erscheint das Symbol r mit der aktuellen Uhrzeit.
Der Backofen schaltet ab.
Drücken Sie zum vorzeitigen Beenden des Signals eine der Funktionstasten.
Automatisches Einund Ausschalten
Das Backen oder Braten beginnt für die eingestellte Dauer zu einem von Ihnen gewählten, späteren Zeitpunkt.
Betriebszeit-Dauer einstellen
1.Drehen Sie den Funktionswähler auf die gewünschte Betriebsart.
2.Drehen Sie den Temperaturwähler auf die gewünschte Temperatur.
Der Backofen schaltet ein.
3.Drücken Sie die Funktionstaste r.
4.Stellen Sie mit den Tasten + und - die Betriebszeit-Dauer ein.
Der Backofen startet und im Anzeigefeld erscheint das Symbol A und die aktuelle Uhrzeit.
Betriebszeit-Ende einstellen
1.Drücken Sie die Taste q.
Im Anzeigefeld wird die Summe der aktuellen Uhrzeit und der Betriebszeit-Dauer angezeigt.
2.Halten Sie die Taste q gedrückt und ändern Sie das Ende der Betriebszeit mit den Tasten + und -.
Der Backofen schaltet sich ab und startet später automatisch. Im Anzeigefeld erscheint das Symbol A und die aktuelle Uhrzeit.
Betriebszeit-Dauer ist abgelaufen
Ein Signal ertönt und im Anzeigefeld erscheint das Symbol r mit der aktuellen Uhrzeit.
Der Backofen schaltet ab.
Drücken Sie zum vorzeitigen Beenden des Signals eine der Funktionstasten.
7

Pflege und Reinigung
Bei sorgfältiger Pflege und Reinigung bleibt Ihr Backofen lange schön und funktionsfähig. Wie Sie Ihren Backofen richtig pflegen und reinigen erklären wir Ihnen hier.
Hinweise
■Kleine Farbunterschiede an der Backofenfront ergeben sich durch verschiedene Materialien, wie Glas, Kunststoff oder Metall.
■Schatten an der Türscheibe, die wie Schlieren wirken, sind Lichtreflexe der Backofenlampe.
■Email wird bei sehr hohen Temperaturen eingebrannt. Dadurch können geringe Farbunterschiede entstehen. Das ist normal und hat keinen Einfluss auf die Funktion. Kanten dünner Bleche lassen sich nicht voll emaillieren. Sie können deshalb rau sein. Der Korrosionsschutz wird dadurch nicht beeinträchtigt.
:Stromschlaggefahr!
Eindringende Feuchtigkeit kann einen Stromschlag verursachen. Keinen Hochdruckreiniger oder Dampfreiniger verwenden.
:Verbrennungsgefahr!
Das Gerät wird sehr heiß. Nie die heißen Garraum-Innenflächen oder Heizelemente berühren. Das Gerät immer abkühlen lassen. Kinder fernhalten.
Reinigungsmittel
Damit die unterschiedlichen Oberflächen nicht durch falsche Reinigungsmittel beschädigt werden, beachten Sie die folgenden Angaben.
Verwenden Sie
■keine scharfen oder scheuernden Reinigungsmittel
■keine stark alkoholhaltigen Reinigungsmittel
■keine harten Scheuerkissen oder Putzschwämme
■keine Hochdruckreiniger oder Dampfreiniger.
Waschen Sie neue Schwammtücher vor Gebrauch gründlich aus.
Bereich |
Reinigungsmittel |
|
|
Gerät außen |
Heiße Spüllauge: |
|
Mit einem Spültuch reinigen und einem |
|
weichen Tuch nachtrocknen. Keinen |
|
Glasreiniger oder Glasschaber verwen- |
|
den. |
|
|
Edelstahl |
Heiße Spüllauge: |
|
Mit einem Spültuch reinigen und einem |
|
weichen Tuch nachtrocknen. Kalk-, Fett-, |
|
Stärkeund Eiweißflecken sofort entfer- |
|
nen. Unter solchen Flecken kann sich |
|
Korrosion bilden. |
|
Beim Kundendienst oder im Fachhandel |
|
sind spezielle Edelstahl-Pflegemittel |
|
erhältlich, die sich für warme Oberflä- |
|
chen eignen. Das Pflegemittel mit einem |
|
weichen Tuch hauchdünn auftragen. |
|
|
Aluminium und |
Glasreiniger: |
Kunststoff |
Mit einem weichen Tuch reinigen. |
Bereich |
Reinigungsmittel |
|
|
Emailflächen (glatte |
Zur leichteren Reinigung können Sie die |
Oberfläche) |
Garraumbeleuchtung einschalten und |
|
ggf. die Gerätetür aushängen.Handelsüb- |
|
liche Spülmittel oder Essigwasser mit |
|
einem weichen, feuchten Lappen oder |
|
Fensterleder auftragen; mit einem wei- |
|
chen Tuch nachtrocknen.Weichen Sie |
|
eingebrannte Speiserückstände mit |
|
einem feuchten Tuch und Spülmittel |
|
auf.Bei starker Verschmutzung empfeh- |
|
len wir Backofenreiniger in Gelform. Die- |
|
ser kann gezielt aufgetragen werden.Den |
|
Garraum nach der Reinigung zum Trock- |
|
nen geöffnet lassen. |
|
|
Selbstreinigende |
Beachten Sie die Hinweise im Kapitel: |
Flächen (raue Ober- |
Selbstreinigende Flächen |
fläche) |
|
|
|
Türscheiben |
Glasreiniger: |
|
Mit einem weichen Tuch reinigen. Keinen |
|
Glasschaber verwenden. |
|
|
Glasabdeckung der |
Heiße Spüllauge: |
Backofenlampe |
Mit einem Spültuch reinigen. |
|
|
Dichtung |
Heiße Spüllauge: |
Nicht abnehmen! |
Mit einem Spültuch reinigen. Nicht |
|
scheuern. |
|
|
Gestelle |
Heiße Spüllauge: |
|
Einweichen und mit einem Spültuch oder |
|
einer Bürste reinigen. |
|
|
Zubehör |
Heiße Spüllauge: |
|
Einweichen und mit einem Spültuch oder |
|
einer Bürste reinigen. |
|
|
Katalytische Garraumverkleidung
Katalytische Garraumverkleidungen sind mit selbstreinigender Emaille beschichtet.
Während der Backofen in Betrieb ist, reinigen sich die Flächen selbst. Größere Spritzer verschwinden erst nach mehrmaligem Betrieb des Backofens.
Selbstreinigende Flächen
Die Seitenwände sind katalytisch verkleidet. Reinigen Sie diese Flächen nie mit Backofenreiniger. Eine leichte Verfärbung der Emaille hat auf die Selbstreinigung keinen Einfluss.
Deckenplatte herausnehmen
Zur besseren Reinigung können Sie die Deckenplatte herausnehmen.
8

Gerätetür ausund einhängen
Zur besseren Reinigung können Sie die Gerätetür aushängen.
Gerätetür aushängen
:Verletzungsgefahr!
Wenn die Scharniere ungesichert sind, schnappen sie mit großer Kraft zu. Achten Sie darauf, dass die Sperrhebel beim Aushängen der Backofentür ganz hochgeklappt sind.
1.Backofentür ganz öffnen.
2.Die beiden Sperrhebel links und rechts hochklappen. Achten Sie darauf, wenn die Sperrhebel hochgeklappt sind, dass Sie die Backofentür nicht schließen. Die Scharniere können verbogen werden und es können Emailschäden entstehen.
|
|
3.Backofentür schräg stellen. Mit beiden Händen links und rechts anfassen. Noch etwas weiter schließen und herauszie-
hen. |
Gerätetür einhängen |
1.Achten Sie beim Einhängen der Backofentür darauf, dass die Kerbe unten an den Scharnieren in den Schlitz einrastet.
2.Die beiden Sperrhebel links und rechts wieder nach unten legen und die Backofentür schließen.
:Verletzungsgefahr!
Wenn die Backofentür unabsichtlich herausfällt oder ein Scharnier zuschnappt, nicht ins Scharnier greifen. Rufen Sie den Kundendienst.
Einhängegitter reinigen
Die Einhängegitter können Sie zur besseren Reinigung aushängen.
Die Einhängegitter sind jeweils an drei Punkten an den Seitenwänden im Garraum befestigt.
Einhängegitter aushängen
1.Heben Sie den vorderen Haken A aus der Bohrung.
2.Ziehen Sie das Einhängegitter nach vorne aus den hinteren Bohrungen B.
Einhängegitter reinigen
Reinigen Sie die Einhängegitter mit Spülmittel und einem Schwamm oder einer Bürste.
Einhängegitter einhängen
1.Stecken Sie das Einhängegitter in die Bohrungen der Rückwand.
2.Hängen Sie den vorderen Haken in die Bohrung ein.
Eine Störung, was tun?
Tritt eine Störung auf, so liegt es oft nur an einer Kleinigkeit. Bevor Sie den Kundendienst rufen, achten Sie bitte auf folgende Hinweise.
Störung |
Mögliche Ursa- |
Hinweise/Abhilfe |
|
che |
|
|
|
|
Das Gerät funk- |
Sicherung |
Sehen Sie im Sicherungs- |
tioniert nicht. |
defekt. |
kasten nach, ob die Siche- |
|
|
rung für den Herd in |
|
|
Ordnung ist. |
|
|
|
|
Stromausfall. |
Prüfen Sie, ob die Küchen- |
|
|
lampe funktioniert. |
|
|
|
Das Abschal- |
Die Elektronik |
Sicherung ausschalten. |
ten des Back- |
ist defekt. |
Kundendienst rufen. |
ofens ist nicht |
|
|
möglich. |
|
|
Störung |
Mögliche Ursa- |
Hinweise/Abhilfe |
|
che |
|
|
|
|
Die Uhranzeige |
Stromausfall |
Uhrzeit neu einstellen. |
blinkt. |
|
|
|
|
|
Der Backofen |
Sicherung |
Sicherung überprüfen oder |
heizt nicht. |
defekt. |
erneuern. |
|
|
|
|
Funktionswäh- |
Funktionswähler einstellen. |
|
ler ist nicht ein- |
|
|
gestellt. |
|
|
|
|
Das Türglas ist |
|
Gerät ausschalten. Kunden- |
gebrochen. |
|
dienst rufen. |
|
|
|
Obstsaft oder |
Feuchte |
Harmlose Veränderung des |
Eiweißflecken |
Kuchenoder |
Emails, nicht behebbar. |
auf emaillierten |
Fleischsäfte. |
|
Flächen. |
|
|
|
|
|
9

:Stromschlaggefahr!
Unsachgemäße Reparaturen sind gefährlich. Nur ein von uns geschulter Kundendienst-Techniker darf Reparaturen durchführen.
Wenn Ihr Gerät unsachgemäß repariert wird, können für Sie erhebliche Gefahren entstehen.
Backofenlampe auswechseln
Wenn die Backofenlampe ausgefallen ist, muss sie ausgewechselt werden. Temperaturbeständige Ersatzlampen erhalten Sie beim Kundendienst oder im Fachhandel. Geben Sie bitte die E- Nummer und die FD-Nummer Ihres Gerätes an. Verwenden Sie keine anderen Lampen.
1.Schalten Sie die Sicherung aus oder entfernen ziehen sie den Netzstecker.
2.Öffnen Sie die Gerätetür.
3.Legen Sie ein Geschirrtuch in den kalten Garraum, um Schäden zu vermeiden.
4.Drehen Sie die Glasabdeckung der defekten Backofenlampe im Inneren des Garraums durch Linksdrehen heraus.
5.Ersetzen Sie die Backofenlampe durch den gleichen Lampentyp.
Spannung: 240 V; Leistung: 25 W; Gewinde: E14;
Temperaturbeständigkeit: 300 °C
6.Drehen Sie die Glasabdeckung der Backofenlampe wieder hinein.
7.Nehmen Sie das Geschirrtuch wieder heraus und schalten Sie die Sicherung wieder ein oder stecken den Netzstecker wierder ein.
Drücken Sie die Funktionstaste für die Backofenbeleuchtung, bis sie einrastet, um zu überprüfen, ob die Backofenbeleuchtung funktioniert.
Kundendienst
Wenn Ihr Gerät repariert werden muss, ist unser Kundendienst für Sie da. Wir finden immer eine passende Lösung, auch um unnötige Technikerbesuche zu vermeiden.
E-Nummer und FD-Nummer
Geben Sie beim Anruf bitte die Erzeugnisnummer (E-Nr.) und die Fertigungsnummer (FD-Nr.) an, damit wir Sie qualifiziert betreuen können. Das Typenschild mit den Nummern finden Sie rechts, seitlich an der Backofentür. Damit Sie bei Bedarf nicht lange suchen müssen, können Sie hier die Daten Ihres Gerätes und die Telefonnummer des Kundendienstes eintragen.
E-Nr. FD-Nr.
Kundendienst O
Beachten Sie, dass der Besuch des Servicetechnikers im Falle einer Fehlbedienung auch während der Garantiezeit nicht kostenlos ist.
Die Kontaktdaten aller Länder für den nächstgelegenen Kundendienst finden Sie hier bzw. im beiliegenden KundendienstVerzeichnis.
Reparaturauftrag und Beratung bei Störungen A 0810 240 260
D01801 22 33 55
(0,039 €/Min. aus dem Festnetz, Mobilfunk max. 0,42 €/Min.)
CH 0848 840 040
Vertrauen Sie auf die Kompetenz des Herstellers. Sie stellen somit sicher, dass die Reparatur von geschulten Servicetechnikern durchgeführt wird, die mit den Original-Ersatzteilen für Ihr Hausgerät ausgerüstet sind.
Energieund Umwelttipps
Hier erhalten Sie Tipps, wie Sie beim Backen und Braten Energie sparen können und wie Sie Ihr Gerät richtig entsorgen.
Energiesparen
■Heizen Sie den Backofen nur vor, wenn es im Rezept angegeben ist.
■Verwenden Sie dunkle, schwarz lackierte oder emaillierte Backformen. Sie nehmen die Hitze besonders gut auf.
■Öffnen Sie die Backofentür während Sie Garen, Backen oder Braten möglichst selten.
■Mehrere Kuchen backen Sie am besten nacheinander. Der Backofen ist noch warm. Dadurch verkürzt sich die Backzeit
für den zweiten Kuchen. Sie können auch 2 Kastenformen nebeneinander einschieben.
■Bei längeren Garzeiten können Sie den Backofen 10 Minuten vor Ende der Garzeit ausschalten und die Restwärme zum Fertiggaren nutzen.
Umweltgerecht entsorgen
Entsorgen Sie die Verpackung umweltgerecht.
Dieses Gerät entspricht der europäischen Richtlinie 2002/96/EG über Elektround Elektronik-Altgeräte (WEEE – waste electrical and electronic equipment). Die Richtlinie gibt den Rahmen für eine EU-weit gültige Rücknahme und Verwertung der Altgeräte vor.
10
Acrylamid in Lebensmitteln
Acrylamid entsteht vor allem bei hocherhitzt zubereiteten Getreideund Kartoffelprodukten wie z. B. Kartoffelchips, Pom-
mes frites, Toast, Brötchen, Brot oder feinen Backwaren (Kekse, Lebkuchen, Spekulatius).
Tipps zur acrylamidarmen Zubereitung von Speisen
Allgemein |
■ Garzeiten möglichst kurz halten. |
|
■ Speisen goldgelb, nicht zu dunkel bräunen. |
|
■ Großes, dickes Gargut enthält weniger Acrylamid. |
|
|
Backen |
Mit Ober-/Unterhitze max. 200 °C. |
|
Mit 3D-Heißluft oder Heißluft max. 180 °C. |
|
|
Plätzchen |
Mit Ober-/Unterhitze max. 190 °C. |
|
Mit 3D-Heißluft oder Heißluft max. 170 °C. |
|
Ei oder Eigelb verringert die Bildung von Acrylamid. |
|
|
Backofen Pommes frites |
Gleichmäßig und einlagig auf dem Blech verteilen. Mindestens 400 g pro Blech backen, |
|
damit die Pommes nicht austrocknen |
|
|
Anwendungstipps
Hier finden Sie eine Auswahl von Tipps zum Geschirr und zur |
Backen |
||
Zubereitung. |
|
Backformen |
|
Hinweise |
|
||
|
■ Verwenden Sie vor allem helle Backformen und -bleche. |
||
■ Verwenden Sie das mitgelieferte Zubehör. Zusätzliches Zube- |
|||
|
|||
hör erhalten Sie als Sonderzubehör im Fachhandel oder beim |
■ Stellen Sie Backformen immer in die Mitte des Backund |
||
Kundendienst. |
|
Bratrostes. |
|
Nehmen Sie vor dem Benutzen Zubehör und Geschirr das |
|
||
Sie nicht benötigen aus dem Garraum. |
|
|
|
■ Benutzen Sie immer einen Topflappen, wenn Sie heißes |
|
||
Zubehör oder Geschirr aus dem Garraum nehmen. |
|
||
Tipps zum Backen |
|
|
|
|
|
||
So stellen Sie fest, ob der Rührkuchen |
Stechen Sie etwa 10 Minuten vor Ende der im Rezept angegebenen Backzeit mit einem |
||
durchgebacken ist. |
Holzstäbchen an der höchsten Stelle in den Kuchen. Wenn kein Teig mehr am Holz |
||
|
klebt, ist der Kuchen fertig. |
||
|
|
||
Der Kuchen fällt zusammen. |
Verwenden Sie beim nächsten Mal weniger Flüssigkeit oder stellen Sie die Backofentem- |
||
|
peratur um 10 Grad niedriger ein. Beachten Sie die angegebenen Rührzeiten im Rezept. |
||
Der Kuchen ist in der Mitte hoch aufgeFetten Sie den Rand der Springform nicht ein. Nach dem Backen lösen Sie den Kuchen
gangen und am Rand niedriger. |
vorsichtig mit einem Messer. |
|
|
Der Kuchen wird oben zu dunkel. |
Schieben Sie ihn tiefer ein, wählen Sie eine niedrigere Temperatur und backen Sie den |
|
Kuchen etwas länger. |
|
|
Der Kuchen ist zu trocken. |
Stechen Sie mit dem Zahnstocher kleine Löcher in den fertigen Kuchen. Dann träufeln |
|
Sie Obstsaft oder Alkoholisches darüber. Wählen Sie beim nächsten Mal die Temperatur |
|
um 10 Grad höher und verkürzen Sie die Backzeiten. |
Das Brot oder der Kuchen (z.B. KäsekuVerwenden Sie beim nächsten Mal etwas weniger Flüssigkeit und backen Sie mit niedrichen) sieht gut aus, ist aber innen klitgerer Temperatur etwas länger. Bei Kuchen mit saftigem Belag, backen Sie erst den
schig (spintig, mit Wasserstreifen |
Boden vor. Bestreuen Sie ihn mit Mandeln oder Semmelbrösel und geben dann den |
durchzogen) |
Belag darauf. Beachten Sie bitte Rezepte und Backzeiten. |
|
|
Das Gebäck ist ungleichmäßig |
Wählen Sie die Temperatur etwas niedriger, dann wird das Gebäck gleichmäßiger. Über- |
gebräunt. |
stehendes Backpapier kann die Luftzirkulation beeinflussen. Schneiden Sie Backpapier |
|
immer passend zum Blech zu. |
|
|
Der Obstkuchen ist unten zu hell. |
Schieben Sie den Kuchen beim nächsten Mal eine Ebene tiefer ein. |
|
|
Der Obstsaft läuft über. |
Verwenden Sie beim nächsten Mal, wenn vorhanden, die tiefere Universalpfanne. |
|
|
Kleingebäck aus Hefeteig klebt beim |
Um jedes Gebäckstück sollte ein Abstand von ca. 2 cm sein. So ist genügend Platz, |
Backen aneinander. |
dass die Gebäckstücke aufgehen und rundherum bräunen können. |
Beim Backen von saftigen Kuchen tritt Kondenswasser auf.
Beim Backen kann Wasserdampf entstehen. Er entweicht über der Tür. Der Wasserdampf kann sich am Bedienfeld oder an benachbarten Möbelfronten niederschlagen und als Kondenswasser abtropfen. Dies ist physikalisch bedingt.
11

Braten und Grillen |
Tipps zum Grillen |
|
Geschirr |
■ Nehmen Sie möglichst gleich dicke Grillstücke. Sie sollten |
|
Sie können jedes hitzebeständige Geschirr verwenden. Stellen |
mindestens 2 bis 3 cm dick sein. So bräunen sie gleichmäßig |
|
und bleiben schön saftig. |
||
Sie das Geschirr immer in die Mitte des Rostes. Für große Bra- |
||
|
||
ten eignet sich auch das emaillierte Backblech. |
■ Legen Sie das Grillgut auf die Mitte des Rostes. Geben Sie |
|
Tipps zum Braten |
etwas Wasser auf das emaillierte Backblech und schieben |
|
Sie es zusätzlich zum Fettauffangen in die darunterliegende |
||
■ Eine niedrigere Temperatur ergibt eine gleichmäßigere Bräu- |
Einschubhöhe ein. Stellen Sie es nie auf den Garraumboden. |
|
■ Benetzen Sie das Grillgut etwas mit Öl, bevor Sie es auf dem |
||
nung. |
||
■ Geben Sie zu magerem Fleisch 2 bis 3 Esslöffel Flüssigkeit, |
Rost unter den Grill legen. |
|
■ Wenden Sie dünneres Grillgut nach der Hälfte der Grilldauer |
||
zu Schmorbraten 8 bis 10 Esslöffel, je nach Größe. |
||
■ Bei Ente ode Gans stechen Sie die Haut unter den Flügeln |
und dickeres Grillgut mehrmals während der Grilldauer. Ver- |
|
wenden Sie dabei eine Grillzange, so wird das Grillgut nicht |
||
ein, dann kann das Fett ablaufen. |
||
durchbohrt und der Fleischsaft bleibt z.B. im Braten. |
||
■ Geflügel wird besonders knusprig braun, wenn Sie es gegen |
||
■ Dunkle Fleischsorten wie Lammund Rindfleisch werden |
||
Ende der Bratzeit mit Butter, Salzwasser oder Orangensaft |
||
schneller und besser braun als helleres Schweineund Kalb- |
||
bestreichen. |
||
fleisch. |
||
■ Wenden Sie Fleischstücke nach der Hälfte der Zeit. |
||
Tipps zum Drehspieß |
||
■ Wenn der Braten fertig ist, sollte er noch 10 Minuten im abge- |
||
|
||
schalteten, geschlossenen Backofen ruhen. So verteilt sich |
■ Stecken Sie den Braten möglichst mittig auf den Drehspieß |
|
der Bratensaft besser. |
und befestigen Sie ihn an beiden Enden mit den Halteklam- |
|
■ Beim Braten von größeren Fleischstücken kann es zu ver- |
mern. |
|
stärkter Dampfbildung und Niederschlag an der Backofentür |
■ Zusätzlich können Sie den Braten mit Küchengarn festbin- |
|
kommen. Das ist eine normale Erscheinung, die keinen Ein- |
den. Bei Geflügel binden Sie die Flügelenden unter dem |
|
fluss auf die Funktionstüchtigkeit hat. Trocknen Sie nach dem |
Rücken und die Keulen am Rumpf fest. So werden sie nicht |
|
Bratvorgang mit einem Tuch die Backofentür und das Sicht- |
zu dunkel. |
|
fenster ab. |
Stechen Sie die Haut unter den Flügeln ein, dann kann das |
|
|
||
■ Wenn Sie auf dem Rost braten, schieben Sie zum Fettauffan- |
Fett ablaufen. |
|
gen zusätzlich das emaillierte Backblech in Einschubhöhe 1 |
|
|
ein. |
|
|
Tipps zum Braten |
|
Wie können Sie feststellen, ob der BraBenutzen Sie ein Fleischthermometer (im Fachhandel erhältlich) oder machen Sie die
ten fertig ist. |
“Löffelprobe”. Drücken Sie mit dem Löffel auf den braten. Fühlt er sich fest an, ist er fer- |
|
tig. Wenn er nachgibt, braucht er noch etwas Zeit. |
Der Braten ist zu dunkel und die Kruste Überprüfen Sie die Einschubhöhe und die Temperatur. stellenweise verbrannt.
Der Braten sieht gut aus, aber die Soße Wählen Sie beim nächsten Mal ein kleineres Bratgeschirr und geben Sie mehr Flüssig-
ist angebrannt. |
keit zu. |
Der Braten sieht gut aus, aber die Soße Wählen Sie beim nächsten Mal ein größeres Bratgeschirr und verwenden Sie weniger
ist zu hell und wässrig. |
Flüssigkeit. |
|
|
12

Ú Table of contents |
|
Important safety information................................................... |
13 |
Causes of damage .......................................................................... |
15 |
Your new appliance.................................................................. |
15 |
Function selector.............................................................................. |
15 |
Temperature selector ...................................................................... |
16 |
The electronic clock ........................................................................ |
16 |
Accessories ...................................................................................... |
16 |
Before using the oven for the first time ................................. |
16 |
Setting the clock .............................................................................. |
16 |
Baking out the oven ........................................................................ |
16 |
Cleaning the accessories............................................................... |
17 |
How to operate your oven........................................................ |
17 |
Type of heating and temperature ................................................. |
17 |
How to operate your electronic clock..................................... |
17 |
Changing the settings ..................................................................... |
17 |
Cancelling settings .......................................................................... |
17 |
Setting the acoustic signal............................................................. |
17 |
Setting the electronic clock ........................................................... |
17 |
Setting the timer............................................................................... |
17 |
Setting the automatic timer ............................................................ |
17 |
Care and cleaning .................................................................... |
18 |
Cleaning agents............................................................................... |
18 |
Catalytic cooking compartment panels....................................... |
19 |
Removing the ceiling panel ........................................................... |
19 |
Removing and fitting the appliance door.................................... |
19 |
Cleaning the hook-in racks............................................................ |
19 |
Troubleshooting ....................................................................... |
20 |
Replacing the oven light bulb ....................................................... |
20 |
After-sales service ................................................................... |
20 |
E number and FD number ............................................................. |
20 |
Energy and environment tips.................................................. |
21 |
Saving energy................................................................................... |
21 |
Environmentally-friendly disposal.................................................. |
21 |
Acrylamide in foodstuffs ......................................................... |
21 |
Tips for using your appliance ................................................. |
21 |
Baking................................................................................................ |
21 |
Roasting and grilling ....................................................................... |
22 |
Additional information on products, accessories, replacement parts and services can be found at www.bosch-home.com and in the online shop www.bosch-eshop.com
:Important safety information
Read these instructions carefully. Only then will you be able to operate your appliance safely and correctly. Retain the instruction manual and installation instructions for future use or for subsequent owners.
This appliance is only intended to be fully fitted in a kitchen. Observe the special installation instructions.
Check the appliance for damage after unpacking it. Do not connect the appliance if it has been damaged in transport.
Only a licensed professional may connect appliances without plugs. Damage caused by incorrect connection is not covered under warranty.
This appliance is intended for domestic use only. The appliance must only be used for the preparation of food and drink. The appliance must be supervised during operation. Only use this appliance indoors.
This appliance may be used by children over the age of 8 years old and by persons with reduced physical, sensory or mental capacity or by persons with a lack of experience or knowledge if they are supervised or are instructed by a person responsible for their safety how to use the
appliance safely and have understood the associated hazards.
Children must not play with the appliance. Children must not clean the appliance or carry out general maintenance unless they are at least 8 years old and are being supervised.
Keep children below the age of 8 years old at a safe distance from the appliance and power cable.
Always slide accessories into the cooking compartment correctly. See "Description of accessories in the instruction manual.
Risk of fire!
■Combustible items stored in the cooking compartment may catch fire. Never store combustible items in the cooking compartment. Never open the appliance door if there is smoke inside. Switch off the appliance and unplug it from the mains or switch off the circuit breaker in the fuse box.
■A draught is created when the appliance door is opened. Greaseproof paper may come into contact with the heating element and catch fire. Do not place
13
greaseproof paper loosely over accessories during preheating. Always weight down the greaseproof paper with a dish or a baking tin. Only cover the surface required with greaseproof paper. Greaseproof paper must not protrude over the accessories.
Risk of burns!
■The appliance becomes very hot. Never touch the interior surfaces of the cooking compartment or the heating elements. Always allow the appliance to cool down. Keep children at a safe distance.
■Accessories and ovenware become very hot. Always use oven gloves to remove accessories or ovenware from the cooking compartment.
■Alcoholic vapours may catch fire in the hot cooking compartment. Never prepare food containing large quantities of drinks with a high alcohol content. Only use small quantities of drinks with a high alcohol content. Open the appliance door with care.
Risk of scalding!
■The accessible parts become hot during operation. Never touch the hot parts. Keep children at a safe distance.
■When you open the appliance door, hot steam may escape. Open the appliance door with care. Keep children at a safe distance.
■Water in a hot cooking compartment may create hot steam. Never pour water into the hot cooking compartment.
Risk of injury!
Scratched glass in the appliance door may develop into a crack. Do not use a glass scraper, or sharp or abrasive cleaning aids or detergents.
Risk of electric shock!
■Incorrect repairs are dangerous. Repairs may only be carried out by one of our trained after-sales engineers. If the appliance is faulty, unplug the mains plug or switch off the fuse in the fuse box. Contact the after-sales service.
■The cable insulation on electrical appliances may melt when touching hot parts of the appliance. Never bring
electrical appliance cables into contact with hot parts of the appliance.
■Penetrating moisture may cause an electric shock. Do not use any highpressure cleaners or steam cleaners.
■When replacing the cooking compartment bulb, the bulb socket contacts are live. Before replacing the bulb, unplug the appliance from the mains or switch off the circuit breaker in the fuse box.
■A defective appliance may cause electric shock. Never switch on a defective appliance. Unplug the appliance from the mains or switch off the circuit breaker in the fuse box. Contact the after-sales service.
Risk of fire!
■Loose food residues, grease and meat juices may catch fire during the Selfcleaning cycle. Remove coarse dirt from the cooking compartment and from the accessories before every Self-cleaning cycle.
■The appliance will become very hot on the outside during the Self-cleaning cycle. Never hang combustible objects, e.g. tea towels, on the door handle. Do not place anything against the front of the oven. Keep children at a safe distance.
Risk of burns!
■The cooking compartment will become very hot during the Self-cleaning cycle. Never open the appliance door or move the locking latch by hand. Allow the appliance to cool down. Keep children at a safe distance.
■; The appliance will become very hot on the outside during the Self-cleaning cycle. Never touch the appliance door. Allow the appliance to cool down. Keep children at a safe distance.
Risk of serious damage to health!
The appliance will become very hot during the Self-cleaning cycle. The non-stick coating on baking trays and tins is destroyed and noxious gases are released. Never let non-stick baking trays and tins go through the Self-cleaning cycle. Only enamelled accessories may be cleaned at the same time.
14

Causes of damage
Caution!
■Accessories, foil, greaseproof paper or ovenware on the cooking compartment floor: do not place accessories on the cooking compartment floor. Do not cover the cooking compartment floor with any sort of foil or greaseproof paper. Do not place ovenware on the cooking compartment floor if a temperature of over 50 ºC has been set. This will cause heat to accumulate. The baking and roasting times will no longer be correct and the enamel will be damaged.
■Water in a hot cooking compartment: do not pour water into the cooking compartment when it is hot. This will cause steam. The temperature change can cause damage to the enamel.
■Moist food: do not store moist food in the cooking compartment when it is closed for prolonged periods This will damage the enamel.
■Fruit juice: when baking particularly juicy fruit pies, do not pack the baking tray too generously. Fruit juice dripping from
the baking tray leaves stains that cannot be removed. If possible, use the deeper universal pan.
■Cooling with the appliance door open: only allow the cooking compartment to cool when it is closed. Even if the appliance door is only open a little, front panels of adjacent units could be damaged over time.
■Very dirty door seal: If the door seal is very dirty, the appliance door will no longer close properly when the appliance is in use. The fronts of adjacent units could be damaged.Always keep the door seal clean.
■Appliance door as a seat, shelf or worktop: Do not sit on the appliance door, or place or hang anything on it. Do not place any cookware or accessories on the appliance door.
■Inserting accessories: depending on the appliance model, accessories can scratch the door panel when closing the appliance door. Always insert the accessories into the cooking compartment as far as they will go.
■Carrying the appliance: do not carry or hold the appliance by the door handle. The door handle cannot support the weight of the appliance and could break.
Your new appliance
Get to know your appliance. You will find information on the control panel, the oven, types of heating and accessories.
|
|
|
|
|
|
Explanation |
|
|
1Function selector
2Temperature selector
3Indicator light
4Display panel and control buttons
Function selector
Use the function selector to set the type of heating.
Setting |
Use |
|
|
Û Off position |
The oven is switched off. |
|
|
% Top/bottom heat |
For cakes, bakes and lean joints. |
|
Heat is emitted evenly from the top |
|
and bottom. |
|
|
( Grill, large area |
For grilling steaks, sausages, bread |
|
and pieces of fish. The whole area |
|
below the grill element becomes hot. |
* Type of heating used to determine the energy efficiency class in accordance with EN50304.
Setting |
Use |
|
|
* Grill, small area |
For grilling small amounts of steaks, |
|
sausages, bread and pieces of fish. |
|
The centre part of the grill element |
|
becomes hot. |
|
|
7 Hot air grilling |
For roasting meat, poultry and whole |
|
fish. The grill element and the fan |
|
switch on and off alternately. The fan |
|
causes the hot air to circulate |
|
around the dish. |
|
|
; Pizza setting |
For the quick preparation of frozen |
|
products without preheating, |
|
e.g. pizza, chips or strudel. The bot- |
|
tom heating element and the ring |
|
heating element in the back panel |
|
heat up. |
|
|
< Hot air* |
For cakes and pastries on one or |
|
two levels. The fan distributes the |
|
heat from the heating ring in the |
|
back panel evenly around the cook- |
|
ing compartment. |
NTop/bottom heating For cakes and pastries on one or
and Hot air |
two levels. The fan distributes heat |
|
from the heating elements evenly in |
|
the cooking compartment. |
6Bottom heating and For cakes with moist topping. The
Hot air |
fan distributes heat from the bottom |
|
heating element evenly in the cook- |
|
ing compartment. |
* Type of heating used to determine the energy efficiency class in accordance with EN50304.
When you set the type of heating, the oven light in the cooking compartment switches on.
15

Temperature selector
The temperature selector is used to set the temperature or grill setting.
Setting |
|
Meaning |
|
|
|
Ú |
Off position |
The oven does not heat up. |
|
|
|
50-250 |
Temperature |
The temperature in the cooking |
|
range |
compartment in °C. |
|
|
|
( |
Grill setting |
The grill setting for the grill. |
|
|
|
The indicator light is lit when the oven is heating up. It goes out during heating pauses.
The electronic clock
You can use the electronic clock to control your oven. You can therefore preselect, for example, the time at which the oven is to switch on or at which time the automatic timer is to end the baking or cooking process. The electronic clock can also be used as a timer.
Function buttons
Select the desired function by pressing the appropriate button. Use the + and - buttons to set the cooking time and or clock time. You can read the values that you have set in the display panel.
Symbol |
Meaning |
Use |
|
|
|
U |
Timer |
Setting the duration |
|
|
|
r |
End of operating |
Setting the time for auto- |
|
time |
matic switch-off |
|
|
|
q |
Operating time |
Setting the time until auto- |
|
duration |
matic switch-off |
Symbol |
Meaning |
Use |
|
|
|
- |
Minus |
Reducing the duration or |
|
|
time |
|
|
|
+ |
Plus |
Increasing the duration or |
|
|
time |
|
|
|
Accessories
The accessories can be inserted into the cooking compartment at 4 different levels. Always insert them as far as they will go so that the accessories do not touch the door panel. Ensure that the accessories have always been inserted into the cooking compartment correctly.
|
|
|
|
You can pull out the accessories two thirds of the way without them tipping. This allows dishes to be removed easily.
The accessories may become deformed when they become hot. As soon as they have cooled down, the deformation disappears with no effect on the function.
You can buy accessories from the after-sales service, from specialist retailers or online.
Accessories Description
Baking and roasting shelf
For ovenware, cake tins, joints, grilled items, frozen meals.
Enamelled baking tray
For moist cakes, pastries, frozen meals and large roasts. Can also be inserted underneath the wire rack or rotary spit and used as a drip tray to collect fat.
Before using the oven for the first time
In this section, you can find out what you must do before using your appliance to prepare food for the first time. Read the Safety information section beforehand.
Remove the appliance packaging and dispose of it appropriately.
Setting the clock
1.Press the r and q function buttons simultaneously.
2.Use the + and - function buttons to set the current time. After a few seconds, the time is saved.
Baking out the oven
Precleaning the oven
1.Remove the accessories and the hook-in racks from the cooking compartment.
2.Completely remove any leftover packaging, e.g. small pieces of polystyrene, from the cooking compartment.
3.Some parts are covered with a protective film. Remove this scratch protection film.
4.Clean the outside of the appliance with a soft, damp cloth.
5.Clean the cooking compartment with hot soapy water.
16

Heating up the oven
To remove the new cooker smell, heat up the oven when it is empty and closed.
1.Turn the function selector to the Top/bottom heating operating mode.
2.Turn the temperature selector to the maximum temperature.
3.Switch the oven off after 40 minutes.
Recleaning the oven
1.Clean the cooking compartment with hot soapy water.
2.Refit the hook-in racks.
Cleaning the accessories
Before using the accessories, clean them thoroughly using a cloth and warm soapy water.
How to operate your oven
You have the option of adjusting your oven to a range of different settings. You can control the oven using the electronic clock.
Type of heating and temperature
1.Use the function selector to set the type of heating.
2.Use the temperature selector to set the temperature or grill setting.
The oven begins to heat up.
Switching off the oven
Turn the function selector to the off position.
Changing the settings
The type of heating and temperature or grill setting can be changed at any time using their respective selectors.
How to operate your electronic clock
You can operate the electronic clock with one hand. After pressing the appropriate function button, set the time or cooking time with the + and - buttons. The value which is set is adopted.
You can also change or cancel your settings during operation and thereby cancel the process.
Changing the settings
1.Press the appropriate function button. The corresponding symbol lights up
2.Change your settings with the + and - buttons.
Cancelling settings
1.Press the appropriate function button. The corresponding symbol lights up
2.Press the - button until 0 00 is shown in the display panel.
3.If the automatic timer was in operation, switch off the oven.
Setting the acoustic signal
You can choose between three sounds provided no programme is running.
Press the - button several times until the desired sound is reached.
The sound is adopted.
Setting the electronic clock
After the appliance has first been connected to the mains or after a power cut, three zeros are shown in the display.
Setting the clock
You can only set the clock when no other function is in operation.
1.Press the r and q function buttons simultaneously.
2.Use the + and - function buttons to set the current time.
Setting the timer
The timer is a reverse counting timer which produces an audible signal once the duration set has elapsed. The timer has no influence on the functions of the oven.
Setting the duration
1.Press the U button.
2.Use the + and - function buttons to set the duration. The U symbol is shown in the display.
3.To show the remaining duration in the display, press the U button.
An audible signal sounds once the time has elapsed.
Setting the automatic timer
The electronic clock can be used to switch the oven on or off automatically.
Automatic switch-off
Setting the operating time duration
1.Turn the function selector to the desired operating mode.
2.Turn the temperature selector to the desired temperature. The oven switches on.
3.Press the r function button.
4.Use the + and - buttons to set the operating time duration.
The oven starts and the A symbol and the current clock time appear in the display panel.
The operating time duration has elapsed
A signal sounds and the r symbol is shown with the current clock time in the display panel.
The oven switches off.
To end the signal early, press one of the function buttons.
Automatic switch-on and switch-off
Baking or roasting starts for the set duration at a later time which you chose.
17

Setting the operating time duration
1.Turn the function selector to the desired operating mode.
2.Turn the temperature selector to the desired temperature. The oven switches on.
3.Press the r function button.
4.Use the + and - buttons to set the operating time duration.
The oven starts and the A symbol and the current clock time appear in the display panel.
Setting the end of operating time
1.Press the q button.
The total of the current clock time and the operating time duration is shown in the display panel.
2.Press and hold the q button and use the + and - buttons to change the end of the operating time.
The oven switches off and starts later automatically. The A symbol and the current clock time appear in the display panel.
The operating time duration has elapsed
A signal sounds and the r symbol is shown with the current clock time in the display panel.
The oven switches off.
To end the signal early, press one of the function buttons.
Care and cleaning
With good care and cleaning, your oven will remain clean and fully-functioning for a long time to come. Here we will explain how to maintain and clean your oven correctly.
Notes
■Slight differences in the colours on the front of the oven are caused by the use of different materials, such as glass, plastic and metal.
■Shadows on the door panel which look like streaks, are caused by reflections made by the oven light.
■Enamel is baked on at very high temperatures. This can cause some slight colour variations. This is normal and does not affect their function. The edges of thin trays cannot be completely enamelled. As a result, these edges can be rough. This will not impair the anti-corrosion protection.
:Risk of electric shock!
Penetrating moisture may cause an electric shock. Do not use any high-pressure cleaners or steam cleaners.
:Risk of burns!
The appliance becomes very hot. Never touch the interior surfaces of the cooking compartment or the heating elements. Always allow the appliance to cool down. Keep children at a safe distance.
Cleaning agents
Damage to the various different surfaces caused by using the wrong cleaning agent can be avoided by observing the following instructions.
Do not use
■harsh or abrasive cleaning agents
■cleaning agents with high concentrations of alcohol
■hard scouring pads and sponges
■high-pressure cleaners or steam cleaners.
Wash new sponge cloths thoroughly before use.
Area |
Cleaning agents |
|
|
Appliance exterior |
Hot soapy water: |
|
Clean with a dish cloth and dry with a |
|
soft cloth. Do not use glass cleaners or |
|
glass scrapers. |
Area |
Cleaning agents |
|
|
Stainless steel |
Hot soapy water: |
|
Clean with a dish cloth and dry with a |
|
soft cloth. Remove flecks of limescale, |
|
grease, starch and albumin (e.g. egg |
|
white) immediately. Corrosion can form |
|
under such residues. |
|
Special stainless steel cleaning prod- |
|
ucts suitable for hot surfaces are availa- |
|
ble from our after-sales service or from |
|
specialist retailers. Apply a very thin layer |
|
of the cleaning product with a soft cloth. |
|
|
Aluminium and |
Glass cleaner: |
plastic |
Clean with a soft cloth. |
|
|
Enamel surfaces |
To facilitate cleaning, you can switch on |
(smooth surfaces) |
the interior lighting and detach the appli- |
|
ance door if necessary. Apply commer- |
|
cially available washing-up liquid or a |
|
vinegar solution with a soft, damp cloth |
|
or chamois; dry with a soft cloth. Loosen |
|
baked-on food residues with a damp |
|
cloth and detergent. We recommend |
|
using oven cleaning gel if the oven is |
|
very dirty. This can be applied to the |
|
affected area. Leave the cooking com- |
|
partment open after cleaning to allow it |
|
to dry. |
|
|
Self-cleaning sur- |
Please see the notes in section: Self- |
faces (rough sur- |
cleaning surfaces |
faces) |
|
|
|
Door panels |
Glass cleaner: |
|
Clean with a soft cloth. Do not use a |
|
glass scraper. |
|
|
Glass cover for the |
Hot soapy water: |
oven light bulb |
Clean with a dish cloth. |
|
|
Seal |
Hot soapy water: |
Do not remove. |
Clean with a dish cloth. Do not scour. |
|
|
Shelves |
Hot soapy water: |
|
Soak and clean with a dish cloth or |
|
brush. |
|
|
Accessories |
Hot soapy water: |
|
Soak and clean with a dish cloth or |
|
brush. |
|
|
18

Catalytic cooking compartment panels
The catalytic cooking compartment panels are coated with selfcleaning enamel.
The surfaces clean themselves while the oven is in operation. Larger splashes will only be removed after the oven has been used several times.
Self-cleaning surfaces
The side walls are covered with catalytic panelling. Never clean these surfaces with oven cleaner. Slight discolouration of the enamel does not affect automatic self-cleaning.
Removing the ceiling panel
For ease of cleaning, you can remove the ceiling panel.
Removing and fitting the appliance door
You can remove the appliance door to clean it more thoroughly.
Removing the appliance door
:Risk of injury!
Whenever the hinges are not locked, they snap shut with great force. Make sure that, when unhooking the oven door, the locking levers are folded up completely.
1.Open the oven door completely.
2.Fold up the left and right locking levers. Make sure that, when the locking levers are folded up, you do not close the oven door. The hinges may become bent which may cause damage to the enamel.
|
|
3.Open the oven door at an angle. Hold it on the right and left with both hands. Close it just a little further and pull it out.
Fitting the appliance door
1.When hooking in the oven door, ensure that the notch on the bottom of the hinge locks into the slot.
2.Fold down both locking levers on the left and right again and close the oven door.
:Risk of injury!
Do not reach into the hinge if the oven door falls out unintentionally or a hinge snaps closed. Call the aftersales service.
Cleaning the hook-in racks
You can remove the hook-in racks for easier cleaning.
The hook-in racks in each case are fixed to the side walls of the cooking compartment at three points.
Removing the hook-in racks
1.Lift the front hook A out of the hole.
2.Pull the hook-in rack forwards out of the rear holes B.
Cleaning the hook-in racks
Clean the hook-in racks with washing-up liquid and a sponge or brush.
Inserting the hook-in rack
1.Insert the hook-in rack into the holes in the back wall.
2.Hook the front hook into the hole.
19

Troubleshooting
Malfunctions often have simple explanations. Please read the following notes before calling the aftersales service.
Problem |
Possible cause |
Notes/remedy |
|
|
|
The appliance |
Circuit breaker |
Look in the fuse box and |
does not work. |
faulty. |
check that the circuit |
|
|
breaker for the cooker is in |
|
|
working order. |
|
|
|
|
Power cut |
Check whether the kitchen |
|
|
light works. |
|
|
|
The oven can- |
The electronics |
Switch off the circuit |
not be switched |
are faulty. |
breaker. Contact the after- |
off. |
|
sales service. |
|
|
|
The clock dis- |
Power cut |
Reset the clock. |
play flashes. |
|
|
|
|
|
The oven does |
Circuit breaker |
Check the circuit breaker |
not heat up. |
faulty. |
and replace if necessary. |
|
|
|
|
The function |
Set the function selector. |
|
selector has not |
|
|
been set. |
|
|
|
|
The door glass |
|
Switch off the appliance. |
is broken. |
|
Contact the after-sales serv- |
|
|
ice. |
|
|
|
Fruit juice or |
Moist cake or |
Harmless change in the |
albumen stains |
meat juices. |
enamel, cannot be |
on enamelled |
|
removed. |
surfaces. |
|
|
:Risk of electric shock!
Incorrect repairs are dangerous. Repairs may only be carried out by one of our trained after-sales engineers.
Incorrect repairs may result in significant risk to the user.
Replacing the oven light bulb
If the bulb in the oven light fails, it must be replaced. Replacement heat-resistant bulbs can be obtained from the after-sales service or from specialist retailers. Please supply your appliance's E number and FD number. Do not use any other type of bulb.
1.Switch off the appliance at the circuit breaker or pull out the mains plug.
2.Open the appliance door.
3.Lay a tea towel in the cold cooking compartment to prevent damage.
4.Unscrew the glass cover from the defective oven light bulb inside the cooking compartment by turning it anti-clockwise.
5.Replace the oven light bulb with one of the same type.
Voltage: 240 V; Power: 25 W; Thread: E14;
Temperature resistance: 300 °C
6.Screw the glass cover of the oven light bulb back on.
7.Remove the tea towel and switch the circuit breaker back on or plug in the mains plug.
Press the function button for the oven lighting until it locks into place in order to check whether the oven lighting is working properly.
After-sales service
Our after-sales service is there for you if your appliance needs to be repaired. We will always find the right solution in order to avoid unnecessary visits from a service technician.
E number and FD number
When calling us, please give the product number (E no.) and the production number (FD no.) so that we can provide you with the correct advice. The rating plate containing these numbers can be found on the right-hand side of the oven door. To save time, you can make a note of the number of your appliance and the telephone number of the after-sales service in the space below, should it be required.
E no. |
FD no. |
|
|
|
|
After-sales service O
Please note that there will be a fee for a visit by a service technician in the event of a malfunction, even during the warranty period.
You can find the contact information for your nearest after-sales service in all countries here or in the attached after-sales service directory.
Repair order and advice if faults occur A 0810 240 260
D01801 22 33 55 (€0.039/min. from a landline,
max. €0.42/min. from a mobile phone)
CH 0848 840 040
Put your trust in the expertise of the manufacturer. You can then be sure that the repair work is carried out by trained service technicians who can supply original spare parts for your household appliance.
20
Energy and environment tips
Here you can find tips on how to save energy when baking and roasting and how to dispose of your appliance properly.
Saving energy
■Only preheat the oven when it is specified in the recipe that you should do so.
■Use dark, black lacquered or enamelled baking tins. They absorb the heat particularly well.
■Open the oven door as infrequently as possible while you are cooking, baking or roasting.
■It is best to bake several cakes one after the other. The oven is still warm. This reduces the baking time for the second cake. You can also place two loaf tins next to each other.
■For longer cooking times, you can switch the oven off
10 minutes before the end of the cooking time and use the residual heat to finish cooking.
Environmentally-friendly disposal
Dispose of packaging in an environmentally-friendly manner.
This appliance complies with European Directive 2002/96/EC on Waste Electrical and Electronic Equipment (WEEE). The directive gives a framework for the collection and recycling of old appliances, which is valid across the EU.
Acrylamide in foodstuffs
Acrylamide is mainly produced in grain and potato products prepared at high temperatures, such as potato crisps, chips,
toast, bread rolls, bread or fine baked goods (biscuits, gingerbread, cookies).
Tips for keeping acrylamide to a minimum when preparing food
General |
■ Keep cooking times to a minimum. |
|
■ Cook meals until they are golden brown, but not too dark. |
|
■ Large, thick pieces of food contain less acrylamide. |
|
|
Baking |
With Top/bottom heating max. 200 °C. |
|
With 3D hot air or hot air max.180 °C. |
|
|
Biscuits |
With Top/bottom heating max. 190 °C. |
|
With 3D hot air or hot air max. 170 °C. |
|
Egg or egg yolk reduces the production of acrylamide. |
|
|
Oven chips |
Spread out a single layer evenly on the baking tray. Cook at least 400 g at once on a |
|
baking tray so that the chips do not dry out. |
|
|
Tips for using your appliance
Here you will find a selection of tips about ovenware and preparation methods.
Notes
■Use the accessories provided. Additional accessories may be obtained as optional accessories from specialist retailers or from the after-sales service.
Before using the oven, remove any unnecessary accessories and ovenware from the cooking compartment.
■Always use an oven cloth or oven gloves when taking accessories or cookware out of the cooking compartment.
Baking tips
Baking
Baking tins
■Use light-coloured baking tins and trays wherever possible.
■Always place the baking tins on the middle of the baking and roasting wire rack.
How to establish whether sponge cake is baked through.
Approx. 10 minutes before the end of the baking time stated in the recipe, insert a cocktail stick into the cake at its deepest point. If no cake mixture sticks to the wood, the cake is ready.
The cake collapses. |
Use less fluid next time or set the oven temperature 10 degrees lower. Note the stirring |
|
times indicated in the recipe. |
|
|
The cake has risen high in the middle |
Do not grease the sides of the springform cake tin. After baking, carefully loosen the |
and less around the edges. |
cake using a knife. |
The cake is too dark on the top.
Place it lower in the oven, select a lower temperature and bake the cake for a little longer.
21
The cake is too dry. |
When it is done, make small holes in the cake using a cocktail stick. Then drizzle fruit |
|
juice or an alcoholic drink over it. Next time, set the temperature 10 degrees higher and |
|
reduce the baking time. |
|
|
The bread or cake (e.g. cheesecake) |
Next time, use less liquid and bake at a lower temperature for slightly longer. For cakes |
looks good but is sticky on the inside |
with a moist topping, bake the base first. Sprinkle it with almonds or bread crumbs and |
(soggy with wet streaks). |
then place the topping on top. Take care to follow recipes and baking times. |
|
|
The pastries are not evenly browned. |
Select a slightly lower temperature to ensure that the cake is baked more evenly. Excess |
|
greaseproof paper can affect the air circulation. Always cut the greaseproof paper to suit |
|
the size of the baking tray. |
|
|
The bottom of a fruit flan is too light. |
Place the cake one level lower the next time. |
|
|
The fruit juice overflows. |
Next time, use the deeper universal pan, if you have one. |
|
|
Small baked items made out of yeast |
There should be a gap of approx. 2 cm around each item. This gives enough space for |
dough stick to one another during bakthe baked items to expand and turn brown on all sides. |
|
ing. |
|
|
|
Condensation forms when you bake |
Baking may create water vapour, which escapes above the door. The steam may settle |
moist cakes. |
and form water droplets on the control panel or on the fronts of adjacent units. This is a |
|
natural process. |
|
|
Roasting and grilling |
|
Grilling tips |
|
Ovenware |
|
■ If possible, grill items should be of equal thickness. They |
|
You may use any heatresistant ovenware. Always place the |
should be at least 2 to 3 cm thick. This ensures that they |
||
brown evenly while also remaining succulent. |
|||
ovenware in the middle of the wire rack. The enamelled baking |
|||
|
|||
tray is also suitable for large roasts. |
|
■ Place the food to be grilled in the centre of the wire rack. |
|
Roasting tips |
|
Pour a little water into the enamelled baking tray and insert |
|
|
this into the shelf position underneath the grill to collect the |
||
■ A a lower temperature produces more even browning. |
drips of fat. Never place it on the cooking compartment floor. |
||
■ Drizzle some oil over the food to be grilled before you place it |
|||
■ Depending on the size of the joint, add 2 or 3 tablespoons of |
|||
on the wire rack under the grill. |
|||
liquid to lean meat and 8 to 10 tablespoons of liquid to pot |
|||
■ If the food to be grilled is thin, turn it over halfway through |
|||
roasts. |
|
||
■ When cooking duck or goose, pierce the skin on the |
grilling; if it is thick, turn it over several times during grilling. |
||
Use tongs when turning the food to avoid piercing it and, in |
|||
underside of the wings to allow the fat to run out. |
|||
the case of meat, to keep the meat juices inside the meat. |
|||
■ Poultry will turn out particularly crispy and brown if you baste |
|||
■ Dark meats such as lamb and beef brown better and more |
|||
it towards the end of the roasting time with butter, salted |
|||
quickly than light meats such as pork and veal. |
|||
water or orange juice. |
|
||
|
|
||
■ Turn pieces of meat halfway through the cooking time. |
Tips on using the rotary spit |
||
■ When the roast is ready, turn off the oven and allow it to rest |
■ Place the joint as centrally as possible on the rotary spit and |
||
for an additional 10 minutes. This will allow the meat juices to |
secure it at both ends with the retaining clips. |
||
distribute themselves better inside the roast. |
■ You can also truss the joint with string. With poultry, bind the |
||
■ When roasting large pieces of meat, you may find that the |
|||
ends of the wings underneath the back and the thighs |
|||
amount of steam and condensation on the oven door is more |
against the body. This prevents them from overbrowning. |
||
than usual. This is a normal occurrence which has no effect |
Pierce the skin on the underside of the wings to allow the fat |
||
on the oven's performance. Once roasting is complete, dry |
|||
to escape. |
|||
the oven door and window with a cloth. |
|
||
|
|
||
■ If you are roasting on the wire rack, insert the enamelled |
|
||
baking tray into shelf position 1 to collect the drips of fat. |
|
||
Roasting tips |
|
|
|
|
|
||
How can you tell when the roast is |
Use a meat thermometer (available from specialist retailers) or carry out a "spoon test". |
||
ready? |
Press down on the roast with a spoon. If it feels firm, it is ready. If the spoon can be |
||
|
pressed in, it needs to be cooked for a little longer. |
||
|
|
||
The roast is too dark and the crackling |
Check the shelf position and temperature. |
||
is burnt in places. |
|
|
|
|
|
||
The roast looks good but the juices are |
Next time, use a smaller roasting dish and add more liquid. |
||
burnt. |
|
|
|
|
|
||
The roast looks good, but the juices are |
Next time, use a larger roasting dish and add less liquid. |
||
too clear and watery. |
|
|
|
|
|
|
|
22

â Indice |
|
Importanti avvertenze di sicurezza......................................... |
23 |
Cause dei danni ............................................................................... |
25 |
Il nuovo apparecchio................................................................ |
25 |
Selettore funzioni.............................................................................. |
25 |
Selettore della temperatura............................................................ |
26 |
L'orologio elettronico....................................................................... |
26 |
Accessori........................................................................................... |
26 |
Prima del primo utilizzo ........................................................... |
26 |
Impostazione dell'ora ...................................................................... |
26 |
Riscaldamento del forno ................................................................ |
27 |
Pulizia degli accessori .................................................................... |
27 |
Come usare il forno.................................................................. |
27 |
Tipo di riscaldamento e temperatura........................................... |
27 |
Funzionamento dell'orologio elettronico ............................... |
27 |
Modifica delle impostazioni ........................................................... |
27 |
Cancellazione delle impostazioni ................................................. |
27 |
Impostazione del tono del segnale acustico.............................. |
27 |
Impostazione dell'orologio elettronico ......................................... |
27 |
Impostazione del contaminuti........................................................ |
27 |
Impostazione del timer automatico .............................................. |
27 |
Cura e manutenzione............................................................... |
28 |
Detergente ........................................................................................ |
28 |
Rivestimento catalitico del vano di cottura................................. |
29 |
Rimozione della copertura di protezione .................................... |
29 |
Smontaggio e montaggio della porta dell'apparecchio........... |
29 |
Pulizia della griglia mobile ............................................................. |
29 |
Che cosa fare in caso di guasto? ........................................... |
30 |
Sostituzione della lampadina del forno ....................................... |
30 |
Servizio di assistenza tecnica................................................. |
30 |
Codice prodotto (E) e codice di produzione (FD) .................... |
30 |
Consigli per l'ambiente e il risparmio energetico ................. |
31 |
Risparmio energetico...................................................................... |
31 |
Smaltimento ecocompatibile ......................................................... |
31 |
Acrilamide negli alimenti ......................................................... |
31 |
Consigli per l'utilizzo ............................................................... |
31 |
Cottura al forno ................................................................................ |
31 |
Cottura arrosto e al grill.................................................................. |
32 |
Per ulteriori informazioni su prodotti, accessori, pezzi di ricambio e servizi è possibile consultare il sito Internet
www.bosch-home.com e l'eShop www.bosch-eshop.com
:Importanti avvertenze di sicurezza
Leggere attentamente le presenti istruzioni per l'uso. Solo così è possibile utilizzare l'apparecchio in modo sicuro e corretto. Custodire con la massima cura le presenti istruzioni per l'uso e il montaggio in caso di un utilizzo futuro o cessione a terzi.
Questo apparecchio è concepito esclusivamente per l'incasso Osservare le speciali istruzioni di montaggio.
Controllare l'apparecchio dopo averlo disimballato. Qualora si fossero verificati danni da trasporto, non collegare l'apparecchio.
L'allacciamento senza spina dell'apparecchio può essere effettuato solo da un tecnico autorizzato. In caso di danni causati da un allacciamento non corretto, decade il diritto di garanzia.
Questo apparecchio è pensato esclusivamente per l'utilizzo in abitazioni private e in ambito domestico. Utilizzare l'apparecchio per la preparazione di cibi e bevande. Prestare attenzione all'apparecchio durante il suo funzionamento. Utilizzare l'apparecchio esclusivamente in luoghi chiusi.
Questo apparecchio può essere utilizzato da bambini di età pari o superiore a 8 anni e da persone con ridotte facoltà fisiche, sensoriali o mentali nonché da persone prive di sufficiente esperienza o conoscenza dello stesso se sorvegliate da una persona responsabile della loro sicurezza o se istruite in merito all'utilizzo sicuro dell'apparecchio e consapevoli degli eventuali rischi derivanti da un utilizzo improprio.
I bambini non devono utilizzare l'apparecchio come un giocattolo. I bambini non devono né pulire né utilizzare l'apparecchio da soli a meno che non abbiano un'età superiore agli 8 anni e che siano assistiti da parte di un adulto.
Tenere lontano dall'apparecchio e dal cavo di alimentazione i bambini di età inferiore agli 8 anni.
Inserire sempre correttamente gli accessori nel vano di cottura. Vedi la descrizione degli accessori nelle istruzioni per l'uso.
23
Pericolo di incendio!
■Gli oggetti infiammabili depositati nel vano di cottura possono incendiarsi. Non riporre mai oggetti infiammabili all'interno del vano di cottura. Non aprire mai la porta dell'apparecchio quando fuoriesce del fumo. Disattivare l'apparecchio e staccare la spina o il fusibile nella scatola dei fusibili.
■All'apertura della porta dell'apparecchio avviene uno spostamento d'aria che può sollevare la carta da forno. Quest'ultima potrebbe entrare in contatto con gli elementi riscaldanti e prendere fuoco. Durante il preriscaldamento non disporre mai la carta da forno sugli accessori se non è ben fissata. Fermare sempre la carta da forno con una stoviglia o una teglia. Ricoprire con carta da forno solo la superficie necessaria. La carta da forno non deve fuoriuscire dall'accessorio.
Pericolo di scottature!
■L'apparecchio si surriscalda. Non sfiorare mai le superfici interne calde del vano di cottura o le resistenze. Lasciar sempre raffreddare l'apparecchio. Tenere lontano i bambini.
■L'accessorio o la stoviglia si surriscalda. Servirsi sempre delle presine per estrarre le stoviglie e gli accessori caldi dal vano di cottura.
■I vapori dell'alcol nel vano di cottura caldo potrebbero prendere fuoco. Non cucinare pietanze con quantità elevate di bevande ad alta gradazione alcolica. Utilizzare esclusivamente piccole quantità di bevande ad alta gradazione alcolica. Aprire con cautela la porta dell'apparecchio.
Pericolo di scottature!
■Durante il funzionamento le parti scoperte diventano molto calde. Non toccare mai le parti ad alta temperatura. Tenere lontano i bambini.
■Aprendo la porta dell'apparecchio potrebbe fuoriuscire del vapore caldo. Aprire con cautela la porta dell'apparecchio. Tenere lontano i bambini.
■La presenza di acqua nel vano di cottura caldo può causare la formazione di vapore. Non versare mai acqua nel forno caldo
Pericolo di lesioni!
Il vetro graffiato della porta dell'apparecchio potrebbe saltare. Non utilizzare raschietti per vetro, né detergenti abrasivi o corrosivi.
Pericolo di scossa elettrica!
■Gli interventi di riparazione effettuati in modo non conforme rappresentano una fonte di pericolo.Le riparazioni devono essere effettuate esclusivamente da personale tecnico del servizio di assistenza adeguatamente istruito.Se l'apparecchio è guasto, staccare la spina o disattivare il fusibile nella rispettiva scatola. Rivolgersi al servizio di assistenza clienti.
■Se posto vicino ai componenti caldi dell'apparecchio, l'isolamento del cavo degli apparecchi elettronici può fondere. Evitare il contatto tra il cavo di allacciamento e i componenti caldi dell'apparecchio.
■L'infiltrazione di liquido può provocare una scarica elettrica. Non utilizzare detergenti ad alta pressione o dispositivi a getto di vapore.
■Durante la sostituzione della lampada del vano di cottura i contatti del portalampada sono sotto tensione. Prima di procedere alla sostituzione, staccare la spina o disattivare il fusibile nella relativa scatola.
■Un apparecchio difettoso può causare delle scosse elettriche. Non mettere mai in funzione un apparecchio difettoso. Togliere la spina o disattivare il fusibile nella scatola dei fusibili. Rivolgersi al servizio di assistenza clienti.
Pericolo di incendio!
■Durante la fase di autopulizia i residui di cibo, di grasso e il sugo dell'arrosto possono prendere fuoco. Prima di procedere all'autopulizia, eliminare lo sporco più intenso dal vano di cottura e dall'accessorio.
■Durante l'autopulizia l'esterno dell'apparecchio diventa molto caldo. Non appendere alla maniglia della porta oggetti infiammabili come ad esempio gli strofinacci. Lasciare libero il lato anteriore dell'apparecchio. Tenere lontano i bambini.
24
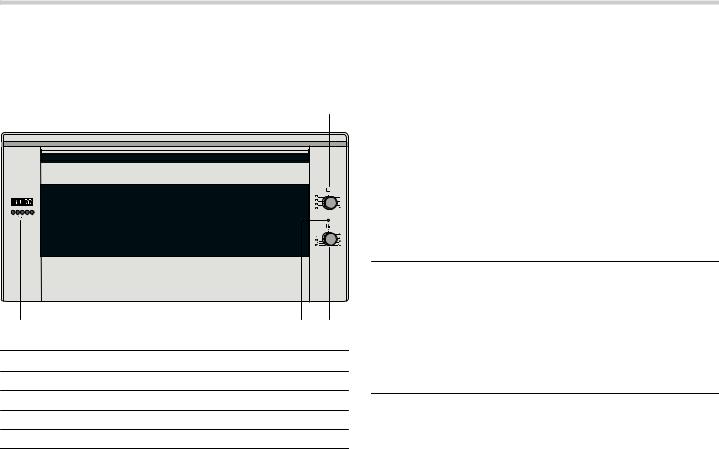
Pericolo di scottature!
■Durante l'autopulizia il vano di cottura diventa molto caldo. Non aprire mai la porta dell'apparecchio né spostare con la mano il gancio di bloccaggio. Lasciar raffreddare l'apparecchio. Tenere lontano i bambini.
■; Durante l'autopulizia l'esterno dell'apparecchio diventa molto caldo. Non toccare mai la porta dell'apparecchio. Lasciar raffreddare l'apparecchio. Tenere lontano i bambini.
Pericolo di gravi danni alla salute!
Durante l'autopulizia l'apparecchio diventa molto caldo. Il rivestimento antiaderente delle teglie e degli stampi viene danneggiato e può causare la formazione di gas velenosi. Durante l'autopulizia, non inserire teglie e stampi con rivestimento antiaderente. Pulire esclusivamente gli accessori smaltati.
Cause dei danni
Attenzione!
■Accessori, pellicola, carta da forno o stoviglie sul fondo del vano di cottura: non riporre alcun accessorio sul fondo del vano di cottura. Non coprire il fondo del vano di cottura con nessun tipo di pellicola o carta da forno. Con temperature superiori a 50 °C non collocare alcuna stoviglia sul fondo del vano di cottura. Si genera un accumulo di calore. I tempi di
cottura non sono più corretti e la superficie smaltata viene danneggiata.
■Acqua nel vano di cottura caldo: non versare mai acqua nel vano di cottura caldo per evitare la formazione di vapore acqueo. La variazione di temperatura può danneggiare la superficie smaltata.
■Alimenti umidi: non conservare alimenti umidi all'interno del vano di cottura chiuso per periodi di tempo prolungati. Lo smalto viene danneggiato.
■Succo della frutta: durante la preparazione di dolci alla frutta molto succosi, non riempire eccessivamente la teglia. Il succo della frutta che trabocca dalla teglia causa la formazione di macchie indelebili. Se possibile, si consiglia di utilizzare la leccarda più profonda.
■Raffreddamento con porta dell'apparecchio aperta: il raffreddamento del vano di cottura deve avvenire esclusivamente con la porta chiusa. Anche se la porta dell'apparecchio è socchiusa, con il passare del tempo i mobili adiacenti possono danneggiarsi.
■Guarnizione della porta molto sporca: se la guarnizione della porta è molto sporca, durante il funzionamento la porta dell'apparecchio non si chiude più correttamente. Le superfici dei mobili adiacenti possono danneggiarsi.Mantenere sempre pulita la guarnizione della porta.
■Utilizzo della porta dell'apparecchio come superficie d'appoggio: non appoggiarsi alla porta dell'apparecchio, né sedervisi sopra o appendervisi. Non posare stoviglie o accessori sulla porta dell'apparecchio.
■Inserimento degli accessori: a seconda del modello di apparecchio è possibile che gli accessori graffino il pannello della porta al momento della chiusura di quest'ultima. Inserire gli accessori nel vano di cottura sempre fino all'arresto.
■Trasporto dell'apparecchio: non trasportare l'apparecchio afferrandolo dalla maniglia in quanto questa non sopporta il peso dell'apparecchio e può rompersi.
Il nuovo apparecchio
Qui è possibile apprendere le caratteristiche del nuovo apparecchio. Sono indicate informazioni relative al pannello comandi, al forno, ai tipi di riscaldamento e agli accessori.
|
|
|
|
|
|
Spiegazione |
|
|
1Selettore funzioni
2Selettore della temperatura
3Spia
4Campo degli indicatori e tasti di comando
Selettore funzioni
Con il selettore funzioni è possibile impostare il tipo di riscaldamento.
Posizione |
Tipo di utilizzo |
|
|
|
|
Û |
Posizione zero |
Il forno è spento. |
|
|
|
% |
Riscaldamento |
Per dolci, sformati e pezzi di arrosto |
|
sup./inf. |
magri. Il calore viene distribuito uni- |
|
|
formemente dall'alto e dal basso. |
|
|
|
( |
Grill, superficie |
Per grigliare bistecche, salsicce, |
|
grande |
toast e piccole porzioni di pesce. Si |
riscalda l'intera superficie al di sotto della resistenza grill.
*Grill, superficie picPer grigliare piccole quantità di cola bistecche, salsicce, toast e piccole
|
porzioni di pesce. La parte centrale |
|
della resistenza grill si scalda. |
|
|
7 Grill ventilato |
Per la cottura arrosto di carne, pol- |
|
lame e pesci interi. La resistenza grill |
|
e la ventola si attivano e disattivano |
|
in maniera alternata. La ventola fa sì |
|
che l'aria calda avvolga gli alimenti. |
*Tipo di riscaldamento con cui è stata definita la classe di efficienza energetica secondo EN50304.
25

Posizione |
Tipo di utilizzo |
|
|
; Livello pizza |
Per la preparazione rapida di pro- |
|
dotti surgelati senza preriscaldare, |
|
ad es. pizza, patate fritte o strudel. Si |
|
riscaldano la resistenza inferiore e la |
|
resistenza circolare sulla parete |
|
posteriore. |
|
|
< Aria calda* |
Per dolci e biscotti su 1-2 livelli. La |
|
ventola distribuisce uniformemente |
|
all'interno del vano di cottura il |
|
calore generato dalla resistenza cir- |
|
colare collocata sulla parete poste- |
|
riore del forno. |
|
|
N Riscaldamento |
Per dolci e biscotti su 1-2 livelli. La |
sup./inf. & Aria |
ventola distribuisce uniformemente |
calda |
nel vano di cottura il calore generato |
|
dagli elementi riscaldanti. |
6Riscaldamento infePer dolci con farcitura umida. La
riore & Aria calda ventola distribuisce uniformemente nel vano di cottura il calore generato dall'elemento riscaldante inferiore.
*Tipo di riscaldamento con cui è stata definita la classe di efficienza energetica secondo EN50304.
Quando si imposta il tipo di riscaldamento, la lampadina nel vano di cottura si accende.
Selettore della temperatura
Servendosi del selettore della temperatura, impostare la temperatura o il livello grill.
Posizione |
Significato |
|
|
|
|
Ú |
Posizione zero |
Il forno non riscalda. |
|
|
|
50-250 |
Ambito di tempe- |
Temperatura nel vano di cottura in |
|
ratura |
°C. |
|
|
|
( |
Livello grill |
Il livello grill per il grill. |
|
|
|
Quando il forno riscalda, la spia si accende . Si spegne invece durante le pause del sistema di riscaldamento.
L'orologio elettronico
Il forno può essere comandato tramite l'orologio elettronico. Per esempio è possibile selezionare anticipatamente l'orario in cui il forno deve accendersi o il timer automatico deve far terminare il processo di cottura. L'orologio elettronico può essere utilizzato anche come contaminuti.
Tasti funzione
Selezionare la funzione premendo il rispettivo tasto funzione. Mediante i tasti + e - si possono impostare la durata o il tempo. Nel campo degli indicatori vengono visualizzati i valori impostati.
Simbolo |
Significato |
Tipo di utilizzo |
|
|
|
U |
Contaminuti |
Impostazione della durata |
|
|
|
r |
Fine del funziona- |
Per impostare l'orario della |
|
mento |
disattivazione automatica |
qDurata di funzionaPer impostare la durata
|
mento |
fino alla disattivazione |
|
|
automatica |
|
|
|
- |
Meno |
Per ridurre la durata o il |
|
|
tempo |
|
|
|
+ |
Più |
Per aumentare la durata o |
|
|
il tempo |
|
|
|
Accessori
È possibile inserire gli accessori nel vano di cottura a 4 livelli differenti. Inserirli sempre fino all'arresto in modo che non entrino in contatto con il pannello della porta. Prestare attenzione affinché vengano sempre inseriti correttamente nel vano di cottura.
|
|
|
|
È possibile estrarre gli accessori per due terzi della loro lunghezza, senza pericolo che si ribaltino, in modo da poter afferrare facilmente le pietanze.
Quando si surriscaldano, gli accessori possono deformarsi, ma riacquistano la forma originale non appena si raffreddano, senza alcuna conseguenza sul funzionamento.
Gli accessori si possono acquistare presso il servizio clienti, i rivenditori specializzati o in Internet.
Accessori |
Descrizione |
Griglia
Per stoviglie, stampi per dolci, arrosti, carni alla griglia, piatti surgelati.
Teglia smaltata
Per torte con frutta o crema, biscotti, piatti surgelati e arrosti di grandi dimensioni. Inserita sotto la griglia o lo spiedo girevole può essere utilizzata anche come recipiente per la raccolta del grasso.
Prima del primo utilizzo
In questo capitolo viene illustrato tutto ciò che bisogna fare prima di utilizzare l'apparecchio per la prima volta. Leggere prima il capitolo Norme di sicurezza.
Rimuovere l'imballaggio dell'apparecchio e smaltirlo in modo conforme.
Impostazione dell'ora
1.Premere contemporaneamente i tasti funzione r e q.
2.Mediante i tasti funzione + e - impostare l'ora attuale. Dopo alcuni secondi l'ora viene acquisita.
26

Riscaldamento del forno
Pulizia preliminare del forno
1.Rimuovere dal vano di cottura gli accessori e la griglia mobile.
2.Togliere tutti i resti dell'imballaggio, ad es. pezzettini di polistirolo, dal vano di cottura.
3.Alcune parti sono rivestite con una pellicola protettiva antigraffio. È necessario rimuoverla.
4.Pulire l'esterno dell'apparecchio con un panno morbido umido.
5.Pulire il vano di cottura con soluzione di lavaggio calda.
Riscaldamento del forno
Per eliminare l'odore dell'apparecchio nuovo, far riscaldare il forno vuoto e ben chiuso.
1.Ruotare il selettore funzioni sulla modalità di funzionamento Riscaldamento sup./inf.
2.Ruotare il selettore della temperatura sulla temperatura massima.
3.Disattivare il forno dopo 40 minuti.
Pulizia successiva del forno
1.Pulire il vano di cottura con soluzione di lavaggio calda.
2.Montaggio della griglia mobile.
Pulizia degli accessori
Prima di utilizzare gli accessori, pulirli accuratamente con una soluzione alcalina di lavaggio calda e un panno morbido.
Come usare il forno
È possibile effettuare varie impostazioni del forno. Il forno può essere comandato tramite l'orologio elettronico.
Tipo di riscaldamento e temperatura
1.Impostare il tipo di riscaldamento utilizzando il selettore funzioni.
2.Servendosi del selettore della temperatura, impostare la temperatura o il livello grill.
Il forno inizia a riscaldarsi.
Spegnimento del forno
Ruotare il selettore funzioni in posizione zero.
Modifica delle impostazioni
Il tipo di riscaldamento e la temperatura o il grado grill possono essere modificati in qualunque momento con il selettore corrispondente.
Funzionamento dell'orologio elettronico
Basta una mano per comandare l'orologio elettronico. Dopo aver premuto il rispettivo tasto funzione, impostare il tempo o la durata mediante i tasti + e -. Viene acquisito il valore impostato.
Anche durante il funzionamento è possibile modificare o cancellare le impostazioni e interrompere il procedimento.
Modifica delle impostazioni
1.Premere il relativo tasto funzione. Si illumina il rispettivo simbolo.
2.Modificare le impostazioni mediante i tasti + e -.
Cancellazione delle impostazioni
1.Premere il relativo tasto funzione. Si illumina il rispettivo simbolo.
2.Premere il tasto - finché non compare 0 00 nel campo degli indicatori.
3.Se era in funzione il timer automatico: spegnere il forno.
Impostazione del tono del segnale acustico
È possibile scegliere tra tre toni quando non vi è alcun programma in corso.
Premere più volte il tasto - fino al tono desiderato. Il tono viene acquisito.
Impostazione dell'ora
È possibile impostare l'ora solo se non è attiva nessuna altra funzione.
1.Premere contemporaneamente i tasti funzione r e q.
2.Mediante i tasti funzione + e - impostare l'ora attuale.
Impostazione del contaminuti
Il contaminuti è un timer che emette un segnale acustico una volta trascorsa la durata impostata. Il contaminuti non influisce in alcun modo sulle funzioni del forno.
Impostazione della durata
1.Premere il tasto U.
2.Mediante i tasti funzione + e - impostare la durata. Sul display compare il simbolo U.
3.Per visualizzare sul display la durata residua premere il tasto
U.
Una volta trascorso il tempo viene emesso un segnale acustico.
Impostazione del timer automatico
Tramite l'orologio elettronico è possibile disattivare o attivare e disattivare automaticamente il forno.
Impostazione dell'orologio elettronico
Dopo l'allacciamento dell'apparecchio alla rete elettrica o in seguito a un'interruzione di corrente compaiono sull'indicatore tre zeri.
27

Spegnimento automatico
Impostazione della durata di funzionamento
1.Ruotare il selettore funzioni sulla modalità di funzionamento desiderata.
2.Ruotare il selettore della temperatura sulla temperatura desiderata.
Il forno si accende.
3.Premere il tasto funzione r.
4.Mediante i tasti + e - impostare la durata di funzionamento.
Il forno si attiva e nel campo degli indicatori compaiono il simbolo A e l'ora attuale.
La durata di funzionamento è trascorsa
Viene emesso un segnale acustico e nel campo degli indicatori compare il simbolo r con l'ora attuale.
Il forno si spegne.
Premere uno dei tasti funzione per arrestare anticipatamente il segnale acustico.
Attivazione e disattivazione automatica
La cottura inizia a un orario posticipato stabilito dall'utente e prosegue per la durata impostata.
Impostazione della durata di funzionamento
1.Ruotare il selettore funzioni sulla modalità di funzionamento desiderata.
2.Ruotare il selettore della temperatura sulla temperatura desiderata.
Il forno si accende.
3.Premere il tasto funzione r.
4.Mediante i tasti + e - impostare la durata di funzionamento.
Il forno si attiva e nel campo degli indicatori compaiono il simbolo A e l'ora attuale.
Impostazione della fine del funzionamento
1.Premere il tasto q.
Nel campo degli indicatori viene visualizzata la somma dell'ora attuale e della durata di funzionamento.
2.Tenere premuto il tasto q e modificare la fine del funzionamento con i tasti + e -.
Il forno si disattiva e si avvia automaticamente più tardi. Nel campo degli indicatori compaiono il simbolo A e l'ora attuale.
La durata di funzionamento è trascorsa
Viene emesso un segnale acustico e nel campo degli indicatori compare il simbolo r con l'ora attuale.
Il forno si spegne.
Premere uno dei tasti funzione per arrestare anticipatamente il segnale acustico.
Cura e manutenzione
Una cura e manutenzione scrupolosa contribuiscono a mantenere a lungo il forno in buone condizioni. Sono qui illustrate le modalità di cura e pulizia del forno corrette.
Avvertenze
■Lievi differenze di colore sul lato anteriore del forno sono dovute a diversi materiali quali vetro, plastica o metallo.
■Eventuali ombreggiature sul pannello della porta, simili a striature, sono dovute al riflesso della luce della lampada del forno.
■A temperature molto elevate lo smalto viene marcato a fuoco e potrebbero dunque generarsi variazioni cromatiche. Questo
è normale e non influisce in alcun modo sul funzionamento. I bordi delle lamiere sottili non possono essere smaltati integralmente e pertanto è possibile che appaiano grezzi. Questo non pregiudica la protezione anticorrosione.
:Pericolo di scariche elettriche!
L'infiltrazione di liquido può provocare una scarica elettrica. Non utilizzare detergenti ad alta pressione o dispositivi a getto di vapore.
:Pericolo di scottature!
L'apparecchio si surriscalda. Non sfiorare mai le superfici interne calde del vano di cottura o le resistenze. Lasciar sempre raffreddare l'apparecchio. Tenere lontano i bambini.
Detergente
Per non danneggiare le diverse superfici con l'utilizzo di detergenti non appropriati, prestare attenzione alle indicazioni seguenti.
Non utilizzare
■detergenti aggressivi o abrasivi
■detergenti con elevato contenuto di alcol
■spugnette dure o abrasive
■detergenti ad alta pressione o dispositivi a getto di vapore.
Lavare bene le spugne nuove prima di utilizzarle.
Settore |
Detergente |
|
|
Esterno dell'appa- |
Soluzione di lavaggio calda: |
recchio |
pulire con una spugna e asciugare con |
|
un panno morbido. Non utilizzare deter- |
|
genti o raschietti per vetro. |
|
|
Acciaio inox |
Soluzione di lavaggio calda: |
|
pulire con una spugna e asciugare con |
|
un panno morbido. Rimuovere immedia- |
|
tamente le macchie di calcare, grasso, |
|
amido o albume in quanto potrebbero |
|
corrodere la superficie. |
|
Speciali detergenti per acciaio inox, |
|
adatti a superfici calde, sono disponibili |
|
presso il servizio di assistenza tecnica o |
|
presso i rivenditori specializzati. Stendere |
|
uno strato sottile di detergente con un |
|
panno morbido. |
|
|
Alluminio e plastica |
Detergente per vetro: |
|
pulire con un panno morbido. |
|
|
Superfici smaltate |
Per una pulizia leggera è possibile |
(superficie liscia) |
accendere l'illuminazione del vano di cot- |
|
tura ed eventualmente sganciare la porta |
|
dell'apparecchio. Applicare un detersivo |
|
per piatti reperibile in commercio o una |
|
soluzione di acqua e aceto con uno |
|
straccio morbido umido o un panno in |
|
pelle di daino; asciugare con un panno |
|
morbido.Eliminare i residui di cibo bru- |
|
ciati con un panno umido e detersivo per |
|
piatti. In caso di sporco resistente si con- |
|
siglia di pulire il forno con un detergente |
|
apposito in gel, in quanto può essere |
|
applicato in modo mirato. Terminata la |
|
pulizia, lasciare aperto il vano di cottura |
|
per farlo asciugare. |
28

Settore |
Detergente |
|
|
Superfici autopu- |
Osservare le avvertenze nel capitolo: |
lenti (superfici |
Superfici autopulenti |
ruvide) |
|
|
|
Pannelli della porta |
Detergente per vetro: |
|
pulire con un panno morbido. Non utiliz- |
|
zare raschietti per vetro. |
|
|
Copertura in vetro |
Soluzione di lavaggio calda: |
della lampadina del |
pulire con un panno spugna. |
forno |
|
|
|
Guarnizione |
Soluzione di lavaggio calda: |
Non rimuovere! |
pulire con un panno spugna. Non sfre- |
|
gare. |
|
|
Supporti |
Soluzione di lavaggio calda: |
|
lasciare in ammollo e pulire con un |
|
panno spugna o una spazzola. |
|
|
Accessori |
Soluzione di lavaggio calda: |
|
lasciare in ammollo e pulire con un |
|
panno spugna o una spazzola. |
|
|
Rivestimento catalitico del vano di cottura
I rivestimenti catalitici del vano di cottura sono ricoperti di smalto autopulente.
Mentre il forno è in funzione le superfici si puliscono da sole. Gli schizzi più consistenti vengono eliminati solo dopo vari utilizzi del forno.
Superfici autopulenti
Le pareti laterali sono dotate di rivestimento catalitico. Non utilizzare mai detergenti per forno per pulire queste superfici. Il leggero scolorimento dello smalto non influisce in alcun modo sul processo di autopulizia.
Rimozione della copertura di protezione
Per una migliore pulizia è possibile rimuovere la copertura di protezione.
Smontaggio e montaggio della porta dell'apparecchio
Per agevolare la pulizia è possibile smontare la porta dell'apparecchio.
Smontaggio della porta dell'apparecchio
:Pericolo di lesioni!
Se le cerniere non sono bloccate, scattano con una forza maggiore. Mentre si sgancia la porta del forno, prestare attenzione che le leve di bloccaggio siano aperte.
1.Aprire completamente la porta del forno.
2.Aprire le due leve di bloccaggio a destra e a sinistra. Quando le leve di bloccaggio sono aperte, prestare attenzione a non chiudere la porta del forno. Le cerniere potrebbero venire piegate causando il danneggiamento dello smalto.
|
|
3.Mettere la porta del forno trasversalmente. Afferrarla con entrambe le mani a destra e a sinistra. Chiuderla leggermente e rimuoverla.
Montaggio della porta dell'apparecchio
1.Durante il rimontaggio della porta del forno prestare attenzione a che le tacche inferiori sulla cerniera si innestino nella fessura.
2.Riposizionare verso il basso entrambe le leve di bloccaggio, destra e sinistra, e chiudere la porta del forno.
:Pericolo di lesioni!
Se la porta del forno cade inavvertitamente o se scatta una cerniera, non toccarla. Rivolgersi al servizio di assistenza tecnica.
Pulizia della griglia mobile
Per una migliore pulizia è possibile sganciare la griglia mobile.
La griglia mobile è fissata in tre punti alla parete laterale del vano di cottura.
Smontaggio della griglia mobile
1.Sollevare il gancio anteriore A sfilandolo dal foro.
2.Tirare la griglia mobile in avanti sfilandola dai fori posteriori B.
29
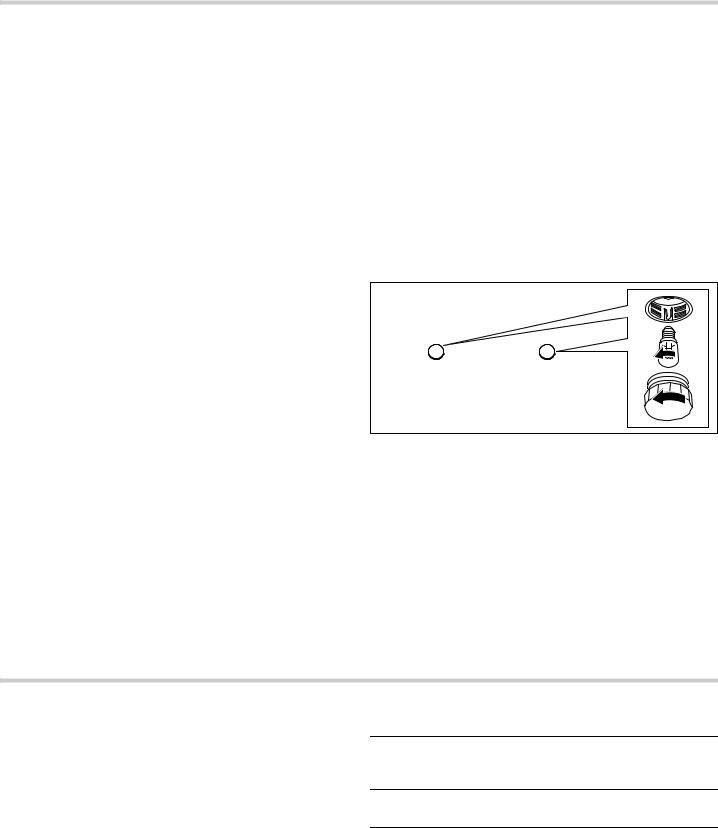
Pulizia della griglia mobile
Pulire la griglia mobile con il detersivo e una spugna oppure una spazzola.
Montaggio della griglia mobile
1.Agganciare la griglia mobile nei fori della parete posteriore.
2.Inserire il gancio anteriore nel foro.
Che cosa fare in caso di guasto?
Quando si verifica un'anomalia, si tratta spesso di un problema facilmente risolvibile. Prima di rivolgersi al servizio di assistenza tecnica, prestare attenzione alle seguenti avvertenze:
Guasto |
Possibile |
Avvertenze/rimedio |
|
causa |
|
|
|
|
L'apparecchio |
Il fusibile è difet- |
Controllare nella scatola dei |
non funziona. |
toso. |
fusibili che il fusibile |
|
|
dell'apparecchio sia in per- |
|
|
fette condizioni. |
|
|
|
|
Interruzione di |
Verificare che la lampada |
|
corrente. |
della cucina funzioni. |
|
|
|
Non è possibile |
Il sistema elet- |
Disattivare il fusibile. Rivol- |
spegnere il |
tronico è difet- |
gersi al servizio di assi- |
forno. |
toso. |
stenza clienti. |
|
|
|
L'indicatore |
Interruzione di |
Impostare nuovamente |
dell'ora lampeg- |
corrente |
l'ora. |
gia. |
|
|
|
|
|
Il forno non |
Il fusibile è difet- |
Verificare il fusibile o sosti- |
riscalda. |
toso. |
tuirlo. |
|
|
|
|
Il selettore fun- |
Impostare il selettore |
|
zioni non è |
funzioni . |
|
impostato. |
|
|
|
|
Il vetro della |
|
Disattivare l'apparecchio. |
porta è rotto. |
|
Rivolgersi al servizio di assi- |
|
|
stenza clienti. |
|
|
|
Macchie di |
Succo di dolci |
Innocuo cambiamento dello |
succo o di |
imbevuti oppure |
smalto, senza rimedio. |
albume sulle |
sugo della |
|
superfici smal- |
carne. |
|
tate. |
|
|
|
|
|
:Pericolo di scossa elettrica!
Gli interventi di riparazione effettuati in modo non conforme rappresentano una fonte di pericolo. Le riparazioni devono essere effettuate esclusivamente da personale tecnico del servizio di assistenza adeguatamente istruito.
Se gli interventi di riparazione dell'apparecchio non sono conformi possono causare gravi pericoli.
Sostituzione della lampadina del forno
È necessario sostituire le lampadine del forno bruciate. Le lampadine di ricambio termostabili sono in vendita presso il servizio di assistenza tecnica o presso il rivenditore specializzato. Specificare il codice del prodotto (E) e il numero di produzione (FD) dell'apparecchio. Non utilizzare altri tipi di lampadine.
1.Disattivare il fusibile o staccare la spina.
2.Aprire la porta dell'apparecchio.
3.Stendere un canovaccio nel vano di cottura freddo per evitare di danneggiarlo.
4.Svitare la copertura in vetro della lampadina del forno difettosa all'interno del vano di cottura ruotandola verso sinistra.
5.Sostituire la lampadina del forno con una dello stesso modello.
Tensione: 240 V; Potenza: 25 W; Filettatura: E14;
Resistenza termica: 300 °C
6.Riavvitare la copertura in vetro della lampadina del forno.
7.Rimuovere il canovaccio e riattivare il fusibile oppure riattaccare la spina.
Premere il tasto funzione per l'illuminazione del forno finché non si inserisce per verificare se l'illuminazione funziona.
Servizio di assistenza tecnica
Il servizio di assistenza tecnica è a disposizione per eventuali riparazioni. Troveremo la soluzione giusta, evitando di coinvolgere un tecnico quando non è necessario.
Codice prodotto (E) e codice di produzione (FD)
Quando si contatta il servizio clienti indicare sempre il codice prodotto (E) e il codice di produzione (FD), in modo da poter ricevere subito un'assistenza mirata. La targhetta con i numeri è visibile a destra, di lato alla porta del forno. Per avere subito a disposizione le informazioni utili in caso di necessità, si consiglia di riportare subito qui i dati relativi all'apparecchio e il numero di telefono del servizio di assistenza tecnica.
Codice pro- |
Codice di pro- |
dotto (E) |
duzione (FD) |
|
|
Servizio di assistenza tecnica O
Prestare attenzione al fatto che, in caso di utilizzo improprio, l'intervento del tecnico del servizio di assistenza non è gratuito anche se effettuato durante il periodo di garanzia.
I dati di tutti i land relativi al servizio di assistenza clienti più vicino si trovano qui o nell'elenco del servizio di assistenza clienti in allegato (a seconda del modello).
30
 Loading...