


Bosch HES255U, HES256U, HES247U, HES246U, HES242U User Manual
...Freestanding Electric Range |
Household Appliances |
Cuisinière électrique amovible
Estufa eléctrica autoestable
Use and Care Manual
Guide d’utiliasation et d’ entretien
Manual de uso y cuidado
for Models: HES242U, HES245U, HES246U, HES247U, HES252U, HES255U, HES256U
PLEASE READ ENTIRE INSTRUCTIONS BEFORE PROCEEDING.
IMPORTANT: Save these instructions.
INSTALLER: Please leave these instructions with this unit for the owner.
OWNER: Please retain these instructions for future reference.

A Special Message
to Our Customers
Dear Bosch Range Owner:
Thank you and congratulations on the purchase of your Bosch Electric Range. Whether you are an expert chef or an aspiring cook, we know that your new range will exceed your expectations. Decades of knowledge and experience are built into this range making it among the highest quality, most versatile and most efficient available.
We ask that you read this manual thoroughly before using your new range. Please pay particular attention to the safety precautions printed at the front of this book and the numerous safety hints and cautions placed throughout. Also, be sure to familiarize yourself with the proper operation of the range and its cleaning and maintenance procedures. Adherence to these instructions and procedures will assure that you realize the full potential of your new Bosch range as well as maintain it for years of dependable use.
Thank you and good cooking,
BSH Home Appliances Corporation
IMPORTANT SAFETY NOTICE
WARNING
When properly cared for, your new Bosch range has been designed to be a safe, reliable appliance. Read all instructions carefully before using this range. These precautions will reduce the risk of burns, electric shock, fire, and injury to persons. Do not operate the oven or cooktop controls if the glass is broken. Food splatter or cleaning solution may penetrate a broken control panel and create a risk of electric shock. Contact a qualified technician immediately should your glass control panel become broken. When using kitchen appliances, basic safety precautions must be followed, including those in the following pages.
The California Safe Drinking and Toxic Enforcement Act requires the Governor of California to publish a list of substances known to the state to cause cancer, birth defects or other reproductive harm, and requires businesses to warn customers of potential exposure to such substances.
The elimination of soil during self-cleaning generates some by-products which are on the list.
The fiberglass insulation in self-clean ovens gives off very small amounts of formaldehyde during the first several cleaning cycles.
Exposure to these substances can be minimized by:
1.Providing good ventilation when cooking with gas
2.Providing good ventilation during and immediately after self cleaning the oven.
3.Operating the unit according to the instructions in this manual.
The Bosch range referred to thoughout this manual is manufactured by BSH Home Appliance Corp.

Table of Contents
Important Safety Instructions ............................................................................. |
1 |
Getting Familiar with Your Range ....................................................................... |
3 |
Setting Up Your Range |
|
Setting and Changing the Clock ............................................................................ |
5 |
Setting the Functions ........................................................................................... |
6 |
Accessing and Using the Select Functions Menu .............................................. |
6 |
Volume ........................................................................................................ |
7 |
Change Temperature ..................................................................................... |
7 |
Temperature Format ..................................................................................... |
7 |
Lock Keys ..................................................................................................... |
7 |
Language Option .......................................................................................... |
7 |
Clock Display ................................................................................................ |
8 |
Oven Temperature Offset .............................................................................. |
8 |
Demo Mode .................................................................................................. |
8 |
Reset Defaults .............................................................................................. |
8 |
Sabbath Feature ........................................................................................... |
8 |
The Cooktop |
|
Cooktop Features ................................................................................................ |
9 |
Operating the mTwisT Cooktop............................................................................. |
11 |
The Oven |
|
Oven (cut here) Features ..................................................................................... |
12 |
Oven Modes - Bake and Convection Bake .............................................................. |
13 |
Oven Modes - Broil and Convection Broil ............................................................... |
14 |
Oven Modes - Convection Roast ........................................................................... |
15 |
Oven Modes - Dehydrate ..................................................................................... |
16 |
Selecting the Mode .............................................................................................. |
17 |
Using the Timer (s) ............................................................................................. |
18 |
Using Timed Cook ............................................................................................... |
19 |
Using the Probe (some models) ............................................................................ |
20 |
The Warming Drawer .............................................................................................. |
21 |
Care and Cleaning |
|
Cooktop .............................................................................................................. |
23 |
Oven .................................................................................................................. |
25 |
Self Help, Maintenance, Etc. |
|
Cookware Selection Guide .................................................................................... |
28 |
(cut here) |
|
Maintenance |
|
Removing the Oven Door .............................................................................. |
29 |
Replacing the Oven Light .............................................................................. |
29 |
Self Help |
|
Cooktop (cut here)........................................................................................ |
30 |
Oven (cut here) ............................................................................................ |
31 |
Customer Service and Warranty ........................................................................... |
32 |

 Important Safety Instructions
Please read all instructions before using this appliance.
APPLIANCE SAFETY |
RANGE SAFETY |
||
• This appliance must be properly installed and grounded by |
• Tie long hair so that it does not hang loose. |
||
a qualified technician. Connect only to properly grounded |
• The heating elements may be hot even though they are not |
||
outlet. Refer to Installation Instructions for details. |
red in color. Interior surfaces of an oven become hot enough |
||
• This appliance should be serviced only by a qualified service |
to cause burns. |
||
technician. Contact the nearest authorized service center |
• Do not touch heating elements or interior surfaces of oven |
||
for examination, repair or adjustment. |
during operation. |
||
• Do not repair or replace any part of the range unless |
• During and after use, do not touch or let clothing or other |
||
specifically recommended. Refer service to an authorized |
flammable materials contact the heating elements or the |
||
servicer. |
interior surfaces of the oven until they have had sufficient |
||
• Do not operate this appliance if it is not working properly |
time to cool. |
||
or if it has been damaged, until an authorized servicer has |
• The trim on the sides of the oven door may become hot |
||
examined it. |
enough to cause burns. |
||
• Use this appliance only for its intended use as described in |
• Use care when opening the door. Open the door slightly to |
||
this manual. If you have any questions, contact the |
let hot air or steam escape before removing or replacing |
||
manufacturer. |
food. |
||
• Do not cover or block any openings on this appliance. |
• Do not heat unopened food containers. Build-up of pressure |
||
• Do not use corrosive chemicals, vapors, or nonfood products |
may cause the container to burst and cause injury. |
||
in this appliance. This type of range is specifically designed |
• Always place oven racks in desired location while oven is |
||
to heat or cook. It is not designed for industrial or laboratory |
cool. If a rack must be moved while oven is hot, do not let |
||
use. The use of corrosive chemicals in heating or cleaning |
potholder contact the hot heating elements. |
||
will damage the appliance. |
• Use only dry potholders. Moist or damp potholders on hot |
||
• In the event that personal clothing or hair catches fire, |
surfaces may result in burns from steam. Do not let potholder |
||
DROP AND ROLL IMMEDIATELY to extinguish flames. |
touch hot heating elements. Do not use a towel or other |
||
• Do not allow children to use this appliance unless closely |
bulky cloth. |
||
supervised by an adult. Children and pets should not be left |
• Keep the oven free from grease build up. |
||
alone or unattended in the area where the appliance is in |
• Do not place food directly on oven bottom. |
||
use. They should never be allowed to sit or stand on any |
• When using cooking or roasting bags in the oven, follow the |
||
part of the appliance. |
manufacturer’s directions. |
||
|
|
• Do not use aluminum foil to line oven bottoms, except as |
|
PERSONAL SAFETY |
|||
suggested in this manual. Improper installation of aluminum |
|||
WARNING |
foil many result in a risk of electric shock or fire. |
||
To reduce the risk of injury to persons, in the event of a |
• To avoid electric shock, do not operate the oven without the |
||
light bulb cover in place. |
|||
grease fire, observe the following: |
|||
|
|||
• In the event of a grease fire SMOTHER FLAMES with a close- |
COOKTOP SAFETY |
|
fitting lid, cookie sheet, or other metal tray, then turn off the |
• Do not cook on a cooktop in which the glass top has broken. |
|
elements. BE CAREFUL TO PREVENT BURNS. If the flames do |
||
If the cooktop glass should break, do not use it or attempt |
||
not go out immediately, EVACUATE AND CALL THE FIRE |
||
to clean or fix it. Cleaning solutions and spillovers may |
||
DEPARTMENT. |
||
penetrate the broken cooktop and create a risk of electric |
||
• Do not use water, including wet dishcloths or towels on grease |
||
shock. Turn off electric circuit to the cooktop and call an |
||
fires. A violent steam explosion may result. |
||
authorized service agency immediately. |
||
• SMOTHER FLAMES from other types of food fires with baking |
||
• When using the cooktop, DO NOT TOUCH THE HOT |
||
soda. NEVER use water on cooking fires. |
COOKING AREA OR THE IMMEDIATE SURROUNDING |
|
• NEVER PICK UP A FLAMING PAN. You may be burned. |
AREA. Even though dark in color, these areas may be hot. |
|
• ALWAYS have a working SMOKE DETECTOR near the kitchen. |
Areas adjacent to the elements may become hot enough to |
|
• LEAVE THE HOOD VENTILATOR ON when flambéing food. |
||
cause burns. Never let clothing, potholders, or other |
||
• Use an extinguisher ONLY IF: |
flammable materials come in contact with a cooking area |
|
until it has cooled. |
||
• YouknowyouhaveaClassABCextinguisher,andyoualready |
||
• Use high heat settings on the cooktop only when necessary. Use |
||
know how to operate it. |
||
low to medium settings to heat oil slowly. |
||
• The fire is small and contained in the area where it started. |
||
• Never move a pan of hot oil, especially a deep fat fryer. Wait until |
||
• The fire department is being called. |
||
it is cool. |
||
• You can fight the fire with your back to an exit. |
||
|
||
|
|
|
Page 1 |
||

 Important Safety Instructions
Please read all instructions before using this appliance.
COOKTOP SAFETY (cont’d)
•Never leave the cooktop unattended. Boilovers can cause smoke and possibly damage the cooktop.
•Hold the handle of the pan to prevent movement of the utensil when stirring or turning food.
•Other than the use of metal pans, only certain types of glass, heatproof glass ceramic, ceramic, earthenware, or other glazed utensils are suitable for cooktop use. Other types of utensils may break with sudden temperature changes. Use only on low or medium heat settings according to the utensil manufacturer’s directions.
OVEN SAFETY
To reduce the risk of fire:
•Do not store flammable materials in or near the oven.
•Do not use water on a grease fire. Smother fire or use a dry chemical or foam-type extinguisher.
•Have an appropriate fire extinguisher available and highly visible near any cooking appliance.
•Do not use the cavity for storage purposes. Do not leave paper products, cooking utensils or food in the cavity when not being used.
•If materials inside the oven should ignite, keep oven door closed.Turn off oven and disconnect the circuit at the circuit breaker box.
•Do not block any vent openings.
•Never use the oven to warm or heat a room. This can damage the oven parts.
•Never wear loose-fitting or hanging garments while using the appliance. Be careful when reaching for items stored over the range. Flammable material could be ignited if brought in contact with hot surface units or heating elements and may cause severe burns.
•Do not allow anyone to climb, stand or hang on the oven door, warming drawer door, storage drawer or cooktop. This can damage the range and even tip it over, causing severe personal injury.
•Have the installer show the location of the circuit breaker or fuse. Mark it for easy reference.
WARMING DRAWER SAFETY
To reduce the risk of fire, electric shock, or injury to persons:
•Do not store flammable materials in the warming drawer.
•Use care when opening the warming drawer. Open door slightly and let hot air or steam escape before removing or replacing food.
•Do not place food in unopened containers in the warming drawer. Pressure could build up and cause container to burst.
SELF-CLEANING SAFETY
•Confirm that the door locks and will not open once the door lock indicator icon appears. If the door does not lock, touch OFF and do not run Self-Clean. Phone 800/944-2904 for service.
•Note: During a normal Self-Clean cycle, the door will not lock until the oven reaches 450º F. In a Delayed Self-Clean cycle, the door locks immediately.
•Do not clean the oven gasket. It is essential for a good seal. Care should be taken not to rub, damage, move or remove the oven gasket.
•Do not use commercial oven cleaners or oven liner protective coatings of any kind in or around any part of the oven.
•Clean only oven parts listed in this manual.
•Before self-cleaning the oven, remove the broiler pan, oven racks, oven probe, other utensils and wipe out excess soft spillage.
REGARDING PET BIRDS:
Birds have very sensitive respiratory systems. Keep pet birds out of the kitchen or other rooms where kitchen fumes could reach them. During self clean, fumes are released that may be harmful to birds. Other kitchen fumes such as overheating margarines and cooking oils may also be harmful.
CAUTION
Items of interest to children should not be stored in cabinets above a range or on the backsplash of a range. Children climbing on the range to reach items could be seriously injured.
Page 2

Getting Familiar with Your Range
Parts Included with
Your Electric Range:
1.Use & Care Manual
2.Installation Instructions
3.AHAM Anti-Tip Brochure
4.Bosch Cookbook
5.Probe (some models)
6.Telescopic Racks (some models)
7.Anti-Tip Bracket
8.Screws for Anti-Tip Bracket
9.Ceran Cooktop Scraper
10.Cooktop Cleaning Solution (not visible)
11.Registration Card
12.Incandescent Lights (not visible)
13.Oven Control
14.Panel and Knob
15.mTwisT Dial
16.Broil Element (not visible)
17.Convection Fan and Element (not visible)
18.Probe Receptacle (some models)
19.Rack Positions
20.Door Gasket
21.Model & Serial # Plate
22.Bake Element (not visible)
23.Door Lock (not visible)
24.Oven Rack Back
25.Oven Rack Front
26.Broiler Pan
27.Warming Drawer
28.Warming Drawer Rack (some models)
29.Oven Vent
|
14 |
23 |
13 |
18 |
15 |
|
|
20 |
|
19 |
29 |
|
27 21
9
COOKTOP SCRAPER
24
7 & 8
OVEN RACK
BROIL PAN
WARMING DRAWER RACK
(some models)
 25
25 

 26
26
 28
28
ANTI-TIP
BRACKETS
AND SCREWS
PROBE |
5 |
(some models) |
|
TELESCOPIC |
6 |
RACK
(some models)
Actual parts are larger than depicted in above graphics.
Page 3
Getting Familiar with Your Range
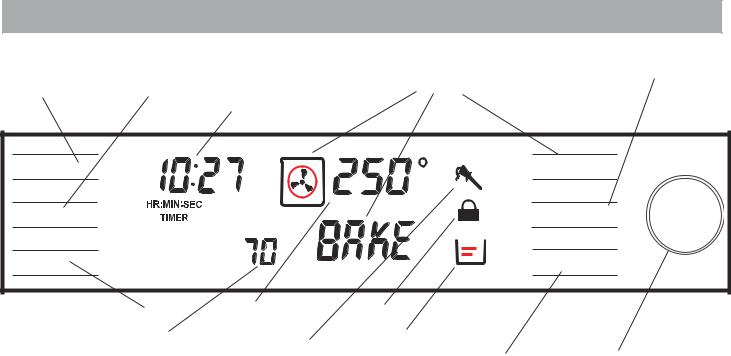
The Oven Control Panel
|
|
Temperature |
Light |
Time |
Cooking Mode |
|
||
|
|
Clock |
Light
Time
Off
Off
Preheat or Probe
Temperature
AM |
C |
|
PM |
||
F |
||
|
||
|
BAKE |
Oven |
Lock |
|
|
Temperature |
Indicator |
|
|
|
|
||
Probe |
Warming |
|
|
Drawer |
|
||
Indicator |
Start |
||
Indicator |
|||
|
|||
|
|
Cooking Mode
Temperature
Start
Control Knob
Display Window Features
CLOCK– Shows the time of day with a 12-hour or 24-hour |
WARMING DRAWER INDICATOR - Icon displays when |
|
clock option. |
warming drawer is in use. Indicates warming drawer setting. |
|
COOKING MODE - Touch pad to display cooking mode. |
|
|
COOKING OR TIMED MODE – Shows the number of hours |
|
|
and minutes the oven will be “on.” Cooking Mode Icon is also |
|
|
displayed when cooking mode is seleceted. |
Other Indicators and Features |
|
CONTROL KNOB - Used to set the clock, timers, select |
||
|
||
cooking mode and temperature. Turn clockwise to increase |
BEEP - Signals that more information must be entered |
|
and turn counterclockwise to decrease. |
or confirms the receipt of an entry. A Beep also signals |
|
ELEMENTS – Displays which element(s) are active during a |
the end of a program or an oven error. |
|
cooking mode. |
DEFAULT SETTINGS - The cooking modes |
|
LIGHT - Touch pad to turn oven light on or off. |
||
automatically select the default temperature. These can |
||
DOOR LOCK INDICATOR - icon is displayed during the |
be changed when a different one is needed. |
|
|
||
self-clean mode when the door is locked. DO NOT attempt |
FLASHING SYMBOL OR NUMBER - Signals an |
|
to open the door until the lock symbol is no longer present. |
incomplete setting and calls for another step or START |
|
OFF - Touch pad to turn off oven and/or warming drawer. |
to be touched. |
|
|
||
OVEN TEMPERATURE - Shows the oven temperature |
F NUMBER CODES - These codes are displayed when |
|
selected. |
there is a problem with the signal sent to the electronic |
|
PREHEAT - Displays temperature of oven during preheat |
control board. |
|
CONVECTION FAN - The convection fan operates |
||
mode. Also displays internal temperature of meat when probe |
||
is in use. |
during any convection mode. When the oven is |
|
PROBE INDICATOR - Indicates the probe is installed in |
operating in the convection mode, the fan will turn off |
|
automatically when the door is opened except when in |
||
oven. The internal temperature of the meat is displayed in |
||
the dehydrate mode. The convection fan will also run |
||
place of the preheat temperature. |
during the preheat time for specific modes. |
|
START - Touch pad to complete an entry. |
|
|
TEMPERATURE - Touch pad to select cooking temperature. |
|
|
TIMER – There are two timersTIMER 1 AND TIMER 2; Each |
|
|
counts down the time in hours and minutes. With less than |
|
|
60 minutes remaining, the timer also displays seconds. |
|
Page 4

Setting Up Your Range
Setting the Clock (after power to the range has been off)
•Always set the clock after installation or after a power failure. Once power returns to the oven, the clock defaults to 12:00 am.
•The time of day is displayed in hours and minutes.
•The clock time will appear during all oven operations except when the timer or a timed cooking operation is running.
•The oven is preset to a 12-hour clock and indicates AM and PM.
Note: To switch to a 24 hr. clock, see "Select Function” section.
1.CLOCK will be displayed and the hour digits will flash.
Turn knob to select hour and AM or PM. Turning to the right increases by 1 hour increments; turning to the left decreases by 1 hour increments.
2.Touch TIME. CLOCK will still be displayed and the minute digits will flash.
3.Turn knob. Set minutes.
4.Touch TIME and the clock is now set.
Changing the Clock Time
1.Touch Time. TIMER 1 will flash in display.
2.Turn knob to select CLOCK .
3.Touch TIME again and hour digits will flash.
4.Turn knob to change hours.
5.Touch TIME again and minute digits will flash.
6.Turn knob clockwise or counter-clockwise to change minutes.
7.Touch TIME again and the clock is set.
12: 00 |
A M |
CLOCK |
|
|
|
|
|
|
BEEP REMINDER
If operation is not completed,the oven will beep periodically as a reminder to set clock time. Push
OFF.
0: 00 A M
HR:MIN |
TIMER 1 |
TIMER |
|
Helpful Hint
To cancel the TIME selection when setting the clock, touch OFF at any time while in the clock mode.
Page 5

Setting Up Your Range
SELECT FUNCTIONS is the section of the menu where you can set or change the following features on your range:
VOLUME (decrease or increase loudness of control beeps)
TEMPERATURE FORMAT (switch temperature scale to Fahrenheit or Celsius)
TIME FORMAT (12 hr or 24 hr)
LOCK KEYS (oven control pad lockout )
LANGUAGEOPTION(for display; select English,
Spanish, or French)
CLOCK DISPLAY (yes or no)
OVEN TEMPERATURE OFFSET (used to calibrate the oven temperature)
DEMO |
DEMO MODE (used by appliance stores) |
|||||||
|
|
|
|
|
|
|
|
|
|
|
|
|
|
|
|
|
RESET DEFAULTS (change all function settings |
|
|
|
|
|
|
|
|
back to original factory settings) |
|
|
|
|
|
|
|
|
SABBATH FEATURE(forreligiousfaithswith“no |
|
|
|
|
|
|
|
|
|
|
|
|
|
|
|
|
|
|
|
|
|
|
|
|
|
|
work” requirements on the Sabbath) |
|
|
|
|
|
|
|
|
|
NOTE: In the event of a power failure, the functions return to the factory settings and will need to be reset.
Accessing and Using the Select Functions
Menu
To access the SELECT FUNCTIONS menu, touch and hold COOKING MODE touch pad for five (5) seconds.
SELECT FUNCTION is displayed.
1.Turn knob to desired feature.
2.Press START to choose any function, and turn knob to choose any sub-functions.
3.After selecting feature, touch OFF.
4.Touch OFF again to exit the select functions menu.
TIPS on Using Functions
•Therewillbeaslightdelaybefore each message (or feature) can be seen in the display.
•Turn knob slowly, and wait approximatelyonesecondfordisplay to show next feature.
•To move through the feature menu,slowlyturntheknobclockwise oneclickaftereachfeatureappears.
BEEPS
To indicate when a mode is done, 3 consecutive beeps will sound.
Page 6

Setting Up Your Range
BEEP VOLUME
•Thevolumeofthecontrolbeepcanbechanged from LOW (softest) to HIGH (loudest).
•The control default for beep volume is Medium.
Changing the beep volume
1.Access SELECT FUNCTION Menu.
2.Turn knob clockwise slowly until VOLUME is displayed.
3.Touch START.
4.Turn knob to select volume level Low, Medium or High.
5.Touch START.
CHANGE TEMPERATURE
•The oven has been preset to the Fahrenheit temperature scale.
•The feature allows you to switch between Fahrenheit and Celsius temperature.
Changing the Temperature Scale
1.Access SELECT FUNCTION Menu.
2.Turn knob clockwise slowly untiL SELECT TEMP F-C is displayed.
3.Touch START.
4.Turn knob to select Fahrenheit (F) or Celsius (C).
5.Touch START to accept new selection.
TIME FORMAT
•The clock can be set to a 12-hr or 24-hr format.
•The oven default for clock format is 12-hr.
Changing the TIME FORMAT
1.Access SELECT FUNCTION Menu.
2.Turn knob clockwise slowly until TIME FORMAT is displayed.
3.Touch START.
4.Turn knob to select 12 hr or 24 hr format.
5.Touch START to accept new selection.
LOCK KEYS
•The keypad can be locked for safety purposes.
•This feature can be used to prevent changes to the oven function.
Locking or Unlocking the Oven Control Panel
1.Access SELECT FUNCTION Menu.
2.Turn knob clockwise slowly until LOCK KEYS is flashing.
3.Touch START. KEY PAD LOCKED is displayed. The display will beep if a key is pressed to indicate that the keypad is locked.
4.To unlock keypads, touch COOKING MODE and hold for 5 seconds. Display will read UNLOCKING KEY PAD.
5. When unlocked, the clock will again appear in the display. Note: This function DOES NOT lock oven door.

 LANGUAGE DISPLAY
•Language choices are English, Spanish, and French.
•English is the default language.
Changing the Language Display
1.Access SELECT FUNCTION Menu.
2.Turnknobclockwiseslowlyuntildesiredlanguageisdisplayed.
3.Touch START.
4.Turn knob clockwise to select a different language
5.Touch START to accept a language change.
NOTE
The SELECT FUNCTION menu is displayed in English only, regardless of language selected.
Page 7
Setting Up Your Range
CLOCK DISPLAY(ON or OFF)
•Clock time display can be turned off.
•The default display is on.
Turning the Clock Display ON or OFF
1.Access SELECT FUNCTION Menu.
2.Turn knob clockwise slowly until CLOCK DISPLAY is displayed.
3.Touch START.
4.Turn knob once and ON or OFF will appear in display.
5.Touch START to accept new selection.

 OVEN TEMPERATURE OFFSET
Changing the Oven Temp Offset
1.Access SELECT FUNCTION Menu.
2.Turn knob clockwise slowly until OVEN TEMP OFFSET is displayed.
3.Touch START. 0° F is displayed.
4.Turn the knob to the right to increase temperature +25°F and to the left to decrease -25° temperature.
5.Touch START to accept a temperature change.
DEMO DEMO MODE
The demo mode is for appliance store use only.
RESET DEFAULTS
•This feature is used to change all the “Select Functions” settings back to the original factory settings (or defaults).
Resetting the factory settings.
1.Access SELECT FUNCTIONS Menu.
2.Turn knob clockwise slowly until RESET DEFAULTS is displayed.
3.TouchSTART. Display reads SELECTFUNCTIONS.
SABBATH FEATURE
•Theovenwillbakefor48hoursbeforeautomaticallyturning off.
•Oven or warming drawer cannot be operating to set the Sabbath Feature.
Setting the Sabbath Feature
1.Access SELECT FUNCTIONS Menu.
2.Turn knob clockwise until SABBATH OPTION appears.
3.Touch START. BAKE will show in display and temperature will flash.
4.Turn knob to set oven temperature.
5.Turn oven light on if desired (touch LIGHT). Note: The light cannot be changed after this point. It will stay on or off, as selected, during the entire Sabbath mode.
6.Touch START. Oven starts after 5 seconds. Note: The probe CANNOT be used during the Sabbath mode.
While baking in Sabbath mode, the display will show SABBATH and the BAKE icon will be displayed. The clock will be off and no temperature will show in the display.
During the Sabbath mode, only the off key will operate.
Press Off at any time during the Sabbath mode to end the mode and turn off the oven.
At end of 48 hours, the oven will turn OFF automatically and the display will show SABBATH END. Touch OFF to return to time of day.
Page 8
 Loading...